SC6000 Instructions for use
Instructions for Use
Original Instructions
4/2016 revised 10/2022 REV E
Form no. 56091161
A-English
Advance Models:
56116000 (36C)
56116001 (40D)
56116002 (34D)
TABLE OF CONTENTS
| Topic | Page |
|---|---|
| Identification of Mechanical Brake Status | 3 |
| Introduction | 5 |
| Cautions and Warnings | 6 – 9 |
| Know Your Machine | 10 – 11 |
| Control Panel | 12 – 13 |
| Information Menu Display | 14 – 15 |
| Magnetic SmartKey | 16 |
| Prepare the Machine for Use | |
| Lead-Acid Batteries | 16 – 17 |
| Lead-Acid Battery Installation | 16 |
| Install the Brushes (Disc System) | 18 |
| Install the Brushes (Cylindrical System) | 19 |
| Filling the Solution Tank | 20 |
| Solution Tank Indicator | 20 |
| Solution Shutoff Valve | 20 |
| Squeegee Installation | 21 |
| Detergent System Preparation (Ecoflex Models Only) | 22 – 23 |
| Fill the Detergent Cartridge | 22 |
| Detergent System Purge (EcoFlex Models Only) | 23 |
| Detergent System Use (EcoFlex) | 24 – 25 |
| Operating the Machine | 27 – 29 |
| Starting the Machine | 27 |
| Stopping the Machine | 27 |
| Scrubbing | 28 |
| Wet Vacuuming | 29 |
| After Use | 30 |
| Topic | Page |
|---|---|
| Maintenance | |
| Maintenance Schedule | 30 |
| Dustguard Nozzle Cleaning Procedure | 30 |
| Lubricating the Machine | 31 |
| Electromagnetic Brake | 31 |
| Charging Wet Lead-Acid Batteries | 32 |
| Check the Battery Water Level | 32 |
| Charging GEL/AGM (VRLA) Batteries | 33 |
| Charging Other Types of Batteries | 33 |
| Squeegee Maintenance | 34 – 35 |
| Squeegee Adjustment | 34 – 35 |
| Side Blade Maintenance | 36 – 37 |
| Side Blade Height Adjustment | 36 |
| Side Blade Pressure Adjustment | 36 |
| Double Scrub Position | 36 |
| Troubleshooting | 38 |
| General Machine Troubleshooting | 39 |
| Fault Code Display | 39 – 40 |
| Fault Code History | 41 |
| Specifications | |
| Accessories Options | 42 |
| Solution Flow Rates | 42 |
| Technical Specifications without Mechanical Brake | 43 |
| Technical Specifications with Mechanical Brake | 44 |
IDENTIFICATION OF MECHANICAL BRAKE STATUS
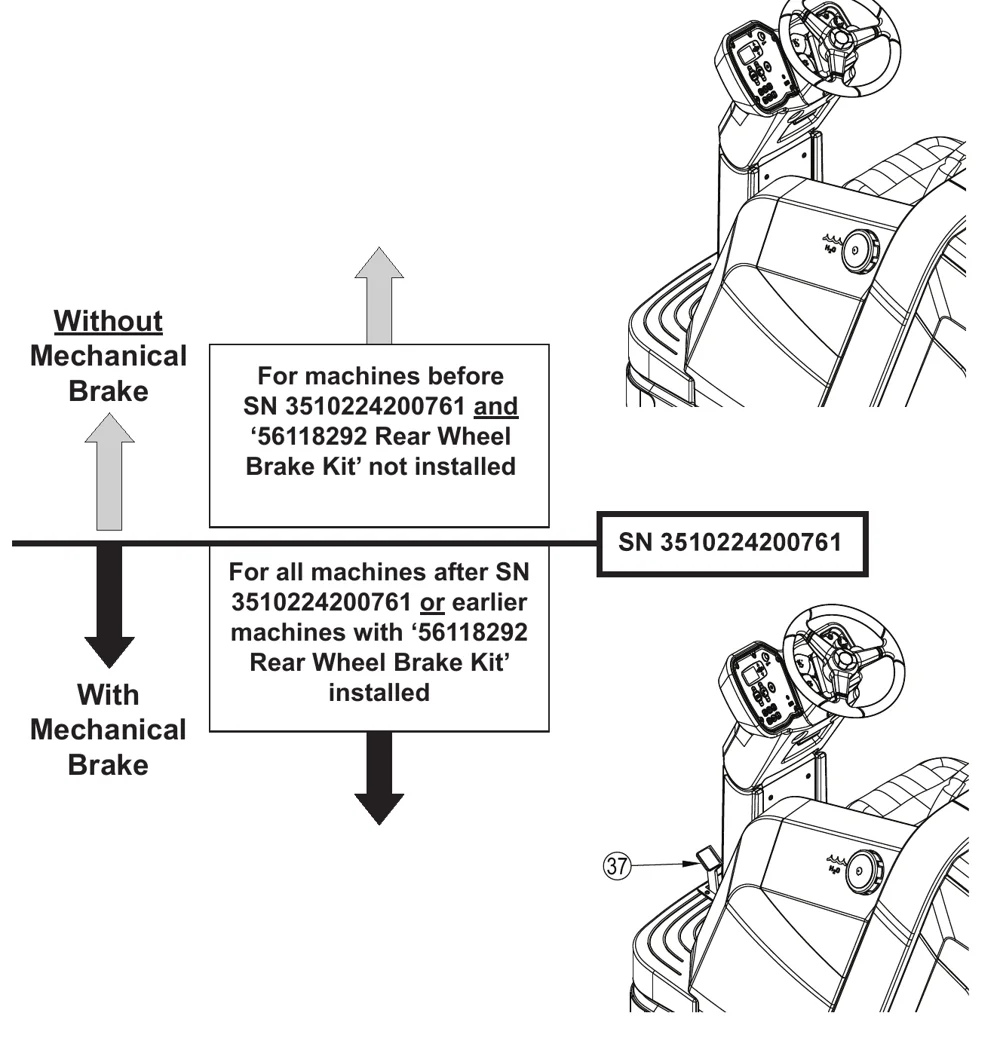
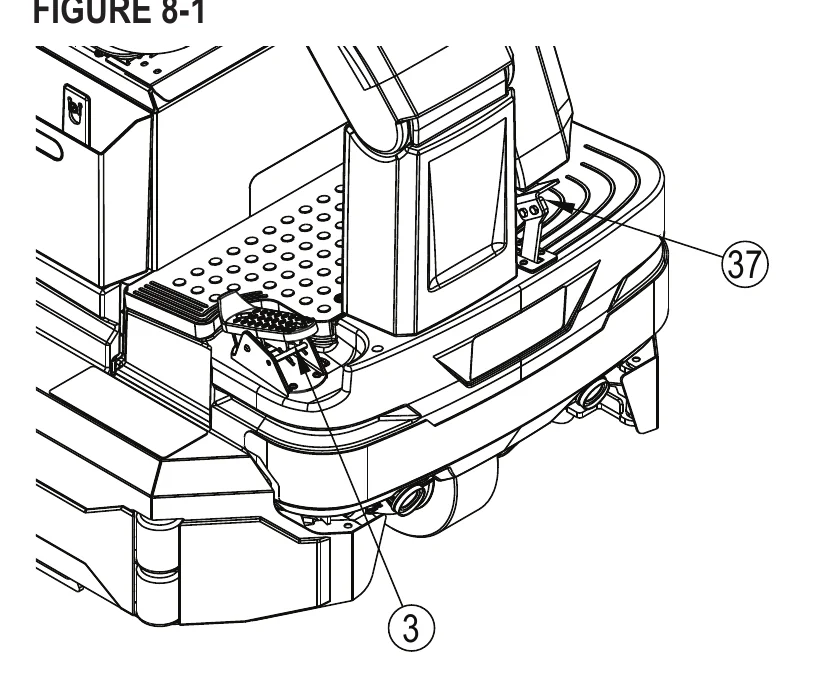
This manual covers both machines with and without a mechanical brake. Please refer to the graphic below and observe your machine to determine if your machine is equipped with the mechanical brake. Presence of Brake Pedal (37) identifies mechanical brake has been installed. Keep this in mind as you use this manual and refer to the appropriate sections for your machine, hence forth referred to as machines “Without Mechanical Brake” or “With Mechanical Brake”.
CAUTIONS SPECIFIC TO MACHINES WITHOUT MECHANICAL BRAKE
- Use extreme CAUTION when operating this machine. Be certain that you are thoroughly familiar with all operating instructions before using this machine. If you have any questions, contact your supervisor or your local Advance Industrial Dealer.
- If the machine malfunctions, do not try to correct the problem unless your supervisor directs you to do so. Have a qualified company mechanic or an authorized Advance Dealer service person make any necessary corrections to the equipment.
- Use extreme care when working on this machine. Loose clothing, long hair, and jewelry can get caught in moving parts. Turn the Power Switch OFF and remove the magnetic key before servicing the machine. Use good common sense, practice good safety habits and pay attention to the yellow decals on this machine.
- Drive the machine slowly on inclines. DO NOT turn the machine on an incline; drive straight up or down.
- The maximum incline for scrubbing is 7% (4°). The maximum incline during transport is 7% (4°).
CAUTIONS SPECIFIC TO MACHINES WITH MECHANICAL BRAKE
- Use extreme CAUTION when operating this machine. Be certain that you are thoroughly familiar with all operating instructions before using this machine. If you have any questions, contact your supervisor or your local Advance Industrial Dealer.
- If the machine malfunctions, do not try to correct the problem unless your supervisor directs you to do so. Have a qualified company mechanic or an authorized Advance Dealer service person make any necessary corrections to the equipment.
- Use extreme care when working on this machine. Loose clothing, long hair, and jewelry can get caught in moving parts. Turn the Power Switch OFF and remove the magnetic key before servicing the machine. Use good common sense, practice good safety habits and pay attention to the yellow decals on this machine.
- Drive the machine slowly on inclines. Use the Brake Pedal (37) to help control machine speed while descending inclines. DO NOT turn the machine on an incline; drive straight up or down.
- The maximum incline for scrubbing is 12.2% (7°). The maximum incline during transport is 18.5% (10.5°).
INTRODUCTION
This manual will help you get the most from your Advance Rider Scrubber. Read it thoroughly before operating the machine.
Note: Bold numbers in parentheses indicate an item illustrated on pages 10 – 13.
This product is intended for commercial use only.
PARTS AND SERVICE
Repairs, when required, should be performed by your Authorized Advance Service Center, who employs factory trained service personnel, and maintains an inventory of Advance original replacement parts and accessories.
Call the ADVANCE DEALER named below for repair parts or service. Please specify the Model and Serial Number when discussing your machine.
MODIFICATIONS
Modifications and additions to the cleaning machine which affect capacity and safe operation shall not be performed by the customer or user without prior written approval from Nilfisk, Inc. Unapproved modifications will void the machine warranty and make the customer liable for any resulting accidents.
NAMEPLATE
The Model Number (also known as Part Number) and Serial Number of your machine are shown on the Nameplate, located on the steering column of the machine. This information is needed when ordering repair parts for the machine. Use the space below to note the Part Number and Serial Number of your machine for future reference.
PART NO. ____________________________________________________
SERIAL NO. __________________________________________________
UNCRATE THE MACHINE
When the machine is delivered, carefully inspect the shipping packaging and the machine for damage. If damage is evident, save the shipping carton (if applicable) so that it can be inspected. Contact the Advance Customer Service Department immediately to file a freight damage claim. Refer to the unpacking instruction sheet included with the machine to remove the machine from the pallet.
TRANSPORTING THE MACHINE
- All tanks are empty.
- All access doors are latched securely.
- The machine is tied down securely - see Tie Down Point locations (25).
- The machine’s electromagnetic brake is engaged (not manually overridden).
- Lower the scrub deck and squeegee then press Emergency Stop Switch (U) or disconnect batteries to prevent them from raising when the machine is powered off.
- The machine is turned off and the magnetic SmartKey™ is removed.
CAUTIONS AND WARNINGS FOR MACHINES WITHOUT MECHANICAL BRAKE
SYMBOLS
Advance uses the symbols below to signal potentially dangerous conditions. Always read this information carefully and take the necessary steps to protect personnel and property.
This machine is for commercial use, for example in hotels, schools, hospitals, factories, shops and offices other than normal residential housekeeping purposes.
DANGER!
Is used to warn of immediate hazards that will cause severe personal injury or death.
WARNING!
Is used to call attention to a situation that could cause severe personal injury.
CAUTION!
Is used to call attention to a situation that could cause minor personal injury or damage to the machine or other property.
Read all instructions before using.
GENERAL SAFETY INSTRUCTIONS
Specific Cautions and Warnings are included to warn you of potential danger of machine damage or bodily harm.
- This machine shall be used only by properly trained and authorized persons.
- This machine is not intended for use by persons (including children) with reduced physical, sensory or mental capabilities, or lack of experience and knowledge, unless they have been given supervision or instruction concerning use of the machine by a person responsible for their safety.
- Children should be supervised to ensure that they do not play with the machine.
- Close attention is necessary when used near children.
- While on ramps or inclines, avoid sudden stops. Avoid abrupt sharp turns. Use low speed down ramps.
- Keep sparks, flame and smoking materials away from batteries. Explosive gases are vented during normal operation.
- Charging the batteries produces highly explosive hydrogen gas. Charge batteries only in well-ventilated areas, away from open flame. Do not smoke while charging the batteries.
- Remove all jewelry when working near electrical components.
- Turn the power switch off, remove the magnetic key and disconnect the batteries before servicing electrical components.
- Never work under a machine without safety blocks or stands to support the machine.
- Do not dispense flammable cleaning agents, operate the machine on or near these agents, or operate in areas where flammable liquids exist.
- Do not pressure wash operator control panel, circuit breaker panel or batteries.
- Only use the brushes provided with the appliance or those specified in the instruction manual. The use of other brushes may impair safety.
- Observe the Gross Vehicle Weight, GVW, of the machine when loading, driving, lifting or supporting the machine.
- Do not use the machine without a falling object protective structure (FOPS) in areas where it is likely that the operator is hit by falling objects.
- Do not leave the machine unattended without being sure that it cannot move independently.
CAUTIONS AND WARNINGS FOR MACHINES WITHOUT MECHANICAL BRAKE - CONTINUED
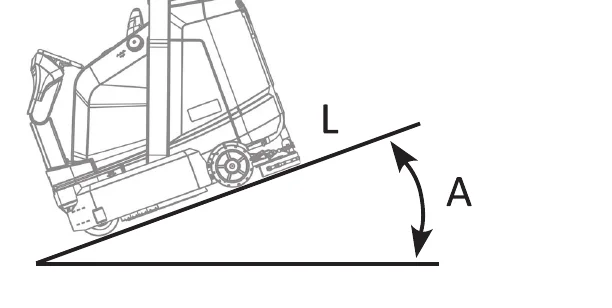
- DO NOT OPERATE the machine under the below conditions.
L =/> 15 m + A =/> 7%(4°) + battery 100%
- This machine is not approved for use on public paths or roads.
- This machine is not suitable for picking up hazardous dust.
- Do not use scarifier discs and grinding stones. Advance will not be held responsible for any damage to floor surfaces caused by scarifiers or grinding stones (can also cause damage to the brush drive system).
- When operating this machine, ensure that third parties, particularly children, are not endangered.
- Before performing any service function, carefully read all instructions pertaining to that function.
- Do not leave the machine unattended without first turning the power switch off and removing the magnetic key.
- Turn the power switch off and remove the magnetic key, before changing the brushes, and before opening any access panels.
- Take precautions to prevent hair, jewelry, or loose clothing from becoming caught in moving parts.
- Use caution when moving this machine in below freezing temperature conditions. Any water in the solution, recovery or detergent tanks or in the hose lines could freeze, causing damage to valves and fittings. Flush with windshield washer fluid.
- The batteries must be removed from the machine before the machine is scrapped. The disposal of the batteries should be safely done in accordance with your local environmental regulations.
- Do not use on surfaces having a gradient exceeding that marked on the machine.
- All doors and covers are to be positioned as indicated in the instruction manual before using the machine.
- The machine’s magnetic smart key has a built-in magnet. Do not place objects having magnetic bands (such as credit cards, electronic keys, phone cards) near the key. The built-in magnet can damage or erase the data stored on the magnetic bands.
SAVE THESE INSTRUCTIONS
CAUTIONS AND WARNINGS FOR MACHINES WITH MECHANICAL BRAKE
SYMBOLS
Advance uses the symbols below to signal potentially dangerous conditions. Always read this information carefully and take the necessary steps to protect personnel and property.
This machine is for commercial use, for example in hotels, schools, hospitals, factories, shops and offices other than normal residential housekeeping purposes.
Read all instructions before using.
GENERAL SAFETY INSTRUCTIONS
Specific Cautions and Warnings are included to warn you of potential danger of machine damage or bodily harm.
- This machine shall be used only by properly trained and authorized persons.
- This machine is not intended for use by persons (including children) with reduced physical, sensory or mental capabilities, or lack of experience and knowledge, unless they have been given supervision or instruction concerning use of the machine by a person responsible for their safety.
- Children should be supervised to ensure that they do not play with the machine.
- Close attention is necessary when used near children.
- While on ramps or inclines, avoid sudden stops. Avoid abrupt sharp turns. Use low speed down ramps.
- Keep sparks, flame and smoking materials away from batteries. Explosive gases are vented during normal operation.
- Charging the batteries produces highly explosive hydrogen gas. Charge batteries only in well-ventilated areas, away from open flame. Do not smoke while charging the batteries.
- Remove all jewelry when working near electrical components.
- Turn the power switch off, remove the magnetic key and disconnect the batteries before servicing electrical components.
- Never work under a machine without safety blocks or stands to support the machine.
- Do not dispense flammable cleaning agents, operate the machine on or near these agents, or operate in areas where flammable liquids exist.
- Do not pressure wash operator control panel, circuit breaker panel or batteries.
- Only use the brushes provided with the appliance or those specified in the instruction manual. The use of other brushes may impair safety.
- Observe the Gross Vehicle Weight, GVW, of the machine when loading, driving, lifting or supporting the machine.
- Do not use the machine without a falling object protective structure (FOPS) in areas where it is likely that the operator is hit by falling objects.
- Do not leave the machine unattended without being sure that it cannot move independently.
CAUTIONS AND WARNINGS FOR MACHINES WITH MECHANICAL BRAKE - CONTINUED
- This machine is not approved for use on public paths or roads.
- This machine is not suitable for picking up hazardous dust.
- Do not use scarifier discs and grinding stones. Advance will not be held responsible for any damage to floor surfaces caused by scarifiers or grinding stones (can also cause damage to the brush drive system).
- When operating this machine, ensure that third parties, particularly children, are not endangered.
- Before performing any service function, carefully read all instructions pertaining to that function.
- Do not leave the machine unattended without first turning the power switch off and removing the magnetic key.
- Turn the power switch off and remove the magnetic key, before changing the brushes, and before opening any access panels.
- Take precautions to prevent hair, jewelry, or loose clothing from becoming caught in moving parts.
- Use caution when moving this machine in below freezing temperature conditions. Any water in the solution, recovery or detergent tanks or in the hose lines could freeze, causing damage to valves and fittings. Flush with windshield washer fluid.
- The batteries must be removed from the machine before the machine is scrapped. The disposal of the batteries should be safely done in accordance with your local environmental regulations.
- Do not use on surfaces having a gradient exceeding that marked on the machine.
- All doors and covers are to be positioned as indicated in the instruction manual before using the machine.
- The machine’s magnetic smart key has a built-in magnet. Do not place objects having magnetic bands (such as credit cards, electronic keys, phone cards) near the key. The built-in magnet can damage or erase the data stored on the magnetic bands.
SAVE THESE INSTRUCTIONS
KNOW YOUR MACHINE
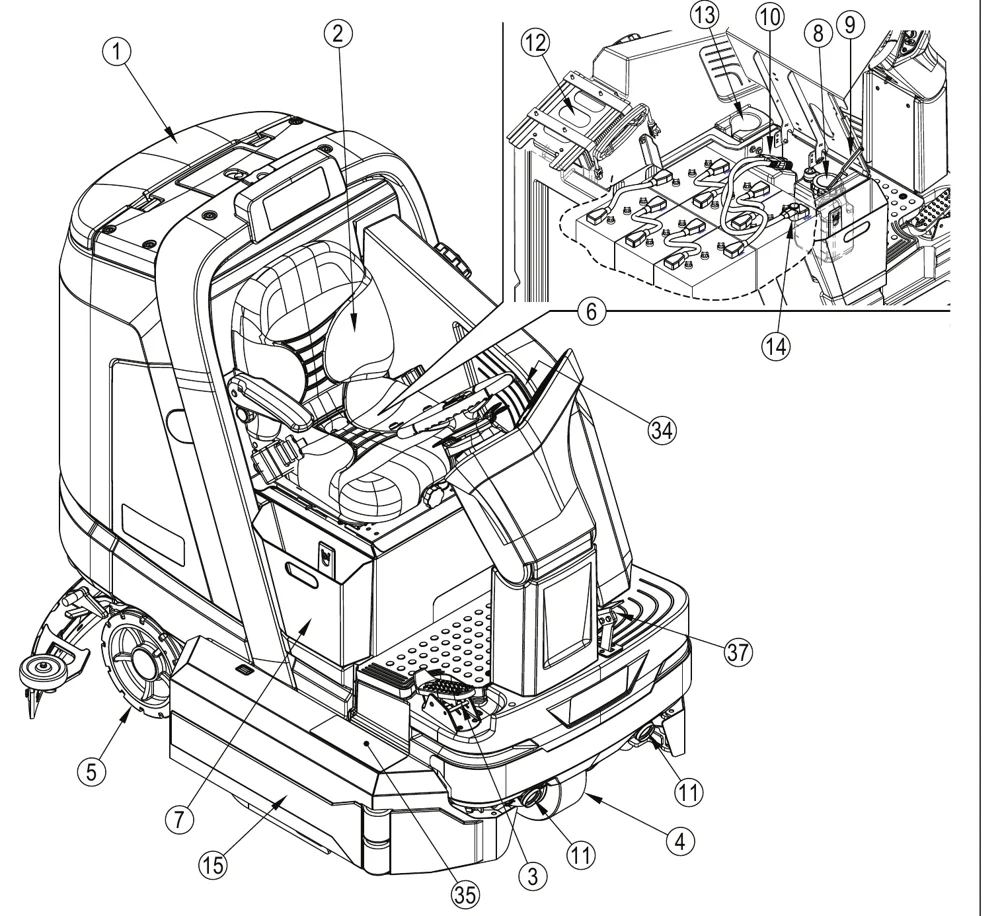
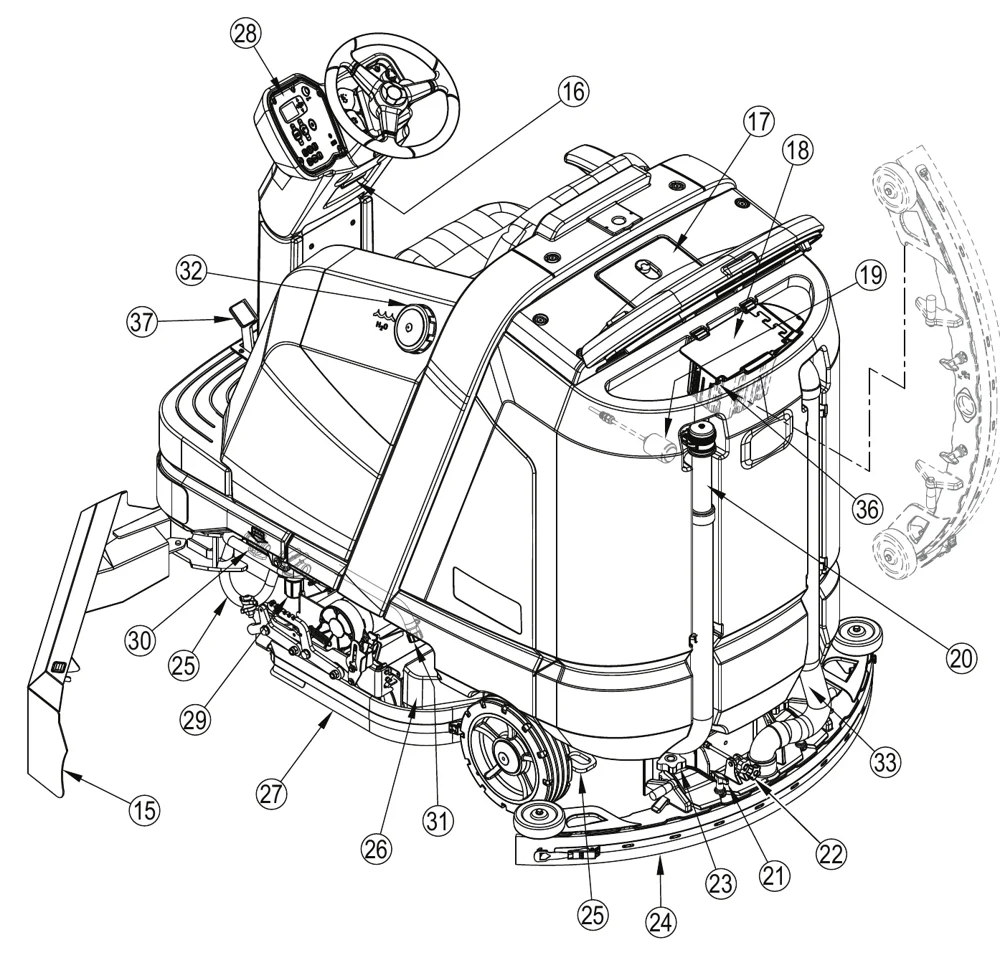
As you read this manual, you will occasionally run across a bold number or letter in parentheses - example: (2). These numbers refer to an item shown on these pages unless otherwise noted. Refer back to these pages whenever necessary to pinpoint the location of an item mentioned in the text. NOTE: Refer to the service manual for detailed explanations of each item illustrated on the next 4 pages.
| No. | Item |
|---|---|
| 1 | Recovery Tank Cover |
| 2 | Operator’s Seat (adjustable) |
| 3 | Drive Pedal, Directional/Speed |
| 4 | Drive and Steer Wheel |
| 5 | Rear Wheel |
| 6 | Battery Compartment |
| 7 | Waste Bin |
| 8 | Detergent Cartridge (EcoFlex models only) |
| 9 | Seat Prop Rod |
| 10 | Machine Battery Connector |
| 11 | Headlights (optional) |
| 12 | Onboard Battery Charger (optional) |
| 13 | Cup Holder |
| 14 | Fuse Holder Boot (Main Fuse 150 Amp) |
| 15 | Scrub Deck Side Door |
| 34 | Left Side Access Grip |
| 35 | Step |
KNOW YOUR MACHINE
| No. | Item |
|---|---|
| 15 | Scrub Deck Side Door |
| 16 | Steering Column Tilt Adjust |
| 17 | Recovery Filter and Screen Cover |
| 18 | Debris Catch Tray |
| 19 | Recovery Tank Full Switch |
| 20 | Recovery Tank Drain Hose |
| 21 | Squeegee Removal Knob |
| 22 | Squeegee Tilt Adjust Knob |
| 23 | Squeegee Height Adjust Knob |
| 24 | Squeegee Assembly |
| 25 | Tie-Down Location |
| 26 | Hopper (cylindrical only) |
| 27 | Scrub Deck |
| 28 | Control Panel |
| 29 | Solution Filter |
| 30 | Solution Shutoff Valve |
| 31 | Solution Tank Drain Hose |
| 32 | Solution Tank Fill |
| 33 | Squeegee Hose |
| 36 | Squeegee Hook |
| 37 | Brake Pedal (see Page 3) |
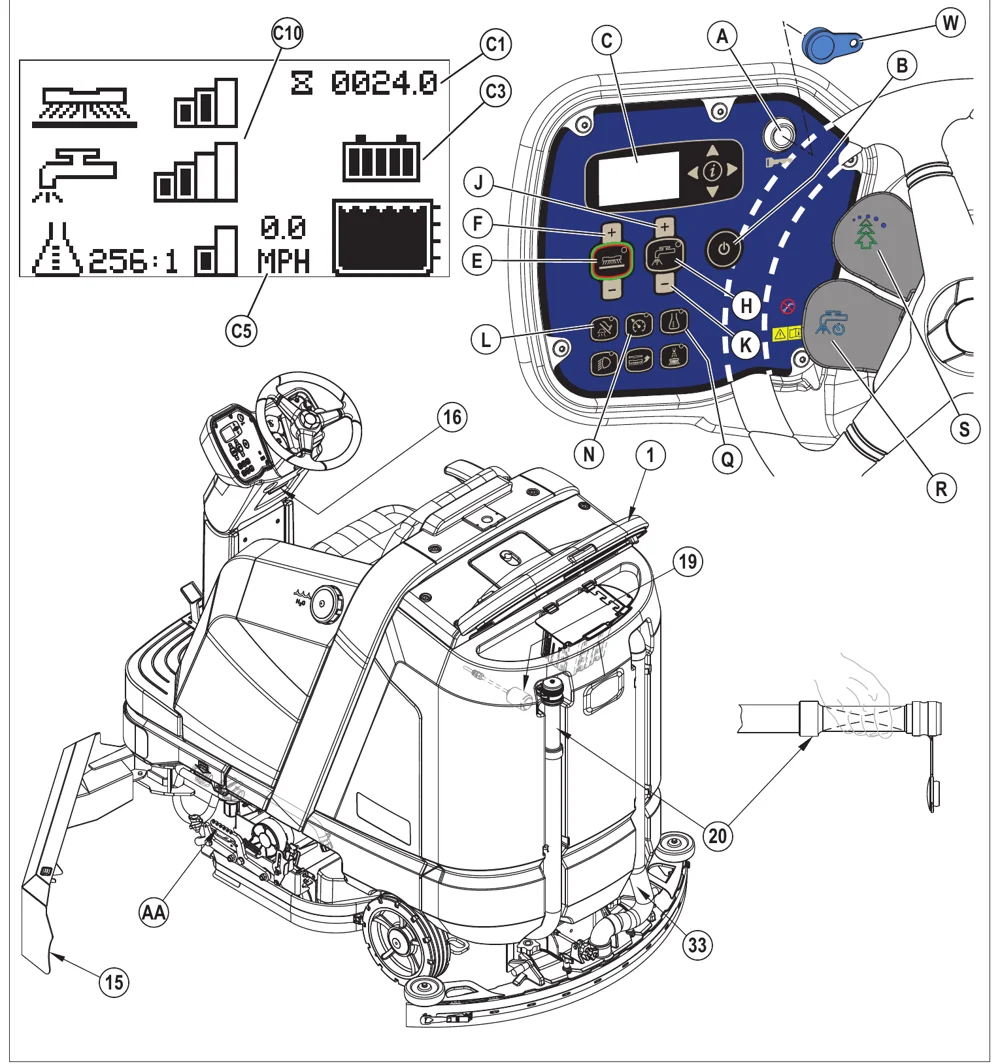
CONTROL PANEL
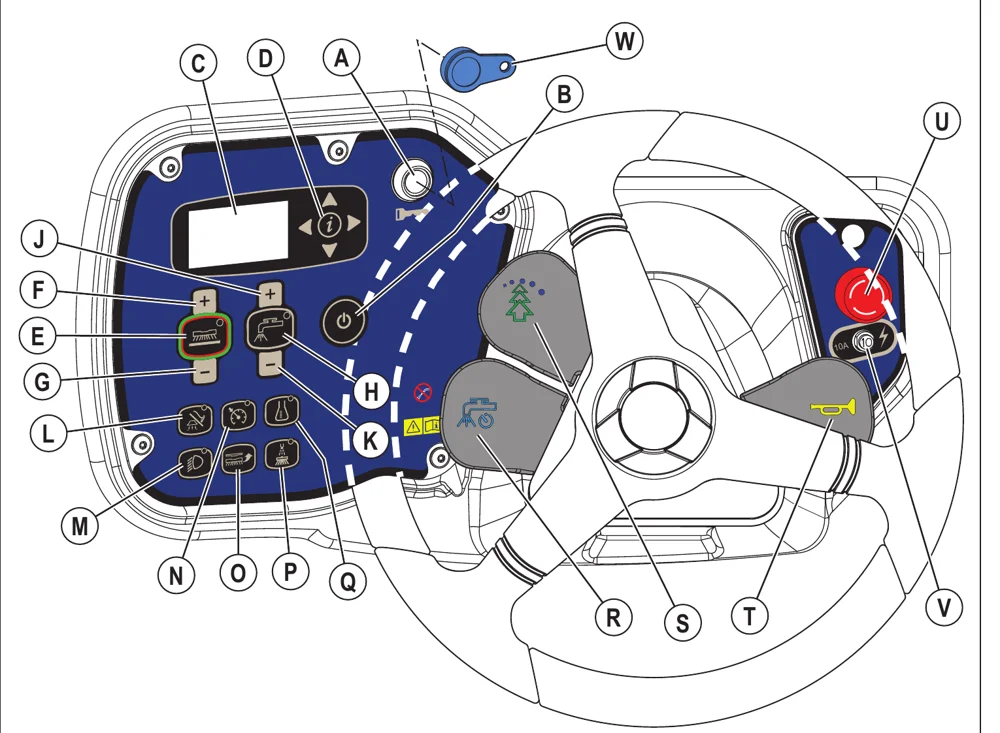
| Key | Control or display item |
|---|---|
| A | SmartKey™ Reader |
| B | Power Switch |
| C | Display |
| D | Information Switch and Navigation Switches |
| E | One-Touch™ Scrub Switch |
| F | Scrub Pressure Increase Switch |
| G | Scrub Pressure Decrease Switch |
| H | Solution Switch |
| J | Solution Flow Increase Switch |
| K | Solution Flow Decrease Switch |
| L | Vacuum / Wand Switch |
| M | Headlight Switch (optional) |
| N | Speed Limiter Switch |
| O | Brush Install Switch |
| P | Dust Guard™ Switch (optional) |
| Q | Detergent Switch |
| R | Timed Solution Off Paddle |
| S | Burst of Power Paddle |
| T | Horn Paddle |
| U | Emergency Stop Switch |
| V | Control Circuit Breaker |
| W | Magnetic SmartKey™
|
CONTROL PANEL - CONTINUED
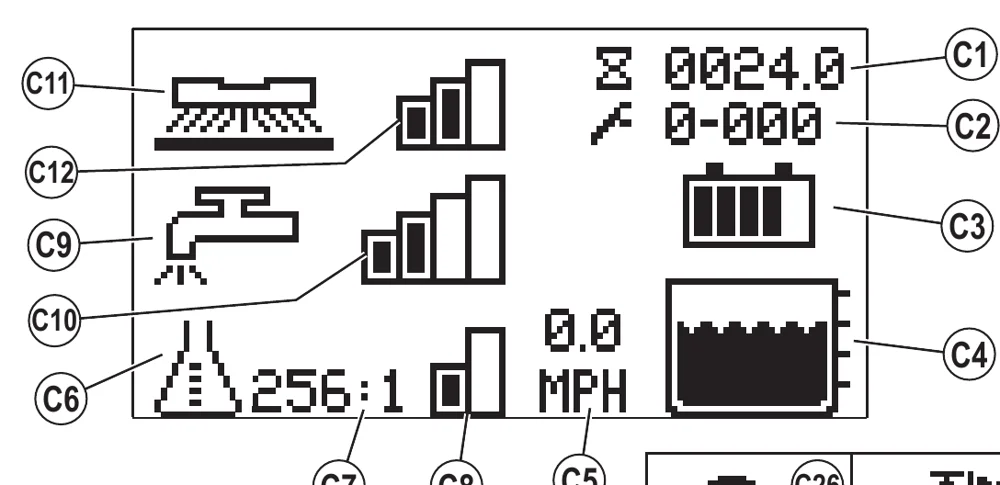
| No. | Display item |
|---|---|
| C1 | Hour Meter (Drive Hours) |
| C2 | Active Fault Codes |
| C3 | Battery Indicator |
| C4 | Solution Tank Level Indicator |
| C5 | Speed (miles per hour) |
| C6 | Detergent Indicator (if so equipped) |
| C7 | Detergent Ratio Indicator |
| C8 | Detergent Indicator Bar Graph
|
| C9 | Solution Flow Indicator |
| C10 | Solution Flow Rate Bar Graph
|
| C11 | Scrub Pressure Indicator |
| C12 | Scrub Brush Pressure Bar Graph
|
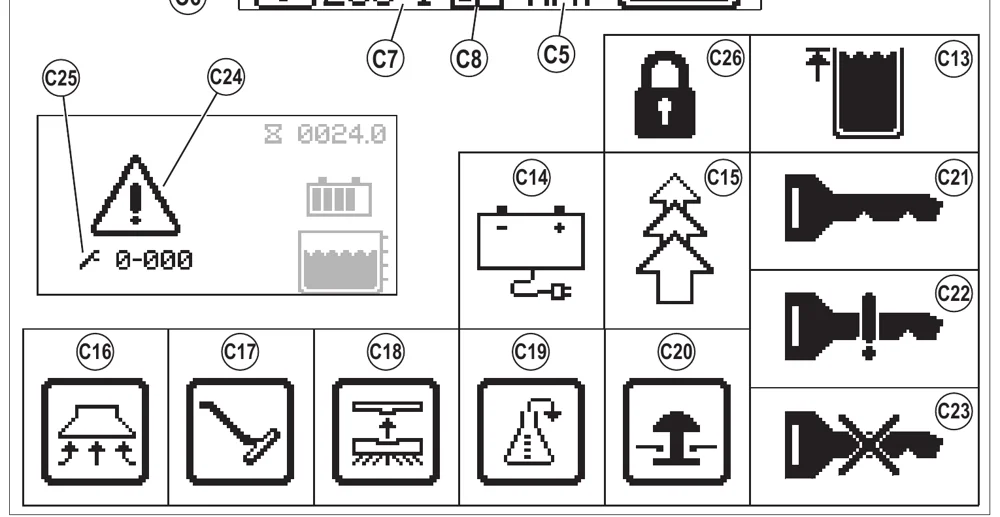
| C13 | Recovery Tank Full Indicator |
| C14 | Battery Low Voltage Indicator |
| C15 | Burst of Power Indicator (EcoFlex models only) |
| C16 | Vacuum Indicator |
| C17 | Wand Indicator |
| C18 | Brush Install Indicator |
| C19 | Purge Indicator (EcoFlex models only) |
| C20 | Emergency Stop Activated Indicator |
| C21 | No Key Indicator |
| C22 | Key Read Error Indicator (see Troubleshooting) |
| C23 | Restricted User Key Indicator (see Troubleshooting) |
| C24 | Critical Fault Indicator |
| C25 | Fault Code (Critical) |
| C26 | Impact Lockout Indicator (see page 11) |
INFORMATION MENU DISPLAY
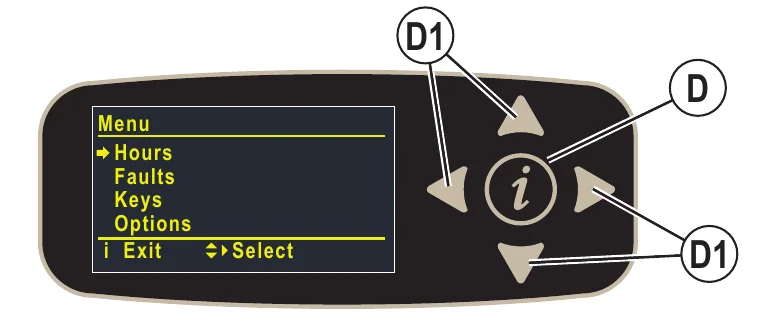
Menu Display
Pressing the Information Switch (D) will bring up the menu shown below which allows the operator to change machine settings and gather machine information. Use the four Navigation Arrows (D1) (up, down, left & right) to move through the menu and the information switch to exit the menu.
| Menu Level | Notes | |
|---|---|---|
| 1 | 2 | |
| Hours | Displays various system hours | |
| On Time | Displays Power ON hours | |
| Drive Time | Displays drive(non-neutral) hours | |
| Scrub Time | Displays scrub/brush ON hours | |
| Recovery Time | Displays recovery/vacuum ON hours | |
| Faults** | ||
| Active Faults | Displays list of active faults w/timestamp and description | |
| Fault History | Displays list of fault history w/timestamp and description | |
| Keys | ||
| Read Key | Read the key serial number, family and type for key inserted into holder - if user key, allows supervisor to add to key list | |
| Key List | Display the current approved user key list supervisor can also remove selected key from list | |
**See Fault Code Display
| Menu Level | Notes | ||
|---|---|---|---|
| 1 | 2 | 3 | |
| Options | User selectable options | ||
| Language | English* Italiano Deutsch Portuguese Français Español | Menu display language | |
| Floor | Standard* Smooth | Floor type | |
| Scrub Startup | Light Heavy Extreme Last* | Scrub level at start | |
| Scrub Max | Light Heavy Extreme* | Maximum scrub level allowed | |
*Default setting
INFORMATION MENU DISPLAY - CONTINUED
| Menu Level | Notes | ||
|---|---|---|---|
| 1 | 2 | 3 | |
| Options | User selectable options | ||
| Solution | Proportional* Fixed UK | Solution mode; Proportional – solution flow increases with speed of machine. Fixed – Solution flow stays the same despite machine speed. UK (United Kingdom) – solution flow is reduced to conserve water. | |
| Solution In Rev | No* Yes | Leave solution on in reverse? | |
| Lock Detergent | No* Yes | Lockout detergent ratio adjustment for user? | |
| Headlight | On* Off | Headlight on/off at startup | |
| Burst Of Power (s) | min = 60* max = 300 step = 60 | Burst-of-power (BOP) time span (seconds) | |
| Fwd Speed Max (%) | min = 50 max = 100* step = 10 | Maximum forward speed as percentage of maximum available speed | |
| Lock Speed Limit | No* Yes | Lockout scrub speed limit for user? | |
| Inactivity Time (min) | min = 1 max = 30 step = 1 default = 15 | Inactivity time before putting machine in sleep mode (minutes) | |
| Impact Detect | Off* Log Lockout | Impact detection status Log – Impact is recorded Lockout – Impact is recorded and User is locked out of scrub functions (Display shows (C26)) until machine is reset with a Supervisor key. | |
| Impact Level | High* Low | Impact detection sensitivity level. If nuisance tripping occurs (i.e. driving over a floor transition), adjust setting to low. | |
| System | |||
| Firmware | Display current firmware revision | ||
| Serial Num | Display PCB serial number from factory | ||
| Impact Log | Display list of impact events with max value, timestamp and user id (only if enabled) - single item view will show max values for each axis (x,y,z) | ||
*Default setting
MAGNETIC SmartKey™
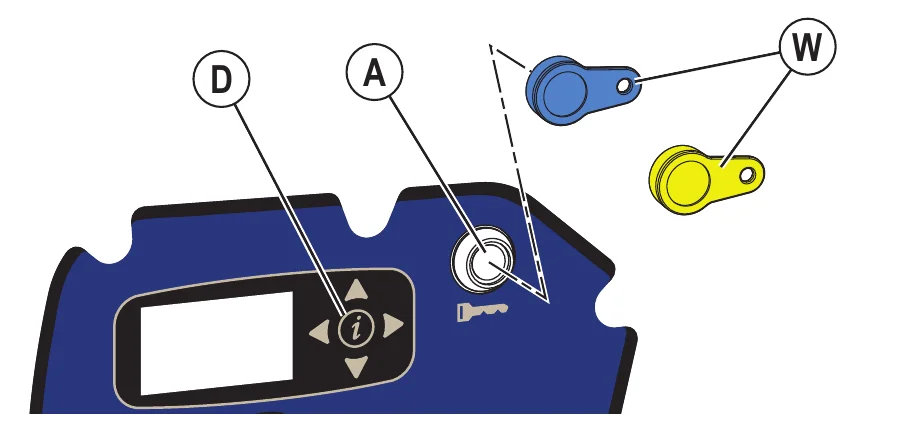
The use of a Magnetic SmartKey (W) is required to operate this machine. Pressing the power switch without a key in place on the SmartKey Reader (A) will cause the machine to momentarily turn on and display No Key Indicator (C21) before turning off.
There are two different magnetic SmartKeys (W).
- The “User” (blue) key allows a basic level of access to the information menu (press Information Switch (D)).
- The “Supervisor” (yellow) key allows an additional level of access. The service menu allows observing operational and user parameters. The configuration menu allows adjusting machine settings. See Service Manual for more details.
PREPARE THE MACHINE FOR USE
LEAD-ACID BATTERIES
If your machine shipped with batteries installed do the following:
- Check that the batteries are connected to the machine.
- Turn ON the Power Switch (B) and check the Battery Indicator (C3). If the gauge is completely filled the batteries are ready for use. If the gauge is less than full the batteries should be charged before use. See the “Charging The Batteries” section.
If your machine shipped without batteries installed do the following:
- Consult your Authorized Advance dealer for recommended batteries.
- Install the batteries by following the instructions below.
LEAD-ACID BATTERY INSTALLATION
When Servicing Batteries...
- Remove all jewelry
- Do not smoke
- Wear safety glasses, rubber gloves and a rubber apron
- Work in a well-ventilated area
- Do not allow tools to touch more than one battery terminal at a time
- ALWAYS disconnect the negative (ground) cable first when replacing batteries to prevent sparks.
- ALWAYS connect the negative cable last when installing batteries.
LEAD-ACID BATTERIES - CONTINUED
- Remove the batteries from their shipping crate and carefully inspect them for cracks or other damage. If damage is evident, contact the carrier that delivered them or the battery manufacturer to file a damage claim.
- Turn the Power Switch (B) OFF and remove the magnetic SmartKey.
- Raise the steering column to the full upright position. Tip the seat forward and engage the Seat Prop Rod (9).
- Remove the crossbar and if installed also remove the overhead guard.
- Remove the recovery tank from the machine. NOTE: Disconnect the recovery switch wiring and the vacuum motor wiring then lift the tank straight up and off the machine.
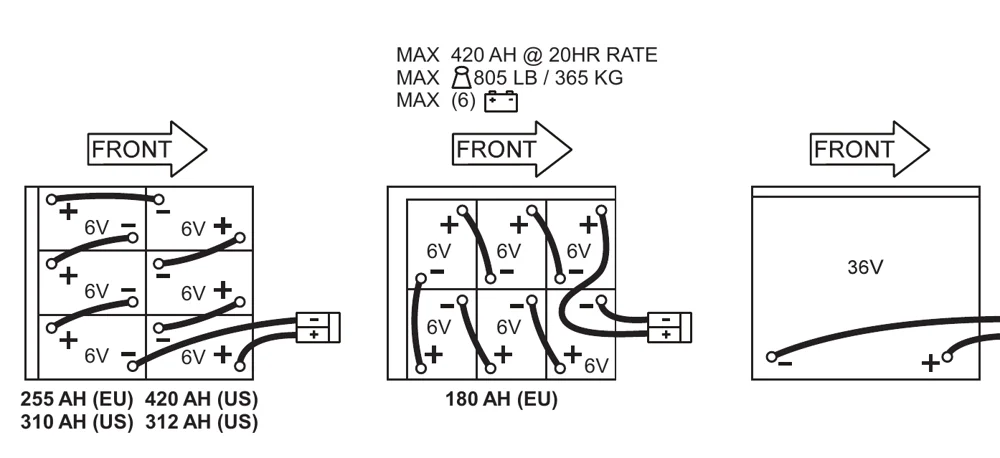
- Your machine comes from the factory with enough battery cables to install six 6 volt batteries. Using at least (2) people and an appropriate lifting strap, carefully lift the batteries into the battery compartment and arrange them exactly as shown in FIGURE 1. Secure the batteries as close to the front and right side of the machine as possible. Use battery spacer to keep batteries from moving. If installing a mono-block battery use an overhead hoist (the seat support bracket will need to be temporarily removed to install a mono-block battery).
- Install the battery cables as shown. Position the cables so the battery caps can be easily removed for battery service.
- Carefully tighten the nut in each battery terminal until the terminal will not turn. Do not over-tighten the terminals, or they will be very difficult to remove for future service.
- Coat the terminals with spray-on battery terminal coating (available at most auto parts stores).
- Put one of the black rubber boots over each of the terminals and connect the Machine Battery Connector (10).
- Make sure the Fuse Holder Boot (14) is covering the fuse holder, the cable end of the Machine Battery Connector (10), and as much of the battery terminal as possible. Leave the protective caps supplied with the batteries in place or re-use to cover the terminal areas not protected by the terminal cover boots.
When changing batteries or the charger, please contact your local authorized service center for correct battery, charger and machine settings to prevent battery damage.
FIGURE 1
INSTALL THE BRUSHES (DISC SYSTEM)
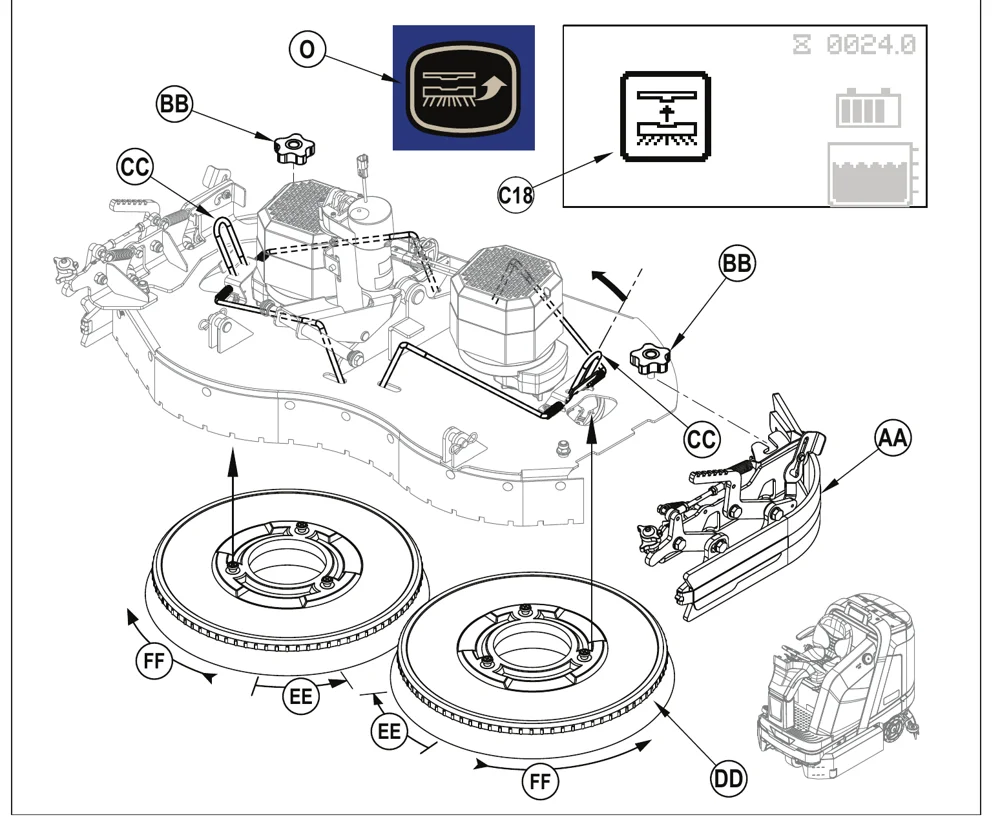
- Make sure the Scrub Deck is in the RAISED position. Make sure the Power Switch (B) is off.
- Unlatch and swing open the Scrub Deck Side Doors (15).
- See Figure 2. Remove both Side Blade Assemblies (AA). NOTE: The blades are held in place by a large Knob (BB). Loosen these knobs and slide the Blade Assemblies (AA) forward slightly and then off of the Scrub Deck.
4a To manually install the brushes:
Lift the Brushes (DD) (or pad holders) and align the lugs on the brush with the holes on the mounting plate then turn to lock in place (turn the outside edge of brush towards the front of machine as shown by arrow (EE)).
4b To use the automatic Brush Install feature:
- Press the Guide Bar (CC) forward while sliding the brush under the deck and stop when the brush is contacting both legs of the guide bar. Repeat this step for the brush on the other side of the deck. NOTE: Do not push the first brush out of position with the second brush.
- Turn the machine ON at the Power Switch (B). (SCRUB SYSTEM MUST BE OFF and MACHINE IN NEUTRAL)
- Press the Brush Install Switch (O) the display will show Brush Install Indicator (C18) then wait for the brush install sequence to finish.
- Reinstall the side blade assemblies and close the deck side doors. NOTE: While scrubbing the brushes rotate as shown by arrow (FF).
FIGURE 2
INSTALL THE BRUSHES (CYLINDRICAL SYSTEM)
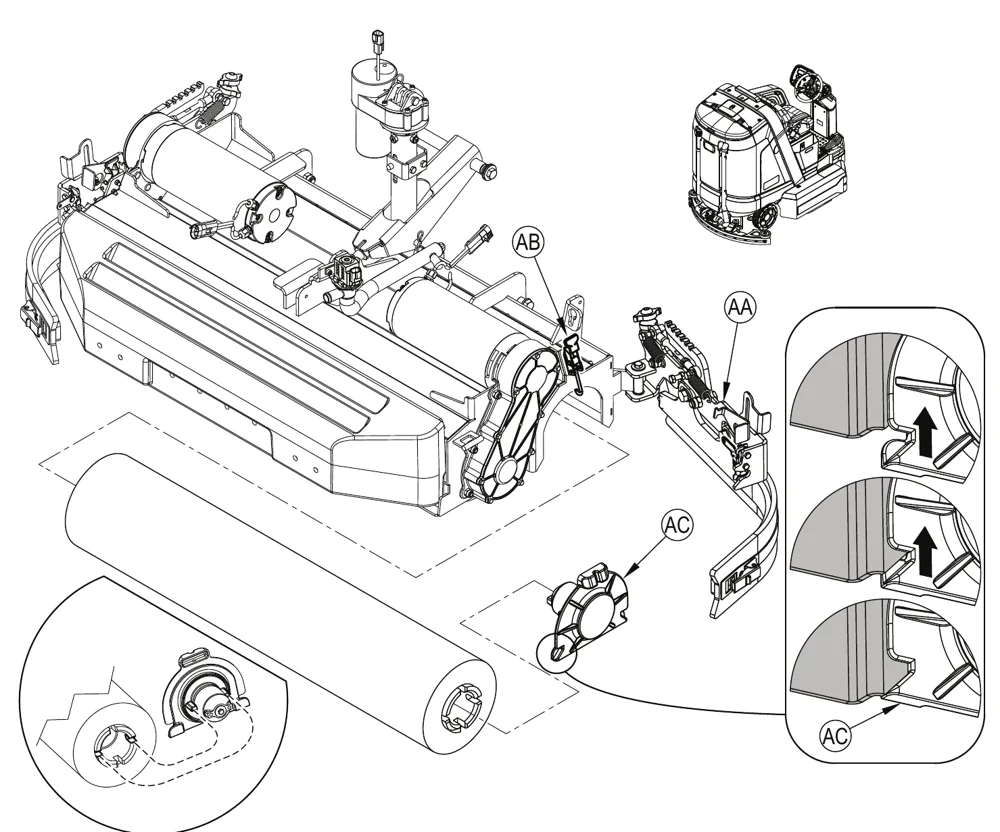
- Make sure the Scrub Deck is in the RAISED position. Make sure the Power Switch (B) is off.
- Unlatch and swing open the Scrub Deck Side Doors (15).
- See Figure 3. Unlatch and swing open both Side Blade Assemblies (AA).
- Unhook the Latch (AB) on top of the Idler Assemblies (AC) and remove.
- Slide the brush into the housing, lift slightly, push and turn until the tabs on the drive hub seat into the notches in the brush. NOTE: The idler is designed with a snug fit into the brush to reduce vibration. Re-install the Idler Assemblies (AC) make sure the tabs on the idler are inside of the weldment (as shown in Figure 3). Secure with Latch (AB). Close and latch both the Blade Assemblies (AA) and Scrub Deck Doors (15).
FIGURE 3
FILLING THE SOLUTION TANK
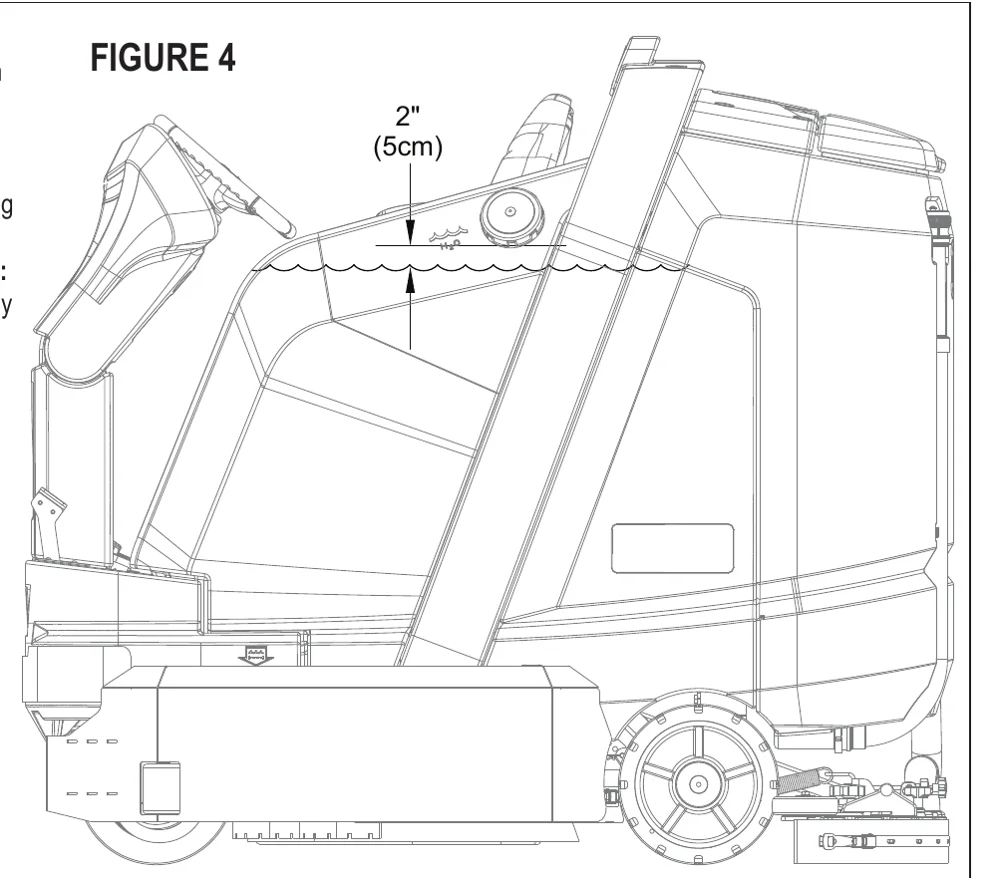
See Figure 4. Fill the solution tank with a maximum of 50 gallons (190 Liters) of cleaning solution. Do not fill the solution tank above 5 cm (2 inches) from the bottom of the Solution Fill (32). The solution should be a mixture of water and the proper cleaning chemical for the job. Always follow the dilution instructions on the chemical container label. NOTE: EcoFlex machines can either be used conventionally with detergent mixed in the tank or the detergent dispensing system can be used. When using the detergent dispensing do not mix detergent in the tank, plain water should be used.
SOLUTION TANK INDICATOR
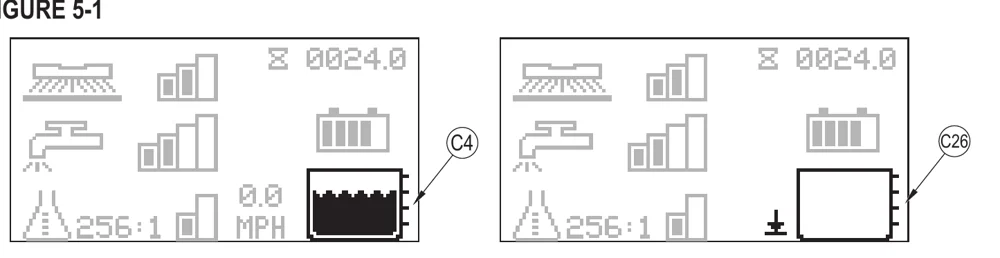
See Figure 5-1. The solution tank has a level sensor with four measurement points. The Solution Level Indicator (C4) displays the level (1-4) of the solution in the tank. Once the tank is empty the Solution Empty Indicator (C26) will flash on the display.
SOLUTION SHUTOFF VALVE
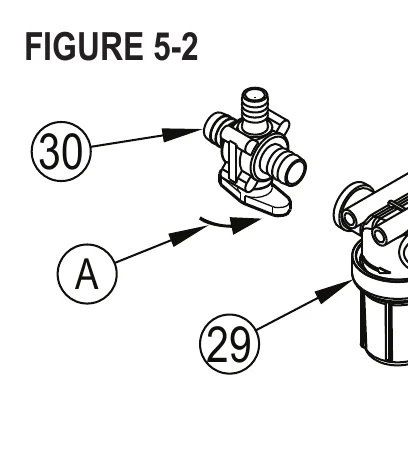
See Figure 5-2. A bidirectional Shutoff Valve (30) permits the solution flow to be shutoff, directed toward the scrub deck, or directed toward the drain hose. The flow is off when the handle is perpendicular to the body. When the handle is turned completely in direction shown (arrow ‘A’), solution flow will be directed toward Solution Filter (29) & scrub deck.
SQUEEGEE INSTALLATION
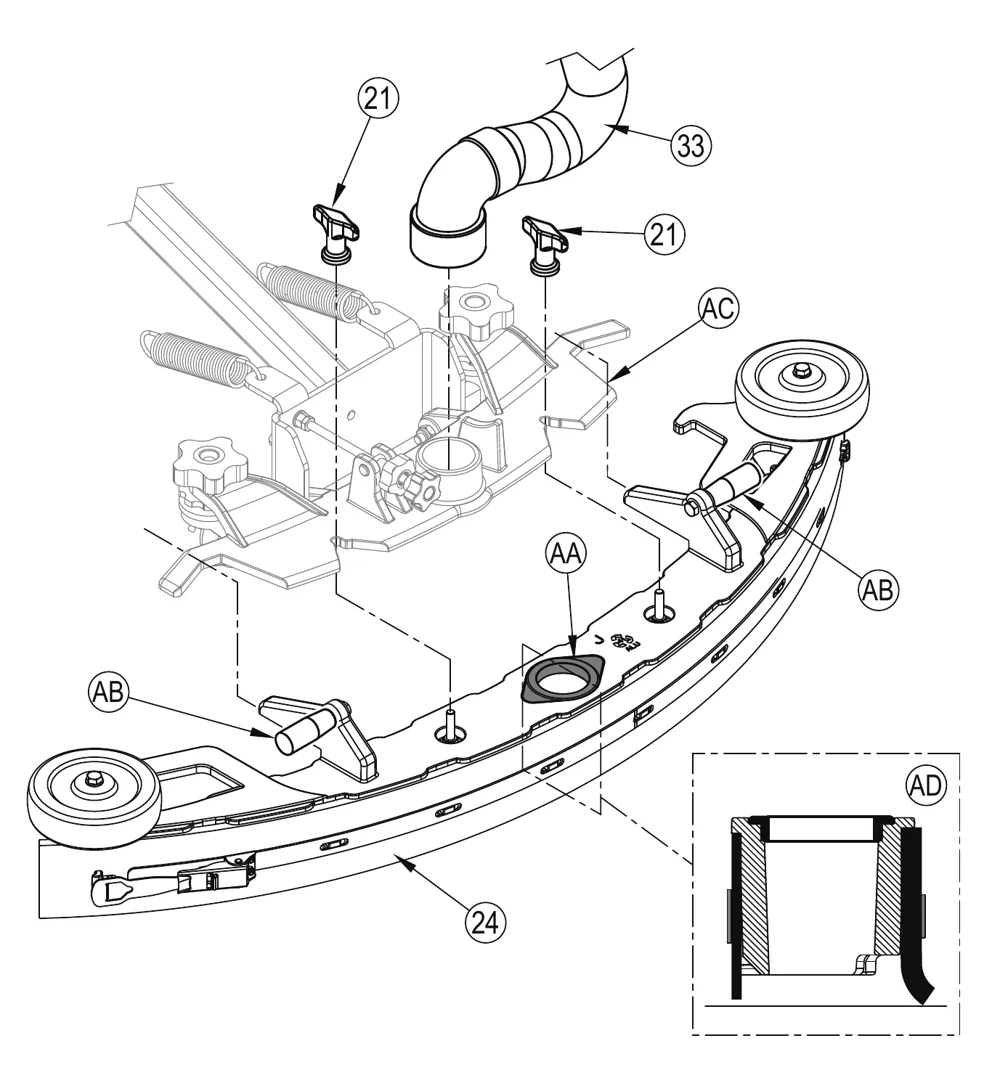
- See Figure 6. Ensure the Squeegee Seal (AA) is free from debris and installed on the Squeegee Assembly (24). Lift the squeegee assembly by its Handles (AB) and slide it onto the Squeegee Mount (AC) and tighten the Squeegee Mount Thumb Nuts (21).
- Connect the Recovery Hose (33) to the squeegee mount (AC).
- Lower the squeegee and move the machine ahead slightly. Check that the rear squeegee blade touches the floor evenly across its entire width and is bent over slightly as shown in the squeegee cross section (AD). If necessary adjust the rear squeegee to the proper height and angle by following the steps in the “Squeegee Adjustment” section.
FIGURE 6
DETERGENT SYSTEM PREPARATION (ECOFLEX MODELS ONLY)
FILL THE DETERGENT CARTRIDGE
In the event of a detergent spill follow these four steps:
- Communicate the hazard. Immediately notify others working in the area and any supervisory personnel of the hazard, and if the situation warrants it, evacuate the area.
- Control the spill. Ensure the spill does not become any worse.
- Contain the hazard.
- Clean up the spill and any damage safely.
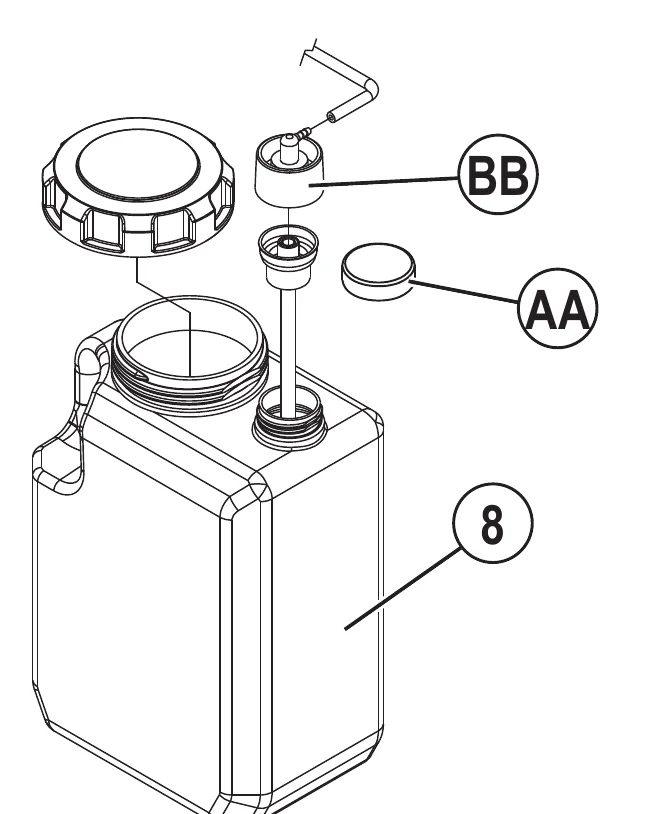
The Detergent Cartridge (8) is located beneath the seat. Fill the detergent cartridge with a maximum of 1 gallon (4 Liters) of detergent.
It is recommended that a separate cartridge be used for each detergent you plan to use. The detergent cartridges have a white decal on them so you can write the detergent name on each cartridge for clarification. When installing a new cartridge, remove the Factory Cap (AA) and place the cartridge in the machine. Install the Dry Break Cap (BB) and detergent hose as shown in Figure 7-1.
The system should be purged of previous detergent when switching to a different detergent (see “To Purge When Changing Detergent”).
FIGURE 7-1
DETERGENT SYSTEM PURGE (ECOFLEX MODELS ONLY)
To Purge When Changing Detergent (SCRUB AND SOLUTION SYSTEMS MUST BE OFF):
- Disconnect and remove the Detergent Cartridge (8).
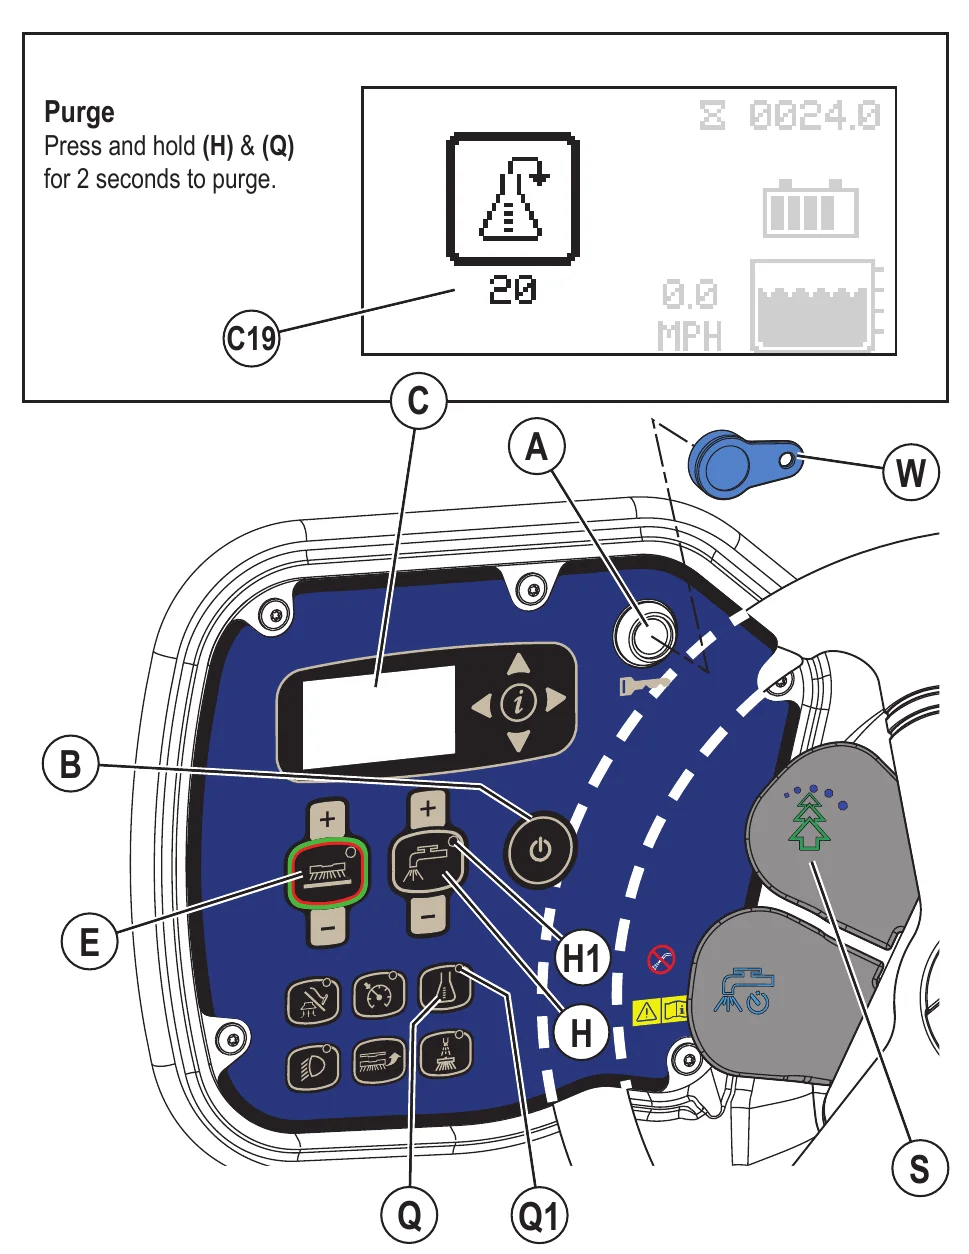
- Place the Magnetic SmartKey (W) onto SmartKey Reader (A). See Figure 7-2. Press the Power Switch (B) to power on the machine. Wait a few seconds for the start-up sequence to finish.
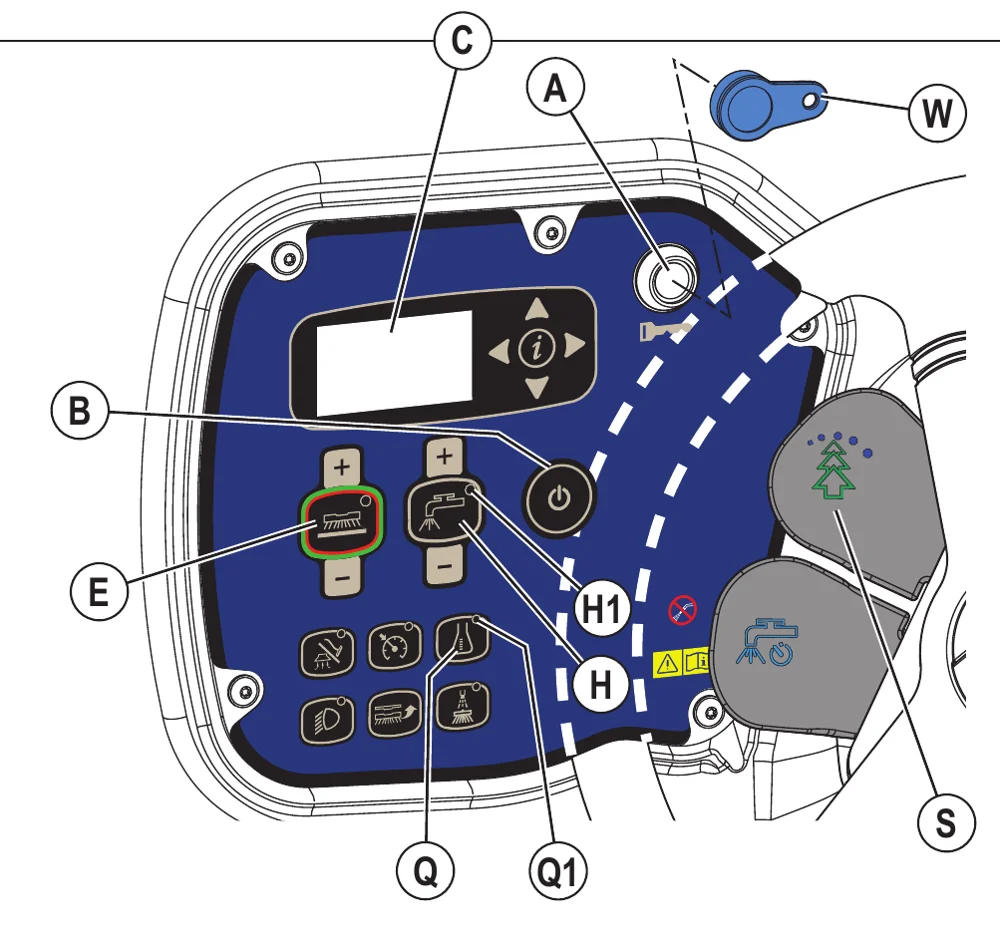
- Press and hold the Solution Switch (H) and the Detergent Switch (Q) down for 2 seconds. Release the switches when the Detergent Purge Indicator (C19) appears on the display (the Detergent Switch Light (Q1) and Solution Switch Light (H1) will be ON). NOTE: Once activated the purge process takes 20 seconds. Press (H) and (Q) again before 20 seconds to cancel purge. Normally one purge cycle is adequate to purge the system.
To Purge Weekly (SCRUB AND SOLUTION SYSTEMS MUST BE OFF):
- Disconnect and remove the detergent cartridge. Install and connect a Cartridge filled with clean warm water.
- Follow steps 2 and 3 from “To Purge When Changing Detergent”.
When the detergent level is nearing the bottom of the cartridge it is time to refill or replace the cartridge.
FIGURE 7-2
DETERGENT SYSTEM USE (ECOFLEX)
Detergent Ratio (SCRUB SYSTEM MUST BE ON): See Figure 7-3.
No detergent is dispensed until the scrub and detergent systems are enabled and the Drive Pedal (3) pushed forward.
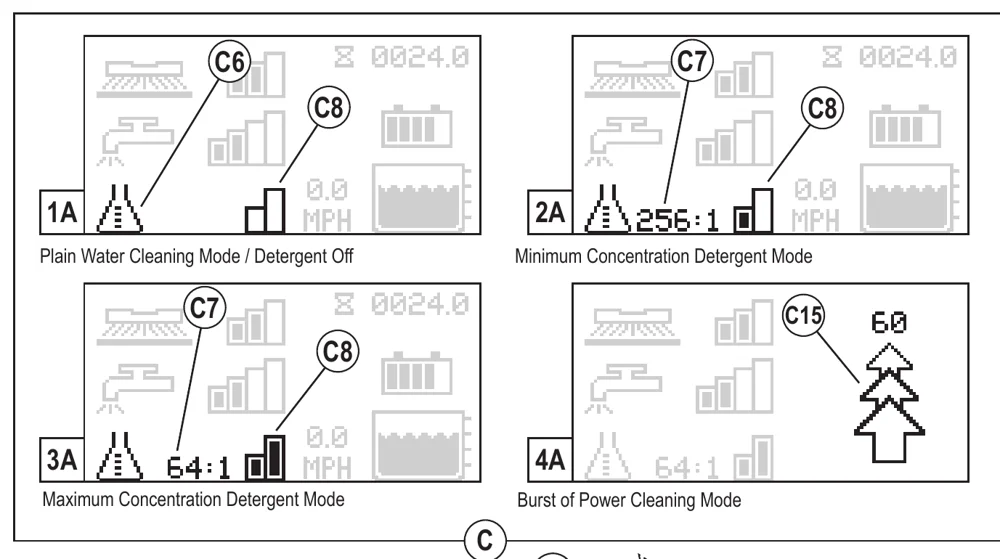
- The Detergent Indicator (C6) will be displayed in scrub mode when the detergent system is installed on the machine.
- The Detergent Ratio Indicator (C7) will display the selected ratio when the detergent system is on.
There are 4 modes of EcoFlex operation:
1A. Plain Water Cleaning Mode - During scrubbing, the detergent system can be turned off at any time by pressing the Detergent Switch (Q) to allow scrubbing with water only. Detergent Ratio Indicator (C7) will be blank and Detergent Indicator Bar Graph (C8) will display no bars filled. Detergent Light (Q1) will be off.
2A. Minimum Concentration Detergent Mode – Activated by pressing the Detergent Switch (Q) when detergent is off (repeated presses will cycle to maximum Mode, off and back to minimum mode). Detergent Ratio Indicator (C7) will display the current minimum detergent level and Detergent Indicator Bar Graph (C8) will display first bar filled. Detergent Light (Q1) will be on. See below the steps “To program the Minimum Detergent Level”.
3A. Maximum Concentration Detergent Mode – Activated by pressing the Detergent Switch (Q) when detergent is at minimum mode (repeated presses will cycle to minimum mode, off and back to maximum mode). Detergent Ratio Indicator (C7) will display the current maximum detergent level and Detergent Indicator Bar Graph (C8) will display left and right bars filled. Detergent Light (Q1) will be on. See below the steps “To program the Maximum Detergent Level”. Do not use a concentration level exceeding the detergent manufacturer’s recommendation.
4A. Burst of Power Cleaning Mode – Pull the Burst of Power Paddle (S) to increase the detergent ratio for one minute to the pre-programmed “maximum concentration” detergent level (as noted in programming instructions below). Detergent system will be turned ON at “minimum concentration” detergent level if it was off. This will also cause the solution flow rate to increase to the next level and the scrub pressure to increase to the next level. Burst of Power Indicator (C15) will blink for one minute on the display along with a 60 second timer countdown. Pull Paddle (S) again before 60 seconds to cancel Burst of Power. The amount of time Burst of Power runs is adjustable (see “Information Menu Display” submenu “Options”).
To program the Maximum Concentration Detergent Level
- Press the OneTouch™ Scrub switch (E) to activate the scrub system.
- Press and release Detergent Switch (Q) until you have entered the maximum concentration detergent mode ((C8) shows left and right bars filled).
- Press and hold the Detergent Switch (Q) for approximately 2 seconds until the Ratio Indicator (C7) flashes.
- While the ratio is flashing, pressing and releasing the detergent switch will cycle through the available ratios (400:1, 300:1, 256:1, 200:1, 150:1, 128:1, 100:1, 64:1, 50:1, 32:1).
- Once the desired ratio is displayed on the screen, stop and it will save the setting after 3 seconds.
- Whenever the maximum concentration detergent setting is set to a lower concentration than the current minimum programmed concentration setting, the minimum concentration default setting will be equal to the maximum concentration setting until changed by the operator.
To program the Minimum Concentration Detergent Level
- Press the OneTouch™ Scrub switch (E) to activate the scrub system.
- Press and release Detergent Switch (Q) until you have entered the minimum concentration detergent mode ((C8) shows left bar filled).
- Press and hold the Detergent Switch (Q) for approximately 2 seconds until the Ratio Indicator (C7) flashes.
- While the ratio is flashing, pressing and releasing the detergent switch will cycle through the available ratios (Note: only ratios that are a lower concentration or equal to the maximum detergent setting will be available.
- Once the desired ratio is displayed on the screen, stop and it will save the setting after 3 seconds.
Once set, the detergent flow rate automatically increases and decreases with the solution flow rate, but the detergent ratio remains the same.
DETERGENT SYSTEM USE (ECOFLEX MODELS ONLY)
FIGURE 7-3
OPERATING THE MACHINE
While on ramps or inclines, avoid sudden stops. Avoid abrupt sharp turns. Use low speed down ramps.
STARTING THE MACHINE
- Follow the instructions in “Preparing the Machine for Use” section of this manual and verify the following;
- Batteries are fully charged.
- Exterior of machine is free of damage. Report any damage to your supervisor.
- This point only for machines with Mechanical Brake. Check the Brake Pedal (37). The pedal should be firm. If the brake pedal reaches its end of travel in the slot while being pressed, DO NOT OPERATE THE MACHINE. Report all defects immediately to service personnel.
- Proper brushes are correctly installed.
- Squeegee is installed.
- Solution tank is full.
- Recovery tank is empty.
- Ensure that area to be scrubbed is clear of obstacles that are not fixed, such as hoses, buckets or pails, boxes, electrical cords, carts, pallets, etc.
- See Figure 8-2. While seated on the machine, adjust the seat and steering wheel to a comfortable operating position using the adjustment controls found on the seat and Steering column Tilt Adjust (16).
- Place the Magnetic SmartKey (W) onto the SmartKey Reader (A). Press the Power Switch (B). This will activate the Display (C).
- Reference the Battery Condition Indicator (C3) and Hour Meter (C1) before proceeding.
- To transport the machine to the work area, apply even pressure with your foot on the front of the Drive Pedal (3) to go forward or the rear of the pedal for reverse.
- Adjust machine speed by varying the pressure on the Drive Pedal (3).
STOPPING THE MACHINE
- Stop the machine by releasing the Drive Pedal (3).
- This step only for machines with Mechanical Brake.
After releasing the Drive Pedal, the Brake Pedal (37) can be pressed to help stop the machine.NOTE: The brake pedal actuates the mechanical brake system located on the rear wheels. - ONLY IN THE EVENT OF AN EMERGENCY!
To stop all machine functions immediately, press the Emergency Stop (U).- The display will show Emergency Stop Activated Indicator (C20).
- To reset the machine functions, rotate the emergency stop clockwise.
OPERATING THE MACHINE
While on ramps or inclines, avoid sudden stops when loaded. Avoid abrupt sharp turns. Use low speed down hills.
To Scrub...
Follow the instructions in “Starting the Machine” section and drive the machine to the starting point for cleaning.
- Press the Solution Switch (H) and hold for 5 seconds to pre-wet the floor. NOTE: This will help prevent scarring of the floor surface when starting to scrub with dry brushes. This must be done prior to pressing the One-Touch Scrub Switch (E).
- Press the One-Touch Scrub ON Switch (E) once for Regular Scrub. Press the Scrub Pressure Increase Switch (F) once for Heavy Scrub or twice for Extreme Scrub mode. The solution flow has settings that coincide with the scrub pressure, it will increase and decrease along with the scrub pressure.
NOTE: The solution flow rate can also be increased or decreased independently of the scrub pressure by pressing the Solution Flow Increase Switch (J) or Solution Flow Decrease Switch (K), observe the Solution Flow Rate Bar Graph (C10) (see Control Panel). Any subsequent scrub pressure adjustments will reset the solution flow rate to default. - When the One-Touch Scrub ON Switch (E) is selected, the brushes and squeegee are automatically lowered to the floor. The scrub, solution, vacuum and detergent (EcoFlex models) systems are all automatically enabled and will start when the Drive Pedal (3) is activated. Any individual system can be turned OFF or back ON by simply pressing its switch at any time during scrubbing.
NOTE: When operating the machine in reverse the squeegee automatically raises. - Begin scrubbing by driving the machine forward in a straight line at a normal walking speed and overlap each path by 2-3 inches (50-75 mm). Adjust the machine speed and solution flow when necessary according to the condition of the floor. Pull the Timed Solution Off Paddle (R) before entering a turn to temporarily turn off the solution flow. The Solution Flow Rate Bar Graph (C10) will be replaced by a 5 second countdown timer showing how long the solution flow will be off. Pull paddle again before timer runs out to cancel solution off.
NOTE: While scrubbing the maximum machine speed can be set by pressing the Speed Limiter Switch (N). Adjust the machine to the desired speed using the Drive Pedal (3) then press the Speed Limiter Switch (N). The operator can now press the pedal all the way forward without increasing the machine speed thereby reducing operator fatigue. The machine Speed (C5) is shown on the display.
- When scrubbing, check behind the machine occasionally to see that all of the waste water is being picked up. If there is water trailing the machine, you may be dispensing too much solution, the recovery tank may be full, or the squeegee tool may require adjustment.
- The machine defaults to the last cleaning mode used Minimum or Maximum Concentration Detergent (if detergent is installed and was activated). Pull the Burst of Power Paddle (S) to override the current cleaning mode and temporarily increase scrub pressure, solution flow and the detergent ratio (unless in Maximum Concentration). This will cause the Burst of Power Indicator (C15) to be displayed along with a countdown timer for one minute, solution flow rate will increase to the next level, scrub pressure will increase to the next level and the detergent ratio will be at the Maximum Concentration level (detergent system will be turned on at Minimum Concentration level if it was off).
NOTE: Repeatedly pressing and releasing the Detergent Switch (Q) will cycle between Minimum Concentration, Maximum Concentration and detergent off. The EcoFlex system will only function if the scrub system (E) has been enabled. - For extremely dirty floors, a one-pass scrubbing operation may not be satisfactory and a “double-scrub” operation may be required. This operation is the same as a one-pass scrubbing except on the first pass the squeegee and scrub deck blades are in the up position (press the Vacuum/Wand Switch (L) to raise the squeegee). Open both scrub deck Side Doors (15) and step down on the side blade Raise/Lower Lever (AA) to raise the side blades. This allows the cleaning solution to remain on the floor to work longer. The final pass is made over the same area, with the squeegee and side blades (step down on Lever (AA) again to lower) lowered to pick up the accumulated solution.
- The recovery tank has a Tank Full Switch (19) that causes ALL systems to turn OFF except the drive system when the recovery tank is full. When this switch is activated, the recovery tank must be emptied. The machine will not pick up water or scrub with the switch activated.
NOTE: Scrub, solution and detergent indicators vanish and the Recovery Tank Full Indicator (C13) appears on the Display Panel when the switch is activated. - When the operator wants to stop scrubbing or the recovery tank is full, press the One-Touch Scrub Switch (E) once. This will automatically stop the scrub brushes and solution flow and the scrub deck will raise up. The squeegee will raise up after a brief delay and the vacuum will stop after an additional delay (this is to allow any remaining water to be picked up without turning the vacuum back on).
- Drive the machine to a designated waste water “DISPOSAL SITE” and empty the recovery tank. To empty, pull the Drain Hose (20) from its rear storage area, then remove the plug (hold the end of the hose above the water level in the tank to avoid sudden, uncontrolled flow of waste water). Refill the solution tank and continue scrubbing.
When the batteries require recharging the Battery Low Voltage Indicator (C14) will come on, the scrub brushes and solution flow will stop and the scrub deck will raise up. The squeegee will raise up after a brief delay and the vacuum will stop after an additional delay. Transport the machine to a service area and recharge the batteries according to the instructions in the Battery section of this manual.
WET VACUUMING
Steps to follow in fitting the machine with optional attachments for wet vacuuming.
- Disconnect the recovery hose (33) from the squeegee mount. Connect the coupler and hose from the wand kit to the recovery hose.
- Attach suitable wet pick-up tools to the hose. (An optional Vac Wand Kit PN56116355 is available from Advance).
- Place the magnetic key onto the SmartKey Reader (A) and press the Power Switch (B). While standing alongside the machine (not on the seat) press the Vacuum/Wand Switch (L). The vacuum motor and the pump will run continuously until the switch is pressed again to turn it OFF. The Wand Indicator (C17) is displayed. NOTE: Pressing the Vacuum/Wand Switch (L) while seated on the machine will cause the squeegee to lower and the vacuum motor(s) to run while machine is moving forward. The Vacuum Indicator (C16) will be displayed.
SERVICE NOTE: Refer to the service manual for detailed functional descriptions of all controls and optional programmability.
FIGURE 8-2
AFTER USE
Batteries and chargers: make sure your charger is compatible with your batteries, and set its charging algorithm to your battery pack before you use it.
- When finished scrubbing, press the One-Touch Scrub Switch (E). This will automatically raise, retract and stop all the machine systems (brush, squeegee, vacuum, solution and detergent (EcoFlex models)). Then drive the machine to a service area for daily maintenance and review of other needed service up keep.
- To empty the solution tank, open the left side scrub deck door and remove the Solution Drain Hose (31) from it’s storage clamp. Direct the hose to a designated “DISPOSAL SITE” and remove the plug. Rinse the tank with clean water.
- To empty the recovery tank, pull the Recovery Tank Drain Hose (20) from its storage area. Direct the hose to a designated “DISPOSAL SITE” and remove the plug (hold the end of the hose above the water level in the tank to avoid sudden, uncontrolled flow of waste water). The Recovery Tank Drain Hose can be squeezed to regulate the flow. Rinse the recovery tank with clean water. Inspect the recovery and vacuum hoses; replace if kinked or damaged.
- Remove the brushes or pad holders. Rinse the brushes or pads in warm water and hang up to dry.
- Remove the squeegee, rinse it with warm water and re-install on mount or hang it from the back of the recovery tank.
- Remove the hopper on cylindrical systems and clean thoroughly. Remove from either side of the machine by opening the scrub deck door, unlatching and swinging open the side blade and tilting the hopper up and away from housing, then pull out.
- Check the maintenance schedule below and perform any required maintenance before storage.
- Store the machine indoors in a clean dry place. Keep from freezing. Leave the tanks open to air them out.
- Turn the machine off by pressing the Power Switch (B) and then remove the magnetic key.
- Batteries are the most expensive replacement item on this machine. To protect your investment and to get as many cycles from the batteries as possible, remember the following:
- Batteries will last longer if kept fully charged.
- Battery chargers will not over or undercharge the batteries.
- Batteries will prematurely fail if stored in a discharged state.
- Every day after use, the battery charger must be plugged in and the charger must be allowed to run through a full charging sequence to fully charge the batteries.
MAINTENANCE SCHEDULE
| MAINTENANCE ITEM | Daily | Weekly | Monthly | Yearly |
|---|---|---|---|---|
| Charge Batteries | X | |||
| Check/Clean Tanks & Hoses | X | |||
| Check/Clean/Rotate the Brushes/Pads | X | |||
| Check/Clean the Squeegee | X | |||
| Empty/Clean Debris Catch Tray in Recovery Tank | X | |||
| Check/Clean the vacuum motor foam filter(s) | X | |||
| Clean Hopper on Cylindrical System | X | |||
| Clean the DustGuard system spray nozzles | X | |||
| *Check mechanical brake (if equipped) | X | |||
| Check Each Battery Cell(s) Water Level (wet lead-acid batteries) | X | |||
| Inspect Scrub Housing Blades | X | |||
| Inspect and clean Solution Filter | X | |||
| Clean Solution Trough on Cylindrical System | X | |||
| Purge Detergent System (EcoFlex only) | X | |||
| Lubrication – see “Lubricating the Machine” | X | |||
| ** Check Carbon Brushes | X |
*The brake pedal should be firm. If the brake pedal reaches its end of travel in the slot while being pressed, DO NOT OPERATE THE MACHINE. Report all defects immediately to service personnel.
** Have Advance check the vacuum motor carbon motor brushes after 1200 recovery hours (replace motor after 2000 recovery hours).
DUSTGUARD NOZZLE CLEANING PROCEDURE
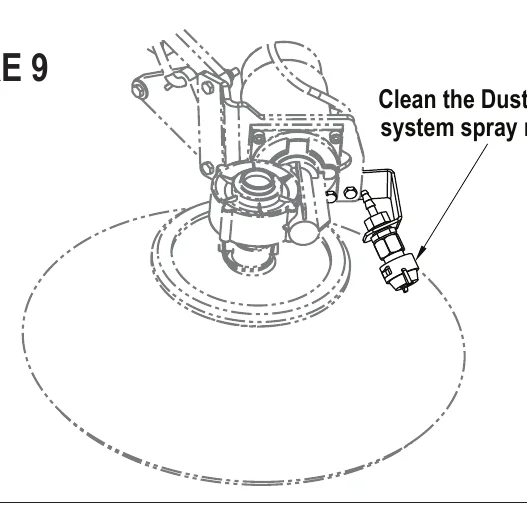
To prevent nozzle plugging remove nozzle(s) after each daily use and soak overnight in clean white vinegar or appropriate calcium/lime remover. To avoid machine downtime best practice is to purchase spare nozzle(s) and replaced those that have just been used with those that have been cleaned. When nozzles can no longer be cleaned effectively replace as necessary.
LUBRICATING THE MACHINE
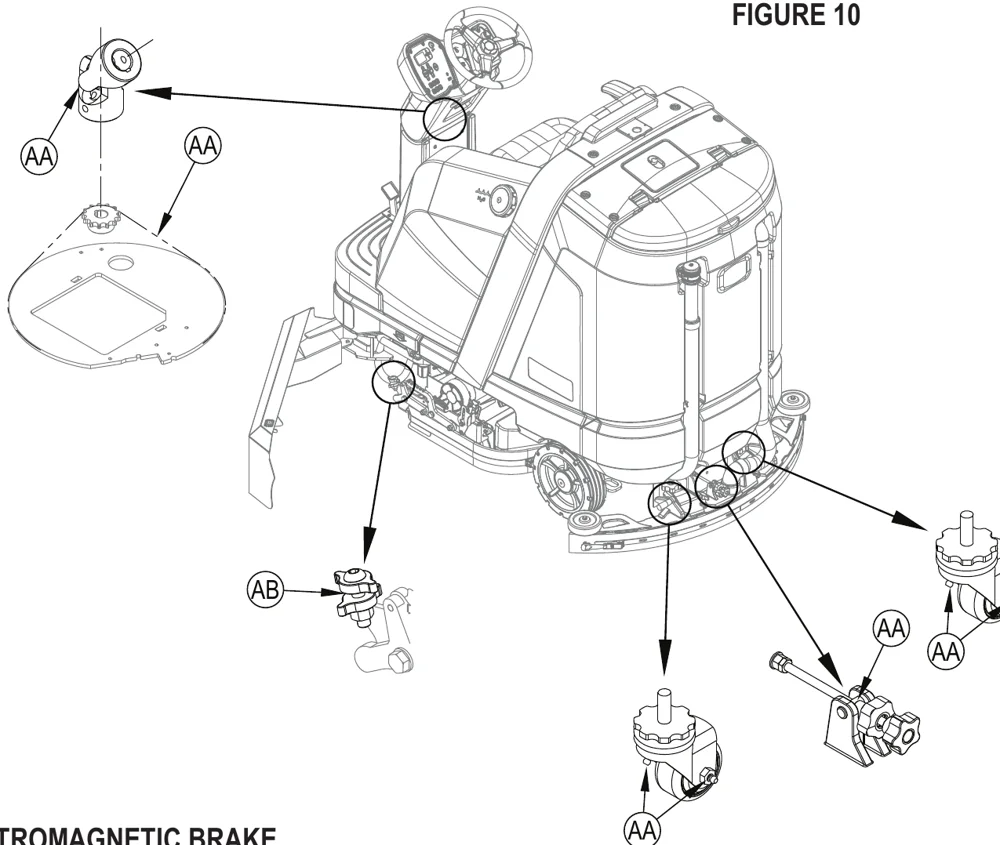
Once a month, pump a small amount of grease into each grease fitting on the machine until grease seeps out around the bearings. See Figure 10.
Grease fitting locations (or apply grease to) (AA):
- Squeegee Caster Wheel Axle and Pivot
- Steering Wheel Shaft Universal joint
- Steering Chain
- Squeegee mount angle adjustment knob threads
Once a month, apply light machine oil or synthetic lubricant spray to lubricate (AB):
- Side Blade Down Stop Adjustment Threads
FIGURE 10
ELECTROMAGNETIC BRAKE
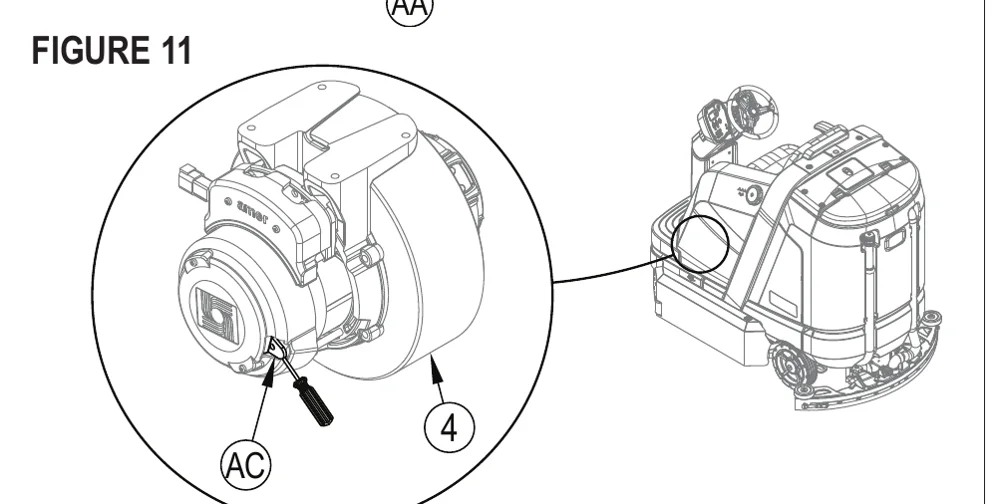
See Figure 11. The Drive Wheel Assembly (4) has a built in electromagnetic brake that is engaged whenever the machine power is OFF or the Drive Pedal (3) is not being pressed, machine in neutral. This brake can be manually overridden if necessary by inserting a medium to large screwdriver behind the Yoke (AC) as shown. This should only be done in the event you need to push or pull the unit.
FIGURE 11
CHARGING WET LEAD-ACID BATTERIES
Batteries and chargers: make sure your charger is compatible with your batteries, and set its charging algorithm to your battery pack before you use it.
Charge the batteries each time the machine is used or when the Battery Charge Level Indicator (C3) is reading less than full.
Charge batteries in a well-ventilated area. If battery acid makes contact with your skin, flush the affected area with water for 5 minutes and seek medical attention.
Do not smoke while servicing the batteries.
When Servicing Batteries...
- Remove all jewelry
- Do not smoke
- Wear safety glasses, rubber gloves and a rubber apron
- Work in a well-ventilated area
- Do not allow tools to touch more than one battery terminal at a time
- ALWAYS disconnect the negative (ground) cable first when replacing batteries to prevent sparks.
- ALWAYS connect the negative cable last when installing batteries.
If your machine shipped with an onboard battery charger do the following:
- Turn the machine off at the Power Switch (B).
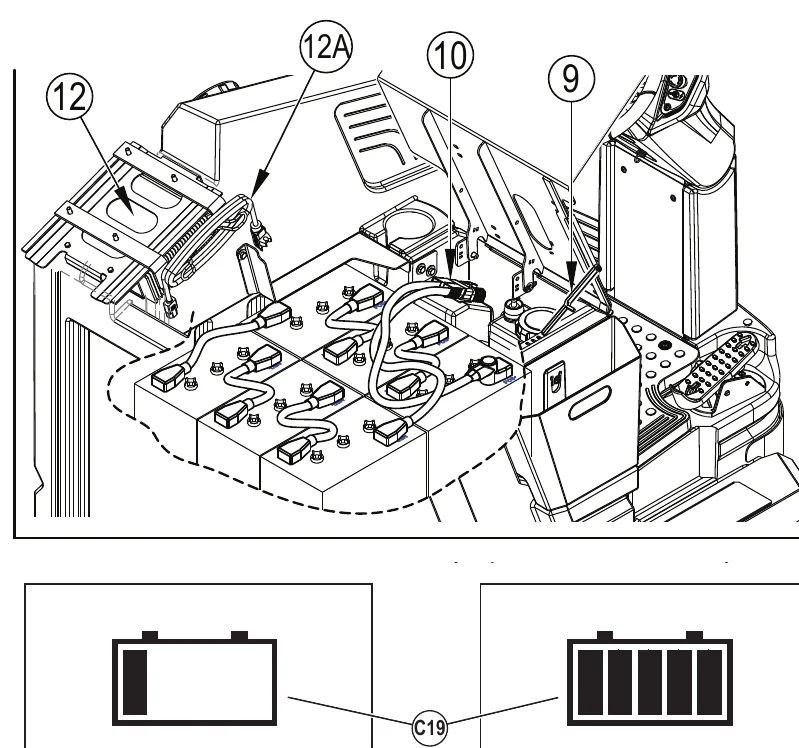
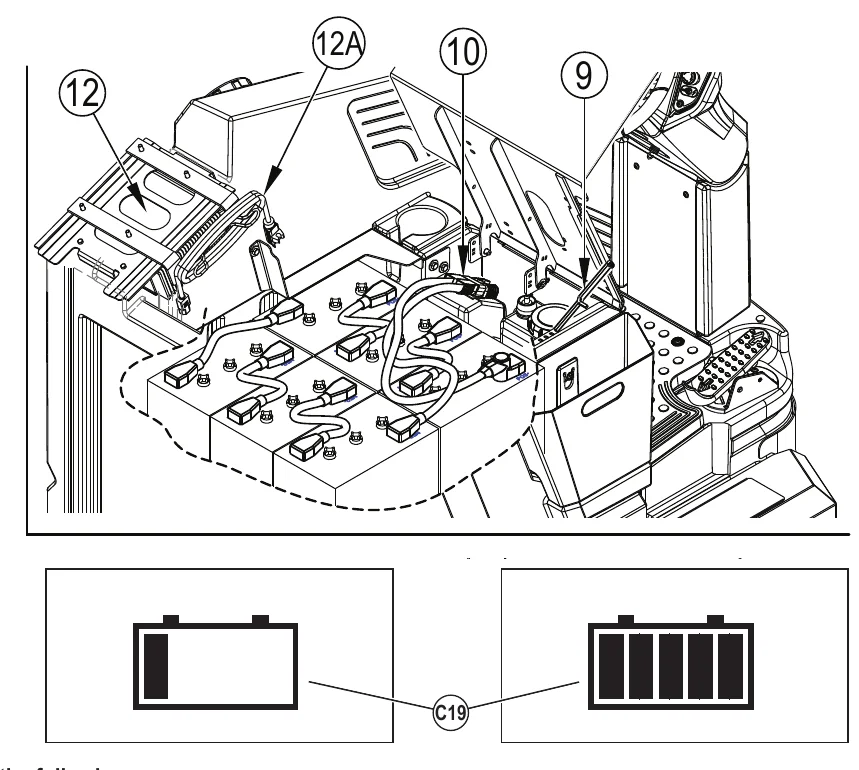
- See Figure 12. Raise the steering column to the full upright position. Tip the seat forward and engage the Seat Prop Rod (9) for battery, charger access and proper ventilation.
- Unwind the electrical cord for the onboard charger and plug it into a properly grounded outlet. Refer to the OEM product manual for more detailed operating instructions. While AC power is applied to the onboard charger all machine functions are disabled.
- The Battery Charge Status Indicator (C19) will begin showing the batteries’ state of charge. This indicates that the charging cycle has begun. As the charging cycle continues, the battery charge level will fill in.
- When the Battery Charge Status Indicator (C19) is completely filled, the machine senses fully charged batteries, however the charging process may not be complete. Rely on the status lights on the Charger (12) (and its OEM manual) to verify when the batteries are completely charged. This may take several hours depending upon the condition of the batteries before charging.
- After charging is complete unplug the charger and wind up the Cord (12A). Wait at least 10 seconds before turning on the machine after unplugging the charger.
If your machine shipped without an onboard battery charger do the following:
- Turn the machine off at the Power Switch (B).
- See Figure 12. Raise the steering column to the full upright position. Tip the seat forward and engage the Seat Prop Rod (9) for battery access and proper ventilation.
- Disconnect the batteries from the machine and push the connector from the charger into the Machine Battery Connector (10). Follow the instructions on the battery charger. SERVICE NOTE: Make sure you plug the battery charger into the connector that attaches to the batteries.
CHECKING THE BATTERY WATER LEVEL
Batteries and chargers: make sure your charger is compatible with your batteries, and set its charging algorithm to your battery pack before you use it.
After charging, check the water level of the batteries at least once a week.
Remove the vent caps and check the water level in each battery cell. Use distilled or demineralized water in a battery filling dispenser (available at most auto parts stores) to fill each cell to the level indicator (or to .39 inches / 10 mm over the top of the separators). DO NOT over-fill the batteries! Reinstall vent caps.
Tighten the vent caps. Wash the tops of the batteries with a solution of baking soda and water (2 tablespoons of baking soda to 1 liter of water).
CHARGING GEL/AGM (VRLA) BATTERIES
Batteries and chargers: make sure your charger is compatible with your batteries, and set its charging algorithm to your battery pack before you use it.
Charge the batteries each time the machine is used or when the Battery Charge Level Indicator (C3) is reading less than full.
Do not smoke while servicing the batteries.
When Servicing Batteries...
- Remove all jewelry
- Do not smoke
- Wear safety glasses, rubber gloves and a rubber apron
- Work in a well-ventilated area
- Do not allow tools to touch more than one battery terminal at a time
- ALWAYS disconnect the negative (ground) cable first when replacing batteries to prevent sparks.
- ALWAYS connect the negative cable last when installing batteries.
If your machine shipped with an onboard battery charger do the following:
- Turn the machine off at the Power Switch (B).
- See Figure 12. Raise the steering column to the full upright position. Tip the seat forward and engage the Seat Prop Rod (9) for battery, charger access and proper ventilation.
- Unwind the electrical cord for the onboard charger and plug it into a properly grounded outlet. Refer to the OEM product manual for more detailed operating instructions. While AC power is applied to the onboard charger all machine functions are disabled.
- The Battery Charge Status Indicator (C19) will begin showing the batteries’ state of charge. This indicates that the charging cycle has begun. As the charging cycle continues, the battery charge level will fill in.
- When the Battery Charge Status Indicator (C19) is completely filled, the machine senses fully charged batteries, however the charging process may not be complete. Rely on the status lights on the Charger (12) (and its OEM manual) to verify when the batteries are completely charged. This may take several hours depending upon the condition of the batteries before charging.
- After charging is complete unplug the charger and wind up the Cord (12A). Wait at least 10 seconds before turning on the machine after unplugging the charger.
If your machine shipped without an onboard battery charger do the following:
- Turn the machine off at the Power Switch (B).
- See Figure 12. Raise the steering column to the full upright position. Tip the seat forward and engage the Seat Prop Rod (9) for battery access and proper ventilation.
- Disconnect the batteries from the machine and push the connector from the charger into the Machine Battery Connector (10). Follow the instructions on the battery charger. SERVICE NOTE: Make sure you plug the battery charger into the connector that attaches to the batteries.
CHARGING OTHER TYPES OF BATTERIES
See separate Instructions for Use document(s) regarding any battery type not mentioned in this document.
SQUEEGEE MAINTENANCE
If the squeegee leaves narrow streaks or water, the blades may be dirty or damaged. Remove the squeegee, rinse it under warm water and inspect the blades. Reverse or replace the blades if they are cut, torn, wavy or worn.
To Reverse or Replace the Rear Squeegee Wiping Blade...
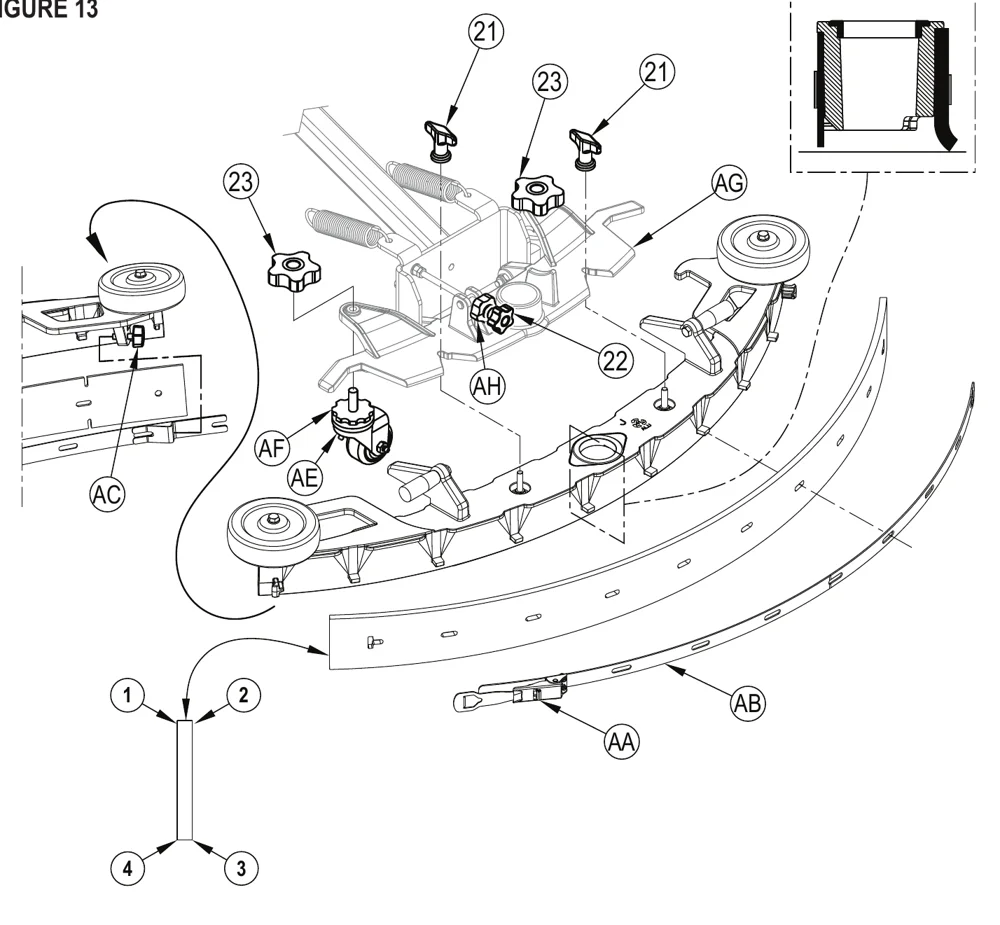
- See Figure 13. Raise the squeegee tool off the floor, then unsnap the Latch (AA) on the squeegee tool.
- Remove the Tension Strap (AB).
- Slip the rear blade off the alignment pins.
- The squeegee blade has 4 working edges as shown below. Turn the blade so a clean, undamaged edge faces toward the front of the machine. Replace the blade if all 4 edges are nicked, torn or worn to a large radius.
- Install the blade, following the steps in reverse order and adjust the squeegee tilt.
To Reverse or Replace the Front Squeegee Blade...
- Raise the squeegee tool off the floor, then loosen the (2) Thumb Nuts (21) on top of the squeegee and remove the squeegee tool from the mount.
- Loosen the Front Squeegee Blade Removal Thumb Nut (AC), then remove Tension Strap (AD) and front blade
- The squeegee blade has 4 working edges as shown below. Turn the blade so a clean, undamaged edge faces toward the front of the machine. Replace the blade if all 4 edges are nicked, torn or worn to a large radius.
- Install the blade, following the steps in reverse order and adjust the squeegee tilt.
SQUEEGEE ADJUSTMENT
There are two squeegee tool adjustments possible, angle and height.
Adjust the squeegee angle whenever a blade is reversed or replaced, or if the squeegee is not wiping the floor dry.
- Park the machine on a flat, even surface.
- Lower the squeegee, move the machine ahead slightly and adjust the squeegee tilt and height using the Squeegee Tilt Adjust Knob (22) and Squeegee Height Adjust Knobs (23) so that the rear squeegee blade touches the floor evenly across its entire width and is bent over slightly as shown in the squeegee cross section.
- Squeegee height is pre-set at the factory but may require periodic adjustment due to caster wear. Proper squeegee height is achieved when the front squeegee blade is in contact with the floor but not bent over.
- Loosen Height Adjust Knob (23).
- Thread Caster (AE) up or down as required to achieve proper height and ensure blade position is uniform left to right.
- Tighten Caster Stop (AF) against squeegee mount (AG).
- Tighten Height Adjust Knob (23) against squeegee mount to lock adjustment.
- The Tilt Adjust Knob (22) is used to adjust the tool angle for uniform contact from center to tips of blade.
- Loosen Tilt Stop Knob (AH).
- Turn Tilt Adjust Knob as required to adjust.
- Tighten Tilt Stop Knob (AH) against the squeegee mount to lock adjustment.
SQUEEGEE MAINTENANCE - CONTINUED
FIGURE 13
SIDE BLADE MAINTENANCE
The side blade’s function is to channel the waste water to the squeegee, helping contain the water within the machines cleaning path. During normal use the blades will wear in time. The operator will notice a small amount of water leaking out underneath the side blades. A height adjustment can easily be made to lower the blades so that all the water can be picked-up by the squeegee.
To reverse or replace the scrub system side blades ...
- Unlatch and open the scrub deck side doors (15).
- See Figure 14-1. Unlatch the retaining strap (AA) and remove the strap and blade.
- The main side blade has 4 working edges as shown. Turn the blade so a clean, undamaged edge faces toward the center of the machine. Swap the right and left side blades to use the remaining two edges. Replace the blades as a set if all edges are nicked, torn or worn beyond their ability to be adjusted.
- Reinstall the blade onto the blade assembly and secure by latching the retainer strap (AA). Adjust the blade for proper contact to the floor when the brush deck is placed in the scrub position.
SIDE BLADE HEIGHT ADJUSTMENT
- The down stop can be adjusted on the side blades to compensate for blade wear.
- Make sure the machine is on a level surface.
- Lower the scrub deck by pressing the One-Touch Scrub Switch (E) and drive the machine forward a short distance to ensure the blades fold over.
- Open the scrub deck side doors (15) and observe blade fold over.
- To adjust, loosen the Side Blade Lock Knob (AB). Turn the Down Stop Knob (AC) (Up or Down) to where the blades just fold over enough when scrubbing that all the waste water is contained inside the deck. NOTE: Make small adjustments to obtain good blade wiping. Do not lower the blades too much to where they fold over excessively and cause unneeded blade wear.Tighten the Side Blade Lock Knob (AB) to lock the adjustment.
SIDE BLADE PRESSURE ADJUSTMENT
- The scrub deck side blades have two settings for down pressure.
- See Figure 14-2. Position 1 (AE) is normal wiping pressure, it is recommended to start at this setting. Position 2 (AF) is heavy wiping pressure, this setting can be used if wiping performance is not satisfactory. NOTE: Position 2 will cause faster blade wear.
- Pull Bracket (AG) to change between the two settings. Use the same setting on both sides of the scrub deck.
DOUBLE SCRUB POSITION
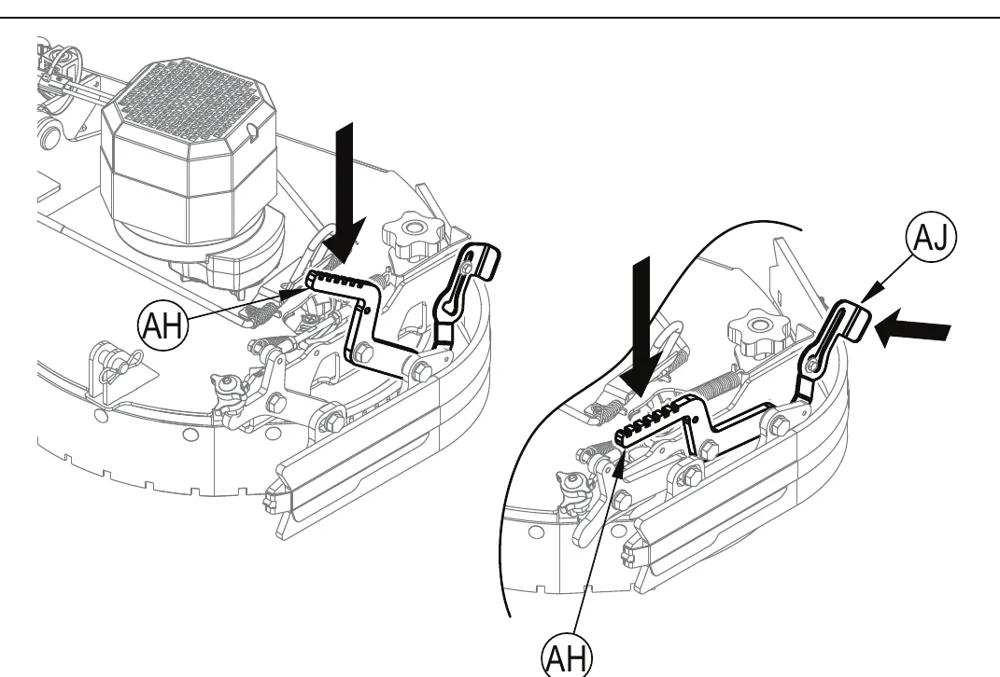
- See Figure 14-3. Step down on Blade Raise/Lower Lever (AH) to raise blade. NOTE: This position can also be used for installing/removing brushes.
- When finished double scrubbing with the machine, step down again on Lever (AH) or pull Release Bracket (AJ) to lower side blade back to its normal operating position.
SIDE BLADE MAINTENANCE
FIGURE 14-1
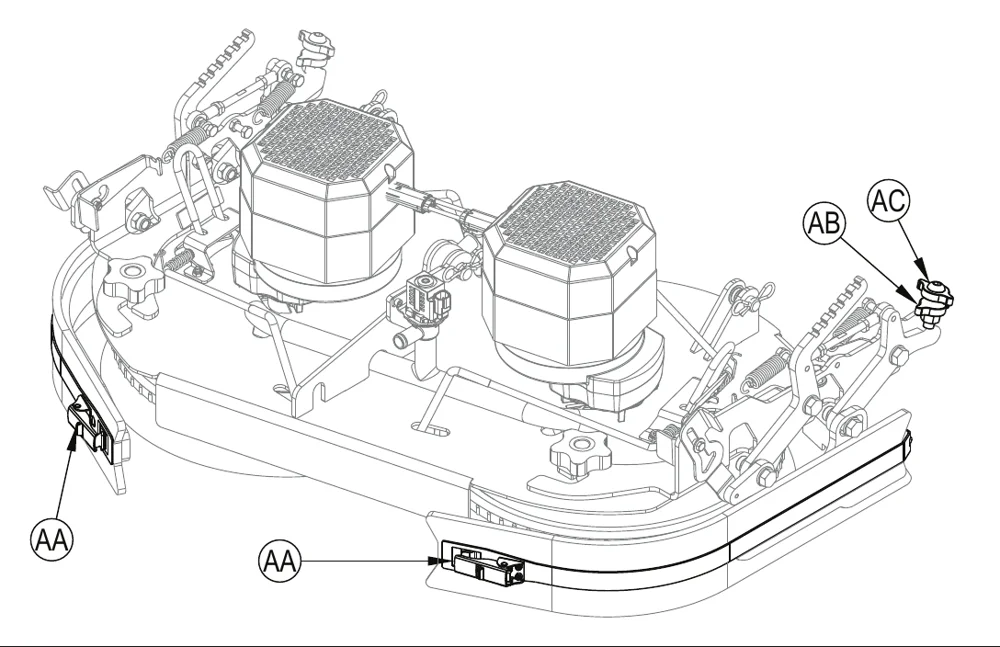
FIGURE 14-2
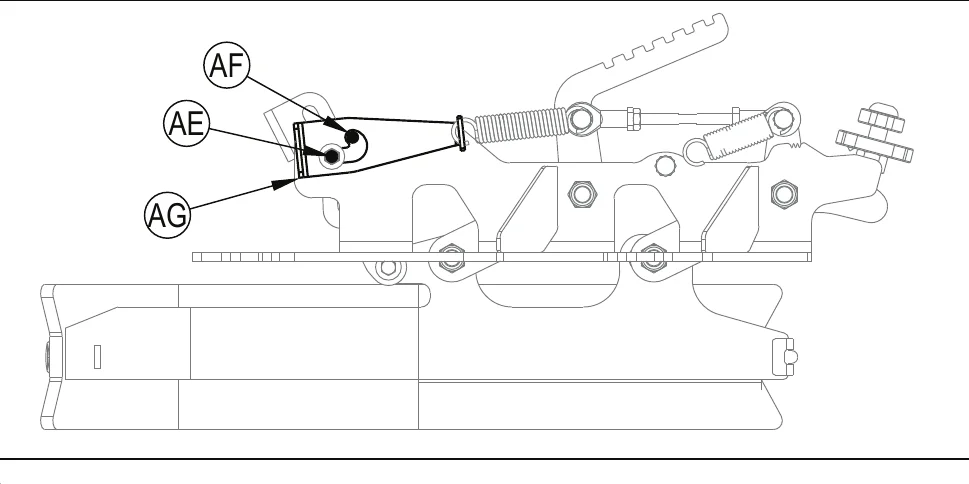
FIGURE 14-3
GENERAL MACHINE TROUBLESHOOTING
| Problem | Possible Cause | Remedy |
|---|---|---|
| Poor water pick-up | Worn or torn squeegee blades | Reverse or replace |
| Squeegee out of adjustment | Adjust so blades touch floor evenly across entire width | |
| Recovery tank full | Empty recovery tank | |
| Recovery tank drain hose leak | Secure drain hose cap or replace | |
| Recovery tank cover gasket leak | Replace gasket / Seat cover properly | |
| Debris caught in squeegee | Clean squeegee tool | |
| Squeegee seal clogged or missing | Clean or replace squeegee seal | |
| Vacuum hose clogged | Remove debris | |
| Using too much solution | Reduce flow via control panel solution button | |
| Foam filter cover not seated | Seat cover properly | |
| Poor scrubbing performance | Worn brush or pad | Rotate or replace brushes |
| Wrong brush or pad type | Consult Advance Authorized Service Center | |
| Wrong cleaning chemical | Consult Advance Authorized Service Center | |
| Moving machine too fast | Slow down | |
| Not using enough solution | Increase flow via control panel solution button | |
| Inadequate solution flow or no solution | Solution tank empty | Fill solution tank |
| Solution lines, valves, filter or trough clogged | Flush lines, trough and clean solution filter | |
| Solution turned OFF | Activate flow via control panel solution button | |
| Solution solenoid valve plugged or defective | Clean or replace valve (contact Advance Authorized Service Center) | |
| Machine does not power ON | Machine Battery Connector (10) disconnected | Reset Emergency Stop Switch Reconnect battery connectors |
| Tripped 10 Amp (CB1) circuit breaker (V) | Check for electrical short circuit & reset | |
| Blown Main Fuse 150 Amp (14) | Replace Main Fuse 150 Amp | |
| No FWD/REV wheel drive | Drive system speed controller | Check error fault codes (contact Advance Authorized Service Center) |
| Emergency Stop Switch (U) activated, display will show Emergency Stop Activated Indicator (C20). | Reset Emergency Stop Switch | |
| Brake(s) locked, if equipped | Consult Advance Authorized Service Center | |
| Poor Sweeping Performance (Cylindrical System) | Hopper Full | Empty and clean hopper |
| Brushes worn | Replace brushes | |
| Bristles have taken a set | Rotate brushes | |
| No Detergent Flow (EcoFlex models only) | Empty detergent cartridge | Fill detergent cartridge |
| Plugged or kinked detergent flow line | Purge system, straighten lines to remove any kinks | |
| Dry seal cap on detergent cartridge not sealed | Reseat dry seal cap | |
| Detergent pump | Check pump, wiring and lines | |
| Magnetic SmartKey Errors | No Key Indicator (C21). -No Magnetic SmartKey is present on the SmartKey Reader (A). | Place an appropriate SmartKey onto the SmartKey Reader. |
| Key Read Error Indicator (C22). - Magnetic SmartKey present on the SmartKey Reader (A) cannot be read. | Clean both the SmartKey and the SmartKey Reader using a clean cloth. Depress the SmartKey between your thumb and forefinger to insure free movement of the magnet. | |
| Restricted User Key Indicator (C23). -Magnetic SmartKey present on the SmartKey Reader (A) is not programmed to be used with this machine. | Place a SmartKey that has been programmed to be used with this machine onto the SmartKey Reader. |
GENERAL MACHINE TROUBLESHOOTING
FAULT CODE DISPLAY
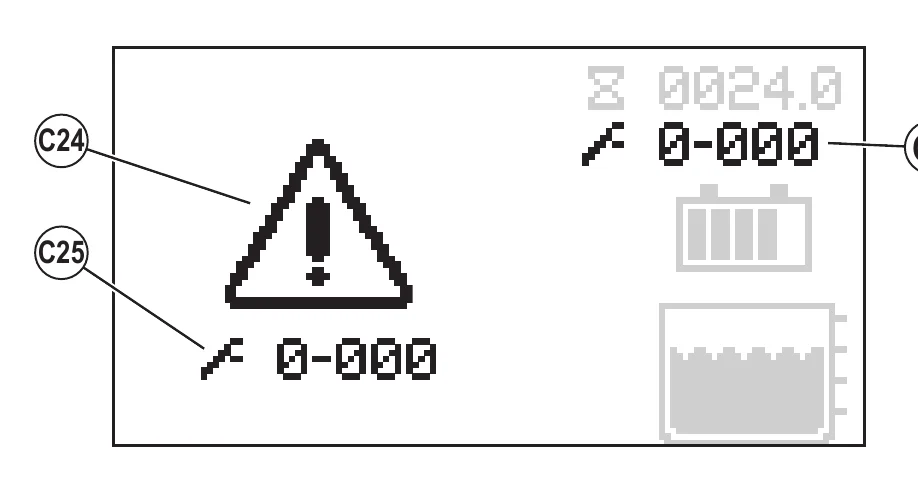
Any fault codes detected by the controllers will be displayed on the control panel display as they occur. If more than one error exists, the display will sequence through the error codes at one-second intervals. The error will display as a mechanical wrench symbol followed by a four-digit code. Fault codes are displayed as X-YYY, where
X = system number (1: main board, 2: power module, 3: drive controller)
YYY = fault code number
For example, 1-101 would be solution solenoid valve – short.
C2 Active Fault Code
C24 Critical Fault Indicator
C25 Fault Code (Critical)
| Fault Code | Description |
|---|---|
| E2 Main Controller Faults | |
| 1-001 | K1 Coil Open |
| 1-002 | K1 Coil Short |
| 1-003 | K1 Contact Weld |
| 1-010 | CAN Bus 0 |
| 1-011 | CAN Bus 1 |
| 1-101 | L1 Short |
| 1-102 | L2 Short |
| 1-103 | H2 Short |
| 1-104 | LP1,2 Short |
| 1-105 | H1 Short |
| 1-106 | M8 Short |
| 1-107 | M9 Short |
| 1-201 | Level Sensor |
| 1-560 | EEPROM Configuration |
| 1-561 | EEPROM Options |
| 1-562 | EEPROM Sys Values |
| 1-563 | EEPROM Fault Log |
| 1-564 | EEPROM User Key List |
| 1-565 | EEPROM Impact Log |
| Fault Code | Description |
|---|---|
| E3 Power Module Faults | |
| 2-001 | E3 Timeout |
| 2-011 | Precharge Fail |
| 2-012 | K2 Overload |
| 2-013 | K2 Contact Weld |
| 2-014 | K2 Contact Open |
| 2-017 | OverVolt Cutoff |
| 2-018 | UnderVolt Cutoff |
| 2-021 | M1 Open |
| 2-022 | M2 Open |
| 2-023 | M3 Open |
| 2-024 | M4 Open |
| 2-025 | M5 Open |
| 2-026 | M6 Open |
| 2-027 | M7 Open |
| 2-028 | M10 Open |
| 2-031 | M1 Overload |
| 2-032 | M2 Overload |
| 2-033 | M3 Overload |
| 2-034 | M4 Overload |
| 2-035 | M5 Overload |
| 2-036 | M6 Overload |
| 2-037 | M7 Overload |
| 2-038 | M10 Overload |
| 2-041 | M1 Overcurrent |
| 2-042 | M2 Overcurrent |
| 2-043 | M3 Overcurrent |
FAULT CODE HISTORY
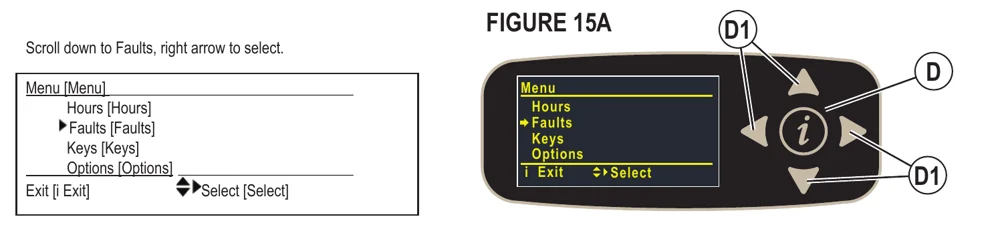
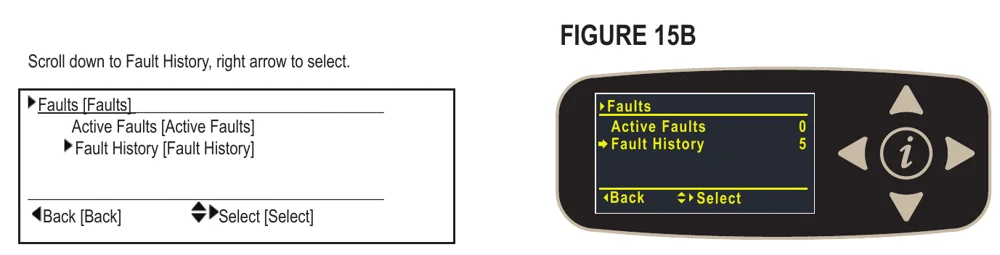
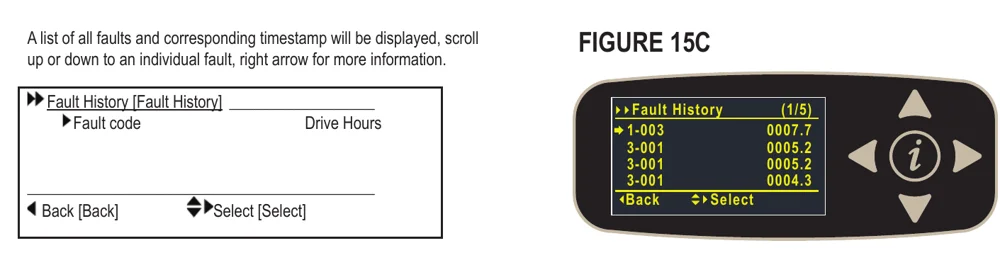
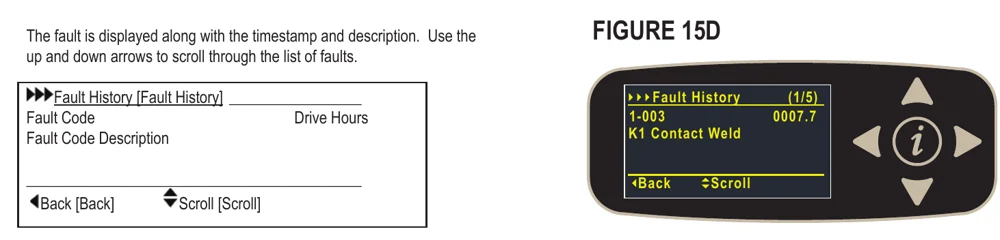
Every fault code that occurs is recorded by the machine and kept in a history log. See Figures 15A-15D. To view the fault history press the Information Switch (D) to bring up the information menu. Use the four Navigation Arrows (D1) (up, down, left & right) to move through the menu and the information switch to exit the menu.
Scroll down to Faults, right arrow to select.
Scroll down to Fault History, right arrow to select.
A list of all faults and corresponding timestamp will be displayed, scroll up or down to an individual fault, right arrow for more information.
The fault is displayed along with the timestamp and description. Use the up and down arrows to scroll through the list of faults.
ACCESSORIES / OPTIONS
In addition to the standard components, the machine can be equipped with the following accessories/options, according to the machine specific use:
| Brushes with harder or softer bristles | Operator Foot Guard Kit |
| Squeegee and side blades with different material | Back-Up Alarm Kit |
| Dual Vacuum Motor Kit | Vacuum Wand Kit |
| Warning Beacon Kit | Headlight Kit |
| Deluxe Seat Kit | Squeegee Guard Kit |
| Overhead Guard Kit | Dust Guard Kit |
| Seat Belt Kit | Detergent Metering Kit |
| Battery Watering Kit | Heavy Duty Front Bumper Kit |
| Wash Hose Kit | Mop Holder Kit |
| Onboard Charger Kit | USB Kit |
| TrackClean Kit | Side Sweep Kit |
| Solution Auto-Fill Kit |
For further information about the above-mentioned accessories, contact an authorized Retailer.
SOLUTION FLOW RATES
| Standard Flow Rates* | Override Flow Rate** | |||
|---|---|---|---|---|
| 1 bar | 2 bars | 3 bars | 4 bars | |
| 36” Cylindrical | 0.70 GPM / 2.6 liters/minute | 0.84 GPM / 3.1 liters/minute | 1.00 GPM / 3.7 liters/minute | 2.50 GPM / 9.4 liters/minute |
| 34” Disc | 0.70 GPM / 2.6 liters/minute | 0.84 GPM / 3.1 liters/minute | 1.00 GPM / 3.7 liters/minute | 2.50 GPM / 9.4 liters/minute |
| 40” Disc | 0.84 GPM / 3.1 liters/minute | 1.00 GPM / 3.7 liters/minute | 1.50 GPM / 5.6 liters/minute | 2.50 GPM / 9.4 liters/minute |
*These values are for Fixed Flow mode with a full solution tank.
**These are maximum values with a full solution tank.
TECHNICAL SPECIFICATIONS (AS INSTALLED AND TESTED ON THE UNIT) FOR MACHINES WITHOUT MECHANICAL BRAKE
| Model | SC6000 36C | SC6000 34D | SC6000 40D | |
|---|---|---|---|---|
| Model No. | 56116000 | 56116002 | 56116001 | |
| Voltage, Batteries | V | 36V | 36V | 36V |
| Battery Capacity (max) | Ah C20 | 420 | 420 | 420 |
| Protection Grade, Operating | Class 3 | Class 3 | Class 3 | |
| Protection Grade, Charging | Class 1 | Class 1 | Class 1 | |
| Sound Pressure Level IEC 60335-2-72: 2002 Amend. 1:2005, ISO 11203, ISO 3744 | dB(A)/20μPa | 69 | 69 | 69 |
| Sound Pressure level - KpA (IEC 60335-2-72, ISO 11203) Uncertainty | dB(A) | 3.0 | 3.0 | 3.0 |
| Gross Vehicle Weight* | lbs / kg | 2359 / 1070 | 2359 / 1070 | 2359 / 1070 |
| Transportation Weight** | lbs / kg | 1784 / 810 | 1784 / 810 | 1784 / 810 |
| Maximum Wheel Floor Loading (center front) | psi / kg/cm2 | 120 / 8.43 | 104 / 7.31 | 120 / 8.43 |
| Maximum Wheel Floor Loading (right rear) | psi / kg/cm2 | 128 / 8.99 | 121 / 8.50 | 128 / 8.99 |
| Maximum Wheel Floor Loading (left rear) | psi / kg/cm2 | 110 / 7.73 | 109 / 7.66 | 110 / 7.73 |
| Vibrations at the Hand Controls (ISO 5349-1) | m/s2 | <2.5 | <2.5 | <2.5 |
| Vibrations at the Seat (EN 1032) | m/s2 | <0.04 | <0.02 | <0.02 |
| Gradeability Transport | 7% (4°) | 7% (4°) | 7% (4°) | |
| Gradeability Cleaning | 7% (4°) | 7% (4°) | 7% (4°) | |
| Machine Length | inch / cm | 70 / 178 | ||
| Machine Height | inch / cm | 62.3 / 158 | ||
| Machine Height (w/Std overhead guard) | inch / cm | 82 / 208 | ||
| Machine Height (w/Low overhead guard) | inch / cm | 79 / 200 | ||
| Machine Width | inch / cm | 46 / 117 | 39 / 99 | 46 / 117 |
| Machine Width with Squeegee | inch / cm | 48.5 / 123 “K” | 43 / 109 “J” | 48.5 / 123 “K” |
| Minimum Aisle Turn Width | inch / cm | 79.5 / 202 | ||
| Solution Tank Capacity | Gallon / L | 50 / 190 | ||
| Recovery Tank Capacity | Gallon / L | 50 / 190 | ||
| Transport Speed (Fwd. Maximum) | mph / kph | 5.6 / 9.0 | ||
| Transport Speed (Rev. Maximum) | mph / kph | 2.6 / 4.2 | ||
| Battery Compartment Size (approximate) | ||||
| Height (maximum) | inch / cm | 17.25 /43.8 | ||
| Width (maximum) | inch / cm | 22 / 55.9 | ||
| Length (maximum) | inch / cm | 24 / 61 | ||
| Scrub brush size | ||||
| Outside Scrub Brush Diameter - Cylindrical (inside core is 3.5 in / 8.9 cm) | inch / cm | 7.1 / 18 | — | — |
| Scrub Brush Length - Cylindrical (two brushes per machine) | inch / cm | 35.58 / 90.4 | — | — |
| Brush Diameter - Disc | inch / cm | — | (Quantity of 2) at 17 / 43 | (Quantity of 2) at 20 / 51 |
| Scrub Brush Speed - Cylindrical | RPM | 760 | — | — |
| Scrub Brush Speed - Disc | RPM | — | 250 | 250 |
| Hopper Capacity - Cylindrical | in3 / L | 744 / 12.2 | — | — |
| Cleaning Path Width (scrubbing path) | inch / cm | 36 / 91.4 | 34 / 86.3 | 40 / 101.6 |
| Sweeping Path with optional side broom - Cylindrical | inch / cm | 43 / 109 | — | — |
*Gross Vehicle Weight: Standard machine without options, full solution tank and empty recovery tank, with removable scrub brushes, batteries installed and 75 kg operator.
**Transportation Weight: Standard machine without options, empty solution and recovery tanks, with batteries installed and no operator.
TECHNICAL SPECIFICATIONS (AS INSTALLED AND TESTED ON THE UNIT) FOR MACHINES WITH MECHANICAL BRAKE
| Model | SC6000 36C | SC6000 34D | SC6000 40D | |
|---|---|---|---|---|
| Model No. | 56116000 | 56116002 | 56116001 | |
| Voltage, Batteries | V | 36V | 36V | 36V |
| Battery Capacity (max) | Ah C20 | 420 | 420 | 420 |
| Protection Grade, Operating | Class 3 | Class 3 | Class 3 | |
| Protection Grade, Charging | Class 1 | Class 1 | Class 1 | |
| Sound Pressure Level IEC 60335-2-72: 2002 Amend. 1:2005, ISO 11203, ISO 3744 | dB(A)/20μPa | 69 | 69 | 69 |
| Sound Pressure level - KpA (IEC 60335-2-72, ISO 11203) Uncertainty | dB(A) | 3.0 | 3.0 | 3.0 |
| Gross Vehicle Weight* | lbs / kg | 2359 / 1070 | 2359 / 1070 | 2359 / 1070 |
| Transportation Weight** | lbs / kg | 1784 / 810 | 1784 / 810 | 1784 / 810 |
| Maximum Wheel Floor Loading (center front) | psi / kg/cm2 | 120 / 8.43 | 104 / 7.31 | 120 / 8.43 |
| Maximum Wheel Floor Loading (right rear) | psi / kg/cm2 | 128 / 8.99 | 121 / 8.50 | 128 / 8.99 |
| Maximum Wheel Floor Loading (left rear) | psi / kg/cm2 | 110 / 7.73 | 109 / 7.66 | 110 / 7.73 |
| Vibrations at the Hand Controls (ISO 5349-1) | m/s2 | <2.5 | <2.5 | <2.5 |
| Vibrations at the Seat (EN 1032) | m/s2 | <0.04 | <0.02 | <0.02 |
| Gradeability Transport | 18.5% (10.5°) | 18.5% (10.5°) | 18.5% (10.5°) | |
| Gradeability Cleaning | 12.2% (7°) | 12.2% (7°) | 12.2% (7°) | |
| Machine Length | inch / cm | 70 / 178 | ||
| Machine Height | inch / cm | 62.3 / 158 | ||
| Machine Height (w/Std overhead guard) | inch / cm | 82 / 208 | ||
| Machine Height (w/Low overhead guard) | inch / cm | 79 / 200 | ||
| Machine Width | inch / cm | 46 / 117 | 39 / 99 | 46 / 117 |
| Machine Width with Squeegee | inch / cm | 48.5 / 123 “K” | 43 / 109 “J” | 48.5 / 123 “K” |
| Minimum Aisle Turn Width | inch / cm | 79.5 / 202 | ||
| Solution Tank Capacity | Gallon / L | 50 / 190 | ||
| Recovery Tank Capacity | Gallon / L | 50 / 190 | ||
| Transport Speed (Fwd. Maximum) | mph / kph | 5.6 / 9.0 | ||
| Transport Speed (Rev. Maximum) | mph / kph | 2.6 / 4.2 | ||
| Battery Compartment Size (approximate) | ||||
| Height (maximum) | inch / cm | 17.25 /43.8 | ||
| Width (maximum) | inch / cm | 22 / 55.9 | ||
| Length (maximum) | inch / cm | 24 / 61 | ||
| Scrub brush size | ||||
| Outside Scrub Brush Diameter - Cylindrical (inside core is 3.5 in / 8.9 cm) | inch / cm | 7.1 / 18 | — | — |
| Scrub Brush Length - Cylindrical (two brushes per machine) | inch / cm | 35.58 / 90.4 | — | — |
| Brush Diameter - Disc | inch / cm | — | (Quantity of 2) at 17 / 43 | (Quantity of 2) at 20 / 51 |
| Scrub Brush Speed Cylindrical | RPM | 760 | — | — |
| Scrub Brush Speed Disc | RPM | — | 250 | 250 |
| Hopper Capacity - Cylindrical | in3 / L | 744 / 12.2 | — | — |
| Cleaning Path Width (scrubbing path) | inch / cm | 36 / 91.4 | 34 / 86.3 | 40 / 101.6 |
| Sweeping Path with optional side broom - Cylindrical | inch / cm | 43 / 109 | — | — |
*Gross Vehicle Weight: Standard machine without options, full solution tank and empty recovery tank, with removable scrub brushes, batteries installed and 75 kg operator.
**Transportation Weight: Standard machine without options, empty solution and recovery tanks, with batteries installed and no operator.
Advance and Nilfisk are trademarks of Nilfisk A/S. Southeastern Equipment & Supply is an independent dealer.