Aztec Sidewinder 24 / 30 Operator Manual
OWNER’S MANUAL SIDEWINDER 24” & 30”
Propane WorkSmart® Stripping Machine
03-2025
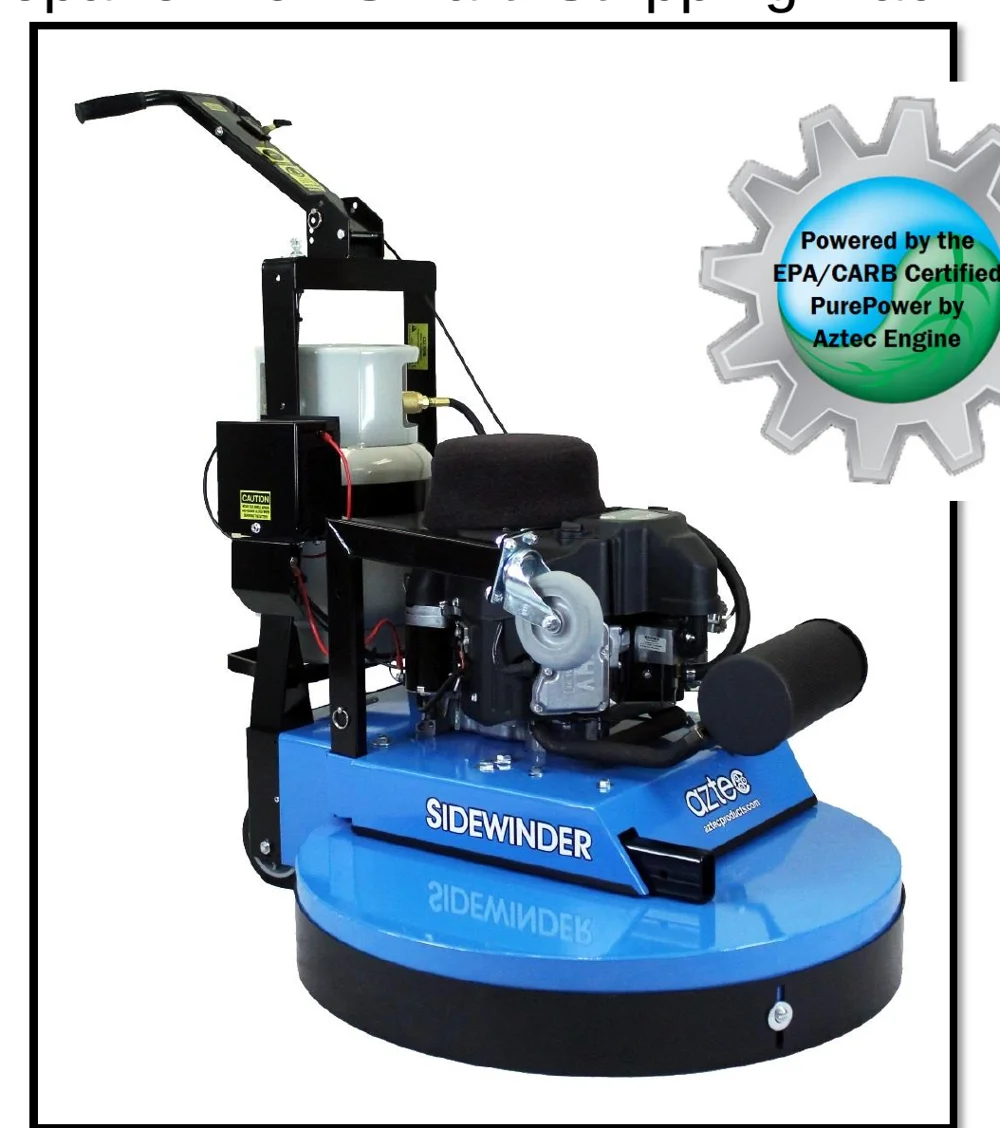
TABLE OF CONTENTS
| Section | Page |
|---|---|
| TABLE OF CONTENTS | PG 2 |
| INTRODUCTION | PG 3 |
| SAFETY MESSAGE INFORMATION | PG 3 |
| IMPORTANT SAFETY INSTRUCTIONS | PG 4 |
| GUIDE TO GRAPHICAL SYMBOLS & PRODUCT LABELS | PG 4 |
| GENERAL OPERATION SAFETY INFORMATION | PG 5-7 |
| STORAGE AND HANDLING SAFETY INFORMATION | PG 8 |
| RETAILER/DISTRIBUTOR CONTACT INFO | PG 8 |
| MAINTENANCE SAFETY INFORMATION | PG 9 |
| BEFORE OPERATION CHECKLIST | PG 10-11 |
| SIDEWINDER OPERATION | PG 12-13 |
| SIDEWINDER – GETTING STARTED | PG 14 |
| STOPPING THE ENGINE | PG 15 |
| SIDEWINDER CLEAN-UP | PG 15 |
| TRANSPORTING THE MACHINE | PG 16 |
| STORING THE MACHINE & PROPANE TANKS | PG 16 |
| NOTES | PG 16 |
| ENGINE MAINTENANCE SAFETY | PG 17 |
| ENGINE MAINTENANCE METER | PG 17 |
| EMISSION CONTROL SYSTEM INFORMATION | PG 17 |
| TROUBLESHOOTING – ELEC SYSTEM & BRUSH DRIVE BELT | PG 18-19 |
| BRUSH DRIVE BELT DIAGRAM | PG 19 |
| ENGINE OIL & MAINTENANCE | PG 20-21 |
| ENGINE MAINTENANCE SCHEDULE | PG 22 |
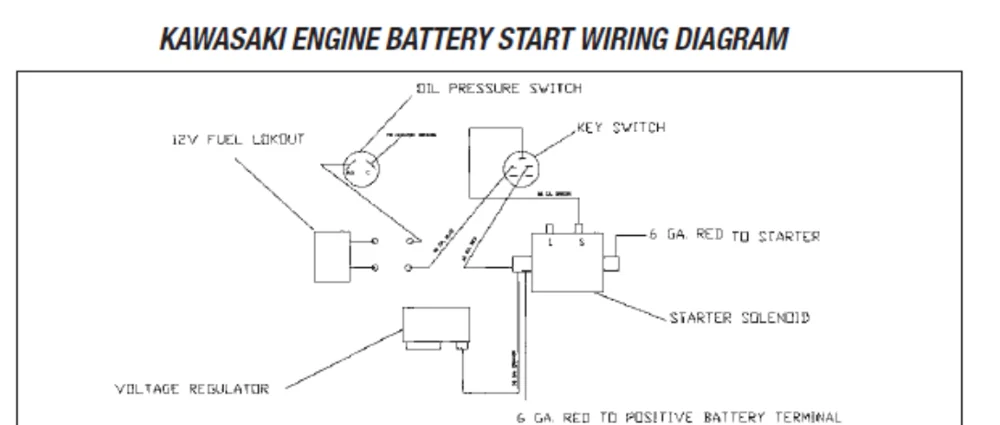
| BATTERY START WIRING DIAGRAM | PG 22 |
| TOUBLESHOOTING – ENGINE | PG 23 |
| ENGINE TUNE UP SPECS | PG 23 |
| SIDEWINDER QUICK START DIAGRAM | PG 24 |
| SIDEWINDER WARNING LABEL LOCATIONS | PG 25 |
| ORDER REPLACEMENT PARTS & ENGINE MAINT KIT | PG 26 |
| SIDEWINDER BODY – DIAGRAM & PARTS | PG 27 |
| SIDEWINDER UPPER DRIVE – DIAGRAM & PARTS | PG 28 |
| SIDEWINDER LOWER DRIVE – DIAGRAM & PARTS | PG 29 |
| SIDEWINDER PAD DRIVER & BRUSH OPTIONS | PG 30 |
| SIDEWINDER PAD DRIVER SYSTEM | PG 30 |
| SIDEWINDER PAD ASSEMBLY | PG 30 |
| FUEL SYSTEM 12V STARTER – DIAGRAM & PARTS | PG 31 |
| PUREPOWER ENGINE FS481V DIAGRAM | PG 32 |
| PUREPOWER ENGINE FS481V PARTS | PG 33 |
| WARRANTY | PG 34 |
INTRODUCTION
Thank you for purchasing this Aztec Products, Inc. machine. You have purchased a quality product and we welcome you to the Aztec family. It is critically important to utilize proper training, understanding, maintenance and care for this product. Neglect of the Safety Messages, especially the DANGER, WARNING, CAUTION and NOTICE statements throughout this Owner’s Manual may lead to serious injury or death, and/or cause damage to the floor and/or facility.
For best results from your Aztec machine, you must read and understand this Owner’s Manual, and follow all operation guidelines and safety messages. Protect your WARRANTY by following all maintenance guidelines and keeping a dated log. If a problem should arise, consult an authorized Aztec service center.
All information in this Owner’s Manual is up to date and based on the latest product information available at the time. Aztec Products, Inc. reserves the right to make changes at any time without notice or incurring obligation. This Owner’s Manual and the maintenance log must be kept as a permanent part of the machine and remain with the machine if resold.
No part of this document may be copied or reproduced without written permission.
SAFETY MESSAGE INFORMATION
Your safety and the safety of others is very important. As the manufacturer, we have provided important safety messages throughout this manual and on the machine. The purpose of these safety messages is to prevent damage to you, your machine, the property, and/or the environment.
Please read and understand this information thoroughly. A safety message alerts you to potential hazards that could result in injury or death, and/or cause damage to the floor and/or facility. Each safety message is preceded by a universal safety alert symbol (!) and one of these safety words: DANGER, WARNING, CAUTION, or NOTICE. These signal words mean:

IMPORTANT SAFETY INSTRUCTIONS
READ and UNDERSTAND all instructions and safety messages before operating this machine.
Follow the instructions given in this Owner’s Manual and the training given by your supervisor for the safe operation of this machine. Failure to do so can result in personal injury and/or damage to the machine or property.
GUIDE TO GRAPHICAL SYMBOLS AND PRODUCT LABELS

- DANGER, WARNING OR CAUTION; read all instructions before using
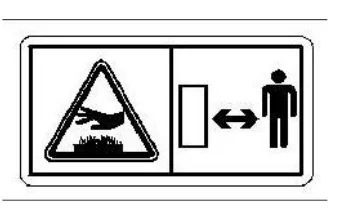
- Hot surface – Do not touch
- Wear hearing protection when operating
- Wear safety goggles when operating
- Switch “On” Position
- Switch “Off” position
GENERAL OPERATION SAFETY INFORMATION
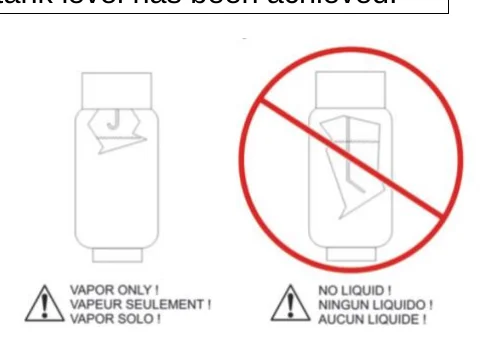
Liquefied petroleum gas (LPG or propane) is stored under pressure and must be handled in the proper manner to be safe. Observe the following safety messages to get the best performance, lowest emissions, and longest life out of your equipment.
- A continuous mechanical ventilation that removes the products of combustion to the outdoors of not less than 300 CFM for each 10,000 BTUH or fraction thereof; or
- Natural ventilation of not less than 300 CFM for each 10,000 BTUH input or fraction thereof, based on a maximum of one-quarter air exchange per hour for the net building volume.

STORAGE AND HANDLING SAFETY INFORMATION
RETAILER / DISTRIBUTOR CONTACT INFO
PURCHASE DATE:
DISTRIBUTOR NAME:
DISTRIBUTOR PHONE NUMBER(S):
MAINTENANCE SAFETY INFORMATION
BEFORE OPERATION CHECKLIST
For your safety, to ensure compliance with environmental regulations, and to maximize the service life of your equipment, it is very important to take a few minutes before you operate this machine to check its condition. Be sure to take care of any problem you find, or have your service dealer correct it before you operate this machine.
Before beginning your Before Operation Checklist, the machine and engine must be on a level surface, with the engine switch in the OFF position, and the propane tank valve is in the CLOSED position. Always check the following items before you start the engine:
A. READ AND UNDERSTAND ALL SAFETY MESSAGES
Carefully read and understand the SAFETY INSTRUCTIONS on pages 3-9.
B. CHECK THE GENERAL CONDITION OF THE MACHINE:
- Look around and underneath the machine and engine for signs of oil leaks.
- Remove any excessive dirt or debris, especially around the muffler and recoil starter.
- Look for signs of damage.
- Check that all shields and covers are in place, and all nuts, bolts and screws are tightened.
- Address all of the above issues before proceeding.
C. CHECK THE ENGINE:
- Check the engine oil level and filters. Running the engine with a low oil level can cause engine damage. Your first oil change should be after the first 8 hours of use.
- Check the air filter element. A dirty air filter element will restrict air flow to the carburetor, reducing engine performance and potentially increasing harmful engine emissions.
D. CHECK THE MAINTENANCE SCHEDULE
All machines are equipped with a multi-function maintenance meter. The functions include the following: hour meter, service alert and tachometer. (See ENGINE MAINTENANCE METER instructions on pg 17).
E. CHECK THE ENGINE OIL
Make sure the machine is level when checking the oil. Always take two (2) readings of the dipstick before adding oil. If the oil level is below the full mark, add just enough oil to the engine to bring the oil level up to the full mark. Never over fill. Check for foreign material on the dipstick.
F. CHECK THE PROPANE/LPG TANK AND LINES:
- Every tank has been pressure and leak tested. However, every time a tank is filled and/or connected to the machine it should be soap tested. All LPG lines must be pressurized and every inch of line and connections must be sprayed. If you find a leak, make the proper repairs before operating the machine.
- Never overfill the LPG tank. The LPG tank is designed to hold a maximum of 20 pounds of propane. Make sure to weigh the tank as it is being filled. The gross weight of a full tank should not exceed 48 pounds. If, while operating the machine, you notice frost forming on the LPG lines or the regulator, your tank has been over filled. If you continue to operate the machine in this condition, damage will occur. The excess propane in the tank must be removed before normal operations resume. The bleeding of a propane tank must be done in a safe manner; refer to the GENERAL OPERATION SAFETY INFORMATION on pages 3-8. In some cases, the regulator must defrost before restarting the engine.
- To connect the high pressure hose to the LPG tank, make sure the couplers are in line and screwed together, hand tight. If this is not done properly, fuel will not pass through to the regulator. Never complete the connection of the tanks to the machine by using a tool.
SIDEWINDER OPERATION
This ultra-high speed VCT (vinyl composite tile) stripping and scrubbing machine is designed for superior performance and long term durability. It includes a heavy-duty German engineered, precision centrifugal clutch that will substantially increase the belt life. No application, other than ultra-high speed VCT stripping and scrubbing, should be attempted nor is recommended. Contact Aztec parts@aztecproducts.comf for any additional application questions.
First, refer to the SAFETY INFORMATION on pages 3-8, and complete the BEFORE OPERATION CHECKLIST on page 10-11.
- Once opened, the CO detection badge will expire in 90 days, so write the open date on the badge when installing on your machine.
- The CO detection badge is individually wrapped and must be unwrapped for detector to function.
- To apply, simply unwrap the badge, remove the orange backing and apply to the handle assembly of your propane machine, somewhere easily visible to the operator.
- The CO detection badge is a passive carbon monoxide detector and can detect as little as 100 parts per million (ppm) carbon monoxide gas at an approximate relative humidity range of 33 to 50%. If the humidity is very high it can detect concentrations as low as 20ppm.
- If CO is present in the area, the circle indicator will change color (from orange-red to red-brown, and then to gray-black as the concentration levels increase).
- Once the CO detection badge is exposed to fresh air it will return back to orange-red and may be reused.
- There is no alarm function and requires no power, but must be visible and seen to determine whether CO is present in the area.
- The CO detection badge will be inactivated and damaged by the presence of halogens (iodine, chlorine, bromine), and ammoniac or nitrous gases.
SIDEWINDER – GETTING STARTED
- Complete the BEFORE OPERATION CHECKLIST on pages 10-11, and refer to OPERATION on pgs 12-13.
- To install scrub pads or strip brushes, tilt machine back and secure in place. To tilt back the machine safely, refer to TRANSPORTING THE MACHINE on pg 16.
- Once the machine is securely tipped back in position, remove the pads. Remove and responsibly dispose of the old pads. Be sure to center the new pad in the center of the pad holders. For brushes, turn clockwise to remove, and counter clockwise to install new brushes.
- Return machine back to level position before proceeding.
- Adjust the machine handle to comfortable position using pin provided to secure in place.
- Open the LPG tank valve by turning counter clockwise.
- Set the throttle control switch to the SLOW position.
- Turn the key switch to the “START” position until engine starts. Starter should not be engaged for more than 10 seconds at a time. Using the electric starter for more than 10 seconds at a time will overheat the starter motor and can damage it. If hard starting is a problem, carefully review BEFORE OPERATION CHECKLIST pages 10-11. As soon as the engine starts, move throttle cable into desired engine speed.
- Follow the machine in a moderate walking speed; keep moving forward.
- When the job is complete, the Sidewinder must be cleaned. See MACHINE CLEAN UP steps on page 15. Always clean and maintain your equipment, and keep accurate records of service and maintenance to maintain the warranty. Refer to the MAINTENANCE SCHEDULE on pg 22.
- To properly store equipment, refer to the STORAGE AND HANDLING SAFETY INFORMATION on pg 8.
STOPPING THE ENGINE
Turn the propane tank valve clockwise to CLOSED position and turn the engine key to OFF position. Refer to TRANSPORTING THE MACHINE on pg 16, and MACHINE CLEAN-UP and STORING THE MACHINE & PROPANE TANKS on pg 18.
SIDEWINDER CLEAN UP
Refer to the SAFETY INFORMATION on pages 3-9. Once the job is complete for the day/night, clean up is required. The manufacturer’s and engine warranty will be voided if the equipment is not properly maintained. Clean the entire machine after each use:
- Turn the propane tank valve clockwise to CLOSED position and turn the engine key to OFF position.
- Refer to TRANSPORTING THE MACHINE steps on pg 16 to properly tilt back and secure machine.
- Check the machine for possible loose nuts and bolts; tighten and secure as needed.
- Rinse around splash skirt and body of machine. Rinse the underside of the machine, including the underside and top side of the main drive unit. Do not spray water inside main drive unit through the brush bolt openings. The outside of the drum should be completely free of any contaminants.
- The Foam Hat, or engine dust filter, should be removed and cleaned periodically by shaking out the accumulated dust and rinsing with water and a mild detergent. Squeeze out the excess water. Allow the filter to air dry before replacing. Failure to keep the engine dust filter clean may result in engine overheating.
- All air and oil filters should be cleaned.
- Return the machine to leveled operating position, then start engine and run machine for 2-3 minutes to expel any excess water.
TRANSPORTING THE MACHINE
First, refer to the SAFETY INFORMATION on pages 3-9. Refer to SIDEWINDER CLEAN UP above. The machine must be on a level surface, with the engine switch in the OFF position, and the propane tank valve in the CLOSED position. The manufacturer and engine warranty will be voided if the equipment is not properly maintained.
- Remove the propane tank from the machine, or disconnect the connection and securely fasten tank to machine. Adjust handle of machine to comfortable position to tilt back.
- To tilt back the machine, place one foot on the propane tank base bar, one hand on the handle base, and one hand on the “T” handle. Pull back and down from the handle base, and push down with your foot, using the “T” handle only to control lateral motion.
- Once secured in a tilted back position, insert transport wheel and secure with pin provided. Push machine forward, to desired location, unless loading machine up on a ramp into a vehicle. When loading up a ramp into a vehicle, the machine should be pulled back rather than pushed forward, to prevent tipping over. Return and secure transport wheel to storage slot on top deck of the machine when not in use, and when the machine is being transported in a vehicle.
STORING THE MACHINE AND PROPANE TANKS
Once the job is complete for the day/night, remove the propane tank from the machine and store the tank in a well ventilated approved area. Store your machine in a safe and secure area. Refer to the SAFETY INFORMATION on pages 3-9. Also refer to TRANSPORTING THE MACHINE on pg 16, and MACHINE CLEAN-UP on pg 15.
NOTES
ENGINE MAINTENANCE SAFETY
Some of the most important safety precautions follow. However, we cannot warn you of every conceivable hazard that can arise in performing maintenance. Only you can decide whether or not you should perform a given task. Consistent maintenance is essential for safe, economical and trouble-free operation. It will also help reduce pollution.
To properly care for and maintain your machine and its engine, follow the recommended engine maintenance schedule, routine inspection procedures and simple maintenance procedures using basic hand tools. Other service tasks that are more difficult, or require special tools, are best handled by professionals and are normally performed by an authorized technician or other qualified mechanic.
The maintenance schedule applies to normal operating conditions. If you operate your engine under severe conditions, such as sustained high-load or high temperature operation, or use in unusually wet or dusty conditions, consult an authorized service center for recommendations applicable to your individual needs and use.
Maintenance, replacement, or repair of the emission control devices and systems may be performed by an engine repair establishment or individual, using parts that are “certified” to EPA standards.
ENGINE MAINTENANCE METER
This multi-function meter acts as a preventive maintenance tool, which benefits you with increased fuel economy, less down-time and longer engine life.
The meter displays are:
- Hour Meter: Displays total run hours when machine is off.
- Tachometer: Indicates engine RPM during operation.
- Service Alert: The display flashes to alert you to lube and change the oil at 25 hour intervals. After the service is complete, the meter can be reset by pushing the reset button on the face of the meter. Therefore, it is recommended that a separate maintenance log be kept to track of oil changes.
EMISSION CONTROL SYSTEM INFORMATION
The PurePowerTM by Aztec engine utilizes lean carburetor settings and other systems to reduce the emissions of carbon monoxide, oxides of nitrogen, and hydrocarbons.
Tampering and Altering
Tampering with or altering the emission control system may increase emissions beyond the legal limit. Among those acts that constitute tampering are:
- Removal or alteration of any part of the intake, fuel, or exhaust systems.
- Altering or defeating the governor linkage or speed-adjusting mechanism to cause the engine to operate outside its design parameters.
TROUBLESHOOTING – ELECTRICAL SYSTEM
- Check all wire connections for obvious problems. Remove propane tank, then remove battery box cover. Check all connections visibly and physically. If any “loose”, damaged or unconnected wires are noticed, replace or repair as needed.
- Check the battery posts and wires. If the battery post(s) are corroded, remove the wires and clean posts and wires. Applying some axle grease on the posts of the battery after they are cleaned will slow down the battery corrosion process. If nothing obvious is noted, a more detailed investigation is warranted. Before any such troubleshooting begins, the following things should be done:
- Replace propane tank with one from a machine that runs.
- Charge the battery or provide an absolute source of 12-volt DC power capable of 50 amperes total output. Jumper cables from a car or truck battery will suffice. Use a 12-volt test light.
- If the problem appears to be in the electrical control equipment, disconnect the starter from the system so as to check the system without spinning the engine.
- Battery rundown is a common problem. An engine key left in the ON position when engine is turned OFF will result in battery running down.
TROUBLESHOOTING – ENGINE BELT & BRUSH DRIVE BELT
If the engine runs but the drive unit will not engage, this is usually related to the Engine Belt or the Belt Tension Spring. Without removing the drive unit you can check and fix the following:
- Remove the four (4) 3/8" bolts holding the belt cover to the body. Remove the 3/8" bolt holding the Muffler Bracket to the Belt Cover. Check if the Belt Tension Spring is attached to the bolt located on the Idler Spring Plate on the body. Refer to the Upper Drive diagram on page 26 (for the 30” Sidewinder) or page 29 (for the 24” Sidewinder).
- Check to see if the Engine Belt has come off the Input Pulley or Centrifugal Clutch. If so, carefully raise front of machine off the floor to install the belt back onto the pulley. To safely tip back and secure the machine, refer to TRANSPORTING THE MACHINE on pg 16.
If further investigation is required, you will need to remove the drive unit:
- To replace the Engine Belt, remove old or worn belt and replace them with the new ones.
- Remove one end of the Belt Tension Spring to aid in installation of new belt. Check for wear on the springs and their catches.
- Slide the Belt Cover back into place and insert four (4) 3/8" bolts into belt cover (hand tighten only). Insert the 3/8" bolt into Muffler Bracket and Belt Cover, then tighten all five (5) 3/8" bolts.
To change the Brush Drive Belt:
- Refer to step one above.
- Remove three (3) bolts on the right side of upper deck (use a 3/4" wrench). Slowly raise front of machine off the floor. Refer to TRANSPORTING THE MACHINE on pg 16.
- Remove Input Boom Pulley and Head Support Boom Arm from above the Brush Drive by using the two ¾" wrenches—sliding one ¾” wrench below the pillow block bearing, and the other wrench in the slot above the Pillow Block Bearing; unscrew the two shafts apart.
- Remove the six (6) bolts from the bottom side of Brush Drive and split Brush Drive Top Pan and Brush Drive Plate.
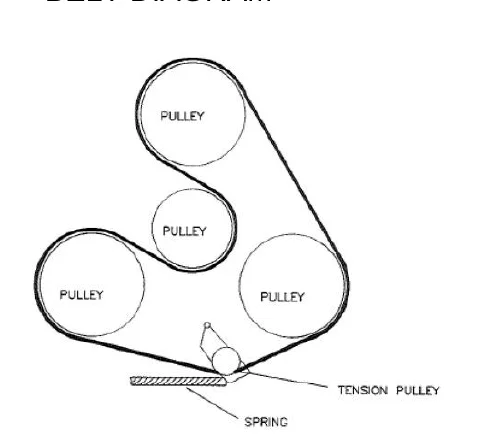
- Remove worn belt and replace. See diagram below for proper belt installation and note the two size Sidewinders have different belt configurations.
- It is a good idea at this time to check the Tension Spring, Belt, Bearings and the Idler for damage and replace them if necessary.
Once the brush belt drive has been replaced, reassemble following the above steps in reverse.
SIDEWINDER 30”
BRUSH DRIVE
BELT DIAGRAM
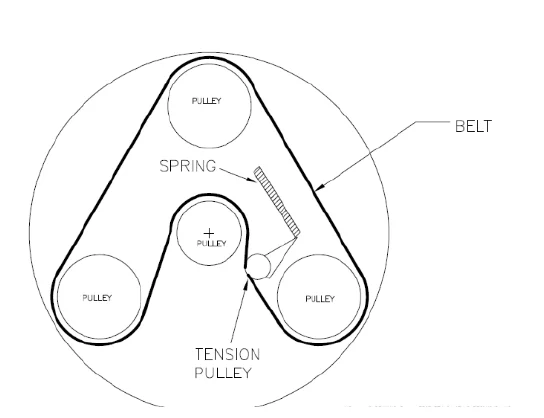
SIDEWINDER 24”
BRUSH DRIVE
BELT DIAGRAM
ENGINE OIL AND MAINTENANCE
Refer to the SAFETY INFORMATION on pages 3-8. Also refer to the BEFORE OPERATION CHECKLIST on pages 10-11 before operating this machine. Then carefully follow these guidelines:
A.) RECOMMENDED OIL
The following engine oils are recommended: API Service Classification: SF, SG, SH, or SJ.
B.) CHECK THE OIL
- To check the oil, the engine should be turned OFF, and the machine should be on a level surface.
- Clean the area around the oil gauge before removing it.
- Remove the oil gauge and wipe it with a clean cloth.
- Pour the oil slowly to “FULL” mark on the oil gauge.
- Insert the oil gauge into the tube WITHOUT SCREWING IT IN.
- Remove the oil gauge to check the oil level. The oil level should be between “ADD” and “FULL” marks. Do not overfill.
- Install and tighten the oil gauge.
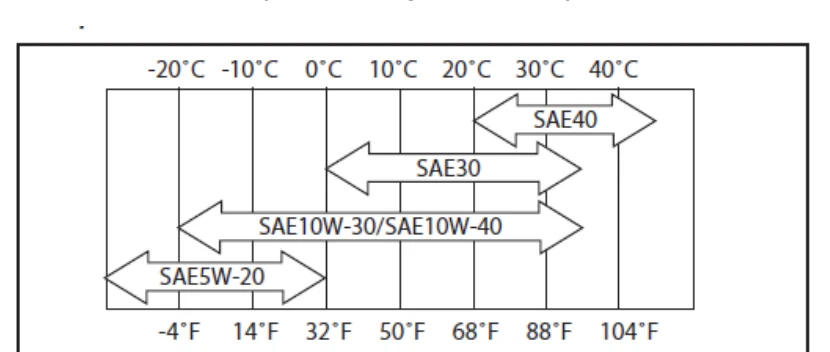
C.) OIL VISCOSITY
Choose the viscosity according to the temperature as follows:
D.) ENGINE OIL CAPACITY:
For the Kawasaki FS481V engine, 1.7 L (1.8 US qt.) when oil filter is removed
E.) OIL CHANGES
Change oil after first 8 hours of operation. Thereafter change oil every 50 hours. Refer to the PUREPOWER ENGINE MAINTENANCE SCHEDULE on pg 22.
- Run the engine to warm oil.
- Be sure the engine (equipment) is level.
- Stop the engine.
- Open the oil drain valve and drain the oil into suitable container while engine is warm.
F.) OIL DRAIN PLUG
- Close the oil drain valve.
- Remove oil gauge and refill with fresh oil (See RECOMMENDED OIL on page 19).
- Check the oil level (refer to the BEFORE OPERATION CHECKLIST on pages 10-11 for OIL LEVEL CHECK). Also, refer to the PUREPOWER ENGINE MAINTENANCE SCHEDULE on pg 22.
G.) OIL FILTER CHANGE
Change the oil filter every 100 hours of operation. Refer to the PUREPOWER ENGINE MAINTENANCE SCHEDULE on pg 22.
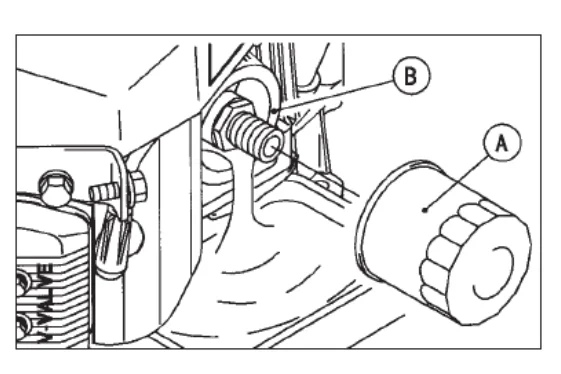
- Drain engine oil into a suitable container.
- Rotate the oil filter (A) counterclockwise to remove it.
- Coat a film of clean engine oil on seal of new filter.
- Install new filter rotating it clockwise until seal contacts mounting surface (B). Then rotate filter 3/4 turn more by hand.
- Supply engine oil as specified.
- Run the engine for about 3 minutes, stop engine, and check oil leakage around the filter.
- Add oil to compensate for oil level drop due to oil filter capacity (refer to the BEFORE OPERATION CHECKLIST on pages 10-11 for OIL LEVEL CHECK).
ENGINE MAINTENANCE SCHEDULE
| MAINTENANCE | Daily | First 8 hr. | Every 25 Hr. | Every 50 hr. | Every 100 hr. | Every 200 hr. | Every 300 hr. |
|---|---|---|---|---|---|---|---|
| Check and add engine oil | ● | ||||||
| Check for loose or lost nuts and screws | ● | ||||||
| Check for fuel and oil leakage | ● | ||||||
| Check battery electrolyte level | ● | ||||||
| Check or clean air intake screen | ● | ||||||
| Clean air cleaner foam element | ● | ||||||
| Clean air cleaner paper element | ● | ||||||
| Clean dust and dirt from cylinder and cylinder head fins | ● | ||||||
| Tighten nuts and screws | ● | ||||||
| Change engine oil | ● | ● | |||||
| Clean and gap spark plugs | ● | ||||||
| Change oil filter | ● | ||||||
| Replace air cleaner paper element | ● | ||||||
| Clean combustion chambers | ● | ||||||
| Clean and adjust valve clearance | ●* | ● | |||||
| Clean and lap valve seating surface | ● |
*After the 1st 50 hours
Follow this MAINTENANCE SCHEDULE. Remember that this schedule is based on the assumption that your machine will be used for its designed purpose. Sustained high-load or high-temperature operation, or use in unusually wet or dusty conditions, will require more frequent service.
KAWASAKI ENGINE BATTERY START WIRING DIAGRAM
TROUBLESHOOTING - ENGINE
| COMMON PROBLEMS & PROBABLE CAUSES | SOLUTIONS |
|---|---|
Engine cranks but will not start:
|
|
Engine starts hard:
|
|
Engine will not crank:
|
|
Engine overheats:
|
|
Exhaust emissions or propane odor:
|
|
PUREPOWER ENGINE TUNE-UP SPECIFICATIONS
| ITEM | SPECIFICATIONS |
|---|---|
| Ignition Timing | Non-adjustable |
| Spark Plugs (gap) | NGK BPR4ES (.028 in) |
| Low Idle Speed | 1500 RPM |
| High Idle Speed | 3400 RPM |
| Valve Clearance | IN: 0.10-0.15 mm (0.004-0.006 in) EX: 0.10-0.15 mm (0.004-0.006 in) |
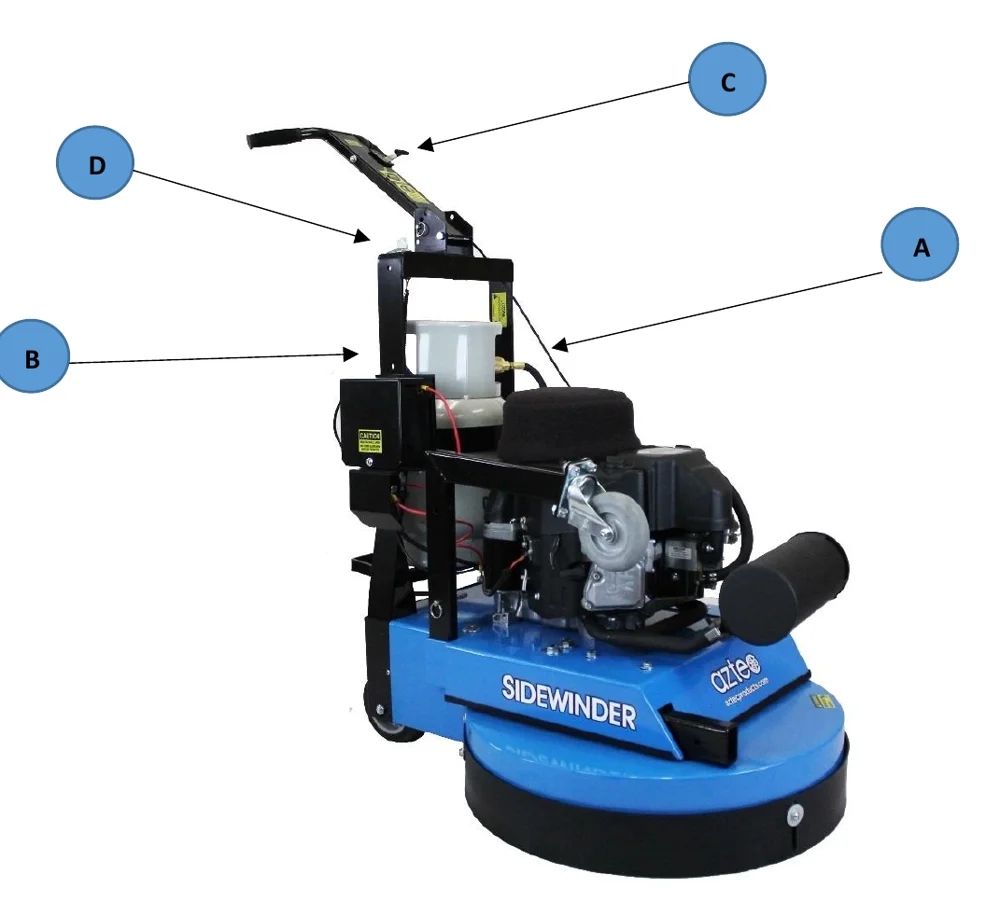
AZTEC SIDEWINDER QUICK START GUIDE
- Read, understand and observe all important SAFETY INSTRUCTIONS before operating the machine (see pgs 3-9).
- Complete the BEFORE OPERATION CHECKLIST on pgs 10-11.
- Make sure the machine is properly maintained prior to use (see pgs 9, 15, 19-21).
- Make sure the LPG tank (A) is filled, connected and checked for leaks (see pg 13).
- Open the LPG tank by turning the knob (B) counter-clockwise.
- Set throttle lever (C) to idle/SLOW position
- Turn key (D) to start [ I ] position
- Move throttle lever (C) toward FAST position. If motor fails to start, return to Step 5 above.
- Set throttle lever (C) to desired operating speed and follow the moving machine (straight ahead) at moderate walking pace (keep moving).
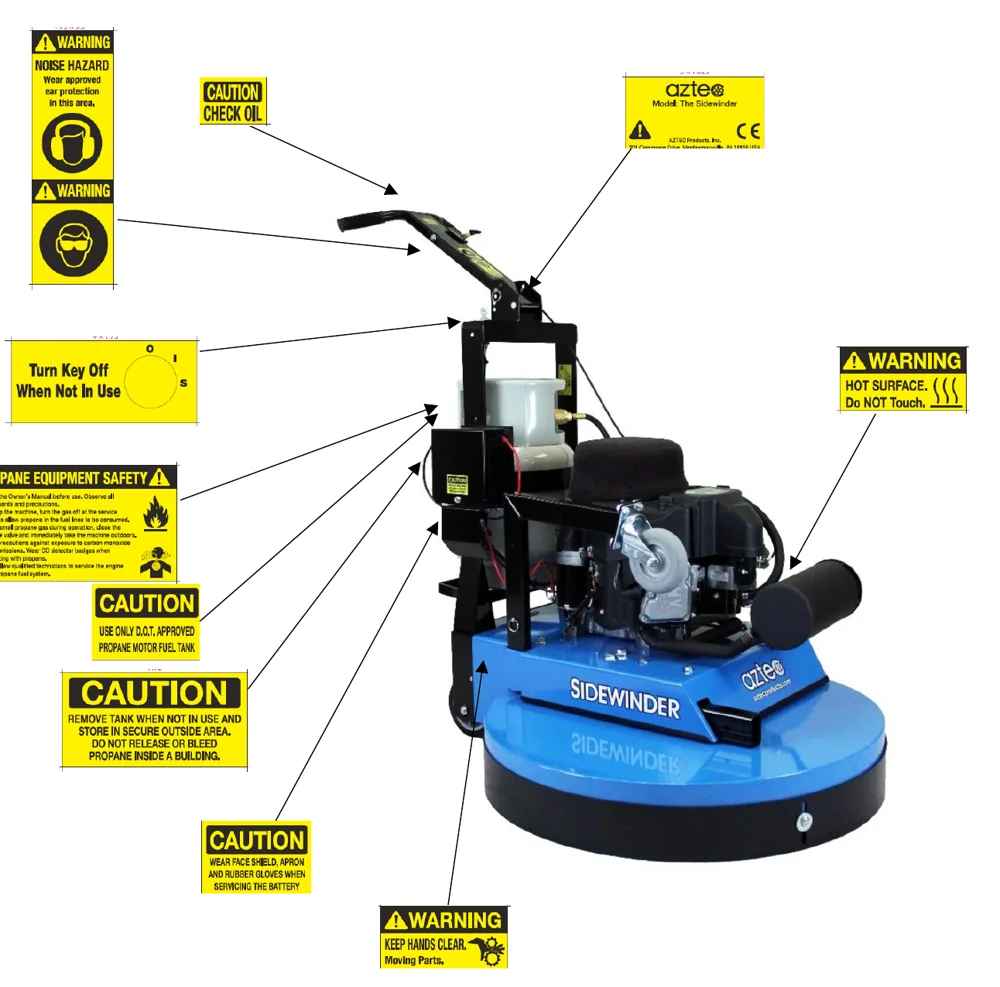
SIDEWINDER 24” & 30” WARNING LABEL LOCATIONS
Order Aztec Approved replacement parts for your Sidewinder here:
aztec.parts
Or email us for parts not found on our parts website, including parts for the older model Sidewinder with fiberglass body or with a different engine than the current Kawasaki FS481 engine:
parts@aztecproducts.com
The Preventative Maintenance Kit for the FS481 engine, Part # 309-603-PH includes the following parts:
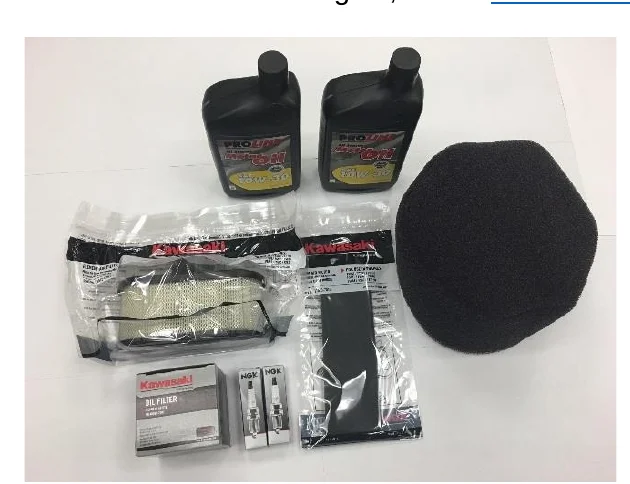
| PART # | DESCRIPTION | QTY IN KIT |
|---|---|---|
| 309-11013-7046 | Pre Filter (Foam Hat) | 1 |
| 309-11013-7049 | Air Filter (Paper Element) | 1 |
| 309-49065-7007 | Oil Filter | 1 |
| 309-92070-7004 | Spark Plugs (NGK BPR4ES) | 2 |
| 119-Oil-Q | 10W30 Quart Oil | 2 |
| 186-271964 | Debris Filter (Foam Hat) | 1 |
SIDEWINDER PAD DRIVER OPTIONS
| CHARACTERISTICS | PART # | QTY | |
|---|---|---|---|
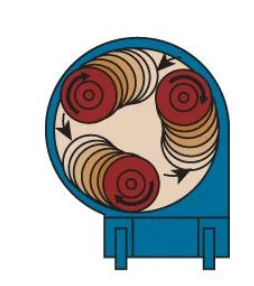
| 10” STRIP BRUSH | Very aggressive stripping brush, lasts up to 1 million square feet, depending on the floor, can strip up to 10 layers of wax in one pass | 010-962STBH | 3 |
* Each 10” strip brush is sold separately
SIDEWINDER PAD DRIVER SYSTEM
The Sidewinder is designed with three 10" pads, with a pad grabber to hold each pad in place. Reverse threaded bolt for easy pad change. The Pad Drive Assembly (part # 010-962STP) includes one Black Hi-Pro pad (sold by the case, QTY 5, part # 253-09074). Nylon bristles help prevent pads from clogging. Approximately 25%-30% faster than stripping with brushes.
SIDEWINDER STRIP PAD ASSEMBLY
| DESCRIPTION | PART # | QTY |
|---|---|---|
| 24” and 30” Sidewinder Strip Pad Assembly 10” | 010-962STP | 3 |
* Each 10” pad assembly is sold separately and includes one 10” black stripping pad, part # 253-09074
| PAD | CHARACTERISTICS | PART # | QTY/SW |
|---|---|---|---|
| BLACK 10” | For stripping: use 1 per pad driver | 253-09074 | 3 |
| BLUE 10” | For scrubbing: use 1 per pad driver | 253-08082 | 3 |
* Each 10” pad is sold in a case of QTY 5 pads
AZTEC PUREPOWERLPG 603cc FS481V ENGINE DIAGRAM
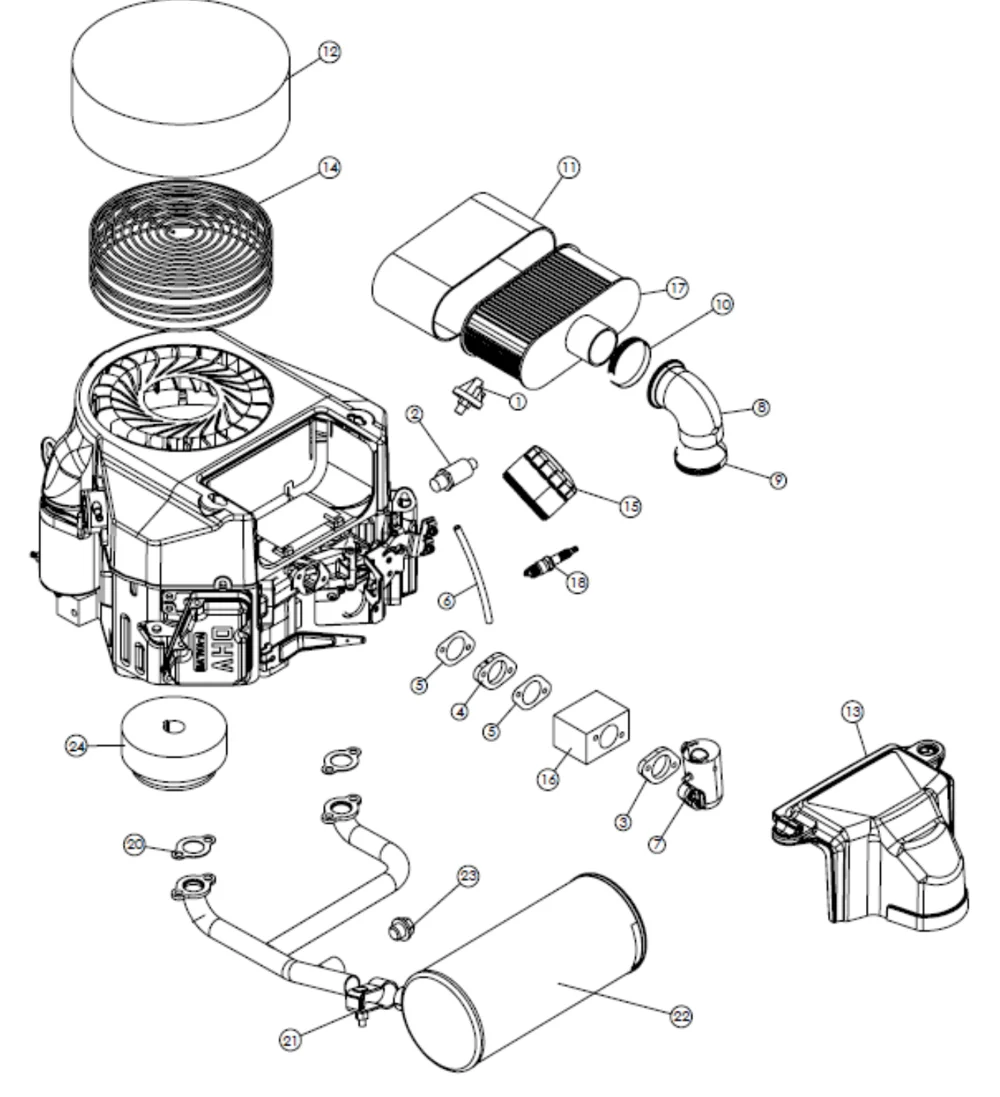
AZTEC SIDEWINDER WARRANTY
This warranty is limited as follows:
| Component | Term of Warranty |
|---|---|
| Engine | 2 yrs from engine manufacturer |
| Fuel System | 1 yr |
| LPG Tank | 1 yr on valve, 3 yrs on cylinder from date of manufacturer |
| Body Parts | 1 yr |
| Battery | 1 yr from battery manufacturer |
| Centrifugal Clutch | 1 yr |
This warranty does not apply to certain wear parts such as:
Belts, Brushes, Pulleys, Springs
Engine Maintenance & Tune Up Parts
Aztec Products, Inc. warrants its products to be free from defects in material and workmanship for a period of one year from the date of sale. All engines, batteries and propane tanks are warranted by the manufacturers when proper maintenance schedules are followed according to the manufacturer’s standards.
This warranty does not apply to damage or failure caused by abuse, misuse, neglect, disassembly, alteration, unauthorized modification or repair, lack of proper maintenance, theft or damage by freight carriers. The warranty applies to parts, labor, and ground freight only. Aztec is not responsible for transportation to or from repair centers or travel for on-site repairs. Aztec will not be liable for incidental or consequential damages arising from the use of any of its products, whether defective or not.
Aztec Products, Inc. agrees, at its discretion, to repair or replace at its own expense any product or part(s) which examination proves to be defective in workmanship or materials provided, when the purchaser notifies Aztec Products, Inc. directly within the warranty period and follows the Return Goods Policy. Engine repairs must be performed by authorized engine manufacturer service centers. For your closest dealer contact Kawasaki: 616-949-6500 or visit their website: www.kawasaki.com/en-us/research-tools/dealer-locator
To obtain a warranty evaluation, the following procedures must be followed:
- If you purchased the parts or equipment through a distributor, please contact them first. If you purchased directly from Aztec, send an email to Aztec: parts@aztecproducts.com and request a Warranty Policy Form. All returns must include an RGA (Return Goods Authorization) number and provide the machine serial number.
- Aztec maintains the serial number, date of shipment or sale, and customer name on each piece of equipment sold. If you are the purchaser, please include that information on your request for replacement or repair. You will need to provide your distributor name, purchase date, and the serial number of the machine.
- A defective part must include an Aztec issued RGA # and be returned via prepaid freight to Aztec Products, Inc. with a copy to the original purchase invoice. Aztec is not responsible for the cost of receiving inbound freight, nor inbound freight damage. Pack your return carefully and provide tracking information to expedite your return.
- Only Aztec Products, or its authorized dealers, may make warranty repairs on Aztec floor machines. Others do so at their own risk and expense.
- Aztec may offer to do warranty related repairs free of charge at our facility with a scheduled appointment. Arrangements must be made in advance as outlined above. We will not accept freight collect returns or returns that do not indicate the RGA number on the packing list
The need for proper maintenance and care for this product cannot be overstated. Poor maintenance, neglect or abuse will void the warranty and prove to be very expensive.
You have purchased a quality product. Each of its components have been tested and approved for use by Aztec Products, Inc. It is unlikely that you will ever have a warranty claim if you properly maintain your machine.
This warranty is non-transferable.
AZTEC PRODUCTS, INC. • www.aztecprocucts.com
201 Commerce Drive • Montgomeryville, PA 18936 • 215-393-4700
parts@aztecproducts.com
Aztec, Sidewinder and PurePower are trademarks of Aztec Products, Inc. Southeastern Equipment & Supply is an independent dealer.