Free Shipping on Equipment & Parts orders of $200 or more! * Click for Restrictions

Have a question? 800-440-6723 International: 803-252-0100

English Se habla español
Parts โ€บ PartFinder โ€บ Kaivac 1700 Series โ€บ Operator manual
Form KV1700_Manual_120216, Rev. 080816
Kaivac ยท Cleaning machine

Kaivac 1700 Series Operator Manual

KV1700_Manual_120216 Rev. 08081635 pagesKaivac 1700 Series Manual (CE1750, KV1715, KV1750)
Free to read, no account neededEvery page has its own linkPart numbers link to the part
COVER

Operator & Parts Manual KaiVacยฎ 1700 Series

1715 Serial Number 409-
1750 Serial Number 13409-
CE1750 Serial Number 497-โ€Œโ€Œโ€‹โ โ โ€โ โ€‹โ€‹โ€‹โ€Œโ€Œโ€โ€‹โ€‹โ€‹โ€Œโ€Œโ โ โ€‹โ€‹โ€‹โ€‹โ€‹โ€‹โ€‹โ€Œโ€‹โ€‹โ€‹โ€Œโ€‹โ โ€‹โ€‹โ€โ€Œโ โ€โ โ โ€‹โ โ€‹โ€‹โ€Œโ€Œโ€‹โ€โ€Œโ€‹โ โ€‹โ€‹โ€Œโ€Œโ€โ€Œโ 

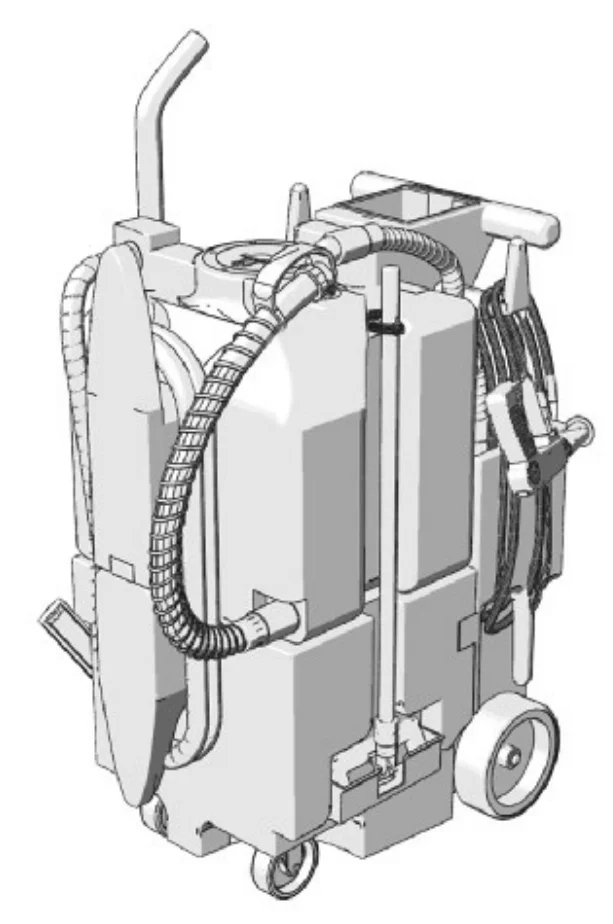
Line drawing of the KaiVac 1700 Series machine on wheels, with a tall handle at the back, a coiled hose wrapped around the tank, a spray gun hung on the right side and a large wheel at the lower right

www.kaivac.com

ยฉ 2006-2016 Kaivac, Inc. All Rights Reserved

Source: Kaivac 1700 Series Operator Manual KV1700_Manual_120216 Rev. 080816, page 1, used with permission. SES ref PF-7ZK4-B7MKโ€Œโ€Œโ€‹โ โ โ€โ โ€‹โ€‹โ€‹โ€Œโ€Œโ€โ€‹โ€‹โ€‹โ€Œโ€Œโ โ โ€‹โ€‹โ€‹โ€‹โ€‹โ€‹โ€‹โ€Œโ€‹โ€‹โ€‹โ€Œโ€‹โ โ€‹โ€‹โ€โ€Œโ โ€โ โ โ€‹โ โ€‹โ€‹โ€Œโ€Œโ€‹โ€โ€Œโ€‹โ โ€‹โ€‹โ€Œโ€Œโ€โ€Œโ 
1700 Series KV1700_Manual_120216 (080816)Page 1 of 35
REVISION SHEET

Revision Sheet

In short This page lists the releases of this manual with their dates and what changed in each. It notes that specifications and parts can change without notice.โ€Œโ€Œโ€‹โ โ โ€โ โ€‹โ€‹โ€‹โ€Œโ€Œโ€โ€‹โ€‹โ€‹โ€Œโ€Œโ โ โ€‹โ€‹โ€‹โ€‹โ€‹โ€‹โ€‹โ€โ€‹โ€‹โ€‹โ€Œโ€‹โ โ€‹โ€‹โ€‹โ€โ€‹โ โ€Œโ€Œโ โ โ€Œโ€Œโ โ€Œโ€‹โ€Œโ€‹โ โ€Œโ€โ€Œโ€Œโ€Œโ€โ€Œโ€
Release No.DateRevision Description
10151310/15/13Operator & Parts Manual Released
12171312/17/13Modified the Rotomold Warranty to 5 years.
08081608/08/16Modified the Safety Warnings to ETL-C requirements
NOTE: Specifications and parts are subject to change without notice

Kaivac, Inc.โ€Œโ€Œโ€‹โ โ โ€โ โ€‹โ€‹โ€‹โ€Œโ€Œโ€โ€‹โ€‹โ€‹โ€Œโ€Œโ โ โ€‹โ€‹โ€‹โ€‹โ€‹โ€‹โ€‹โ€โ€‹โ€‹โ€‹โ€Œโ€‹โ โ€‹โ€‹โ€‹โ€โ€‹โ โ€Œโ€Œโ โ โ€Œโ€Œโ โ€Œโ€‹โ€Œโ€‹โ โ€Œโ€โ€Œโ€Œโ€Œโ€โ€Œโ€

401 S. Third Street

Hamilton, OH 45011

Source: Kaivac 1700 Series Operator Manual KV1700_Manual_120216 Rev. 080816, page 2, used with permission. SES ref PF-WEMR-TV36โ€Œโ€Œโ€‹โ โ โ€โ โ€‹โ€‹โ€‹โ€Œโ€Œโ€โ€‹โ€‹โ€‹โ€Œโ€Œโ โ โ€‹โ€‹โ€‹โ€‹โ€‹โ€‹โ€‹โ€โ€‹โ€‹โ€‹โ€Œโ€‹โ โ€‹โ€‹โ€‹โ€โ€‹โ โ€Œโ€Œโ โ โ€Œโ€Œโ โ€Œโ€‹โ€Œโ€‹โ โ€Œโ€โ€Œโ€Œโ€Œโ€โ€Œโ€
1700 Series KV1700_Manual_120216 (080816)Page 2 of 35
TABLE OF CONTENTS

OPERATOR & PARTS MANUAL

SectionTitlePage #
1.0GETTING STARTED1-1
1.1Limited Warranty Protection Plan1-1
1.2Warranty Registration Form1-2
1.3Safety Precautions1-3
2.0OPERATION2-1
2.1Out of Box Setup Instructions2-1
2.2Kaivac Tool Arrangement2-2
2.3Preparing Your Kaivac For Use2-3
2.4Vac Tank Cleanout Instructions2-4
2.5Vac Tank Removal Instructions2-5
2.6Operating your Kaivac using S-I-M-P-L-E Process2-6
3.0MAINTENANCE3-1
3.1Machine Maintenance3-1
3.2Black Box Removal Instructions3-2
3.3Troubleshooting3-3
3.4Machine Diagrams3-6
3.5Parts List3-18
Source: Kaivac 1700 Series Operator Manual KV1700_Manual_120216 Rev. 080816, page 3, used with permission. SES ref PF-CRK3-2573โ€Œโ€Œโ€‹โ โ โ€โ โ€‹โ€‹โ€‹โ€Œโ€Œโ€โ€‹โ€‹โ€‹โ€Œโ€Œโ โ โ€‹โ€‹โ€‹โ€‹โ€‹โ€‹โ€‹โ โ€‹โ€‹โ€‹โ€Œโ€‹โ โ€‹โ€‹โ โ€โ€‹โ€โ€Œโ€Œโ€โ€โ€โ€Œโ€Œโ€‹โ€Œโ€‹โ€Œโ€Œโ€โ€‹โ€โ€Œโ€โ€โ€‹โ€Œ
1700 Series KV1700_Manual_120216 (080816)Page 3 of 35
1.0 GETTING STARTED

1.0 GETTING STARTED

1.1 Limited Warranty Protection Plan

In short This section explains the Kaivac warranty periods, which depend on the chemicals used with the machine. Warranty claims need a Return Authorization Number (RAN) from Kaivac Customer Service, and returns are not accepted without one.โ€Œโ€Œโ€‹โ โ โ€โ โ€‹โ€‹โ€‹โ€Œโ€Œโ€โ€‹โ€‹โ€‹โ€Œโ€Œโ โ โ€‹โ€‹โ€‹โ€‹โ€‹โ€‹โ€Œโ€‹โ€‹โ€‹โ€‹โ€Œโ€‹โ โ€‹โ€‹โ โ€Œโ€Œโ€Œโ€‹โ€‹โ€โ€โ€Œโ€‹โ€โ€โ€Œโ€‹โ€โ€‹โ โ โ€โ€Œโ€Œโ โ€‹โ€‹

The Kaivac has been engineered and tested to provide long lasting performance. This warranty covers defects in workmanship or materials under normal use and service from the date of purchase.โ€Œโ€Œโ€‹โ โ โ€โ โ€‹โ€‹โ€‹โ€Œโ€Œโ€โ€‹โ€‹โ€‹โ€Œโ€Œโ โ โ€‹โ€‹โ€‹โ€‹โ€‹โ€‹โ€Œโ€‹โ€‹โ€‹โ€‹โ€Œโ€‹โ โ€‹โ€‹โ โ€Œโ€Œโ€Œโ€‹โ€‹โ€โ€โ€Œโ€‹โ€โ€โ€Œโ€‹โ€โ€‹โ โ โ€โ€Œโ€Œโ โ€‹โ€‹

Kaivac, Inc. warrants the following components to be free from defects in materials and workmanship for these time periods:

1.) Extended Warranty for end users who use only Kaivac chemicals for the life of the machine.

  • 5 years on rotationally molded parts
  • 3 years on other parts (excluding wear items)
  • 1 year on labor

2.) Standard Warranty (for approved non-Kaivac chemicals)

  • 1 year parts and labor

3.) Chemicals that have not been approved by Kaivac (If uncertain, please contact Kaivac to verify your chemical before using).

  • No warranty

All Kaivac replacement parts are guaranteed for 90 days from the date of installation. Normal wear items such as wheels, hoses, seals, gaskets, cords, casters, squeegees and GFCI are excluded from warranty coverage.

All warranty claims must be accompanied by a Return Authorization Number (RAN), which is available by calling the Kaivac, Inc. Customer Service Department. No returns will be accepted without a RAN.

This warranty does not apply to return freight costs, damage or defect caused by accident, negligence, misuse, fire or repair done by anyone other than a Kaivac authorized repair center. In no event shall Kaivac, Inc. be liable for incidental or consequential damages, or any damages to persons or property.

Please Note: Under no circumstances will the seller be liable for any loss, damage, expenses or consequential damages arising in connection with the use or inability to use sellerโ€™s product. Kaivac, Inc. reserves the right to make changes or improvements to its equipment without notice. Some states do not allow the exclusion or limitation of incidental or consequential damages. This warranty is in lieu of any other warranty expressed or implied, including any warranty of merchantability or fitness for a particular purpose.

Source: Kaivac 1700 Series Operator Manual KV1700_Manual_120216 Rev. 080816, page 4, used with permission. SES ref PF-63FR-Y7T6โ€Œโ€Œโ€‹โ โ โ€โ โ€‹โ€‹โ€‹โ€Œโ€Œโ€โ€‹โ€‹โ€‹โ€Œโ€Œโ โ โ€‹โ€‹โ€‹โ€‹โ€‹โ€‹โ€Œโ€‹โ€‹โ€‹โ€‹โ€Œโ€‹โ โ€‹โ€‹โ โ€Œโ€Œโ€Œโ€‹โ€‹โ€โ€โ€Œโ€‹โ€โ€โ€Œโ€‹โ€โ€‹โ โ โ€โ€Œโ€Œโ โ€‹โ€‹
1700 Series KV1700_Manual_120216 (080816)Page 4 of 35
1.0 GETTING STARTED

1.2 WARRANTY REGISTRATION FORM

In short This is the warranty card the customer who buys the equipment fills out and mails or faxes to Kaivac, Inc. It must be returned within ten days of purchase.โ€Œโ€Œโ€‹โ โ โ€โ โ€‹โ€‹โ€‹โ€Œโ€Œโ€โ€‹โ€‹โ€‹โ€Œโ€Œโ โ โ€‹โ€‹โ€‹โ€‹โ€‹โ€‹โ€Œโ€Œโ€‹โ€‹โ€‹โ€Œโ€‹โ โ€‹โ€‹โ€‹โ€Œโ€โ€โ€‹โ€‹โ โ€โ€โ€โ€‹โ€‹โ โ€Œโ โ€โ€โ€‹โ€‹โ€Œโ€‹โ โ€Œโ€Œ

To be completed and mailed or faxed by the customer purchasing equipment. Return this warranty card within ten days of purchase.โ€Œโ€Œโ€‹โ โ โ€โ โ€‹โ€‹โ€‹โ€Œโ€Œโ€โ€‹โ€‹โ€‹โ€Œโ€Œโ โ โ€‹โ€‹โ€‹โ€‹โ€‹โ€‹โ€Œโ€Œโ€‹โ€‹โ€‹โ€Œโ€‹โ โ€‹โ€‹โ€‹โ€Œโ€โ€โ€‹โ€‹โ โ€โ€โ€โ€‹โ€‹โ โ€Œโ โ€โ€โ€‹โ€‹โ€Œโ€‹โ โ€Œโ€Œ

Purchased By:

Name: ____________________________________________ Title: _____________________________

Company: ___________________________________________________________________________

Street Address: _______________________________________________________________________

City: ____________________________________ State: ___________ Zip Code: _________________

  • โ˜ KV1750
  • โ˜ KV1250
  • โ˜ KV2150
  • โ˜ KV1715AC
  • โ˜ KV1715
  • โ˜ KV1215
  • โ˜ OMNIFLEX Pump Box
  • โ˜ OMNIFLEX Wet/Dry Vac

Serial Number: __________________

Type of Business

  • โ˜ School/University
  • โ˜ Contract Cleaner
  • โ˜ Office
  • โ˜ Hospital/Health Care
  • โ˜ Industrial
  • โ˜ Other: _____________

Intended Uses (check all that apply)

  • โ˜ Restroom Cleaning
  • โ˜ Cleaning Around Machines
  • โ˜ Classroom Cleaning
  • โ˜ Floor Stripping
  • โ˜ Stairwell Cleaning
  • โ˜ Other: ____________
  • โ˜ Kitchen Cleaning
  • โ˜ Lockers & Showers
  • โ˜
  • โ˜ Carpet Extraction
  • โ˜ Hallway Cleaning
  • โ˜

Thank you for registering for our warranty program.

Please return completed forms to:
Kaivac, Inc.
401 S. Third Street
Hamilton, OH 45011
Or Fax to: (513) 887-4601

Source: Kaivac 1700 Series Operator Manual KV1700_Manual_120216 Rev. 080816, page 5, used with permission. SES ref PF-OGZ7-LTEOโ€Œโ€Œโ€‹โ โ โ€โ โ€‹โ€‹โ€‹โ€Œโ€Œโ€โ€‹โ€‹โ€‹โ€Œโ€Œโ โ โ€‹โ€‹โ€‹โ€‹โ€‹โ€‹โ€Œโ€Œโ€‹โ€‹โ€‹โ€Œโ€‹โ โ€‹โ€‹โ€‹โ€Œโ€โ€โ€‹โ€‹โ โ€โ€โ€โ€‹โ€‹โ โ€Œโ โ€โ€โ€‹โ€‹โ€Œโ€‹โ โ€Œโ€Œ
1700 Series KV1700_Manual_120216 (080816)Page 5 of 35
1.0 GETTING STARTED

SAFETY PRECAUTIONS

In short This section lists the basic electrical safety rules to follow when using the machine, including grounding and ground fault circuit interrupter (GFCI) requirements. Read all instructions before use, keep the cord and connections protected, and test the GFCI before each use.โ€Œโ€Œโ€‹โ โ โ€โ โ€‹โ€‹โ€‹โ€Œโ€Œโ€โ€‹โ€‹โ€‹โ€Œโ€Œโ โ โ€‹โ€‹โ€‹โ€‹โ€‹โ€‹โ€Œโ€โ€‹โ€‹โ€‹โ€Œโ€‹โ โ€‹โ€‹โ€‹โ€‹โ€Œโ โ โ โ€Œโ โ€Œโ€โ€Œโ€‹โ€‹โ โ โ โ€โ€Œโ€Œโ โ€โ€Œโ€โ€Œ

IMPORTANT SAFETY INSTRUCTIONS
SAVE THESE INSTRUCTIONS

When using an electrical appliance, basic precautions should always be followed, including the following:โ€Œโ€Œโ€‹โ โ โ€โ โ€‹โ€‹โ€‹โ€Œโ€Œโ€โ€‹โ€‹โ€‹โ€Œโ€Œโ โ โ€‹โ€‹โ€‹โ€‹โ€‹โ€‹โ€Œโ€โ€‹โ€‹โ€‹โ€Œโ€‹โ โ€‹โ€‹โ€‹โ€‹โ€Œโ โ โ โ€Œโ โ€Œโ€โ€Œโ€‹โ€‹โ โ โ โ€โ€Œโ€Œโ โ€โ€Œโ€โ€Œ

CAUTION: TO REDUCE THE RISK OF INJURY, READ ALL INSTRUCTIONS BEFORE USING THIS APPLIANCE
WARNING RISK OF ELECTROCUTION:
  • Connect to a properly grounded outlet. Do not remove ground pin.
  • Inspect cord before using โ€“ do not use if cord is damaged.
  • Keep all connections dry and off the ground.
  • Do not touch plug with wet hands.
  • This product is provided with a ground fault circuit interrupter built into the power cord. If replacement of the plug or cord is needed, use only identical replacement parts.
  • Test the ground fault circuit interrupter (GFCI) before each use.
  • Do not pull or carry by cord, use cord as a handle, close door on cord, or pull cord around sharp edges or corners. Do not run appliance over cord.
  • Do not put any object into openings. Do not use with any opening blocked; keep free of dust, lint, hair, and anything that may reduce air flow.
  • Use extra care when cleaning on stairs.
  • Keep the cord away from heated surfaces.
  • Do not spray liquid from the Kaivac onto electrical outlets or on any electrical devices.
  • Turn off the unit before unplugging.
  • Do not pull on the cord to unplug. Grasp the plug at the outlet and pull.

GROUNDING INSTRUCTIONS

This product must be grounded. If it should malfunction or breakdown, grounding provides a path of least resistance for electric current to reduce the risk of electric shock. This product is equipped with a cord having an equipment-grounding conductor and a grounding plug. The plug must be plugged into an appropriate outlet that is properly installed and grounded in accordance with all local codes and ordinances.

DANGER โ€“ Improper connection of the equipment-grounding conductor can result in a risk of electrocution. Check with a qualified electrician or service personnel if you are in doubt as to whether the outlet is properly grounded. Do not modify the plug provided with the product โ€“ if it will not fit the outlet, have a proper outlet installed by a qualified electrician. Do not use any type of adaptor with this product

GROUND FAULT CIRCUIT INTERRUPTER PROTECTION

This pressure washer is provided with a ground-fault circuit-interrupter (GFCI) built into the plug of the power-supply cord. This device provides additional protection from the risk of electric shock. Should replacement of the plug or cord become necessary, use only identical replacement parts that include GFCI protection.

Source: Kaivac 1700 Series Operator Manual KV1700_Manual_120216 Rev. 080816, page 6, used with permission. SES ref PF-JR74-WHXKโ€Œโ€Œโ€‹โ โ โ€โ โ€‹โ€‹โ€‹โ€Œโ€Œโ€โ€‹โ€‹โ€‹โ€Œโ€Œโ โ โ€‹โ€‹โ€‹โ€‹โ€‹โ€‹โ€Œโ€โ€‹โ€‹โ€‹โ€Œโ€‹โ โ€‹โ€‹โ€‹โ€‹โ€Œโ โ โ โ€Œโ โ€Œโ€โ€Œโ€‹โ€‹โ โ โ โ€โ€Œโ€Œโ โ€โ€Œโ€โ€Œ
1700 Series KV1700_Manual_120216 (080816)Page 6 of 35
1.0 GETTING STARTED

1.3 SAFETY PRECAUTIONS (CONTINUED)

EXTENSION CORDS

Use only 3-wire extension cords that have 3-prong grounding-type plugs and 3-pole cord connectors that accept the plug from the product. Use only extension cords that are intended for outdoor use. These extension cords are identified by a marking โ€œAcceptable for use with outdoor appliances; store indoors while not in use.โ€ Use only extension cords having an electrical rating not less than the rating of the product. Do not use damaged extension cords. Examine extension cord before using and replace if damaged. Do not abuse extension cord and do not pull on any cord to disconnect. Keep cord away from heat and sharp edges. Always disconnect the extension cord from the receptacle before disconnecting the product from the extension cord. WARNING -- To reduce the risk of electrocution, keep all connections dry and off the ground. Do not touch plug with wet hands.โ€Œโ€Œโ€‹โ โ โ€โ โ€‹โ€‹โ€‹โ€Œโ€Œโ€โ€‹โ€‹โ€‹โ€Œโ€Œโ โ โ€‹โ€‹โ€‹โ€‹โ€‹โ€‹โ€Œโ โ€‹โ€‹โ€‹โ€Œโ€‹โ โ€‹โ€‹โ€Œโ โ€‹โ โ โ€โ โ€Œโ€โ€โ€‹โ€โ โ โ€‹โ€โ โ€โ โ€โ โ€Œโ€โ€Œ

WARNING: When using this product, basic precautions should always be followed, including the following:
  • Risk of injection or injury to persons โ€“ do not direct discharge stream at persons.
  • INJECTION HAZARD: EQUIPMENT CAN CAUSE SERIOUS INJURY IF THE SPRAY PERMEATES THE SKIN. DO NOT POINT THE GUN AT ANYONE OR ANY PART OF THE BODY. IN CASE OF PERMEATION, SEEK MEDICAL AID IMMEDIATELY;
  • THIS SYSTEM IS CAPABLE OF PRODUCING 500 PSI (345 kPa). TO AVOID RUPTURE AND INJURY, DO NOT OPERATE THIS PUMP WITH COMPONENTS RATED LESS THAN 500 PSI (345 kPa) WORKING PRESSURE (INCLUDING BUT NOT LIMITED TO SPRAY GUNS, HOSE, AND HOSE CONNECTIONS); and BEFORE SERVICING, CLEANING, OR REMOVAL OF ANY PART, SHUT OFF POWER AND RELIEVE PRESSURE;
  • To reduce the risk of injury, close supervision is necessary when a product is used near children.
  • Know how to stop the product and bleed pressures quickly. Be thoroughly familiar with the controls.
  • Stay alert โ€“ watch what you are doing.
  • DO NOT operate the product when fatigued or under the influence of alcohol or drugs.
  • Keep operating area clear of all persons.
  • DO NOT overreach or stand on unstable support. Keep good footing and balance at all times.
  • DO NOT use to pick up flammable or combustible materials.
  • DO NOT operate without the float installed. If float is removed, reinstall by screwing back into place.
  • Follow the maintenance instructions specified in the manual.

Personal Protective Equipment (PPE): It is recommended to wear proper personal protective equipment as required by the chemical product label instructions used in conjunction with the Kaivac.

FOR INDOOR USE ONLY

INTENDED FOR COMMERCIAL USE

Source: Kaivac 1700 Series Operator Manual KV1700_Manual_120216 Rev. 080816, page 7, used with permission. SES ref PF-VNVY-7UCLโ€Œโ€Œโ€‹โ โ โ€โ โ€‹โ€‹โ€‹โ€Œโ€Œโ€โ€‹โ€‹โ€‹โ€Œโ€Œโ โ โ€‹โ€‹โ€‹โ€‹โ€‹โ€‹โ€Œโ โ€‹โ€‹โ€‹โ€Œโ€‹โ โ€‹โ€‹โ€Œโ โ€‹โ โ โ€โ โ€Œโ€โ€โ€‹โ€โ โ โ€‹โ€โ โ€โ โ€โ โ€Œโ€โ€Œ
1700 Series KV1700_Manual_120216 (080816)Page 7 of 35
2.0 OPERATION

2.1 OUT OF BOX SETUP INSTRUCTIONS

In short This section walks through setting up a new Kaivac machine in seven steps. You attach the placard, vac wand, plastic elbow and vac motor hose, secure the dump hose, place the tools, and hang the filled tote bag on the nose.โ€Œโ€Œโ€‹โ โ โ€โ โ€‹โ€‹โ€‹โ€Œโ€Œโ€โ€‹โ€‹โ€‹โ€Œโ€Œโ โ โ€‹โ€‹โ€‹โ€‹โ€‹โ€‹โ€โ€‹โ€‹โ€‹โ€‹โ€Œโ€‹โ โ€‹โ€‹โ€‹โ€‹โ€โ€Œโ€Œโ€Œโ€‹โ€Œโ€Œโ€Œโ€โ โ€‹โ€Œโ€‹โ โ€โ€‹โ โ โ โ€Œโ€‹โ€
  1. Open Accessory Box and remove the placard and wrap around the Push Handles of your Kaivac Machine. Remove the Tote Bag and set aside for filling with remaining tools from the Accessory Box.
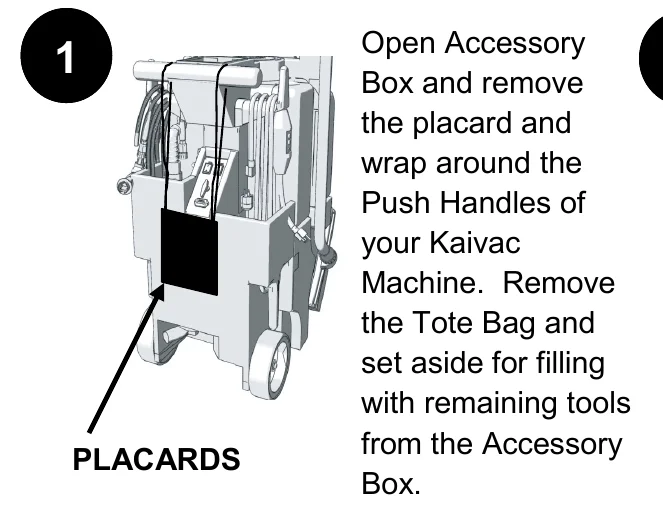
    Step 1: rear of the Kaivac machine with a black placard hanging from the push handles; an arrow points to the placard labeled PLACARDS
    1
  2. Remove vac wand from accessory box and attach vac wand by sliding the sections together until the locking pin engages as shown.
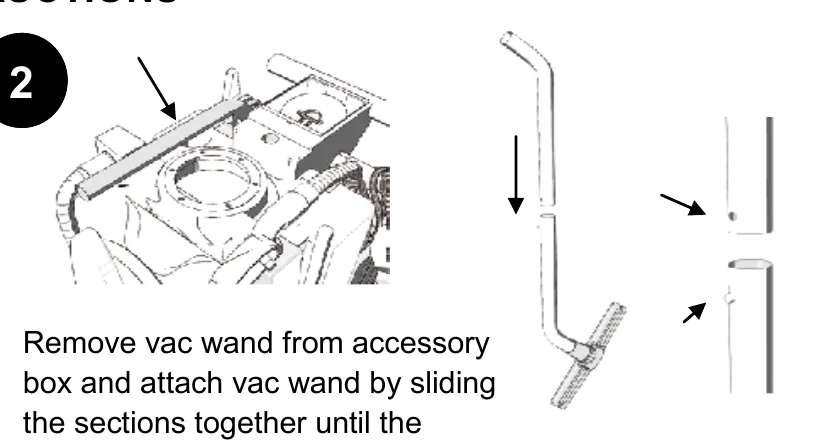
    Step 2: top of the machine with an arrow to the vac wand location, and a two-piece vac wand being slid together until the locking pin engages, with arrows at the pin and hole
    2
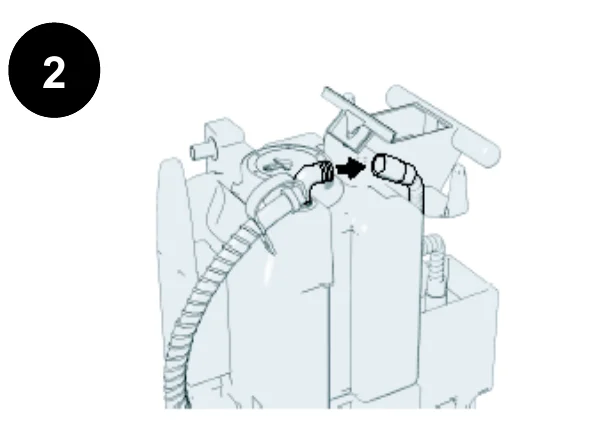
  3. After removing machine from container, attach the plastic elbow to the vac tank as shown above.
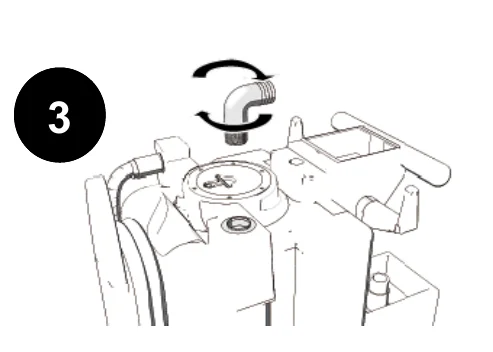
    Step 3: top of the vac tank with a curved arrow showing the plastic elbow being screwed into the tank
    3
  4. Attach vac motor hose to elbow and vac motor inlet as shown above.
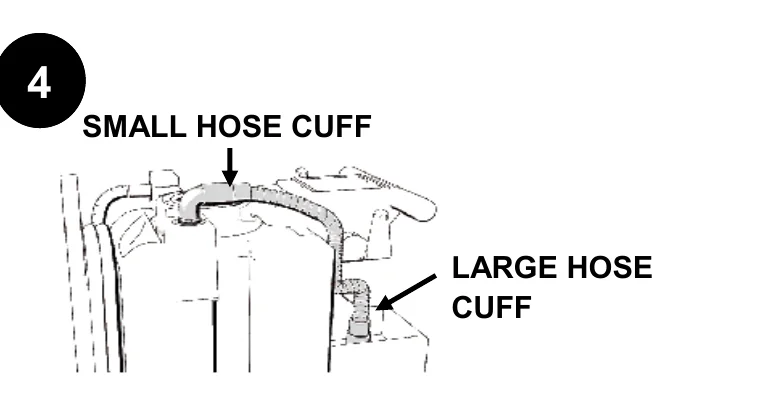
    Step 4: vac motor hose connected between the elbow (small hose cuff, arrow at top) and the vac motor inlet (large hose cuff, arrow at right)
    4
  5. Make sure dump hose is secured to the dump hose cap and tether.
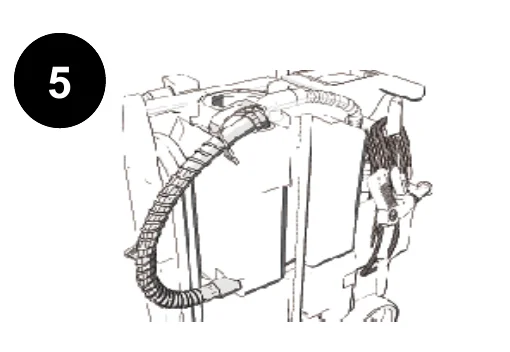
    Step 5: dump hose coiled along the side of the machine and secured to the dump hose cap and tether
    5
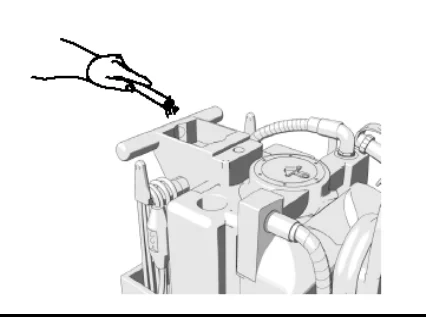
  6. Remove the tools from the accessory box and place them in the appropriate locations as shown above.
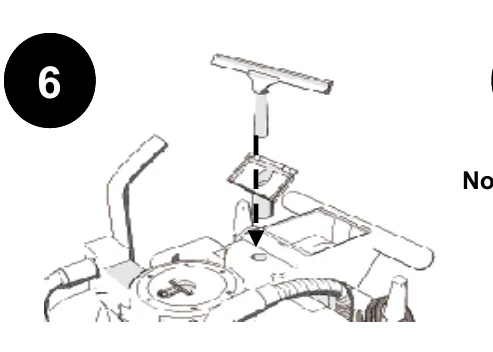
    Step 6: squeegee tool above the vac tank lid area with a dashed arrow showing where tools are placed on the machine
    6
  7. Make sure vac lid is on vac tank and place remaining tools into tote bag and hang on nose.
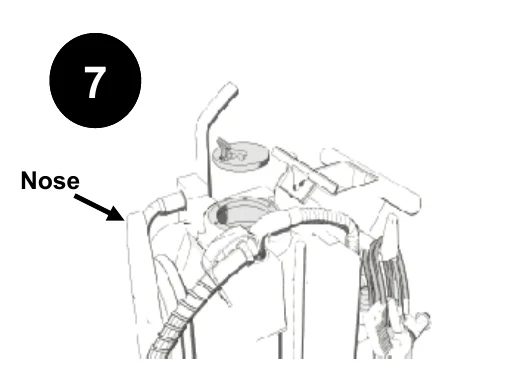
    Step 7: machine with the vac lid on the tank and an arrow labeled Nose pointing to where the tote bag hangs
    7
Source: Kaivac 1700 Series Operator Manual KV1700_Manual_120216 Rev. 080816, page 8, used with permission. SES ref PF-7OD7-H4WYโ€Œโ€Œโ€‹โ โ โ€โ โ€‹โ€‹โ€‹โ€Œโ€Œโ€โ€‹โ€‹โ€‹โ€Œโ€Œโ โ โ€‹โ€‹โ€‹โ€‹โ€‹โ€‹โ€โ€‹โ€‹โ€‹โ€‹โ€Œโ€‹โ โ€‹โ€‹โ€‹โ€‹โ€โ€Œโ€Œโ€Œโ€‹โ€Œโ€Œโ€Œโ€โ โ€‹โ€Œโ€‹โ โ€โ€‹โ โ โ โ€Œโ€‹โ€
1700 Series KV1700_Manual_120216 (080816)Page 8 of 35
2.0 OPERATION

2.2 KAIVAC TOOL ARRANGEMENT

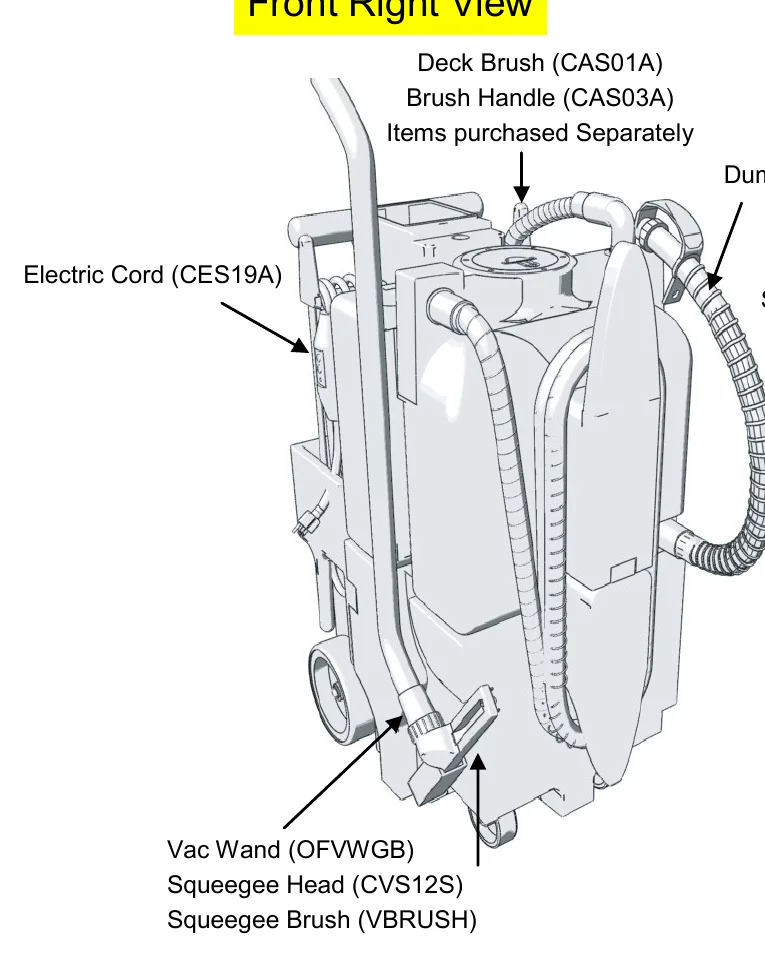
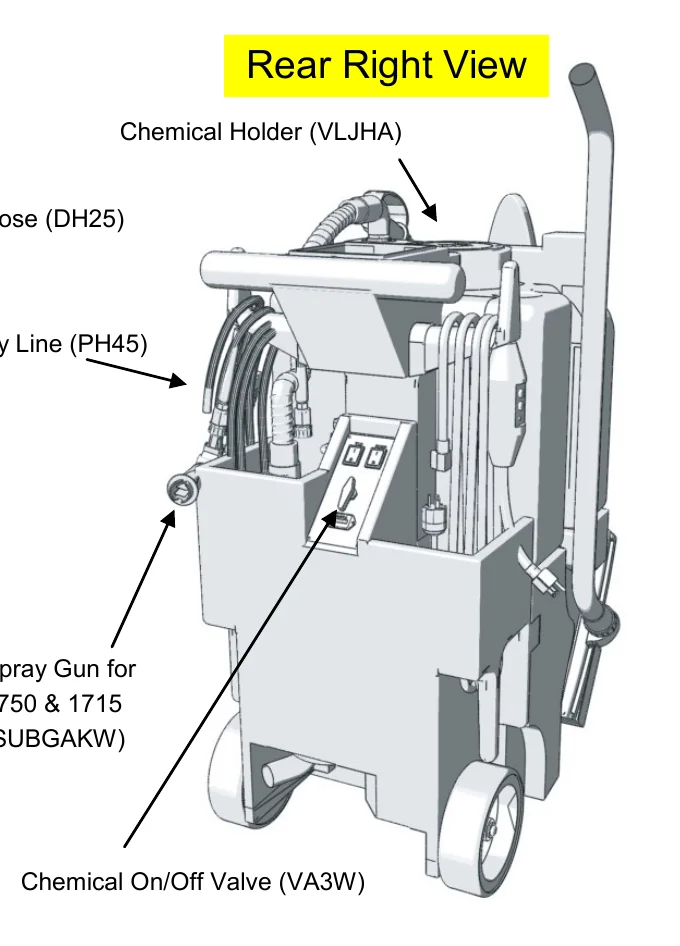
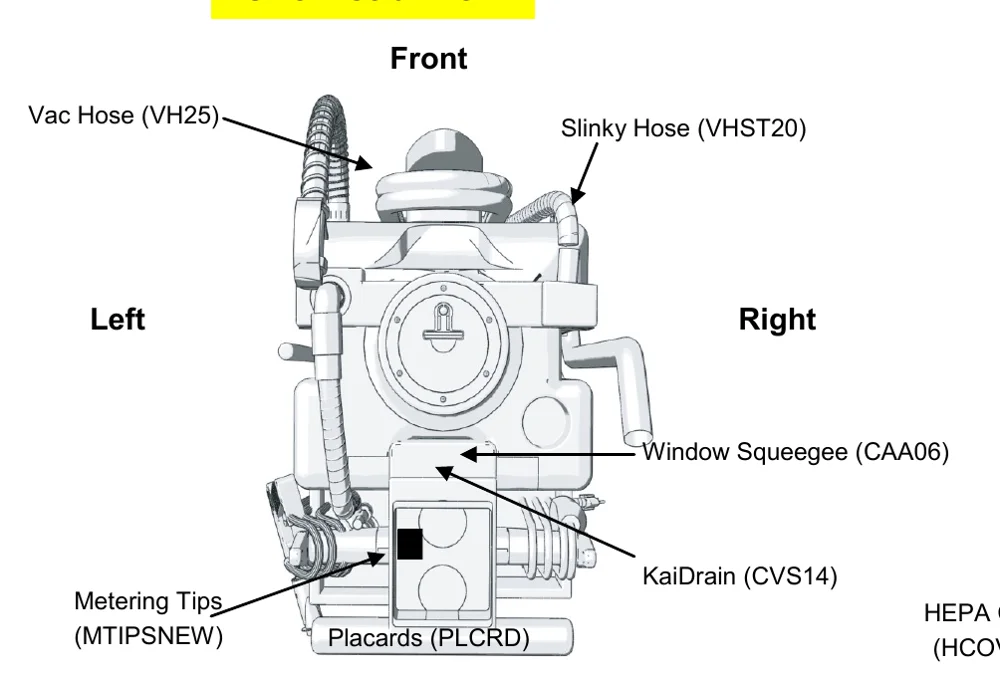
In short This page shows where each tool and hose is located on the machine, using four views: front right, rear right, overhead and bottom. Each item is labeled with its part code.โ€Œโ€Œโ€‹โ โ โ€โ โ€‹โ€‹โ€‹โ€Œโ€Œโ€โ€‹โ€‹โ€‹โ€Œโ€Œโ โ โ€‹โ€‹โ€‹โ€‹โ€‹โ€‹โ€โ€Œโ€‹โ€‹โ€‹โ€Œโ€‹โ โ€‹โ€‹โ€‹โ โ€โ€Œโ€‹โ€‹โ€‹โ โ€โ€โ€Œโ€โ€โ€Œโ โ€Œโ โ€โ€โ€Œโ€‹โ€โ€Œโ€

Front Right View

Front right view of the machine with labels: Deck Brush (CAS01A) and Brush Handle (CAS03A), items purchased separately; Dump Hose (DH25); Electric Cord (CES19A); Vac Wand (OFVWGB), Squeegee Head (CVS12S) and Squeegee Brush (VBRUSH) at the lower front
Front Right View

Rear Right View

Rear right view of the machine with labels: Chemical Holder (VLJHA) at the top, Spray Line (PH45), Spray Gun for 1750 & 1715 (SUBGAKW), and Chemical On/Off Valve (VA3W) on the control panel
Rear Right View

Overhead View

Overhead view of the machine with the front at the top and left and right marked, showing Vac Hose (VH25), Slinky Hose (VHST20), Window Squeegee (CAA06), KaiDrain (CVS14), Metering Tips (MTIPSNEW) and Placards (PLCRD)
Overhead View

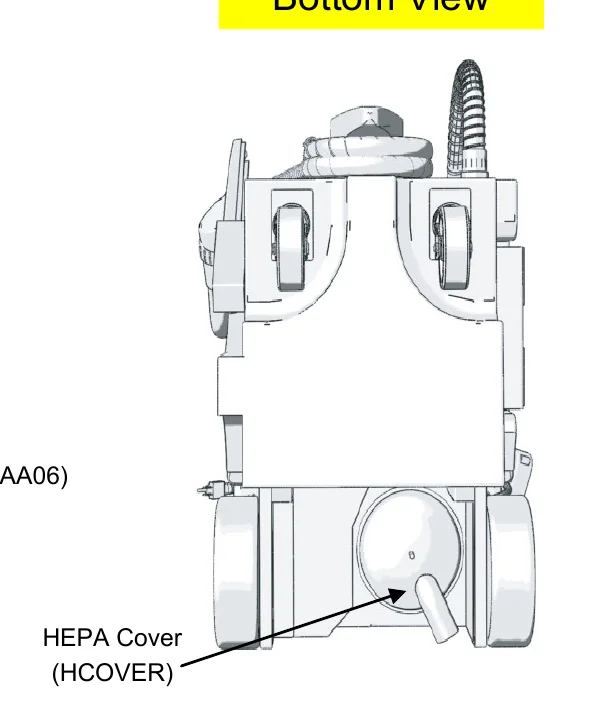
Bottom View

Bottom view of the machine showing the casters and wheels, with the HEPA Cover (HCOVER) labeled on the underside
Bottom View
Source: Kaivac 1700 Series Operator Manual KV1700_Manual_120216 Rev. 080816, page 9, used with permission. SES ref PF-EZUT-MHUXโ€Œโ€Œโ€‹โ โ โ€โ โ€‹โ€‹โ€‹โ€Œโ€Œโ€โ€‹โ€‹โ€‹โ€Œโ€Œโ โ โ€‹โ€‹โ€‹โ€‹โ€‹โ€‹โ€โ€Œโ€‹โ€‹โ€‹โ€Œโ€‹โ โ€‹โ€‹โ€‹โ โ€โ€Œโ€‹โ€‹โ€‹โ โ€โ€โ€Œโ€โ€โ€Œโ โ€Œโ โ€โ€โ€Œโ€‹โ€โ€Œโ€
1700 Series KV1700_Manual_120216 (080816)Page 9 of 35
2.0 OPERATION

2.3 PREPARING YOUR KAIVAC

In short This section lists the six checks to make before cleaning: fill the machine with water, prepare the cleaning solution, check tools and supplies, and inspect the hoses and spray lines. You then plug in the machine and test the GFCI before starting.โ€Œโ€Œโ€‹โ โ โ€โ โ€‹โ€‹โ€‹โ€Œโ€Œโ€โ€‹โ€‹โ€‹โ€Œโ€Œโ โ โ€‹โ€‹โ€‹โ€‹โ€‹โ€‹โ€โ€โ€‹โ€‹โ€‹โ€Œโ€‹โ โ€‹โ€‹โ€โ€Œโ€‹โ€โ€‹โ€Œโ€โ โ€Œโ€‹โ โ โ โ โ€โ€โ€โ€โ€‹โ€Œโ€Œโ โ€โ€Œ
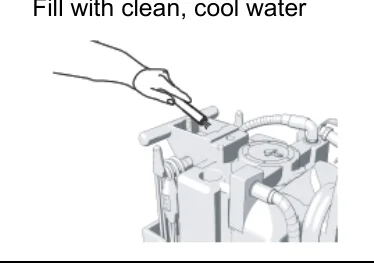
  1. Fill machine with clean, cool water.
    A hand pouring water into the top of the machine's tank to fill it
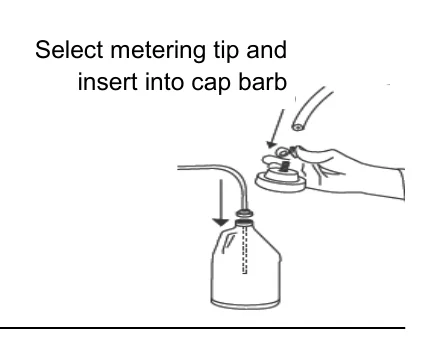
  2. Prepare the cleaning solution you will be using by attaching the chemical feed line and cap to the top of your chemical bottle and selecting the proper metering tip. (See placard for metering tip information)
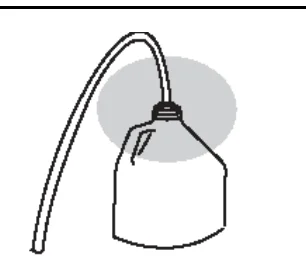
    Chemical bottle with a feed line and cap attached to its top, the cap area highlighted
  3. Check machine for all tools and supplies needed to complete task. See โ€œTool Arrangementโ€ in Section 2.2 of this manual.
    The machine with its hoses and tools in place, viewed for a tool and supply check
  4. If using a cleaning product that has high foaming use a foam inhibitor to cut down on foam. Pour 2 capfuls of inhibitor in the vac hose with vac running to coat inside of hose.
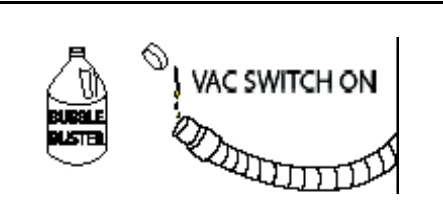
    A bottle of foam inhibitor labeled Bubble Buster beside a vac hose with a cap and the text VAC SWITCH ON
  5. Check all hoses and spray lines for damage prior to use. If damage is found, do not continue until proper repairs are completed.
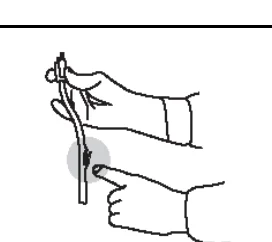
    Gloved hands holding a hose and pointing at a spot on it while checking for damage
  6. Plug in machine and test GFCI (Ground Fault Circuit Interrupter) to ensure it is working properly. You are now ready.
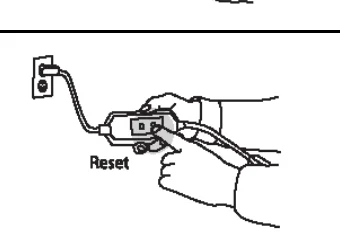
    Machine power cord plugged into a wall outlet with a gloved hand pressing the Reset button on the in-line GFCI
Source: Kaivac 1700 Series Operator Manual KV1700_Manual_120216 Rev. 080816, page 10, used with permission. SES ref PF-L4JG-QJNJโ€Œโ€Œโ€‹โ โ โ€โ โ€‹โ€‹โ€‹โ€Œโ€Œโ€โ€‹โ€‹โ€‹โ€Œโ€Œโ โ โ€‹โ€‹โ€‹โ€‹โ€‹โ€‹โ€โ€โ€‹โ€‹โ€‹โ€Œโ€‹โ โ€‹โ€‹โ€โ€Œโ€‹โ€โ€‹โ€Œโ€โ โ€Œโ€‹โ โ โ โ โ€โ€โ€โ€โ€‹โ€Œโ€Œโ โ€โ€Œ
1700 Series KV1700_Manual_120216 (080816)Page 10 of 35
2.0 OPERATION

2.4 VAC TANK CLEANOUT INSTRUCTIONS

In short This section shows five steps for cleaning out the vac tank after use. You dump and rinse the tank, lock the front casters, tip the machine to drain the remaining water, then re-attach the dump hose and unlock the wheels.โ€Œโ€Œโ€‹โ โ โ€โ โ€‹โ€‹โ€‹โ€Œโ€Œโ€โ€‹โ€‹โ€‹โ€Œโ€Œโ โ โ€‹โ€‹โ€‹โ€‹โ€‹โ€‹โ€โ โ€‹โ€‹โ€‹โ€Œโ€‹โ โ€‹โ€‹โ€‹โ โ€Œโ โ โ€Œโ€โ€‹โ€Œโ€‹โ€โ€‹โ โ€โ€Œโ€โ€โ โ€‹โ€โ€‹โ€Œโ€โ€Œ
  1. Disconnect dump hose and empty contents into proper location.
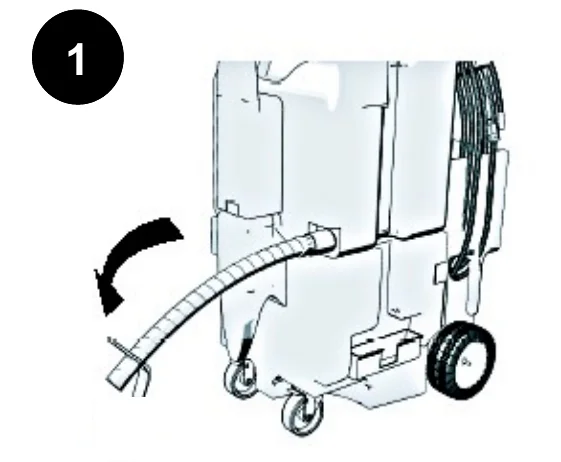
    Rear view of the machine with the dump hose being pulled off and swung out to the left, an arrow showing the direction of movement
    1
  2. After dumping is complete, remove vac lid from vac tank.
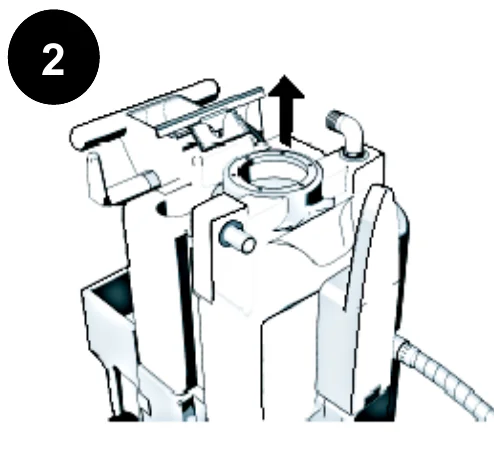
    Top of the vac tank with an arrow pointing up showing the vac lid being lifted off the tank opening
    2
  3. Using pressure gun or other water source, rinse inside of tank thoroughly.
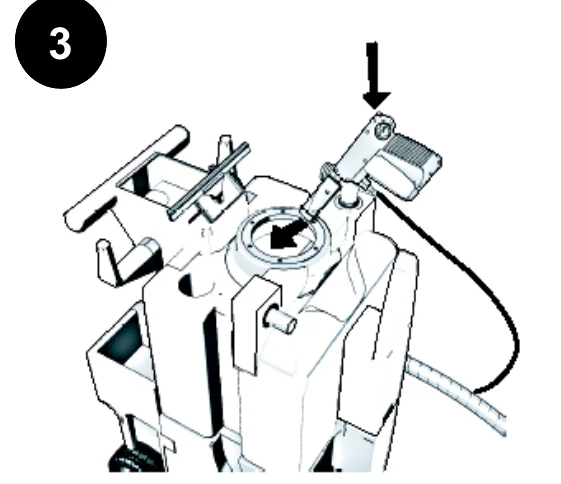
    Pressure gun held over the open vac tank with arrows showing water being sprayed into the tank to rinse it
    3
  4. After tank has been rinsed, lock the front caster wheels by pressing down on the locks as shown.
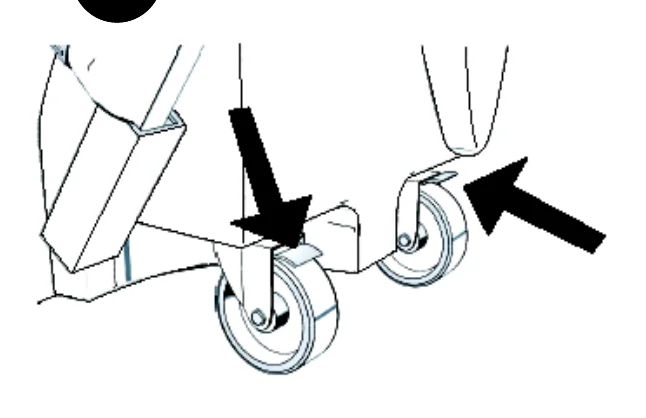
    Front caster wheels with arrows showing the wheel locks being pressed down
    4
  5. After caster wheels have been locked, tip the machine to the left and slightly forward to allow the remaining water to drain. Re-attach dump hose and unlock wheels.
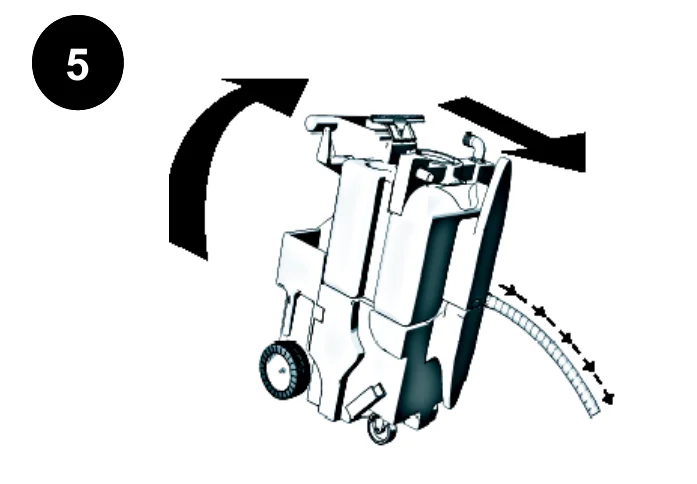
    Machine tipped to the left and slightly forward with curved arrows showing the tipping motion so the remaining water drains, dump hose hanging at the side
    5
Source: Kaivac 1700 Series Operator Manual KV1700_Manual_120216 Rev. 080816, page 11, used with permission. SES ref PF-LP5F-IKY4โ€Œโ€Œโ€‹โ โ โ€โ โ€‹โ€‹โ€‹โ€Œโ€Œโ€โ€‹โ€‹โ€‹โ€Œโ€Œโ โ โ€‹โ€‹โ€‹โ€‹โ€‹โ€‹โ€โ โ€‹โ€‹โ€‹โ€Œโ€‹โ โ€‹โ€‹โ€‹โ โ€Œโ โ โ€Œโ€โ€‹โ€Œโ€‹โ€โ€‹โ โ€โ€Œโ€โ€โ โ€‹โ€โ€‹โ€Œโ€โ€Œ
1700 Series KV1700_Manual_120216 (080816)Page 11 of 35
2.0 OPERATION

2.5 VAC TANK REMOVAL INSTRUCTIONS

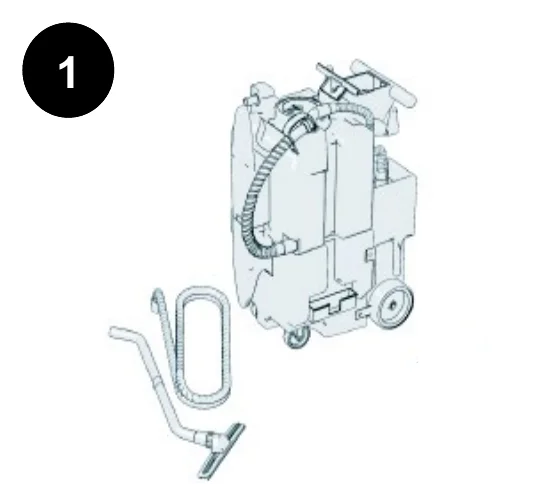
In short This section shows how to take the vac tank off the unit in five illustrated steps. You remove the vac hose and wand, disconnect the inlet hose, un-snap the straps at the top and bottom, then tip the tank back and lift it away.โ€Œโ€Œโ€‹โ โ โ€โ โ€‹โ€‹โ€‹โ€Œโ€Œโ€โ€‹โ€‹โ€‹โ€Œโ€Œโ โ โ€‹โ€‹โ€‹โ€‹โ€‹โ€‹โ โ€‹โ€‹โ€‹โ€‹โ€Œโ€‹โ โ€‹โ€‹โ€Œโ€โ โ€โ โ โ โ€โ€‹โ โ€Œโ€‹โ€Œโ€Œโ€Œโ€Œโ€โ€โ โ€‹โ โ€Œโ€โ€‹
Step 1: the machine with its vac hose and vac wand lying detached on the floor in front of it
1

Remove vac hose and vac wand before removing vac tank.โ€Œโ€Œโ€‹โ โ โ€โ โ€‹โ€‹โ€‹โ€Œโ€Œโ€โ€‹โ€‹โ€‹โ€Œโ€Œโ โ โ€‹โ€‹โ€‹โ€‹โ€‹โ€‹โ โ€‹โ€‹โ€‹โ€‹โ€Œโ€‹โ โ€‹โ€‹โ€Œโ€โ โ€โ โ โ โ€โ€‹โ โ€Œโ€‹โ€Œโ€Œโ€Œโ€Œโ€โ€โ โ€‹โ โ€Œโ€โ€‹

Step 2: arrow showing the vac inlet hose being pulled off the 90 degree fitting on top of the vac tank
2

Disconnect vac inlet hose from 90 degree fitting on vac tank
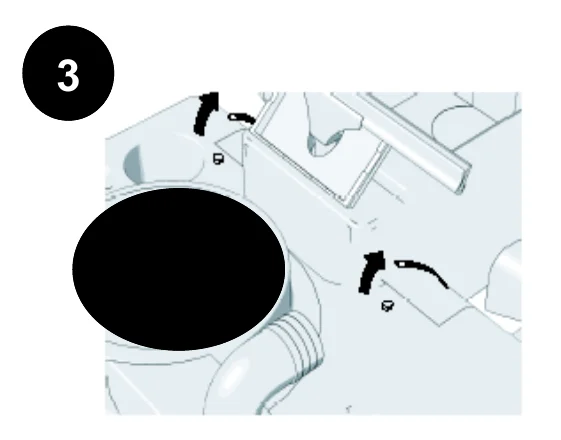
Step 3: close-up of the upper assembly with arrows showing the straps at the top of the vac tank being un-snapped
3

Un-snap straps holding the vac tank to the lid water tank upper assembly.
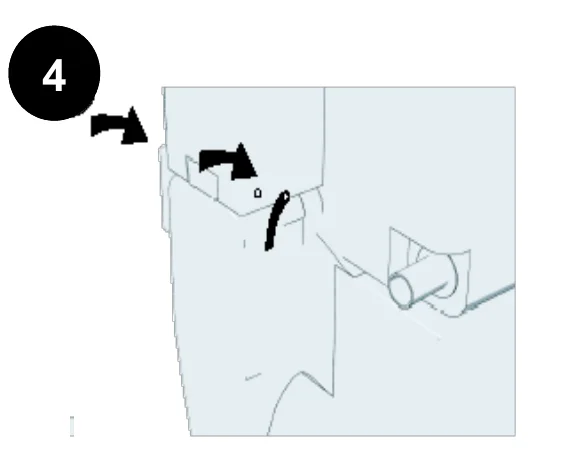
Step 4: side view of the tank with arrows showing the lower strap being un-snapped, one on each side
4

Un-snap straps holding the vac tank to the water tank lower assembly.
(2 locations - one on each side)
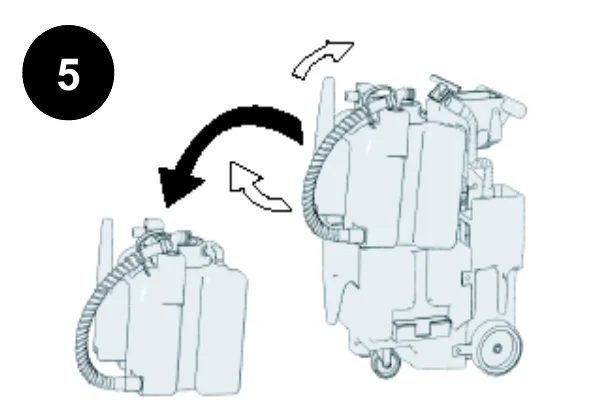
Step 5: arrows showing the bottom of the vac tank pulled out and tipped backwards, then lifted away from the unit
5

Slightly pull the bottom section of the vac tank out while tipping it backwards.

Lift and pull the vac tank away from the unit.

Source: Kaivac 1700 Series Operator Manual KV1700_Manual_120216 Rev. 080816, page 12, used with permission. SES ref PF-PJTD-6O5Hโ€Œโ€Œโ€‹โ โ โ€โ โ€‹โ€‹โ€‹โ€Œโ€Œโ€โ€‹โ€‹โ€‹โ€Œโ€Œโ โ โ€‹โ€‹โ€‹โ€‹โ€‹โ€‹โ โ€‹โ€‹โ€‹โ€‹โ€Œโ€‹โ โ€‹โ€‹โ€Œโ€โ โ€โ โ โ โ€โ€‹โ โ€Œโ€‹โ€Œโ€Œโ€Œโ€Œโ€โ€โ โ€‹โ โ€Œโ€โ€‹
1700 Series KV1700_Manual_120216 (080816)Page 12 of 35
2.0 OPERATION

2.6 S.I.M.P.L.E PROCESS

*Applicable to all units, KV1700 Series shown for illustration.โ€Œโ€Œโ€‹โ โ โ€โ โ€‹โ€‹โ€‹โ€Œโ€Œโ€โ€‹โ€‹โ€‹โ€Œโ€Œโ โ โ€‹โ€‹โ€‹โ€‹โ€‹โ€‹โ โ€Œโ€‹โ€‹โ€‹โ€Œโ€‹โ โ€‹โ€‹โ โ€โ€‹โ€Œโ โ€‹โ€‹โ โ€Œโ โ โ€Œโ€‹โ€Œโ€โ€‹โ€โ€‹โ€โ€‹โ€‹โ โ โ 

In short The S.I.M.P.L.E process is a six-stage picture guide to cleaning: Set-up, Inject, Manual Brush, Pressure wash and rinse, Loop, and Extract. It shows filling the tank, applying chemicals at low pressure, brushing, rinsing at high pressure, looping the hose and extracting.โ€Œโ€Œโ€‹โ โ โ€โ โ€‹โ€‹โ€‹โ€Œโ€Œโ€โ€‹โ€‹โ€‹โ€Œโ€Œโ โ โ€‹โ€‹โ€‹โ€‹โ€‹โ€‹โ โ€Œโ€‹โ€‹โ€‹โ€Œโ€‹โ โ€‹โ€‹โ โ€โ€‹โ€Œโ โ€‹โ€‹โ โ€Œโ โ โ€Œโ€‹โ€Œโ€โ€‹โ€โ€‹โ€โ€‹โ€‹โ โ โ 

Set-up

A hand pouring clean, cool water into the fill opening on top of the machine
Fill with clean, cool water
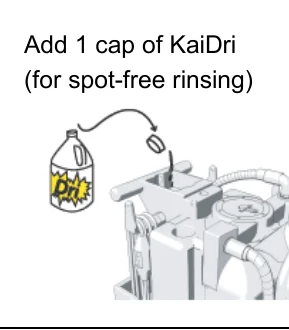
A bottle of KaiDri with one cap being added to the water tank of the machine
Add 1 cap of KaiDri (for spot-free rinsing)
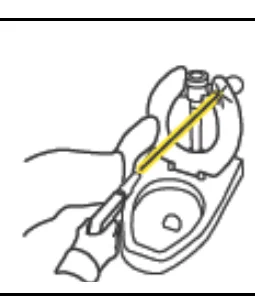
A hand inserting a metering tip into the cap barb of a chemical bottle
Select metering tip and insert into cap barb

Inject

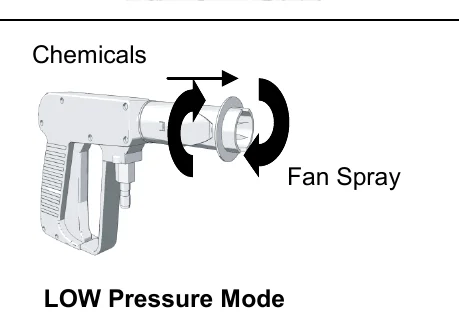
Pressure gun with arrows showing the nozzle turned to fan spray for chemicals in LOW Pressure Mode
Chemicals, Fan Spray, LOW Pressure Mode
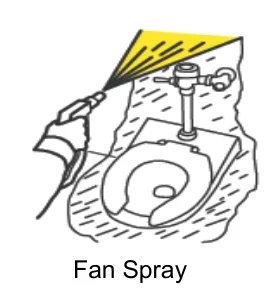
Hand spraying a fan spray of chemical onto a toilet bowl and fixture
Fan Spray
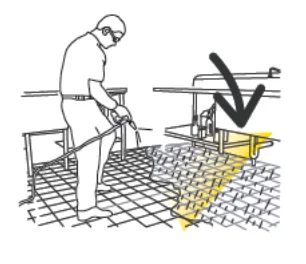
Person spraying chemical across a tiled floor with an arrow pointing to the sprayed area

Manual Brush

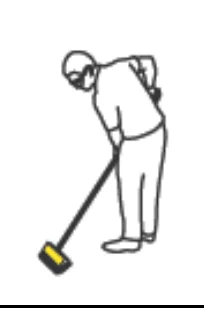
Person bending over and manually brushing the floor with a long-handled brush
Manually brush heavily soiled areas
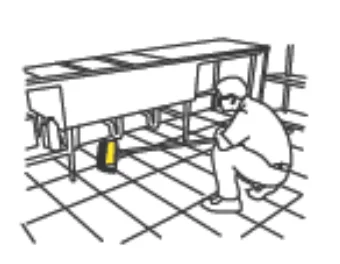
Person crouching and scrubbing under a row of sinks or benches with a brush
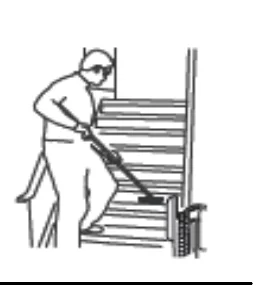
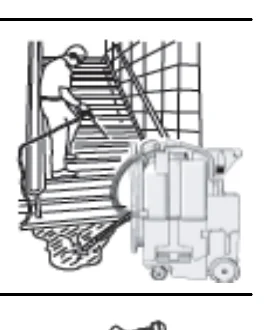
Person brushing the steps of a staircase with a long-handled brush

Pressure wash and rinse

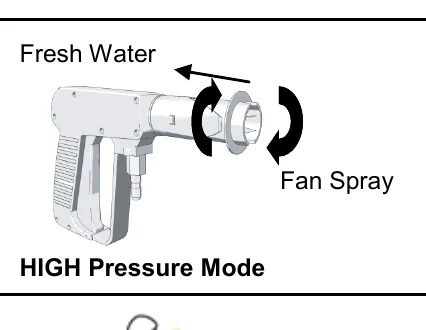
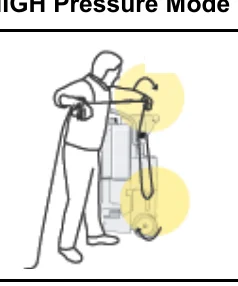
Pressure gun with arrows showing the nozzle turned to fan spray with fresh water in HIGH Pressure Mode
Fresh Water, Fan Spray, HIGH Pressure Mode
Hands rinsing a toilet bowl with the pressure gun wand
Person rinsing a staircase with the pressure gun while the machine stands beside them

Loop

Person looping the pressure hose by the machine, with highlighted loop positions
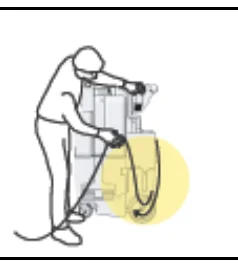
Person hanging a hose loop on the machine, with the loop area highlighted
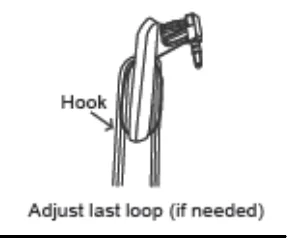
Hose hanging on a hook with the label Hook and a note to adjust the last loop
Adjust last loop (if needed)

Extract

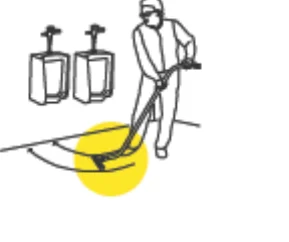
Person using a vacuum squeegee tool on the floor near urinals, with a highlighted sweep area
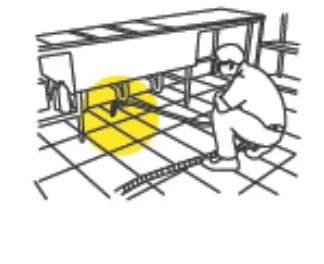
Person crouching and vacuuming the floor under a bench with the tool
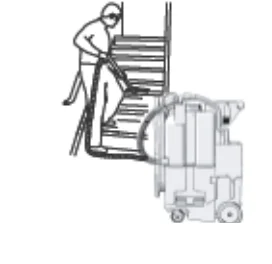
Person vacuuming a staircase with the vacuum hose while the machine stands at the bottom
Source: Kaivac 1700 Series Operator Manual KV1700_Manual_120216 Rev. 080816, page 13, used with permission. SES ref PF-QRDW-Y2FQโ€Œโ€Œโ€‹โ โ โ€โ โ€‹โ€‹โ€‹โ€Œโ€Œโ€โ€‹โ€‹โ€‹โ€Œโ€Œโ โ โ€‹โ€‹โ€‹โ€‹โ€‹โ€‹โ โ€Œโ€‹โ€‹โ€‹โ€Œโ€‹โ โ€‹โ€‹โ โ€โ€‹โ€Œโ โ€‹โ€‹โ โ€Œโ โ โ€Œโ€‹โ€Œโ€โ€‹โ€โ€‹โ€โ€‹โ€‹โ โ โ 
1700 Series KV1700_Manual_120216 (080816)Page 13 of 35
3.0 MAINTENANCE

3.1 MACHINE MAINTENANCE

In short This table lists what to check or do for each part of the machine, such as the floor squeegee, spray gun, hoses, tanks, electrical system, vacuum wand and HEPA filter. Unplug the machine before lifting the electric cover assembly.โ€Œโ€Œโ€‹โ โ โ€โ โ€‹โ€‹โ€‹โ€Œโ€Œโ€โ€‹โ€‹โ€‹โ€Œโ€Œโ โ โ€‹โ€‹โ€‹โ€‹โ€‹โ€‹โ โ€โ€‹โ€‹โ€‹โ€Œโ€‹โ โ€‹โ€‹โ โ€Œโ€โ€‹โ€โ€‹โ€โ€Œโ€Œโ€โ โ€โ€‹โ€โ€Œโ โ€‹โ โ€‹โ โ€‹โ€Œโ€โ 
CAUTION Always make sure machine is unplugged before lifting electric cover assembly
ItemProcedure
Floor Squeegee
  • Check condition of squeegee blades and wheels on the floor tool.
  • Rough floor surfaces will cause the blades and wheels to wear out more quickly. Replace as necessary
Spray Gun
  • Check spray pattern. If spray pattern will not pinpoint, clean orifice by removing it with an Allen wrench and flushing. Replace if needed.
  • If nozzle becomes difficult to move from high to low pressure lubricate nozzle with lithium grease.
Pressure Hose
  • Wipe clean after each use.
  • Check for cuts or frays in the hose jacket, particularly at the end of the fittings. Replace hose if cuts are found
Water Tank
  • Check condition of filter in water tank. Clean as needed.
  • Empty the water tank to prevent mildew and bacteria growth. Empty tank by dipping the vacuum hose into the water tank and transferring the water to the vacuum tank.
Vacuum Tank
  • Empty and flush vacuum tank.
  • Clean and disinfect.
  • Check the float shutoff screen to be sure it is not plugged up. A plugged filter screen restricts airflow and results in reduced suction.
Leaks
  • Be alert for leaks around hoses, fittings, spray wand, tanks or elsewhere.
  • Discontinue use until leaks are repaired
Electrical System
  • The ground fault circuit interrupter (GFCI) must be tested before each use.
  • Electric cord must be inspected for tears or cuts in the insulation.
Vacuum Wand
  • Use a wire brush or coarse brush with acid cleaner or other to remove residue from threads on the coupling and coupling nut. Apply grease when done.
HEPA Filter
  • Replace every 3-6 months depending on use
Source: Kaivac 1700 Series Operator Manual KV1700_Manual_120216 Rev. 080816, page 14, used with permission. SES ref PF-5DDH-Y5UWโ€Œโ€Œโ€‹โ โ โ€โ โ€‹โ€‹โ€‹โ€Œโ€Œโ€โ€‹โ€‹โ€‹โ€Œโ€Œโ โ โ€‹โ€‹โ€‹โ€‹โ€‹โ€‹โ โ€โ€‹โ€‹โ€‹โ€Œโ€‹โ โ€‹โ€‹โ โ€Œโ€โ€‹โ€โ€‹โ€โ€Œโ€Œโ€โ โ€โ€‹โ€โ€Œโ โ€‹โ โ€‹โ โ€‹โ€Œโ€โ 
1700 Series KV1700_Manual_120216 (080816)Page 14 of 35
3.0 MAINTENANCE

3.2 BLACK BOX REMOVAL INSTRUCTIONS

In short This section shows how to take the black box assembly off the machine in five steps. Remove hoses, cords and tools, loosen the bolts, tilt the assembly to the floor, disconnect the water and return lines, then slide the assembly away.โ€Œโ€Œโ€‹โ โ โ€โ โ€‹โ€‹โ€‹โ€Œโ€Œโ€โ€‹โ€‹โ€‹โ€Œโ€Œโ โ โ€‹โ€‹โ€‹โ€‹โ€‹โ€‹โ โ โ€‹โ€‹โ€‹โ€Œโ€‹โ โ€‹โ€‹โ€โ€โ€โ€‹โ€โ โ€Œโ€Œโ€‹โ€โ€โ€‹โ โ€โ€‹โ€‹โ€Œโ โ€‹โ€โ€‹โ โ โ€
  1. Remove all hoses, cords and tools prior to black box removal
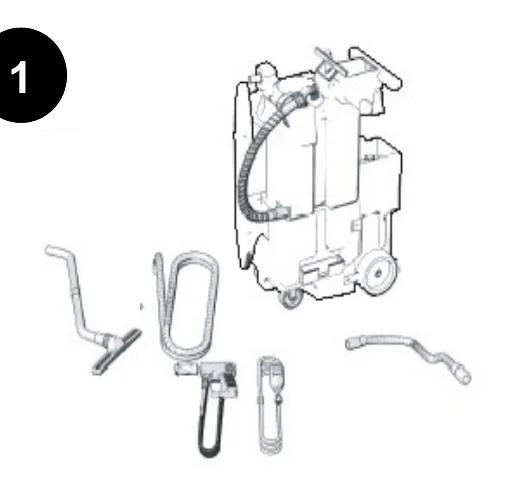
    Machine standing upright with its hoses, cords and tools laid out separately in front of it, removed before black box removal
    1
  2. Loosen and remove the 4 wing and thumb bolts located at the top of the control panel and on the left and right of the black box mid section.
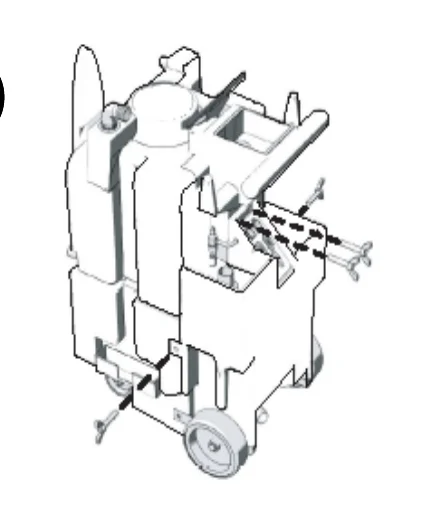
    Machine with dashed lines and arrows showing the wing and thumb bolts at the top of the control panel and on the left and right of the black box mid section being removed
    2
  3. Tilt the black box assembly away from the machine until it rests on the floor. Next, remove the 2 axle strap wing bolts on either side of the machine behind the wheels.
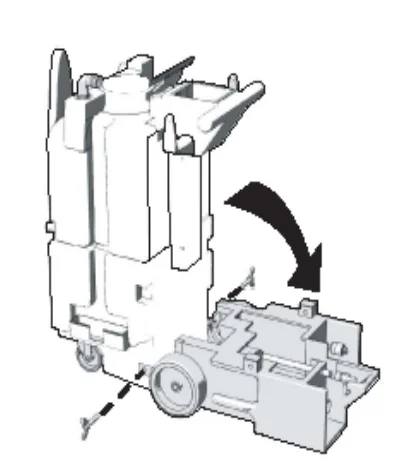
    Black box assembly tilted away from the machine until it rests on the floor, with a curved arrow showing the tilt and dashed lines at the axle strap wing bolts behind the wheel
    3
  4. Locate and disconnect the water line and return line behind the black box on the machine.
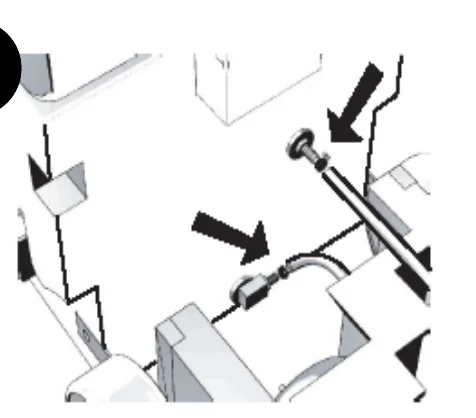
    Close view behind the black box with arrows pointing to the water line and return line connections to disconnect
    4
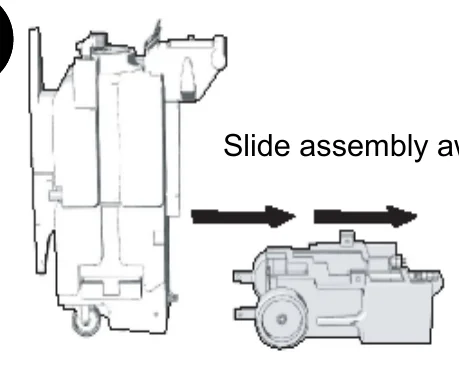
  5. Slide assembly away from water
    Machine on the left and the black box assembly on the floor to its right, with arrows showing the assembly sliding away from the machine
    5
Source: Kaivac 1700 Series Operator Manual KV1700_Manual_120216 Rev. 080816, page 15, used with permission. SES ref PF-UZW3-67CWโ€Œโ€Œโ€‹โ โ โ€โ โ€‹โ€‹โ€‹โ€Œโ€Œโ€โ€‹โ€‹โ€‹โ€Œโ€Œโ โ โ€‹โ€‹โ€‹โ€‹โ€‹โ€‹โ โ โ€‹โ€‹โ€‹โ€Œโ€‹โ โ€‹โ€‹โ€โ€โ€โ€‹โ€โ โ€Œโ€Œโ€‹โ€โ€โ€‹โ โ€โ€‹โ€‹โ€Œโ โ€‹โ€โ€‹โ โ โ€
1700 Series KV1700_Manual_120216 (080816)Page 15 of 35
3.0 MAINTENANCE

3.3 TROUBLESHOOTING

In short This table lists problems by area (electrical, vacuum system, blow dry system) with their possible causes and solutions. Always unplug the machine before lifting the electric cover assembly.โ€Œโ€Œโ€‹โ โ โ€โ โ€‹โ€‹โ€‹โ€Œโ€Œโ€โ€‹โ€‹โ€‹โ€Œโ€Œโ โ โ€‹โ€‹โ€‹โ€‹โ€‹โ€Œโ€‹โ€‹โ€‹โ€‹โ€‹โ€Œโ€‹โ โ€‹โ€‹โ€‹โ€โ€‹โ โ€‹โ โ€‹โ โ€‹โ โ€Œโ โ€Œโ โ€‹โ€Œโ€โ€‹โ€Œโ€โ€‹โ€โ€Œโ€‹
CAUTION Always make sure machineโ€™s unplugged before lifting electric cover assembly
AreaProblemPossible CauseSolution
ElectricalNo Power to pump or vac motorMachine not plugged inPlug machine in
Switch not โ€œonโ€™Check switches for โ€œonโ€
GFCI trippedTest and reset GFCI
Building circuit overloadedCheck and reset circuit
Switch wires looseDisconnect power and check for loose wire
Connections looseDisconnect Power and check for loose wire under panel
Electrical burning smellVac motor brushes wornRemove vac motor and repair
Vac motor hung upRelease pressure on hose and jog vac switch, or replace
Pump motor hung upRelease pressure on hose and jog pump switch, or replace
Vacuum SystemNo / Weak vacuumVac tank fullEmpty vac tank
Squeegee blades or wheels wornReplace wheels or blades and check periodically
Float shutoff screen dirtySpray off float screen to clean
Float ball stuckTap float and release/clean
Damaged hoseCut and repair/replace
Dump hose plug missingContact dealer and replace
Access lid not tightTighten lid hand tight
Vacuum hose pluggedFlush hose to remove debris
Too much liquid in vac hoseAllow air in when vacuuming
Vac hose still wrappedUnwrap vac hose fully
Exhaust pluggedRemove HEPA filter and clean
Leak in vac tankIf repairable, clean and dry affected area and seal with silicone
HEPA Filter cloggedRemove HEPA filter and clean
Moisture from exhaustVac tank fullDump vac tank
Float shutoff missingReplace
Excessive foam in vac tankUse defoamer
Blow Dry SystemNo air flowHose disconnectedReconnect hose
Moisture from nozzleWater in blow hoseDry blow line
Suction, not blow actionVacuum hose connected to vac tankReconnect to vac motor exhaust hose
Source: Kaivac 1700 Series Operator Manual KV1700_Manual_120216 Rev. 080816, page 16, used with permission. SES ref PF-HYSF-ZYCVโ€Œโ€Œโ€‹โ โ โ€โ โ€‹โ€‹โ€‹โ€Œโ€Œโ€โ€‹โ€‹โ€‹โ€Œโ€Œโ โ โ€‹โ€‹โ€‹โ€‹โ€‹โ€Œโ€‹โ€‹โ€‹โ€‹โ€‹โ€Œโ€‹โ โ€‹โ€‹โ€‹โ€โ€‹โ โ€‹โ โ€‹โ โ€‹โ โ€Œโ โ€Œโ โ€‹โ€Œโ€โ€‹โ€Œโ€โ€‹โ€โ€Œโ€‹
1700 Series KV1700_Manual_120216 (080816)Page 16 of 35
3.0 MAINTENANCE
AreaProblemPossible CauseSolution
High Pressure SystemNo water from pump or low pressureOut of WaterFill water tank
Gun nozzle pluggedRemove orifice with Allen wrench and clean
Air in pump (vapor lock)Use power prime technique
Gun orifice missingReplace orifice
Water tank filter pluggedClean tank and filter
In - line bowl filter pluggedRemove filter cover and clean
Bowl filter lid looseGently tighten bowl cover
Pressure hose damagedRepair or replace
Quick disconnect leakingTighten or replace
Injector pluggedRemove safety cap from chemical and blow small amounts of compressed air into line
Pulse hose damagedRepair or replace
Regulator failedReplace
Hose kinkedUnkink and check for damage
Seals in pump need replacedRemove and replace seals
Bad fan pattern or pinpoint pattern on gunDebris in nozzleRemove orifice with Allen wrench and clean
Orifice damagedRemove and replace
Chemical Injection SystemNo chemical flowOut of chemicalRefill chemical
Safety cap not secureCheck safety cap / tighten
Chemical valve โ€œoffโ€Check on / off valve
Safety cap pluggedReplace cap
Spray gun in wrong modeMake sure gun nozzle is pulled out away from gun chemical mode
Metering tip pluggedCheck metering tip for clog
Injector pluggedRemove safety cap from chemical and blow small amounts of compressed air into line
Air entering systemCheck for air entering system around chemical lines or injector
Injector installed backwardsIf fluttering or pulsing sound can be heard while spraying or when machine is running it is possible that your injector is in backwards. Remove and reinstall
Kink in Chemical lineReplace Chemical line
Source: Kaivac 1700 Series Operator Manual KV1700_Manual_120216 Rev. 080816, page 17, used with permission. SES ref PF-77RC-LHGRโ€Œโ€Œโ€‹โ โ โ€โ โ€‹โ€‹โ€‹โ€Œโ€Œโ€โ€‹โ€‹โ€‹โ€Œโ€Œโ โ โ€‹โ€‹โ€‹โ€‹โ€‹โ€Œโ€‹โ€Œโ€‹โ€‹โ€‹โ€Œโ€‹โ โ€‹โ€‹โ€Œโ€โ€‹โ โ€Œโ โ€โ€โ โ€โ€โ โ€โ€Œโ โ โ โ โ โ€Œโ€Œโ€‹โ โ€
1700 Series KV1700_Manual_120216 (080816)Page 17 of 35
3.0 MAINTENANCE
AreaProblemPossible CauseSolution
Chemical Injection System continuedNot enough chemicalMetering tip pluggedRemove and clean
Wrong metering tipCheck and replace per chart
Chemical line blows off safety capDebris in injectorRemove safety cap from chemical and blow small amounts of compressed air into line
Water back flows into chemical bottleBad seat on injector check valveCheck injector o - ring or replace
Bad safety capReplace safety cap
Dump SystemDump hose will not empty tankDump hose cap not removedRemove cap
Clog in bottom of tankTip dump contents, remove debris
Dump hose leaksHose cutIf leak is less than 4โ€ from tank side, cut and reattach, or replace
Clamp looseTighten hose clamp
Dump cap missingReplace cap
Wheels and CastersWheels wonโ€™t roll, or they rubFlat tiresInflate tires to 30 p. s. i.
Debris wrapped around axleCheck for debris on axle
Bearings tightGrease bearings
Wheels too loose on axleRemove wheel, add washers to take up slack
Bearings falling outReplace bearing assembly
Squeegee HeadFloor streaksWorn blades or wheelsReplace wheels and / or blades
Squeegee head doesnโ€™t easily rotate when installed on wandBrass ring on wand not in grooveLoosen coupling nut and re-position head on groove
Coupling nut too tightLoosen 1 / 2 turn
Head wonโ€™t stay on wandCoupling nut crackedReplace
Brass ring wornReplace
Premature blade wearSqueegee wheels wornCheck wheels for wear / replace
Sucks to the floor too tightlySqueegee wheels wornCheck wheels for wear / replace
Source: Kaivac 1700 Series Operator Manual KV1700_Manual_120216 Rev. 080816, page 18, used with permission. SES ref PF-QRUH-WBQAโ€Œโ€Œโ€‹โ โ โ€โ โ€‹โ€‹โ€‹โ€Œโ€Œโ€โ€‹โ€‹โ€‹โ€Œโ€Œโ โ โ€‹โ€‹โ€‹โ€‹โ€‹โ€Œโ€‹โ€โ€‹โ€‹โ€‹โ€Œโ€‹โ โ€‹โ€‹โ€‹โ€‹โ โ€‹โ€โ€โ€โ€โ€‹โ€โ โ€โ€Œโ โ โ€Œโ โ€โ โ€‹โ€Œโ€Œโ โ€‹
1700 Series KV1700_Manual_120216 (080816)Page 18 of 35
3.0 MAINTENANCE

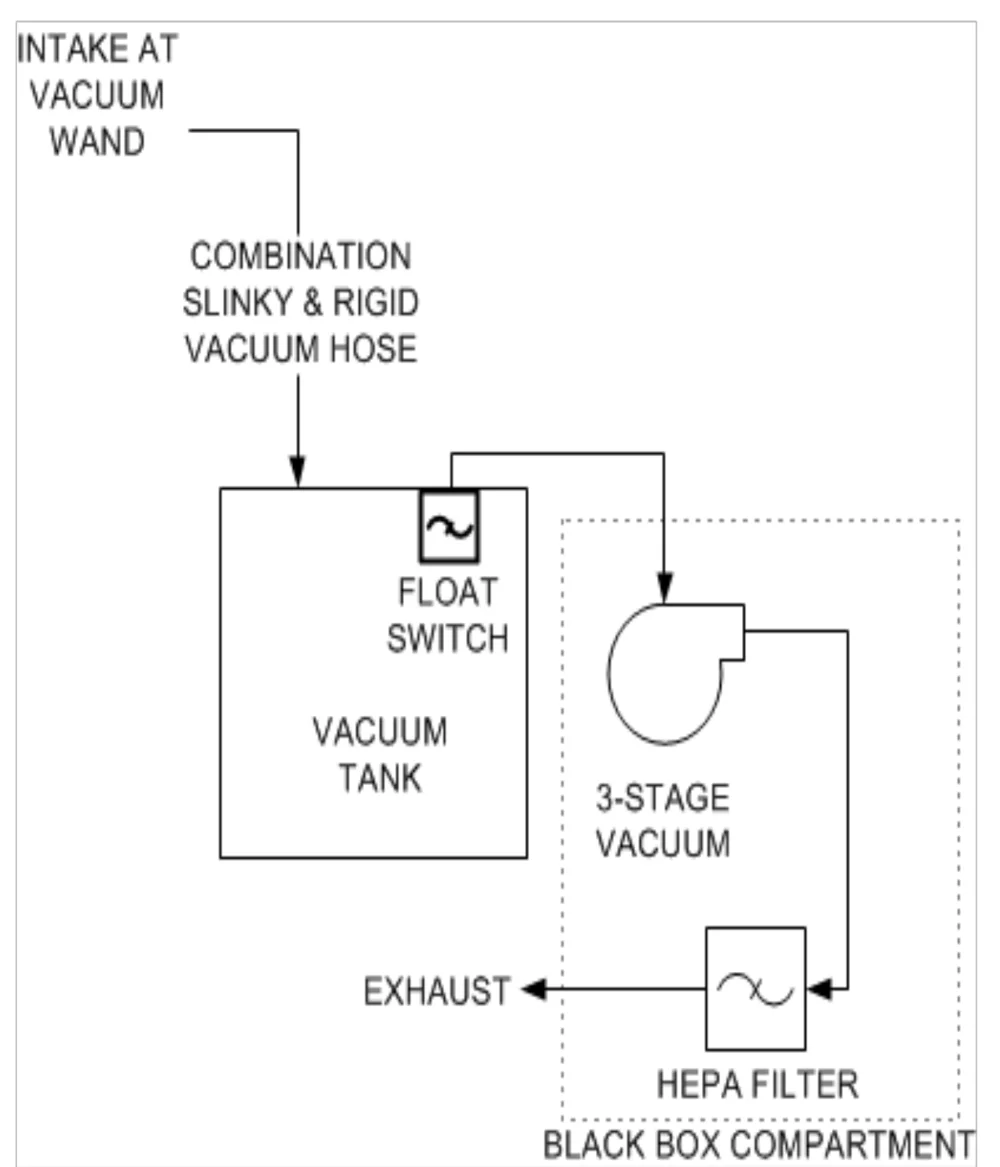
3.4 VACUUM DIAGRAM

In short This diagram shows the path air takes through the vacuum system: in at the vacuum wand, through the hose to the vacuum tank, past the float switch to the 3-stage vacuum, then through the HEPA filter and out the exhaust.โ€Œโ€Œโ€‹โ โ โ€โ โ€‹โ€‹โ€‹โ€Œโ€Œโ€โ€‹โ€‹โ€‹โ€Œโ€Œโ โ โ€‹โ€‹โ€‹โ€‹โ€‹โ€Œโ€‹โ โ€‹โ€‹โ€‹โ€Œโ€‹โ โ€‹โ€‹โ€Œโ€Œโ€Œโ€‹โ€โ€Œโ โ โ€‹โ€‹โ€โ โ€โ€Œโ€Œโ€Œโ โ€Œโ€Œโ€โ€Œโ โ€โ 
Flow diagram of the vacuum system. Intake at vacuum wand leads through the combination slinky and rigid vacuum hose into the vacuum tank, which has a float switch at its top. From the float switch the flow goes to the 3-stage vacuum, then to the HEPA filter, and then to the exhaust. The 3-stage vacuum and HEPA filter sit inside a dotted box labeled black box compartment.
Source: Kaivac 1700 Series Operator Manual KV1700_Manual_120216 Rev. 080816, page 19, used with permission. SES ref PF-MBMD-2UMKโ€Œโ€Œโ€‹โ โ โ€โ โ€‹โ€‹โ€‹โ€Œโ€Œโ€โ€‹โ€‹โ€‹โ€Œโ€Œโ โ โ€‹โ€‹โ€‹โ€‹โ€‹โ€Œโ€‹โ โ€‹โ€‹โ€‹โ€Œโ€‹โ โ€‹โ€‹โ€Œโ€Œโ€Œโ€‹โ€โ€Œโ โ โ€‹โ€‹โ€โ โ€โ€Œโ€Œโ€Œโ โ€Œโ€Œโ€โ€Œโ โ€โ 
1700 Series KV1700_Manual_120216 (080816)Page 19 of 35
3.0 MAINTENANCE

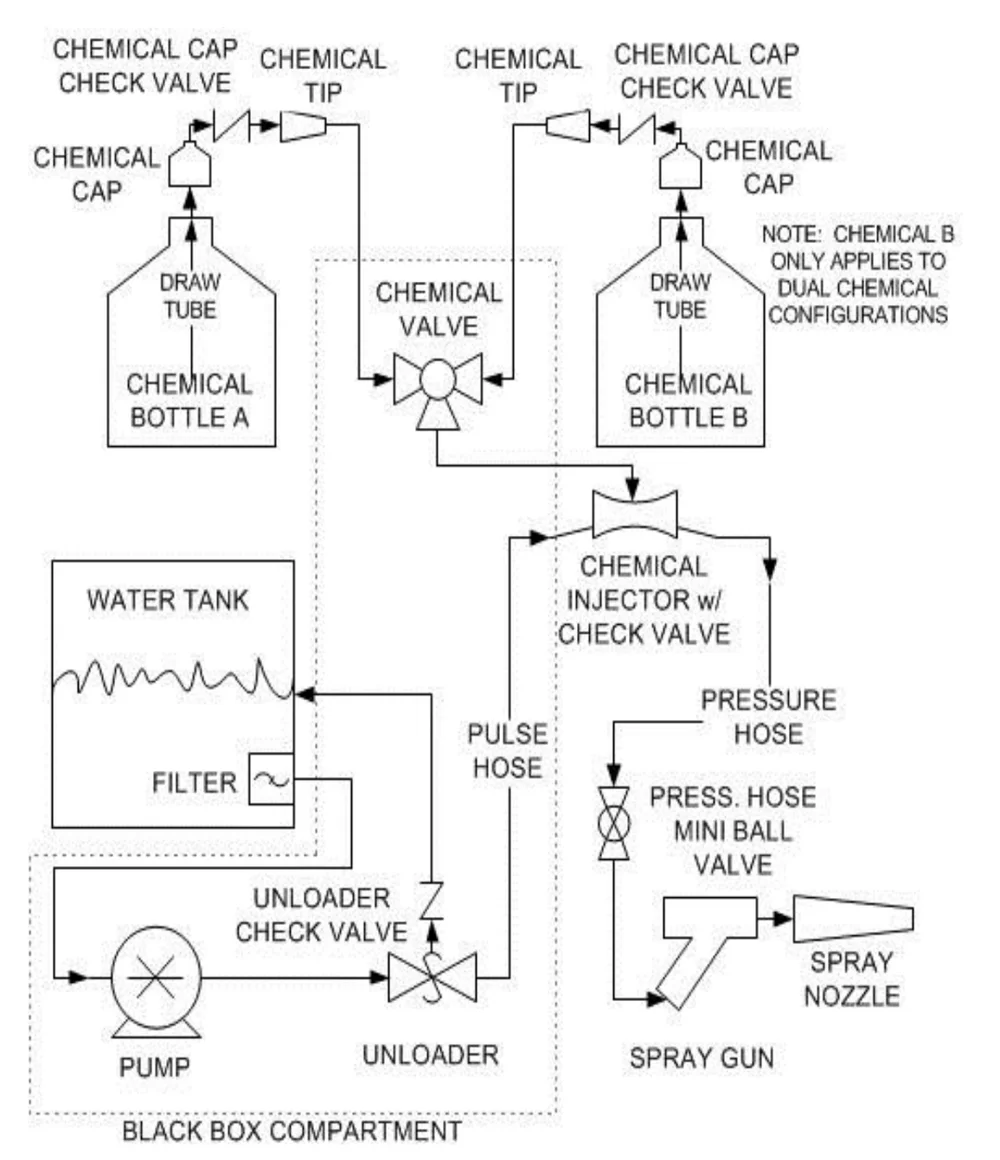
3.4 PUMP DIAGRAM

In short This section shows a flow diagram of the pump system. It traces how water from the tank and chemical from the bottles reach the spray gun and spray nozzle.โ€Œโ€Œโ€‹โ โ โ€โ โ€‹โ€‹โ€‹โ€Œโ€Œโ€โ€‹โ€‹โ€‹โ€Œโ€Œโ โ โ€‹โ€‹โ€‹โ€‹โ€‹โ€Œโ€Œโ€‹โ€‹โ€‹โ€‹โ€Œโ€‹โ โ€‹โ€‹โ€‹โ โ€Œโ€โ€Œโ€‹โ€โ€Œโ€โ โ€โ€Œโ โ€‹โ€‹โ โ โ€Œโ€Œโ€โ€Œโ€Œโ€Œโ€Œ
Flow diagram of the pump system. Chemical bottles A and B, each with a draw tube, chemical cap, chemical cap check valve and chemical tip, feed a chemical valve. The water tank with filter feeds the pump, then the unloader with its unloader check valve, which returns to the tank. The pulse hose leads to the chemical injector with check valve, then through the pressure hose and pressure hose mini ball valve to the spray gun and spray nozzle. The pump, unloader and chemical valve are shown inside the black box compartment. A note says chemical B only applies to dual chemical configurations.
Source: Kaivac 1700 Series Operator Manual KV1700_Manual_120216 Rev. 080816, page 20, used with permission. SES ref PF-DJGM-IK2Jโ€Œโ€Œโ€‹โ โ โ€โ โ€‹โ€‹โ€‹โ€Œโ€Œโ€โ€‹โ€‹โ€‹โ€Œโ€Œโ โ โ€‹โ€‹โ€‹โ€‹โ€‹โ€Œโ€Œโ€‹โ€‹โ€‹โ€‹โ€Œโ€‹โ โ€‹โ€‹โ€‹โ โ€Œโ€โ€Œโ€‹โ€โ€Œโ€โ โ€โ€Œโ โ€‹โ€‹โ โ โ€Œโ€Œโ€โ€Œโ€Œโ€Œโ€Œ
1700 Series KV1700_Manual_120216 (080816)Page 20 of 35
3.0 MAINTENANCE

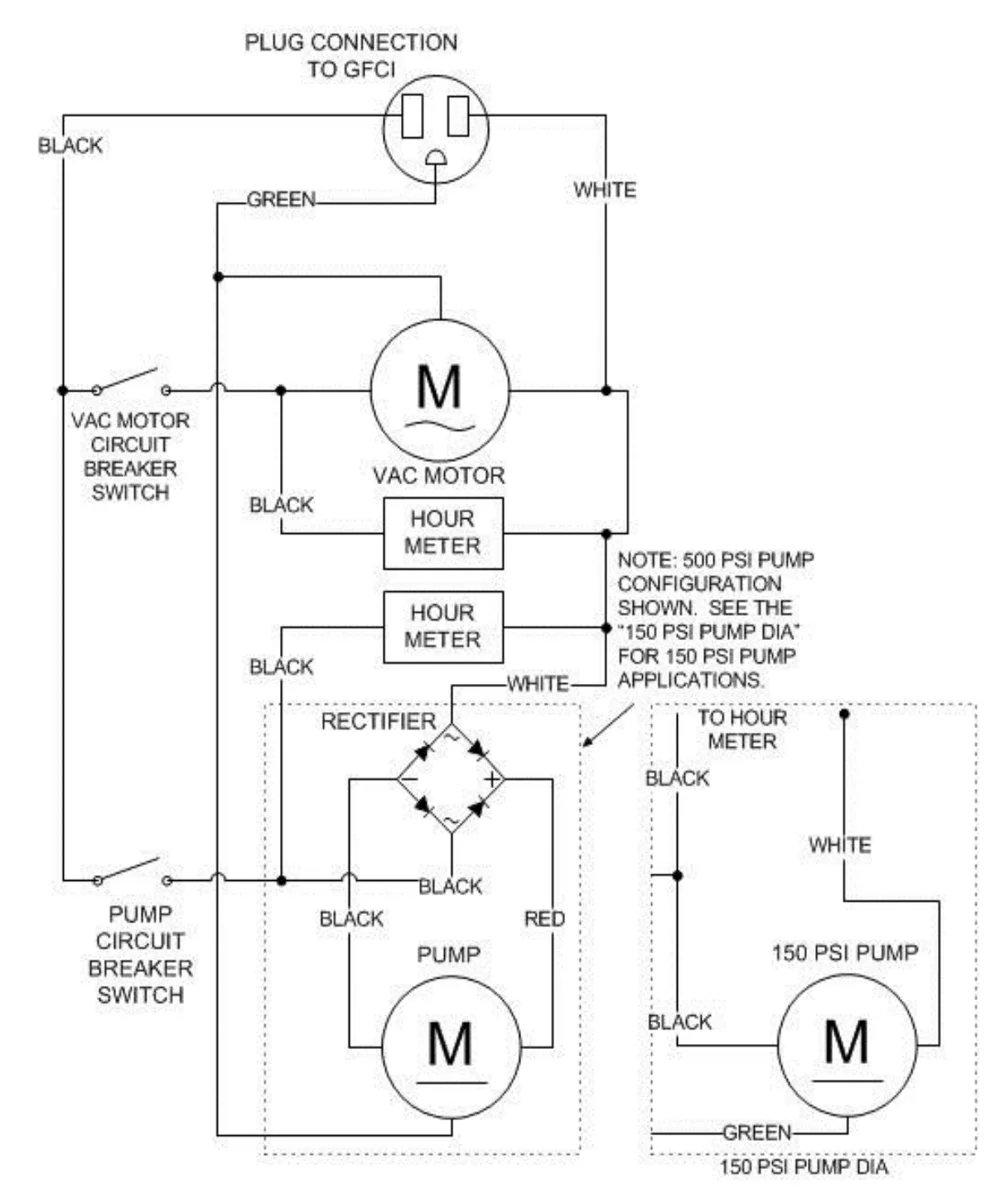
3.4 ELECTRICAL DIAGRAM

In short This section shows the wiring diagram for the machine: the plug connection to the GFCI, the vac motor and pump circuit breaker switches, the hour meters, the rectifier and the pump. A separate drawing shows the wiring for 150 PSI pump applications.โ€Œโ€Œโ€‹โ โ โ€โ โ€‹โ€‹โ€‹โ€Œโ€Œโ€โ€‹โ€‹โ€‹โ€Œโ€Œโ โ โ€‹โ€‹โ€‹โ€‹โ€‹โ€Œโ€Œโ€Œโ€‹โ€‹โ€‹โ€Œโ€‹โ โ€‹โ€‹โ€‹โ€Œโ€‹โ€‹โ€โ€โ€‹โ โ โ€‹โ€‹โ€โ€โ€Œโ โ โ€‹โ€‹โ€Œโ€‹โ€‹โ€โ โ€
Electrical wiring diagram. At the top, a plug connection to GFCI with black, green and white wires feeds a vac motor through a vac motor circuit breaker switch, with an hour meter. Below, a pump circuit breaker switch feeds a second hour meter and a rectifier connected to the pump with black and red wires. A note says the 500 PSI pump configuration is shown and refers to the 150 PSI pump diagram. At the right, a dashed box labeled 150 PSI PUMP DIA shows the 150 PSI pump wired with black, white and green wires and a connection to the hour meter.
Source: Kaivac 1700 Series Operator Manual KV1700_Manual_120216 Rev. 080816, page 21, used with permission. SES ref PF-H7ER-ZIHQโ€Œโ€Œโ€‹โ โ โ€โ โ€‹โ€‹โ€‹โ€Œโ€Œโ€โ€‹โ€‹โ€‹โ€Œโ€Œโ โ โ€‹โ€‹โ€‹โ€‹โ€‹โ€Œโ€Œโ€Œโ€‹โ€‹โ€‹โ€Œโ€‹โ โ€‹โ€‹โ€‹โ€Œโ€‹โ€‹โ€โ€โ€‹โ โ โ€‹โ€‹โ€โ€โ€Œโ โ โ€‹โ€‹โ€Œโ€‹โ€‹โ€โ โ€
1700 Series KV1700_Manual_120216 (080816)Page 21 of 35
3.0 MAINTENANCE

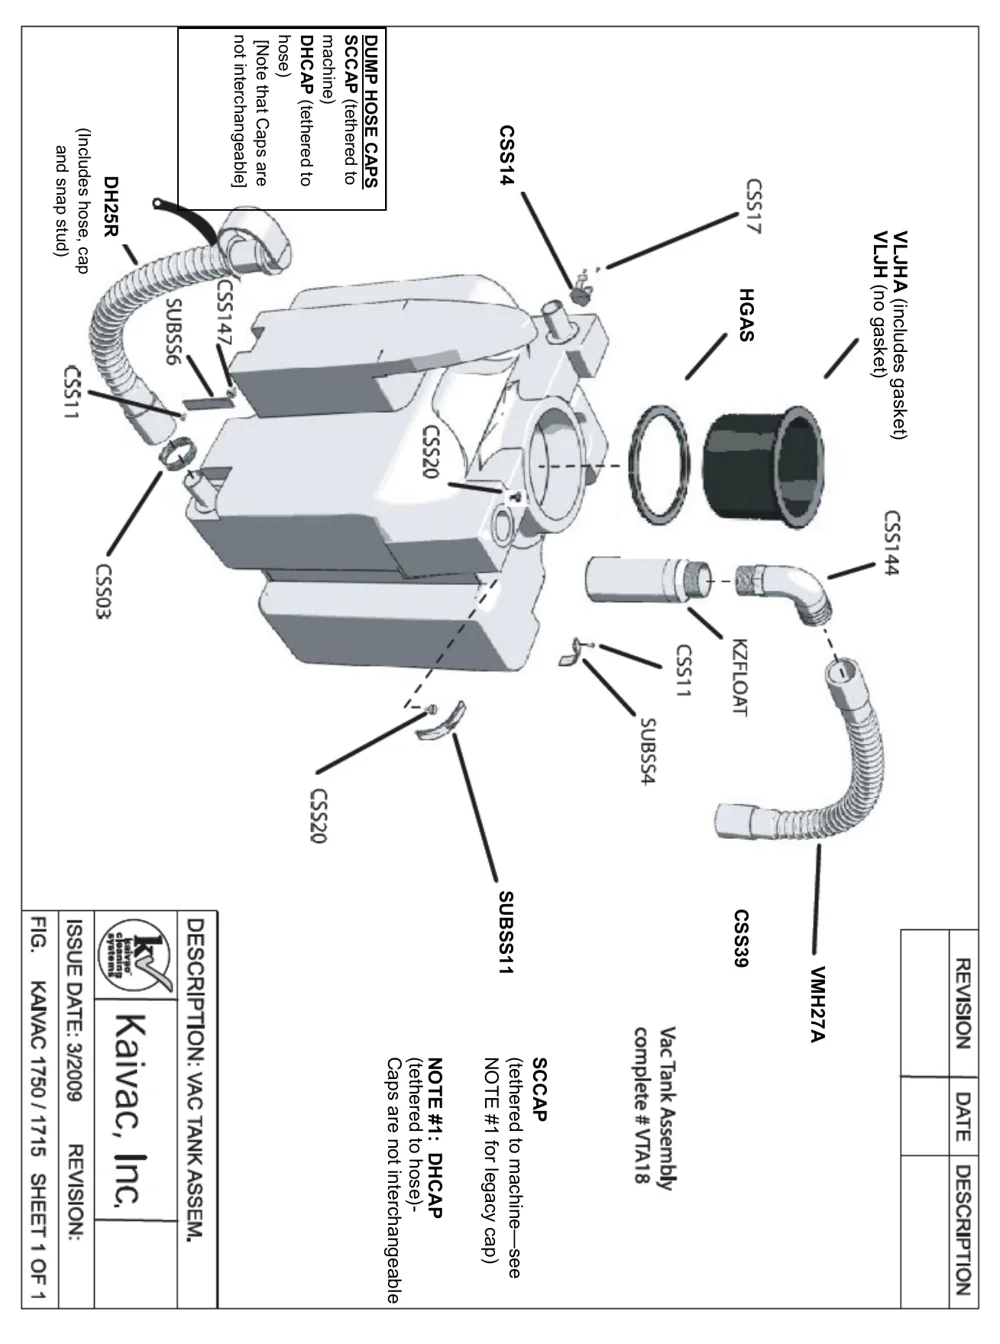
3.4 MACHINE DIAGRAMS

In short This page is an exploded diagram of the vac tank assembly, with part codes marked on it. It also notes that the dump hose caps, SCCAP and DHCAP, are not interchangeable.โ€Œโ€Œโ€‹โ โ โ€โ โ€‹โ€‹โ€‹โ€Œโ€Œโ€โ€‹โ€‹โ€‹โ€Œโ€Œโ โ โ€‹โ€‹โ€‹โ€‹โ€‹โ€Œโ€Œโ€โ€‹โ€‹โ€‹โ€Œโ€‹โ โ€‹โ€‹โ€‹โ€‹โ€‹โ€โ€‹โ โ€Œโ โ€‹โ โ€Œโ€‹โ€Œโ€Œโ€‹โ€โ€โ โ โ€โ€‹โ€โ โ€
Exploded drawing of the vac tank assembly turned sideways, with part codes labeled: CSS14, CSS17, HGAS, VLJHA and VLJH, CSS144, KZFLOAT, CSS11, SUBSS4, CSS20, SUBSS11, CSS39, VMH27A, CSS147, SUBSS6, DH25R and CSS503. A dump hose caps box and a Kaivac title block sit along the sides.
Kaivac 1750 / 1715, Sheet 1 of 1. Description: Vac Tank Assem. Issue date 3/2009

DUMP HOSE CAPS
SCCAP (tethered to machine)
DHCAP (tethered to hose)
[Note that Caps are not interchangeable]โ€Œโ€Œโ€‹โ โ โ€โ โ€‹โ€‹โ€‹โ€Œโ€Œโ€โ€‹โ€‹โ€‹โ€Œโ€Œโ โ โ€‹โ€‹โ€‹โ€‹โ€‹โ€Œโ€Œโ€โ€‹โ€‹โ€‹โ€Œโ€‹โ โ€‹โ€‹โ€‹โ€‹โ€‹โ€โ€‹โ โ€Œโ โ€‹โ โ€Œโ€‹โ€Œโ€Œโ€‹โ€โ€โ โ โ€โ€‹โ€โ โ€

DH25R (Includes hose, cap and snap stud)

VLJHA (includes gasket)
VLJH (no gasket)

VacTank Assembly complete #VTA18

SCCAP (tethered to machineโ€”see NOTE #1 for legacy cap)
NOTE #1: DHCAP (tethered to hose)-Caps are not interchangeable

Source: Kaivac 1700 Series Operator Manual KV1700_Manual_120216 Rev. 080816, page 22, used with permission. SES ref PF-NJXI-X2YIโ€Œโ€Œโ€‹โ โ โ€โ โ€‹โ€‹โ€‹โ€Œโ€Œโ€โ€‹โ€‹โ€‹โ€Œโ€Œโ โ โ€‹โ€‹โ€‹โ€‹โ€‹โ€Œโ€Œโ€โ€‹โ€‹โ€‹โ€Œโ€‹โ โ€‹โ€‹โ€‹โ€‹โ€‹โ€โ€‹โ โ€Œโ โ€‹โ โ€Œโ€‹โ€Œโ€Œโ€‹โ€โ€โ โ โ€โ€‹โ€โ โ€
1700 Series KV1700_Manual_120216 (080816)Page 22 of 35
MAINTENANCE

3.4 MACHINE DIAGRAMS

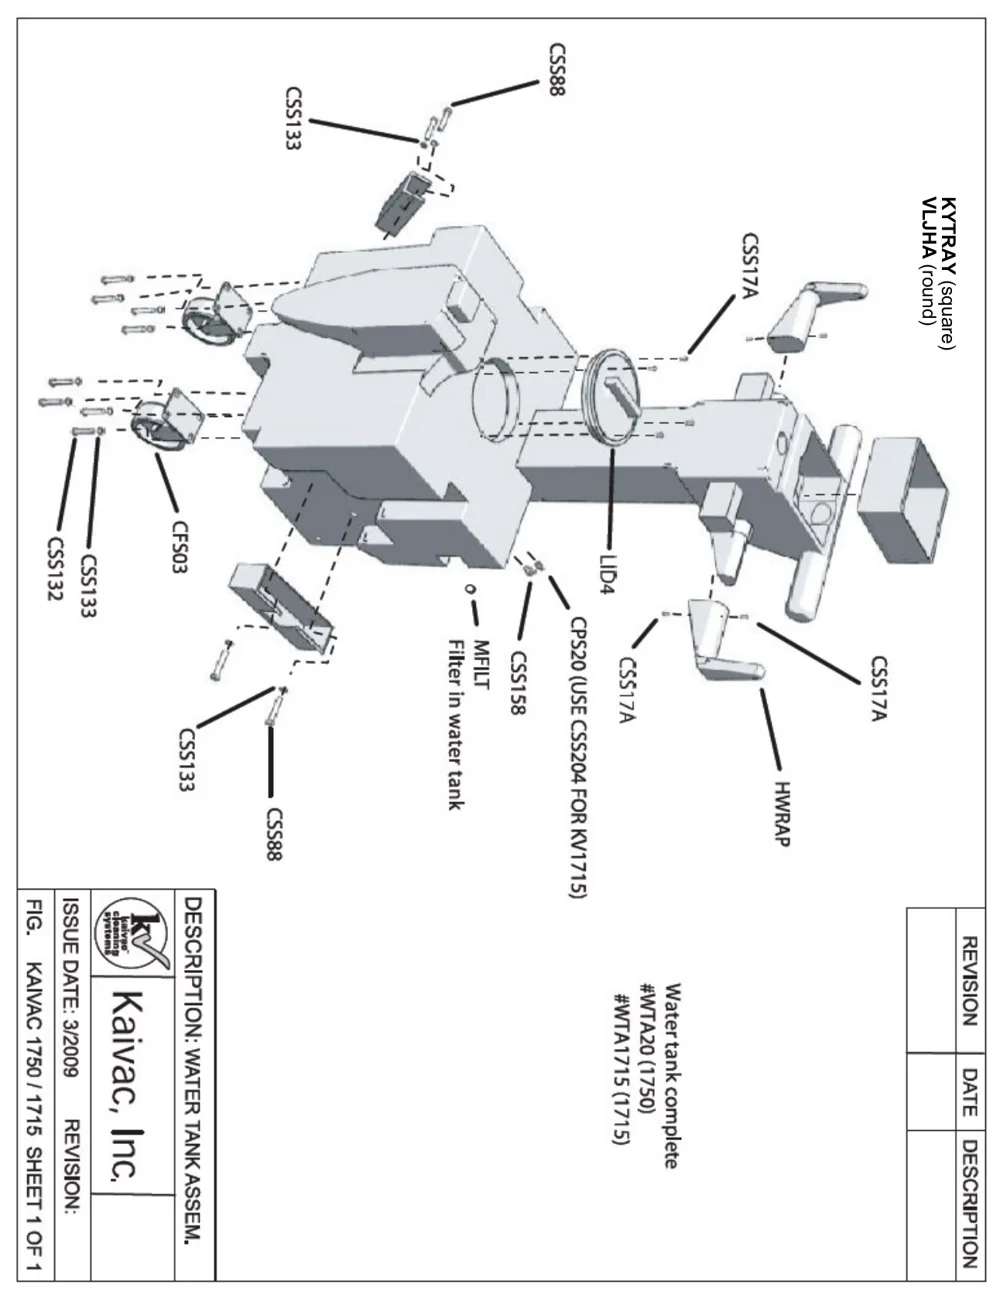
In short This section shows machine diagrams. This page has the exploded view of the water tank assembly for the Kaivac 1750 / 1715, with each part labeled by its part code.โ€Œโ€Œโ€‹โ โ โ€โ โ€‹โ€‹โ€‹โ€Œโ€Œโ€โ€‹โ€‹โ€‹โ€Œโ€Œโ โ โ€‹โ€‹โ€‹โ€‹โ€‹โ€Œโ€Œโ โ€‹โ€‹โ€‹โ€Œโ€‹โ โ€‹โ€‹โ€‹โ€‹โ€‹โ€‹โ โ€Œโ€โ€‹โ โ€‹โ€Œโ€‹โ€‹โ€โ€‹โ€โ€โ€โ€‹โ โ€โ โ€‹โ€
Exploded drawing of the water tank assembly, turned sideways on the page, with the tank body in the center and the parts around it labeled by code: CSS88, CSS133, CSS132, CFS03, CSS17A, LID4, MFILT (filter in water tank), CSS158, CPS20 (use CSS204 for KV1715), HWRAP, and KYTRAY (square) or VLJHA (round). A title block at the lower edge reads Kaivac, Inc., description water tank assem., Kaivac 1750 / 1715 sheet 1 of 1, issue date 3/2009.
Water tank assembly, Kaivac 1750 / 1715, sheet 1 of 1

Water tank complete #WTA20 (1750) #WTA1715 (1715)โ€Œโ€Œโ€‹โ โ โ€โ โ€‹โ€‹โ€‹โ€Œโ€Œโ€โ€‹โ€‹โ€‹โ€Œโ€Œโ โ โ€‹โ€‹โ€‹โ€‹โ€‹โ€Œโ€Œโ โ€‹โ€‹โ€‹โ€Œโ€‹โ โ€‹โ€‹โ€‹โ€‹โ€‹โ€‹โ โ€Œโ€โ€‹โ โ€‹โ€Œโ€‹โ€‹โ€โ€‹โ€โ€โ€โ€‹โ โ€โ โ€‹โ€

Source: Kaivac 1700 Series Operator Manual KV1700_Manual_120216 Rev. 080816, page 23, used with permission. SES ref PF-QNAT-RDT4โ€Œโ€Œโ€‹โ โ โ€โ โ€‹โ€‹โ€‹โ€Œโ€Œโ€โ€‹โ€‹โ€‹โ€Œโ€Œโ โ โ€‹โ€‹โ€‹โ€‹โ€‹โ€Œโ€Œโ โ€‹โ€‹โ€‹โ€Œโ€‹โ โ€‹โ€‹โ€‹โ€‹โ€‹โ€‹โ โ€Œโ€โ€‹โ โ€‹โ€Œโ€‹โ€‹โ€โ€‹โ€โ€โ€โ€‹โ โ€โ โ€‹โ€
1700 Series KV1700_Manual_120216 (080816)Page 23 of 35
3.0 MAINTENANCE

3.4 MACHINE DIAGRAMS

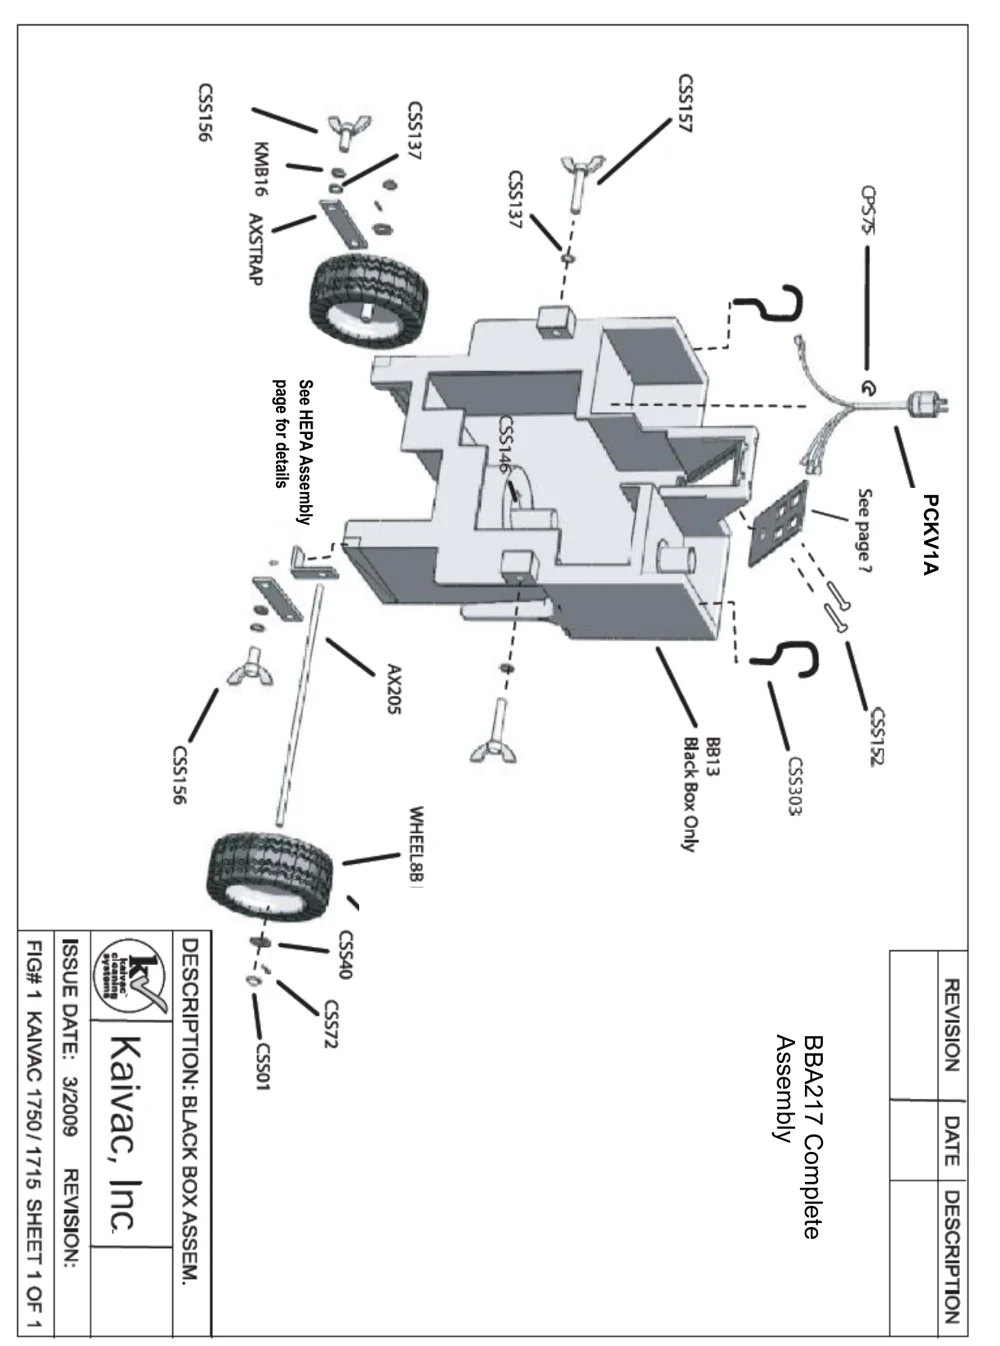
In short This section shows an exploded diagram of the black box assembly (BBA217 Complete Assembly) with each part labeled by its part number. Use it to identify the wheels, axle, hardware, power cord and black box parts.โ€Œโ€Œโ€‹โ โ โ€โ โ€‹โ€‹โ€‹โ€Œโ€Œโ€โ€‹โ€‹โ€‹โ€Œโ€Œโ โ โ€‹โ€‹โ€‹โ€‹โ€‹โ€Œโ€โ€‹โ€‹โ€‹โ€‹โ€Œโ€‹โ โ€‹โ€‹โ€‹โ€โ€‹โ โ€‹โ€Œโ โ โ€‹โ€‹โ€Œโ€Œโ€โ€Œโ€Œโ โ โ โ€Œโ€Œโ€Œโ€Œโ€‹โ€Œ
Exploded diagram of the black box assembly, printed rotated on its side, showing the black box with two wheels, an axle, axle straps, wing-nut thumb screws, washers, cotter pin, push cap nut, power cord and switch panel, each labeled with a part number such as CSS156, CSS137, KMB16, AXSTRAP, CSS157, CPS75, PCKV1A, CSS152, CSS303, B13 Black Box Only, WHEEL8B, CSS40, CSS72, CSS01, AX205 and CSS146. Notes read 'See HEPA Assembly page for details' and 'See page ?'. The title block reads BBA217 Complete Assembly, Description: Black Box Assem., Fig# 1 Kaivac 1750/1715 Sheet 1 of 1, Issue date 3/2009.
Source: Kaivac 1700 Series Operator Manual KV1700_Manual_120216 Rev. 080816, page 24, used with permission. SES ref PF-LRQA-LAWHโ€Œโ€Œโ€‹โ โ โ€โ โ€‹โ€‹โ€‹โ€Œโ€Œโ€โ€‹โ€‹โ€‹โ€Œโ€Œโ โ โ€‹โ€‹โ€‹โ€‹โ€‹โ€Œโ€โ€‹โ€‹โ€‹โ€‹โ€Œโ€‹โ โ€‹โ€‹โ€‹โ€โ€‹โ โ€‹โ€Œโ โ โ€‹โ€‹โ€Œโ€Œโ€โ€Œโ€Œโ โ โ โ€Œโ€Œโ€Œโ€Œโ€‹โ€Œ
1700 Series KV1700_Manual_120216 (080816)Page 24 of 35
MAINTENANCE

3.4 MACHINE DIAGRAMS

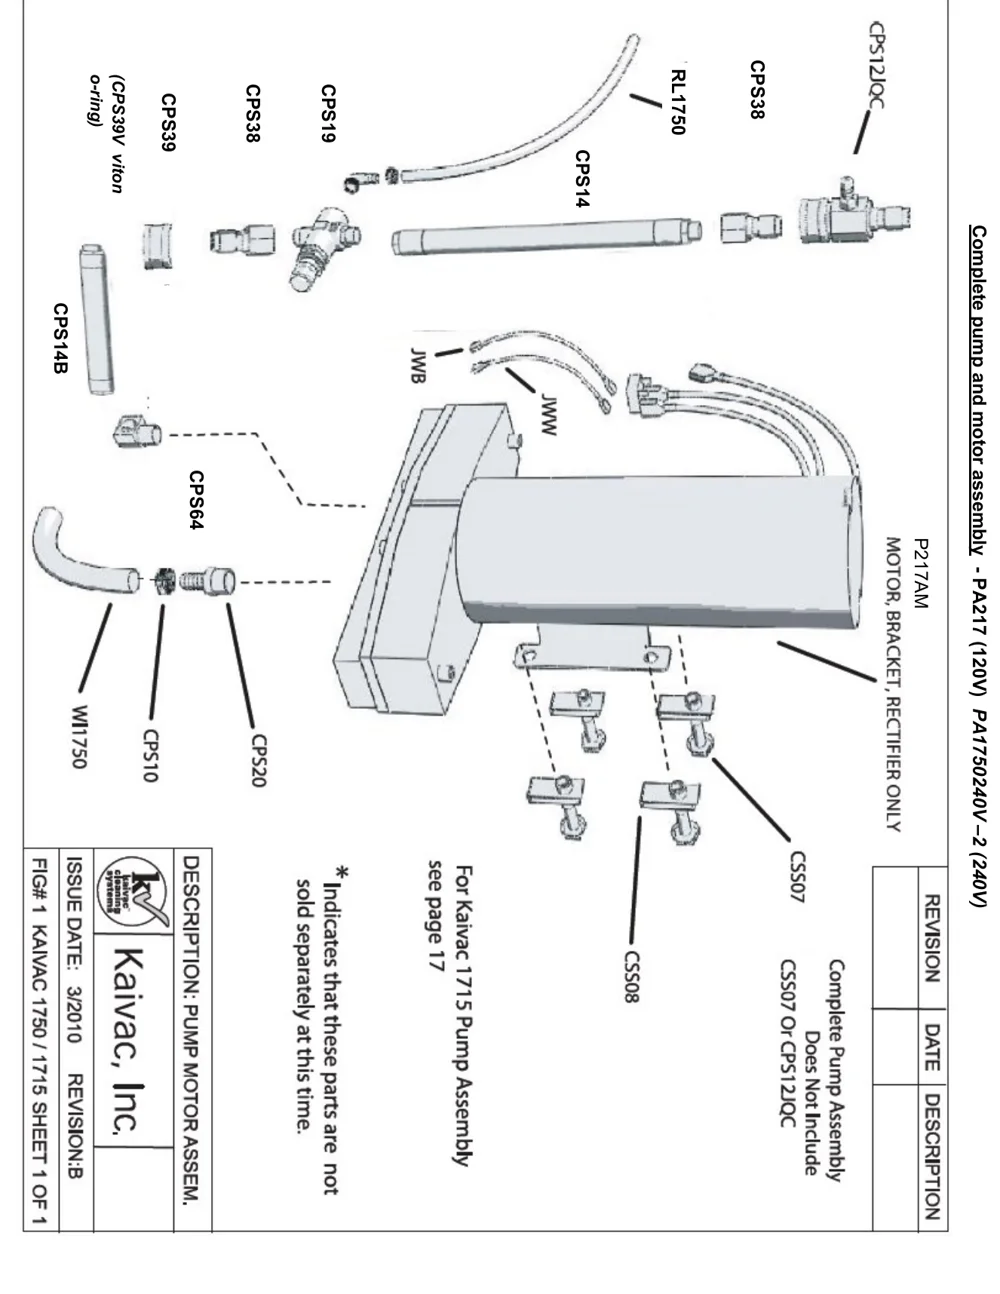
In short This page shows a rotated diagram of the complete pump and motor assembly for the Kaivac 1750 / 1715, with the part numbers labeled on each component. The note on the drawing says the complete pump assembly does not include CSS07 or CPS12QC.โ€Œโ€Œโ€‹โ โ โ€โ โ€‹โ€‹โ€‹โ€Œโ€Œโ€โ€‹โ€‹โ€‹โ€Œโ€Œโ โ โ€‹โ€‹โ€‹โ€‹โ€‹โ€Œโ€โ€Œโ€‹โ€‹โ€‹โ€Œโ€‹โ โ€‹โ€‹โ โ€‹โ โ€‹โ€Œโ โ โ โ€‹โ€Œโ€‹โ€Œโ€‹โ€‹โ€โ€Œโ โ€‹โ โ€‹โ€โ€โ€โ€Œ
Rotated exploded drawing of the complete pump and motor assembly (PA217 120V, PA1750240V-2 240V) with labeled parts: CPS12QC, CPS38 (two), RL1750, CPS14, CPS19, CPS39 (CPS39V viton o-ring), CPS14B, CPS64, WL1750, CPS10, CPS20, JWB and JWW jumper wires, P217AM motor, bracket and rectifier only, and mounting hardware CSS07 and CSS08. Notes say the complete pump assembly does not include CSS07 or CPS12QC, that an asterisk marks parts not sold separately at this time, and that for the Kaivac 1715 pump assembly see page 17. A title block reads: Kaivac, Inc., Description: Pump Motor Assem., Issue date 3/2010, Revision B, Fig# 1 Kaivac 1750 / 1715 Sheet 1 of 1.
Complete pump and motor assembly - PA217 (120V) PA1750240V-2 (240V)
Source: Kaivac 1700 Series Operator Manual KV1700_Manual_120216 Rev. 080816, page 25, used with permission. SES ref PF-FQSS-4T7Kโ€Œโ€Œโ€‹โ โ โ€โ โ€‹โ€‹โ€‹โ€Œโ€Œโ€โ€‹โ€‹โ€‹โ€Œโ€Œโ โ โ€‹โ€‹โ€‹โ€‹โ€‹โ€Œโ€โ€Œโ€‹โ€‹โ€‹โ€Œโ€‹โ โ€‹โ€‹โ โ€‹โ โ€‹โ€Œโ โ โ โ€‹โ€Œโ€‹โ€Œโ€‹โ€‹โ€โ€Œโ โ€‹โ โ€‹โ€โ€โ€โ€Œ
1700 Series KV1700_Manual_120216 (080816)Page 25 of 35
3.0 MAINTENANCE

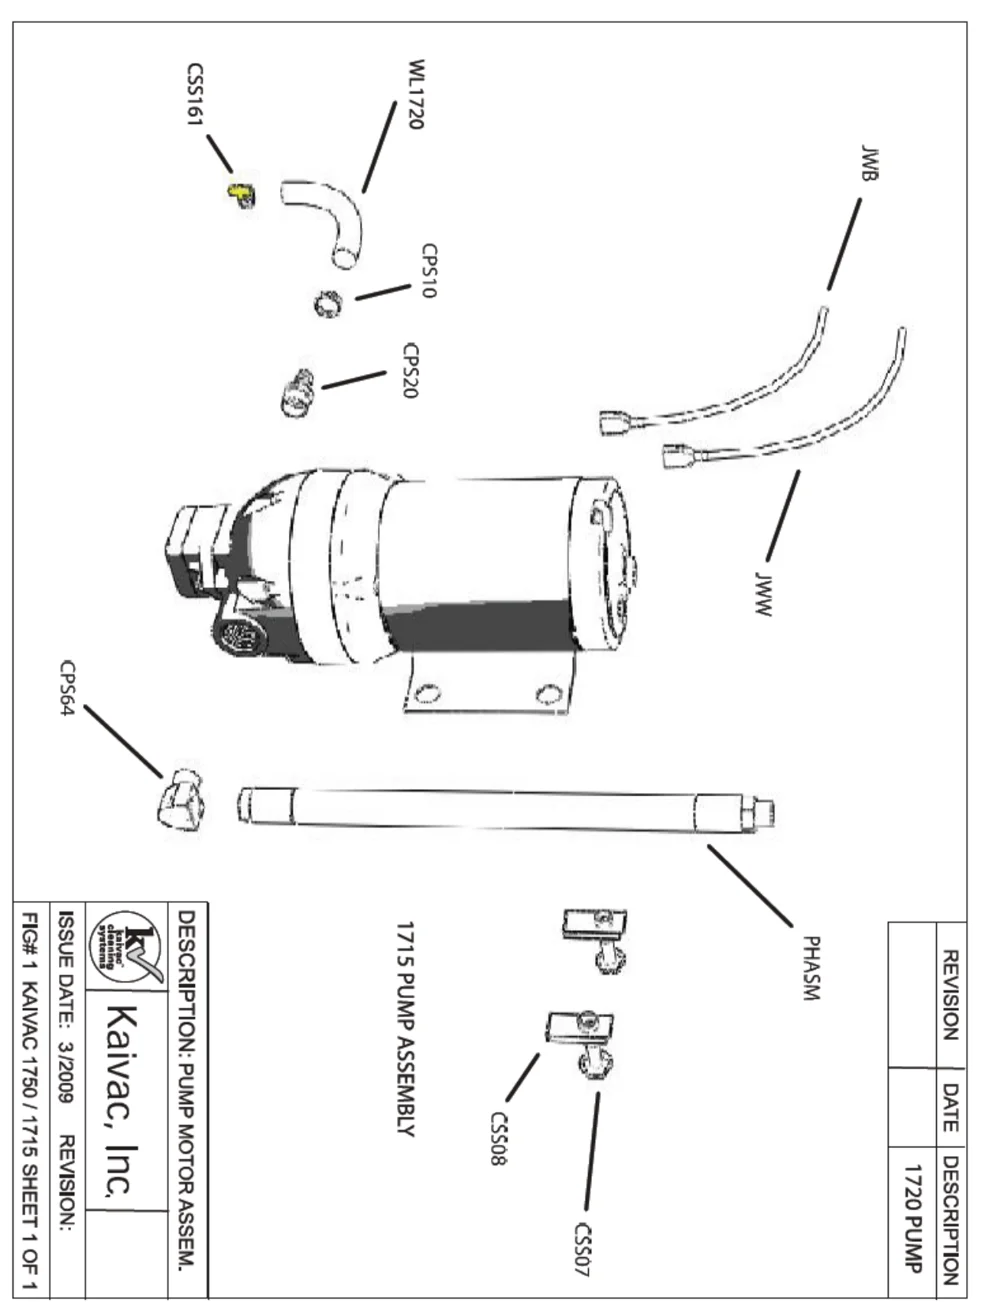
3.4 MACHINE DIAGRAMS

Exploded drawing of the Kaivac 1720 pump motor assembly, printed rotated on the page, with part callouts CSS161, WL1720, CPS10, CPS20, JWB, JWW, CPS64, PHASM, CSS08 and CSS07 pointing to the fitting, water line, hose clamp, brass hose barb, black and white jumper wires, 90 degree fitting, pulse hose, U-nut and bolt around the pump motor. The label 1715 PUMP ASSEMBLY appears beside the pulse hose, and the title block reads Kaivac, Inc., description pump motor assem., fig 1 Kaivac 1750 / 1715 sheet 1 of 1, issue date 3/2009, with a revision table showing 1720 PUMP.
FIG# 1 KAIVAC 1750 / 1715 SHEET 1 OF 1 - Pump motor assembly
Source: Kaivac 1700 Series Operator Manual KV1700_Manual_120216 Rev. 080816, page 26, used with permission. SES ref PF-ACYM-Q2B6โ€Œโ€Œโ€‹โ โ โ€โ โ€‹โ€‹โ€‹โ€Œโ€Œโ€โ€‹โ€‹โ€‹โ€Œโ€Œโ โ โ€‹โ€‹โ€‹โ€‹โ€‹โ€Œโ€โ€โ€‹โ€‹โ€‹โ€Œโ€‹โ โ€‹โ€‹โ€‹โ โ€‹โ โ€โ โ€‹โ€Œโ€โ€โ€‹โ€โ€‹โ€โ€Œโ€โ€Œโ€‹โ€โ€‹โ€Œโ€‹โ€โ€
1700 Series KV1700_Manual_120216 (080816)Page 26 of 35
3.0 MAINTENANCE

3.4 MACHINE DIAGRAMS

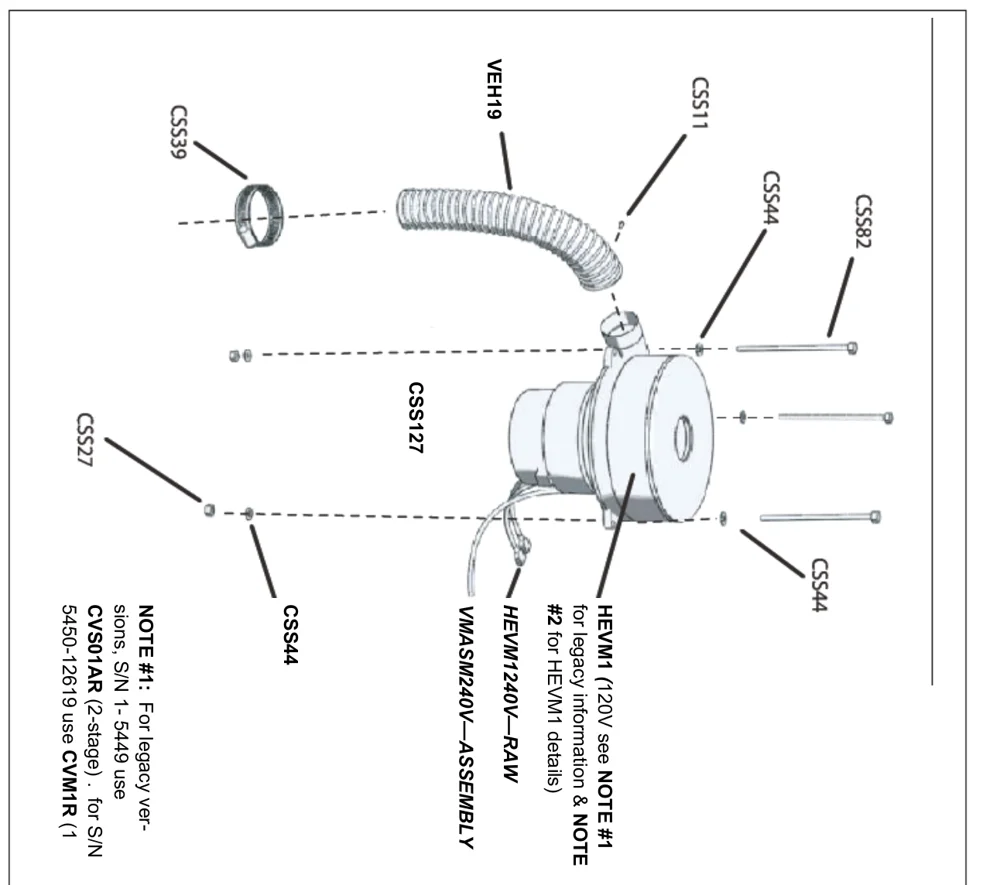
In short This section shows exploded machine diagrams. This page shows the vac motor and cover parts for the Kaivac 1750 / 1715, with the part numbers for the motor assembly and its mounting hardware, and notes on which motor fits which serial numbers.โ€Œโ€Œโ€‹โ โ โ€โ โ€‹โ€‹โ€‹โ€Œโ€Œโ€โ€‹โ€‹โ€‹โ€Œโ€Œโ โ โ€‹โ€‹โ€‹โ€‹โ€‹โ€Œโ€โ โ€‹โ€‹โ€‹โ€Œโ€‹โ โ€‹โ€‹โ โ โ โ โ โ€‹โ€โ€‹โ โ€‹โ โ€Œโ€โ€‹โ€‹โ€‹โ€Œโ โ โ€Œโ€โ โ€โ€Œ
Exploded view of the vac motor assembly, drawn rotated on the page, showing the vac motor with its exhaust hose and hose clamp, mounting bolts, washers and nuts, and the motor wires. Callouts: CSS39, VEH19, CSS11, CSS44, CSS82, CSS127, CSS27, HEVM1, HEVM1240V and VMASM240V.
FIG# 1 KAIVAC 1750 / 1715 SHEET 1 OF 1 - Vac motor / cover

NOTE #1: For legacy versions, S/N 1-5449 use CVS01AR (2-stage). for S/N 5450-12619 use CVM1R (1โ€Œโ€Œโ€‹โ โ โ€โ โ€‹โ€‹โ€‹โ€Œโ€Œโ€โ€‹โ€‹โ€‹โ€Œโ€Œโ โ โ€‹โ€‹โ€‹โ€‹โ€‹โ€Œโ€โ โ€‹โ€‹โ€‹โ€Œโ€‹โ โ€‹โ€‹โ โ โ โ โ โ€‹โ€โ€‹โ โ€‹โ โ€Œโ€โ€‹โ€‹โ€‹โ€Œโ โ โ€Œโ€โ โ€โ€Œ

HEVM1 (120V see NOTE #1 for legacy information & NOTE #2 for HEVM1 details)

HEVM1240Vโ€”RAW

VMASM240Vโ€”ASSEMBLY

NOTE #2: VMA1700 Vac Motor Assembly Details Standard on; 1750-12620 and higher and 1715-401 and higher. *1750's and 1715's that have the vac motor installed with a bracket can be upgraded to this setup but must order entire assembly #VMA1700. See part numbers below for this assembly.

Hardware for mounting motor to bracket

Hardware for mounting bracket to black

DESCRIPTION: VAC MOTOR / COVER
ISSUE DATE: 3/2009 REVISION:
FIG# 1 KAIVAC 1750 / 1715 SHEET 1 OF 1

Source: Kaivac 1700 Series Operator Manual KV1700_Manual_120216 Rev. 080816, page 27, used with permission. SES ref PF-32RG-3IFEโ€Œโ€Œโ€‹โ โ โ€โ โ€‹โ€‹โ€‹โ€Œโ€Œโ€โ€‹โ€‹โ€‹โ€Œโ€Œโ โ โ€‹โ€‹โ€‹โ€‹โ€‹โ€Œโ€โ โ€‹โ€‹โ€‹โ€Œโ€‹โ โ€‹โ€‹โ โ โ โ โ โ€‹โ€โ€‹โ โ€‹โ โ€Œโ€โ€‹โ€‹โ€‹โ€Œโ โ โ€Œโ€โ โ€โ€Œ
1700 Series KV1700_Manual_120216 (080816)Page 27 of 35
3.0 MAINTENANCE

3.4 MACHINE DIAGRAMS

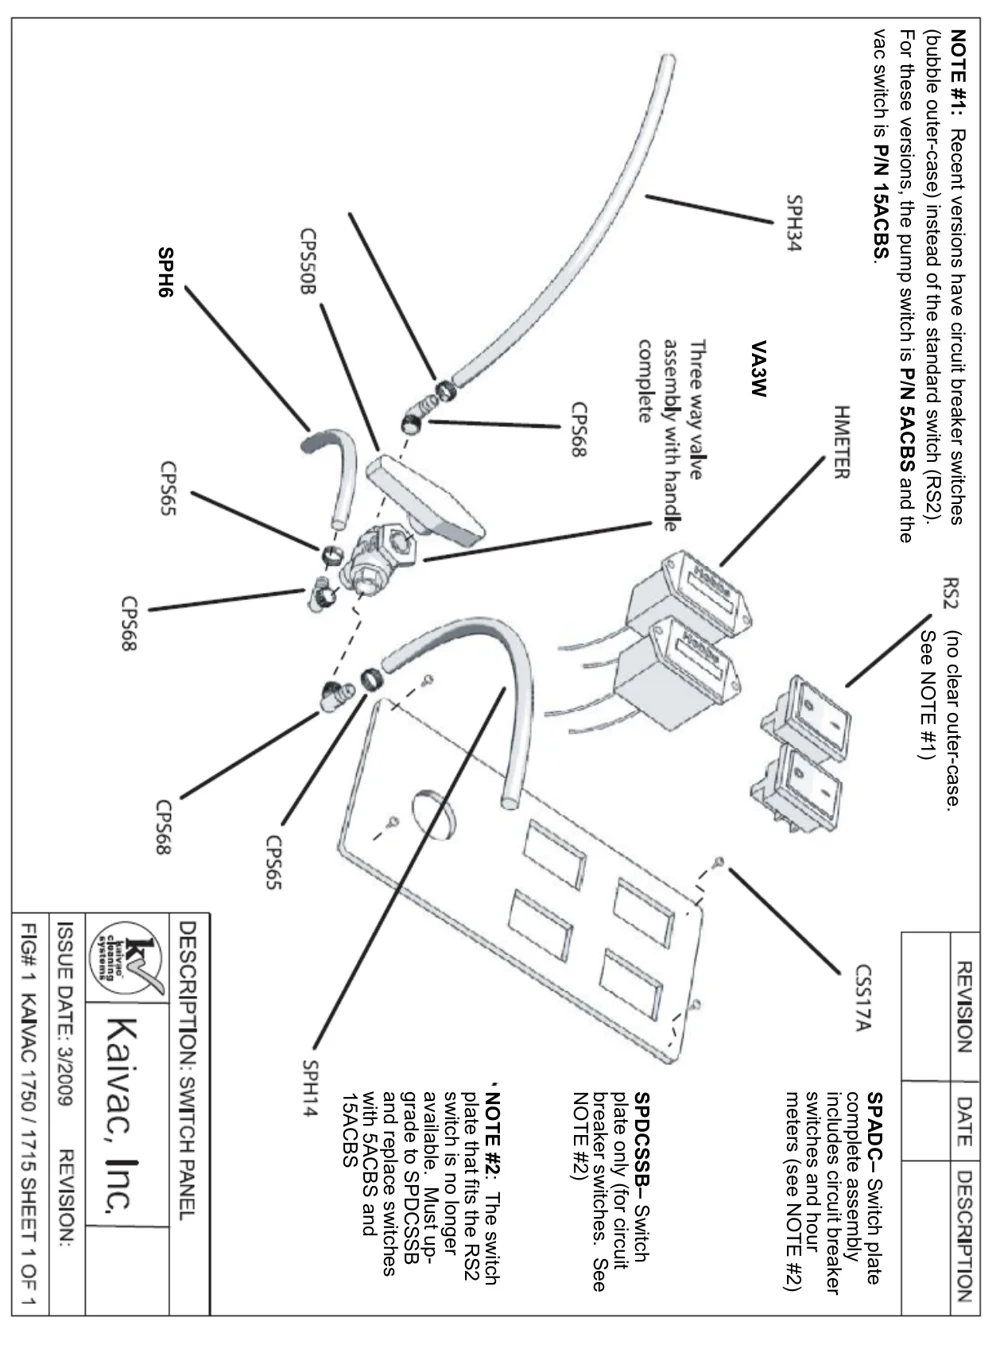
In short This page shows an exploded diagram of the switch panel with the part numbers of its components. The notes explain that newer units use circuit breaker switches and that the old RS2 switch plate must be upgraded.โ€Œโ€Œโ€‹โ โ โ€โ โ€‹โ€‹โ€‹โ€Œโ€Œโ€โ€‹โ€‹โ€‹โ€Œโ€Œโ โ โ€‹โ€‹โ€‹โ€‹โ€‹โ€Œโ โ€Œโ€‹โ€‹โ€‹โ€Œโ€‹โ โ€‹โ€‹โ€โ โ€‹โ โ โ โ€โ€Œโ€โ€โ โ€โ€‹โ โ€Œโ โ€‹โ โ€โ€โ โ€โ€Œโ 
Exploded diagram of the switch panel, rotated sideways, showing the switch plate with hour meters (HMETER), RS2 switches, a three way valve assembly with handle (VA3W), hoses SPH34, SPH6 and SPH14, fittings CPS50B, CPS68 and CPS65, and screw CSS17A, each with a leader line
FIG# 1 KAIVAC 1750 / 1715 SHEET 1 OF 1 - Description: Switch panel
NOTE #1: Recent versions have circuit breaker switches (bubble outer-case) instead of the standard switch (RS2). For these versions, the pump switch is P/N 5ACBS and the vac switch is P/N 15ACBS.

SPADCโ€“ Switch plate complete assembly includes circuit breaker switches and hour meters (see NOTE #2)โ€Œโ€Œโ€‹โ โ โ€โ โ€‹โ€‹โ€‹โ€Œโ€Œโ€โ€‹โ€‹โ€‹โ€Œโ€Œโ โ โ€‹โ€‹โ€‹โ€‹โ€‹โ€Œโ โ€Œโ€‹โ€‹โ€‹โ€Œโ€‹โ โ€‹โ€‹โ€โ โ€‹โ โ โ โ€โ€Œโ€โ€โ โ€โ€‹โ โ€Œโ โ€‹โ โ€โ€โ โ€โ€Œโ 

SPDCSSBโ€“ Switch plate only (for circuit breaker switches. See NOTE #2)

NOTE #2: The switch plate that fits the RS2 switch is no longer available. Must upgrade to SPDCSSB and replace switches with 5ACBS and 15ACBS
Source: Kaivac 1700 Series Operator Manual KV1700_Manual_120216 Rev. 080816, page 29, used with permission. SES ref PF-KOVE-P5XUโ€Œโ€Œโ€‹โ โ โ€โ โ€‹โ€‹โ€‹โ€Œโ€Œโ€โ€‹โ€‹โ€‹โ€Œโ€Œโ โ โ€‹โ€‹โ€‹โ€‹โ€‹โ€Œโ โ€Œโ€‹โ€‹โ€‹โ€Œโ€‹โ โ€‹โ€‹โ€โ โ€‹โ โ โ โ€โ€Œโ€โ€โ โ€โ€‹โ โ€Œโ โ€‹โ โ€โ€โ โ€โ€Œโ 
1700 Series KV1700_Manual_120216 (080816)Page 29 of 35
3.0 MAINTENANCE

3.4 MACHINE DIAGRAMS

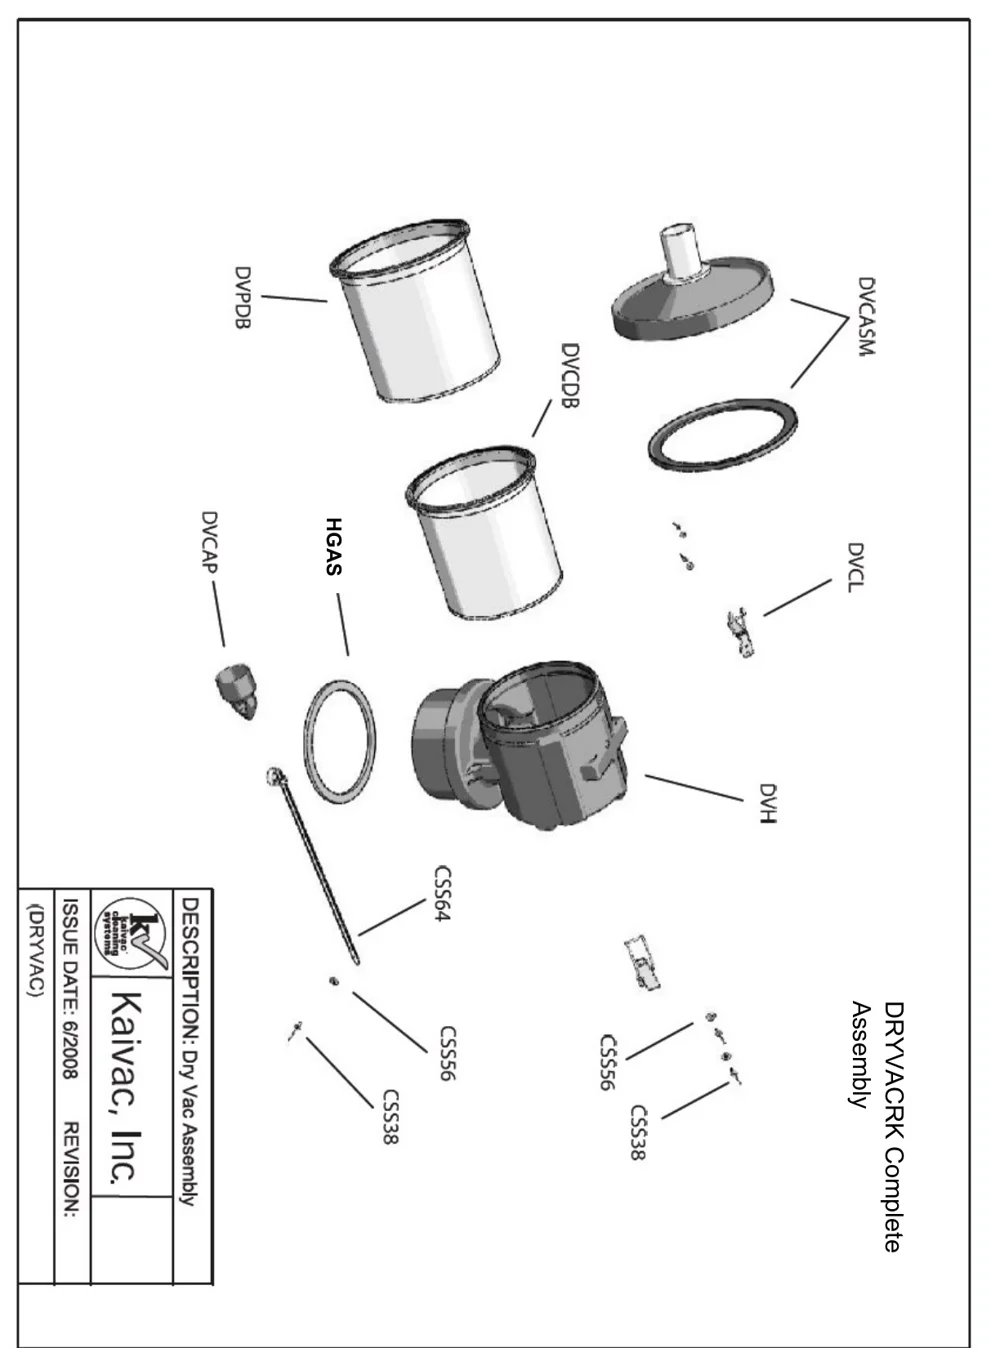
In short This page shows an exploded drawing of the Dry Vac complete assembly with each part labeled by its part code. Use it to identify the parts of the Dry Vac kit.โ€Œโ€Œโ€‹โ โ โ€โ โ€‹โ€‹โ€‹โ€Œโ€Œโ€โ€‹โ€‹โ€‹โ€Œโ€Œโ โ โ€‹โ€‹โ€‹โ€‹โ€‹โ€Œโ โ€โ€‹โ€‹โ€‹โ€Œโ€‹โ โ€‹โ€‹โ€Œโ€Œโ€‹โ โ€โ โ€โ€Œโ€‹โ โ€โ€Œโ€โ€Œโ€‹โ€Œโ€‹โ€‹โ โ€Œโ€โ€Œโ€‹โ€
Exploded drawing of the Dry Vac complete assembly, printed rotated on the page, with part labels DVPDB (paper filter bag), DVCDB (cloth filter bag), DVCASM (lid assembly with ring gasket), HGAS (gasket), DVCAP (cap), DVCL (clip), DVH (housing), CSS64 (tie wrap), and CSS56 and CSS38 (small fasteners). A title block reads Kaivac, Inc., Description: Dry Vac Assembly, Issue date 6/2008, (DRYVAC), and the label DRYVACRK Complete Assembly is at the right.
DRYVACRK Complete Assembly
Source: Kaivac 1700 Series Operator Manual KV1700_Manual_120216 Rev. 080816, page 30, used with permission. SES ref PF-W3MM-XHCUโ€Œโ€Œโ€‹โ โ โ€โ โ€‹โ€‹โ€‹โ€Œโ€Œโ€โ€‹โ€‹โ€‹โ€Œโ€Œโ โ โ€‹โ€‹โ€‹โ€‹โ€‹โ€Œโ โ€โ€‹โ€‹โ€‹โ€Œโ€‹โ โ€‹โ€‹โ€Œโ€Œโ€‹โ โ€โ โ€โ€Œโ€‹โ โ€โ€Œโ€โ€Œโ€‹โ€Œโ€‹โ€‹โ โ€Œโ€โ€Œโ€‹โ€
1700 Series KV1700_Manual_120216 (080816)Page 30 of 35

Kaivac and KaiVac are trademarks of Kaivac, Inc. Southeastern Equipment & Supply is an independent dealer.


Not Sure Which Machine Fits Your Floors?

Talk to a real SES tech about new, demo or certified reconditioned options, parts and service.

© 2026 Southeastern Equipment and Supply, Inc. All Rights Reserved.

Visa Discover AMEX Mastercard