Operator and Parts Manual
Model No. KAIWHIZ
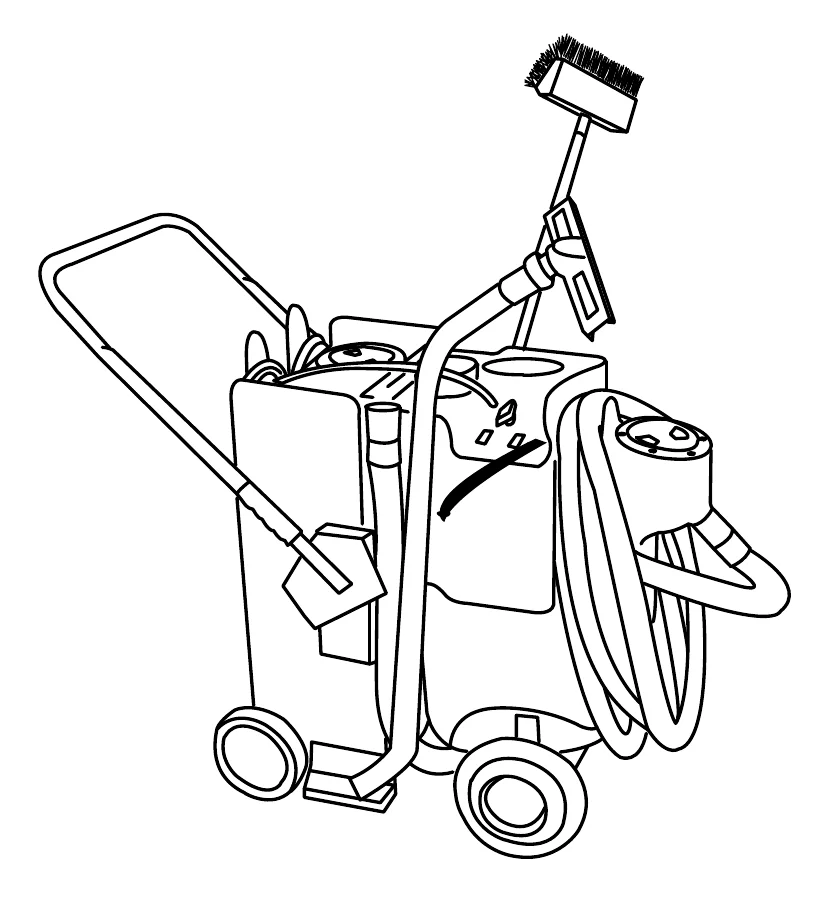
KaiWhiz No-Touch Cleaning System
READ FIRST
INSTALL DATE
Please fill out card for future records
Install date-
Serial No.-
Read this manual prior to operation.
This machine will operate at its optimal efficiency if:
- The machine is operated with care.
- The machine is maintained properly and regulary - per maintenance instructions.
- The machine is maintained with manufacturer parts only.
Carefully unpack and inspect your new KaiWhiz cleaning machine for shipping damage. Each unit is tested and thoroughly inspected before shipping. For instructions regarding any shipping damage, contact Kaivac Inc. immediately. All returns must have a Return Authorization Number (RAN).
MANUAL TABLE OF CONTENTS
| Section | Page |
|---|---|
| INTRODUCTION | 1 |
| SAFETY PRECAUTIONS | 2,3 |
| WARRANTY | 4 |
| MACHINE COMPONENTS | 5 |
| MACHINE PREPARATION | 5 |
| MACHINE OPERATION | 6 |
| MACHINE MAINTENANCE | 7 |
| TROUBLE SHOOTING | 8,9,10 |
| FLOW DIAGRAM | 11 |
| ELECTRICAL DIAGRAM | 11 |
| PARTS LIST | 12 |
| PARTS DRAWINGS | 15,18 |
© kaivac, 2002
SAFETY PRECAUTIONS
EQUIPMENT WARNING
- Read all instructions to ensure safe operation of the KaiWhiz.
GROUNDING INSTRUCTIONS
-THE KAIWHIZ MUST BE GROUNDED. If it should malfunction or stop wprking, grounding provides a path of least resistance for electrical current, thereby reducing the risk of electrical shock. The KaiWhiz is also supplied with a ground fault circuit interruptor (GFCI) to reduce danger of electric shock. It must be maintained and tested regularly. This unit is equipped with a cord that has an equipment grounding conductor and a grounding plug. The plug must be inserted in an appropiate outlet that is properly installed and grounded in accordances. Cutting off the ground wire or using a cord that is not equipped with a ground plug will void the warranty on the unit, and Kaivac will accept NO responsibility associated with the unit.
TRAINING
-Proper training is required before using the KaiWhiz. Contact your authorized KaiWhiz distributor for training information.
-Instruction placards are attached to each KaiWhiz and should not be removed. these placards show proper cleaning procedures and safety precautions.
EQUIPMENT USE
- Do not use the equipment in a manner that it was not intended for by the manufacturer.
- See S-I-M-P-L-E Operation section for proper use of the equipment.
SPRAY GUN
- Never point the spray gun at people.
PREVENTION OF ELECTROCUTION
- Use the Groung Fault Circuit Interruptor (GFCI) with the kaiwhiz at all times.
- Test the GFCI before each use.
- Do not spray liquid from the KaiWhiz onto electrical outlets or on any electrical devices.
PERSONAL PROTECTION
- Wear gloves, eye protection and ear protection when operating the KaiWhiz.
PREVENTING WATER DAMAGE TO BUILDINGS
- The KaiWhiz is to be used on water-reaiatant building surfaces only. These include concrete, terrazzo, ceramic tile and quarry tile.
- The KaiWhiz may be used for stripping on vinyl-composite tile floors, but daily cleaning of reilient flooring using the KaiWhiz is not recomended.
- Never overflow the water tank of the vacuum tank.
- Discontinus use if any leaks occur on the KaiWhiz.
MACHINE COMPONENTS
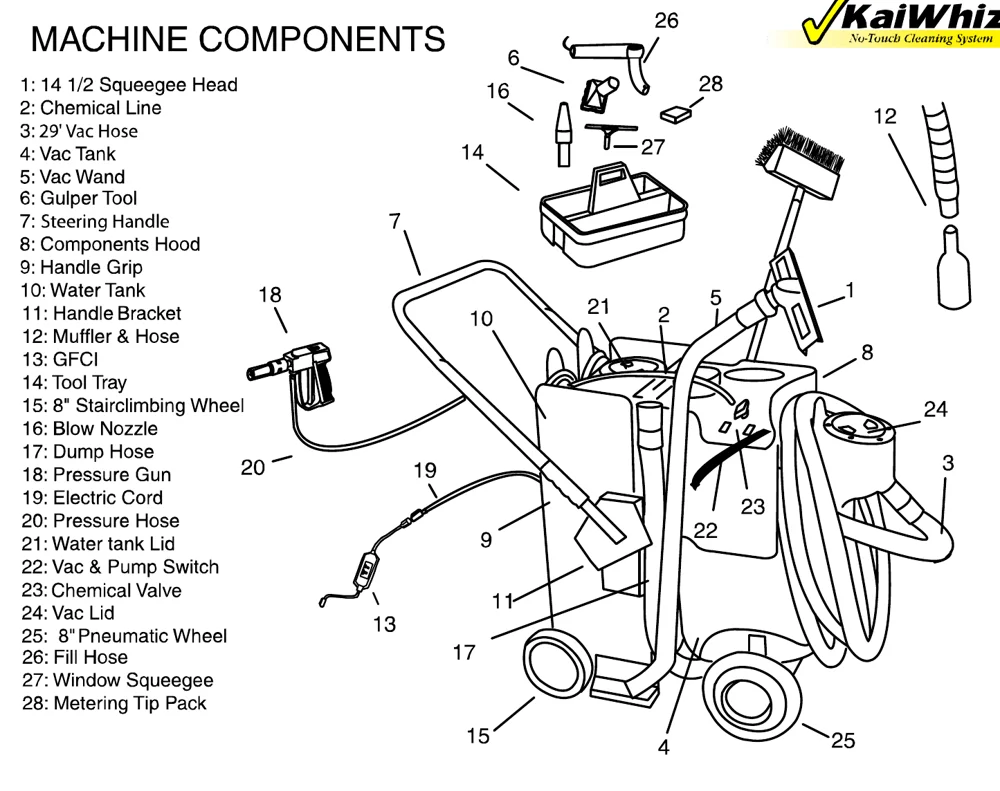
| No. | Component |
|---|---|
| 1 | 14 1/2 Squeegee Head |
| 2 | Chemical Line |
| 3 | 29' Vac Hose |
| 4 | Vac Tank |
| 5 | Vac Wand |
| 6 | Gulper Tool |
| 7 | Steering Handle |
| 8 | Components Hood |
| 9 | Handle Grip |
| 10 | Water Tank |
| 11 | Handle Bracket |
| 12 | Muffler & Hose |
| 13 | GFCI |
| 14 | Tool Tray |
| 15 | 8" Stairclimbing Wheel |
| 16 | Blow Nozzle |
| 17 | Dump Hose |
| 18 | Pressure Gun |
| 19 | Electric Cord |
| 20 | Pressure Hose |
| 21 | Water tank Lid |
| 22 | Vac & Pump Switch |
| 23 | Chemical Valve |
| 24 | Vac Lid |
| 25 | 8" Pneumatic Wheel |
| 26 | Fill Hose |
| 27 | Window Squeegee |
| 28 | Metering Tip Pack |
MACHINE PREPARATION
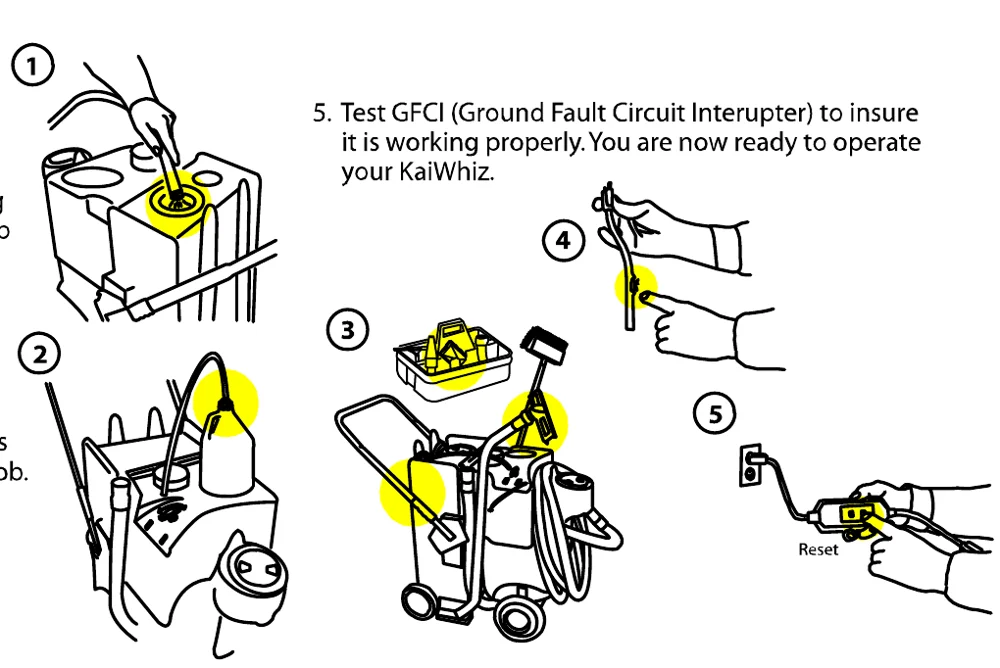
- Fill Kaiwhiz with clean cool water.
- Prepare the cleaning solution you will be using by attaching the chemical feed line and cap to the top of your chemical bottle and selecting proper metering tip.
- Check machine for all tools and supplies needed to complete task.
- Check all hoses and spray lines for damage prior to starting job. If damage is found do not continue until proper repairs are done.
- Test GFCI (Ground Fault Circuit Interupter) to insure it is working properly. You are now ready to operate your KaiWhiz.
S*I*M*P*L*E No-Touch Restroom Cleaning
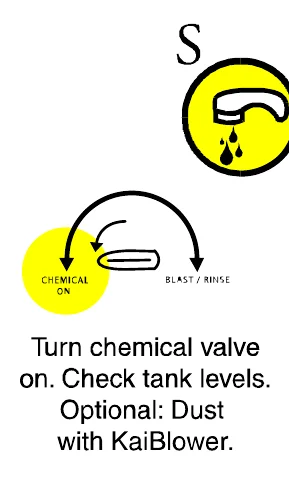
S
Turn chemical valve on. Check tank levels. Optional: Dust with KaiBlower.
I
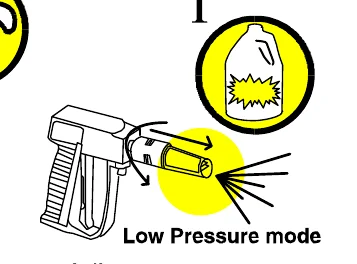
Adjust spray gun to chemical injection, pull nozzle out and rotate to fan pattern.
Low Pressure mode
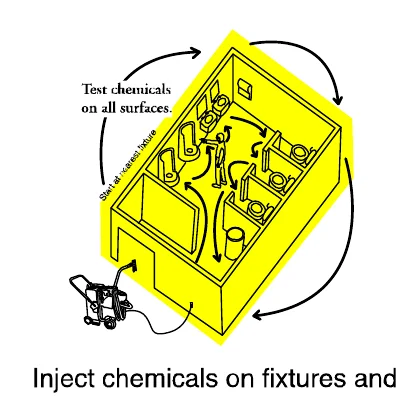
Inject chemicals on fixtures and soiled areas, start at the nearest fixture traveling in circular pattern.
Test chemicals on all surfaces.
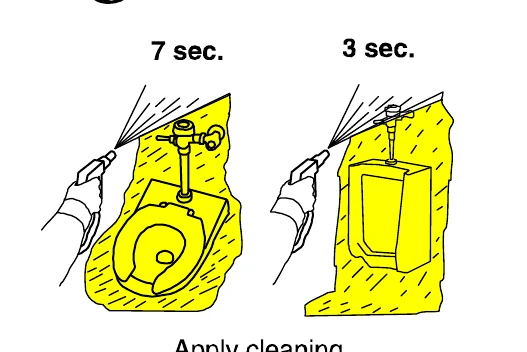
7 sec. 3 sec.
Apply cleaning solution to fixtures. Sinks 2 sec.
Turn valve to Blast / Rinse
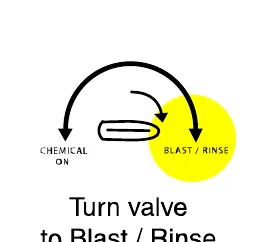
Rinse chemical from spray line onto floor
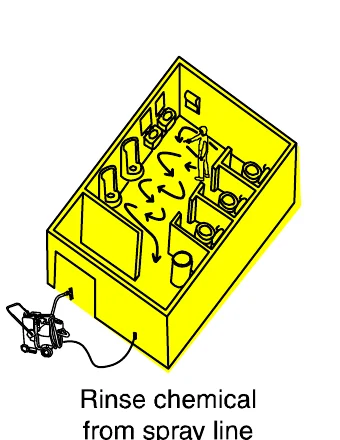
M
Optional: Manual Brush heavily soiled floors.
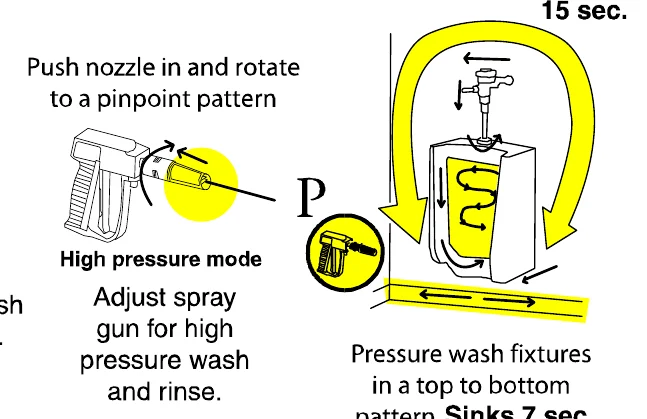
P
Push nozzle in and rotate to a pinpoint pattern
High pressure mode
Adjust spray gun for high pressure wash and rinse.
15 sec. Pressure wash fixtures in a top to bottom pattern. Sinks 7 sec.
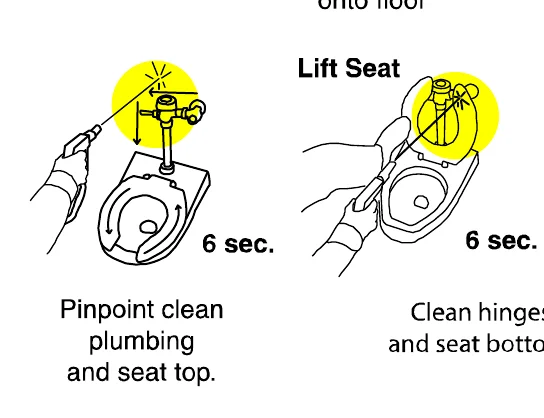
Lift Seat
6 sec. Pinpoint clean plumbing and seat top.
6 sec. Clean hinges and seat bottom.
Rim Shot
4 sec. Place nozzle under rim and rotate.
Slam Dunk
4 sec. Spray into bowl.
10 sec. Spray bottom and base.
Toilet Cleaning time 30 sec.
L
Loop and dry hose in a FIGURE 8 pattern onto hose wraps. Gun and hose should hang to the outside.
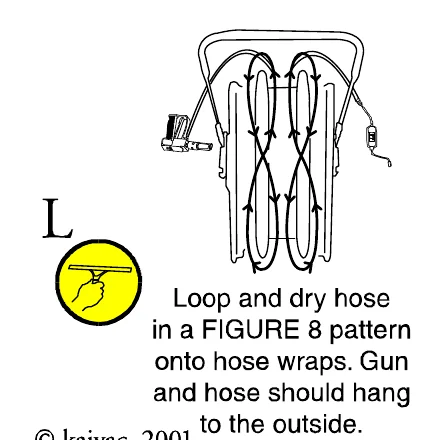
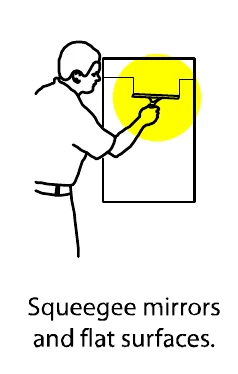
Squeegee mirrors and flat surfaces.
E
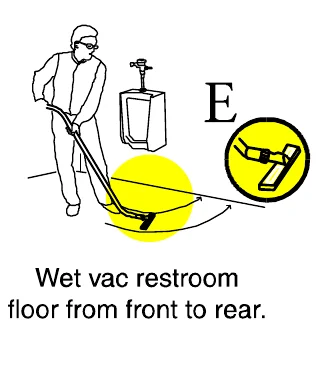
Wet vac restroom floor from front to rear.
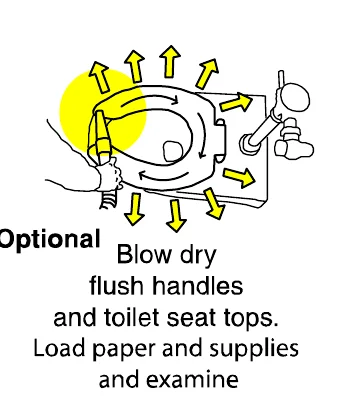
*Optional Blow dry flush handles and toilet seat tops. Load paper and supplies and examine
© kaivac, 2001
MACHINE MAINTENANCE
| Area | Procedure |
|---|---|
| Floor Squeegee | * Check condition of rubber squeegee blades and wheels on the floor tool. Rough floor surfaces will cause the blades and wheels to wear out more quickly. Replace as necessary. |
| Spray Gun | * Check spray pattern. If spray pattern will not pinpoint, clean orifice by removing it with an allen key and flushing. Replace if not pinpointing. * If nozzle becomes difficult to move from high to low pressure lubricate nozzle with a lithium grease. See Gun Lubrication procedure in manual. |
| Pressure Hoses | * Wipe clean after each use. * Check for cuts or frays in the hose jacket, particularly at the end of the fittings. Replace hose if cuts are found. |
| Water Filter | * Check filter screens for debris and clean as needed. Be careful not to crush the end of the filter screens when replacing. * Check the clear filter bowl cover to be sure it is tight. * Check for leaks around filter and filter connections. |
| Water Tank | * Check condition of filter in water tank. Clean as needed. * Empty the water tank to prevent mildew and bacteria growth. Empty tank by dipping the vacuum hose into the water tank, and transferring the water to the vacuum tank. |
| Vacuum Tank | * Empty and flush vacuum tank. * Clean and disinfect. * Check the float shut-off screen to be sure it is not plugged up. A plugged filter screen restricts airflow and results in reduced suction. |
| Leaks | * Be alert for leaks around hoses, fittings, spray wand, tanks or elsewhere on the KaiWhiz. Discontinue use until leaks are repaired. |
| Electrical System | * The Ground Fault Circuit Interrupter (GFCI), must be tested before each use. * Electric cords must be inspected for tears or cuts in the insulation. |
TROUBLESHOOTING
| Area | Problem | Possible Cause | Remedy |
|---|---|---|---|
| Electrical | No power to pump or vac motor. |
|
|
| Electrical burning smell |
|
| |
| Vacuum System | No / Weak vacuum. |
|
|
| Moister from exhaust. |
|
| |
| Blow dry system | No air flow. |
|
|
| Moisture from nozzle. |
|
| |
| Suction instead of blow action. |
|
|
TROUBLESHOOTING
| Area | Problem | Possible Cause | Remedy |
|---|---|---|---|
| High Pressure System | No water from pump or low pressure. | 1. Out of water. 2. Gun nozzle plugged. 3. Air in pump (vapor lock). 4. Gun orifice missing. 5. Tank filter plugged. 6. In-line bowl filter plugged. 7. Bowl filter lid loose. 8. Pressure hose damaged. 9. Quick disconnect leaking. 10. Injector plugged. 11. Pulse hose damaged. 12. Regulator failed. 13. Hose kinked. 14. Seals in pump need replaced. | 1. Fill water tank. 2. Remove orifice with allen wrench and clean. 3. Use power prime technique. 4. Replace orifice. 5. Clean tank and filter. 6. Remove filter cover and clean. 7. Gently tighten bowl cover. 8. Repair or replace. 9. Tighten or replace. 10. Using an air line or equal blow small bursts of air into affected chemical line. 11. Repair or replace. 12. Replace. 13. Unkink and check for damage. 14. Remove and replace seals. |
| Bad fan pattern or pinpoint pattern on gun. | 1. Debris in nozzle. 2. Orifice damaged. | 1. Remove orifice with allen wrench and clean. 2. Remove and replace. | |
| Chemical Injection System | No chemical flow. | 1. Out of chemical. 2. Safety cap not secure 3. Chemical valve "off". 4. Safety cap plugged. 5. Spray gun in wrong mode. 6. Metering tip plugged. 7. Injector plugged. 8. Air entering system. 9. Injector installed backwards. | 1. Refill chemical. 2. Check safety cap / tighten. 3. Check on off valve. 4. Replace cap. 5. Make sure gun nozzle is pulled out away from gun for chemical mode. 6. Check metering tip for clog. 7. Using an air line or equal. blow small bursts of air into affected chemical line. 8. Check for air entering system around chemical lines or injector. 9. If fluttering or pulsing sound can be heard while spraying or when machine is running it is possible that you injector is in backwards. Remove and reinstall. |
TROUBLESHOOTING
| Area | Problem | Possible Cause | Remedy |
|---|---|---|---|
| Chemical Injection System continued. | Not enough chemical flow. | 1. Metering tip plugged. 2. Wrong metering tip. | 1. Remove and clean. 2. Check and replace per chart. |
| Chemical line blows off safety cap. | 1. Debris in injector. 2. Bad seat on injector check valve. 3. Bad safety cap. | 1. Using an air line or equal, blow small bursts of air into affected chemical line. Or remove electric box and clean injector. 2. Check injector o-ring or replace. 3. Repalce safety cap. | |
| Water backflows into chemical bottle. | |||
| Dump System | Dump hose will not empty tank. | 1. Dump hose plug not removed. 2. Clog in bottom of tank. | 1. Remove plug. 2. Tip dump contents, remove debris. |
| Dump hose leaks. | 1. Hose cut. 2. Clamp loose. 3. Dump plug bushing missing. 4. Plug missing. | 1. If leak is less than 4" from tank side, cut and reattach. Or replace. 2. Tighten hose clamp. 3. Replace bushing. 4. Replace plug. | |
| Wheels and casters | Wheels won't roll, or they rub. | 1. Flat tires. 2. Debris wrapped around axle. 3. Bearings tight. 4. Wheels too loose on axle. 5. Bearing falling out. | 1. Inflate tires to 30 psi. 2. Check for debris on axle. 3. Grease bearings. 4. Remove wheel, add washers to take up slack. 5. Refer to remedy 4. |
| Squeegee Head | Floor streaks. | 1. Worn blades or wheels. | 1. Replace wheels and /or blades. |
| Squeegee head doesn't easily rotate when installed on wand. | 1. Brass ring on wand not in groove. 2. Coupling nut too tight. | 1. Loosen coupling nut and re-position head on grove. 2. Loosen 1/2 turn. | |
| Head won't stay on wand | 1. Coupling nut cracked. 2. Brass ring worn. | 1. Replace. 2. Replace. | |
| Premature blade wear. | 1. Squeegee wheels worn. | 1. Check wheels for wear/ replace. | |
| Sucks to the floor too tightly. | 1. Squeegee wheels worn. | 1 Check wheels for wear/ replace. |
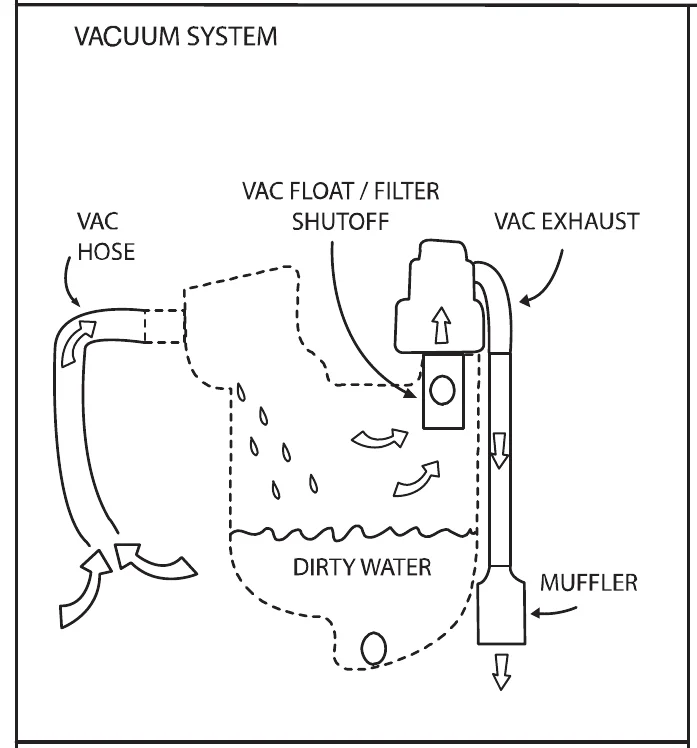
FLOW DIAGRAM
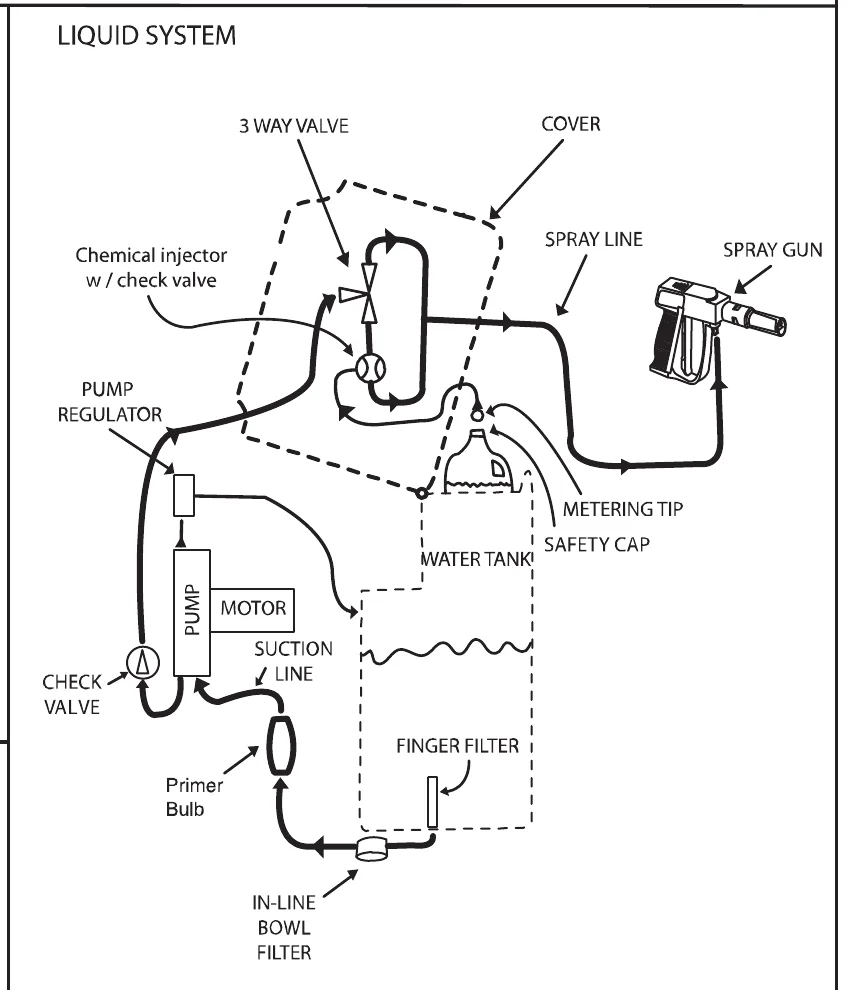
METERING TIP CHART
Flow rate: .75 gal. Per Minute
| Tip | Chemical |
|---|---|
| Black tip: | 1.25 oz/gallon |
| Aqua tip: | 3.00 oz/gallon |
| Orange tip: | 4.75 oz/gallon |
| Tan tip: | 9.50 oz/gallon |
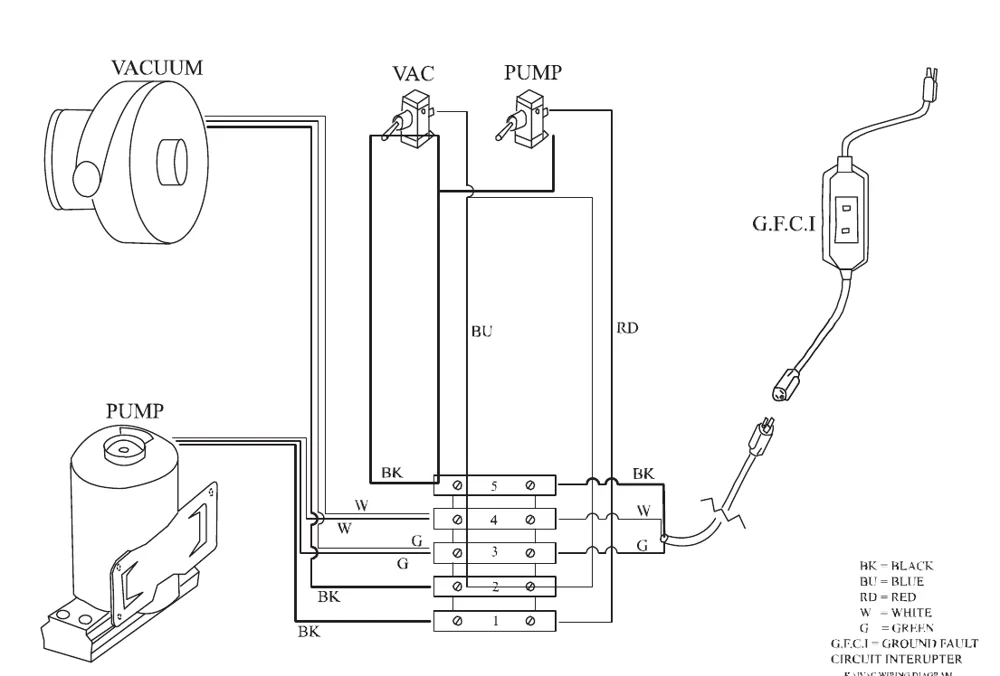
ELECTRICAL DIAGRAM
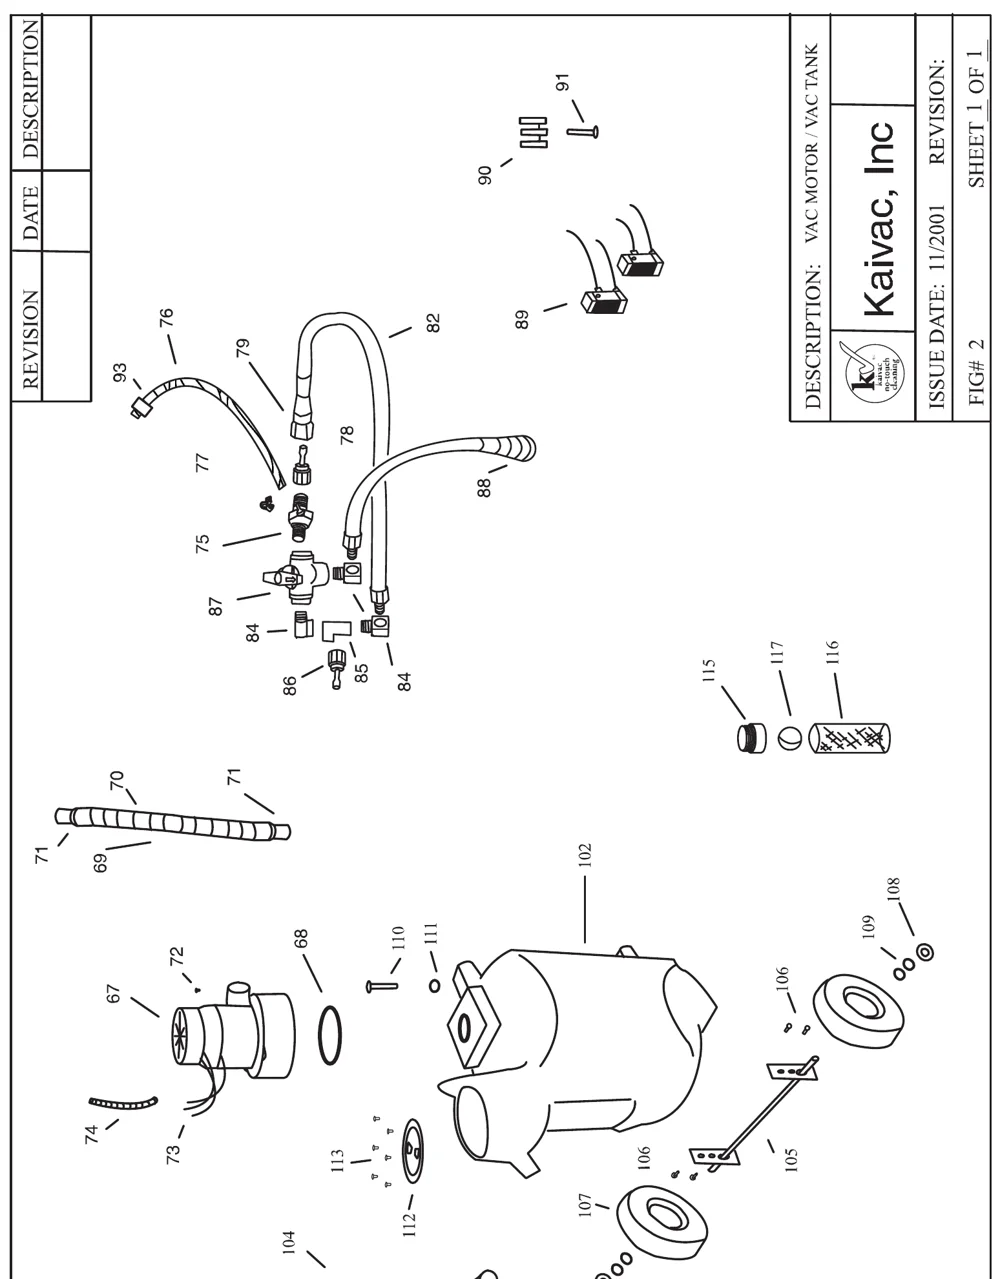
VAC MOTOR / VAC TANK
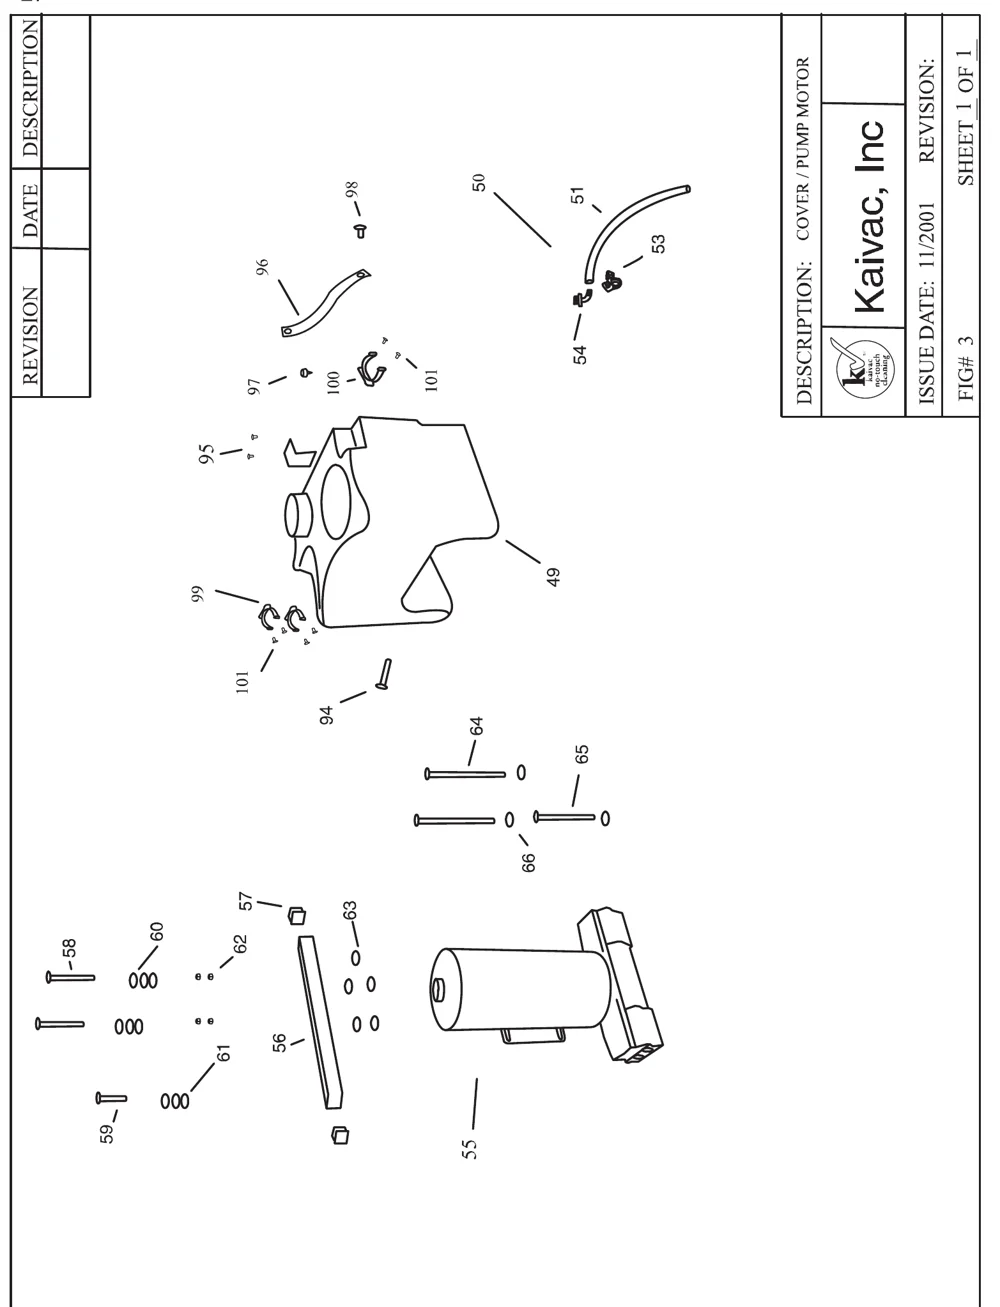
COVER / PUMP MOTOR
FIG# 3, Sheet 1 of 1. Issue date: 11/2001. Kaivac, Inc.
Kaivac and KaiVac are trademarks of Kaivac, Inc. Southeastern Equipment & Supply is an independent dealer.