OPERATOR’S MANUAL UNIVAC®
©2026 Kaivac, Inc. All rights reserved
TABLE OF CONTENTS
Getting Started
- Kaivac Limited Warranty: 2-3
- Important Safety Instructions: 4-5
- Battery Information: 6
- Grounding Information: 7-8
Operation/Assembly
- Unit Components: 9
- Setup/Basic Operation: 10
- Illustrations: 11-12
- Univac Operation: 13
Maintenance
- Daily & General Maintenance: 14
- Unit & Maintenance: 15
- DC Standard Electrical Diagram: 16
- AC Intl. Electrical Diagram: 17
- AC Standard Electrical Diagram: 17
- Troubleshooting: 18-20
Specification Diagrams
- Vacuum Tank Assembly: 21
- Vacuum Head Assembly: 22
- Battery Interface Assembly: 22
SAVE THIS MANUAL FOR FUTURE REFERENCE
VISIT KAIVAC.COM FOR FULL SPECIFICATIONS & TROUBLESHOOTING
Kaivac Limited Warranty
- Limited Warranty. Kaivac warrants to the original purchaser that the Products will be free from defects in materials and workmanship when properly assembled, installed, operated, maintained, and stored in accordance with Kaivac's instructions and recommendations (the "Limited Warranty"), subject to the exclusions and limitations set forth in this Limited Product Warranty.
- Limited Warranty Periods. The applicable Limited Warranty periods are as follows:
- TANK AND TROLLEY LIMITED WARRANTY. The vacuum tank and trolley components of the Product are warranted for a period of Five (5) Years from the date of purchase.
- VACUUM MOTOR and PUMP LIMITED WARRANTY (excluding Battery). The battery interface and related components (excluding lithium-ion batteries), vacuum motor, and pump are warranted for a period of Three (3) Years from the date of purchase.
A Limited Lifetime Warranty for the OmniFlex vacuum motor is available to customers who purchase a Kaivac chemical subscription concurrently with the initial purchase of the OmniFlex unit and maintain the subscription without interruption for the duration of ownership. Eligibility for the warranty is conditioned upon the exclusive use of Kaivac-supplied chemicals in the OmniFlex unit. Any cancellation, lapse, or discontinuation of the subscription will immediately terminate the Limited Lifetime Warranty. Compliance with the requirements of the OmniFlex Limited Lifetime Warranty shall be determined by Kaivac.
- LABOR LIMITED WARRANTY. Labor authorized by Kaivac and performed by a service provider selected or approved by Kaivac is warranted for One (1) Year from the date the labor is performed, not to exceed the warranty period applicable to the repaired or replaced component.
- BATTERY LIMITED WARRANTY. Lithium-ion batteries are warranted for a period of Two (2) Years from the date of purchase.
- REPLACEMENT PARTS. Replacement parts, excluding Accessories, are warranted for a period of ninety (90) days from the date of purchase.
- Limited Warranty Remedy. For any valid warranty claim, Kaivac shall, at its sole option, repair or replace the defective Product or component. If Kaivac authorizes a repair, such repair shall not extend the original Limited Warranty period. If Kaivac provides a replacement Product or component, the Limited Warranty shall continue only for the remainder of the original Limited Warranty period. The remedies set forth in this Limited Product Warranty are the original purchaser's exclusive remedies and Kaivac's sole liability for any breach of the Limited Warranty.
- Exclusions. The Limited Warranty does not apply to:
- Accessories, including without limitation squeegee blades, wheels, hoses, seals, gaskets, cords, casters, HEPA filter cartridges, chemical feed caps, spray guns, GFCIs, and vacuum wand assemblies (collectively, "Accessories");
- Normal wear and tear;
- Any Product repaired, altered, or modified in a manner that, in Kaivac's judgment, adversely affects operation, performance, durability, or intended use;
- Misuse, abuse, negligence, accidents, or failure to operate, maintain, or store the Product in accordance with Kaivac's instructions, recommendations, and warnings;
- Use of high-foaming or corrosive chemicals;
- Use of non-Kaivac batteries or chargers, or improper battery installation;
- Loss of IoT functionality resulting from failure to maintain required network connectivity or failure to permit installation of Kaivac-issued firmware, security certificate, or software updates
- Use of a lithium-ion battery more than five (5) years from the date of purchase; or
- Modification of, or attempted modification to, the Product by anyone other than Kaivac or a service provider authorized by Kaivac
Kaivac Limited Warranty (Continued)
Kaivac shall have sole authority to determine whether a warranty claim is excluded under this Limited Product Warranty.
- Warranty Claim Costs. The original purchaser shall be responsible for all freight, shipping, travel, and related costs associated with warranty service. For warranty claims made outside the country where the Product was originally purchased, the original purchaser shall also be responsible for all duties, taxes, and import-related charges.
- Disclaimer of Other Warranties. EXCEPT AS OTHERWISE EXPRESSLY STATED HEREIN, KAIVAC MAKES NO OTHER WARRANTY OR REPRESENTATION OF ANY KIND, EXPRESSED OR IMPLIED, INCLUDING ANY IMPLIED WARRANTIES OF MERCHANTABILITY OR FITNESS FOR A PARTICULAR PURPOSE. TO THE EXTENT SUCH WARRANTIES CANNOT BE DISCLAIMED, THE IMPLIED WARRANTIES ARE LIMITED IN DURATION TO THE LIFE OF THE APPLICABLE EXPRESS WARRANTY PERIOD.
- Exclusion of Damages. TO THE FULLEST EXTENT PERMITTED BY LAW, KAIVAC SHALL NOT BE LIABLE FOR ANY INDIRECT, INCIDENTAL, CONSEQUENTIAL, SPECIAL, EXEMPLARY, OR PUNITIVE DAMAGES ARISING OUT OF OR RELATING TO ANY PRODUCT OR THE LIMITED WARRANTY, INCLUDING LOSS OF USE, LOSS OF REVENUE, LOSS OF PROFITS, OR PROPERTY DAMAGE, EVEN IF ADVISED OF THE POSSIBILITY OF SUCH DAMAGES. THESE LIMITATIONS SHALL APPLY EVEN IF ANY EXCLUSIVE REMEDY FAILS OF ITS ESSENTIAL PURPOSE. THE REMEDIES SET FORTH IN THIS WARRANTY ARE THE ONLY REMEDIES AVAILABLE TO ANY PERSON UNDER THIS WARRANTY. SOME STATES/PROVINCES DO NOT ALLOW FOR THE DISCLAIMERS, LIMITATIONS, AND EXCLUSIONS IDENTIFIED ABOVE, AND AS A RESULT, THEY MAY NOT APPLY TO YOU
- No Other Warranties. No employee, agent, representative, dealer, or retailer has authority to modify, expand, or create any representation or warranty regarding the Product on behalf of Kaivac unless expressly authorized in writing by Kaivac. Kaivac reserves the right to modify, amend, or discontinue this Limited Warranty at any time. The most current version of the Limited Warranty may be found at www.kaivac.com. The Limited Warranty in effect on the date of purchase shall govern the warranty coverage applicable to the Product.
Consult Kaivac.com for current Product(s) information and Limited Warranty. For any questions or warranty service, please contact Kaivac Customer Service at 1/800-287-1136 (Outside the U.S. Call 513-887-4600).
Version 9-3-2026
Phone:
United States and Canada: 1-800-287-1136
International: 1-513-887-4600
Email:
info@kaivac.com
For Technical Support Contact Form go to: https://www.kaivac.com/contactus.php and choose Technical\Support tab.
IMPORTANT SAFETY INSTRUCTIONS
SAVE THESE INSTRUCTIONS
CONSULT KAIVAC.COM FOR THE MOST UP TO DATE SAFETY PRECAUTIONS
READ ALL INSTRUCTIONS BEFORE USING (THIS UNIT)
When using an electrical unit, basic precautions should always be followed, including the following:
GENERAL SAFETY INSTRUCTIONS (APPLICABLE TO CORDED AND BATTERY UNITS):
- For commercial use only.
- Use unit only as described in this Manual. Use only Kaivac's recommended attachments.
- Follow the maintenance instructions specified in this Manual.
- For indoor use only. Store indoors.
- Stay alert - watch what you are doing. DO NOT overreach or stand on unstable support. Keep good footing and balance at all times.
- Keep operating area clear of all persons.
- Keep hair, loose clothing, fingers, and all parts of body away from openings and moving parts.
- NO COMBUSTIBLES! Sparks inside the motor can ignite flammable vapors or dust. Do not use unit near combustible liquids and gases, or to pick up explosive dusts or gasoline.
- Know how to stop the unit and bleed pressures quickly. Be thoroughly familiar with the unit's controls before operating.
- DO NOT allow unit to be used as a toy and unit should not be operated by children. Close attention is necessary when used near children.
- Use extra care when cleaning on stairs.
- DO NOT operate the unit when fatigued or under the influence of alcohol or drugs.
- DO NOT put any object into unit's openings. Do not use with any of the unit's opening blocked; keep free of dust, lint, hair, and anything that may reduce air flow.
- DO NOT pick up anything that is burning or smoking, such as cigarettes, matches or hot ashes.
- DO NOT operate without the Vacuum Motor Float Cage installed. If float is removed, reinstall by screwing back into place.
- DO NOT use without filters in place.
- Personal Protective Equipment (PPE): It is recommended to wear proper personal protective equipment as required by the chemical product label instructions used in conjunction with the unit. For Kaivac chemical products, refer to product label.
SPRAY SYSTEM SAFETY INSTRUCTIONS:
- DO NOT spray liquid from the unit or attachments onto electrical outlets or any electrical devices.
- Risk of injection or injury to persons - DO NOT direct discharge stream at persons.
- INJECTION HAZARD: Unit can cause serious injury if the spray permeates the skin. Do not point the spray gun at anyone or any part of the body. In case of permeation, seek medical aid immediately.
- THIS UNIT IS CAPABLE OF PRODUCING 500 PSI (3447 kPa). To avoid rupture and injury, do not operate this pump with components rated less than 500 PSI (3447 kPa) working pressure (including but not limited to spray guns, hose, and hose connections); and before servicing, cleaning or removal of any part, shut off power and relieve pressure.
- High pressure cleaners, such as this unit, shall not be used by children, persons with reduced physical, sensory or mental capabilities or lack of experience and knowledge or untrained personnel. Children should not play with the unit. Cleaning and user maintenance should not be performed by children.
CORDED UNITS SAFETY INSTRUCTIONS (APPLICABLE TO CORDED UNITS):
- Inspect cord and plug prior to use. Do not use with damaged cord or plug. If unit is not working as it should, has been dropped, damaged, left outdoors or dropped into water, do not use or charge and return unit to a Kaivac service center.
- This unit may also have been provided with a ground fault circuit interrupter (GFCI) built into the power cord. If replacement of the plug or cord is needed, use only identical replacement parts. Test the unit's ground fault circuit interrupter (GFCI) before each use.
- Turn off the unit before unplugging. Do not leave unit when plugged in. Unplug from outlet when not in use and before servicing.
- Turn off all controls before unplugging.
- Connect to a properly grounded outlet only. Do not remove ground pin on plug. See Grounding Instructions below.
- This unit comes with a grounded attachable extension cord. If cord is damaged, replace with equivalent 120v, 15amps, 14GA rated cord. This cord must be attached and mechanically secured using the provided cord connector to use the unit.
- The unit must be disconnected from any electrical or battery source when the unit is being cleaned or maintenance of unit or when replacing parts
- Keep all connections dry and off the ground. If using extension cord with unit, make sure the connection is above and off the floor and away from exposure to liquid.
- Keep the cord away from heated surfaces.
- DO NOT handle plug or unit with wet hands.
- DO NOT pull or carry by cord, use cord as handle, close a door on cord, or pull cord around sharp edges or corners. Do not run unit over cord. Keep cord away from heated surfaces.
- DO NOT unplug by pulling on cord. To unplug, grasp the plug, not the cord.
IMPORTANT SAFETY INSTRUCTIONS (CONTINUED)
SAVE THESE INSTRUCTIONS
CONSULT KAIVAC.COM FOR THE MOST UP TO DATE SAFETY PRECAUTIONS
READ ALL INSTRUCTIONS BEFORE USING (THIS UNIT)
When using an electrical unit, basic precautions should always be followed, including the following:
Batteries and chargers: make sure your charger is compatible with your batteries, and set its charging algorithm to your battery pack before you use it.

BATTERY UNITS SAFETY INSTRUCTIONS (APPLICABLE TO BATTERY UNITS):
- Never use a battery that has been damaged in any way. Damaged batteries may exhibit unpredictable behavior.
- Never use or charge a damaged battery pack.
- ONLY USE with Kaivac, Inc. battery, and charger.
- Inspect the battery before each use for damage, dents, cracks, or holes.
- If included with legacy unit, the battery splash cover must remain in place. Without the battery splash cover, the battery housing may become damaged which may cause the battery to malfunction, which can result a fire, explosion, personal injury, and/or property damage.
- If your unit contains a chemical-resistant plastic protective helmet, consult the Helmet Addendum for additional instructions and warnings.
- Exposure of units to airborne polyunsaturated fats in the food service industry may cause deterioration of battery components. Failure to inspect and use as instructed may result in fire explosion, personal injury, or property damage.
- Under certain conditions, including damage or liquid infiltrating the battery's interior cells, the battery may emit smoke, sparks, or fire. Liquid may be ejected from the battery; avoid contact. If contact accidentally occurs, flush with water. If liquid contacts eyes, additionally seek medical help. Liquid ejected from the battery may cause irritation or burns.
- Stop use immediately if the battery or unit sparks or shows signs of fire. And may result in fire.
- If unit or battery emits fumes, smoke, sparks, or fire, discontinue use immediately. Do not touch battery. If unit can be safely moved, move outside to a well ventilated fire safe area away from people or combustible material.
- DO NOT attempt to repair, service or modify the batteries or charger. Contact Kaivac Technical Support with any issues.
- Disconnect the battery from the unit before making any adjustments, changing accessories, or storing unit. Such preventive safety measures reduce the risk of starting the unit accidentally.
- When charging battery, make sure charger or unit has at least 6 inches of clearance on all sides for adequate air flow.
- When battery is not in use, keep it away from other metal objects like paper clips, coins, keys, nails, screws or other small metal objects that can make a connection from one terminal to another. Connecting or shorting the battery terminals together may cause burns or a fire.
- Keep heat sources, sparks, and flames away from batteries.
- Prevent unintentional starting. Ensure the switch is in the off-position before connecting to battery, picking up or carrying the unit. Do not carry the unit with your finger on the switch. Energizing an unit that has the switch on invites accidents.
- DO NOT allow battery to be submerged in water.
- DO NOT use a battery that has been submerged in water, or if water has infiltrated the battery housing even if it appears to be working.
- DO NOT charge batteries outdoors.
- DO NOT short-circuit the battery or charger terminals with conductive items such as paper clips. This can deliver high current.
- DO NOT crush or drop the battery.
- DO NOT expose a battery or unit to fire or excessive temperature. Exposure to fire or temperature above 265°F (130°C) may cause explosion.
- DO NOT use or store the NTC System or battery in refrigerated areas, in environments when the battery is in direct contact with liquids, or near flammable or combustible materials.
- DO NOT charge or store battery for extended time (1 month or more) in temperatures below 40°F (4°C).
- DO NOT remove any part of the battery, charging unit, or unit: If your unit has a chemical-resistant plastic protective helmet, do not remove it.
- DO NOT plug battery in while Vacuum Motor is in ON position. It may damage the system.
- DO NOT incinerate the battery even if it is non-working or severely damaged. The battery can explode in a fire.
- DO NOT leave battery connected to charger once the charger light is green. Leaving battery on charger will diminish the life of the battery
- Never dispose of the battery in the trash. It is important that your old, damaged battery is disposed of and/or returned as instructed by Kaivac Customer Care/Technical Support at 1-800-287-1136.

CHARGER/ELECTRICAL WARNINGS:
- Inspect the charger, cords, and connections prior to each use.
- Follow all charging instructions and do not charge the battery or unit outside of the temperature range specified in the instructions. Charging improperly or at temperatures outside of the specified range may damage the battery and increase the risk of fire.
- Connect charging cord to a properly grounded outlet only. See Grounding Instructions.
- DO NOT use charger if it has a damaged cord or plug.
- DO NOT operate charger if it has received a sharp blow, been dropped, or damaged in any way.
- DO NOT handle charger, including charger plug and charger terminals, with wet hands while charger is plugged in or while inserting plug into electrical outlet.
- DO NOT leave charger plugged in when not in use.
- DO NOT plug in charger while Vacuum Head is in ON position. It may damage the unit's electrical system.
- DO NOT pull on charger cord to unplug. Grasp and pull the plug, not the cord.
- DO NOT carry charger by cord.
To recycle battery, call Kaivac Customer Care at 1-800-287-1136 to order a recycling box.
Disposal of batteries are regulated by federal law and must be done properly.
BATTERY INFORMATION
Batteries and chargers: make sure your charger is compatible with your batteries, and set its charging algorithm to your battery pack before you use it.
Keep Batteries at Room Temperature: Store between 32 and 113 degrees F (0°C to 45°C). Avoid battery exposure to extreme temperatures. If shelving battery longer than (1) month, deplete battery to 50% charge during storage period (two bars on the battery indicator).
Batteries Lose Capacity Over Time: Batteries naturally deteriorate over time whether being used or not. If battery use instructions are properly followed, batteries deteriorate at a rate of approximately 10% run time per year but may vary by patterns of use.
Fully Discharge vs. Partial Discharge and the Effect on Battery Cycles: Unlike lead acid batteries, the Lithium-ion battery used with Kaivac equipment is not damaged by full or partial discharging. The expected battery hours of use are approximately 600 hours and 400 charge cycles. If you discharge battery only to 80%, then the user can expect to get more cycles (500 cycles). With dual batteries make sure to alternate batteries per charge in order to maximize for life capacity.
Extended Storage: It is recommended to discharge to 50% capacity (two bars on the battery indicator) and store in a cool location (between 32°F to 113°F or 0°C to 45°C). To avoid battery impact, store battery laying down on its side on lowest shelf, and secured. If battery is dropped or experiences an impact or damage, discontinue use and replace. Never use a damaged battery, as a damaged battery may act in an unpredictable manner resulting in fire, explosion, property damage, or personal injury.
Battery Gauge: The Kaivac provided battery comes with a built-in Battery Gauge or which shows the approximate run time for the current charge remaining.
Replacement - End of Life: Rechargeable batteries eventually wear out. When your Kaivac Battery run time is less than 55% (i.e. 50 minutes for non-quick change and 33 minutes for Quick Change batteries), Kaivac recommends replacing your battery. Regardless of run time, contact Kaivac to replace your battery after 4 years. Consult kaivac.com for information on recycling your old battery through a licensed disposal facility.
DO NOT DISCARD BATTERY INTO TRASH! It is important to recycle your old batteries at your local authorized battery recycling facility or by calling 1-800-USA-CLEAN (1-800-872-2532) and selecting Option 3.
| Battery Specifications | |
|---|---|
| Weight | With Box, 11 lbs. (4,9 kg) |
| Body Material | Injection Mold Polypropylene |
| Dimensions (H x W x D) | 18 x 7 x 5 in. (45,7 x 17,8 x 12,7 cm) |
| Voltage | 36V DC |
| Battery Capacity | 15 A-hr |
| Battery Current | 15 A DC |
| Battery Type | Lithium-Ion |
| Approx. Run Time BOL (Beginning of Life) | 60 minutes |
| Approx. Run Time EOL (End of Life) | 35 minutes (discontinue use and take to recycling center) |
| Battery Box Receptacle | IP65 / IP67 (not required for UL) |
| Run Time Hour Meter | Acts as “odometer for battery” and runs only when motor switch is ON |
| Approx. Charge Cycles | 400 @ 100% discharge / 500 @ 80% discharge |
| Cut off Voltage (fully discharged) | 30V |
| Charger Specifications | |
| Approx. Charge Time | 5 hours |
| Charger Amps | 4 Amps |
| Charge Voltage | 42V DC |
| Charger Voltage | 110-240VAC / 36VDC (240VAC version only needs correct plug for wall outlet) |
| Charging Robustness | No special instructions |
| Battery Charge Memory | None |
| Battery Charge Gauge | Yes, LED Indicator |
| Approx. Charge Cycles | 400 @ 100% discharge / 500 @ 80% discharge |
| Storage/Inventory: | |
| Storage & Operation Ambient Temp | 32°F (0°C) to 113°F(45°C) |
| Storage & Shipping Charge | 40-60% Charge (35-38VDC) |
Customer/Technical Support
1-800-287-1136
GROUNDING INFORMATION
Grounding: Corded Units
GROUND FAULT CIRCUIT INTERRUPTER PROTECTION (for spray systems only)
If your unit is a corded unit, it has been supplied with a ground-fault circuit-interrupter(GFCI) built into the plug of the power-supply cord. This GFCI device provides additional protection from the risk of electric shock. Should replacement of the plug or cord become necessary, use only identical replacement parts that include GFCI protection.
If your unit is a corded unit, it is for use on a nominal circuit and has a grounding attachment plug. Make sure that the appliance is connected to an outlet having the same configuration as the plug. No adapter should be used with this unit.
GROUNDING INSTRUCTIONS
If your unit is a corded unit, it must be grounded. If the unit should malfunction or breakdown, grounding provides a path of least resistance for electric current to reduce the risk of electric shock. This unit is equipped with a cord having an equipment-grounding conductor and a grounding plug. The plug must be plugged into an appropriate outlet that is properly installed and grounded in accordance with all local electrical codes and ordinances.
Improper connection of the unit-grounding conductor can result in a risk of electric shock. Check with a qualified electrician or service person if you are in doubt as to whether the outlet is properly grounded. Do not modify the plug provided with the unit by removing the ground pin on the plug – if the plug will not fit the outlet, have a proper outlet installed by a qualified electrician.
This unit comes with a grounded attachable extension cord. If damaged, replace with Kaivac® (OEM) cord, or if necessary an equivalent cord rated 120V, 15 amps, 3-wire, 14 GA. This cord must be attached and mechanically secured using the provided cord connector to use the unit.
Grounding: Battery Units
Batteries and chargers: make sure your charger is compatible with your batteries, and set its charging algorithm to your battery pack before you use it.
GROUNDING INSTRUCTIONS
The charger must be grounded. If it should malfunction or breakdown, grounding provides a path of least resistance for electric current to reduce the risk of electric shock. This unit is equipped with a cord having equipment grounding conductor and grounding plug. The plug must be inserted into an appropriate outlet that is properly installed and grounded in accordance with all local codes and ordinances.
Improper connection of the unit-grounding conductor can result in a risk of electric shock. Check with a qualified electrician or service person if you are in doubt as to whether the outlet is properly grounded. Do not modify the plug provided with the unit by removing the ground pin on the plug – if the plug will not fit the outlet, have a proper outlet installed by a qualified electrician.
This unit is for use on a nominal circuit and has a grounding attachment plug. Make sure that the unit is connected to an outlet having the same configuration as the plug. No adapter should be used with this unit.
GROUNDING INFORMATION (CONTINUED)
Make sure your extension cord is in good condition and is the correct size for your unit. Table 1 shows the correct size to use depending on cord length and nameplate ampere rating. If in doubt, use the next heavier gauge. The smaller the gage number, the heavier the cord. An undersized extension cord will cause a drop in line voltage resulting in loss of power and overheating.
Use only three-wire outdoor extension cords that have three-prong grounding receptacles that accept the unit's plug.
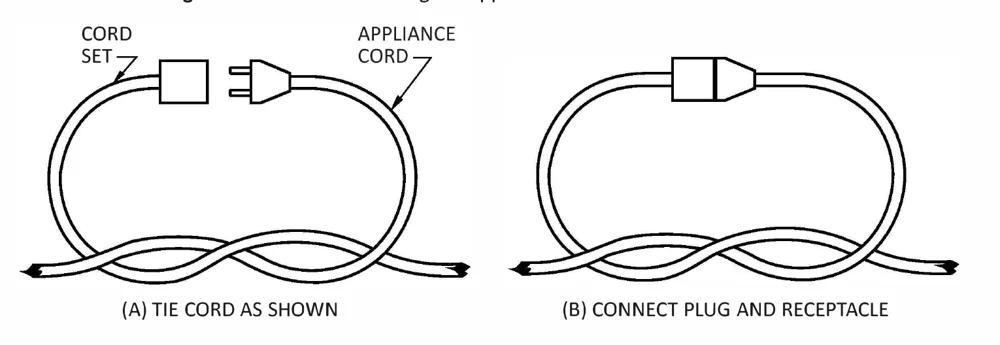
To reduce the risk of disconnection of the unit's cord from the extension cord during operations:
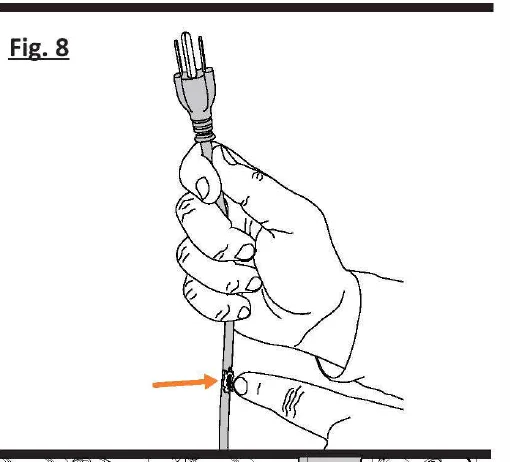
- Make a knot as shown in Figure 1 below:
| Ampere rating: More than, A | Ampere rating: Not more than, A | Volts | Total length of cord | |||
|---|---|---|---|---|---|---|
| 7.62 m (25 ft) | 15.24 m (50 ft) | 30.48 m (100 ft) | 45.72 m (150 ft) | |||
| 120 V | mm² (AWG) | |||||
| 0 | 6 | — | 0.82 (18) | 1.3 (16) | 1.3 (16) | 2.1 (14) |
| 6 | 10 | — | 0.82 (18) | 1.3 (16) | 2.1 (14) | 3.3 (12) |
| 10 | 12 | — | 0.82 (18) | 1.3 (16) | 2.1 (14) | 3.3 (12) |
UNIT COMPONENTS
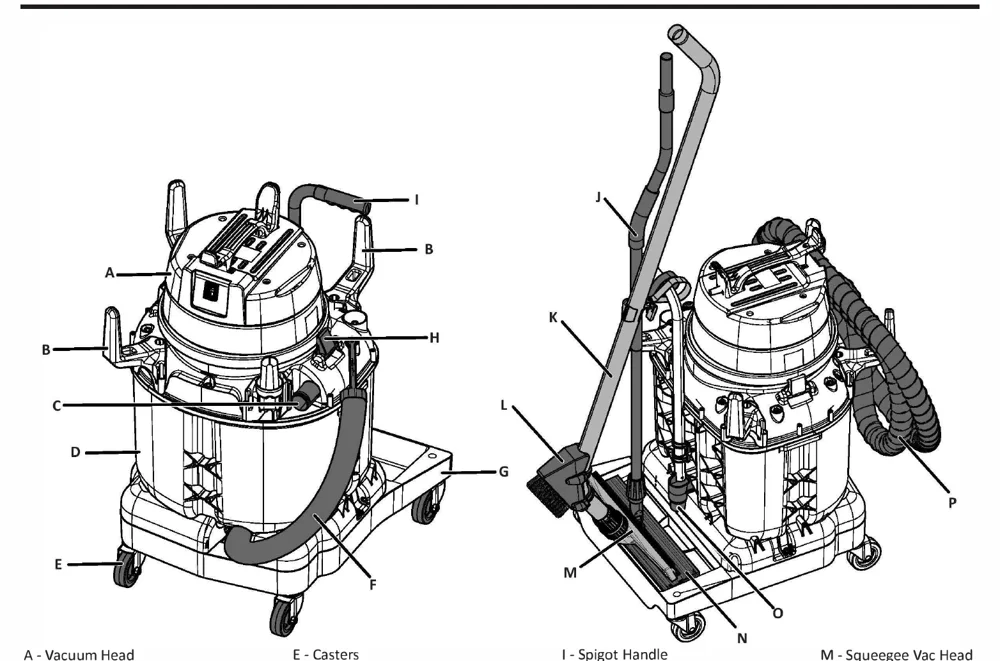
| Key | Component |
|---|---|
| A | Vacuum Head |
| B | Stob (Corded Units) |
| C | Vacuum Hose Port |
| D | Vacuum Tank |
| E | Casters |
| F | Dump Hose |
| G | Chassis |
| H | Locking Clasps |
| I | Spigot Handle |
| J | Spreader Handle |
| K | Vacuum Wand |
| L | Grout Brush |
| M | Squeegee Vac Head |
| N | Pad Holder |
| O | Spigot |
| P | Vacuum Hose |
BASE UNITS
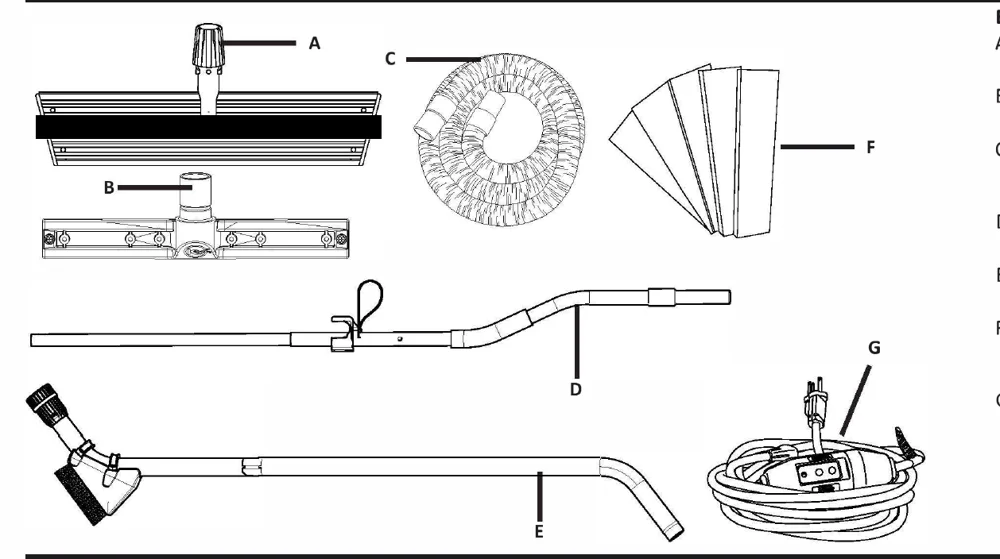
| Key | Component | Part number |
|---|---|---|
| A | Spreader Pad Holder | #MFMH |
| B | Squeegee Vac Head | #CVS12SFS |
| C | Vacuum Hose | Corded Units - #FS25 Battery Units - #FS8 |
| D | Spreader Handle | #MFHNDLSA |
| E | Vacuum Wand | #ODVKIT8 |
| F | Spreader Pads | Blue - #WPPB Green - #WPPG |
| G | GFCI Cord (Corded Units) | #GFCI25 |
SETUP/BASIC OPERATION
INSTALLING BATTERY AND CHARGING
Batteries and chargers: make sure your charger is compatible with your batteries, and set its charging algorithm to your battery pack before you use it.
Battery units only
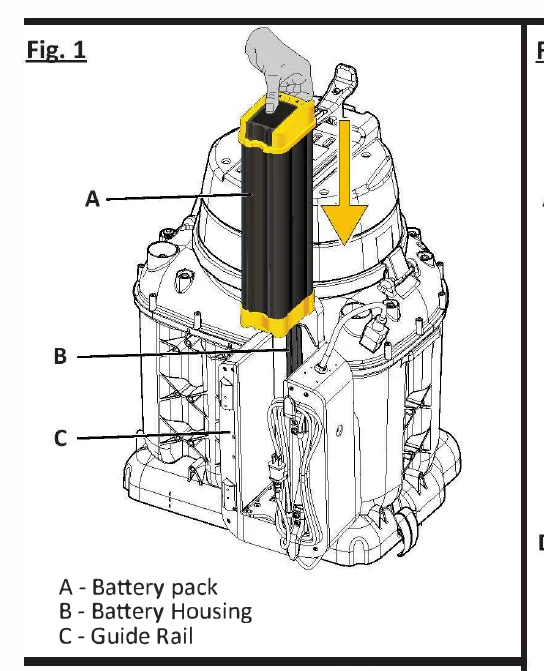
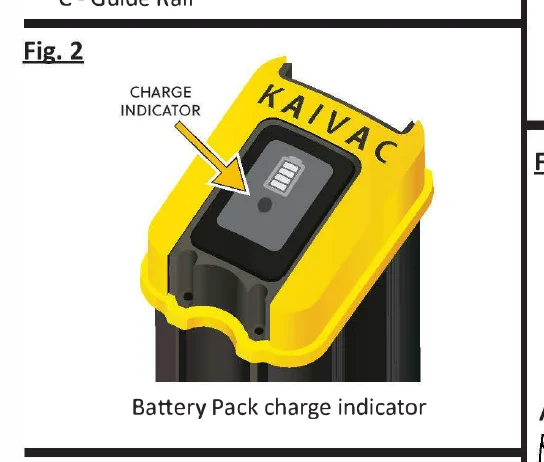
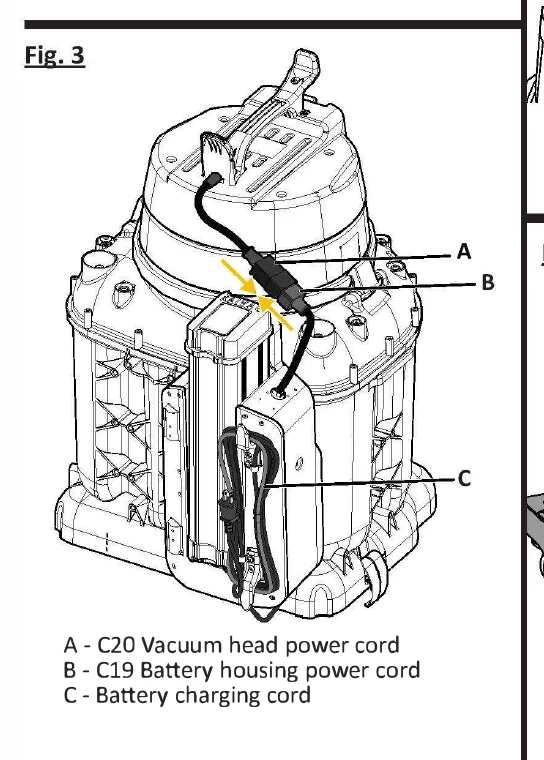
See Figures 1 - 3, page 11
- Lower battery down into the battery housing.
- To see battery charge, press the charge indicator on the top of the battery.
- Connect the plug from the battery housing into the vacuum motor plug.
- To charge the battery, keep the battery in the battery housing. Locate the cord wrapped around the cleats connected to the battery housing, plug into an outlet to begin charging .
PREPARING UNIT FOR USE
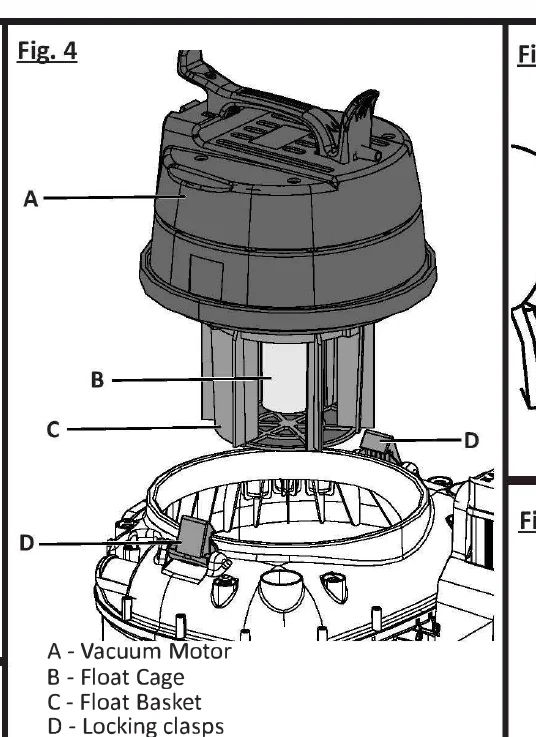
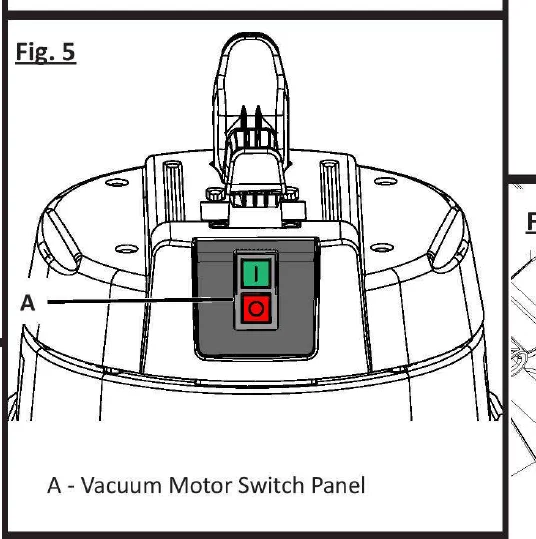
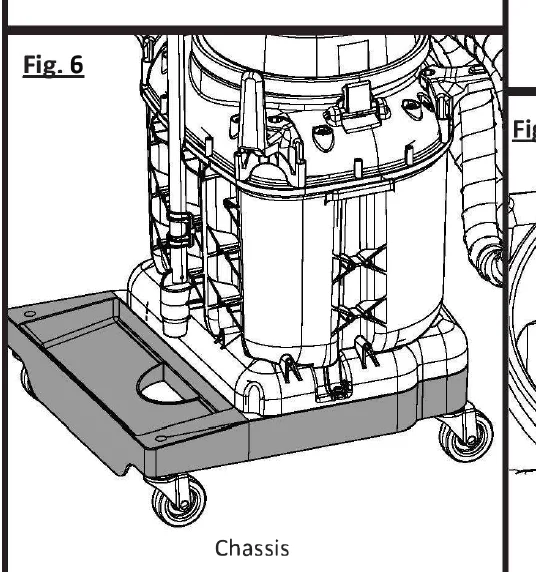
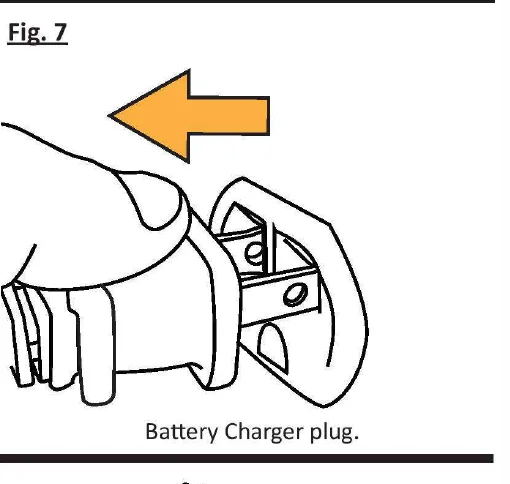
See Figures 4 -8 , page 11-12
- Ensure Vacuum motor is in place on the vacuum tank. Ensure top clasps are secured. Ensure float cage is in place and clean.
Do not use if float cage is not in place.
- Locate switch panel on vacuum head. This is used to operate the vacuum function.
- Note the Chassis, keep the hole clear when dispensing water. Use as tool storage for the vacuum wand and speed spreader as needed.
- Unplug battery from charger if applicable. Avoid getting water on unit.
- Inspect battery, housing, plug, cord, splash cover (if applicable), and helmet (if applicable) for damage, including cracks, separation, dents, holes, missing, pieces, and fraying cord or wires.
FILLING THE UNIT
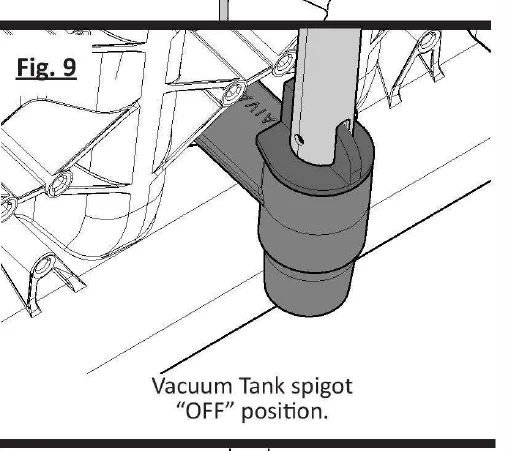
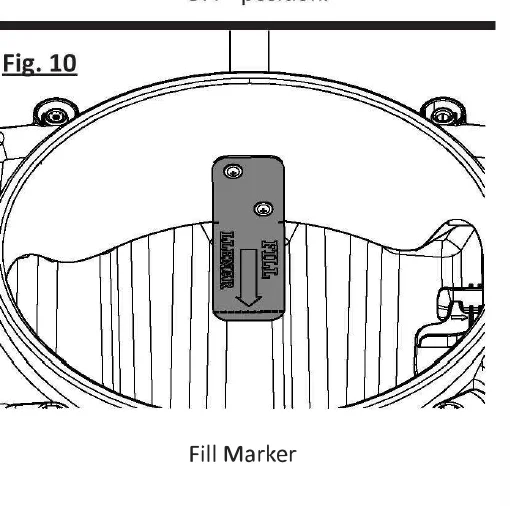
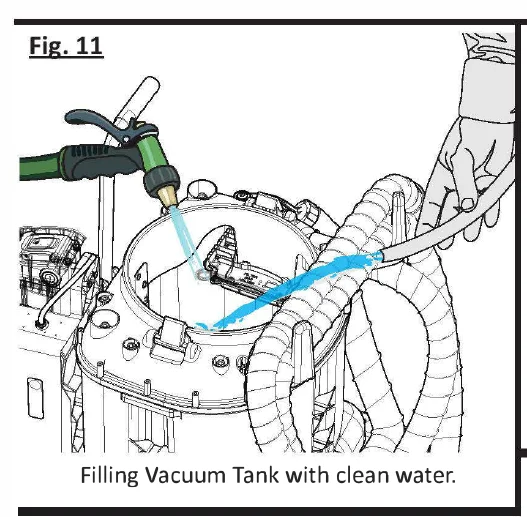
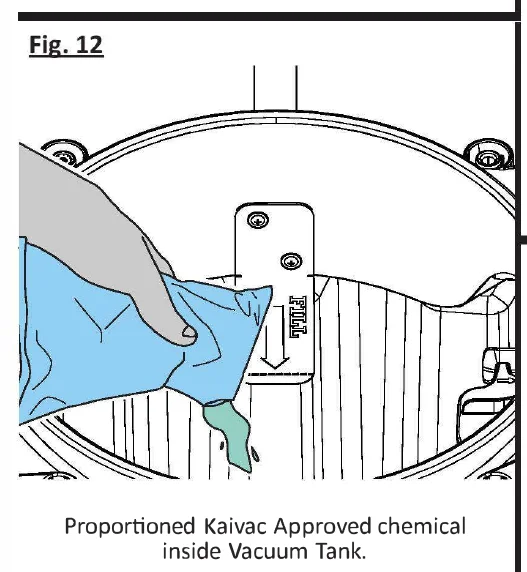
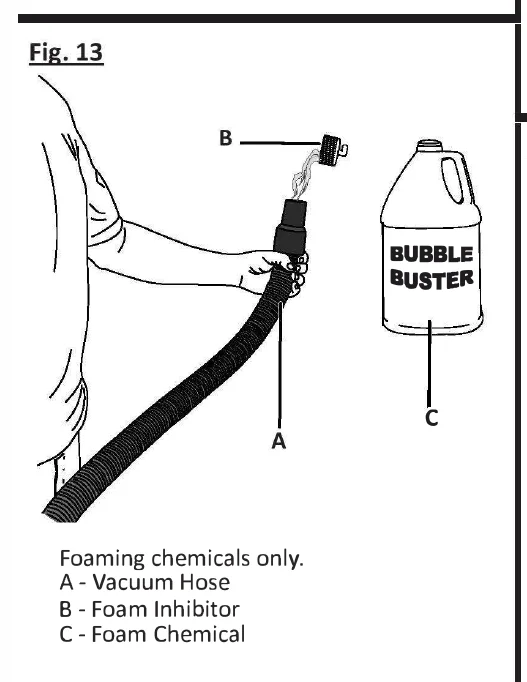
See Figures 9 - 13, pages 11-12
- Note the location of the Fill Marker inside the vacuum tank. The tank can hold up to 10 gallons of water. Do not fill past the Fill Line.
- Ensure spigot is closed before filling.
- To fill the unit, undo the clasps on the vacuum tank and lift the vacuum head off of the unit. Safely place down the vacuum head. Fill the unit with clean, cold water. Avoid getting water on the unit, and ensure the splash guard is in place if applicable. Clean out tank before each use.
- Fill the tank with water and recommended amount of Kaivac approved Chemicals. Follow the proper dilution instructions on bottles or dispenser. For accuracy and convenience, use Kaivac proportioned chemical packets.
- If using a cleaning product that foams, use a foam inhibitor to cut excess. Pour 2 capfuls of inhibitor in the Vacuum Hose with Vac running to coat inside of Vacuum Hose.
- Foaming chemicals in tank may damage Vac Motor.
INSTALLING/REMOVING ATTACHMENTS
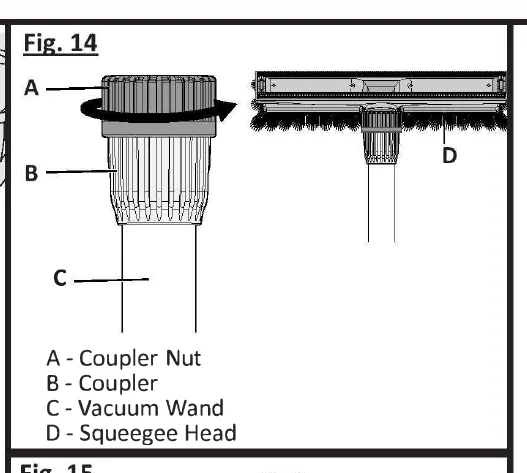
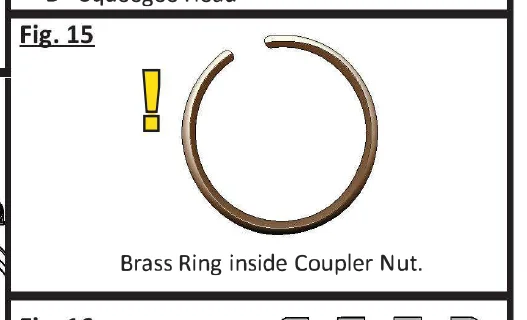
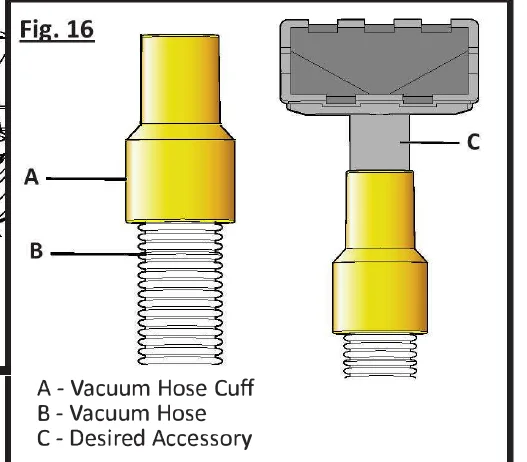
See Figures 14 - 16, page 12
- To attach different accessories to the end of the vacuum wand, start by loosening the coupler nut of the wand. Insert the accessory tool, and tighten the coupler nut.
- Ensure the brass ring inside the coupler nut of the vacuum wand stays in place and does not get lost when changing accessories or taking apart.
- To use accessories without the vacuum wand, push the desired accessory tool directly into the end of the vacuum hose.
- Place the vacuum wand and spreader tool into the chassis when not in use.
VACUUMING
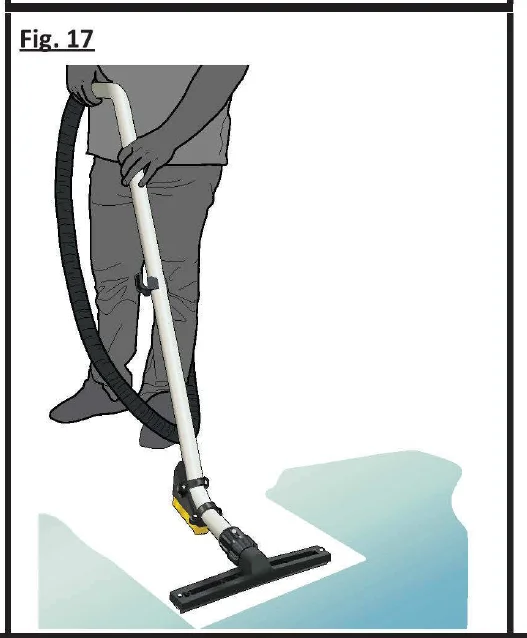
See Figure 17, page 12
- Locate the vacuum hose on the back of the unit. Ensure hose cuff is connected to the port at the top of the unit. Using the other end of the hose, attach the hose cuff to the vacuum wand or desired accessory, and power on the unit to begin using floor squeegee.
UNIVAC OPERATION
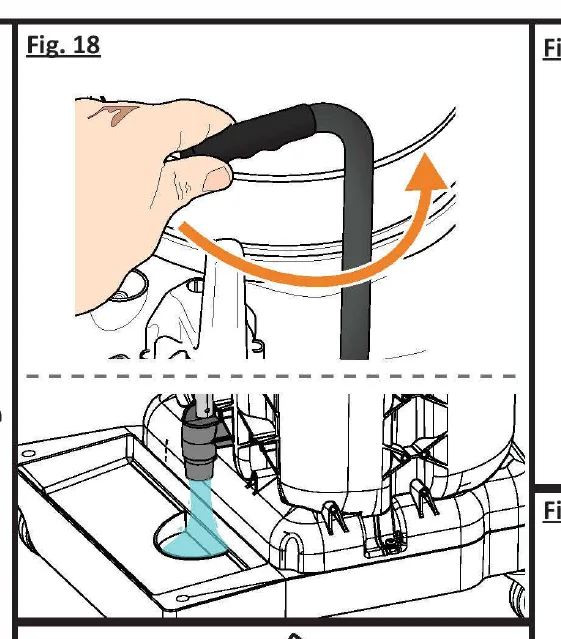
- After the unit has been filled with the appropriate amount of water/solution, turn the Spigot handle counter clockwise to MAX position. Beginning at the rear of the area, begin dispensing solution, moving towards the front of the area (Fig. 18).
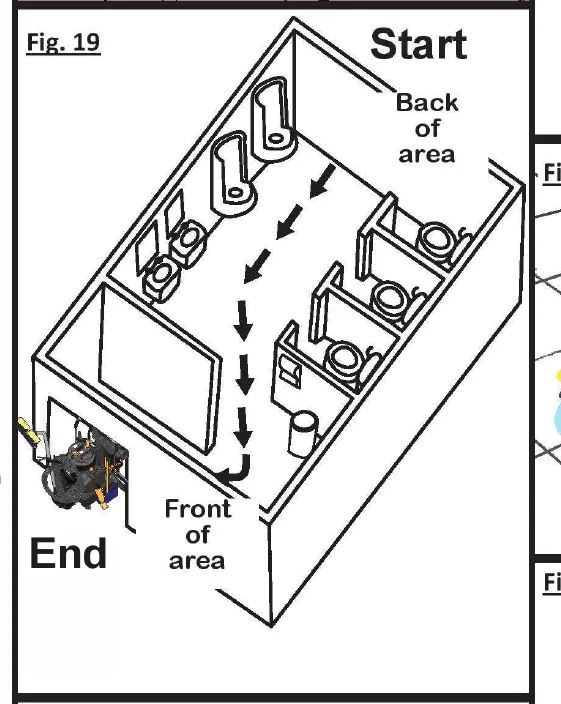
- Beginning at the rear of the area, begin dispensing solution, moving towards the front of the area. Park unit so that it blocks entry to area (Fig. 19).
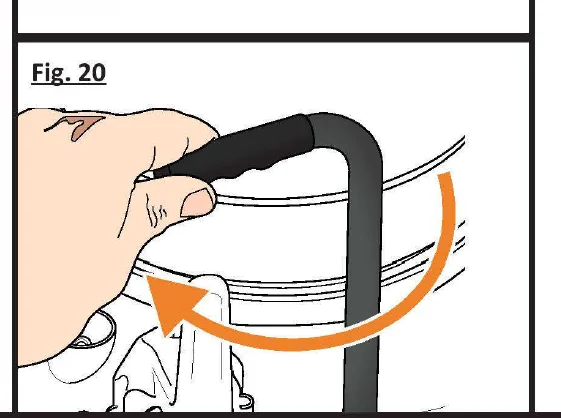
- Turn Spigot clockwise to the OFF position (Fig. 20).
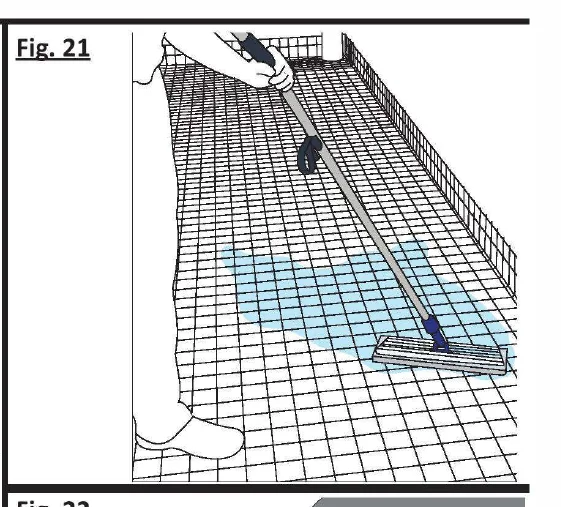
- Use Spreader Tool in back-and-forth motion to cover floor with cleaning solution. *Agitate Spreader Tool over troubled or extra soiled areas to get a deeper clean* (Fig. 21).
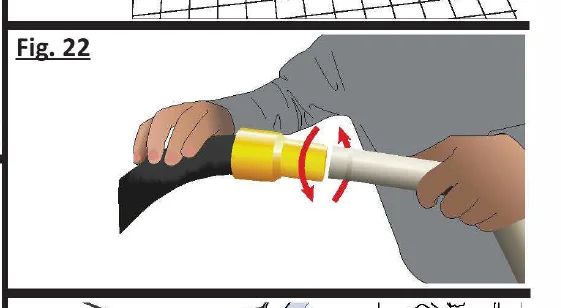
- Attach Vacuum Wand to Vacuum Hose (if not already connected). The yellow portion of the hose will connect to the wand. The black portion will be connected to the tank. (Fig. 22). If corded, plug in provided extension cord to vacuum motor. If battery unit, ensure battery is charged and place into battery housing. Turn Vacuum Motor to ON (I).
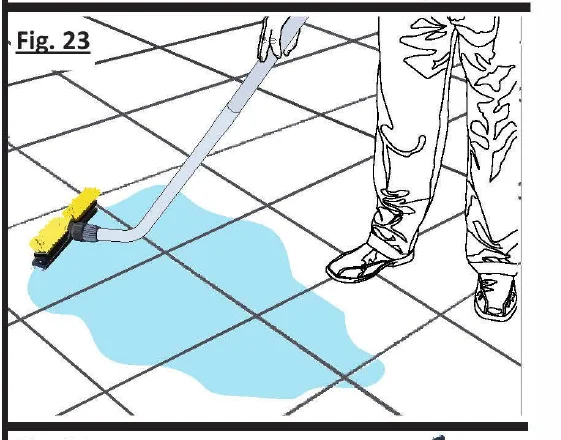
- Vacuum floor surface diagonally to grout lines, reaching under shelves, seating etc. (Fig. 23).
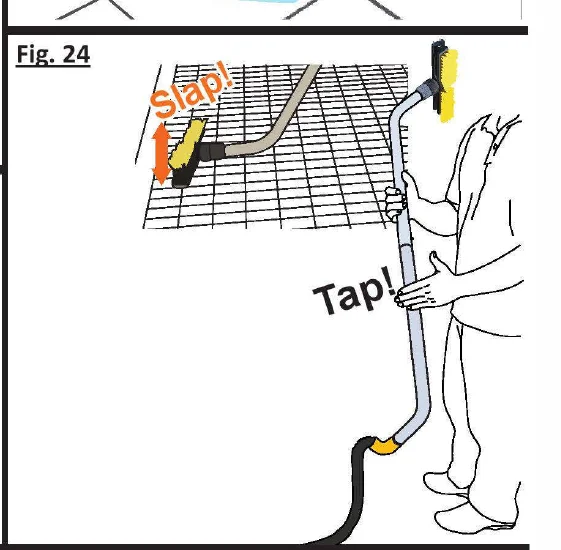
- Slap & Tap: Once Vacuuming is complete, keep motor running. Slap Vacuum Wand on floor 3-4 times to dislodge debris from squeegee head. Then, invert Wand and Tap 4-5 times to dislodge any fluids or substance from Wand (Fig. 24).
DAILY & GENERAL MAINTENANCE
The unit should be checked, emptied, and cleaned after each use.
Unit should be turned OFF (O) unless specified.
EMPTYING THE VACUUM TANK
- If the Vacuum Motor shuts off before the job is complete, the Vacuum Tank may be full and need to be emptied. Lift the Vacuum Head to check liquid level inside the Vacuum Tank. If unit is full or your job is complete, follow the instructions below to empty Tank into appropriate sink/drain.
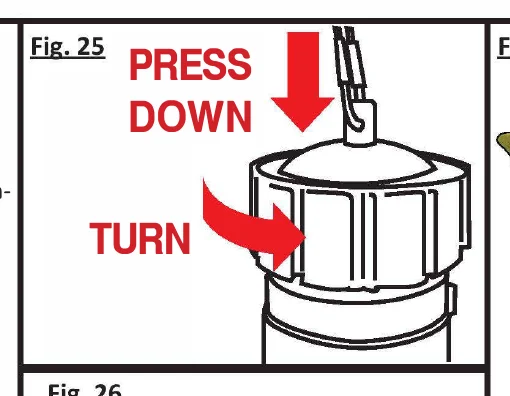
- To begin the dumping process, you must first press down on the Cap and turn counter-clockwise (Fig. 25).
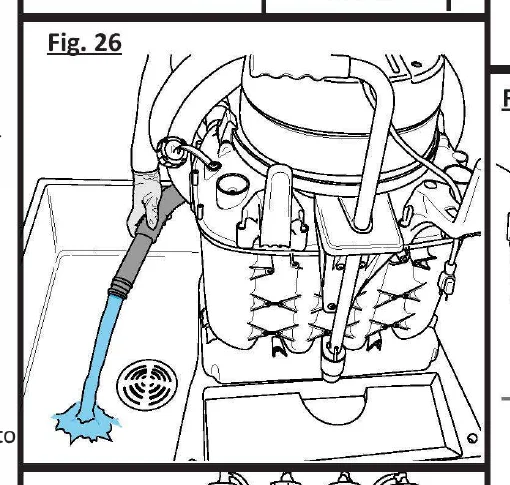
- Once cap is removed, lower Dump Hose into appropriate sink/drain (Fig. 26).
CLEANING UNIT
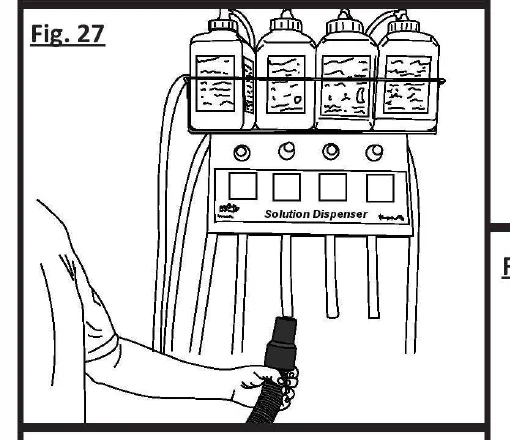
- Alternatively, you can also turn the Vacuum ON (I) and dispense solution into Vacuum Hose as shown to clean Hose and Tank (Fig. 27).
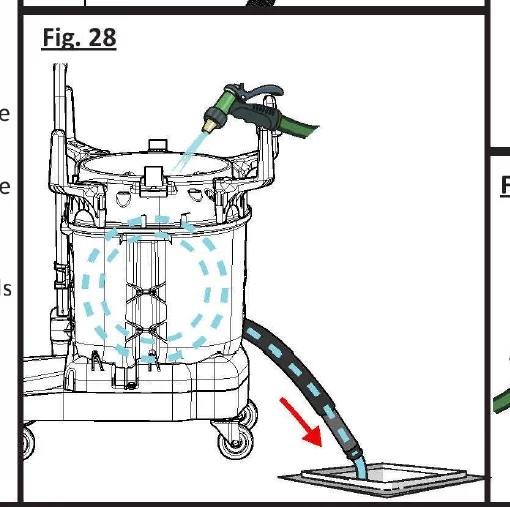
- Rinse Vacuum Tank thoroughly at clean-up sink, preferably with hot water. Rinse out Trolley Bucket (Fig. 28).
CLEANING UNIT FILTERS
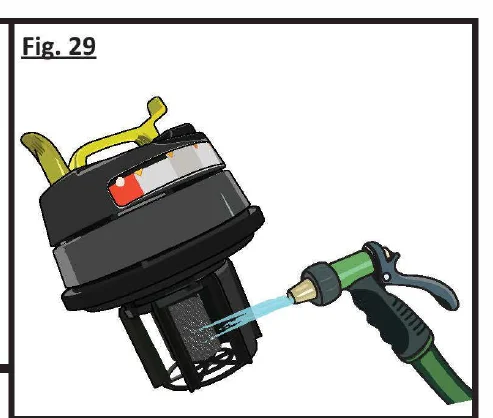
- Lift the Vacuum Head. Clean and spray the Float Cage located inside the Vacuum Head. Ensure Float Cage is in place. Clean Float Cage regularly Do not use if Float Cage is not in place (Fig. 29).
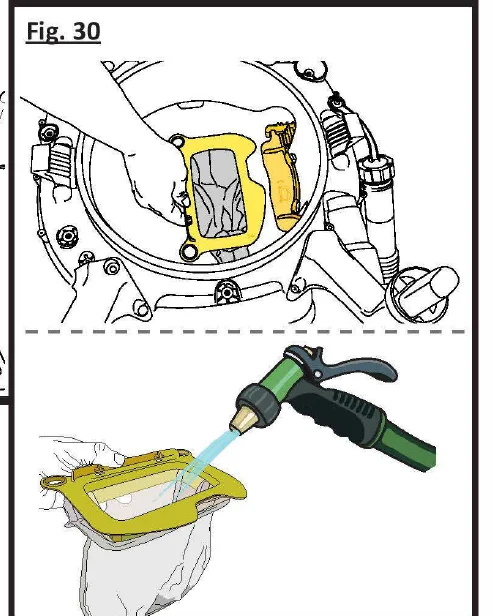
- If unit contains mesh Filter Bag located inside the Vacuum Tank, before starting each new cleaning process, remove Filter Bag, dump any debris out, spray clean, and then replace back into the Filter Bag Frame (Fig. 30).
SQUEEGEE BLADES & ACCESSORIES
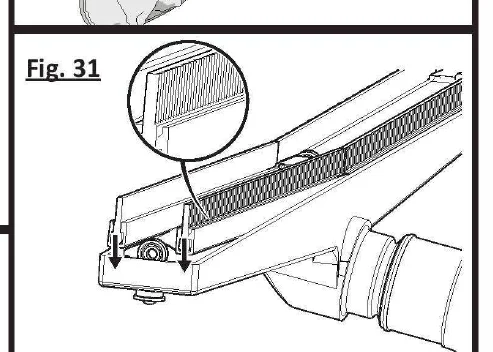
- Check for worn squeegee blades. Worn blades cause streaking and loss of vacuum suction.
- Replace with new every 6-8 weeks. Ensure squeegee blades are replaced with the ribbed portion facing outwards (Fig. 31).
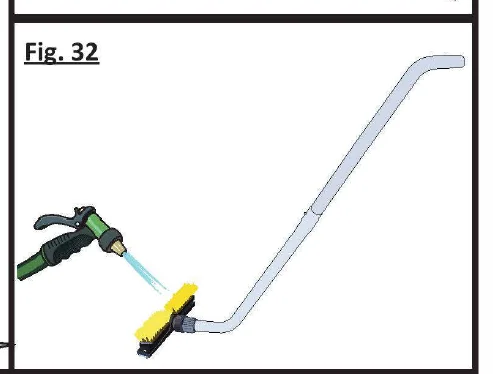
- Clean off accessories and build-up on parts and tools (Fig. 32).
UNIT & MAINTENANCE
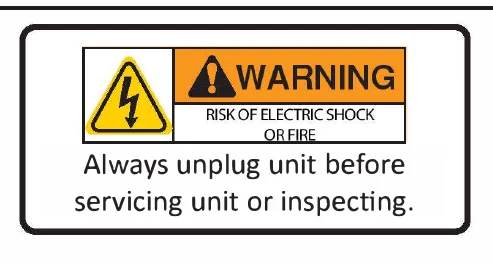
| ITEM | PROCEDURE |
|---|---|
| Floor Squeegee |
|
| Spray Gun |
|
| Pressure Hose |
|
| Water Tank |
|
| Vacuum Tank |
|
| Leaks |
|
| Electrical System |
|
| Vacuum Wand |
|
| HEPA Filter |
|
| Float Cage |
|
| Battery Maintenance |
|
| Splash Cover (if applicable) |
|
DC STANDARD ELECTRICAL DIAGRAM
Batteries and chargers: make sure your charger is compatible with your batteries, and set its charging algorithm to your battery pack before you use it.
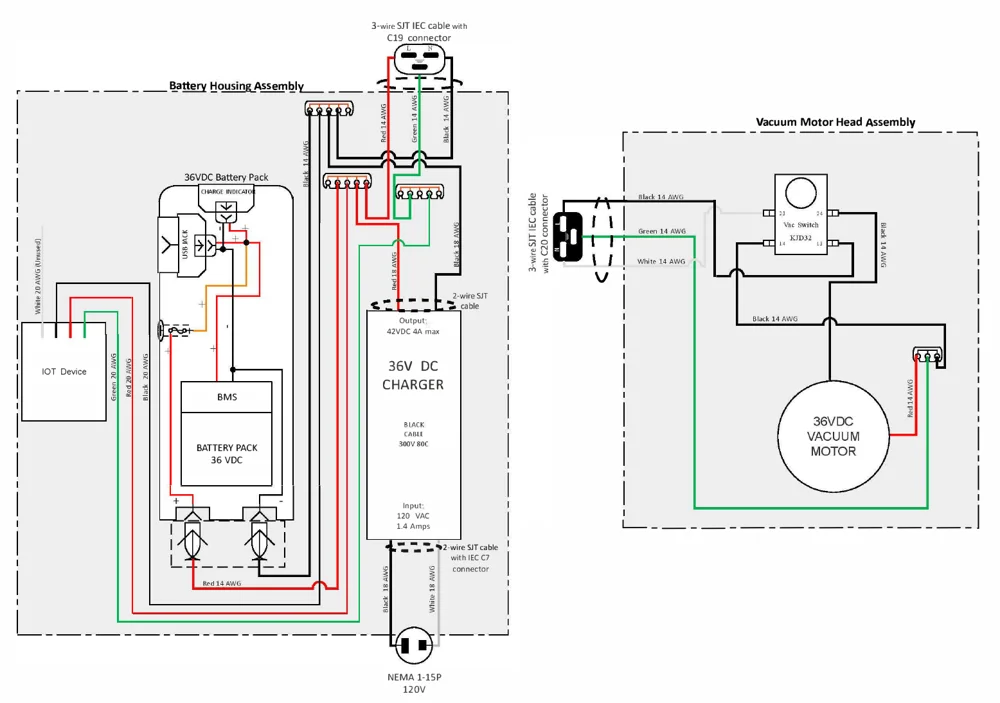
Customer/Technical Support
1-800-287-1136
AC STANDARD ELECTRICAL DIAGRAM
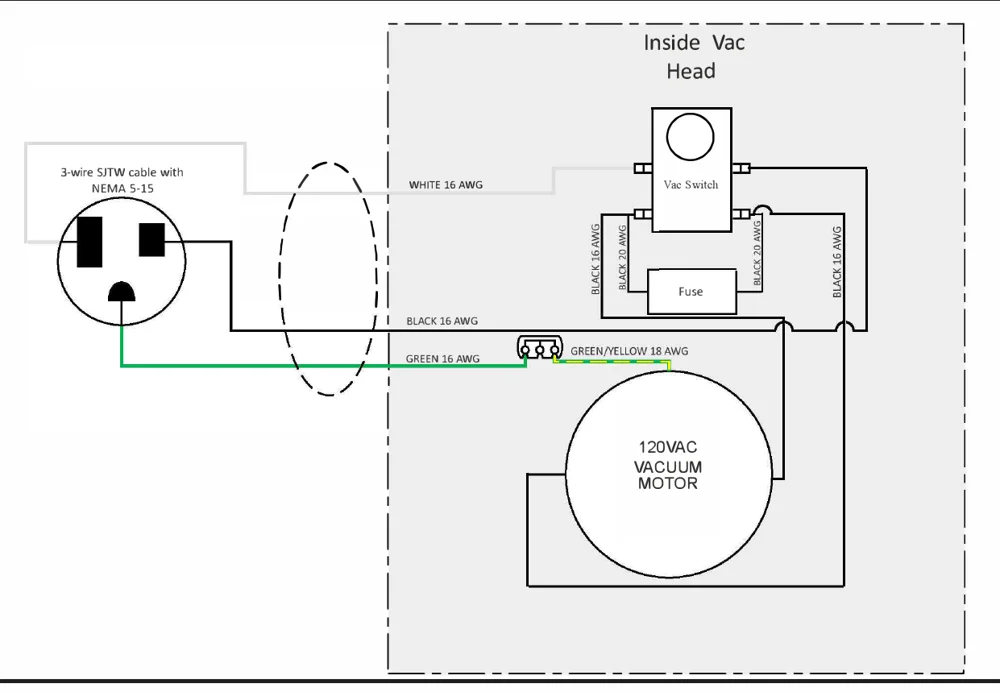
AC INTL. ELECTRICAL DIAGRAM
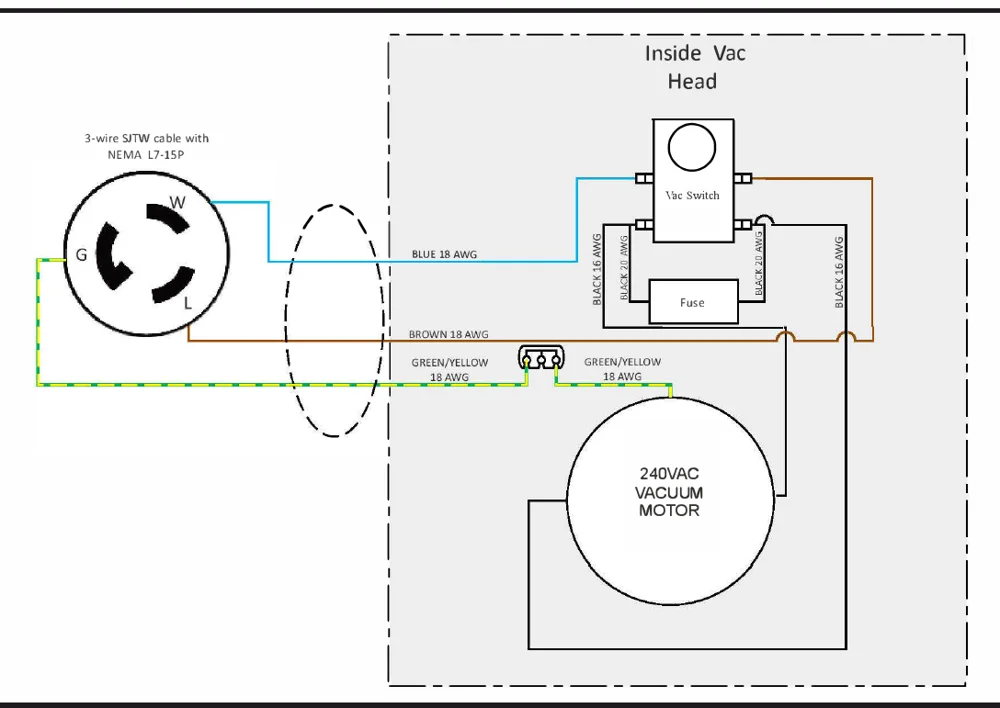
TROUBLESHOOTING
RISK OF ELECTRIC SHOCK OR FIRE
| AREA | PROBLEM | POSSIBLE CAUSE | REMEDY |
|---|---|---|---|
| Electrical | No Power to pump or vac motor | Unit not plugged in | Plug unit in |
| Switch not “on” | Check switches for “on” | ||
| GFCI tripped | Test and reset GFCI | ||
| Building circuit overloaded | Check and reset circuit | ||
| Switch wires loose | Disconnect power and check for loose wire | ||
| Connections loose | Disconnect power and check for loose wire under panel | ||
| Electrical burning smell WARNING! RISK OF FIRE, SERIOUS INJURY, OR DEATH TURN UNIT OFF IMMEDIATELY. | Vac motor brushes worn | Remove vac motor and repair | |
| Vac motor hung up | Release pressure on hose and jog vac switch, or replace | ||
| Pump motor hung up | Release pressure on hose and jog pump switch, or replace | ||
| Vacuum System | No/Weak vacuum | Vac tank full | Empty vac tank |
| Squeegee blades or wheels worn | Replace wheels or blades and check periodically | ||
| Float shutoff screen dirty | Spray off float screen to clean | ||
| Float ball stuck | Tap float and release/clean | ||
| Damaged hose | Cut and repair/replace | ||
| Dump hose plug missing | Contact dealer and replace | ||
| Access lid not right | Tighten lid hand tight | ||
| Vacuum hose plugged | Flush hose to remove debris | ||
| Too much liquid in vac hose | Allow air in when vacuuming | ||
| Vac hose still wrapped | Unwrap vac hose fully | ||
| Exhaust plugged | Clean exhaust port and HEPA filter | ||
| Leak in vac tank | If repairable, clean and dry affected area and seal with silicone | ||
| HEPA filter clogged | Remove HEPA filter and clean | ||
| Moisture from exhaust | Vac tank full | Dump vac tank | |
| Float shutoff missing | Replace | ||
| Excessive foam in vac tank | Use defoamer | ||
| Blow Dry System | No air flow | Hose disconnected | Reconnect hose |
| Moisture from exhaust | Water in blow hose | Dry blow line | |
| Suction, not blow action | Vacuum hose connected to vac tank | Reconnect to vac motor exhaust hose |
TROUBLESHOOTING
| AREA | PROBLEM | POSSIBLE CAUSE | SOLUTION |
|---|---|---|---|
| High Pressure System WARNING Always unplug unit before inspecting or servicing. RISK OF ELECTRICAL SHOCK, FIRE, SERIOUS INJURY, OR DEATH | No water from pump or low pressure | Out of water | Fill water tank |
| Gun nozzle plugged | Remove orifice with Allen wrench and clean | ||
| Air in pump (vapor lock) | Use power prime technique | ||
| Gun orifice missing | Replace orifice | ||
| Water tank filter plugged | Clean tank and filter | ||
| In-line bowl filter plugged | Remove filter cover and clean | ||
| Bowl filter lid loose | Gently tighten bowl cover | ||
| Pressure hose damaged | Repair or replace | ||
| Quick disconnect leaking | Tighten or replace | ||
| Injector plugged | Remove safety cap from chemical and blow small amounts of compressed air into line | ||
| Pulse hose damaged | Repair or replace | ||
| Regulator failed | Replace | ||
| Hose kinked | Unkink and check for damage | ||
| Seals in pump need replaced | Remove and replace seals | ||
| Bad fan pattern or pinpoint pattern on gun | Debris in nozzle | Remove orifice with Allen wrench and clean | |
| Orifice damaged | Remove and replace | ||
| Chemical Injection System WARNING Always unplug unit before inspecting or servicing. RISK OF ELECTRICAL SHOCK, FIRE, SERIOUS INJURY, OR DEATH | No chemical flow | Out of chemical | Refill chemical |
| Safety cap not secure | Check safety cap/tighten | ||
| Chemical valve “off” | Check on/off valve | ||
| Safety cap plugged | Replace cap | ||
| Spray gun in wrong mode | Make sure gun nozzle is pulled out away from gun chemical mode | ||
| Metering tip plugged | Check metering tip for clog | ||
| Injector plugged | Remove safety cap from chemical and blow small amounts of compressed air into line | ||
| Air entering system | Check for air entering system around chemical lines or injector | ||
| Injector installed backwards | If fluttering or pulsing sound can be heard while spraying or when unit is running, it is possible that your injector is in backwards. Remove; reinstall. | ||
| Kink in chemical line | Replace chemical line |
TROUBLESHOOTING
| AREA | PROBLEM | POSSIBLE CAUSE | SOLUTION |
|---|---|---|---|
| Chemical Injection System continued | Not enough chemical | Metering tip plugged | Remove and clean |
| Wrong metering tip | Check and replace per chart | ||
| Chemical line blows off safety cap | Debris in injector | Remove safety cap from chemical and blow small amounts of compressed air into line | |
| Water back flows into chemical bottle | Bad seat on injector check valve | Check injector o-ring or replace | |
| Bad safety cap | Replace safety cap | ||
| Dump System | Dump hose will not empty tank | Dump hose cap not removed | Remove cap |
| Clog in bottom of tank | Tip dump contents, remove debris | ||
| Dump hose leaks | Hose cut | If leak is less than 4” from tank side, cut and reattach, or replace | |
| Clamp loose | Tighten hose clamp | ||
| Dump cap missing | Replace cap | ||
| Wheels and Casters | Wheels will not roll; rubbing | Flat tires | Inflate tires to 30 p.s.i. |
| Debris wrapped around axle | Check for debris on axle | ||
| Bearings tight | Grease bearings | ||
| Wheels too loose on axle | Remove wheel, add washers to take up slack | ||
| Bearings falling out | Replace bearing assembly | ||
| Squeegee Head | Floor streaks | Worn blades or wheels | Replace wheels and/or blades |
| Squeegee head does not easily rotate when installed on wand | Brass ring on wand not in groove | Loosen coupling nut and re-position head on groove | |
| Coupling nut too tight | Loosen 1/2 turn | ||
| Head will not stay on wand | Coupling nut cracked | Replace | |
| Brass ring worn | Replace | ||
| Premature blade wear | Squeegee wheels worn | Check wheels for wear/replace | |
| Sucks to the floor too tightly | Squeegee wheels worn | Check wheels for wear/replace | |
| Battery WARNING RISK OF FIRE, EXPLOSION, AND SERIOUS INJURY, OR DEATH | Sparks/Burning/Fire/Smoke STOP USE IMMEDIATELY | Damage to battery or charger | Stop use immediately. Disconnect battery from charger, if possible. Unplug charger, if possible. |
Kaivac and KaiVac are trademarks of Kaivac, Inc. Southeastern Equipment & Supply is an independent dealer.