User Manual
E Ride 28/32 SPORT Rider Scrubber
Minuteman International. Document 988739UMS, Rev * 05/14.
Technical specifications
This manual is furnished with each new MINUTEMAN ERide 28/32 SPORT. This provides the necesary operating and preventive maintenance instructions. Operators must read and understand this manual before operating or servicing this machine.
This machine was designed to give you excellent performance and efficiency. For best results and minimal cost, please follow the general guidelines below:
- Operate the machine with reasonable care.
- Follow the manufacturers suggested maintenance instructions as provided in this manual.
- Use original Minuteman supplied parts.
| Item | Specification |
|---|---|
| Model | E Ride™ 28/32 SPORT |
| Model No. | ER28DS, ER28DSPLUS, ER28DSQP, ER28DSQPG, ER28DSQPGT, ER32DS, ER32DSPLUS, ER32DSPLUSIW, ER32DSQP, ER32DSQPG, ER32DSQPIW, ER32DSQPT |
| Current | 60 Amps |
| Voltage, Batteries | 36 volts, 6-6volt |
| Battery Capacity | 235 Ah (Optional 395 Ah batteries available) |
| Sound Level | 75 dB |
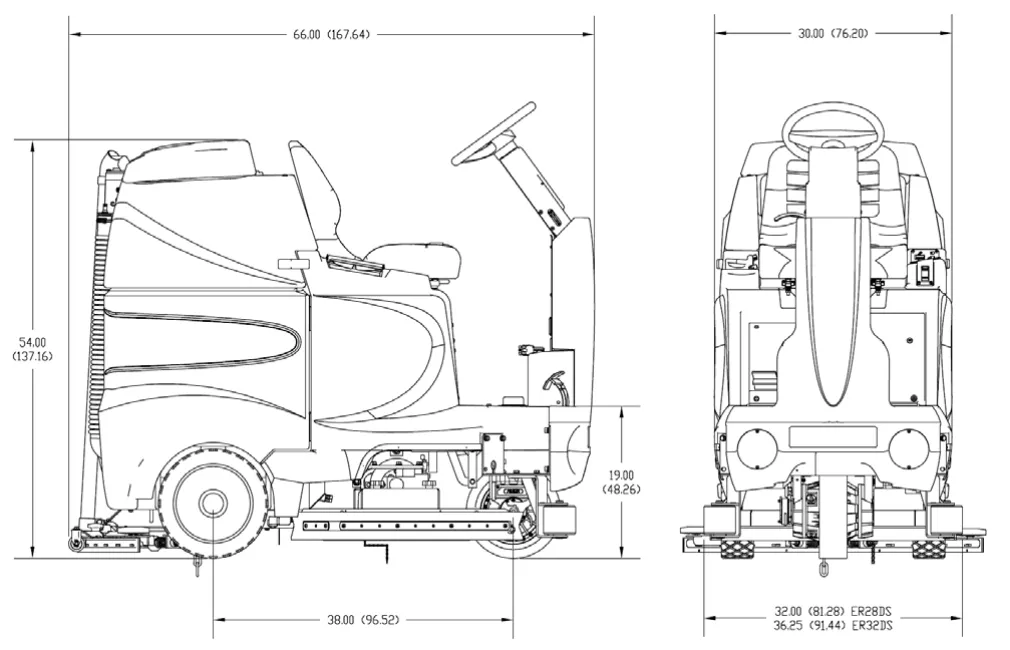
| Dimensions (LxWxH) | 66 in x 31 in x 54 in (167.64cm x 78.74cm x 137cm) |
| Gross Weight | 1,243 lb (564 kg) with batteries 847 lb (384 kg) without batteries |
| Working Grade Transport | 10% (7°) |
| Wheel to Floor Pressure | 64 PSI Front, 69 PSI Rear |
Dimensions
Preface
Dear customer, Thank you for purchasing the Minuteman® E Ride. The outstanding operational characteristics of the E Ride should justify the confidence you demonstrated in making this purchase.
The E Ride is a commercial grade Rider Scrubber machine. It is battery operated and is intended by Minuteman to be used in accordance with this manual, the labels on the machine itself, as well as applicable federal, state, and local safety and environmental statutes, regulations, and ordinances (collectively the "governmental regulations"), applicable commercial standards, and common sense.
The user's own safety, as well as the safety of others, depends to a great extent on how the E Ride is operated, handled, and maintained. Therefore, as a starting point, this manual must be read and understood thoroughly prior to the machine being switched on for the first time. When operating or maintaining the E Ride, THINK SAFETY FIRST! This manual provides vital information concerning the safe operation, use, maintenance, and service of the E Ride.
The various safety alert symbols, signal words, and safety messages contained herein are intended to be read in conjunction with each other, as well as with E Ride labels, instruction plates, and applicable governmental regulations. To the extent that any governmental regulations conflict with the provisions of this instruction manual, such governmental regulations would govern.
Your authorized Minuteman dealer would be happy to answer any questions you may have concerning the operation or maintenance of the E Ride or information contained in this manual. If repair or maintenance work is performed on the E Ride, Minuteman recommends that only genuine replacement parts be used and that such work be performed by qualified individuals.
Proper use
The E Ride is a floor scrubing machine. Its intended scope of application is for wet cleaning of level, hard-surfaced floors in accordance with the provisions of this instruction manual, applicable governmental regulations, manufacturer specifications, and machine labels (collectively, "proper use"). Using the E Ride beyond its proper use will be deemed improper use by Minuteman. Minuteman disclaims any liability for any personal injury, property, or other damages of any nature whatsoever, whether special, indirect, consequential, or compensatory, directly or indirectly resulting from the improper use of the E Ride, or uses beyond or inconsistent with the E Ride's intended scope of application. This disclaimer of liability also extends to modifications to the E Ride made without Minuteman's prior written consent.
The E Ride should only be operated, handled, and maintained by persons who are familiar with the machine and who have been instructed of the potential hazards associated with such operation, handling, and maintenance.
Disclaimer
Minuteman disclaims liability for any personal injury, property, or other damages of any nature whatsoever, whether special, indirect, consequential, or compensatory, directly or indirectly resulting from the publication, use, application, or reliance on this document or, except as expressly set forth in the sales contract for the machine, the operation or maintenance of the E Ride.
EXCEPT AS EXPRESSLY SET FORTH IN SUCH SALES CONTRACT, MINUTEMAN MAKES NO WARRANTIES, EXPRESS OR IMPLIED, AND SPECIFICALLY DISCLAIMS ANY WARRANTY OF MERCHANTABILITY OR FITNESS FOR A PARTICULAR PURPOSE.
Minuteman disclaims and makes no guaranty or warranty, express or implied, as to the accuracy or completeness of any information published herein, and disclaims and makes no warranty that the information in this instruction manual will fulfill any parties' particular purposes or needs. While Minuteman believes that the information in this manual is accurate, in the event that technical or typographical errors exist in this manual, Minuteman reserves the right to make changes to subsequent editions of this manual without prior notice to the recipients of this edition. The reader should notify Minuteman if any errors in this manual are suspected. Minuteman does not undertake to guarantee the performance of any individual manufacturer or seller's products or services by virtue of this instruction manual.
In publishing and making this manual available, Minuteman is not undertaking to render professional or other services for or on behalf of any person or entity, nor is Minuteman undertaking to perform any duty owed by any person or entity to someone else. Anyone using this manual should rely on his or her own independent judgment or, as appropriate, seek the advise of a competent professional in determining the exercise of reasonable care in any given circumstances.
Valid as of: May 2014
Minuteman International Inc.
14N845 U.S. ROUTE 20
PINGREE GROVE, IL 60140
U.S.A.
Notes on warranty
The terms of the sales contract apply in regard to any product warranties. Minuteman expressly disclaims all other warranties, either express or implied, of any kind. It should be noted, however, that failure to maintain and service your E Ride in accordance with its proper use may void the warranty. In this regard, any maintenance work must be performed by an authorized Minuteman service representative and confirmed in the "Maintenance Certificate" - the warranty document. By way of example, the following items are excluded from the E Ride warranty: fuses; normal wear and tear; improper machine handling; damages caused by overloads; unauthorized machine modifications; non-compliance with maintenance instructions or specifications; or improperly fitting parts or accessories.
Acceptance of the machine
Upon arrival, check machine for possible damages in transit. Follow unpacking instructions on shipping pallet. Each unit has been tested and throughly inspected before shipment. Any damage is the responsibility of the delivery carrier who should be notified immediately.
Minuteman International Inc.
14N845 U.S. ROUTE 20
PINGREE GROVE, IL 60140
U.S.A.
The E Ride 28/32 SPORT
Batteries and chargers: make sure your charger is compatible with your batteries, and set its charging algorithm to your battery pack before you use it.
This machine was designed with total operator comfort and ease of use in mind. All machine components have been designed as a total system to efficiently clean dirty floors. The E Ride has four available scrub head types and sizes to fit specific applications. Please contact your Minuteman representative for specific recommendations for the correct scrub head type, size, and brush type and chemical applications.
Before using the machine, always perform the following steps to ensure proper machine operation.
- Check under the machine for leaks.
- Check the rear and side squeegees for wear and damage.
- Check the steering for proper operation.
- Check the solution and recovery tanks.
After using the machine, always perform the following steps:
- Check the battery charge level. Charge batteries if necessary. When charging batteries, extra precaution is required:
- Battery acid can cause burns.
- When working on or around batteries, always wear protective clothing and safety glasses.
- Remove metal jewelry. Do not lay tools or metal objects on top of the batteries.
- Charging batteries generate explosive gasses.
- DO NOT CHARGE BATTERIES WHEN OPEN FLAMES OR SPARKS ARE PRESENT. DO NOT SMOKE.
- Make sure the charger is turned off before disconnecting it from the batteries.
- Charge the batteries in a well-ventilated area.
- Fluid levels should be checked before and after charging and maintained at the proper levels. If low, add water until the metal plates are covered.
- If the machine is not used for an extended period of time, batteries should be kept fully charged with a boost charge once a week.
- Check for wire, string, or twine wrapped around the scrub brushes.
- Check the squeegees for wear and damage.
- Check the rear squeegee suction hose and off-aisle wand hose for obstructions.
- Empty and clean the debris box (cylindrical systems only).
- Drain and clean the recovery tank.
- Check under the machine for leaks.
- Check the service records to determine maintenance requirements.
This page is blank in the printed manual.
Table of contents
- Technical Specifications (page 2)
- Introduction (page 4)
- Notes on Warranty (page 6)
- Acceptance of the machine (page 6)
- The E Ride 28/32 SPORT (page 7)
- Table of Contents (page 9)
- Important Safety Instructions (page 10)
- Unpacking Instructions (page 11)
- 1 Machine Overview (page 12)
- 1.1 Machine Overview - Front (page 12)
- 1.2 Machine Overview - Rear (page 13)
- 1.3 Operator Compartment (page 14)
- 1.4 Control Console (page 16)
- 1.5 Operation Modes (page 18)
- 1.6 Fault/Diagnostic Codes (page 20)
- 1.7 Steering Wheel (page 21)
- 1.8 Accelerator Pedal (page 21)
- 1.9 Seat (page 21)
- 1.10 Directional Switch (page 21)
- 1.11 Parking Brake (page 21)
- 1.12 Circuit Breakers (page 22)
- 1.13 Battery Compartment (page 22)
- Battery Connection Diagram (page 23)
- 1.14 Scrub Deck - Cylindrical (page 24)
- Scrub Deck - Disc (page 24)
- 1.15 Scrub Deck Installation (page 26)
- 1.16 Side Squeegees (page 28)
- 1.17 Rear Squeegee (page 30)
- 1.18 Circuit Breaker Panel - Disc w/Supervisor Key (page 32)
- 1.19 SPORT LEDs & Extreme Pressure Switch (page 34)
- 2 First Operation (page 36)
- 2.1 Instruction (page 36)
- 2.2 Initial charging procedure (page 36)
- 2.3 Before Putting into Operation (page 36)
- 2.4 Start Machine (page 36)
- 2.5 Operation (page 37)
- 2.6 Stop Machine (page 38)
- 2.7 After Work (page 38)
- 2.8 Transporting the machine (page 39)
- 2.9 Tie-down points (page 39)
- 3 Maintenance and Care (page 40)
- 3.1 Minuteman System Maintenance (page 40)
- 3.2 Maintenance Document (page 41)
- 3.3 Maintenance Schedule (page 42)
- 3.4 Maintenance Schedule, cont'd (page 43)
- 4 Troubleshooting (page 48)
- 5 Warranty (page 54)
Important safety instructions
Batteries and chargers: make sure your charger is compatible with your batteries, and set its charging algorithm to your battery pack before you use it.
This machine is designed solely for scrubbing dirt and dust in an indoor environment. Minuteman does not recommend using this machine in any other capacity.
The following information below may cause a potential hazard to the operator and equipment. Read this manual carefully and be aware when these conditions can exist. Take necessary steps to locate all safety devices on the machine and train the personnel operating the machine. Report any machine damage or faulty operation immediately. Do not use machine if it is not in proper operating condition.
For safety during operation
Make sure all safety devices are in place and operate properly. All covers, doors and latches must be closed and fastened before use.
During operation, attention should be paid to other persons in the work area and especially if small children are present.
Electric motors and components can cause an explosion when operated near explosive materials or vapor. Do not operate this machine near flammable materials such as solvents, thinners, fuels, grain dust, etc.
Store or park this machine on a level surface only, with the key switch in the off position. To prevent unauthorized use, machine should be stored or parked with the key removed.
This machine is designed for level operation only. Do not operate on ramps or inclines.
This machine is not suitable for picking up hazardous dusts.
Use caution when moving this machine into areas that are below freezing temperatures. Any water in the tanks or hoses can cause damage to the machine.
For safety when servicing or maintaining machine
Disconnect the power to the machine by pressing the Red Emergency Disconnect Button when charging batteries or during installation or removal of brushes.
Avoid moving parts. Do not wear loose jackets, shirts, or sleeves when working on machine.
Avoid contact with battery acid. Battery acid can cause burns. When working on or around batteries, wear protective clothing and safety glasses. Remove metal jewelry.
Do not lay tools or metal objects on top of batteries.
Charging batteries generates explosive gasses. Do not charge batteries when open flames or sparks are present. Do not smoke. Make sure the charger is turned off before disconnecting it from the machine. Charge the batteries in a well-ventilated area with the battery cover removed completely.
Do not clean machine with a pressure washer.
Authorized personnel must perform repairs and maintenance. Use Minuteman supplied replacement parts.
Unpacking instructions
Carefully unpack and inspect your E Ride Scrubber for shipping damage. Follow unpacking instructions on shipping pallet. Each unit has been tested and thoroughly inspected before shipment. Any damage is the responsibility of the delivery carrier who should be notified immediately.
This machine is battery operated and designed to operate on 36 Volts DC (6) 6-volt batteries.
The recommended batteries are rated 235Ah (Minuteman P.N. 956740).
We do not recommend mixing Amp Hour capacities. Any alternate battery sets can be used if they are of equal physical size and capacity.
Read this manual carefully before operating this machine.
The operator is responsible for taking care of the daily maintenance and check ups of the machine to keep it in good working condition. The operator must inform the service mechanic or supervisor when scheduled maintenance is required as stated in the MAINTENANCE section of this manual.
Before starting, familiarize yourself with the machine and its controls (see "Machine Overview, Front", "Machine Overview, Rear", "Operator Compartment", & "Control Console" diagrams).
SAVE THESE INSTRUCTIONS
1 Machine overview
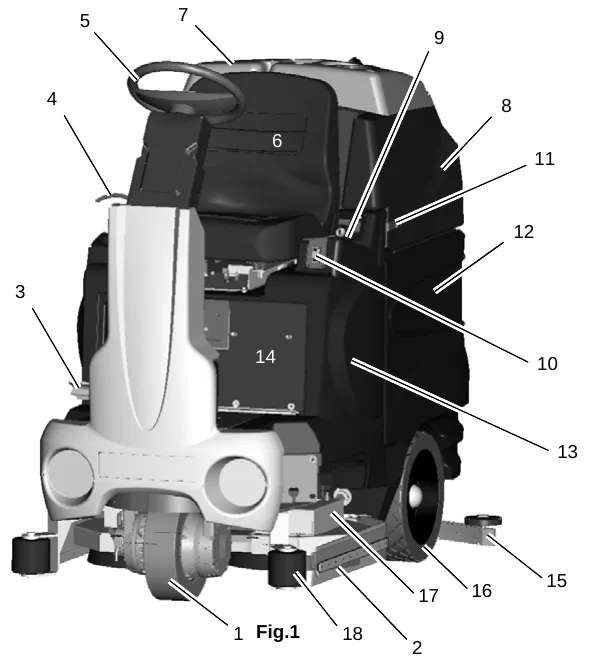
1.1 Machine overview - front
| No. | Part |
|---|---|
| 1 | Front Drive Wheel |
| 2 | Side Squeegee |
| 3 | Accelerator Pedal |
| 4 | Steering Tilt Lever |
| 5 | Steering Wheel |
| 6 | Operator’s Seat |
| 7 | Recovery Tank Lid |
| 8 | Recovery Tank |
| 9 | Control Console |
| 10 | Directional Switch |
| 11 | Recovery Tank Safety Latch |
| 12 | Battery Compartment |
| 13 | Solution Tank |
| 14 | Electrical Panel/Circuit Breakers & SPORT Key Switch Controls |
| 15 | Rear Squeegee |
| 16 | Rear Wheel |
| 17 | Scrubdeck |
| 18 | Roller Bumper |
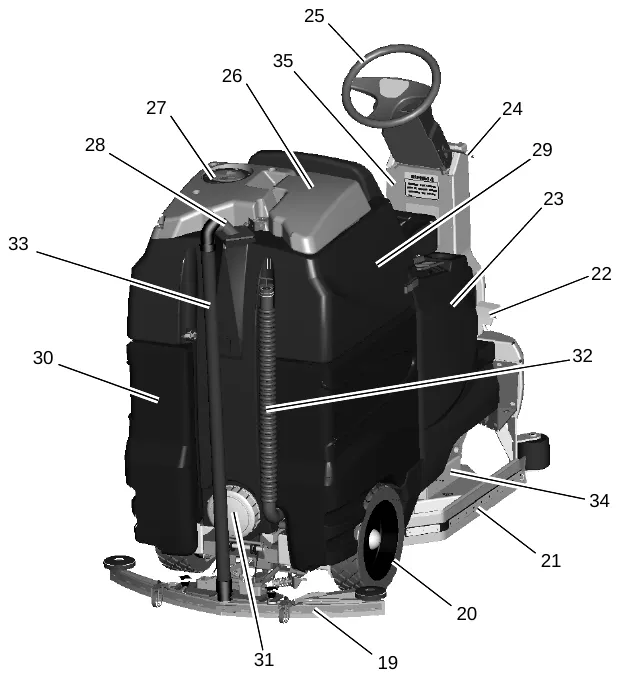
1.2 Machine overview - rear
| No. | Part |
|---|---|
| 19 | Rear Squeegee |
| 20 | Rear Wheel |
| 21 | Side Squeegee |
| 22 | Accelerator Pedal |
| 23 | Solution Tank |
| 24 | Steering Tilt Lever |
| 25 | Steering Wheel |
| 26 | Recovery Tank Lid |
| 27 | Vacuum Filter Access |
| 28 | Vacuum Inlet Assembly |
| 29 | Recovery Tank |
| 30 | Battery Compartment |
| 31 | Clean-Out Cap |
| 32 | Recovery Drain Hose |
| 33 | Recovery Vacuum Hose |
| 34 | Scrubdeck |
| 35 | Extreme Pressure Switch and SPORT LED indicators |
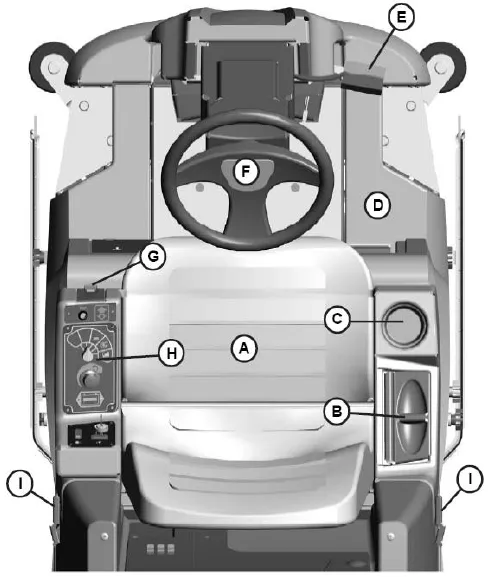
1.3 Operator compartment
| Key | Part |
|---|---|
| A | Operator’s Seat |
| B | Solution Tank Lid |
| C | Cup Holder |
| D | Solution tank |
| E | Accelerator Pedal |
| F | Steering Wheel |
| G | Directional Switch |
| H | Control Panel |
| I | Recovery Tank Safety Latch |
This page is blank in the printed manual.
1.4 Control console
For operator ergonomics, the control console houses all the primary function controls in a central area. The key switch and optional headlight and off-aisle wand switches are clustered in the back portion of the console. The directional switch (forward/reverse) is located at the front of the console for easy fingertip operation. The horn button, function selectors, and battery gauge are located in the central part of the console.
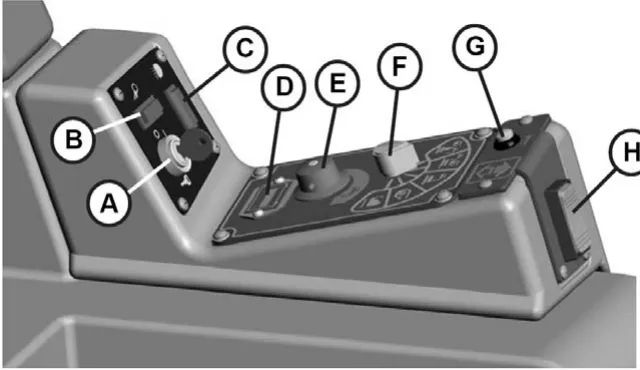
Key Switch (A) - S2
Controls the machine’s power (ON/OFF) with a key for safety. All operational settings are retained even when the power is turned off and on. This also serves as a reset switch when errors or faults occur.
Off Aisle Wand Switch (OPTIONAL) (B) - S7 (281900 OPTIONAL)
ON/OFF control for the water supply to the wand and vacuum motor for the optional Off-Aisle Wand.
Headlight Switch (OPTIONAL) (C) - S10 (281990 OPTIONAL)
ON/OFF control for the optional headlights.
Battery Gauge (D) - BD1
Displays the level of charge remaining in the machine’s batteries. The gauge consists of 10 LEDs. (3 Green, 4 Amber, 3 Red) If the battery life is low, the battery gauge bar icon will be flashing to inform the operator that the
machine is almost out of power. Once this signal is displayed, all functions will shut off, including transport mode. The operator must then turn the key switch OFF and then ON to reset the machine. The machine will then have only a few minutes left of reserve power to briefly use Vacuum Only mode to pick up any remaining solution on the floor and Transport mode to return to the charging station. This gauge will also display a fault code if the system has an error. This code is represented by a specific number of flashing LEDs. See Fault/Diagnostic Codes for specific code information (page 20).
Solution Control Knob (E) - R2
Adjusts the amount of solution being dispensed to the floor while in one of the scrub modes. Turn the knob clockwise to increase the amount of solution being dispensed. The amount of solution applied is variable to a maximum of 1 GPM.
Mode Selector Knob (F) - S4
This knob is used to select the desired operation mode of the machine. See Operation Modes for information about each mode (page 18).
Horn Button (G) - S3
Depressing this button will activate the machine’s horn.
Directional Switch (H) - S6
Pressing switch to the down position will set the machine to move forward. Pressing it to the up position sets the machine to move in reverse.
1.5 Operation modes
1. Regular scrub mode
When the machine is running in this mode, the machine will perform all operations. This mode can be used for day-to-day tasks under normal conditions. When the operator sets the directional switch to forward and activates the accelerator pedal, the solution pump will turn on, the brushes will turn on and be lowered to the floor, as well as the rear squeegee. While operating in this mode, the solution will be dispersed into the brushes, which will scrub the floor allowing the chemical in the solution to break down the dirt on the floor. As the machine continues to move forward, the rear squeegee and vacuum system will recover the dirt and dispensed solution. If the operator stops moving, the machine will automatically raise the scrub deck and turn off the brushes. If the directional switch is changed to reverse the machine will continue to operate normally, only the rear squeegee will raise up.
2. Heavy scrub mode
This mode is similar to Regular Scrub. The machine will continue to operate the same was as if it was in Regular Scrub Mode, only this mode applies more solution and brush pressure is increased. This mode is used for high traffic areas and areas that have been heavily soiled, but do not require time for the solution to soak.
3. Double scrub mode
When the machine is running in this mode, the machine will perform all operations except dirty solution recovery. This mode can be used if the floor is heavily soiled and the chemical will need additional time to emulsify grease and oils that are on the floor. When the operator sets the directional switch to either the forward or reverse position and activates the accelerator pedal, the solution pump will turn on, the brushes will turn on and be lowered to the floor. While operating in this mode, the solution will be dispersed into the brushes, which will scrub the floor allowing the chemical in the solution to break down the dirt on the floor. As the machine continues to move forward or back, the rear squeegee and vacuum system are not on, which allows the solution to stay on the floor emulsifying the grease and oil. If the operator stops moving in either direction, the machine will automatically raise the scrub deck and turn off the brushes. After double scrubbing, the operator should use the vacuum only mode to recover the dirty solution water from the floor.
4. Vacuum only mode
When the machine is running in this mode, the machine will only lower the rear squeegee and turn on the vacuum system to recover the dirty solution from the floor. This mode is usually chosen after double scrubbing to recover the dirty solution but it can also be used to pick up spills. When the operator sets the directional switch to forward, the rear squeegee will be lowered to the floor as the vacuum turns on, pulling the dirty solution water from the rear squeegee into the recovery tank. If the operator stops moving forward and sets the directional switch to reverse, the rear squeegee will retract (protecting it from damage) and the vacuum motor will turn off after a few seconds. If the operator quits moving in either direction, the machine will automatically raise the squeegee and turn off the vacuum motor after a few seconds.
5. Transport mode
When the machine is set in this mode, none of the cleaning functions of the machine will operate. This mode is only used to transport the machine from one location to another.
6. Solution control knob
This control will adjust the amount of solution that is being dispersed to the floor while in one of the scrub modes. Adjust the control clockwise to increase the amount of solution being dispersed. The amount of solution applied is variable to a maximum of 1 GPM.
7. Battery gauge
This gauge displays the level of charge remaining in the machine’s batteries. The gauge consists of 10 LEDs. (3 Green, 4 Amber, 3 Red) If the battery life is low, the battery gauge bar icon will be flashing to inform the operator that the machine is almost out of power. Once this
signal is displayed, all functions will shut off, including transport mode. The operator must then turn the key switch OFF and then ON to reset the machine. The machine will then have only a few minutes left of reserve power to briefly use Vacuum Only mode to pick up any remaining solution on the floor and Transport mode to return to the charging station. This gauge will also display a fault code if the system has an error. This code is represented by a specific number of flashing LEDs. See Fault/Diagnostic Codes for specific code information (page 20).
1.6 Fault/diagnostic codes
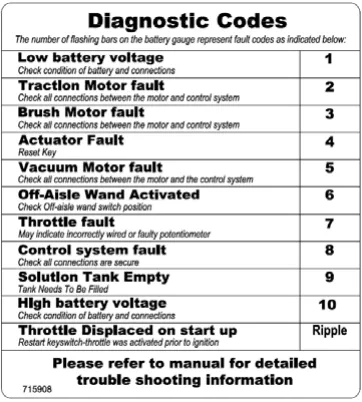
When an error or fault occurs within the machine, a fault code will appear on the battery gauge represented by a specific number of flashing LEDs. The figure below shows a listing of the different codes.
Low battery indicator
If the battery life is low, the battery gauge bar icon will be flashing to inform the operator that the machine is almost out of power. Once this signal is displayed, all functions will shut off, including transport mode. The operator must then turn the key switch OFF and then ON to reset the machine. The machine will then have only a few minutes left of reserve power to briefly use Vacuum Only mode to pick up any remaining solution on the floor and Transport mode to return to the charging station.
Power save mode
The E Ride is equipped with a power save feature to conserve battery power. If the key switch power is left ON and none of the controls are activated for a period of fifteen minutes, the E Ride automatically goes into “power down mode” and turns OFF the power to conserve your batteries in case the operator forgets to turn the key switch off or leaves the machine unattended.
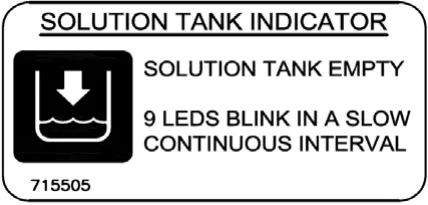
Empty solution tank indicator
Once the solution tank has become empty, the battery gauge will blink a solid 9 LEDs at a constant interval to alert the operator that the solution tank needs to be filled.
1.7 Steering wheel
The steering wheel is adjustable for operator comfort by pulling the tilt-steering lever up and positioning the steering wheel up or down (there are three possible positions).
Pulling on the tilt-steering lever and positioning the steering column in an upright position provides the operator with more room when climbing up and down the machine.
1.8 Accelerator pedal - R1
Located on the right side of the operator compartment on the floor is the accelerator pedal. This pedal controls the propelling speed of the machine. The farther the pedal is pushed down the faster the machine will travel. As discussed earlier, the directional
switch governs the direction of travel the machine will take. Switching the directional switch with the pedal depressed will make your machine change directions (a very slight delay may occur before the direction of travel changes when switching directions on the fly). The accelerator pedal is interlocked with the seat switch, making machine propulsion not possible without the operator sitting on the seat. The accelerator pedal is also linked to the machine’s dynamic braking system. During operation, when the accelerator pedal is released, the dynamic braking system will automatically halt the movement of the machine without need for an additional brake pedal.
1.9 Seat - S8
The ergonomically designed seat is located on top of the solution tank. There is a lever under the seat that allows the operator to adjust the seat forward or backward for operator comfort. There is an interlock switch located inside the seat. This makes it impossible to engage the traction drive circuitry without the operator on the seat. If the operator were to fall off the machine, the traction drive circuitry would turn off.
1.10 Directional switch - S6
Located on the lower front of the control console, this switch controls the direction in which the E Ride will move when the accelerator pedal is activated. Flipping this switch to the down position will set the machine to move forward. Flipping it to the up position
sets the machine to move in reverse.
1.11 Parking brake
This machine is equipped with an Electromagnetic brake built-in on the traction drive motor. When the machine’s power is turned off (using either the key or the emergency button), the E-mag brake is activated and the traction motor is prevented from moving.
1.12 Circuit breakers
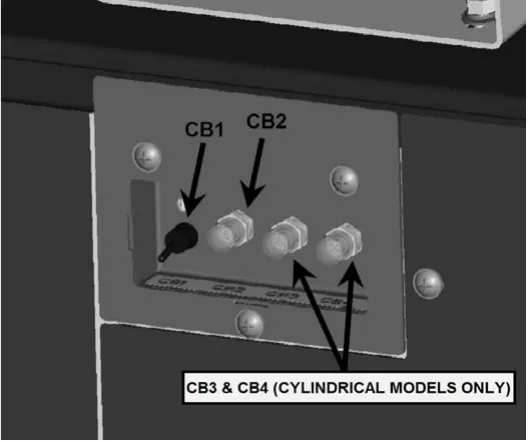
The circuit breakers are located on the front panel under the seat. The 6-amp breaker (CB2) protects all auxiliary circuits on the machine. The 100-amp breaker (CB1) protects the main system circuit (TRIO controller). On the cylindrical models only - The two 30-amp breakers (CB3 & CB4) protect the cylindrical brush deck motors. Each main component is individually protected with an internal breaker built-in the controller. (See fault code table) and can be reset by turning the key switch off a few seconds and then on again. The 100 amp circuit breaker can also be used as a main power disconnect, this should be used only in case of emergency. When tripped the breaker removes power from the main controller and all auxiliary power circuits.
1.13 Battery compartment
The battery compartment is located on the rear of the machine under the recovery tank. Unlatching the two safety latches on the side of the machine enables the operator to tilt the recovery tank and access the batteries for servicing and maintenance (make sure recovery tank has been drained before tilting). The battery compartment contains six, 6-volt batteries connected in series. Connect the batteries according to the battery connection diagram (see diagram). The recommended batteries are 235Ah (Minuteman P.N. 956740). The two batteries positioned in the center are offset and held in position by two steel spacers. These spacers keep the batteries from sliding inside the battery compartment during machine use and prevent undesired stresses in the battery cables. Be sure to replace these spacers whenever reinstalling batteries.
Battery connection diagram
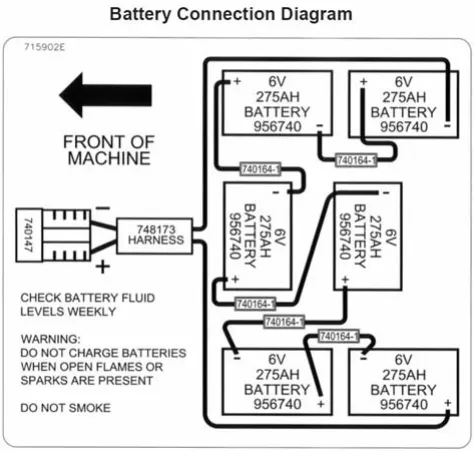
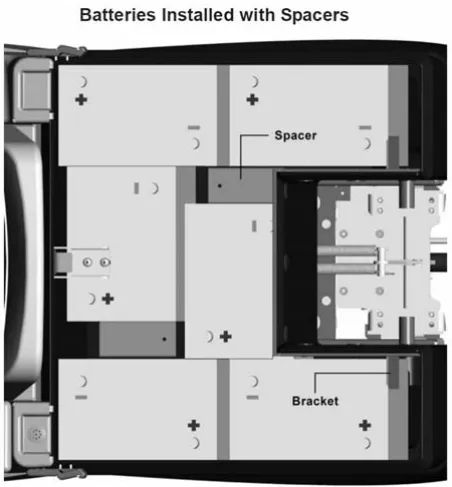
The decal reads 275AH, while the text on pages 2, 11 and 22 gives 235Ah for the same part number 956740. Shown as printed.
1.14 Scrub decks
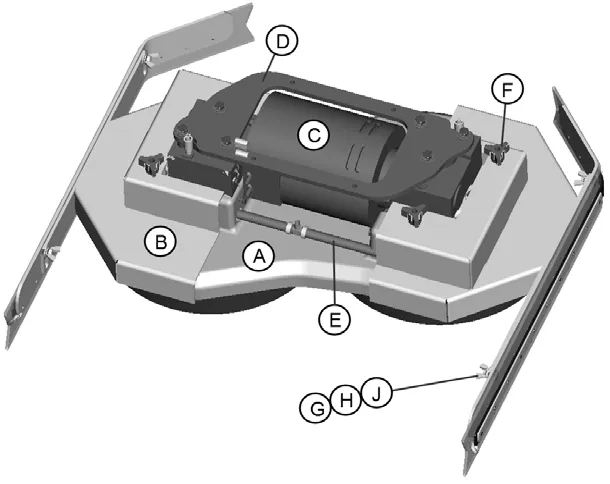
Minuteman offers two deck types (Cylindrical and Disc) to fit your specific needs. The E Ride design is very dynamic wherein the decks are interchangeable in a matter of minutes whenever necessary (removal of four bolts, one hose, and one electrical connection). The cylindrical brush deck has five built-in spray jets to uniformly dispense cleaning solution on the floor and a wet sweeping debris tray to collect loose objects on the floor. The disc brush deck dispenses cleaning solution through the two center hubs and the solution is contained within the bristle area for efficient agitation of cleaning solution to the floor and channeled to the rear of the machine. The disc brushes are also easily removed and installed by easily removing the side deck covers and releasing the scrub brush quick release clamp. Another nice feature that these scrub decks have is the ability to have uniform brush pressure applied to the floor at all times. Since the scrub deck brush pressure is computer controlled, it will automatically adjust and compensate to uneven contours on the floor while maintaining brush pressure.
Cylindrical scrub deck
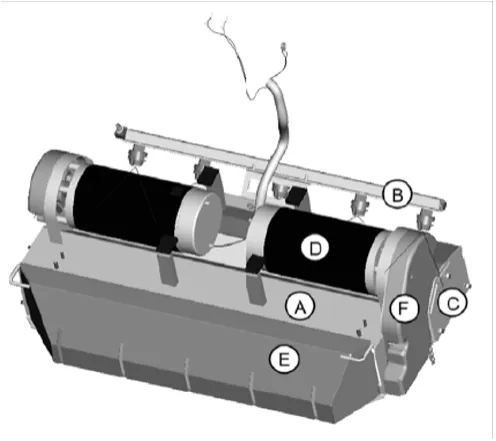
| Key | Part |
|---|---|
| A | Main Housing |
| B | Spray Bar w/ Sprayjets |
| C | Access Door (2) |
| D | Brush Motor (2) |
| E | Debris Box |
| F | Pulley Cover (2) |
Disc scrub deck
| Key | Part |
|---|---|
| A | Center Deck Cover |
| B | Side Deck Cover (2) |
| C | Brush Motor |
| D | Mounting Plate |
| E | Solution Feed Hose |
| F | Three Sided Knob (4) |
| G | Wing Nut for Squeegee Adj. (4) |
| H | Helical Lock Washer for Squeegee Adj. (4) |
| J | Flat Washer for Squeegee Adj. (4) |
1.15 Scrub deck installation
When installing a cylindrical deck to a machine:
- Install brushes after the deck has been mounted to avoid flat spots on the brushes.
- Use a piece of cardboard underneath the deck to prevent scratches to the painted surface when sliding the deck under the machine.
- Make sure the scrub deck is oriented correctly with the spray jets towards the front of the machine.
When installing a disc scrub deck to a machine:
- Install brushes on the scrub deck; this aids the installer in sliding the deck assembly into position.
- Make sure the scrub deck is oriented correctly with the solution hose tee fitting towards the front of the machine.
Installation instructions
- Park the machine on a flat or level surface.
- Turn the key switch to the ON position and select the transport mode with mode selector knob.
- Slide the scrub deck assembly underneath the machine (follow instructions as described above)
- Position the scrub deck to align the mounting brackets with the mounting lugs on the lift linkage.
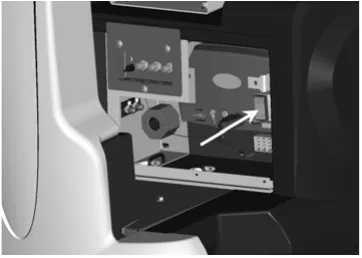
- Lower the lift linkage to the floor by pressing the manual overrride switch for five seconds. (see figure)
- Lower the lift linkage mounting lugs until they barely touch the scrub deck mounting brackets.
- Fasten with (4) 711242 bolts, 711515 flat washers and 711546 lock washers.
- For cylindrical scrub deck only:
- Remove the yellow 3 sided knob on the side squeegee assembly and swing out the side squeegee to reveal the access door.
- Remove the two access doors (one on each end) by removing the three wing nuts on each door.
- Install the brushes by sliding them through the access opening. (see figure for correct orientation.)
- Align the notches on the brush with the drive pins on the hub.
- Push the brush all the way in until it bottoms out.
- Insert the access door hub into the other end of the brush.
- Reinstall the wing nuts and yellow 3 sided knobs and tighten.
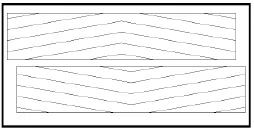
Cylindrical scrub brushes must be installed with the chevron pattern pointing away from each other for best water and debis pick up
Important note when interchanging scrub decks
As previously mentioned, the scrub deck brush pressure is computer controlled. However, when interchanging the two types of decks, an additional step must be taken to ensure that the controller correctly compensates the pressure for the type of deck that is currently installed.
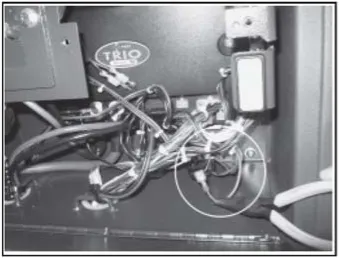
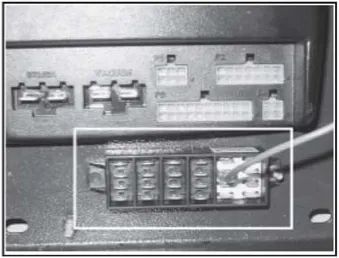
Inside the main electrical box, beneath the seat there is an Orange/Violet jumper wire (shown disconnected in Figure 1) that may or may not be connected to the terminal block, depending on the type of scrub deck that was originally ordered with the machine. When using the Disk Scrub Deck, the wire is disconnected. When using the Cylindrical Scrub Deck, the wire is connected to the terminal block located in the electrical box, beneath the TRIO Controller. This terminal block is divided into five sections, each separated by a divider. The four leftmost sections contain one column each of spade terminals. The section on the right contains two columns of spade terminals (this section also contains four Red/Black wires, not shown in Figure 2 for clarity). The Orange/Violet wire must be connected to a spade terminal in the section with two columns when using the Cylindrical Scrub Deck ONLY!
When switching from the Cylindrical Scrub Deck to the Disk Scrub Deck, be sure to disconnect the Orange/Violet wire. When switching from the Disk Scrub Deck to the Cylindrical Scrub Deck, connect the Orange/Violet wire to any available spade terminal in the section that contains two columns (shown in Figure 2) and the Red/Black wires.
1.16 Side squeegees
The side squeegees (left and right) are attached to the scrub decks. These items channel the dirty solution to the rear squeegee, helping contain the water within the machine’s cleaning path. These squeegees are raised when the scrub deck is in the raised position.
The side squeegees are pre-adjusted at the factory. Adjustments may be required when replacing worn blades or to achieve optimum performance for different floors and conditions.
To adjust the side squeegees, simply loosen the mounting hardware (two wing nuts for Disk Scrub Deck, two black three-sided knobs for Cylindrical Scrub Deck). Lower the scrub deck by switching to a scrubbing mode and when the brushes start up, turn off the key switch. At this point the side squeegees should be resting vertically (no deflection) on the floor. Press down on the side squeegee bracket assembly from each end while making sure that the blade is uniformly deflected in a 45 degree angle along its whole length. Tighten the wing nuts (item A). Turn the steering wheel all the way to the left or right and start pushing the machine to the side to inspect the blade deflection and wiping action. Repeat the steps above until a satisfactory result is obtained.
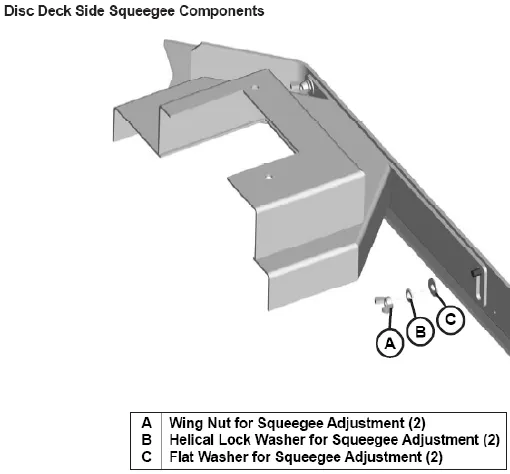
| Key | Part |
|---|---|
| A | Wing Nut for Squeegee Adjustment (2) |
| B | Helical Lock Washer for Squeegee Adjustment (2) |
| C | Flat Washer for Squeegee Adjustment (2) |
Brush changes on the cylindrical deck
In order to change the brushes on the cylindrical deck the side squeegee must be moved in order to access the brush doors. The cylindrical deck was designed so one can change the brushes without having to realign the side squeegees. This is accomplished by removing the yellow three-sided knob (Item C) and swinging the squeegee along the hinge bracket (Item D) located at the front of the deck, gaining access to the brushes. Once completed inserting new brushes, replace the brush doors and swing the squeegee back into place, tightening down the knob (Item C).
In order to remove or adjust the alignment of the side squeegees on the cylindrical deck, remove the black three-sided knobs (Item B) and follow the instructions on the previous page.
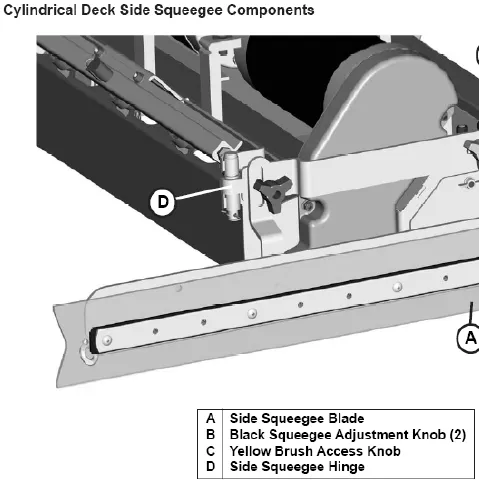
| Key | Part |
|---|---|
| A | Side Squeegee Blade |
| B | Black Squeegee Adjustment Knob (2) |
| C | Yellow Brush Access Knob |
| D | Side Squeegee Hinge |
1.17 Rear squeegee
The rear squeegee is the main element that acts as the conduit that transfers the spent solution into the recovery tank. A daily maintenance check of this component is essential to have optimum machine performance. The rear squeegee assembly is equipped with a universal front blade that allows the operator the option to use a slotted and a non-slotted side for specific applications. Each blade configuration has two usable edges. The rear blade however has four usable edges.
The squeegee is pre-adjusted at the factory. Adjustments may be required to get optimum performance for different floors and conditions.
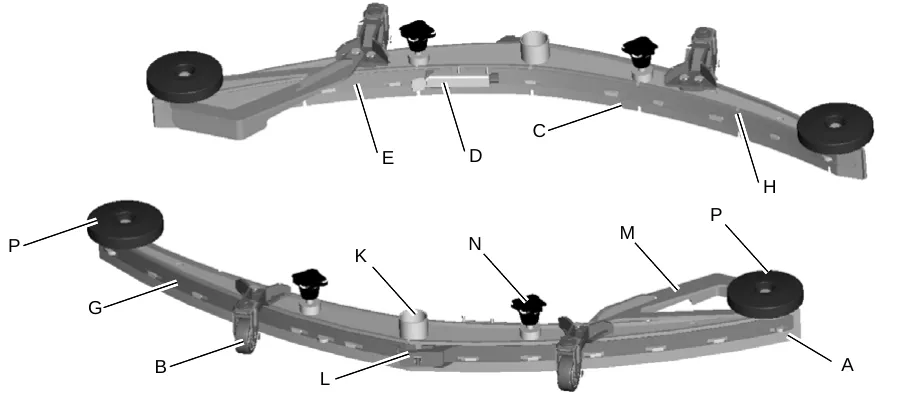
| Key | Part |
|---|---|
| A | Rear squeegee blade |
| B | Swivel Caster (2) |
| C | Front Squeegee Blade |
| D | Latch - Front |
| E | Front Strap (Short) |
| F | Rear Strap (Latch Side) |
| G | Rear Strap (Catch Side) |
| H | Front Strap (Long) |
| J | Guide Wheels (2) |
| K | Recovery Hose Intake |
| L | Latch - Rear |
| M | Deflector Arm |
The drawing also shows callouts N and P, which the printed key does not list. Page 31 refers to P as the exposed threaded stem on the caster.
Rear squeegee adjustment
- Ensure that the scrubber is on a relatively flat surface. Turn on the key switch and select the Vacuum only mode. This lowers the squeegee to the floor and turns the vacuum motor on.
- Move the scrubber one or two feet forward slowly while someone behind the machine checks the rear squeegee blade (item A) for uniform deflection to the floor.
- If uneven deflection or lay is evident, minor adjustments may be necessary to avoid streaking and uneven wear on the blade.
- To correct this, loosen the wing jam nut (item B) in order to adjust the caster height. If the squeegee blade is deflecting too much, the casters (item C) need to be lowered to control the down pressure. Lower the caster by turning the exposed threaded stem (item P) on the caster clockwise. Make the adjustment a few turns at a time. Repeat step 2.
- If the blades are not deflecting enough, raise the caster by turning the stem counter-clockwise to adjust the caster height to allow more down pressure on the squeegee. Repeat step 2.
- Make sure there is even deflection on the entire length of the rear blade. Adjust the casters and retighten the wing jam nuts to lock the caster setting in place.
- Pitch adjustment is necessary if the outer ends on the squeegee blade do not contact the floor and there is too much deflection in the middle area or if the outer ends are over deflected and there is no contact in the middle.
- To adjust the pitch, repeat step 2.
- Loosen the two wing jam nuts (item D) that lock the pitch angle. Turning the knob (item E) clockwise or counter-clockwise controls the forward and backward pitch of the squeegee. Having the rear blades deflected uniformly along its entire length is the desired set-up.
- Repeat step 2 until desired set-up is achieved.
- In certain applications where a non-slotted front wiper blade (item F) is needed, detach the rear squeegee assembly by loosening the two wing bolts (item G). Unlock the toggle clamp (item H) on the front squeegee to release the front long strap (item I) and slide the front short strap (item) (J). Flip the blade over to the non-slotted side. Reattach the straps and lock the clamp back in place.
- You can also easily replace the rear blade by unlatching the latch (item M) and removing the two rear straps (items K & L) by sliding them off the assembly. You can then flip the blade over in order to use a new edge for better wiping action.
The item letters in steps 4, 9, 11 and 12 are printed as shown and do not all match the key on page 30.
1.18 Circuit breaker panel with supervisor key
| No. | Part |
|---|---|
| 1 | CB1- Main Control Circuit Breaker Switch |
| 2 | CB2 - Auxiliary Circuit Breaker, Push Button |
| 3 | SPORT - Key Position III |
| 4 | SPORT - Key Position II |
| 5 | SPORT - Key Position I |
| 6 | Supervisor Key Position - SPORT mode |
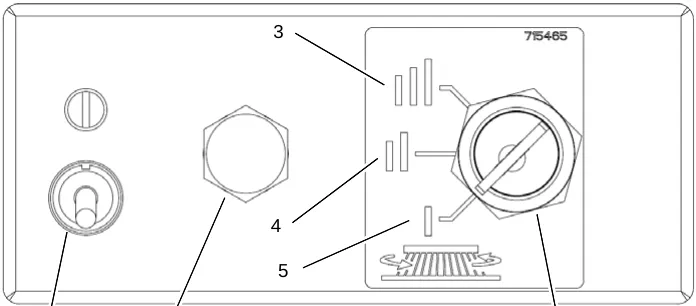
CB1 - Main Contol Circuit Breaker Switch (Fig. 6/1)
Use this lever to turn on/off the main controls of the E RIDE 26 SPORT.
CB2 - Auxiliary Circuit Breaker (Fig. 6/2)
This push button circuit breaker is used to reset breaker control of the auxiliary items on the E Ride 26 SPORT.
SPORT - Key Position III (Fig. 6/3)
When SPORT key is in positon III, the brush speed will be 400 RPM, nominal.
SPORT - Brush Speed II (Fig. 6/4)
When SPORT key is in positon II, the brush speed will be 300 RPM, nominal.
SPORT - Brush Speed I (Fig. 6/5)
When SPORT key is in positon I, the brush speed will be 200 RPM, nominal.
Supervisor Key Position - SPORT mode (Fig. 6/6)
Key must inserted to select SPORT mode (Brush Speed), I, II, or III. SPORT mode selection will remain selected with or without the key inserted. The only way to select a different SPORT mode (Brush Speed) I, II, or III, is to insert the key and turn to a new mode selection.
1.19 SPORT LEDs & Extreme Pressure switch
| No. | Part |
|---|---|
| 1 | SPORT mode I - Green LED indicator |
| 2 | SPORT mode II - Amber LED indicator |
| 3 | SPORT mode III - Red LED indicator |
| 4 | Decal - Extreme Pressure |
| 5 | Toggle Switch - Extreme Pressure |
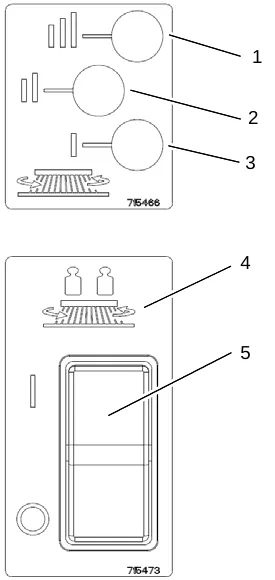
SPORT mode I - Green LED indicator (Fig. 7/1)
This Green LED Indicator will light up when the user has positioned the key in the SPORT mode I postion. The Brush Speed for this position is 200 RPM, nominal.
SPORT mode II - Amber LED indicator (Fig. 7/2)
This Amber LED Indicator will light up when the user has positioned the key in the SPORT mode II postion. The Brush Speed for this position is 300 RPM, nominal.
SPORT mode III - Red LED indicator (Fig. 7/3)
This Red LED Indicator will light up when the user has positioned the key in the SPORT mode III postion. The Brush Speed for this position is 400 RPM, nominal.
Decal - Extreme Pressure (Fig. 7/4)
This decal is to show the location of the Extreme Pressure Switch. The Toggle Switch for the Extreme Pressure Switch is located above this decal.
Toggle Switch - Extreme Pressure Switch (Fig. 7/5)
This toggle switch turns the Extreme Pressure option On or Off. This option is only available with the Disc Scrub Decks. The Extreme Pressure option increases the downward pressure of the Disc Scrub Deck when additional pressure is needed.
2 First operation
Batteries and chargers: make sure your charger is compatible with your batteries, and set its charging algorithm to your battery pack before you use it.
2.1 Instruction
Only persons trained by qualified Minuteman technicians are authorized to operate, service and repair the machine. Operators must read and understand this manual before operating or maintaining this machine.
2.2 Initial charging procedure
2.3 Before putting into operation
Complete the following inspections before taking the machine into operation:
- Check the area around the machine for signs of leakage. Hoses, lines and tanks must be free from any leakage or damage.
- Install brushes - see maintenance chapter.
- Check battery charge and recharge if required. An initial charge is required before first operation of the machine. (see Maintenance section)
- Empty recovery tank and clean it if required, see maintenance chapter.
- Refill solution tank and add cleaning agent according to the manufacturer's recommendations.
2.4 Start machine
Proceed with the following to set the machine to operating mode:
- Disconnect the charger and connect the battery connector
- Switch on machine by actuation of key switch from position (0) to position (1). The battery gauge will display the remaining battery life.
Corrected an obvious misprint: the chapter and section numbers on this page are printed as "1", "1.1", "1.2", "1.3" and "1.4" (now 2, 2.1, 2.2, 2.3 and 2.4, as in the contents on page 9).
2.5 Operation
- Switch on the machine.
- Select one of the five available modes using the mode selector.
- Set the direction the machine will travel by selecting forward or reverse on the direction selector.
- Activating the accelerator pedal turns on the transport, brushes, water flow, vacuum accordingly to the mode selected.
- Start scrubbing by driving the machine forward in a straight line overlapping each path by 2 to 3 inches.
- When scrubbing, check behind the machine occasionally to see that all of the dirty water is being picked up.
- Drive the machine to a designated dirty water disposal area and empty the recovery tank. (Refer to “Maintenance” section for instructions.)
- Refill the solution tank and continue cleaning until the job is done or the machine runs out of charge.
Corrected an obvious misprint: section number printed as "1.5" (now 2.5, as in the contents on page 9).
2.6 Stop machine
To stop cleaning, select the transport mode. This will automatically stop the solution flow, raise the scrubdeck, and turn off the vacuum motor (20-second delay).
2.7 After work
Refer to the “Maintenance” section for specific maintenance instructions described below.
- When finished cleaning, select the transport mode, all cleaning functions will shut off. Move the machine to a suitable site for maintenance.
- Empty and clean the solution tank
- Empty and clean the recovery tank
- Remove and clean the vac shoes.
- Check operating fluid levels, function and setting.
- Clean the machine.
- Check the maintenance schedule and perform any required maintenance before storing the machine.
- Charge batteries.
- Store the machine indoors in a clean dry place.
Leave the solution and recovery tank lids open for ventilation to prevent odor build-up.
- Turn key switch OFF and remove key.
Corrected an obvious misprint: section numbers printed as "1.6" and "1.7" (now 2.6 and 2.7, as in the contents on page 9).
2.8 Transporting the machine
To transport the machine, turn the key switch ON, select the transport mode, select forward or reverse, activate the accelerator pedal to start movement.
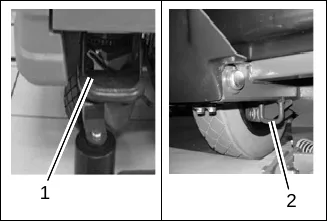
2.9 Tie-down points
When transporting on a vehicle or trailer, the machine has to be secured. Tie the machine down firmly by using the front foot steps (Fig. 3/1) and the rear tie hooks (Fig. 3/2) as tie-down points.
Corrected an obvious misprint: section numbers printed as "1.8" and "1.9" (now 2.8 and 2.9, as in the contents on page 9).
3 Maintenance and care
Compliance with the recommended maintenance work will ensure that you always have a reliable machine available.
Daily or weekly maintenance and repair work may be executed by the driver/operator having been trained accordingly. Further Minuteman system maintenance work must be completed by qualified personnel only. Please contact your local Minuteman Service Center or Minuteman contract dealer. We cannot be held liable for damages resulting from non-compliance with these instructions.
Please indicate the machine's serial number with any enquiry or spare part order, see section 1.7 - Nameplate.
3.1 Minuteman system maintenance
The Minuteman System Maintenance:
- guarantees reliable operability of the Minuteman machines (preventive maintenance)
- minimizes operating costs, repair costs and maintenance costs
- ensures long service life and operability of the machine
The Minuteman System Maintenance is structured in separate modules and determines specific technical works to be executed as well as the intervals for such maintenance works. For any specific maintenance type, the replacement parts are determined and listed in spare part kits.
System Maintenance K: To be performed by the customer in accordance to the maintenance and care instructions contained in the operating instructions (daily or weekly). The operator will be instructed upon delivery of the machine.
System Maintenance I: (every 125 hours of operation) To be performed by qualified personnel of authorized Minuteman Service Center in accordance with the machine-specific system maintenance including spare part kit.
System Maintenance II: (every 250 hours of operation) To be performed by qualified personnel of authorized Minuteman Service Center in accordance with the machine-specific system maintenance including spare part kit.
System Maintenance S: (every 500 hours of operation safety check) To be performed by qualified personnel of authorized Minuteman Service Center in accordance with the machine-specific system maintenance including spare part kit.
Corrected an obvious misprint: chapter and section numbers printed as "1" and "1.1" (now 3 and 3.1, as in the contents on page 9).
3.2 Maintenance document
| Service | Operating hours | Record |
|---|---|---|
| Handing over | — | Upgrade; Test drive; Handing over to the customer; Instruction Workshop stamp carried out on: ____________ at ____________ operating hours |
| System Maintenance I | 125 | Workshop stamp carried out on: ____________ at ____________ operating hours |
| System Maintenance II | 250 | Workshop stamp carried out on: ____________ at ____________ operating hours |
| System Maintenance I | 375 | Workshop stamp carried out on: ____________ at ____________ operating hours |
| System Maintenance S | 500 | Workshop stamp carried out on: ____________ at ____________ operating hours |
| System Maintenance I | 625 | Workshop stamp carried out on: ____________ at ____________ operating hours |
| System Maintenance II | 750 | Workshop stamp carried out on: ____________ at ____________ operating hours |
| System Maintenance I | 875 | Workshop stamp carried out on: ____________ at ____________ operating hours |
| System Maintenance S | 1000 | Workshop stamp carried out on: ____________ at ____________ operating hours |
| System Maintenance I | 1125 | Workshop stamp carried out on: ____________ at ____________ operating hours |
| System Maintenance II | 1250 | Workshop stamp carried out on: ____________ at ____________ operating hours |
| System Maintenance I | 1375 | Workshop stamp carried out on: ____________ at ____________ operating hours |
Corrected an obvious misprint: section number printed as "1.2" (now 3.2, as in the contents on page 9).
3.3 Maintenance schedule
System maintenance customer
Maintenance intervals must be performed by the customer/operator.
| To be performed | Daily | Weekly |
|---|---|---|
| Check/Clean Tanks and Hoses | ✓ | |
| Charge batteries | ✓ | |
| Check/Clean/Rotate the Brushes/Pads Parts › | ✓ | |
| Check/Clean the Squeegee Parts › | ✓ | |
| Check/Clean Vacuum Shut-Off Float | ✓ | |
| Check/Clean the Vacuum Motor Foam Filter Parts › | ✓ | |
| Clean Hopper on Cylindrical System | ✓ | |
| Check Each Battery Cell(s) Water Level | ✓ | |
| Inspect Scrub Housing Skirts | ✓ | |
| Inspect and Clean Solution Filter Parts › | ✓ | |
| Check Foot/Parking Brake for Wear & Adjustment | ✓ | |
| Clean Spray Jets on Cylindrical System Parts › | ✓ |
Corrected an obvious misprint: section number printed as "1.3" (now 3.3, as in the contents on page 9).
3.4 Maintenance schedule cont’d
System maintenance customer
Maintenance intervals must be performed by the customer/operator.
| To be performed | Monthly | Yearly |
|---|---|---|
| Flush the solution system to remove chemical build-up | ✓ | |
| Lubrication - Frease Fittings, chains, etc. | ✓ | |
| Check Carbon Brushes* | ✓ |
Flushing the solution system
The system should be flushed once with the spray jets removed and once with them installed. To flush system, use a mixture of 1 quart of white vinegar to 2 gallons of clean warm water, followed by a warm water rinse.
The spray jets my also be removed and soaked in same vinegar mixture for cleaning. The spray tips are released by turning 1/4 turn clockwise.
Lubricating the machine
Regularly scheduled lubrication of certain machine parts should be performed to insure trouble-free operation of the machine. Apply a generous amount of grease into the fittings on the machine until grease seeps out around the bearings.
The grease points are listed below:
- Rear squeegee caster wheel axle (2)
- Rear squeegee caster wheel stem (2)
- Side squeegee caster wheel axle (2)
- Side squeegee caster wheel stem (2)
- Steering wheel chain sprockets and idlers
Apply lubricant or light machine oil to lubricate the:
- Rear squeegee general pivot points
- Side squeegee general pivot points
- Scrub deck linkages
- Drive wheel assembly seals.
* Have Minuteman check the vacuum motor carbon motor brushes after 300 operating hours or once a year. The brush motor carbon brushes should be checked every 500 hours or once a year.
Corrected an obvious misprint: section number printed as "1.4" (now 3.4, as in the contents on page 9).
System maintenance I & II
The following maintenance work must be performed by an authorized Minuteman Service workshop.
| To be performed | Every 125 hours of operation (I) | Every 250 hours of operation (II) |
|---|---|---|
| Check battery charger | ✓ | ✓ |
| Check tank lid seal of the recovery tank and replace if required | ✓ | ✓ |
| Check drain hose of the recovery tank and replace if required | ✓ | ✓ |
| Grease joints at the brush lift mechanism | ✓ | ✓ |
| Check wheel fixing screws and tighten (24 lb ft) if required | ✓ | ✓ |
| Check condition of tires | ✓ | ✓ |
| Test drive and function test | ✓ | ✓ |
| Inspect steering damages and bearing slackness and replace if required | ✓ | |
| Check roller bumper of the brush deck and replace if required | ✓ | |
| Check suction hose for tight fit and damages and replace if required | ✓ |
System maintenance S (safety check)
The following maintenance work must be performed by an authorized Minuteman Service workshop at least once a year.
| To be performed | Every 500 hours of operation |
|---|---|
| Perform maintenance works according to System Maintenance II | ✓ |
| Clean traction drive motor from carbon dust and check carbon brushes for smooth operation and wear and replace carbon brushes if required | ✓ |
| Clean brush motors from carbon dust and check carbon brushes for smooth operation and wearing and replace carbon brushes if required | ✓ |
| Test drive and function test | ✓ |
Notes
This page is a blank notes page in the printed manual.
Notes
This page is a blank notes page in the printed manual.
4 Troubleshooting
| Problem | Possible cause | Remedy |
|---|---|---|
| Poor water pick-up | Worn or torn squeegee blades | Rotate or replace blades Parts › |
| Squeegee out of adjustment | Adjust so blades touch floor evenly across entire width | |
| Recovery tank full | Empty recovery tank | |
| Recovery tank lid gasket leak | Replace gasket lid cover properly Parts › | |
| Debris caught in squeegee | Clean squeegee | |
| Vacuum hose clogged | Remove debris and flush hose | |
| Using too much solution | Adjust solution control valves | |
| Vacuum hose to squeegee or recovery tank disconnected to squeegee or damaged | Reconnect or replace squeegee hose Parts › | |
| Poor scrubbing performance | Worn brushes | Rotate or replace brushes Parts › |
| Wrong brush or cleaning chemical | Consult Manufacturer | |
| Debris caught on scrub brushes | Remove debris | |
| Moving machine too fast | Slow down | |
| Low battery charge | Recharge batteries | |
| Inadequate solution flow or no solution to the floor | Solution tank empty | Fill solution tank |
| Recovery tank full | Empty recovery tank | |
| Solution lines, valves, filter or spray jets clogged | Flush lines, and clean solution filter and spray jets. | |
| Solution solenoid valve | Clean or replace valve Parts › |
Corrected an obvious misprint: chapter number printed as "1" (now 4, as in the contents on page 9).
| Problem | Possible cause | Remedy |
|---|---|---|
| Machine does not run | Operator seat safety switch | Operator has to be seated. Check for open circuit |
| Main system controller | Check error fault codes | |
| Tripped 100 amp circuit breaker | Check for an electrical short circuit. Reset machine: Reset breaker and turn key switch off and restart. | |
| Batteries Low | Charge Batteries | |
| Vacuum motor does not turn on | Recovery tank full | Empty recovery tank |
| Excessive foaming in recovery tank. | Empty recovery tank. Use less or change chemical Use defoaming agent | |
| Five LEDs flashing on Battery Gauge | Check for motor overload Reset machine: Turn key switch off and restart. | |
| Poor Sweeping Performance (Cylindrical System) | Debris box full | Empty and clean debris box |
| Brushes worn | Replace brushes Parts › | |
| Bristles have taken a set | Rotate Brushes | |
| Solution tank empty indicator light on | Solution tank empty | Refill solution tank |
| Faulty float switch | Replace float switch Parts › |
Fault codes
| No. of bars | No. of flashes | Fault description | Fault code |
|---|---|---|---|
| 1 | LOW BATTERY ERROR | 0x2C00# | |
| LOW BATTERY ERROR2 | 0x2C01# | ||
| SOFT BATTERY LOCKOUT OCCURRED | 0x2C02# | ||
| SOFT BATTERY LOCKOUT 2 OCCURRED | 0x2C03# | ||
| 2 | Traction | MOTOR FAULT 1 | 0x7800# |
| TRACTION OVER CURRENT ERROR | 0x7801# | ||
| SOFT TRACTION MOTOR IN FOLDBACK STATE | 0x7802# | ||
| Traction | MOTOR LINE VOLTAGES INSTABILITY TIMEOUT | 0x7803# | |
| TRACTION SPEED INPUT OUT OF RANGE | 0x7880# | ||
| 3 | SOFT BRUSH MOTOR DISCONNECTED ERROR | 0x7600# | |
| SOFT BRUSH CURRENT FOLDBACK | 0x7601# | ||
| SOFT BRUSH CURRENT FOLDBACK2 | 0x7602# | ||
| SOFT BRUSH CURRENT FOLDBACK3 | 0x7603# | ||
| SOFT BRUSH INHIBIT | 0x7604# | ||
| BRUSH OVERCURRENT DETECTION STARTUP FAULT | 0x7605# |
| No. of bars | No. of flashes | Fault description | Fault code |
|---|---|---|---|
| 4 | 1 | EXCESSIVE CURRENT TRIP (Supported on LCD only) | 0x1310# |
| SOFT BRUSH DECK ACTUATOR OVERCURRENT OCCURRED | 0x1311# | ||
| BRUSH DECK ACTUATOR OVERCURRENT 2 OCCURRED | 0x1321# | ||
| ERROR BRUSH DECK ACTUATOR POSITIVE SHORTED LOW | 0x1411# | ||
| ERROR BRUSH DECK ACTUATOR NEGATIVE SHORTED LOW | 0x1412# | ||
| 2 | SOFT SOLENOID 2 OVERCURRENT OCCURRED | 0x1312# | |
| SOLENOID 2 OVERCURRENT 2 OCCURRED | 0x1322# | ||
| ERROR SOLENOID 2 POSITIVE SHORTED LOW | 0x1413# | ||
| ERROR SOLENOID 2 NEGATIVE SHORTED LOW | 0x1414# | ||
| 5 | SOFT VACUUM MOTOR DISCONNECTED ERROR | 0x7700# | |
| SOFT VACUUM CURRENT FOLDBACK | 0x7701# | ||
| SOFT VACUUM CURRENT FOLDBACK2 | 0x7702# | ||
| SOFT VACUUM CURRENT FOLDBACK3 | 0x7703# | ||
| 6 | OFF AISLE WAND MODE | 0x1E03# | |
| OFF AISLE WAND MODE | 0x1E04# |
| No. of bars | No. of flashes | Fault description | Fault code |
|---|---|---|---|
| 7 | 1 | SPEED POTENTIOMETER FAULT 1 | 0x0810# |
| SPEED POTENTIOMETER MAX WIPER DIFFERENCE ERROR | 0x0811# | ||
| SPEED POTENTIOMETER MAX PULL DOWN DIFFERENCE ERROR | 0x0812# | ||
| SPEED POTENTIOMETER MAX PULL SAFE DIFFERENCE ERROR | 0x0813# | ||
| SPEED POTENTIOMETER REFERENCE ERROR | 0x0814# | ||
| SPEED POTENTIOMETER LO REFERENCE ERROR | 0x0815# | ||
| SPEED POTENTIOMETER HI REFERENCE ISO ERROR | 0x0816# | ||
| SPEED POTENTIOMETER LO REFERENCE ISO ERROR | 0x0817# | ||
| SPEED POTENTIOMETER ERROR BOTH HAVE READINGS | 0x0818# | ||
| SOFT BELLY BUTTON ACTIVATED | 0x7901# | ||
| 2 | V2POINT5 VOLTAGE REFERENCE ERROR | 0x0705# | |
| HI SWITCH REFERENCE ERROR | 0x0706# | ||
| EMERGENCY STOP ERROR | 0x7900# | ||
| 3 | STARTUP WITH PUSH SELECTED | 0x7000# | |
| PUSH ACTIVATED IN DRIVE MODE | 0x7001# |
| No. of bars | No. of flashes | Fault description | Fault code |
|---|---|---|---|
| 8 | Any faults not covered elsewhere | ||
| 9 | 1 | SOLUTION TANK EMPTY | 0x1318# |
| 9 | 2 | SOFT ALARM OVERCURRENT OCCURRED | 0x131C# |
| 9 | 3 | SOFT SOLUTION PUMP OVERCURRENT OCCURRED | 0x1313# |
| 9 | 4 | SOFT SOLENOID 1 OVERCURRENT OCCURRED | 0x1314# |
| 9 | 5 | BRAKE FAULT 1 | 0x1500# |
| 9 | 5 | BRAKE FAULT 2 | 0x1501# |
| 9 | 5 | BRAKE OVERCURRENT ERROR | 0x1507# |
| 10 | HIGH BATTERY ERROR | 0x1600# |
Minuteman International Made Simple Commercial Limited Warranty
Revision J
Effective December 2013
PowerBoss Made Simple Industrial Limited Warranty
Minuteman International owner of PowerBoss warrants to the original purchaser/user that the product is free from defects in workmanship and materials under normal use. PowerBoss will, at its option, repair or replace without charge, parts that fail under normal use and service when operated and maintained in accordance with the applicable operation and instruction manuals. All warranty claims must be submitted through and approved by factory authorized repair stations.
This warranty does not apply to normal wear, or to items whose life is dependent on their use and care. Parts not manufactured by PowerBoss are covered by and subject to the warranties and/or guarantees of their manufacturers. Please contact Minuteman International for procedures in warranty claims against these manufacturers.
Special warning to purchaser -- Use of replacement parts not manufactured by PowerBoss or its designated licensees, will void all warranties expressed or implied. A potential health hazard exits without original equipment replacement.
All warranted items become the sole property of Minuteman International or PowerBoss or its original manufacturer, whichever the case may be.
PowerBoss disclaims any implied warranty, including the warranty of merchantability and the warranty of fitness for a particular purpose. PowerBoss assumes no responsibility for any special, incidental or consequential damages.
This limited warranty is applicable only in the U.S.A. and Canada, and is extended only to the original user/purchaser of this product. Customers outside the U.S.A. and Canada should contact their local distributor for export warranty policies. PowerBoss is not responsible for costs or repairs performed by persons other than those specifically authorized by PowerBoss. This warranty does not apply to damage from transportation, alterations by unauthorized persons, misuse or abuse of the equipment, use of non-compatible chemicals, or damage to property, or loss of income due to malfunctions of the product. If a difficulty develops with this machine, you should contact the dealer from whom it was purchased.
This warranty gives you specific legal rights, and you may have other rights, which vary from state to state. Some states do not allow the exclusion or limitation of special, incidental or consequential damages, or limitations on how long an implied warranty lasts, so the above exclusions and limitations may not apply to you.
Warranty coverage
| Machine type | Travel * | Labor | Parts | Engine | Extended warranty | Costs |
|---|---|---|---|---|---|---|
| Walk Behind | **** | |||||
| Battery Sweepers | 90 Days | 12 months | 12 months | N/A | N/A | - |
| IC Sweepers | 90 Days | 12 months | 12 months | Through Eng. Mfg. | N/A | - |
| Battery Scrubbers | 90 Days | 24 months | 36 months | N/A | N/A | - |
| Riders | ||||||
| Battery Scrubbers | 90 Days | 24 months | 36 months or 2000 hr. | N/A | 36 months parts + 24 labor (or 3000 Hours) | 5% |
| IC Sweeper/Scrubbers 82 & 90 | 90 Days | 6 months | 24 months or 2000 hr. | 24 months or 3000 hrs** | 36 months parts + 24 months labor (or 3000 Hours) + 180 days travel | 5% |
| I.C. Sweepers 9X, 10X | 90 days | 6 months | 48 months or 3000 hrs. | 60 months or 3000 hrs** | 48 months parts + 24 months labor (or 3000 Hours) + 180 days travel | 5% |
| NAUTILUS Scrubber | 180 Days | 24 months | 36 months or 2000 hr. | 36 months or 2000 hrs** | 48 months parts + 24 months labor (or 3000 Hours) + 180 days travel | 3% |
| All Rider, I.C. (excluding APEX series) | Bumper to Bumper: 5000 hr max. 48 months parts, 48 months labor, 180 days travel | 8% | ||||
| Exceptions | ||||||
| Apex Series Sweeper | 90 Days | 12 months | 12 months or 1000 hr. | 12 months or 1000 hrs** | 24 months parts + 24 months labor (or 2000 Hours) | 5% |
| 6X Sweeper | 90 Days | 6 months | 24 months or 2000 hr. | 24 months or 2000 hours** | 36 months parts + 24 months labor (or 3000 Hours) + 180 day travel | 5% |
| Item | Coverage |
|---|---|
| Tank Bladders | Eight years/ no additional labor |
| Polyethylene plastic tanks | Ten years/ no additional labor |
| Batteries | 0-3 months full replacement, 4-12 prorated credit |
| Chargers | One-year replacement |
| Aftermarket Replacement parts | Ninety days from date of purchase |
*Two-Hour Cap Per Service Call
**Through Engine Manufacturer. See Section 3 of Warranty Manual for Engine Warranty Exceptions
*** Based Upon Dealer’s Certification Status: Extended Warranty MUST Be Signed Up Within 30 Days of Delivery to End User (Dealer Has 1Year From Receiving Machine To Sign Up For Extended Warranty)
Back cover
988739UMS Rev * 05/14
Minuteman International, Inc. · 14N845 U.S. Route 20 · Pingree Grove, Illinois 60140 · U.S.A.
Phone: 800-323-9420 · Fax 800-422-6933
www.minutemanintl.com
A Member of the Hako Group
Minuteman and PowerBoss are trademarks of Minuteman International, Inc. Southeastern Equipment & Supply is an independent dealer.