Free Shipping on Equipment & Parts orders of $200 or more! * Click for Restrictions

Have a question? 800-440-6723 International: 803-252-0100

English Se habla español
Parts › PartFinder › Nobles Speed Scrub 15 (corded) › Operator manual
Form 9003761, Rev. 01 (09-2018)
Nobles · Walk-behind floor scrubber

Nobles Speed Scrub 15 (corded) Operator Manual

9003761 Rev. 01 (09-2018)42 pagesModel part no. 9004200 Speed Scrub floor scrubber
Free to read, no account neededEvery page has its own linkPart numbers link to the part
COVER

SPEED SCRUB® FLOOR SCRUBBER OPERATOR MANUAL

Model Part No. 9004200‌‌​⁠‍‍​⁠​‌‍⁠‍​⁠‍​‍​​​​​​​​​‌​​​‌​⁠​​‍​‌​​⁠​⁠⁠​​⁠​‌‍​⁠​‍‍⁠⁠‍​

Insta-Adjust™ Handle
Hygenic™ Cleanable Tanks
Duramer™ Tank Construction

9003761
Rev. 01 (09-2018)

For the latest Parts manuals and other language Operator manuals, visit: www.nobles.com/manuals
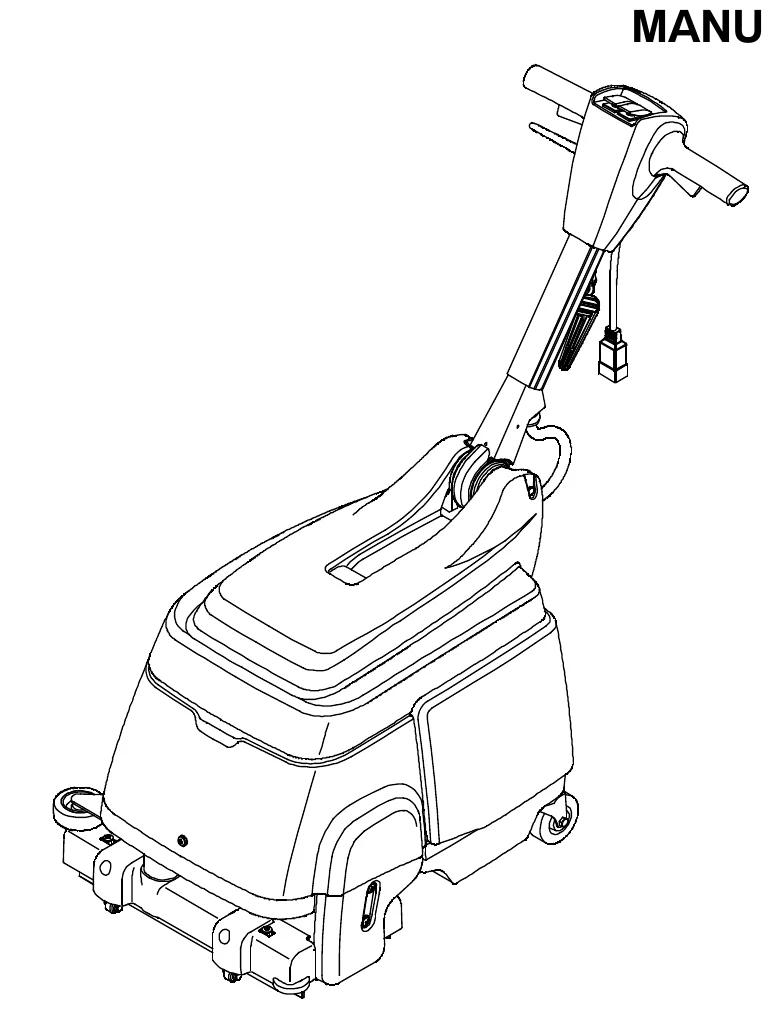
Nobles Speed Scrub walk-behind floor scrubber shown from the rear left, with an adjustable handle carrying the control panel, a power cord hanging from the handle, a large tank body with a lid, and the scrub head at the front
Source: Nobles Speed Scrub 15 (corded) Operator Manual 9003761 Rev. 01 (09-2018), page 1, used with permission. SES ref PF-7HXS-4OSE‌‌​⁠‍‍​⁠​‌‍⁠‍​⁠‍​‍​​​​​​​​​‌​​​‌​⁠​​‍​‌​​⁠​⁠⁠​​⁠​‌‍​⁠​‍‍⁠⁠‍​
Speed Scrub 15 (corded) 9003761 (Rev. 01 (09-2018))Page 1 of 42
OPERATION

OPERATION

This manual is furnished with each new model.
It provides necessary operation and maintenance instructions.‌‌​⁠‍‍​⁠​‌‍⁠‍​⁠‍​‍​​​​​​​​​‍​​​‌​⁠​​⁠‍‍‍‍​⁠‍‌‌⁠⁠‌⁠⁠​‍‍‍‌‌​⁠‌

Read this manual completely and understand the machine before operating or servicing it.

This machine will provide excellent service. However, the best results will be obtained at minimum costs if:

  • The machine is operated with reasonable care.
  • The machine is maintained regularly - per the machine maintenance instructions provided.
  • The machine is maintained with manufacturer-supplied or equivalent parts.

To view, print or download manuals online visit www.tennantco.com/manuals

UNCRATING MACHINE: Carefully check carton for signs of damage. Report damages at once to carrier.

PROTECT THE ENVIRONMENT Please dispose of packaging materials and old machine components in an environmentally safe way according to local waste disposal regulations.
Always remember to recycle.

Tennant Company
PO Box 1452
Minneapolis, MN 55440 USA
Phone: (800) 553-8033
www.nobles.com

Specifications and parts are subject to change without notice.

Copyright © 2008-2018 TENNANT Company.
All rights reserved.

MACHINE DATA

In short This is a form where you write down the machine's identifying details at the time of installation so they are on hand for future reference.‌‌​⁠‍‍​⁠​‌‍⁠‍​⁠‍​‍​​​​​​​​​‍​​​‌​⁠​​⁠‍‍‍‍​⁠‍‌‌⁠⁠‌⁠⁠​‍‍‍‌‌​⁠‌

Please fill out at time of installation for future reference.

  • Model No. -
  • Serial No. -
  • Machine Options -
  • Sales Rep. -
  • Sales Rep. phone no. -
  • Customer Number -
  • Installation Date -

TABLE OF CONTENTS

TopicPage
SAFETY PRECAUTIONS3
GROUNDING INSTRUCTIONS4
SAFETY LABELS4
MACHINE COMPONENTS5
BRUSH INFORMATION6
MACHINE SETUP6
INSTALLING BRUSH6
FILLING SOLUTION TANK7
CONNECTING POWER CORD7
MACHINE OPERATION8
PRE-OPERATION8
SCRUBBING FLOORS8
MACHINE MAINTENANCE10
AFTER EACH USE10
AFTER EVERY 100 HOURS OF USE11
BRUSH MOTOR MAINTENANCE11
STORING MACHINE12
TROUBLESHOOTING12
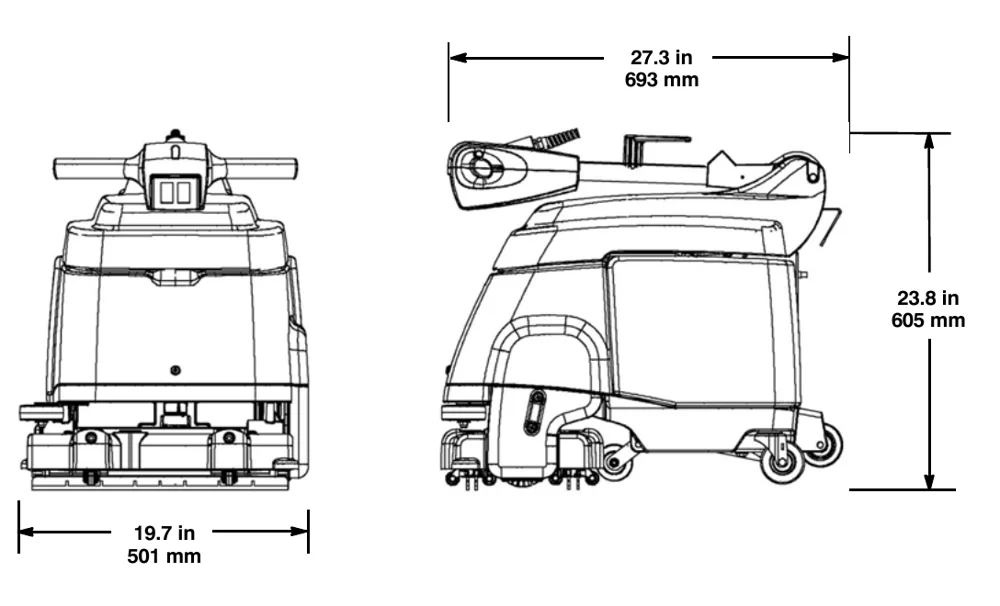
MACHINE SPECIFICATIONS13
MACHINE DIMENSIONS14
Source: Nobles Speed Scrub 15 (corded) Operator Manual 9003761 Rev. 01 (09-2018), page 2, used with permission. SES ref PF-NRKV-3T4R‌‌​⁠‍‍​⁠​‌‍⁠‍​⁠‍​‍​​​​​​​​​‍​​​‌​⁠​​⁠‍‍‍‍​⁠‍‌‌⁠⁠‌⁠⁠​‍‍‍‌‌​⁠‌
Speed Scrub 15 (corded) 9003761 (Rev. 01 (09-2018))Page 2 of 42
OPERATION

SAFETY PRECAUTIONS

In short This section explains that the machine is for commercial indoor scrubbing of hard floors only and that operators must read and follow the safety precautions. It lists the warnings and the "FOR SAFETY" actions to follow before, during and after operating, servicing and transporting the machine.‌‌​⁠‍‍​⁠​‌‍⁠‍​⁠‍​‍​​​​​​​​​⁠​​​‌​⁠​​⁠⁠‍‍​⁠‌‍⁠⁠‌⁠‌‍‌‌​​⁠​⁠​‌​

This machine is intended for commercial use. It is designed exclusively to scrub hard floors in an indoor environment and is not constructed for any other use.‌‌​⁠‍‍​⁠​‌‍⁠‍​⁠‍​‍​​​​​​​​​⁠​​​‌​⁠​​⁠⁠‍‍​⁠‌‍⁠⁠‌⁠‌‍‌‌​​⁠​⁠​‌​

All operators must read, understand and practice the following safety precautions.

The following warning alert symbol and the “FOR SAFETY” heading are used throughout this manual as indicated in their description:

WARNING: To warn of hazards or unsafe practices which could result in severe personal injury or death.

FOR SAFETY: To identify actions which must be followed for safe operation of equipment.

The following safety precautions signal potentially dangerous conditions to the operator or equipment.

WARNING: Fire Or Explosion Hazard
  • Do Not Use or Pick Up Flammable Materials
  • Only Use Commercially Available Floor Cleaners intended for machine application.
  • Do Not Use Near Flammable Liquids, Vapors Or Combustible Dusts.

This machine is not equipped with explosion proof motors. The electric motors will spark upon start up and during operation which could cause a flash fire or explosion if machine is used in an area where flammable vapors/liquids or combustible dusts are present.

WARNING: Electrical Hazard
  • Do Not Operate With Damaged Power Cord.
  • Do Not Modify Power Cord Plug.
  • Unplug Power Cord Before Servicing Machine.

If the power cord is damaged or broken, it must be replaced by the manufacturer or its service agent or a similarly qualified person in order to avoid a hazard.

WARNING: Spinning Brush. Keep Hands Away. Unplug Power Cord Before Servicing Machine.
WARNING: Electrical Shock Hazard. Do Not Use Outdoors. Do Not Expose To Rain. Store Indoors.
FOR SAFETY:
  1. Do not operate machine:
    • Unless trained and authorized.
    • Unless operator manual is read and understood.
    • In an area where flammable vapors/liquids or combustible dusts are present.
    • Unless power cord is properly grounded. Only use the manufacturer- supplied power cord which is designed exclusively for this machine. Do not use additional extension cords.
    • Outdoors.
    • If not in proper operating condition.
    • In standing water.
  2. Before operating machine:
    • Make sure all safety devices are in place and operate properly.
    • Wear non- slip shoes.
    • Place wet floor signs as needed.
  3. When operating machine:
    • Do not run machine over power cord.
    • Do not pull machine by plug or power cord.
    • Do not pull power cord around sharp edges or corners.
    • Do not unplug by pulling on power cord.
    • Do not stretch power cord.
    • Do not handle plug with wet hands.
    • Keep cord away from heated surfaces.
    • Report machine damage or faulty operation immediately.
    • Do not allow children to play on or around machine.
    • If foam or liquid begins to leak from machine, immediately shut off machine.
  4. Before leaving or servicing machine:
    • Turn off machine.
    • Unplug cord from wall outlet.
  5. When servicing machine:
    • Unplug power cord from wall outlet.
    • Avoid moving parts. Do not wear loose jackets, shirts, or sleeves.
    • Do not power spray or hose off machine. Electrical malfunction may occur.
    • Use manufacturer- supplied or approved replacement parts.
    • All repairs must be performed by a qualified service person.
    • Do not modify the machine from its original design.
  6. When transporting machine:
    • Unplug power cord from wall outlet.
Source: Nobles Speed Scrub 15 (corded) Operator Manual 9003761 Rev. 01 (09-2018), page 3, used with permission. SES ref PF-TDUH-EQCL‌‌​⁠‍‍​⁠​‌‍⁠‍​⁠‍​‍​​​​​​​​​⁠​​​‌​⁠​​⁠⁠‍‍​⁠‌‍⁠⁠‌⁠‌‍‌‌​​⁠​⁠​‌​
Speed Scrub 15 (corded) 9003761 (Rev. 01 (09-2018))Page 3 of 42
OPERATION

OPERATION

  • Get assistance when lifting machine.
  • Do not wheel up or down stairs.
  • Use tie-down straps to secure machine to truck or trailer.

GROUNDING INSTRUCTIONS

In short The machine must be plugged into a properly grounded 120-volt outlet that matches its plug. Do not use an adapter or modify the plug.‌‌​⁠‍‍​⁠​‌‍⁠‍​⁠‍​‍​​​​​​​​‌​​​​‌​⁠​​‌‍‍⁠⁠⁠‍‍‍‌​⁠​​​⁠​‍‌⁠‍​⁠‌

This machine must be grounded. If it should electrically malfunction, grounding provides a path of least resistance for electrical current to reduce the risk of electrical shock. This machine is equipped with a cord having an equipment-grounding conductor and grounding plug. The plug must be plugged into an appropriate outlet that is properly installed in accordance with all local codes and ordinances.‌‌​⁠‍‍​⁠​‌‍⁠‍​⁠‍​‍​​​​​​​​‌​​​​‌​⁠​​‌‍‍⁠⁠⁠‍‍‍‌​⁠​​​⁠​‍‌⁠‍​⁠‌

WARNING: Improper connection of the equipment-grounding conductor can result in a risk of electric shock. Check with a qualified electrician or service person if you are in doubt as to whether the outlet is properly grounded. Do not modify the plug provided with the machine. If it will not fit the outlet, have a proper outlet installed by a qualified electrician.

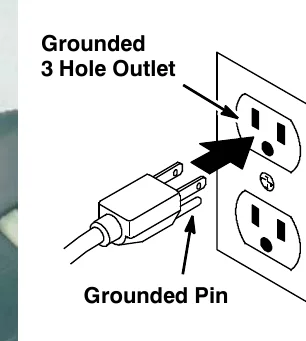
This machine is for use on a nominal 120-volt circuit and has a grounding attachment plug that looks like the plug illustrated below. Make sure that the machine is connected to an outlet having the same configuration as the plug. No adapter should be used with this machine.
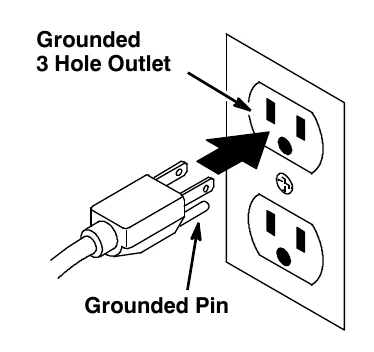
Grounded three-prong power cord plug being inserted into a wall outlet, with labels pointing to the grounded 3 hole outlet and the grounded pin

SAFETY LABELS

In short Safety labels are placed on the machine at the locations shown. Replace any label that is missing, damaged or illegible.

The safety labels appear on the machine in the locations indicated. Replace labels if they are missing or become damaged or illegible.
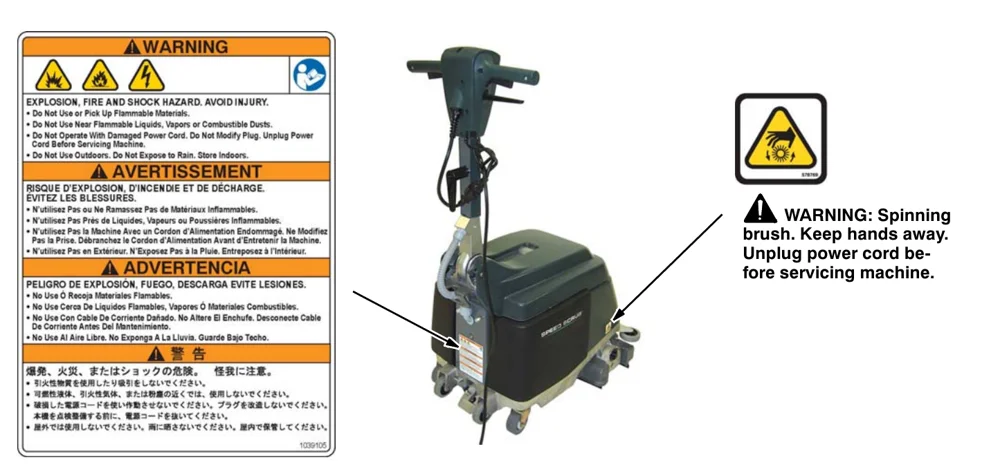
Multilingual warning label for explosion, fire and shock hazard, the machine with lines pointing to where the labels are located, and a spinning brush hand-injury warning symbol
WARNING: Spinning brush. Keep hands away. Unplug power cord before servicing machine.
Source: Nobles Speed Scrub 15 (corded) Operator Manual 9003761 Rev. 01 (09-2018), page 4, used with permission. SES ref PF-OUMB-ZCV3‌‌​⁠‍‍​⁠​‌‍⁠‍​⁠‍​‍​​​​​​​​‌​​​​‌​⁠​​‌‍‍⁠⁠⁠‍‍‍‌​⁠​​​⁠​‍‌⁠‍​⁠‌
Speed Scrub 15 (corded) 9003761 (Rev. 01 (09-2018))Page 4 of 42
OPERATION

MACHINE COMPONENTS

In short This page identifies the numbered parts of the machine, shown from the rear/left and with the tank cover raised. It also lists the symbols used on the switches.‌‌​⁠‍‍​⁠​‌‍⁠‍​⁠‍​‍​​​​​​​​‌‌​​​‌​⁠​​‍​‍⁠‌⁠‍⁠​⁠‍‍‍⁠⁠‌​⁠‍⁠‌​‌​
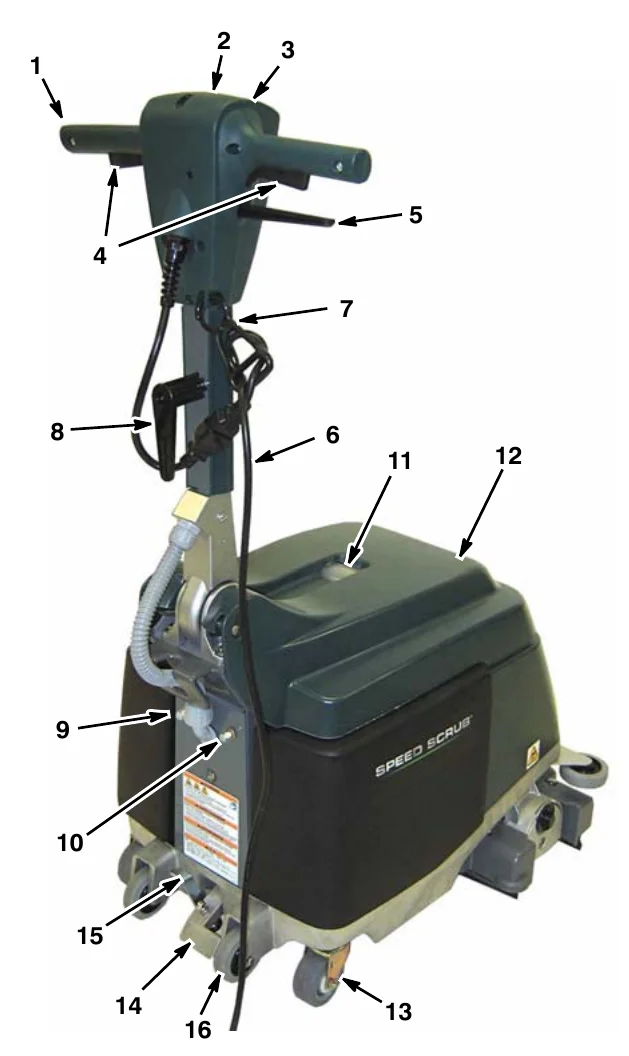
Rear view of the machine with callouts 1 to 16: control handle, power and mode switches, start triggers, handle adjustment lever, power cord with strain relief clip and hook, circuit breaker buttons, recovery window, tank cover, main wheels, pedals and curb climbing wheels
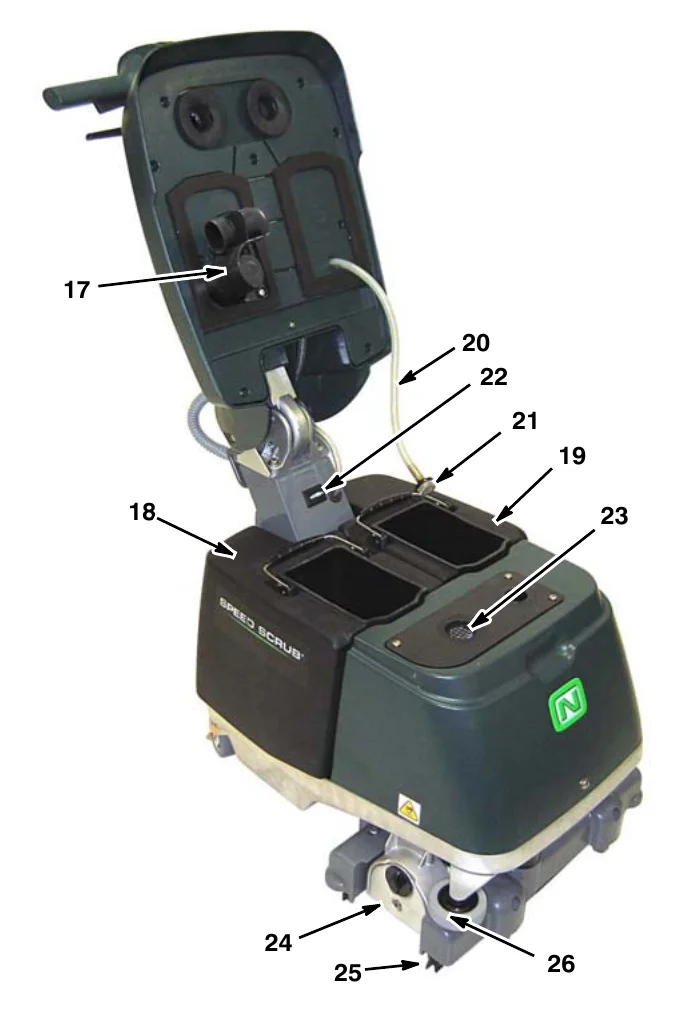
Machine with the tank cover raised, with callouts 17 to 26: vacuum shut-off float, recovery tank, solution tank, solution hose and screen, hour meter, vacuum intake screen, scrub head, squeegee blades and bumper wheel
No.Component
1Adjustable Control Handle
2Main Power ON/OFF Switch
3Scrubbing Mode Switch
4Start Triggers
5Handle Adjustment Lever
650 ft/15 m Power Cord
7Power Cord Strain Relief Clip
8Power Cord Hook
915A Machine Circuit Breaker Button
105A Brush Circuit Breaker Button
11Recovery Window
12Tank Cover
13Main Wheels
No.Component
14Scrub Head Lift Pedal
15Transport Release Pedal
16Curb Climbing/Tilt Wheels
17Vacuum Shut- Off Float
18Recovery Tank
19Solution Tank
20Solution Hose
21Solution Hose Screen
22Hour meter
23Vacuum intake Screen
24Scrub Head
25Squeegee Blades
26Bumper Wheel

SWITCH SYMBOLS

Row of switch symbols with labels: Power On (I), Power Off (O), Vacuum (fan), Brush (brush), Solution (tank with drop)
Power On, Power Off, Vacuum, Brush, Solution
Source: Nobles Speed Scrub 15 (corded) Operator Manual 9003761 Rev. 01 (09-2018), page 5, used with permission. SES ref PF-ANTZ-O76Z‌‌​⁠‍‍​⁠​‌‍⁠‍​⁠‍​‍​​​​​​​​‌‌​​​‌​⁠​​‍​‍⁠‌⁠‍⁠​⁠‍‍‍⁠⁠‌​⁠‍⁠‌​‌​
Speed Scrub 15 (corded) 9003761 (Rev. 01 (09-2018))Page 5 of 42
OPERATION

BRUSH INFORMATION

In short This section describes the three scrub brushes available for the machine: a standard soft nylon brush and two optional brushes, polypropylene and abrasive. It tells what floor conditions each one is meant for.‌‌​⁠‍‍​⁠​‌‍⁠‍​⁠‍​‍​​​​​​​​‌‍​​​‌​⁠​​‍‍⁠‍‌‍​⁠​⁠⁠‍‍​‍‌‌⁠‌‌‍​‍⁠

Soft Nylon Bristle Scrub Brush -
Part No. 1037197 (standard)
Recommended for cleaning coated floors without removing finish. Cleans without scuffing.‌‌​⁠‍‍​⁠​‌‍⁠‍​⁠‍​‍​​​​​​​​‌‍​​​‌​⁠​​‍‍⁠‍‌‍​⁠​⁠⁠‍‍​‍‌‌⁠‌‌‍​‍⁠

Polypropylene Bristle Scrub Brush -
Part No. 1037277 (option)
This general purpose polypropylene bristle scrub brush is used for scrubbing lightly compacted soilage. This brush works well for maintaining concrete, wood and grouted tile floors.

Abrasive Bristle Scrub Brush -
Part No. 1037278 (option)
Nylon fiber impregnated with abrasive grit to remove stains and soilage. Strong action on any surface. Performs well on buildup, grease, or tire marks.

MACHINE SETUP

INSTALLING BRUSH

In short Shows how to install a scrub brush: turn off and unplug the machine, raise the scrub head, remove the idler plate, connect the brush to the drive hub, then reinstall the idler plate and make sure the locking knob is secure.
FOR SAFETY: Before installing brush, turn off machine and unplug power cord from wall outlet.
  1. Raise the scrub head to the transport position by stepping on the scrub head lift pedal (Figure 1).
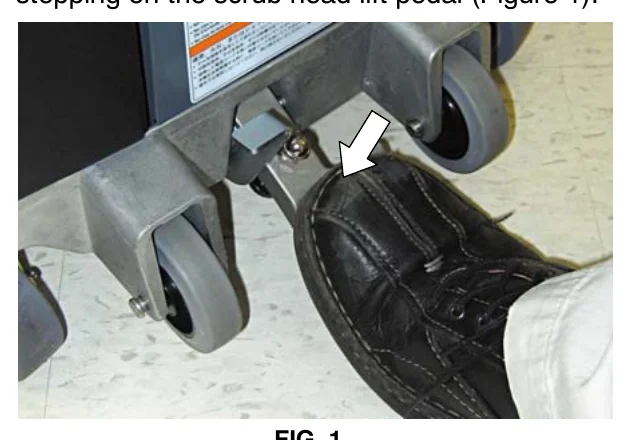
    A booted foot stepping down on the scrub head lift pedal at the base of the machine, with an arrow pointing at the pedal
    FIG. 1
  2. Remove the brush idler plate from the brush base. Turn the idler plate locking knob counter- clockwise to remove (Figure 2).
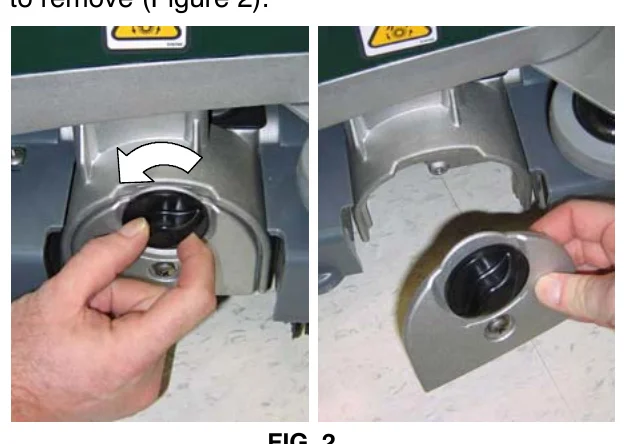
    Two photos: a hand turning the idler plate locking knob counter-clockwise, shown with a curved arrow, and the idler plate being removed from the brush base
    FIG. 2
  3. Connect the slotted end of the brush to the drive hub (Figure 3).
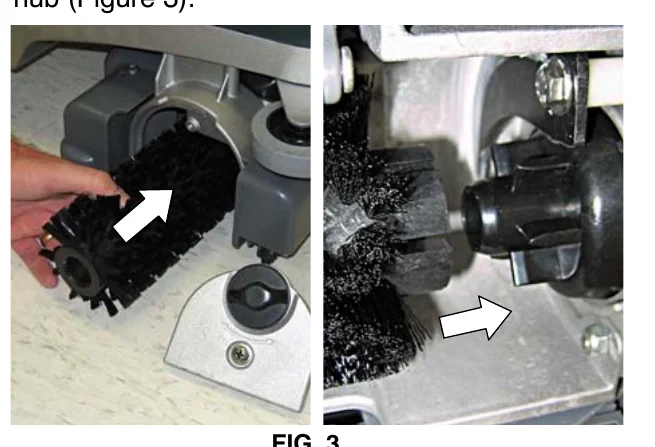
    Two photos: a hand pushing the slotted end of the brush toward the drive hub, and a close-up of the brush end sliding onto the drive hub, with arrows showing the direction
    FIG. 3
  4. Connect the idler plate to the brush and reinstall the idler plate. Make sure the idler plate hooks engage the brush base and that the locking knob is secure (Figure 4).
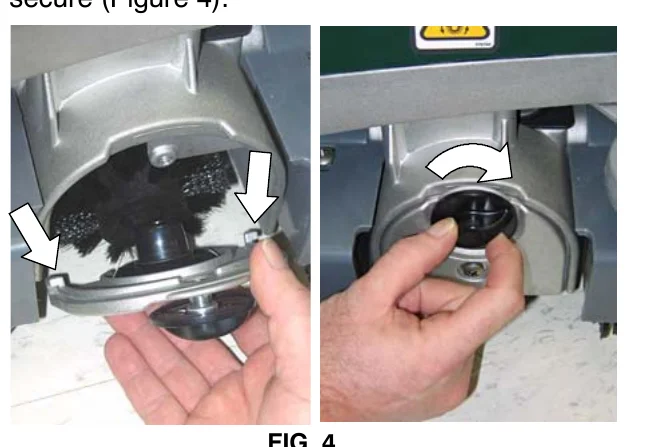
    Two photos: the idler plate being fitted to the brush with arrows at the hooks, and a hand turning the locking knob to secure it, with a curved arrow
    FIG. 4
NOTE: If storing the machine for an extended period, raise the scrub head to the transport position (Fig. 19).
Source: Nobles Speed Scrub 15 (corded) Operator Manual 9003761 Rev. 01 (09-2018), page 6, used with permission. SES ref PF-Z5G3-XZ5Q‌‌​⁠‍‍​⁠​‌‍⁠‍​⁠‍​‍​​​​​​​​‌‍​​​‌​⁠​​‍‍⁠‍‌‍​⁠​⁠⁠‍‍​‍‌‌⁠‌‌‍​‍⁠
Speed Scrub 15 (corded) 9003761 (Rev. 01 (09-2018))Page 6 of 42
OPERATION

FILLING SOLUTION TANK

In short This section explains how to fill the solution tank with clean water and an approved low foaming detergent. Use only approved detergents, never fill from the recovery tank, then put the solution hose screen in the tank and close the cover.‌‌​⁠‍‍​⁠​‌‍⁠‍​⁠‍​‍​​​​​​​​‌⁠​​​‌​⁠​​​‌⁠⁠​‍​‍​⁠​‌​​‍⁠‍‌⁠‌​​⁠‌
  1. Lift the cover and remove the solution tank from the machine (Figure 5).
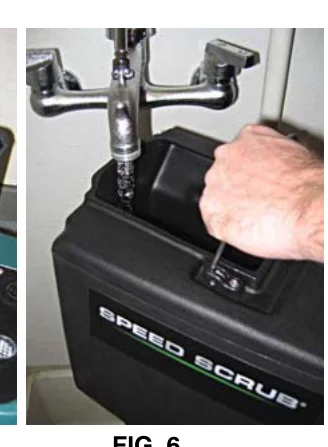
  2. Fill the solution tank with 3 gal/11 L of clean water (122°F/50°C maximum temperature) (Figure 6). Do not fill beyond the “MAX” fill label. Partially fill if unable to lift a full tank.
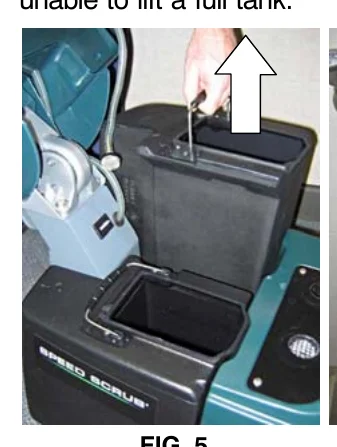
Photo of a hand lifting the solution tank out of the machine with an arrow pointing upward
FIG. 5
Photo of the solution tank being filled with clean water from a faucet while a hand holds the tank
FIG. 6
ATTENTION: Do not use the recovery tank to fill the solution tank. Dirt from the recovery tank may cause damage to the solution pump.
  1. Pour an approved low foaming cleaning detergent into the solution tank according to the mixing instructions on the bottle.
WARNING: Fire Or Explosion Hazard. Do Not Use Flammable Materials. Only Use Commercially Available Floor Cleaners intended for machine application.
ATTENTION: Only use approved cleaning detergents. Machine damage due to improper detergent usage will void the manufacturer’s warranty.

Contact your dealer for recommended cleaning detergents.‌‌​⁠‍‍​⁠​‌‍⁠‍​⁠‍​‍​​​​​​​​‌⁠​​​‌​⁠​​​‌⁠⁠​‍​‍​⁠​‌​​‍⁠‍‌⁠‌​​⁠‌

  1. Submerge the solution hose screen into the solution tank and close the cover.
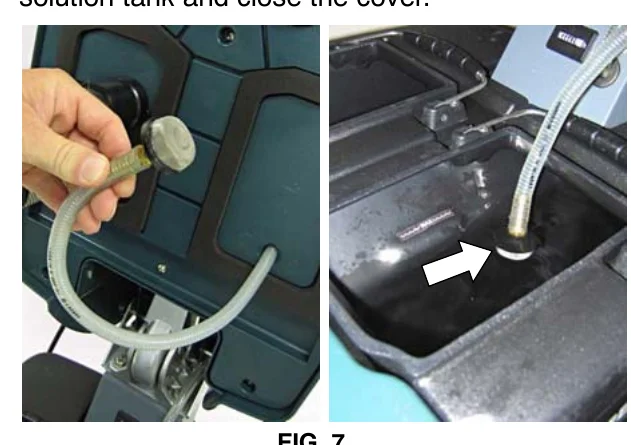
Two photos: a hand holding the solution hose with its screen, and an arrow pointing to the hose screen placed in the solution tank
FIG. 7

CONNECTING POWER CORD

In short This section covers connecting the supplied power cord to the machine and to a properly grounded wall outlet. It also explains how to wrap the cord on the handle and cord hook for storage.
  1. Plug the supplied power cord into the machine and attach the power cord to the strain relief clip as shown (Figure 8).
FOR SAFETY: Do not operate machine unless power cord is properly grounded. Only use the manufacturer- supplied power cord which is designed exclusively for this machine. Do not use additional extension cords.
  1. Plug the power cord into a properly grounded wall outlet (Figure 9).
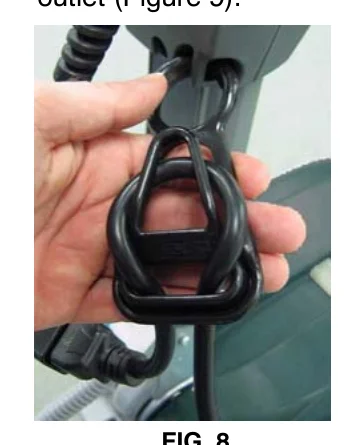
Photo of a hand attaching the power cord to the strain relief clip on the machine
FIG. 8
Drawing of a power cord plug being inserted into a grounded 3 hole wall outlet, with the grounded pin and the grounded 3 hole outlet labeled
FIG. 9
WARNING: Electrical Hazard, Do Not Operate With Damaged Power Cord.
If the power cord is damaged or broken, it must be replaced by the manufacturer or its service agent or a similarly qualified person in order to avoid a hazard.
  1. Wrap the power cord around the handle and cord hook when storing machine. To remove power cord, turn the cord hook upward (Figure 10).
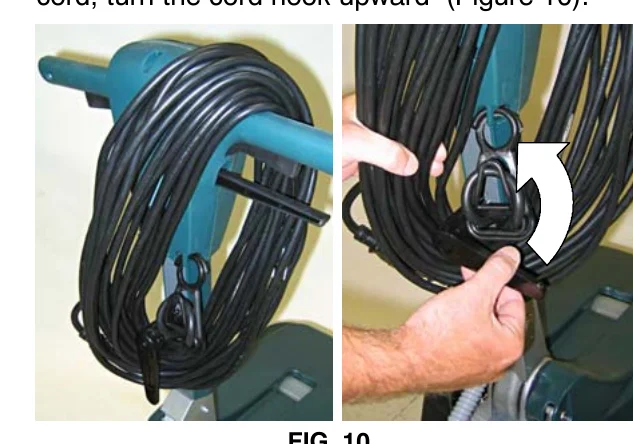
Two photos: power cord wrapped around the handle and cord hook for storage, and a hand turning the cord hook upward with an arrow showing the direction
FIG. 10
Source: Nobles Speed Scrub 15 (corded) Operator Manual 9003761 Rev. 01 (09-2018), page 7, used with permission. SES ref PF-ZFOI-VO7K‌‌​⁠‍‍​⁠​‌‍⁠‍​⁠‍​‍​​​​​​​​‌⁠​​​‌​⁠​​​‌⁠⁠​‍​‍​⁠​‌​​‍⁠‍‌⁠‌​​⁠‌
Speed Scrub 15 (corded) 9003761 (Rev. 01 (09-2018))Page 7 of 42
OPERATION

MACHINE OPERATION

In short This section covers how to prepare the machine and scrub a floor. Check the power cord, floor and blades first, then set the handle height, lower the scrub head, switch on the power and scrubbing mode, and scrub with the triggers pulled.‌‌​⁠‍‍​⁠​‌‍⁠‍​⁠‍​‍​​​​​​​​‍​​​​‌​⁠​​‌​​⁠⁠​‍⁠‍‍​⁠‌​‌‌‍​‍‌⁠⁠⁠⁠
FOR SAFETY: Do not operate machine unless operator manual is read and understood.

PRE-OPERATION

  1. Inspect power cord for damage.
  2. Sweep and dust-mop the floor.
  3. Check that the brush and squeegee blades are installed.

SCRUBBING FLOORS

WARNING: Fire or Explosion Hazard, Do Not Use or Pick Up Flammable Materials.
  1. Pull the handle adjustment lever and adjust the handle to a comfortable operating height (Figure 11). Release the lever to lock the position.
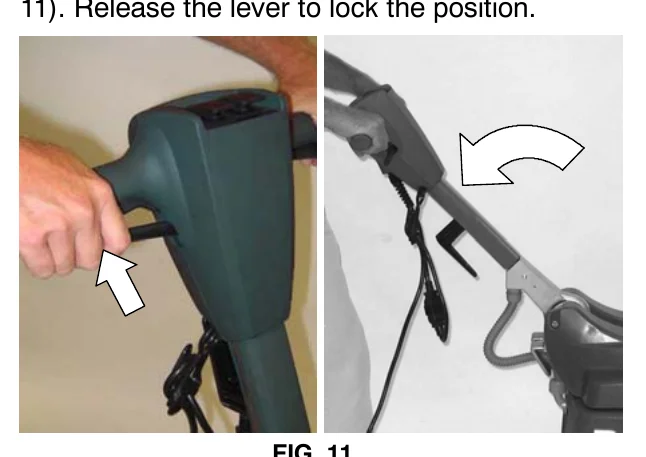
Two photos: a hand pulling the handle adjustment lever on the machine's handle with an arrow pointing to the lever, and the handle being tilted up and down with a curved arrow
FIG. 11
  1. Lower the scrub head to the floor by stepping on the transport release pedal (Figure 12).
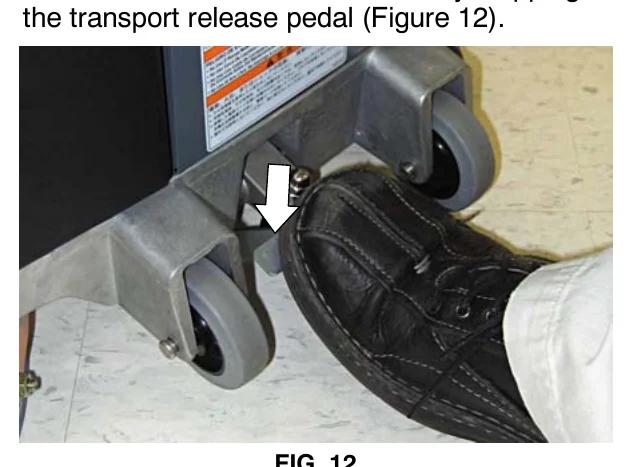
A shoe pressing the transport release pedal near the rear wheel, with an arrow pointing down at the pedal
FIG. 12
  1. Press the main power switch to the on ( I ) position (Figure 13).
  2. Press the scrubbing mode switch towards the vacuum/brush/solution mode (Figure 14).
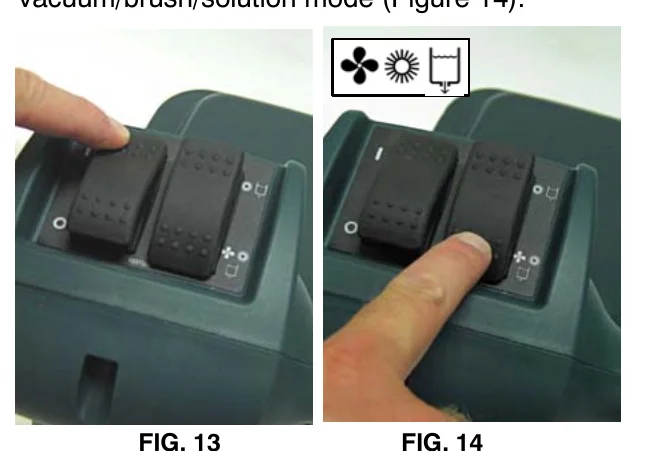
Two photos of the rocker switches: a finger pressing the main power switch to the on position, and a finger pressing the scrubbing mode switch towards the vacuum/brush/solution symbol
FIG. 13, FIG. 14
  1. To begin scrubbing, pull the start triggers and push or pull the machine in either direction (Figure 15).
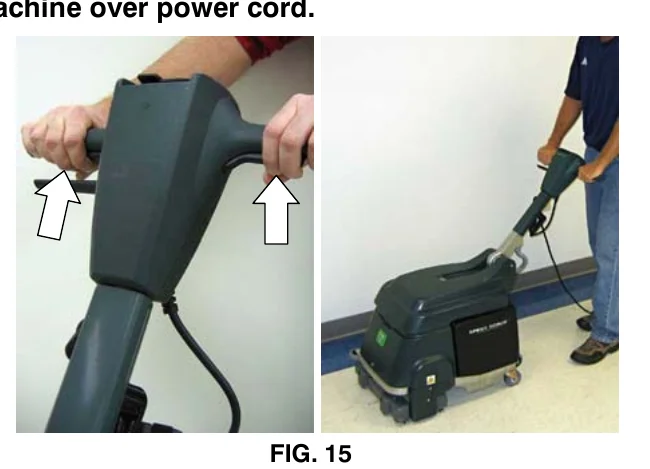
FOR SAFETY: When operating machine, do not run machine over power cord.
Two photos: hands gripping the handle with arrows showing the start triggers being pulled, and an operator pushing the scrubber across a floor
FIG. 15
  1. When stopping, release the triggers and continue to move the machine to pick up all solution.
Source: Nobles Speed Scrub 15 (corded) Operator Manual 9003761 Rev. 01 (09-2018), page 8, used with permission. SES ref PF-WVCM-BNPW‌‌​⁠‍‍​⁠​‌‍⁠‍​⁠‍​‍​​​​​​​​‍​​​​‌​⁠​​‌​​⁠⁠​‍⁠‍‍​⁠‌​‌‌‍​‍‌⁠⁠⁠⁠
Speed Scrub 15 (corded) 9003761 (Rev. 01 (09-2018))Page 8 of 42
OPERATION
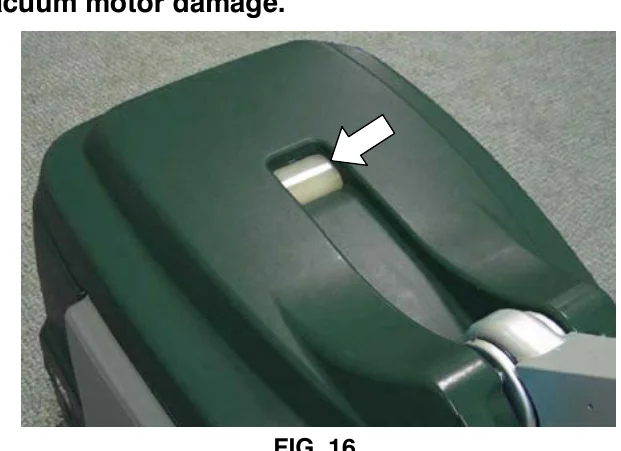
  1. View the water pickup from the recovery window (Figure 16). When the water pickup stops, unplug the power cord and empty the recovery tank.

    The machine is equipped with a vacuum shut-off float that will automatically stop the water pickup should the water level reach the full point. A sudden change in vacuum motor sound will occur.‌‌​⁠‍‍​⁠​‌‍⁠‍​⁠‍​‍​​​​​​​​‍‌​​​‌​⁠​​​​‌⁠‍‍‍‌​⁠⁠‌⁠‌‍​⁠‌‌⁠‍​​⁠

ATTENTION: Check for excessive foam in the recovery tank. Empty tank if excessive. Foam may not activate the shut-off float which may result in vacuum motor damage.
Top of the machine's recovery tank cover with an arrow pointing to the recovery window used to watch the water pickup
FIG. 16
FOR SAFETY: When operating machine, if foam or liquid begins to leak from machine, immediately shut off machine.
  1. For heavily soiled areas, press the scrubbing mode switch towards the brush/solution mode (Figure 17). This allows you to use the double scrub method. First scrub the soiled area in the brush/solution mode then scrub the area a second time in the vacuum/brush/solution mode.
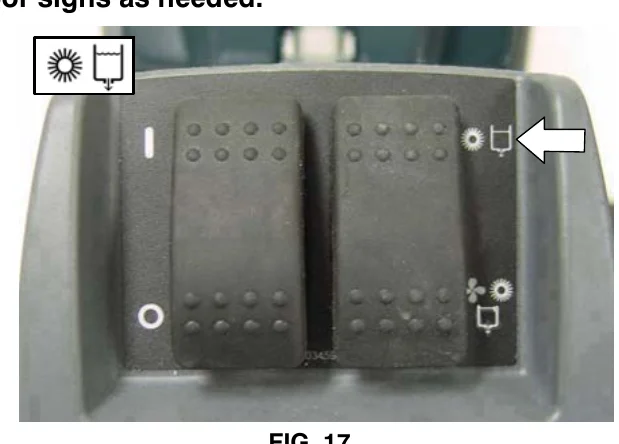
FOR SAFETY: Before operating machine, place wet floor signs as needed.
Scrubbing mode rocker switches on the control panel, with an arrow pointing to the brush/solution mode position on the right-hand switch
FIG. 17
  1. The brush circuit breaker will trip if the brush is obstructed. To reset the circuit breaker, unplug the power cord, remove the obstruction and reset the 5 amp circuit breaker button (Figure 18). If the circuit breaker does not reset immediately, allow the motor to cool.
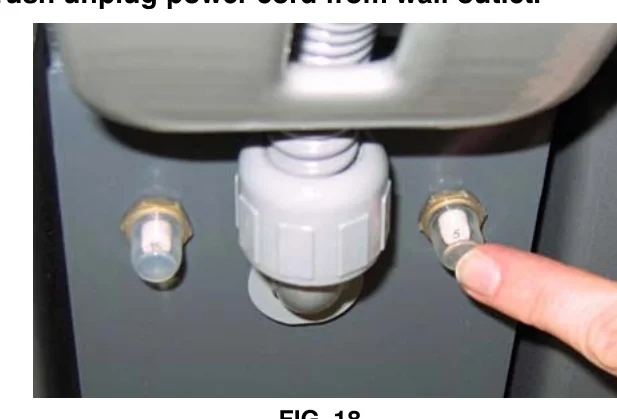
FOR SAFETY: Before removing obstruction from brush unplug power cord from wall outlet.
Underside of the machine housing where a finger points to the 5 amp brush circuit breaker button beside the solution fitting
FIG. 18
  1. When transporting machine, raise the scrub head to the transport position (Figure 19).
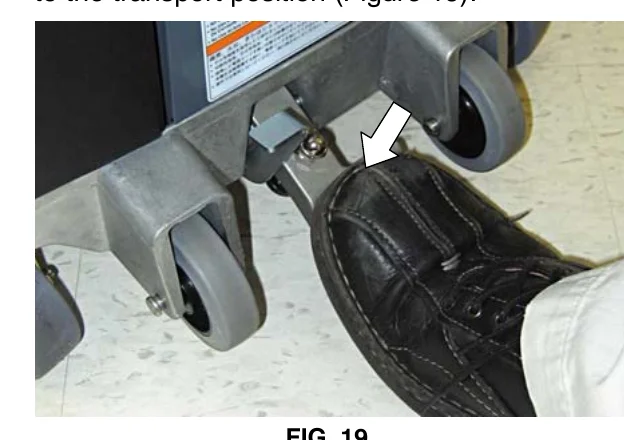
A foot pressing the pedal near the rear wheels to raise the scrub head to the transport position
FIG. 19
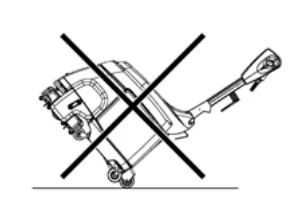
Drawing of the machine being wheeled on its wheels with a large X across it, showing it must not be wheeled up or down stairs
FOR SAFETY: When transporting machine, do not wheel up or down stairs.
Source: Nobles Speed Scrub 15 (corded) Operator Manual 9003761 Rev. 01 (09-2018), page 9, used with permission. SES ref PF-HTHO-S3JX‌‌​⁠‍‍​⁠​‌‍⁠‍​⁠‍​‍​​​​​​​​‍‌​​​‌​⁠​​​​‌⁠‍‍‍‌​⁠⁠‌⁠‌‍​⁠‌‌⁠‍​​⁠
Speed Scrub 15 (corded) 9003761 (Rev. 01 (09-2018))Page 9 of 42
OPERATION

MACHINE MAINTENANCE

In short This section covers keeping the machine in good working condition by following its maintenance procedures. Turn off the machine and unplug the power cord before any maintenance, and contact an Authorized Service Center for repairs.‌‌​⁠‍‍​⁠​‌‍⁠‍​⁠‍​‍​​​​​​​​‍‍​​​‌​⁠​​​​​‌​‌​‌⁠⁠⁠⁠‌⁠‌‍‌⁠⁠‌‍‌‍‍

To keep the machine in good working condition, simply follow the machine’s maintenance procedures.‌‌​⁠‍‍​⁠​‌‍⁠‍​⁠‍​‍​​​​​​​​‍‍​​​‌​⁠​​​​​‌​‌​‌⁠⁠⁠⁠‌⁠‌‍‌⁠⁠‌‍‌‍‍

FOR SAFETY: Before performing maintenance procedures turn off machine and unplug power cord from wall outlet.

ATTENTION: Contact an Authorized Service Center for machine repairs.

AFTER EACH USE

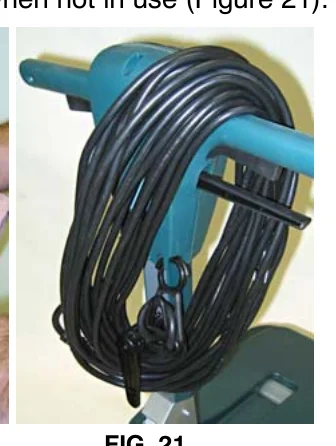
  1. Wipe clean the power cord and inspect it for damage (Figure 20). Wrap power cord around handle and cord hook when not in use (Figure 21).
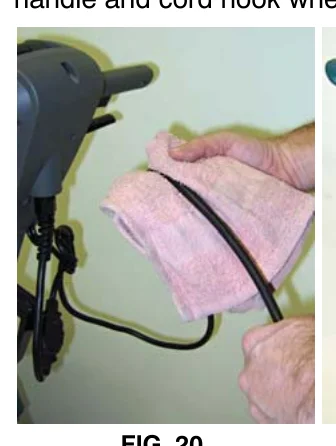
Hand wiping the black power cord with a pink cloth near the machine handle
FIG. 20
Power cord coiled around the machine handle and cord hook
FIG. 21
WARNING: Electrical Hazard, Do Not Operate With Damaged Power Cord.
If the power cord is damaged or broken, it must be replaced by the manufacturer or its service agent or a similarly qualified person in order to avoid a hazard.
  1. Empty the recovery and solution tanks and thoroughly rinse with clean water (Figure 22).
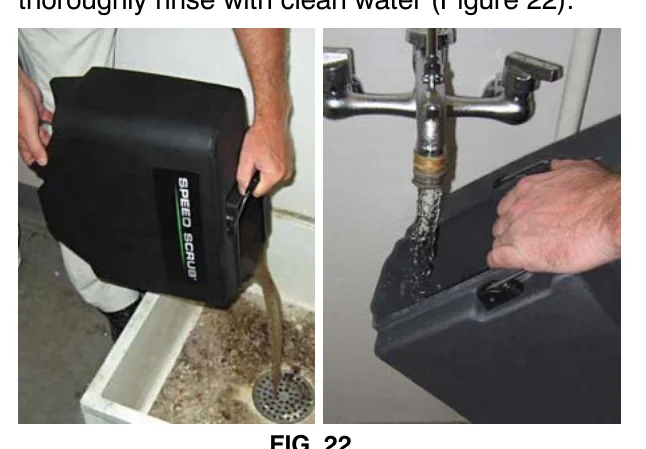
Left: operator pouring the tank contents into a floor drain. Right: tank being rinsed with clean water under a faucet
FIG. 22
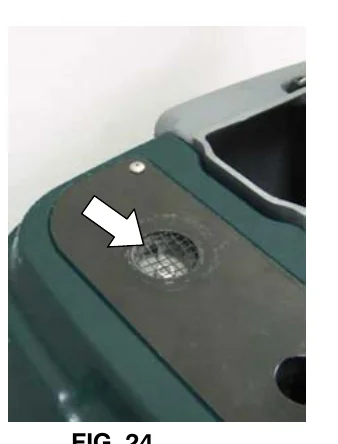
  1. Clean the vacuum shut- off float (Figure 23) and the vacuum intake screen of any debris buildup (Figure 24).
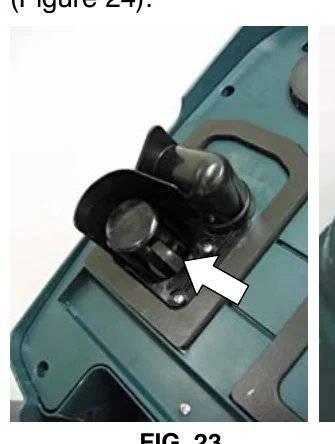
Vacuum shut-off float on the machine with an arrow pointing to it
FIG. 23
Vacuum intake screen with an arrow pointing to it
FIG. 24
  1. Clean the solution hose screen (Figure 25).
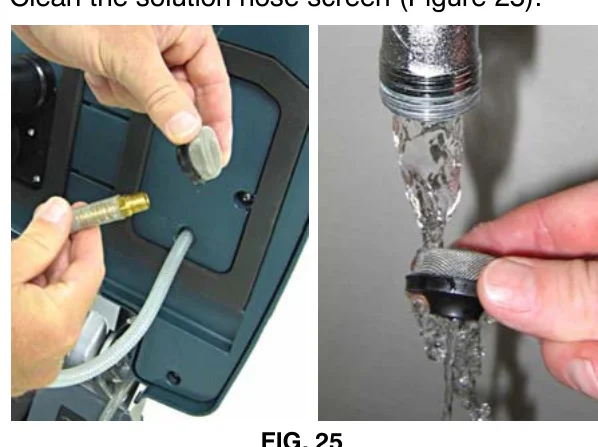
Left: solution hose screen being removed from the machine. Right: screen being rinsed under running water
FIG. 25
  1. Remove and clean the brush (Figure 26). Replace brush if worn.
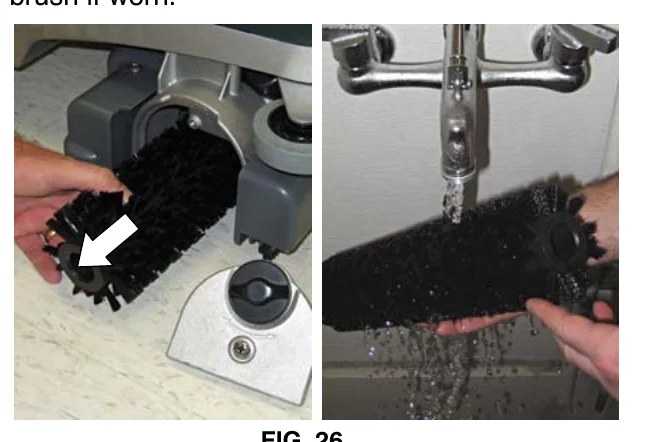
Left: brush being removed from the scrub head, with an arrow pointing to it. Right: brush being rinsed under running water
FIG. 26
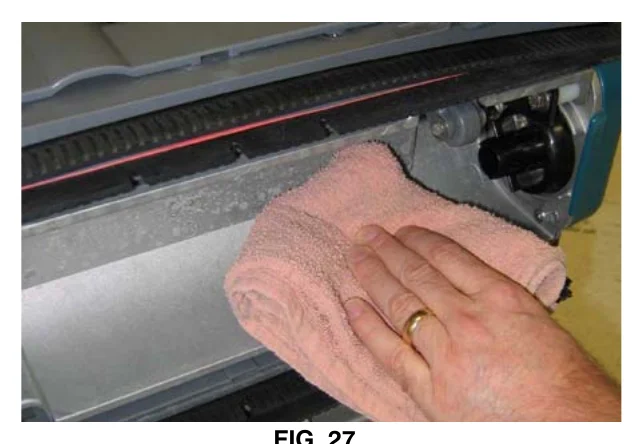
  1. Clean the underside of the scrub head (Figure 27).

FOR SAFETY: Before tipping machine back, unplug power cord from wall outlet.
Source: Nobles Speed Scrub 15 (corded) Operator Manual 9003761 Rev. 01 (09-2018), page 10, used with permission. SES ref PF-WSYE-FQF5‌‌​⁠‍‍​⁠​‌‍⁠‍​⁠‍​‍​​​​​​​​‍‍​​​‌​⁠​​​​​‌​‌​‌⁠⁠⁠⁠‌⁠‌‍‌⁠⁠‌‍‌‍‍
Speed Scrub 15 (corded) 9003761 (Rev. 01 (09-2018))Page 10 of 42
OPERATION
Hand holding a pink cloth wiping the squeegee assembly of the machine
FIG. 27
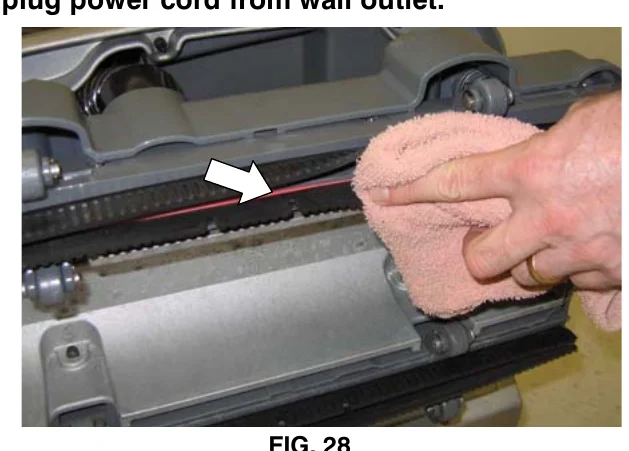
  1. Clean the squeegee blades of any debris (Figure 28). Replace the blades if worn or damaged.
FOR SAFETY: Before tipping machine back, unplug power cord from wall outlet.
Hand with a pink cloth wiping the squeegee blade, with a white arrow pointing along the blade
FIG. 28

To remove the squeegee blades, lift the blade retainer clip and pull the blade from the channel (Figure 29).‌‌​⁠‍‍​⁠​‌‍⁠‍​⁠‍​‍​​​​​​​​‍⁠​​​‌​⁠​​​​‌‌‌​‌‌​⁠⁠⁠‍‌‌‍​⁠​‌​‌‌‌

When replacing blades, install the red blades to the inside channels and the gray blades to the outside channels, ribs facing outwards.
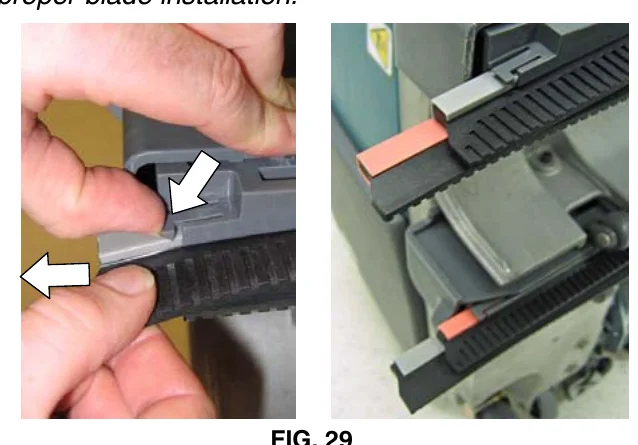
NOTE: The red and gray blade rails are designed to match up with the appropriate channel to prevent improper blade installation.
Two photos of removing a squeegee blade: a hand lifting the retainer clip with arrows showing the pull direction, and a close-up of red and gray blades in their channels
FIG. 29
  1. Clean the machine with an all purpose cleaner and damp cloth (Figure 30).
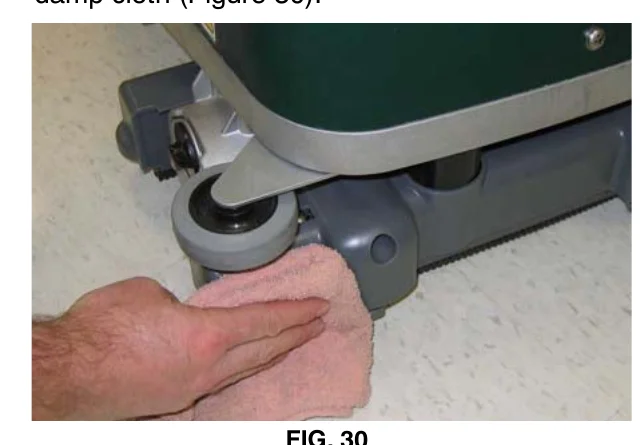
Hands wiping the caster wheel area of the machine with a pink cloth
FIG. 30

AFTER EVERY 100 HOURS OF USE

In short Every 100 hours of use, flush the solution system with white vinegar and soak the spray tip in white vinegar to prevent clogging. Unplug the power cord from the wall outlet before servicing.‌‌​⁠‍‍​⁠​‌‍⁠‍​⁠‍​‍​​​​​​​​‍⁠​​​‌​⁠​​​​‌‌‌​‌‌​⁠⁠⁠‍‌‌‍​⁠​‌​‌‌‌
  1. Flush the solution system with white vinegar to remove any chemical deposits. Pour 1/2 gal/2.2 L of white vinegar into the solution tank and operate the machine for 1- 2 minutes, then let vinegar sit for up to six hours. Rinse solution system with water.
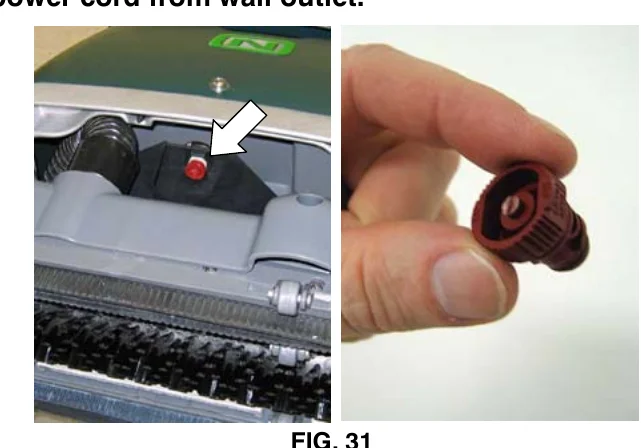
  2. Remove the spray tip and soak in white vinegar to prevent clogging. Do not use a pointed object to clean out spray tip, damage will occur (Figure 31).
FOR SAFETY: When servicing machine, unplug power cord from wall outlet.
Two photos: the red spray tip location in the machine with an arrow pointing to it, and a close-up of the removed red spray tip held in a hand
FIG. 31

BRUSH MOTOR MAINTENANCE

In short Carbon brushes on the brush motor are replaced by an Authorized Service Center. The table lists the replacement interval as 500 hours.

Contact an Authorized Service Center for carbon brush replacement.

Carbon Brush ReplacementHours
Brush Motor500
Source: Nobles Speed Scrub 15 (corded) Operator Manual 9003761 Rev. 01 (09-2018), page 11, used with permission. SES ref PF-E6KG-CJ7W‌‌​⁠‍‍​⁠​‌‍⁠‍​⁠‍​‍​​​​​​​​‍⁠​​​‌​⁠​​​​‌‌‌​‌‌​⁠⁠⁠‍‌‌‍​⁠​‌​‌‌‌
Speed Scrub 15 (corded) 9003761 (Rev. 01 (09-2018))Page 11 of 42
OPERATION

STORING MACHINE

In short Store the machine empty, upright and indoors in a dry area, with the power cord wrapped and the scrub head raised. If it will be stored in freezing temperatures, purge all water from the solution system and pump.‌‌​⁠‍‍​⁠​‌‍⁠‍​⁠‍​‍​​​​​​​​⁠​​​​‌​⁠​​​⁠⁠‍​​​⁠‌‍​‍‍⁠⁠‌⁠‍​‍​‌‌​

Empty tanks and store the machine in a dry area in the upright position. Neatly wrap power cord around handle and cord hook. Raise the scrub head to the transport position.‌‌​⁠‍‍​⁠​‌‍⁠‍​⁠‍​‍​​​​​​​​⁠​​​​‌​⁠​​​⁠⁠‍​​​⁠‌‍​‍‍⁠⁠‌⁠‍​‍​‌‌​

If storing machine in freezing temperatures, purge solution system and pump from all water.

WARNING: Electrical Shock Hazard. Do Not Use Outdoors. Do Not Expose To Rain. Store Indoors.

TROUBLESHOOTING

In short This table lists common problems, their likely causes and the fix for each. Many fixes are simple cleaning, resetting or replacing a part, and others call for the Service Center.
PROBLEMCAUSESOLUTION
Machine does not operate.Faulty power cord.Replace power cord.
Tripped circuit breaker.Unplug power cord and determine cause. Reset 15 amp circuit breaker button. Contact Service Center if circuit breaker continues to trip.
Brush does not spinTripped circuit breaker.Unplug power cord and inspect brush for obstruction. Reset 5 amp circuit breaker button.
Broken brush belt.Contact Service Center.
Faulty brush motor or worn carbon brushes.Contact Service Center.
Poor water pickup.Incorrect scrubbing mode.Properly set scrubbing mode switch.
Clogged squeegee blades.Clean debris from squeegee blades.
Worn or damaged squeegee blades.Replace squeegee blades.
Clogged shut-off float.Clean debris from shut-off float.
Clogged vacuum intake screen.Clean debris from intake screen.
Worn tank cover gaskets.Replace gaskets.
Clogged vacuum hose.Contact Service Center.
Faulty vacuum motor.Contact Service Center.
Little or no spray.Clogged spray tip.Clean or replace tip.
Improper spray tip angle.Adjust spray tip angle.
Faulty spray tip.Replace spray tip.
Empty solution tank.Refill solution tank.
Clogged solution hose screen.Clean debris from solution tank screen.
Damaged solution hose.Contact Service Center.
Faulty solution pump.Contact Service Center.
Poor scrubbing performance.Worn brush.Replace brush.
Incorrect brush type.Change to a different brush type. (See BRUSH INFORMATION on page 6).
Source: Nobles Speed Scrub 15 (corded) Operator Manual 9003761 Rev. 01 (09-2018), page 12, used with permission. SES ref PF-4JC7-B6TF‌‌​⁠‍‍​⁠​‌‍⁠‍​⁠‍​‍​​​​​​​​⁠​​​​‌​⁠​​​⁠⁠‍​​​⁠‌‍​‍‍⁠⁠‌⁠‍​‍​‌‌​
Speed Scrub 15 (corded) 9003761 (Rev. 01 (09-2018))Page 12 of 42
OPERATION

MACHINE SPECIFICATIONS

In short This section lists the Speed Scrub (15 in / 38cm) specifications: dimensions, weight, tank capacities, cleaning widths, motor and electrical ratings, power cord length, sound level and protection grade.‌‌​⁠‍‍​⁠​‌‍⁠‍​⁠‍​‍​​​​​​​​⁠‌​​​‌​⁠​​​​​‌‌‍‍‌⁠​‌​‍‍‌​​‍⁠​‌⁠‌‌
MODELSpeed Scrub (15 in / 38cm)
LENGTH27.3 in / 693 mm with handle folded
WIDTH19.7 in / 501 mm
HEIGHT23.8 in / 605 mm with handle folded
WEIGHT97 lb / 44 kg
SOLUTION TANK CAPACITY3 gal / 11.4 L
RECOVERY TANK CAPACITY4.5 gal / 17 L
PRODUCTIVITY RATE - AVG.8,695 ft2/ 810 m2/hr
CLEANING PATH WIDTH15 in/ 380 mm
SQUEEGEE WIDTH17.5 in/ 445 mm
BRUSH PRESSURE33 lb/ 15 kg
BRUSH MOTOR120V, .4 hp/ .3 kW, 3.2 A, 1200 brush rpm
VACUUM MOTOR120V, 1.2 hp/ .88 kW, 2- stage 5.7, 7.1 A
WATER LIFT- AIR FLOW86 in / 2184 mm
SOLUTION PUMP120V, 0.043 hp/ 0.032 kW, 2- stage 5.7, 0.28 A
SOLUTION FLOW RATE.1 gal / .38 L/min
VOLTAGE120 AC
TOTAL POWER CONSUMPTION11.6 A
POWER CORD LENGTH50 ft/15 m
DECIBEL RATING AT OPERATOR’S EAR, INDOORS*72 dBA
PROTECTION GRADEIPX3
VIBRATIONS AT CONTROLS<2.4 m/s2

*Sounds levels (ISO 11201) as recommended by the American Association of Cleaning Equipment Manufactures (AACEM) and OSHA.‌‌​⁠‍‍​⁠​‌‍⁠‍​⁠‍​‍​​​​​​​​⁠‌​​​‌​⁠​​​​​‌‌‍‍‌⁠​‌​‍‍‌​​‍⁠​‌⁠‌‌

Source: Nobles Speed Scrub 15 (corded) Operator Manual 9003761 Rev. 01 (09-2018), page 13, used with permission. SES ref PF-GRI6-FOXJ‌‌​⁠‍‍​⁠​‌‍⁠‍​⁠‍​‍​​​​​​​​⁠‌​​​‌​⁠​​​​​‌‌‍‍‌⁠​‌​‍‍‌​​‍⁠​‌⁠‌‌
Speed Scrub 15 (corded) 9003761 (Rev. 01 (09-2018))Page 13 of 42
OPERATION

MACHINE DIMENSIONS

In short This page shows the overall size of the machine in front and side views. The printed dimensions are 19.7 in (501 mm) wide, 27.3 in (693 mm) long and 23.8 in (605 mm) high.‌‌​⁠‍‍​⁠​‌‍⁠‍​⁠‍​‍​​​​​​​​⁠‍​​​‌​⁠​​‌​‍‍​‍⁠​​‌‌​‌⁠‌⁠​‍⁠‍​⁠‍​
Front view and side view of the scrubber with dimension arrows: 19.7 in (501 mm) width under the front view, 27.3 in (693 mm) length across the top of the side view, and 23.8 in (605 mm) height along the right side of the side view
Source: Nobles Speed Scrub 15 (corded) Operator Manual 9003761 Rev. 01 (09-2018), page 14, used with permission. SES ref PF-I7AF-LZZ3‌‌​⁠‍‍​⁠​‌‍⁠‍​⁠‍​‍​​​​​​​​⁠‍​​​‌​⁠​​‌​‍‍​‍⁠​​‌‌​‌⁠‌⁠​‍⁠‍​⁠‍​
Speed Scrub 15 (corded) 9003761 (Rev. 01 (09-2018))Page 14 of 42

Tennant and Nobles are trademarks of Tennant Company. Southeastern Equipment & Supply is an independent dealer.


Not Sure Which Machine Fits Your Floors?

Talk to a real SES tech about new, demo or certified reconditioned options, parts and service.

© 2026 Southeastern Equipment and Supply, Inc. All Rights Reserved.

Visa Discover AMEX Mastercard