Tennant EH2 Operator Manual
EH2 200 PSI Carpet Extractor with Heat
Operator and Parts Manual
Model Part No.: 1072860 - 120V
To view, print or download the latest manual, visit: www.tennantco.com/manuals
9011261
Rev. 05 (01-2017)
INTRODUCTION
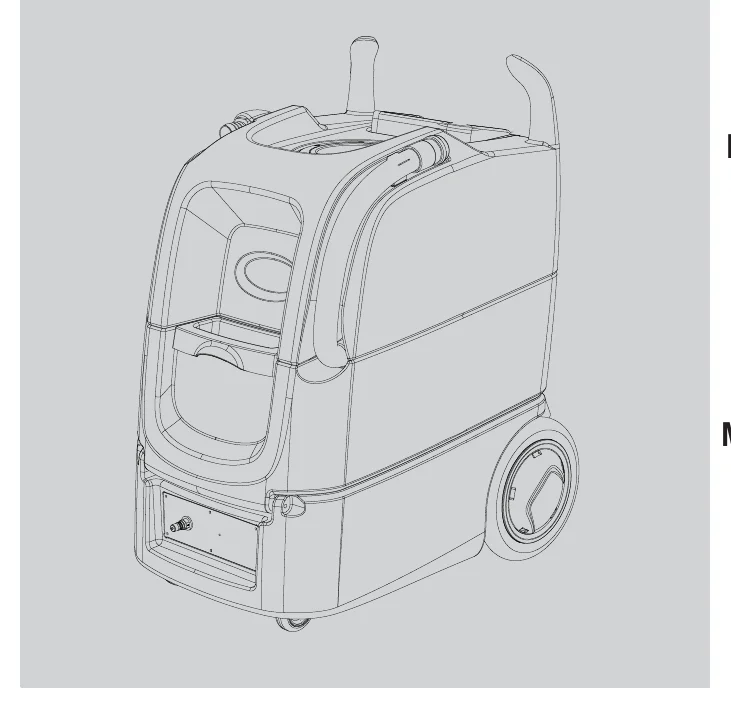
This manual is furnished with each new model. It provides necessary operation and maintenance instructions and replacement parts information.

Read all instructions before using this machine.
INTENDED USE
The Tennant Extractor is intended for commercial use, for example in hotels, schools, hospitals, shops, offices and rental businesses. It is designed to clean carpets in an indoor environment and is not constructed for any other use. Use only commercially available floor cleaners and recommended accessory tools intended for machine application. Do not use this machine other than described in this manual.
GENERAL INFORMATION
This machine will provide excellent service. However, the best results will be obtained at minimum costs if:
- The machine is operated with reasonable care.
- The machine is maintained regularly - per the maintenance instructions provided.
- The machine is maintained with manufacturer supplied or equivalent parts.
To view, print or download manuals online visit www.tennantco.com
UNPACKING MACHINE
Carefully check machine for signs of damage. Report damage at once to carrier. Check machine contents to ensure all parts and accessories are included. Contact distributor or Tennant for missing items.
Tennant Company
PO Box 1452
Minneapolis, MN 55440
Phone: (800) 553-8033 or (763) 513-2850
www.tennantco.com
Specifications and parts are subject to change without notice.
Original Instructions. Copyright ©2013 Tennant Company
All rights reserved. Printed in U.S.A.
MACHINE DATA
Please fill out at time of installation for future reference.
Model No. - _________________________________
Serial No. - _________________________________
Installation Date - ____________________________
MACHINE SERIAL NO. TAG LOCATION
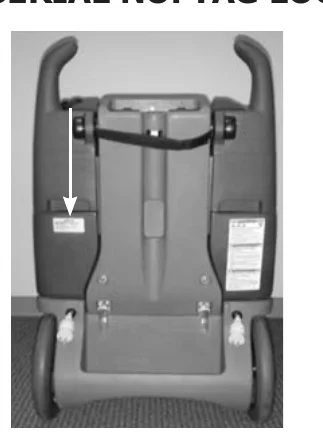
TABLE OF CONTENTS
| Section | Page |
|---|---|
| IMPORTANT SAFETY INSTRUCTIONS | 3 |
| SAFETY LABEL | 4 |
| GROUNDING INSTRUCTIONS | 4 |
| MACHINE COMPONENTS | 5 |
| MACHINE SETUP | 6 |
| MACHINE OPERATION | 7 |
| DRAINING TANKS | 8 |
| MACHINE MAINTENANCE | 8 |
| SERVICING MACHINE | 9 |
| STORING MACHINE | 9 |
| LOADING MACHINE | 9 |
| MACHINE SPECIFICATIONS | 10 |
| TROUBLESHOOTING | 11 |
| PARTS LIST | 32-43 |
| ELECTRICAL DIAGRAM | 44 |
| ACCESSORY TOOLS APPLICATION GUIDE | 45 |
IMPORTANT SAFETY INSTRUCTIONS
When using an electrical appliance, basic precautions should always be followed, including the following:

READ ALL INSTRUCTIONS BEFORE USING THIS MACHINE
- Do not leave appliance when plugged in. Unplug cord from outlet when not in use or servicing machine.
- Do not use outdoors. This machine is for indoor use only.
- Do not allow to be used as a toy. Close attention is necessary when used near children.
- Use only as described in this manual. Use only manufacturer’s recommended accessory tools.
- Operators shall be adequately instructed on the use of this machine.
- This machine is not intended for use by persons, including children, with reduced physical, sensory or mental capabilities, or lack of experience and knowledge.
- Follow site safety guidelines concerning wet floors.
- Wear non-slip shoes when operating machine.
- Do not use with damaged cord or plug. If appliance is not working as it should, has been dropped, damaged, left outdoors, or dropped in water, return it to a service center for repair.
- Do not pull or carry by cord, use cord as a handle, close a door on cord, or pull cord around sharp edges or corners. Do not run appliance over cord. Keep cord away from heated surfaces.
- Do not pull cord to unplug. To unplug, grasp the plug, not the cord.
- Do not handle plug or appliance with wet hands.
- Do not put any object into openings. Do not use with any opening blocked; keep free of dust, lint, hair and anything that may reduce air flow.
- Do not use without ball float screen in place.
- Keep hair, loose clothing, fingers, and all parts of body away from openings and moving parts.
- Turn off all controls before unplugging.
- Do not use flammable cleaning solvents with machine.
- Do not add water over 120˚F/49˚C to solution tank.
- Do not use to pick up flammable or combustible liquids, such as gasoline, or use in areas where they may be present.
- Do not pick up any type of hazardous dust or toxic materials.
- Do not pick up anything that is burning or smoking, such as cigarettes, matches, or hot ashes.
- Do not point spray at yourself or in the direction of others
- Do not use this machine for dry vacuuming before wet cleaning.
- Do not operate machine in standing water.
- Immediately unplug power cord from outlet if machine leaks solution/foam or if machine tips over while operating.
- Release water pressure at accessory tool spray nozzle before disconnecting solution hose.
- Always stop machine on a level surface.
- Use extra care when cleaning on stairs. Do not wheel machine up or down stairs.
- Connect to a properly grounded outlet only.
- Extension cord must be 12/3 gauge and no longer than 40 feet. Replace cord if ground plug becomes damaged.
- Do not use additional extension cords with machine.
- Do not use machine if not in proper operating condition.
- Do not modify machine from its original design.
- Get assistance when lifting machine.
- All repairs must be performed by a qualified service person. Use only manufacturer-supplied or equivalent replacement parts.
- Do not expose machine to rain or moisture. Store indoors only. Do not expose machine to freezing temperatures.
- Wear appropriate personal protection equipment as needed.
SAVE THESE INSTRUCTIONS
SAFETY LABEL
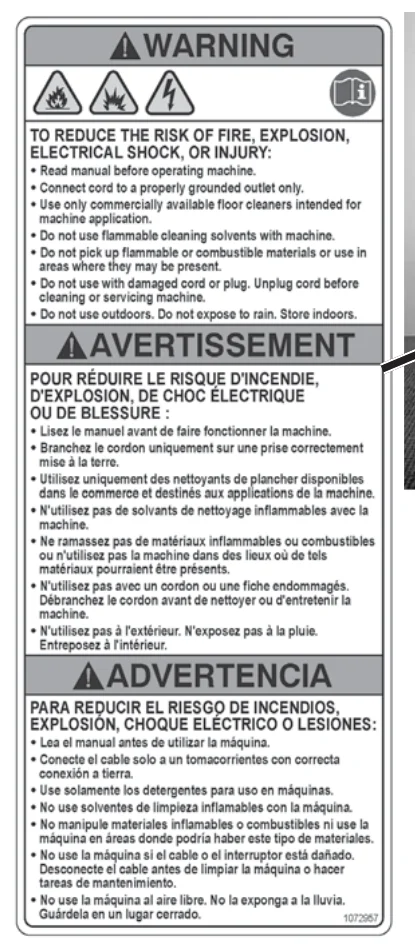
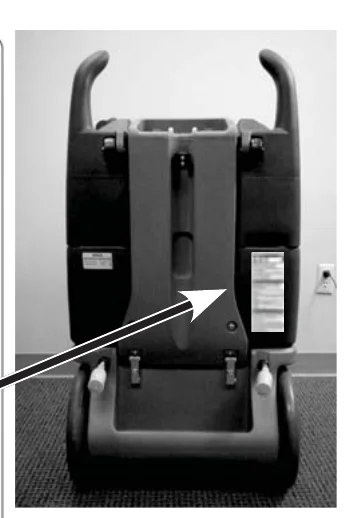
The safety label appears on the machine in the location indicated. Replace label if it becomes damaged or illegible.
WARNING LABEL - Location on back.
GROUNDING INSTRUCTIONS
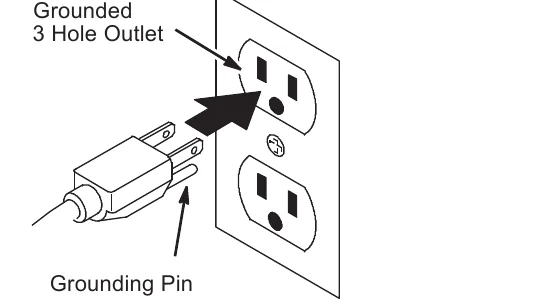
This machine must be grounded. If it should malfunction or breakdown, grounding provides a path of least resistance for electrical current to reduce the risk of electrical shock. This machine is equipped with a cord having an equipment-grounding conductor and grounding plug. The plug must be inserted into an appropriate outlet that is properly installed and grounded in accordance with all local codes and ordinances.
This machine is for use on a nominal 120 volt circuit and has a grounding attachment plug that looks like the plug illustrated below. Make sure that the machine is connected to an outlet having the same configuration as the plug.
MACHINE COMPONENTS:
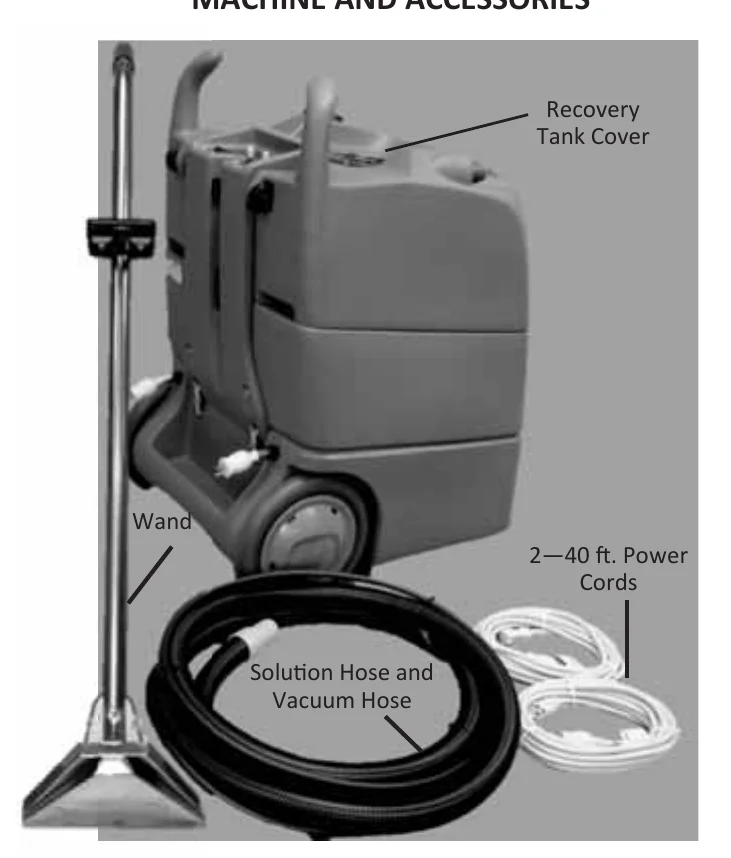
MACHINE AND ACCESSORIES
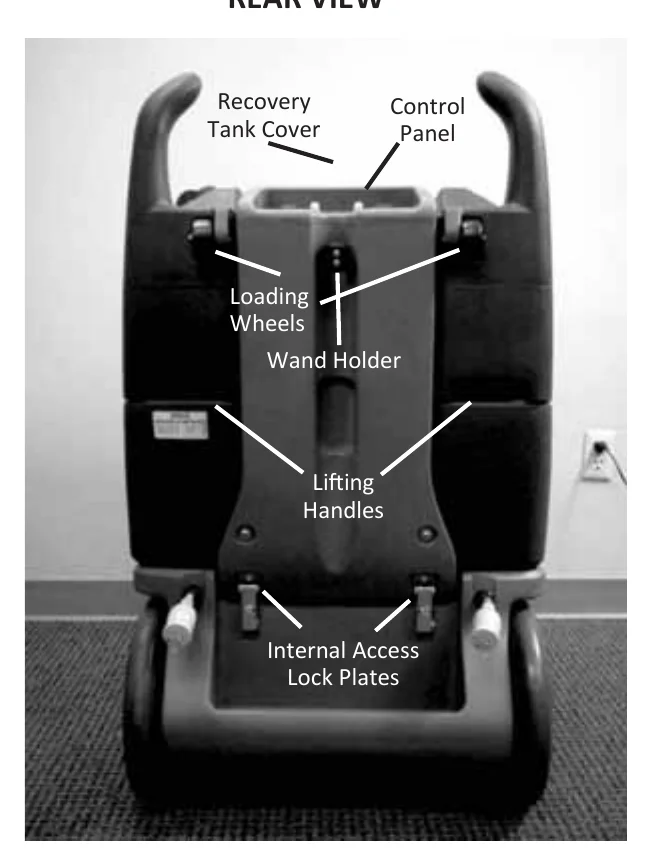
REAR VIEW
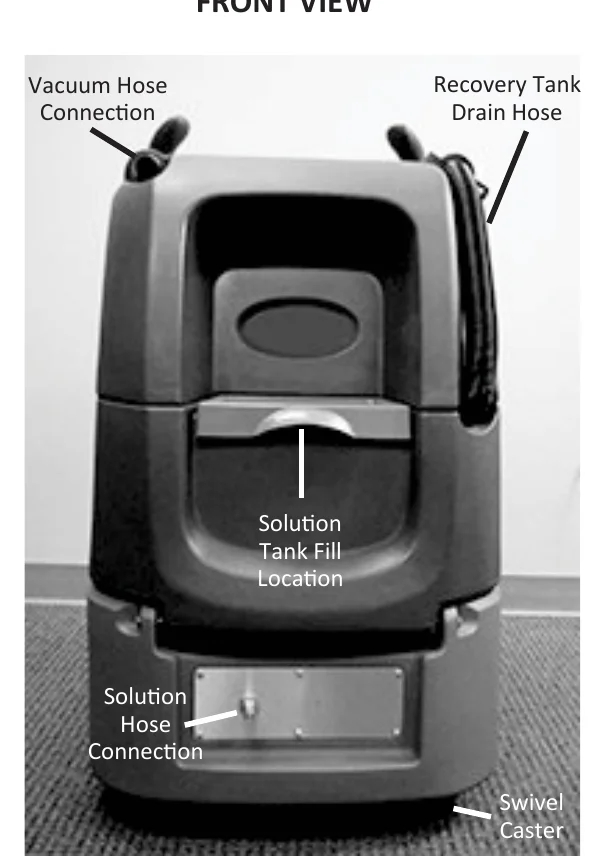
FRONT VIEW
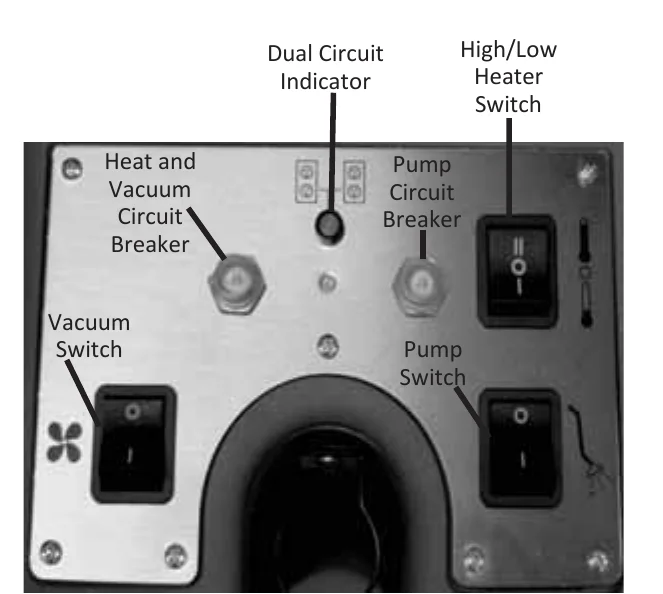
CONTROL PANEL COMPONENTS
MACHINE SETUP
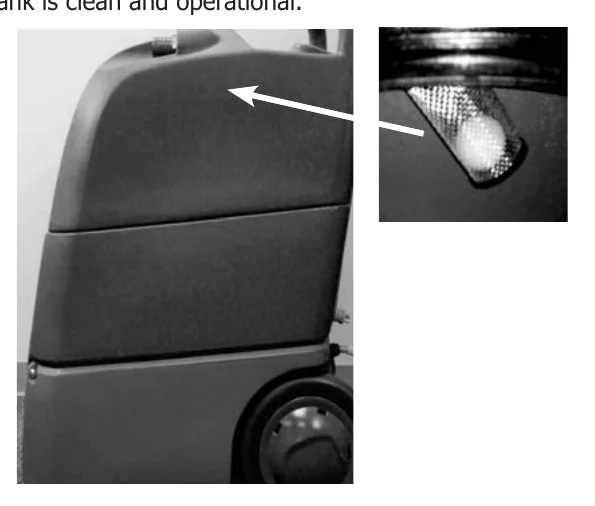
- Before each use, inspect the machine, hoses, and wand for cleanliness and completeness. Ensure the spray tips on the wand are tight and that the ball float screen in the recovery tank is clean and operational.
- Close and tighten the recovery tank cover and screw the cap onto the drain hose.
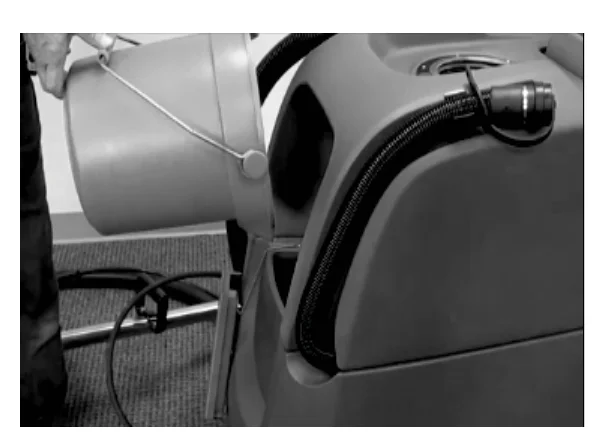
- Fill the solution tank with 15 gallons/57 liters of clean water, by using a garden hose or bucket (maximum temperature 120°F/49°C).
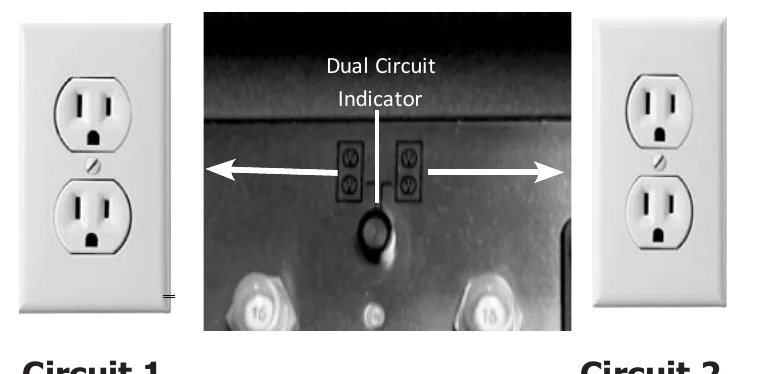
- Turn off all the switches. Plug the two power cords into properly grounded outlets. Do not connect both cords into the same circuit. Dual Circuit Indicator will illuminate bright green when power cords are plugged into different circuits. Machine is ready for operation.
CONNECT WAND TO MACHINE
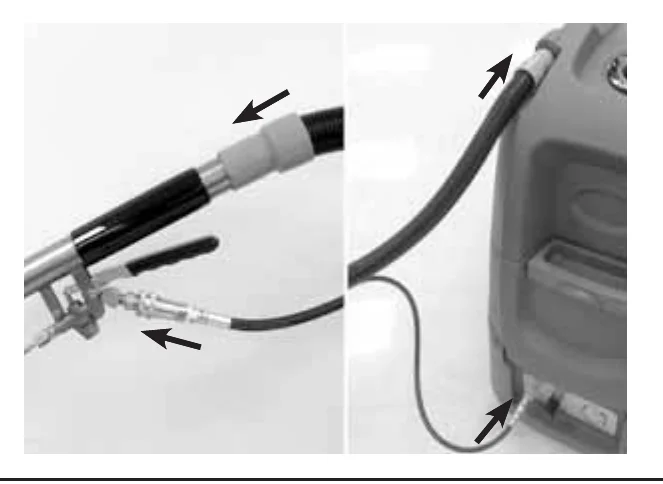
With switches turned off connect the solution hose and the vacuum hose to the machine and to the wand. Only use accessory tools supplied with machine or offered by Tennant. The use of improper accessory tools may cause injury.
TO PRIME MACHINE
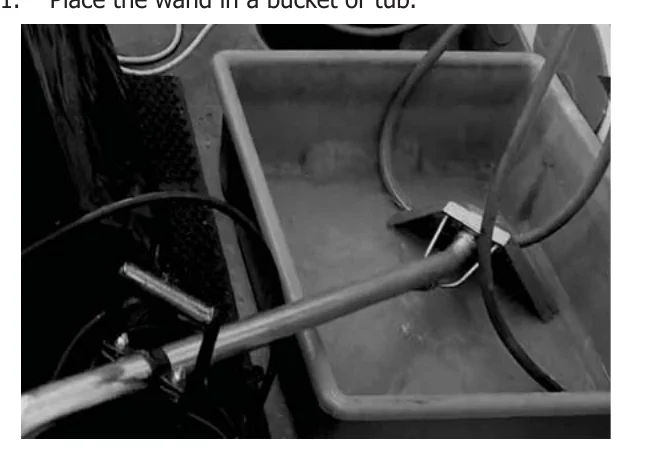
- Place the wand in a bucket or tub.
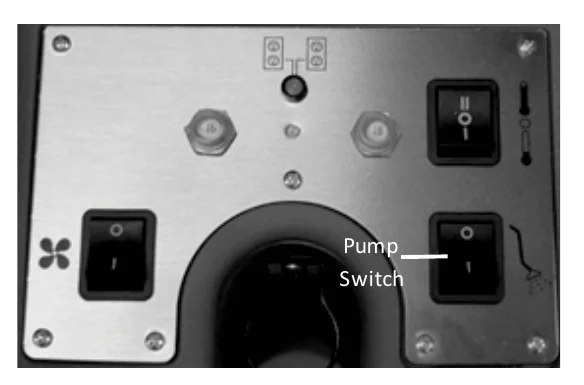
- Turn the pump on from the control panel. Press the lever on the wand and spray until there is no air coming out with the water. This takes approximately 2-3 minutes. Turn the pump off.
MACHINE OPERATION
PRE-SPRAY CARPET
With the use of a pump-up sprayer, pre-spray the carpet with an approved cleaning detergent. Only use commercially available floor cleaners intended for machine application. Follow proper mixing and handling instructions on detergent bottle.
SET TEMPERATURE
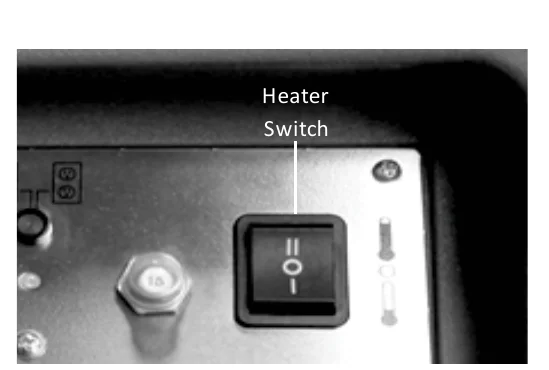
Select the high heat II or low heat I position on the heater switch on the control panel. Wait two minutes for the heater to reach operating temperature.
Note: The heater holds a small amount of water. To maintain maximum temperature for the entire cleaning job, spray for short periods and then stop spraying during a recovery stroke. Continuous spraying will prevent the water from reaching maximum water temperature.
CARPET CLEANING WITH WAND
- Follow site safety guidelines concerning wet floors.
- Verify the vacuum hose and solution hose are securely connected to the machine and wand.
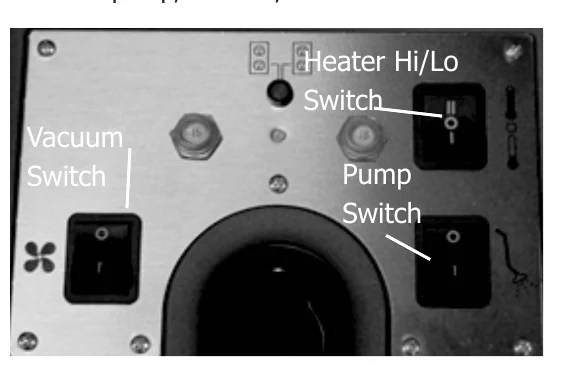
- Turn on the pump, vacuum, and heater switches.
- For optimum cleaning results it is suggested to use a V stroke pattern as shown. Start with an area approximately 4' x 4'. On the back stroke pull the trigger on the wand for the solution to spray.
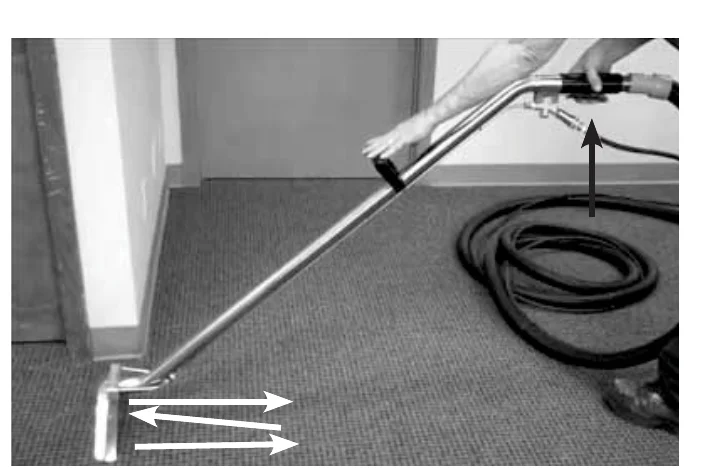
- Let up on the trigger about 4 inches before the end of the stroke for maximum water recovery.
- Push the wand forward at a slight angle until next stroke is slightly overlapping previous stroke.
- Go over area just cleaned with vacuum only stroke before moving to the next area.
- Monitor the water level in the solution tank. If solution tank runs dry, the pump must be reprimed.
- When the solution tank is low, turn off all the switches, empty the recovery tank and then fill the solution tank.
- When finished with the job, shut off all switches. Before disconnecting solution hose relieve the water pressure from the wand by holding the lever on the wand.
DRAINING TANKS
DRAINING SOLUTION TANK
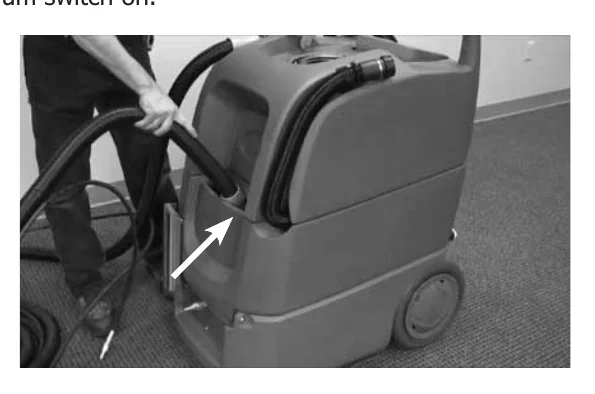
When finished with the job, suction out any unused solution from the solution tank. Place the end of the vacuum hose that was attached to the wand into the solution tank and turn the vacuum switch on.
DRAINING RECOVERY TANK
- Turn off all switches.
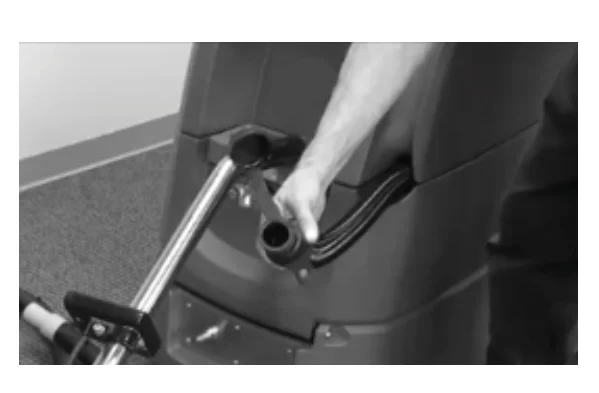
- Drain the recovery tank by holding the end of the drain hose with the cap above the machine. Remove the cap on the drain hose. Lower the drain hose over a drain or a bucket to drain the recovery tank.
MACHINE MAINTENANCE
To keep machine in good working condition, simply follow machine maintenance procedures.
AFTER EACH USE
- If chemicals are used in solution tank flush system with clean water by running the machine using clean water at the end of each job.
- Drain and rinse out recovery tank.
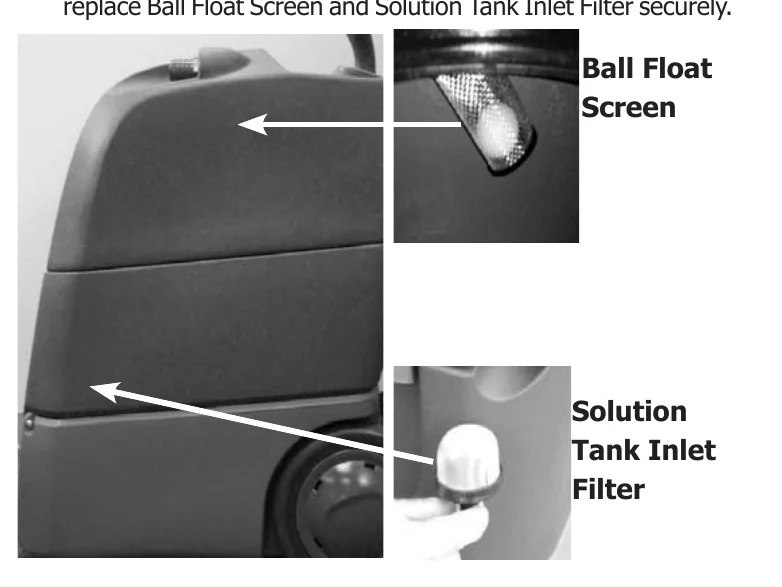
- Remove the Ball Float Screen, unscrew the Solution Tank Inlet Filter. Remove any debris from the scree and filter. Be sure to replace Ball Float Screen and Solution Tank Inlet Filter securely.
- Wipe down the machine with a damp cloth. Do not hose off or power spray machine.
- Inspect solution hose and vacuum hose for cracks or damage Do not use hose if damaged.
- Store extractor with tank covers off to promote air circulation.
- Inspect electrical cord ends on the machine and the power cords used with the machine for damage. Replace power cords if damaged and contact service center or a qualified service person if cord ends on machine are damaged.
- Coil power cords neatly after each use and store on machine.
AFTER 80 HOURS OF USE
Flush solution lines, pump and heater with a descaling solution (such as white vinegar) to remove mineral accumulation which may have formed from the use of hard water. Remove spray tips from wand and soak in a descaling solution. Re-attach wand and hose to machine. Pour solution into solution tank and run solution through system by turning on pump and activating wand. Do not recycle solution as it will carry small mineral deposits. After running solution through system flush with clean water and reinstall spray tips.
SERVICING MACHINE
All repairs must be performed by a qualified service technician.
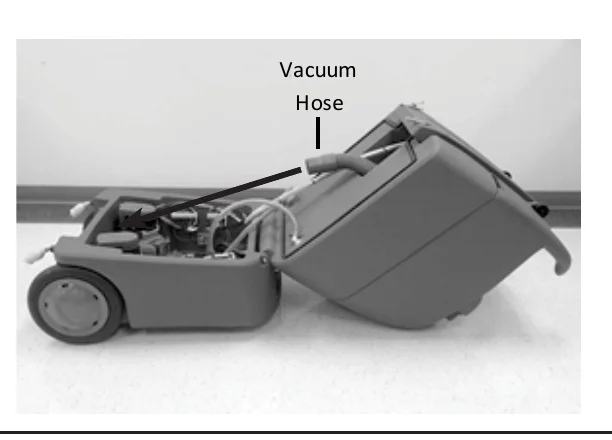
The machine is designed to hinge open for ease of servicing. To access the internal components, remove the two lock plates at back of machine and carefully hinge open machine. Empty tanks before opening machine. Reconnect the vacuum hose when closing machine. Replace lock plates.
STORING MACHINE
- Remove all water from solution tank by using the hose from the machine to vacuum water into the recovery tank.
- Drain and rinse out recovery tank.
- Attach solution hose to machine and wand. Turn on pump and hold lever on wand to run pump dry. Turn off pump.
- Disconnect power cords from machine. Neatly coil the power cords and store on machine.
- Store extractor with tank covers off to promote air circulation.
- Store machine in dry area.
LOADING MACHINE
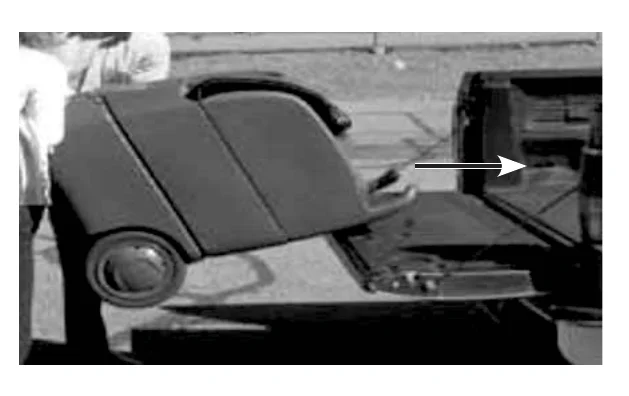
Load machine with assistance by utilizing the 2 top loading wheels as shown. Secure machine with tie down straps. Empty solution tank and recovery tank before loading machine.
MACHINE SPECIFICATIONS
| MODEL | TENNANT EH2 |
|---|---|
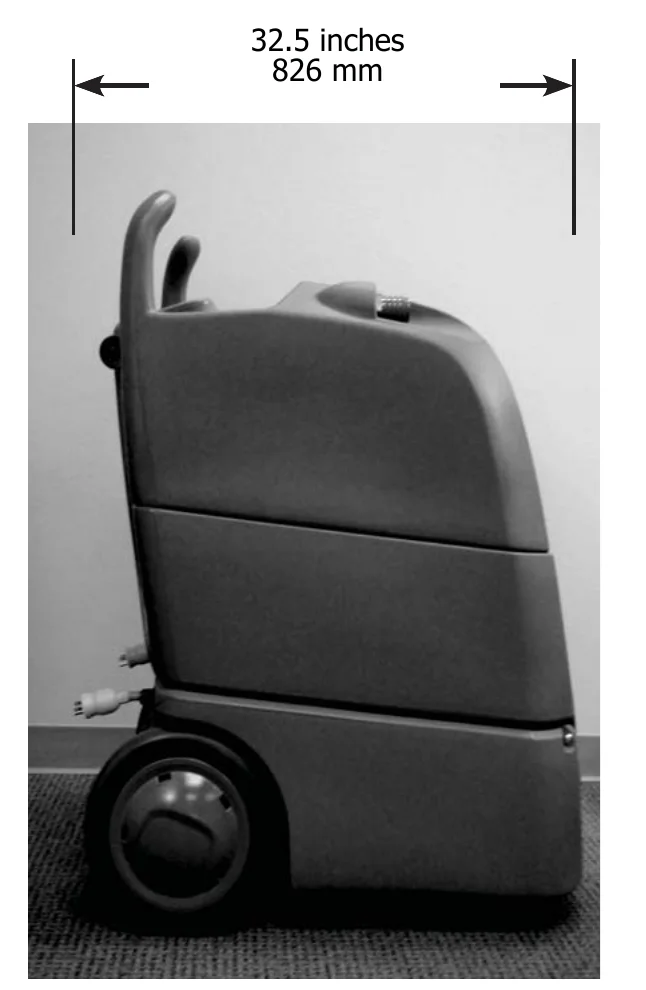
| Length | 32.5 in/ 826 mm |
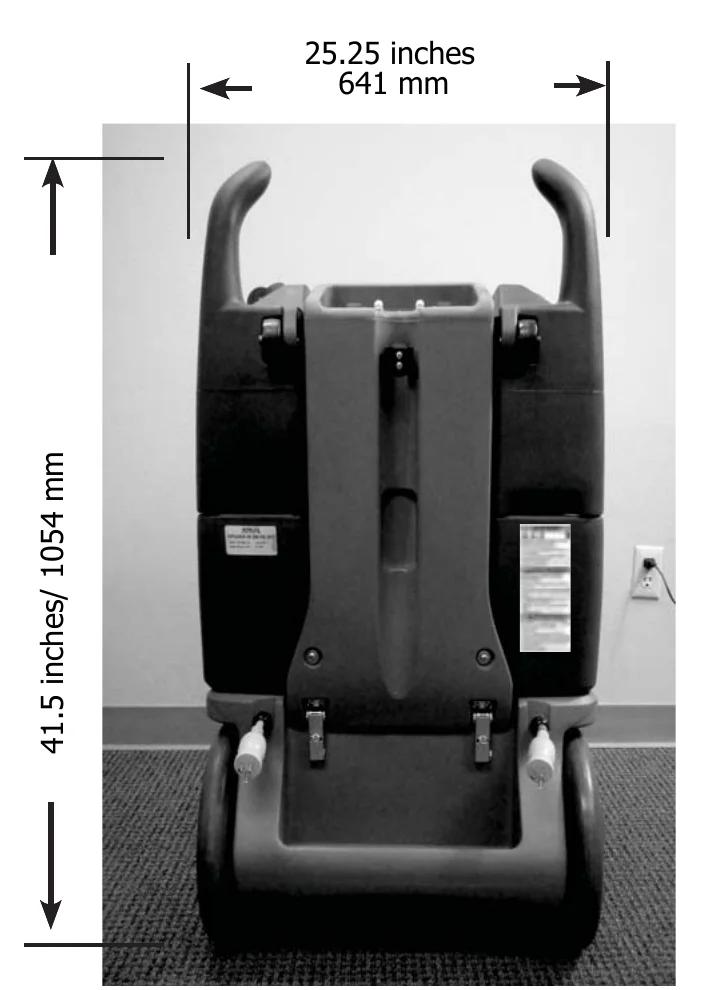
| Width | 25.25 in/ 641 mm |
| Height | 41.5 in/ 1054 mm |
| Weight | 100 lbs/ 46 kg |
| Solution Tank Capacity | 15 Gallon/ 56.78 L |
| Recovery Tank Capacity | 13.5 Gallon/ 51.1 L |
| Voltage | 120 AC/ 60HZ |
| Total Power Consumption | 26.5A Nominal |
| Vacuum Motor | 120V, .685HP/ .504Kw, 3-stage, 13.2A |
| Water Lift - Air Flow | 137 in/ 3479 mm, 107cfm |
| Heater | 120V, 14A, 1750 W, 140°F/60°C low temperature, 200°F/93°C max temperature |
| Solution Pump | 115V, 1.6A, 0.8gpm/ 3.03 l/min, 220 PSI/15.16 bar |
| Cord Length | 2 - 12/3, 40ft/ 12m |
| Sound Pressure Level* | 75 dBA |
*Sound levels (ISO 11203) as recommended by the American Association of Cleaning Equipment Manufacturers *(AACEM) and OSHA.
Specifications are subject to change without notice.
MACHINE DIMENSIONS
TROUBLESHOOTING
| PROBLEM | POSSIBLE CAUSE | SOLUTION |
|---|---|---|
| Low pump pressure | Plugged or dirty solution tank inlet filter | Clean solution tank inlet filter |
| Faulty Pump | Contact a qualified service technician | |
| No spray | Solution tank is empty | Fill solution tank |
| Solution hose is not properly connected | Secure solution hose connection | |
| Spray tip is plugged | Clean or replace spray tip | |
| Pump motor is not running | Verify machine is plugged in and turned on | |
| Plugged/dirty pump solution tank inlet filter | Unplug solution tank inlet filter | |
| Damaged solution hose | Replace solution hose | |
| Pump not running | No power to pump -- no power to cord | Test the switch, test the pump motor, verify power cords are plugged in properly |
| Circuit Breaker tripped | Reset circuit breaker on control panel | |
| Faulty Pump | Contact a qualified service technician | |
| Low suction | Recovery tank cover is loose or drain hose cap is loose | Close recovery tank cover and secure drain hose cap |
| Damaged vacuum gasket | Contact a qualified service technician | |
| Dirty ball float screen | Clean ball float screen | |
| Vacuum hose connection loose or damaged vacuum hose | Check vacuum hose or replace vacuum hose | |
| No suction | Recovery tank is full | Empty recovery tank |
| Circuit Breaker tripped | Reset circuit breaker on control panel | |
| Faulty vacuum motor | Contact a qualified service technician | |
| Low heat | Spraying too long | Shorten spray times by shortening cleaning strokes |
| No heat | Circuit Breaker tripped | Reset circuit breaker on control panel |
| Faulty heater | Contact a qualified service technician | |
| No power | No power to machine | Check building circuit breakers, make sure plugs are on 2 different outlet circuits |
Tennant and Nobles are trademarks of Tennant Company. Southeastern Equipment & Supply is an independent dealer.