
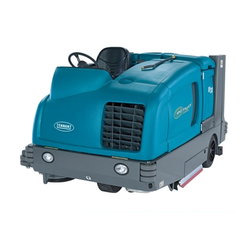
Tennant M20 service manual
Tennant's M20 service information manual 331385 (2007, early machines): how-tos, hydraulic and electrical drawings and schematics. For parts, use the M20 parts pages.
Tennant part numbers changed. In November 2025 Tennant renumbered all of its parts. Every line here shows the new number and the old one, so an old printed manual still works: look up the old number and it takes you to the new one.
Find your parts list →From Tennant service information manual 331385 (2007).
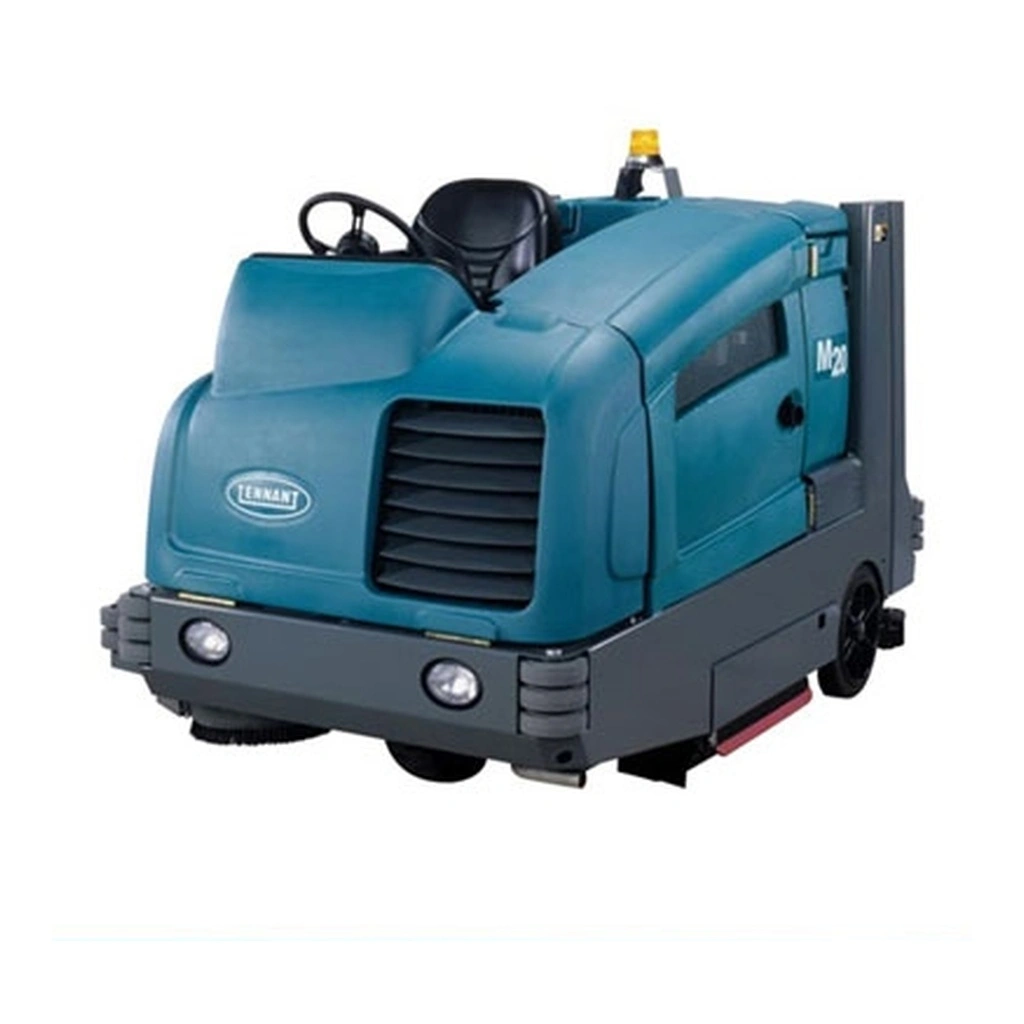
- Machine
- M20 rider sweeper-scrubber
- Cleaning path
- 40 in (56 in with side brush)
- Solution / recovery
- 56 / 73 gal
- Hopper
- 3.9 ft³, 390 lb
- Power
- Gasoline, LPG or diesel
- Main brushes
- 2 × 40 in cylindrical
Your machine
You’re viewing the manual for SN 000000–007999 (Rev 19, May 2016), Tennant’s latest for these machines. Enter your serial number or use the dropdown for your exact machine.
Where to find the serial number and power type
- The machine serial number is on the data plate (on the frame by the operator’s seat). Type it and the page shows only the parts for your machine, including the right engine groups; a serial from the other range opens that list. We never need the engine model: engine plates are often unreadable.
- Power: gasoline, LPG (propane) or diesel. Gas and LPG machines share most parts; engine and fuel groups differ.
- Parts list edition: Tennant’s October 2025 lists are current. The 2022 and 2016 editions stay available for older printed copies.
How to read this list
Tennant M20 service manual: how-tos, drawings and schematics
All 160 gas/LPG pages of Tennant's M20 Service Information Manual 331385 (2007), for machines up to SN 007999, organized by topic. Open a topic to load its pages; tap a page to zoom. Diesel-only pages are left out. Later machines differ in places, so check with us before relying on a value for a newer M20.
Safety and machine information
Safety precautionsPages v–vi · 2 pages
Text of manual page v
M20 Safety Precautions
(Page 1 of 2)
The following precautions are used throughout
this manual as indicated in their description:
WARNING: To warn of hazards or
unsafe practices that could result in
severe personal injury or death.
CAUTION: To warn of unsafe practices
that could result in minor or moderate
personal injury.
FOR SAFETY: To identify actions that must be
followed for safe operation of equipment.
Do not use the machine other than described in
this Operator Manual. The machine is not
designed for use on public roads.
The following information signals potentially
dangerous conditions to the operator or
equipment:
WARNING: Flammable materials can
cause an explosion or fire. Do not use
flammable materials in tank.
WARNING: Flammable materials or
reactive metals can cause an explosion
or fire. Do not pickup.
WARNING: Moving belt and fan. Keep
away.
WARNING: Engine emits toxic gases.
Serious injury or death can result.
Provide adequate ventilation.
WARNING: Raised hopper may fall.
Engage hopper support pin.
WARNING: Lift arm pinch point. Stay
clear of hopper lift arms.
WARNING: Burn hazard. Hot surface. Do
NOT touch.
CALIFORNIA PROPOSITION 65
WARNING: Engine exhaust from this
product contains chemicals known to
the State of California to cause cancer,
birth defects, or other reproductive
harm.
FOR SAFETY:
1. Do not operate machine:
- Unless trained and authorized.
- Unless operator manual is read and
understood.
- If it is not in proper operating
condition.
- In flammable or explosive areas.
- In areas with possible falling objects
unless equipped with overhead guard.
2. Before starting machine:
- Check for fuel, oil, and liquid leaks.
- Keep sparks and open flame away
from refueling area.
- Make sure all safety devices are in
place and operate properly.
- Check brakes and steering for proper
operation.
3. When starting machine:
- Keep foot on brake and directional
pedal in neutral.
4. When using machine:
- Use brakes to stop machine.
- Go slow on inclines and slippery
surfaces.
- Use care when reversing machine.
- Move machine with care when hopper
is raised.
- Make sure adequate clearance is
available before raising hopper.
- Do not carry passengers on machine.
- Always follow safety and traffic rules.
- Report machine damage or faulty
operation immediately.
- Follow mixing and handling
instructions on chemical containers.
CAUTION: LPG engine will run for a
few seconds after key is turned off.
Apply parking brake before leaving
machine.
v
Text of manual page vi
M20 Safety Precautions
(Page 2 of 2)
5. Before leaving or servicing machine:
- Stop on level surface.
- Set parking brake.
- Turn off machine and remove key.
6. When servicing machine:
- Avoid moving parts. Do not wear loose
jackets, shirts, or sleeves.
- Block machine tires before jacking
machine up.
- Jack machine up at designated
locations only. Support machine with
jack stands.
- Use hoist or jack that will support the
weight of the machine.
- Wear eye and ear protection when
using pressurized air or water.
- Disconnect battery connections before
working on machine.
- Avoid contact with battery acid.
- Avoid contact with hot engine coolant.
- Do not remove cap from radiator when
engine is hot.
- Allow engine to cool.
- Keep flames and sparks away from
fuel system service area. Keep area
well ventilated.
- Use cardboard to locate leaking
hydraulic fluid under pressure.
- Use Tennant supplied or approved
replacement parts.
7. When loading/unloading machine
onto/off truck or trailer:
- Turn off machine.
- Use truck or trailer that will support
the weight of the machine.
- Use winch. Do not drive the machine
onto/off the truck or trailer unless the
load height is 380 mm (15 in) or less
from the ground.
- Set parking brake after machine is
loaded.
- Block machine tires.
- Tie machine down to truck or trailer.
vi
Electrical component locatorPages 2–9 · 8 pages
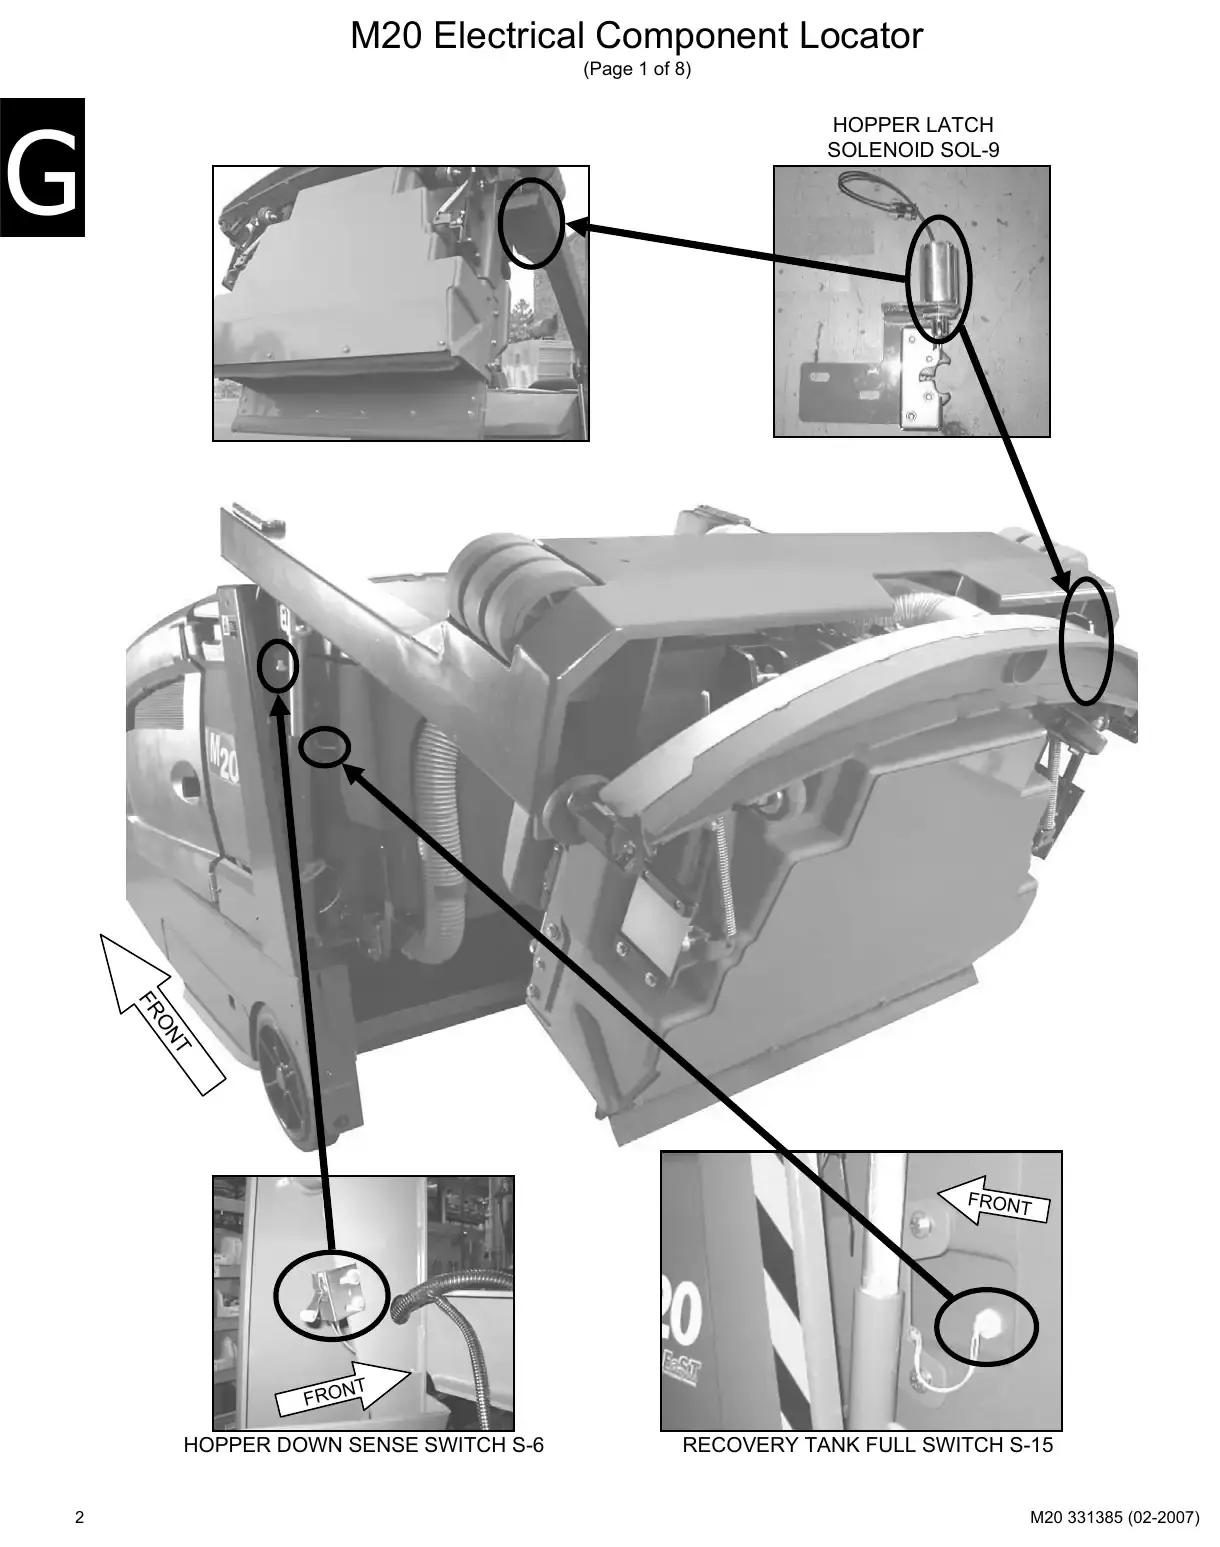
Text of manual page 2
M20 Electrical Component Locator
(Page 1 of 8)
HOPPER LATCH
SOLENOID SOL-9
FR
ON
FRONT
FRON
HOPPER DOWN SENSE SWITCH S-6
2
RECOVERY TANK FULL SWITCH S-15
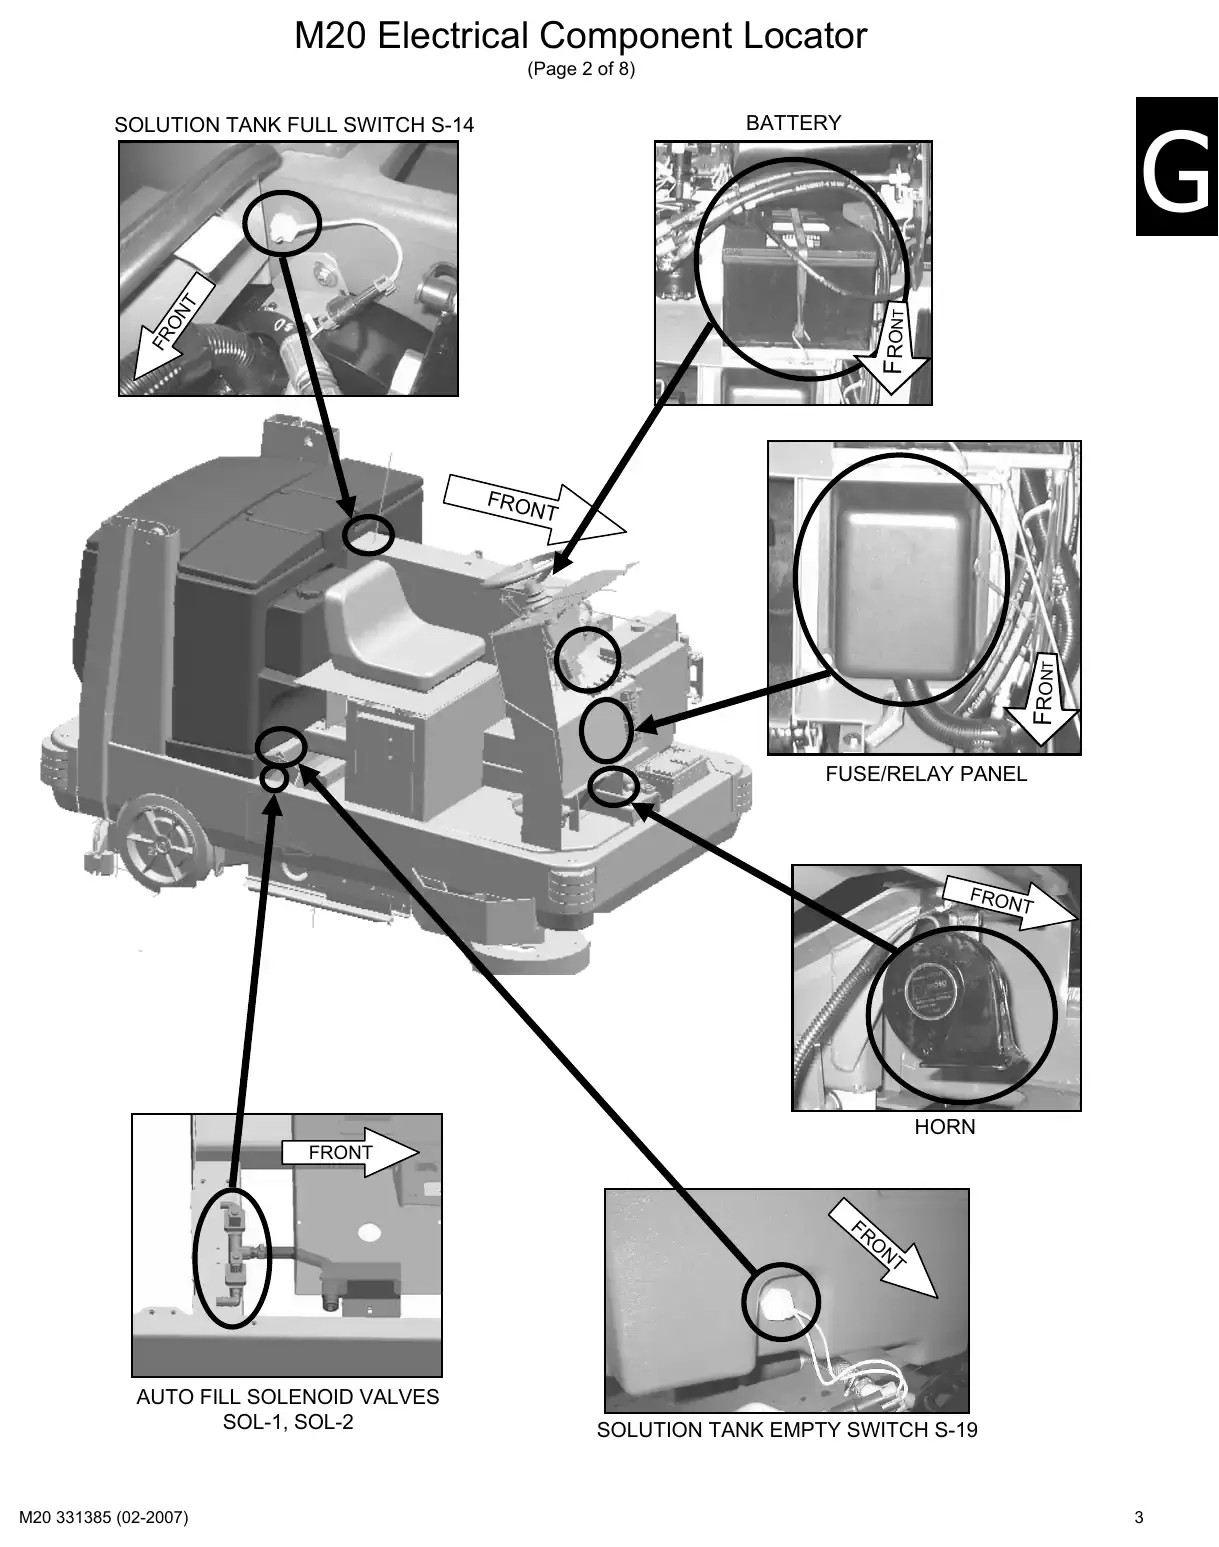
Text of manual page 3
M20 Electrical Component Locator
(Page 2 of 8)
BATTERY
FRONT
FR
ON
SOLUTION TANK FULL SWITCH S-14
FRONT
FRON
FUSE/RELAY PANEL
FRO
NT
HORN
FRONT
FR
AUTO FILL SOLENOID VALVES
SOL-1, SOL-2
NT
SOLUTION TANK EMPTY SWITCH S-19
3
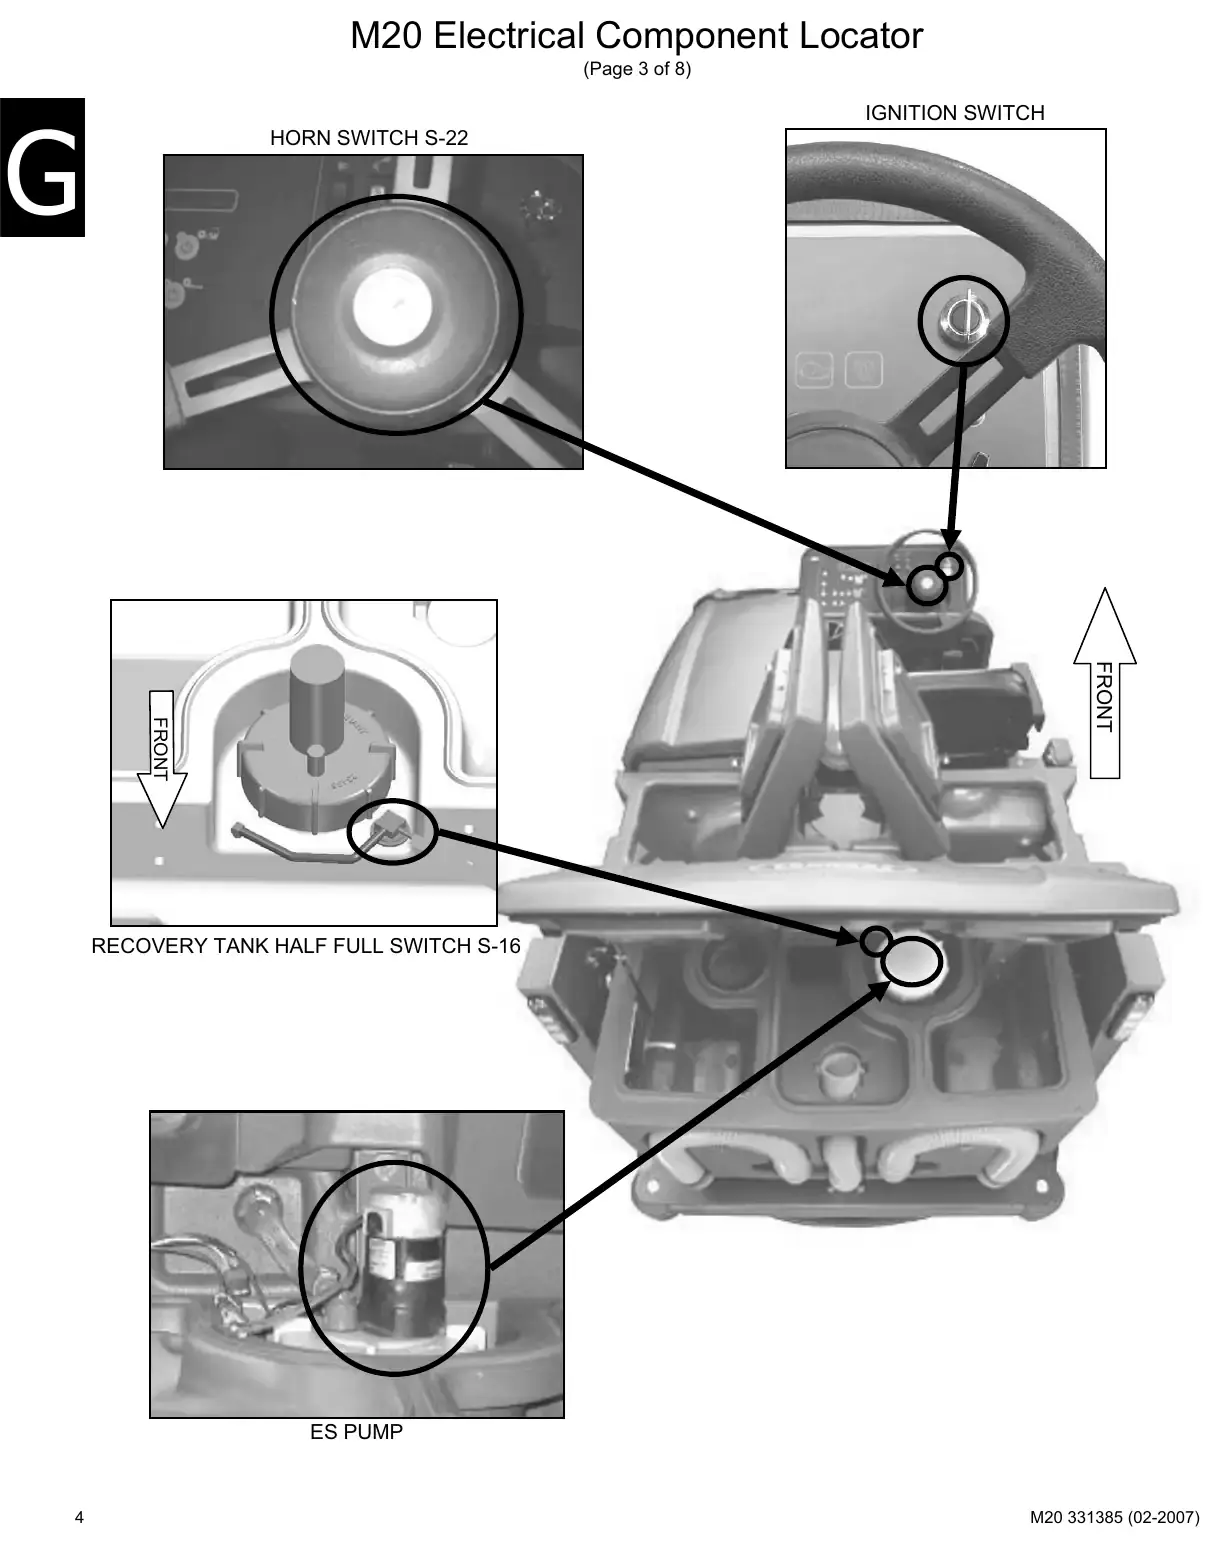
Text of manual page 4
M20 Electrical Component Locator
(Page 3 of 8)
IGNITION SWITCH
HORN SWITCH S-22
FRONT
FRONT
RECOVERY TANK HALF FULL SWITCH S-16
ES PUMP
4
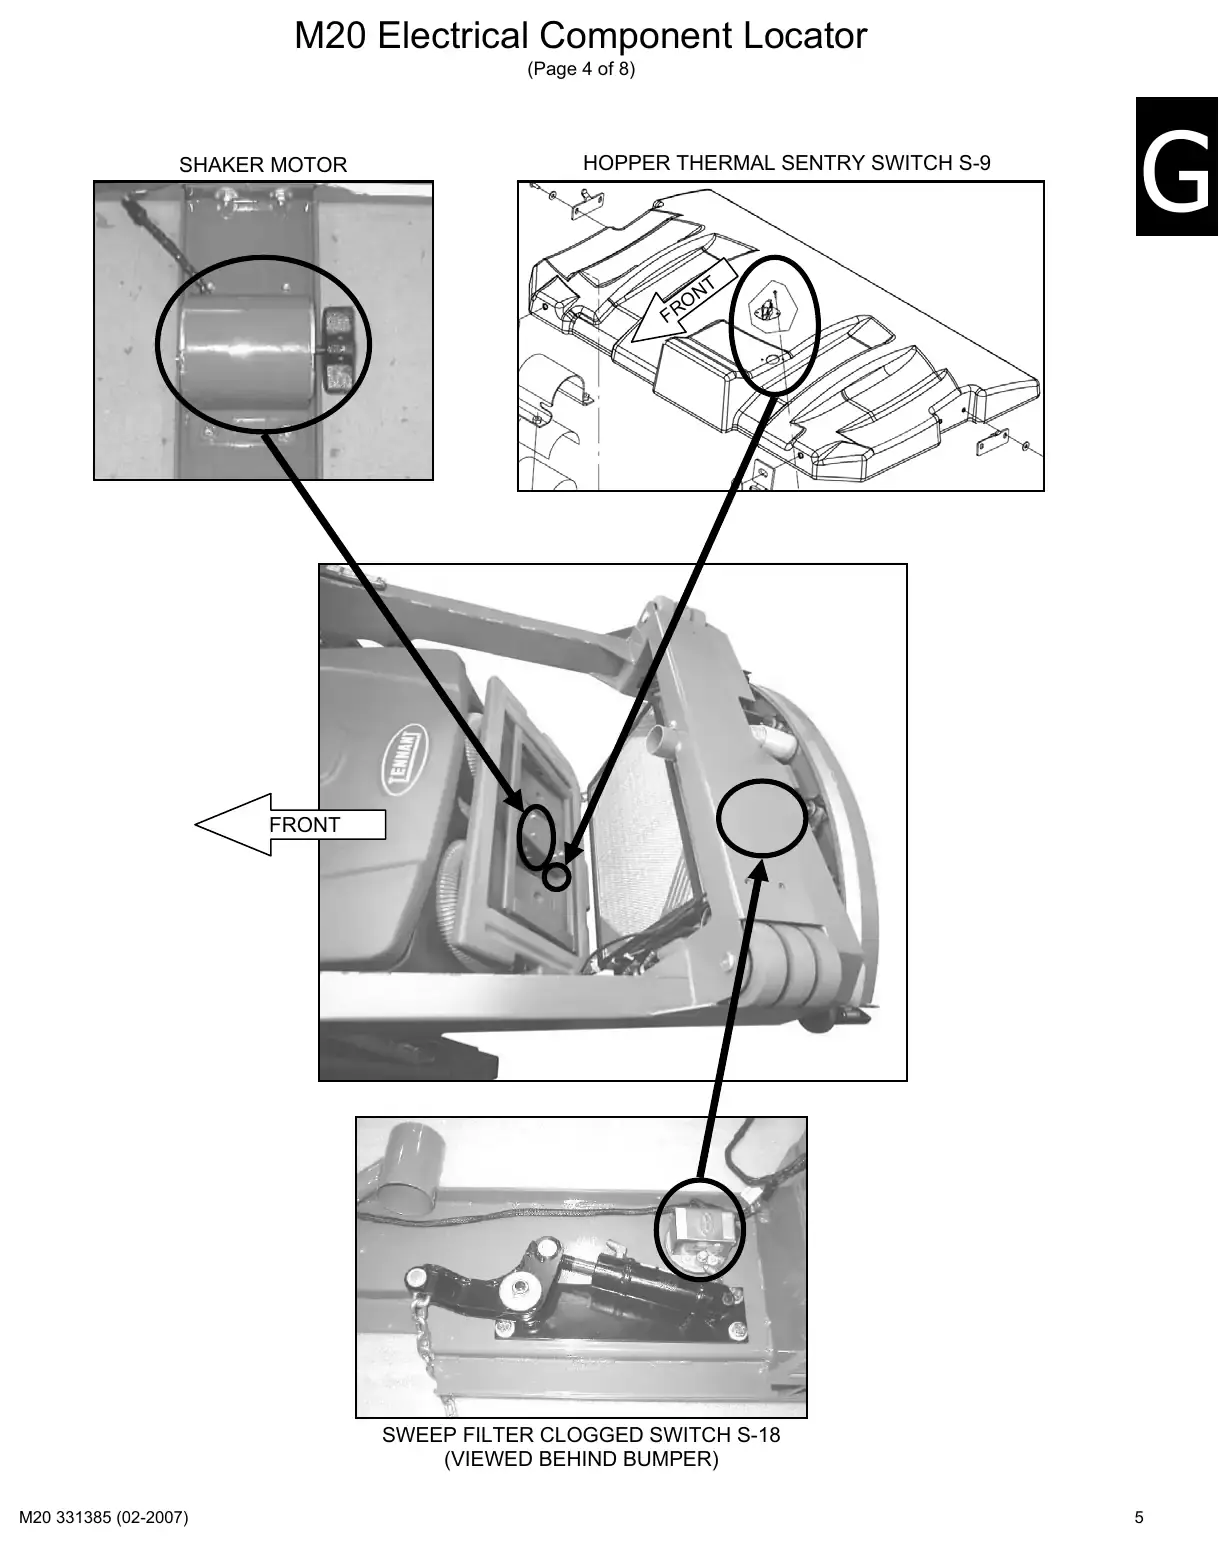
Text of manual page 5
M20 Electrical Component Locator
(Page 4 of 8)
SHAKER MOTOR
HOPPER THERMAL SENTRY SWITCH S-9
ON
FRONT
SWEEP FILTER CLOGGED SWITCH S-18
(VIEWED BEHIND BUMPER)
5
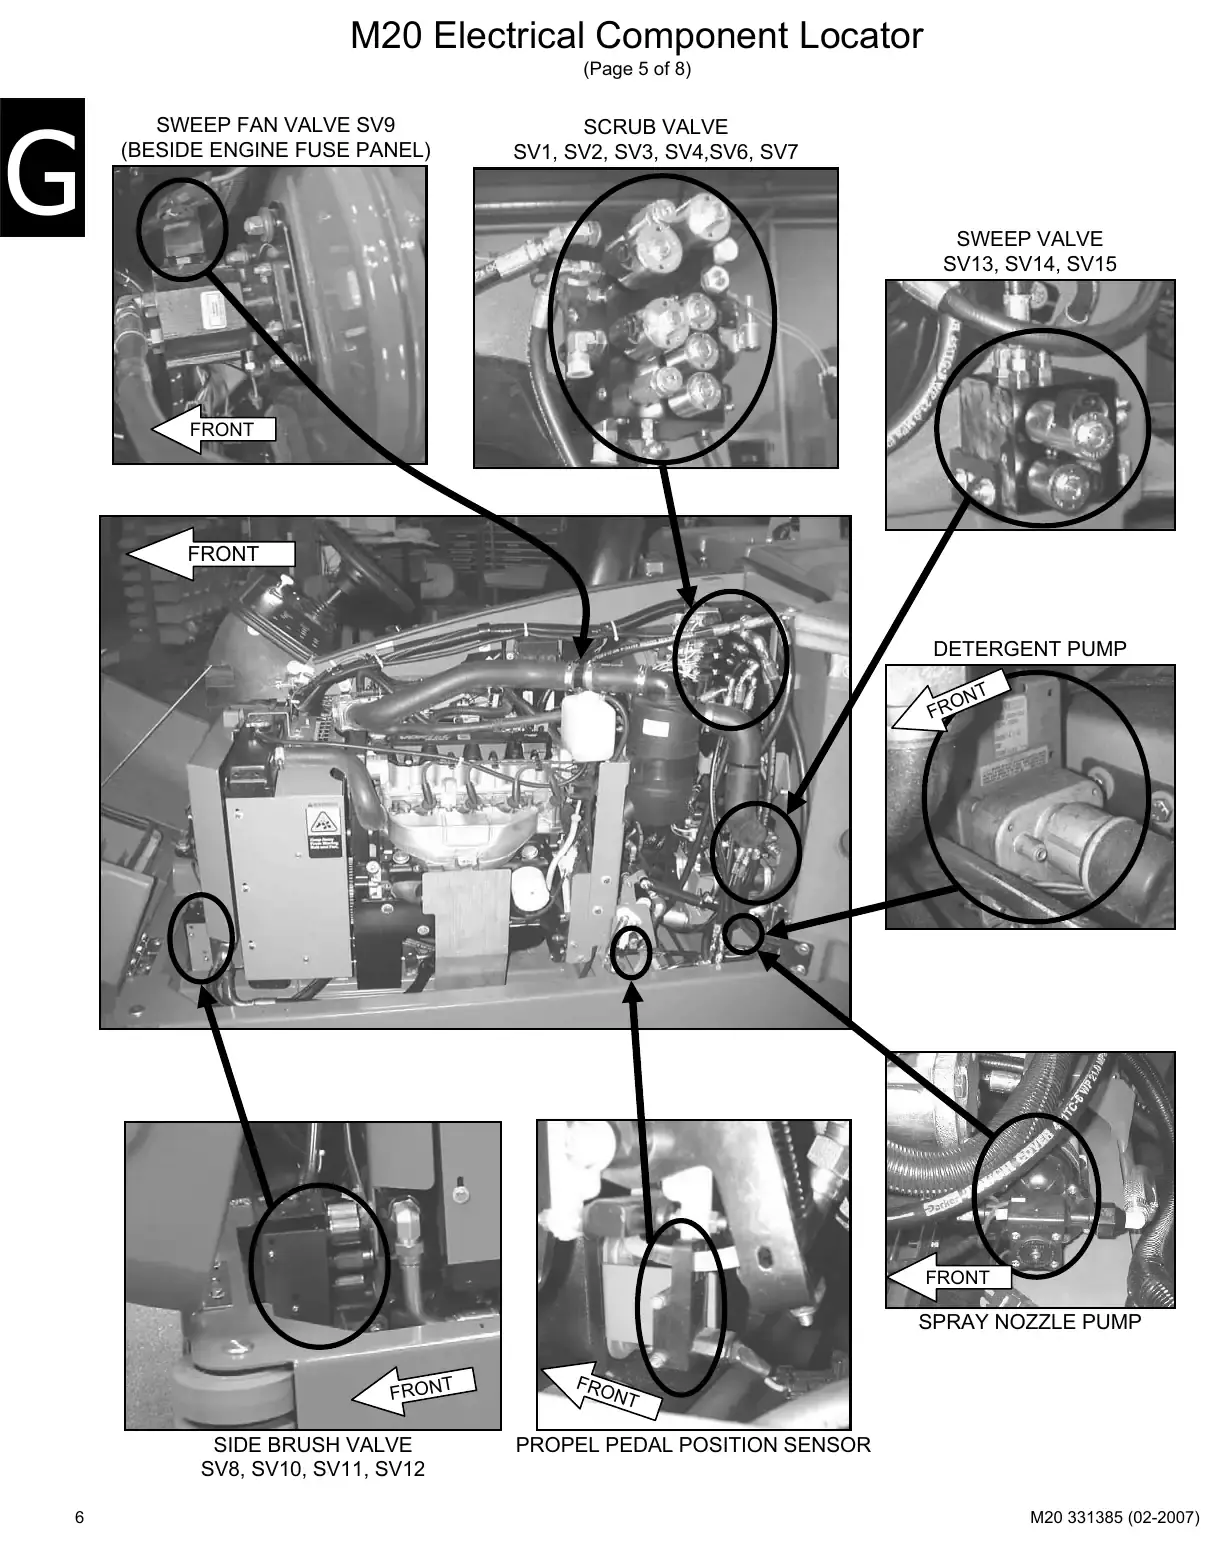
Text of manual page 6
M20 Electrical Component Locator
(Page 5 of 8)
SWEEP FAN VALVE SV9
(BESIDE ENGINE FUSE PANEL)
SCRUB VALVE
SV1, SV2, SV3, SV4,SV6, SV7
SWEEP VALVE
SV13, SV14, SV15
FRONT
FRONT
DETERGENT PUMP
ON
FR
FRONT
SPRAY NOZZLE PUMP
FRONT
SIDE BRUSH VALVE
SV8, SV10, SV11, SV12
6
FRO
NT
PROPEL PEDAL POSITION SENSOR
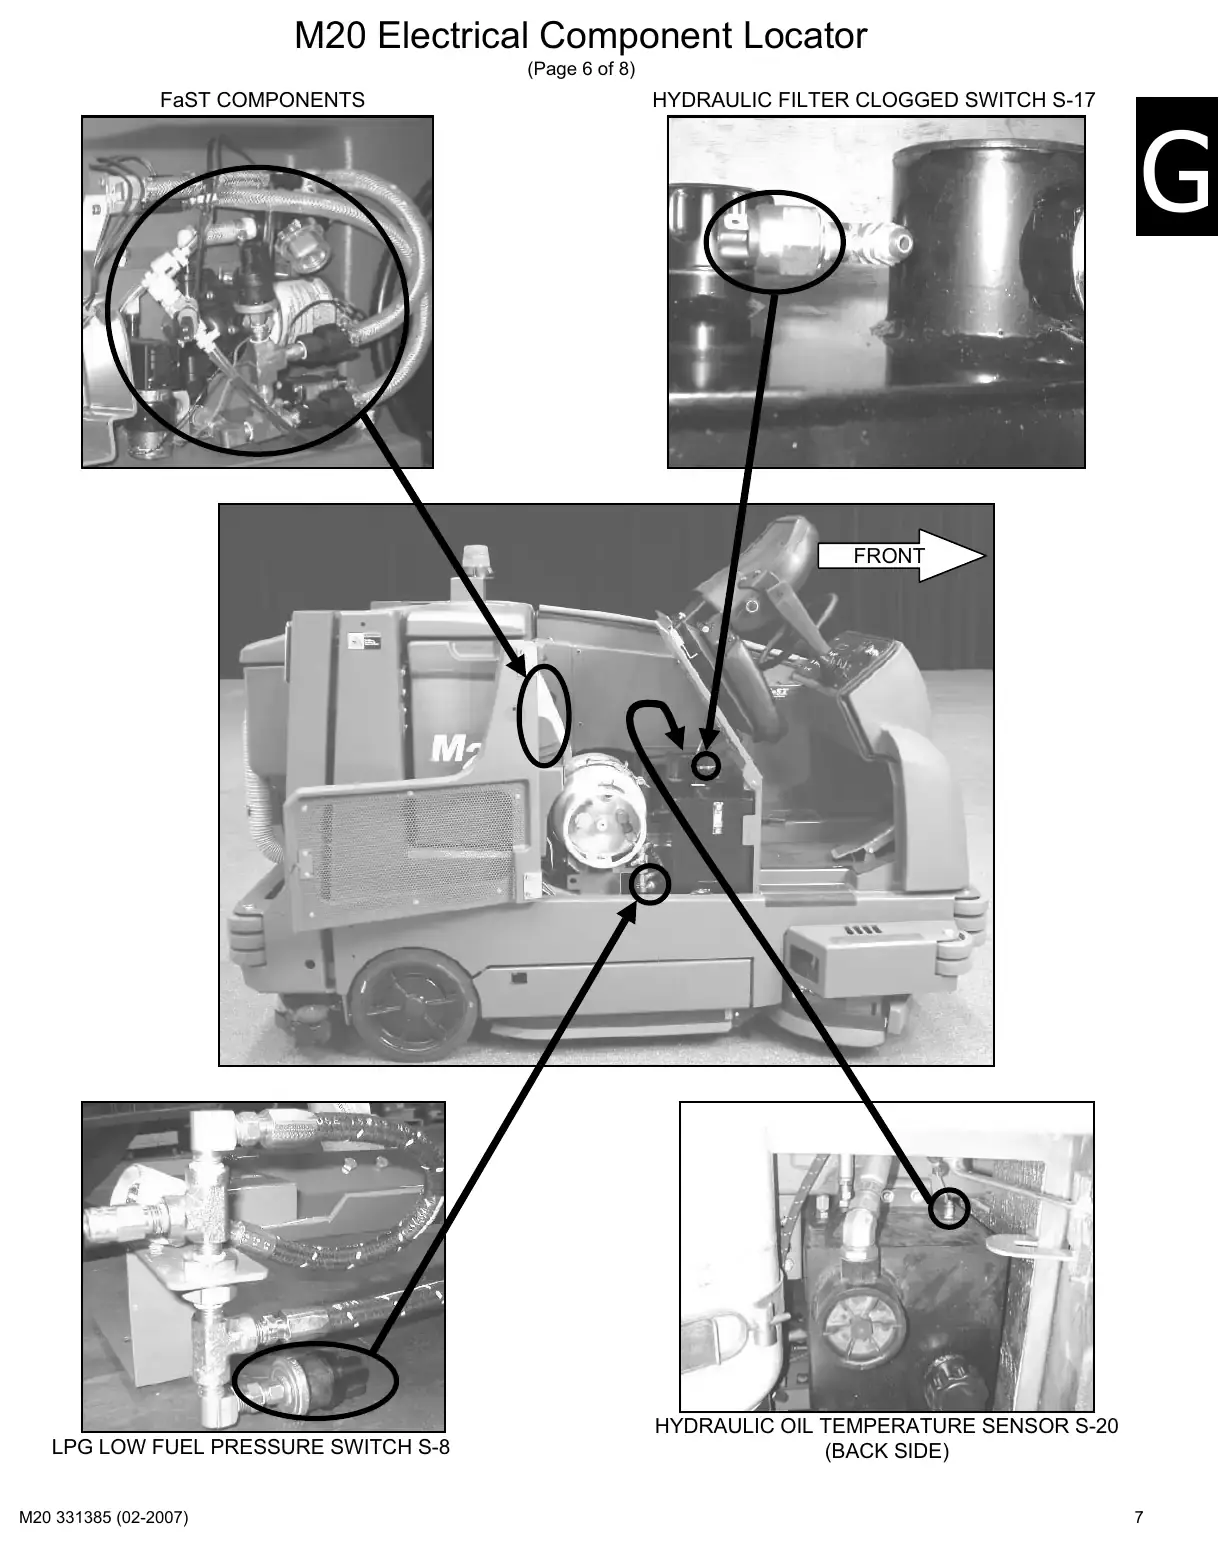
Text of manual page 7
M20 Electrical Component Locator
(Page 6 of 8)
FaST COMPONENTS
HYDRAULIC FILTER CLOGGED SWITCH S-17
FRONT
LPG LOW FUEL PRESSURE SWITCH S-8
HYDRAULIC OIL TEMPERATURE SENSOR S-20
(BACK SIDE)
7
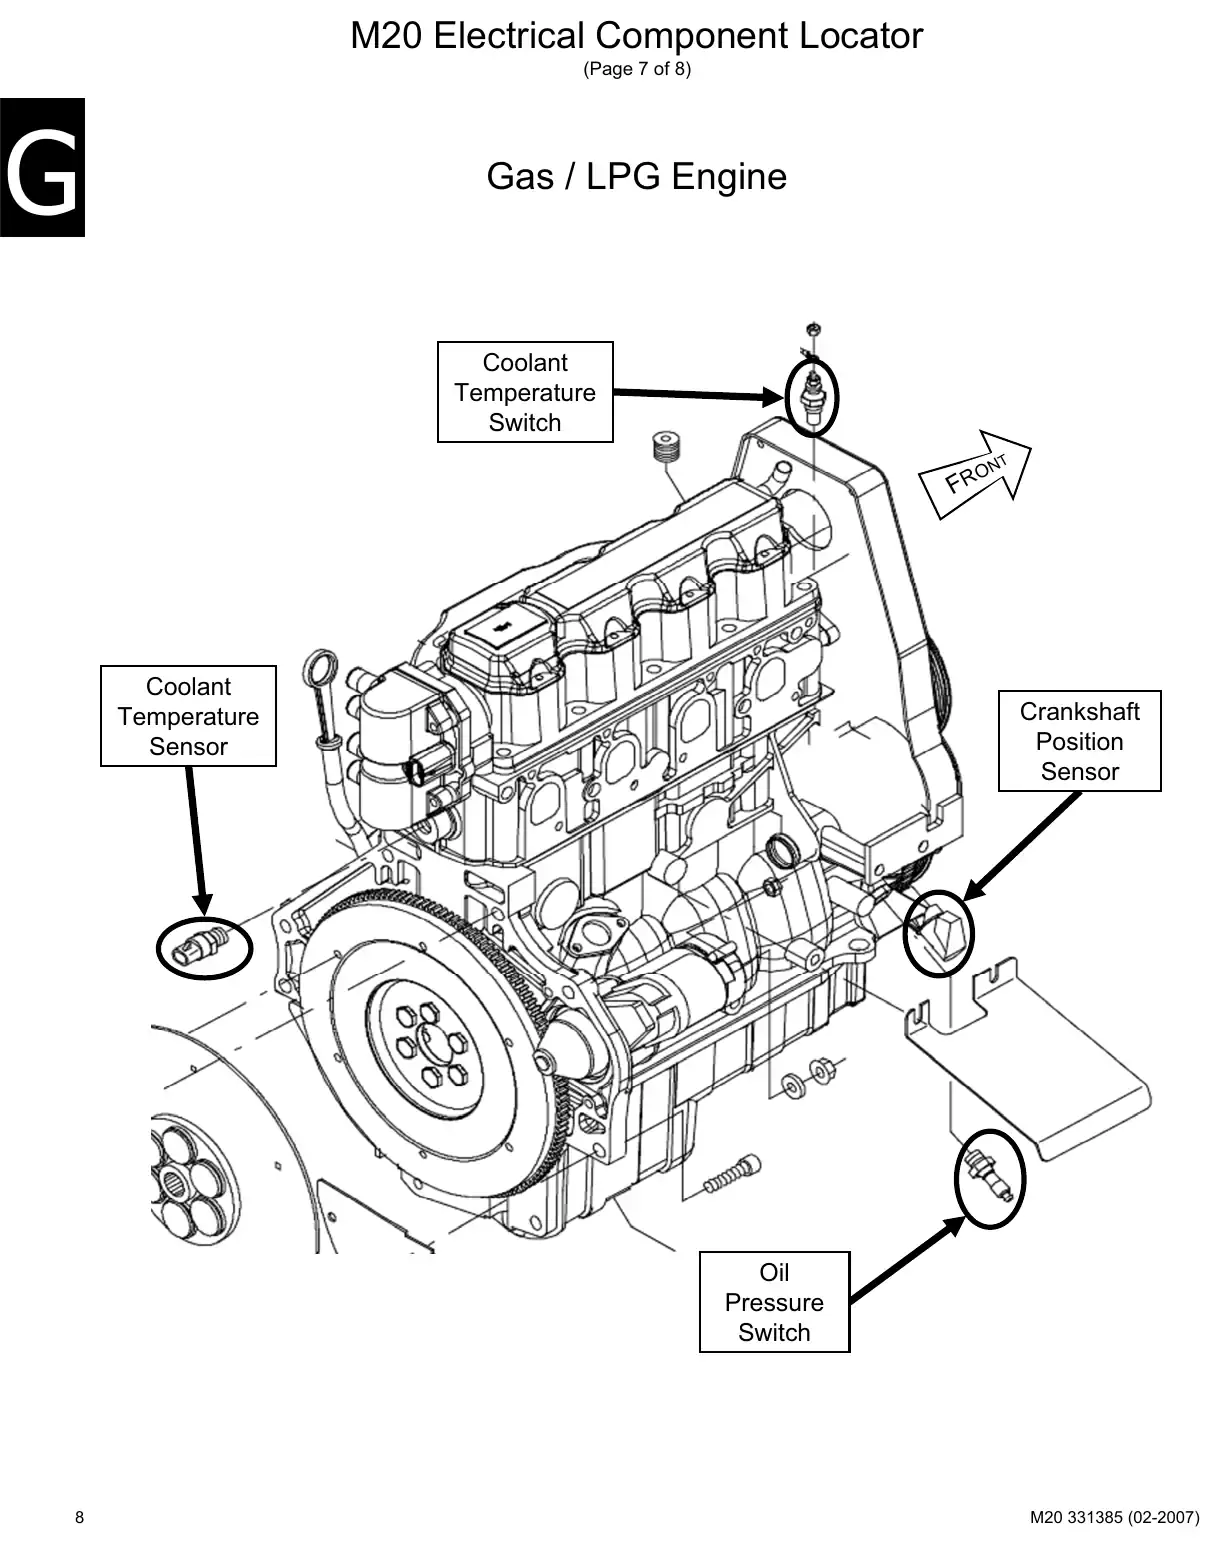
Text of manual page 8
M20 Electrical Component Locator
(Page 7 of 8)
Gas / LPG Engine
Coolant
Temperature
Switch
ON
FR
Coolant
Temperature
Sensor
Crankshaft
Position
Sensor
Oil
Pressure
Switch
8
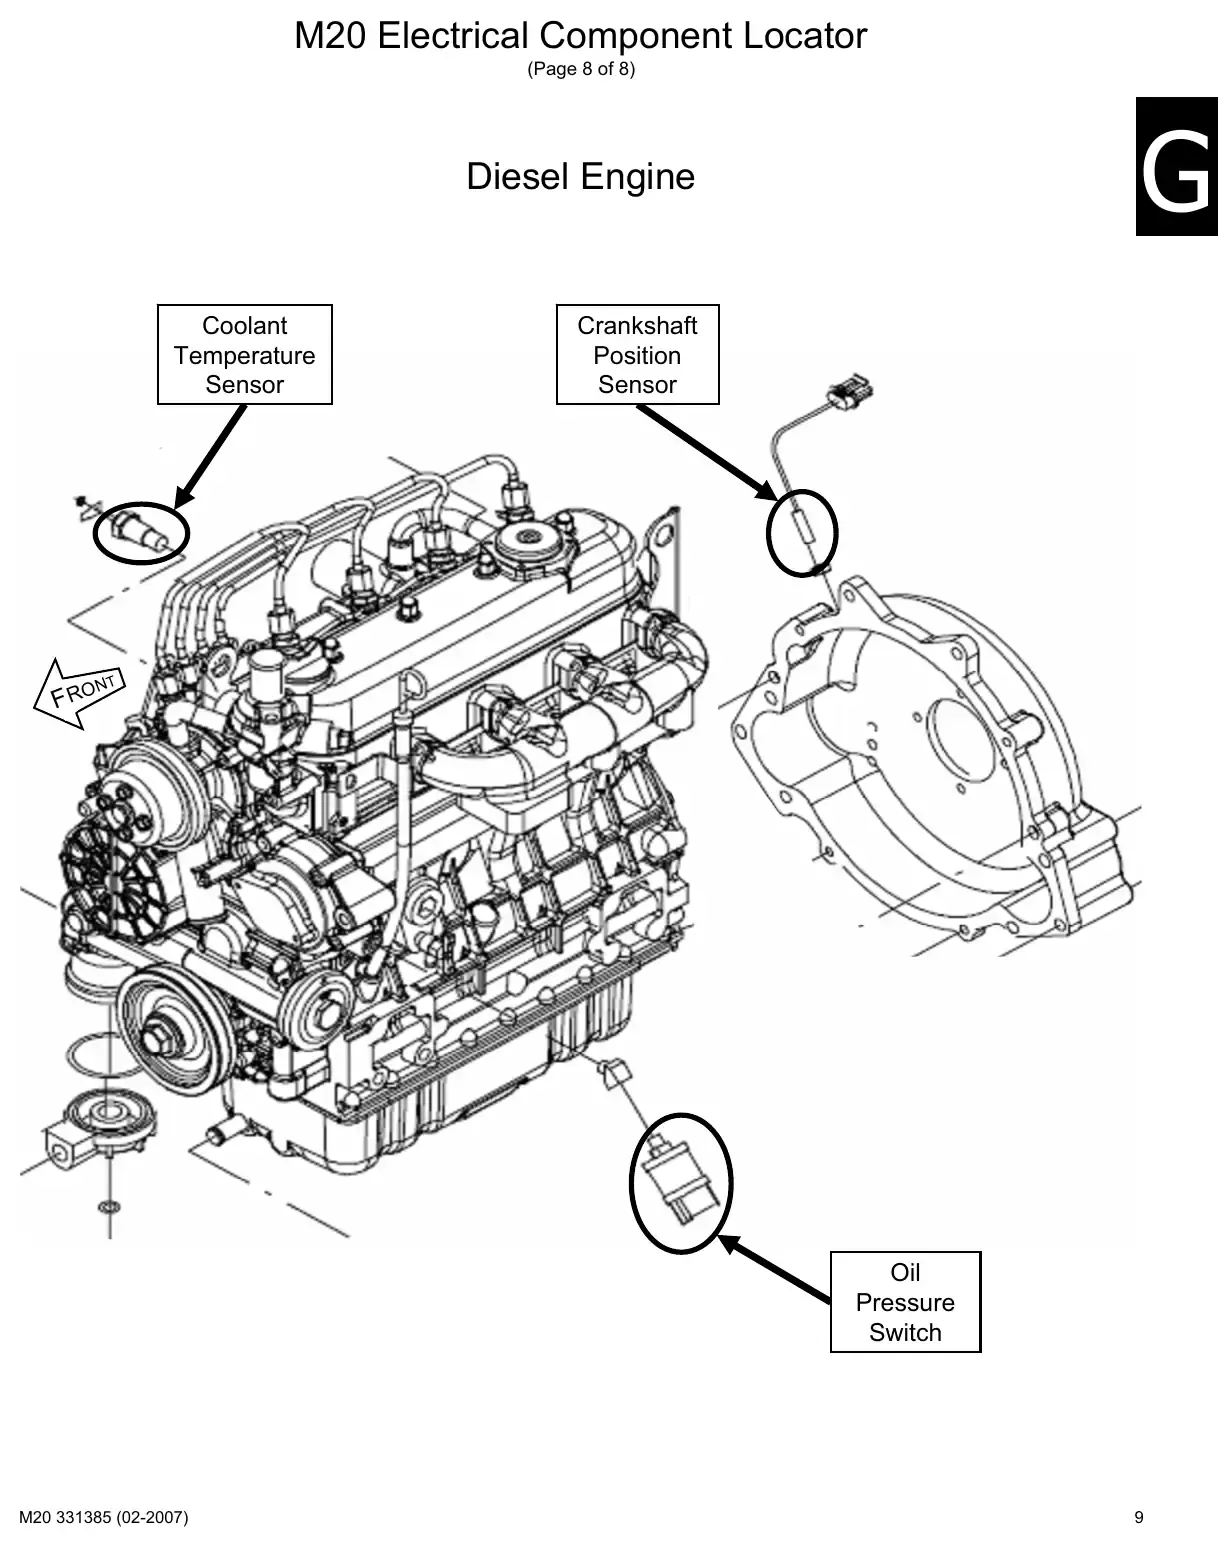
Text of manual page 9
M20 Electrical Component Locator
(Page 8 of 8)
Diesel Engine
Coolant
Temperature
Sensor
FRO
Crankshaft
Position
Sensor
NT
Oil
Pressure
Switch
9
Hydraulic component locatorPages 10–13 · 4 pages
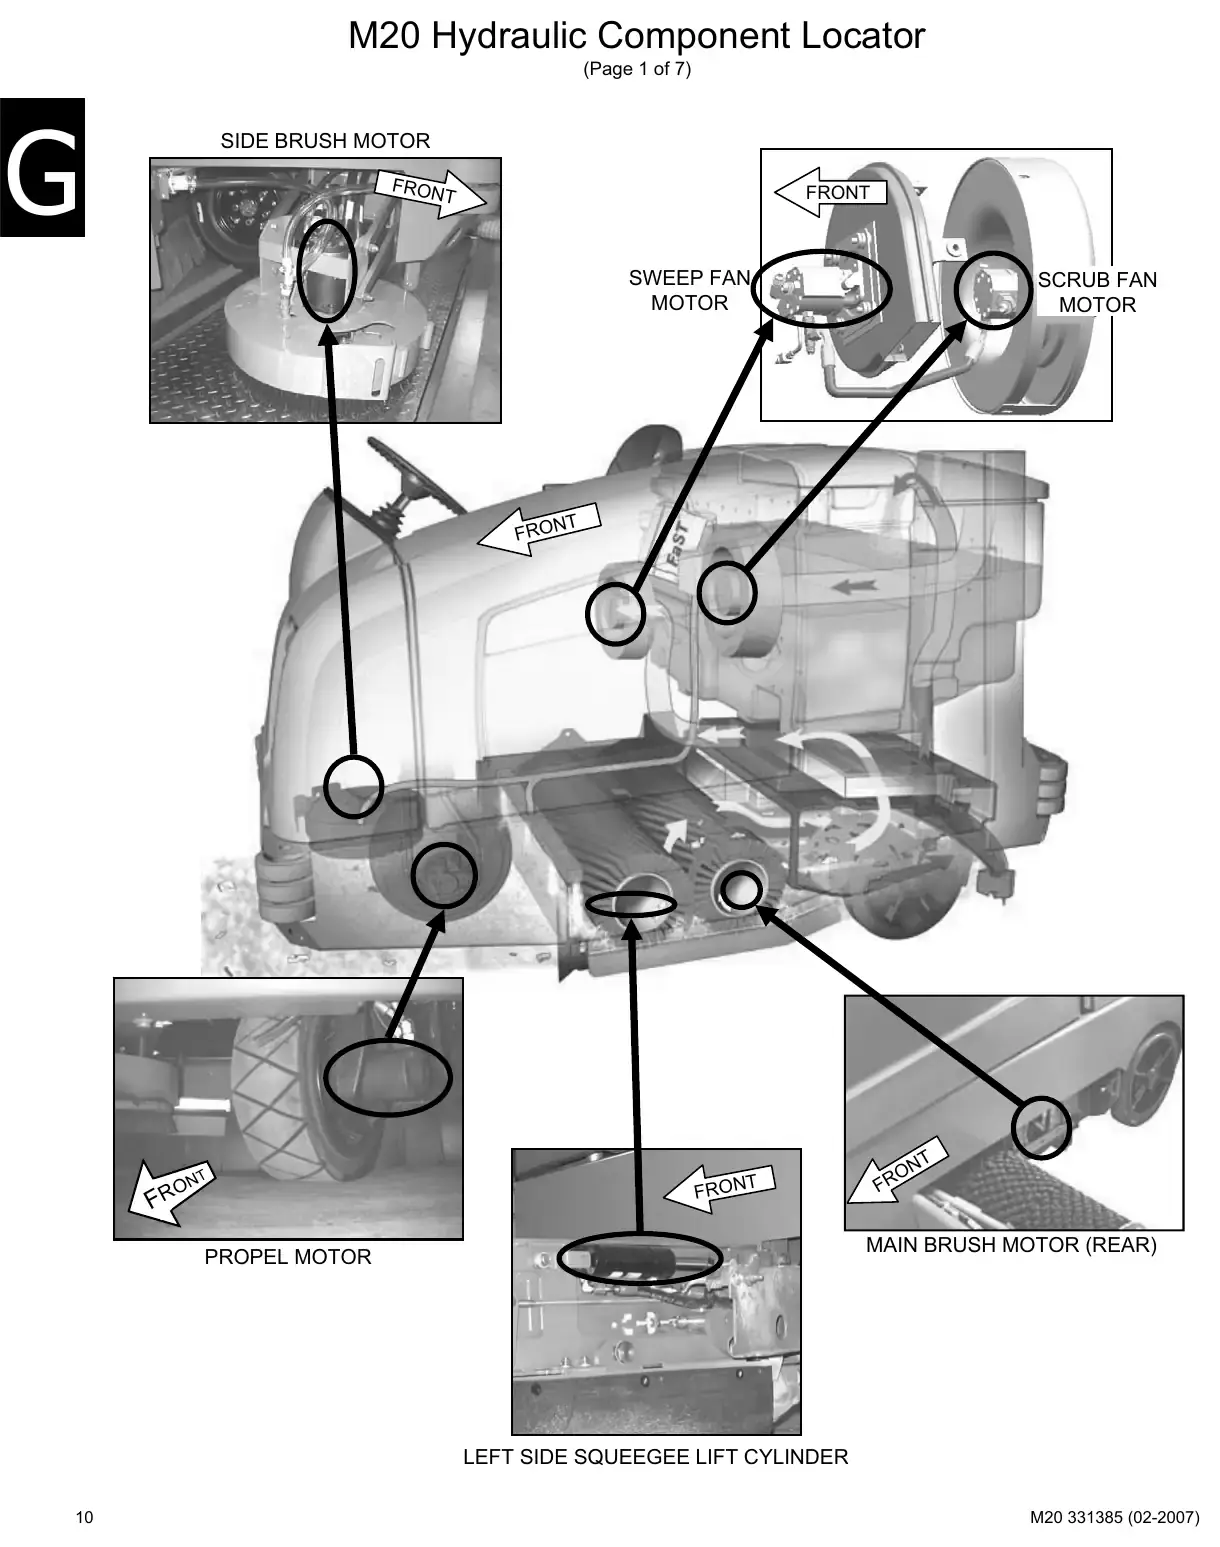
Text of manual page 10
M20 Hydraulic Component Locator
(Page 1 of 7)
SIDE BRUSH MOTOR
FRON
FRONT
SWEEP FAN
MOTOR
SCRUB FAN
MOTOR
NT
FRO
RO
FRON
ON
FR
MAIN BRUSH MOTOR (REAR)
PROPEL MOTOR
LEFT SIDE SQUEEGEE LIFT CYLINDER
10
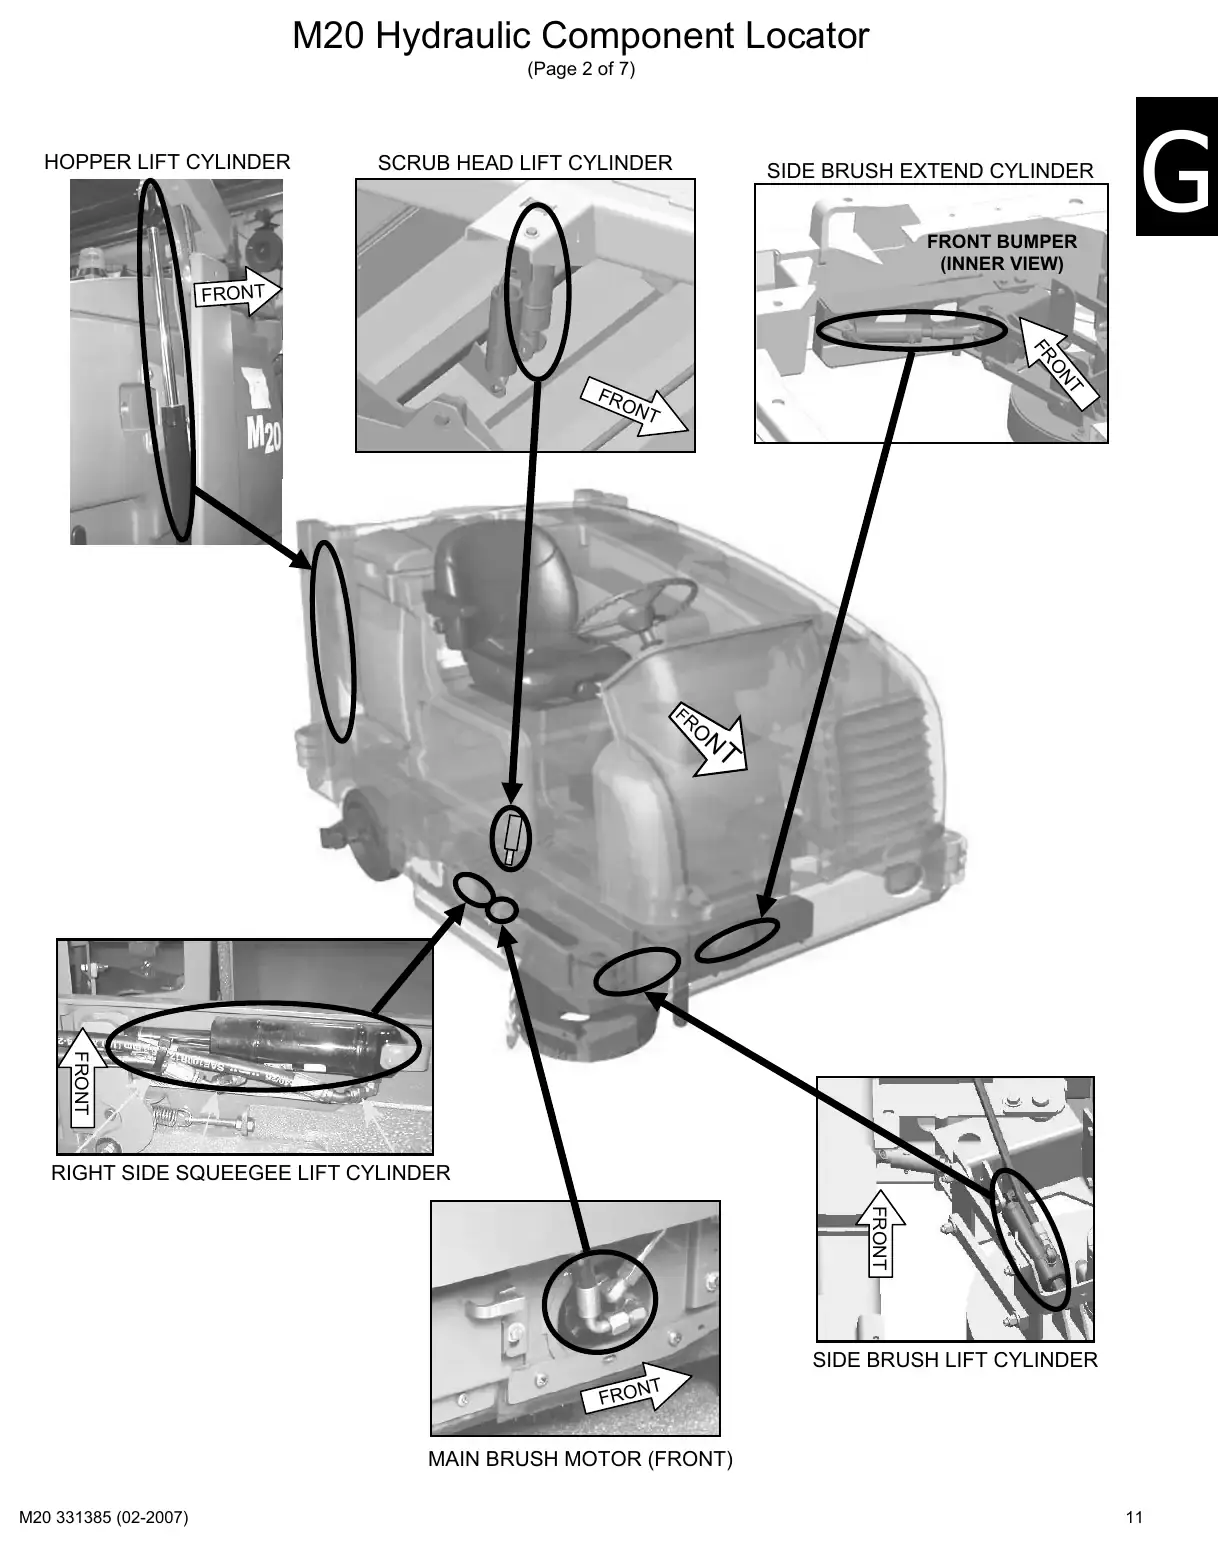
Text of manual page 11
M20 Hydraulic Component Locator
(Page 2 of 7)
HOPPER LIFT CYLINDER
SCRUB HEAD LIFT CYLINDER
SIDE BRUSH EXTEND CYLINDER
FRONT BUMPER
(INNER VIEW)
FRONT
FR
ON
FR
ON
FR
NT
FRONT
RIGHT SIDE SQUEEGEE LIFT CYLINDER
FRONT
SIDE BRUSH LIFT CYLINDER
NT
FRO
MAIN BRUSH MOTOR (FRONT)
11
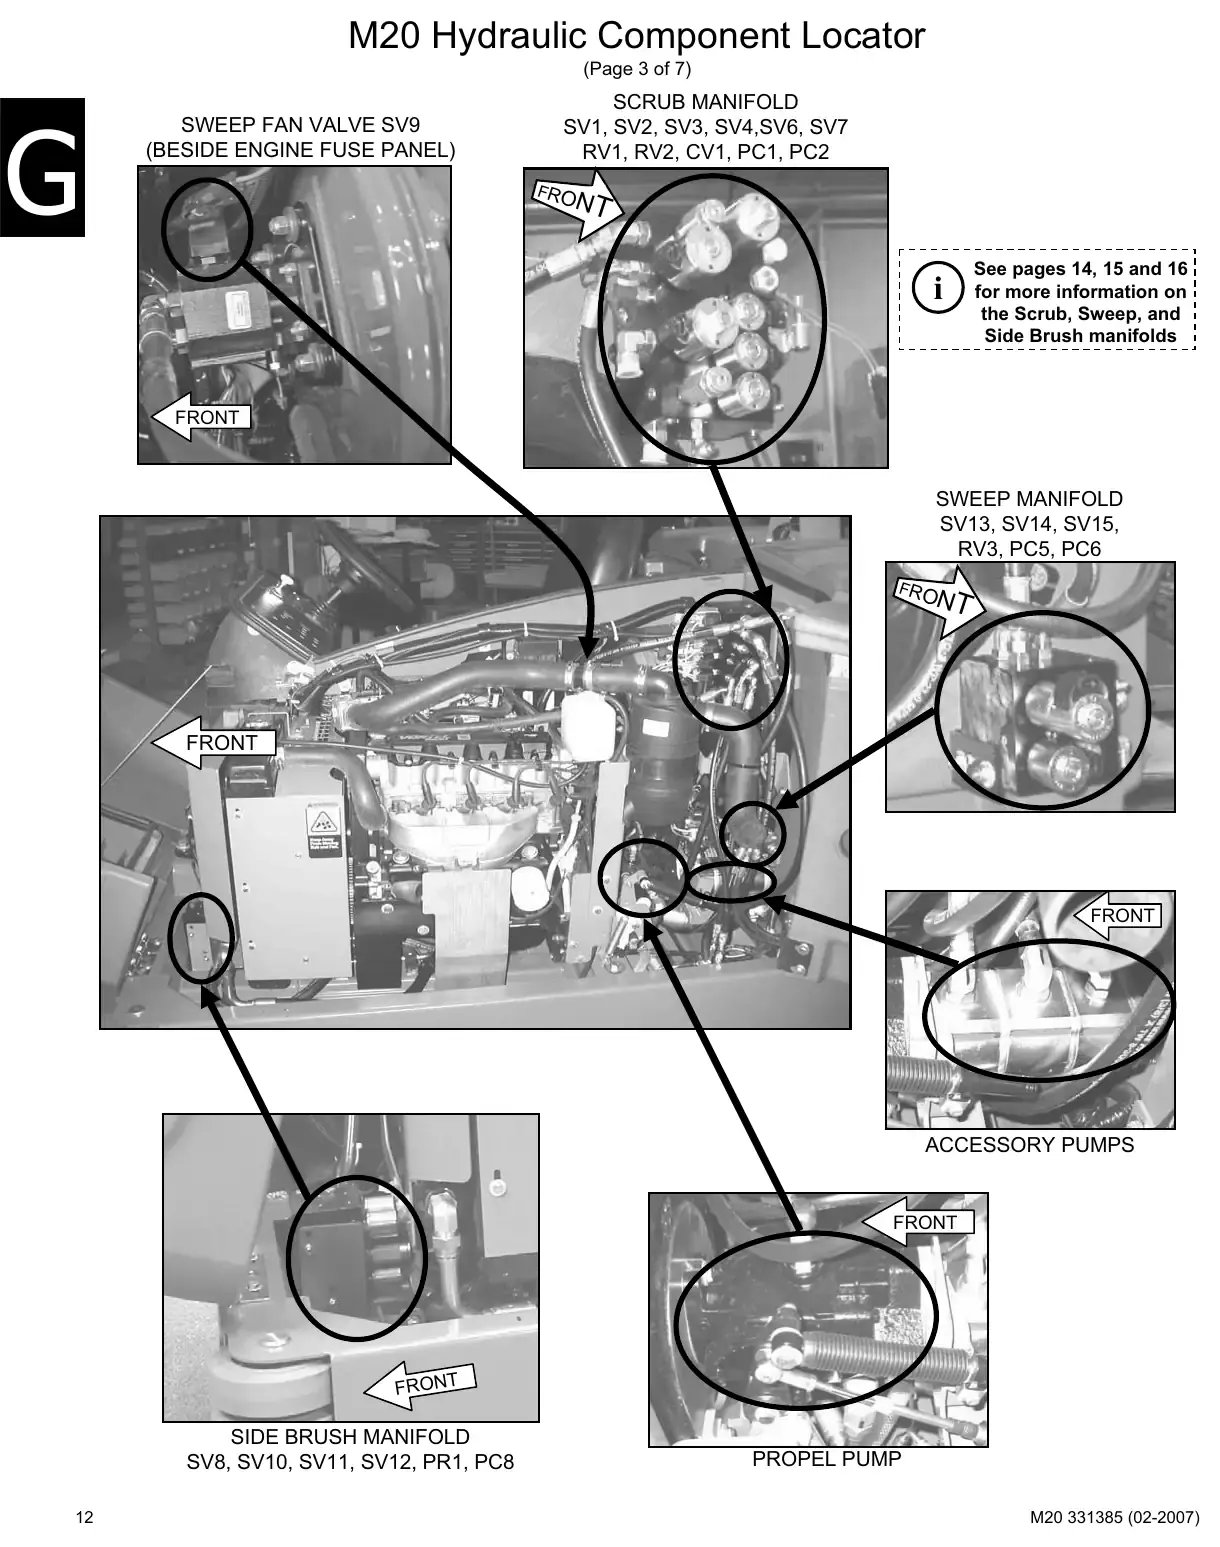
Text of manual page 12
M20 Hydraulic Component Locator
(Page 3 of 7)
SWEEP FAN VALVE SV9
(BESIDE ENGINE FUSE PANEL)
SCRUB MANIFOLD
SV1, SV2, SV3, SV4,SV6, SV7
RV1, RV2, CV1, PC1, PC2
FRO
NT
i
See pages 14, 15 and 16
for more information on
the Scrub, Sweep, and
Side Brush manifolds
FRONT
SWEEP MANIFOLD
SV13, SV14, SV15,
RV3, PC5, PC6
FRO
NT
FRONT
FRONT
ACCESSORY PUMPS
FRONT
FRONT
SIDE BRUSH MANIFOLD
SV8, SV10, SV11, SV12, PR1, PC8
12
PROPEL PUMP
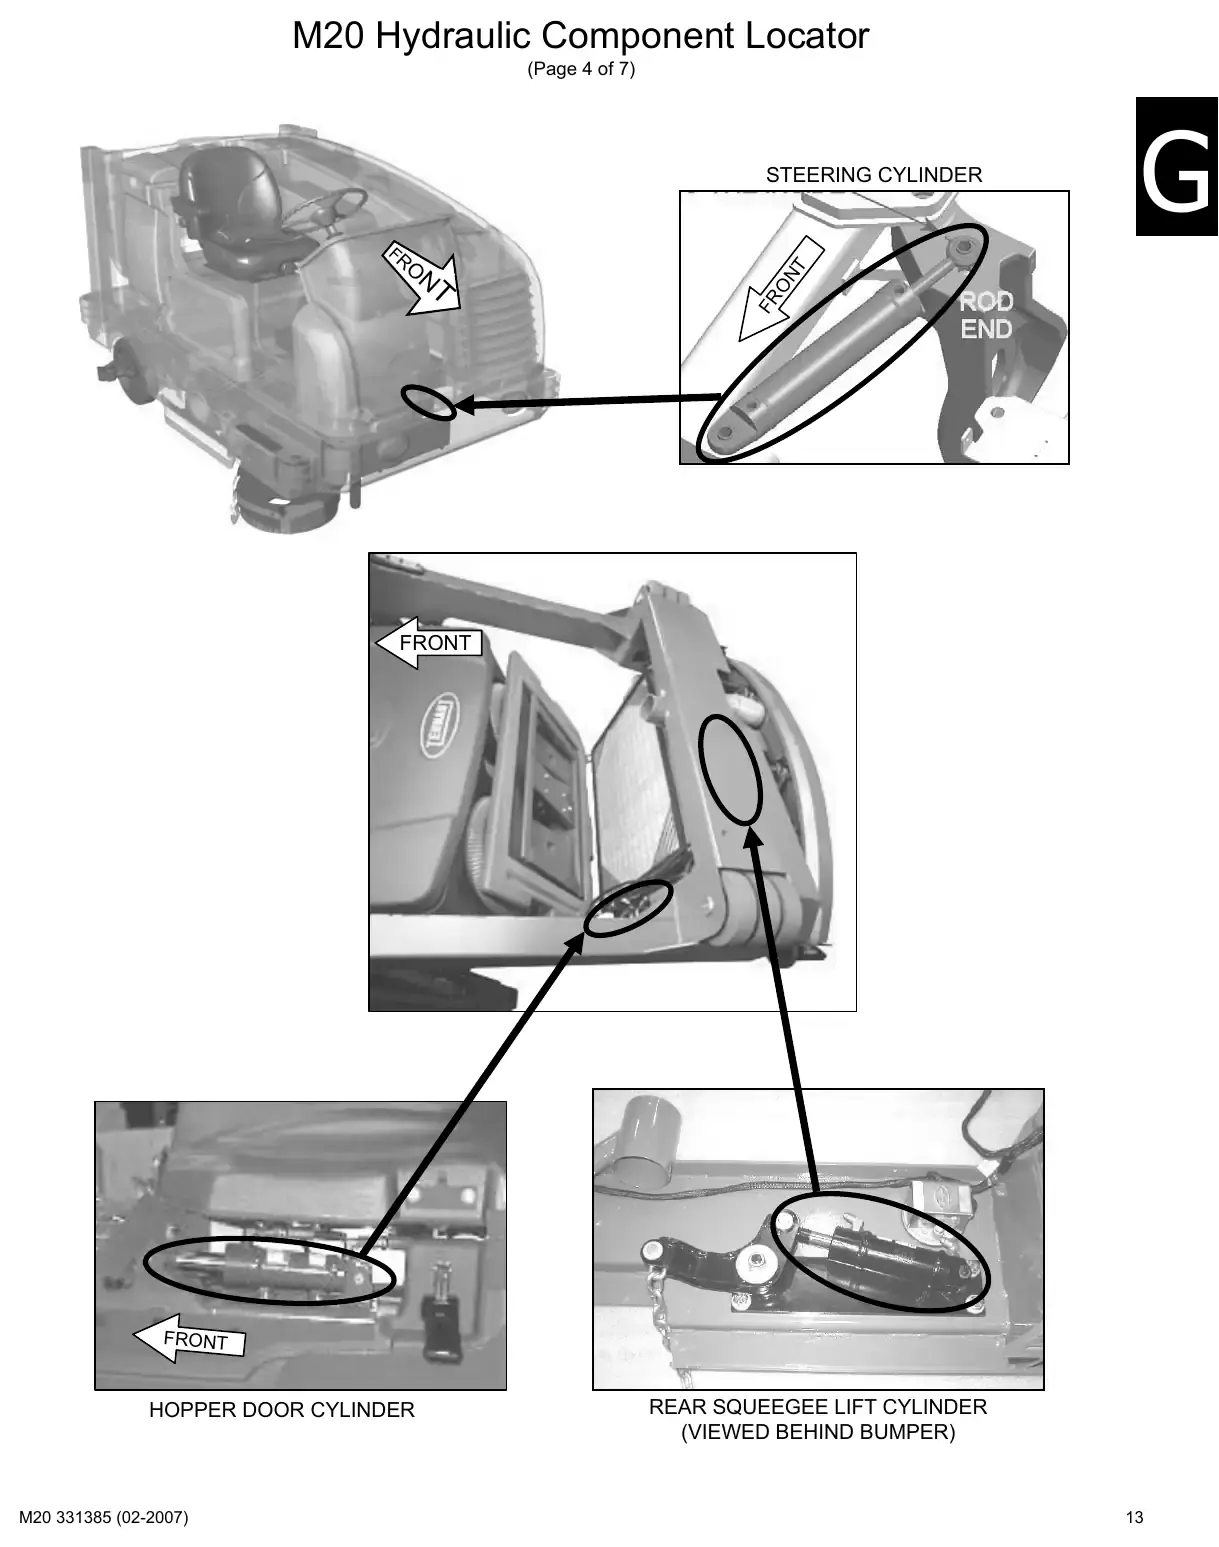
Text of manual page 13
M20 Hydraulic Component Locator
(Page 4 of 7)
FR
NT
FR
ON
STEERING CYLINDER
FRONT
FRONT
HOPPER DOOR CYLINDER
REAR SQUEEGEE LIFT CYLINDER
(VIEWED BEHIND BUMPER)
13
Scrub manifold detailsPage 14 · 1 page
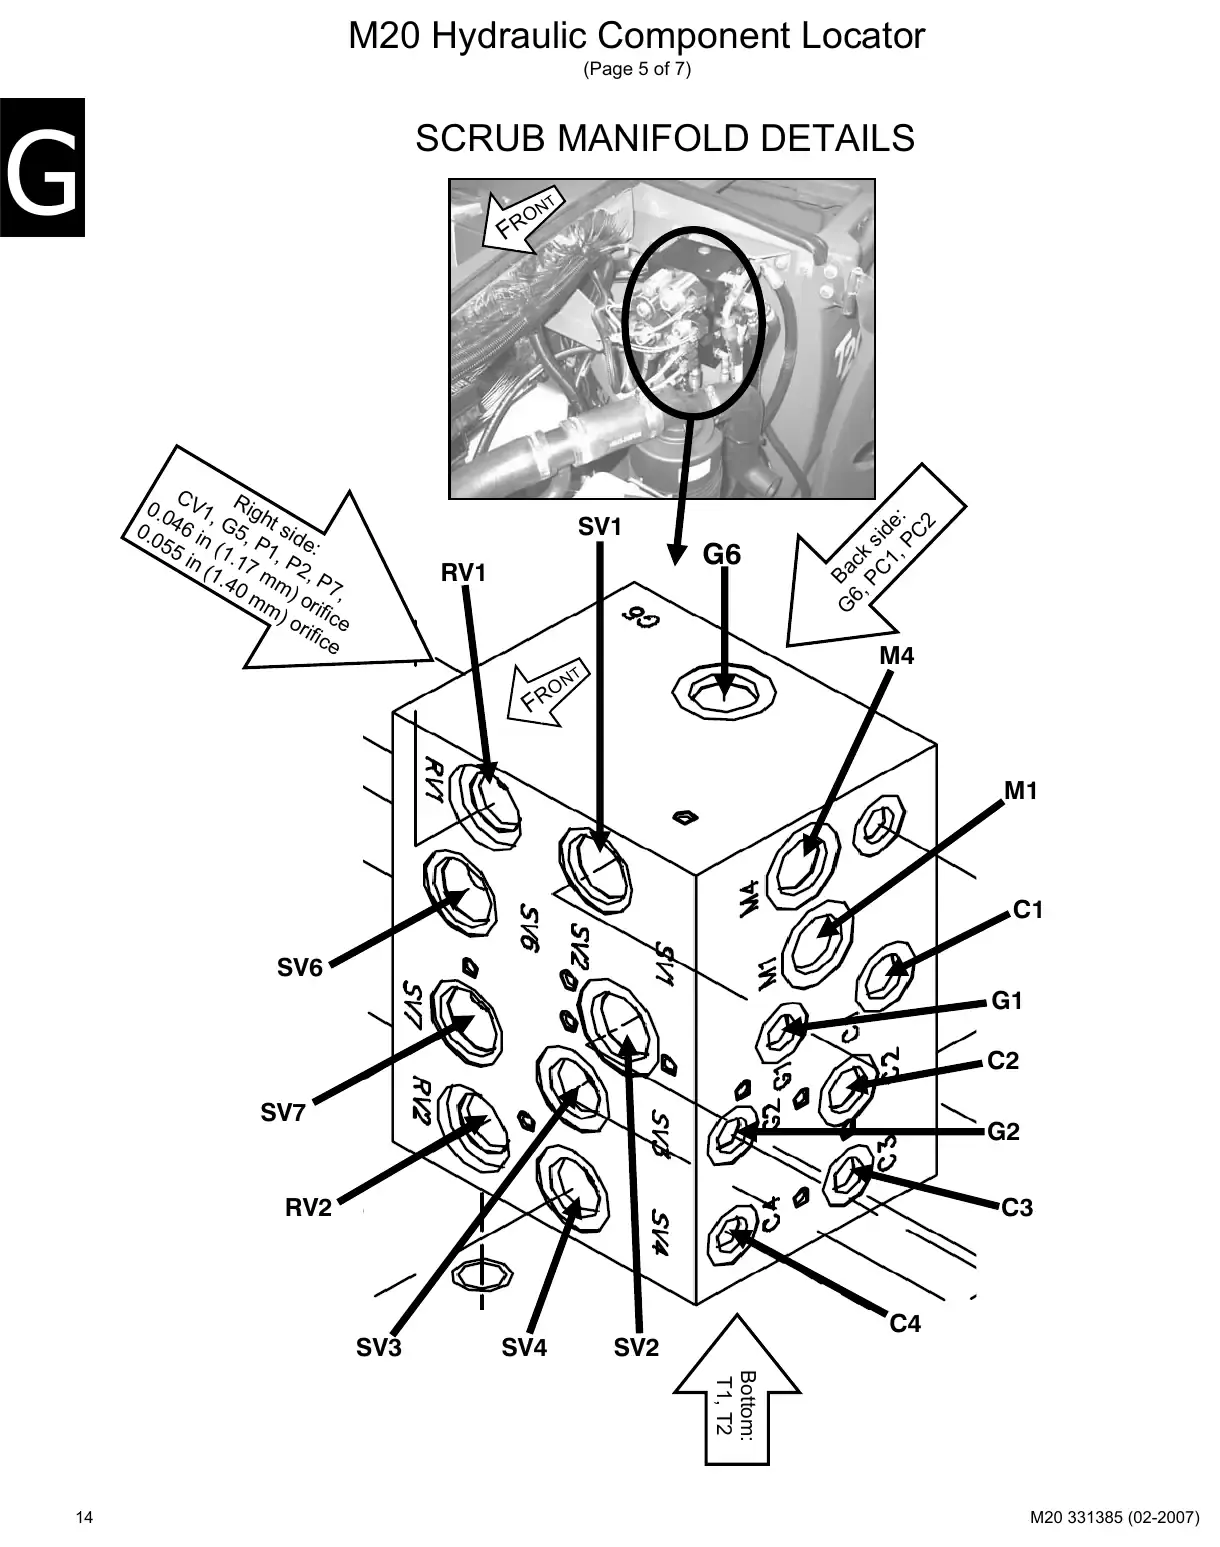
Text of manual page 14
M20 Hydraulic Component Locator
(Page 5 of 7)
SCRUB MANIFOLD DETAILS
0.0 V1, Righ
4
0.0 6 in G5, t sid
e:
55
(
in 1.17 1, P2
(1.
40 mm) , P7,
mm or
) o ifice
rifi
ce
NT
SV1
RV1
FR
G6
G Ba
6 , ck
PC s
1, ide:
PC
2
FR
M4
NT
M1
C1
SV6
G1
C2
SV7
G2
RV2
C3
SV3
SV4
C4
SV2
Bottom:
T1, T2
14
Sweep manifold detailsPage 15 · 1 page
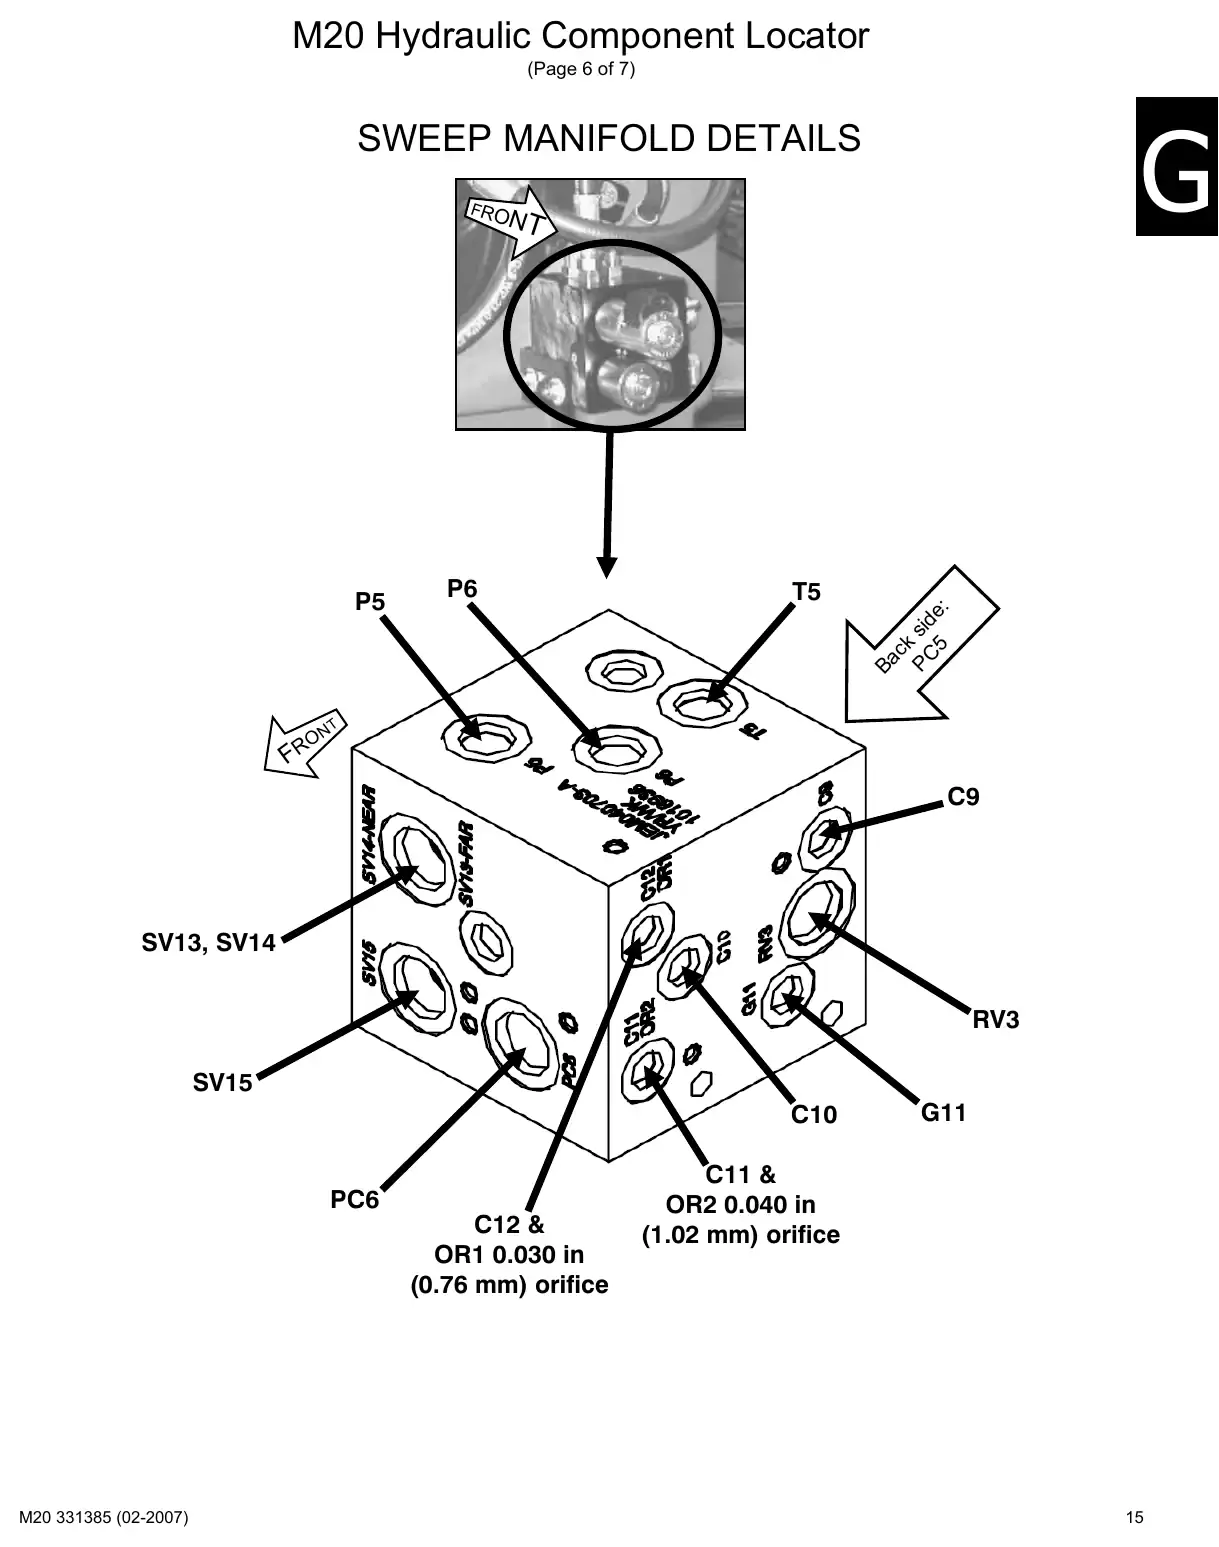
Text of manual page 15
M20 Hydraulic Component Locator
(Page 6 of 7)
SWEEP MANIFOLD DETAILS
P5
FR
NT
P6
T5
Ba
ck
PC sid
5 e:
FRO
NT
C9
SV13, SV14
RV3
SV15
C10
PC6
C12 &
OR1 0.030 in
(0.76 mm) orifice
G11
C11 &
OR2 0.040 in
(1.02 mm) orifice
15
Side brush manifold detailsPage 16 · 1 page
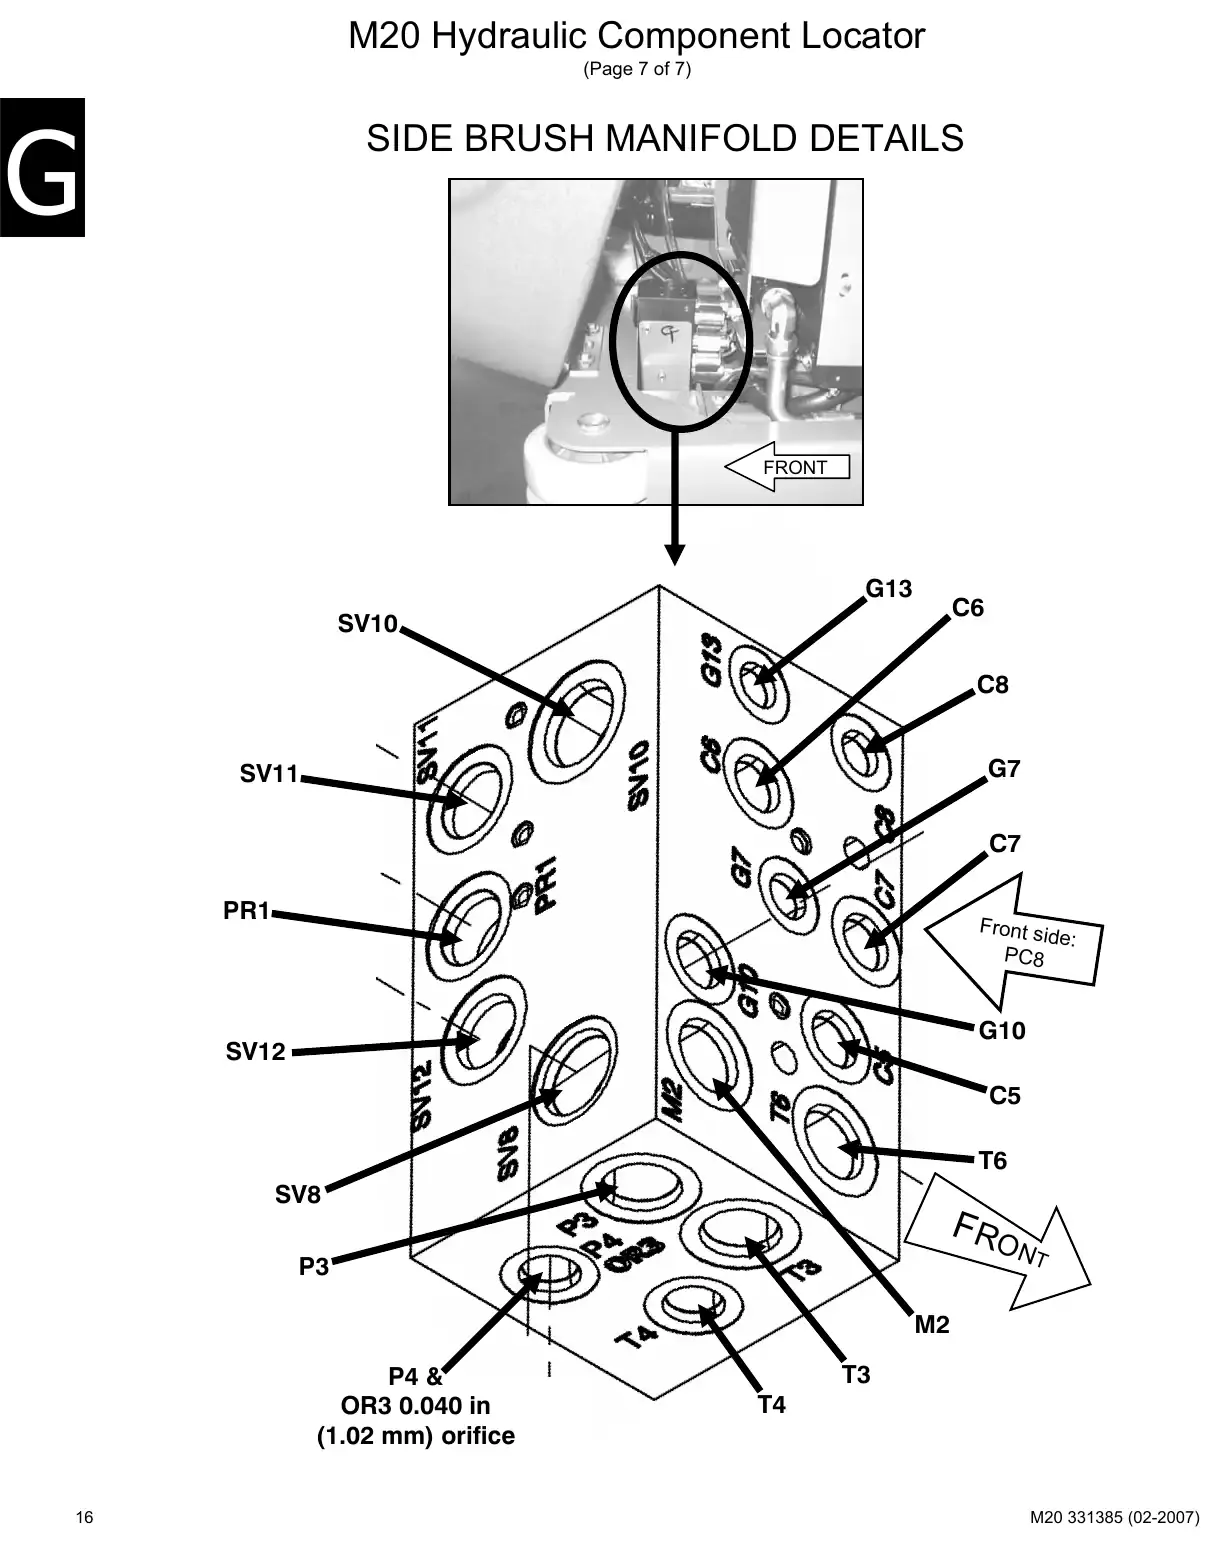
Text of manual page 16
M20 Hydraulic Component Locator
(Page 7 of 7)
SIDE BRUSH MANIFOLD DETAILS
FRONT
G13
C6
SV10
C8
G7
SV11
C7
PR1
Front sid
e:
PC8
G10
SV12
C5
T6
SV8
FRO
NT
P3
M2
P4 &
OR3 0.040 in
(1.02 mm) orifice
16
T4
T3
Specifications and machine dimensionsPages 17–19 · 3 pages
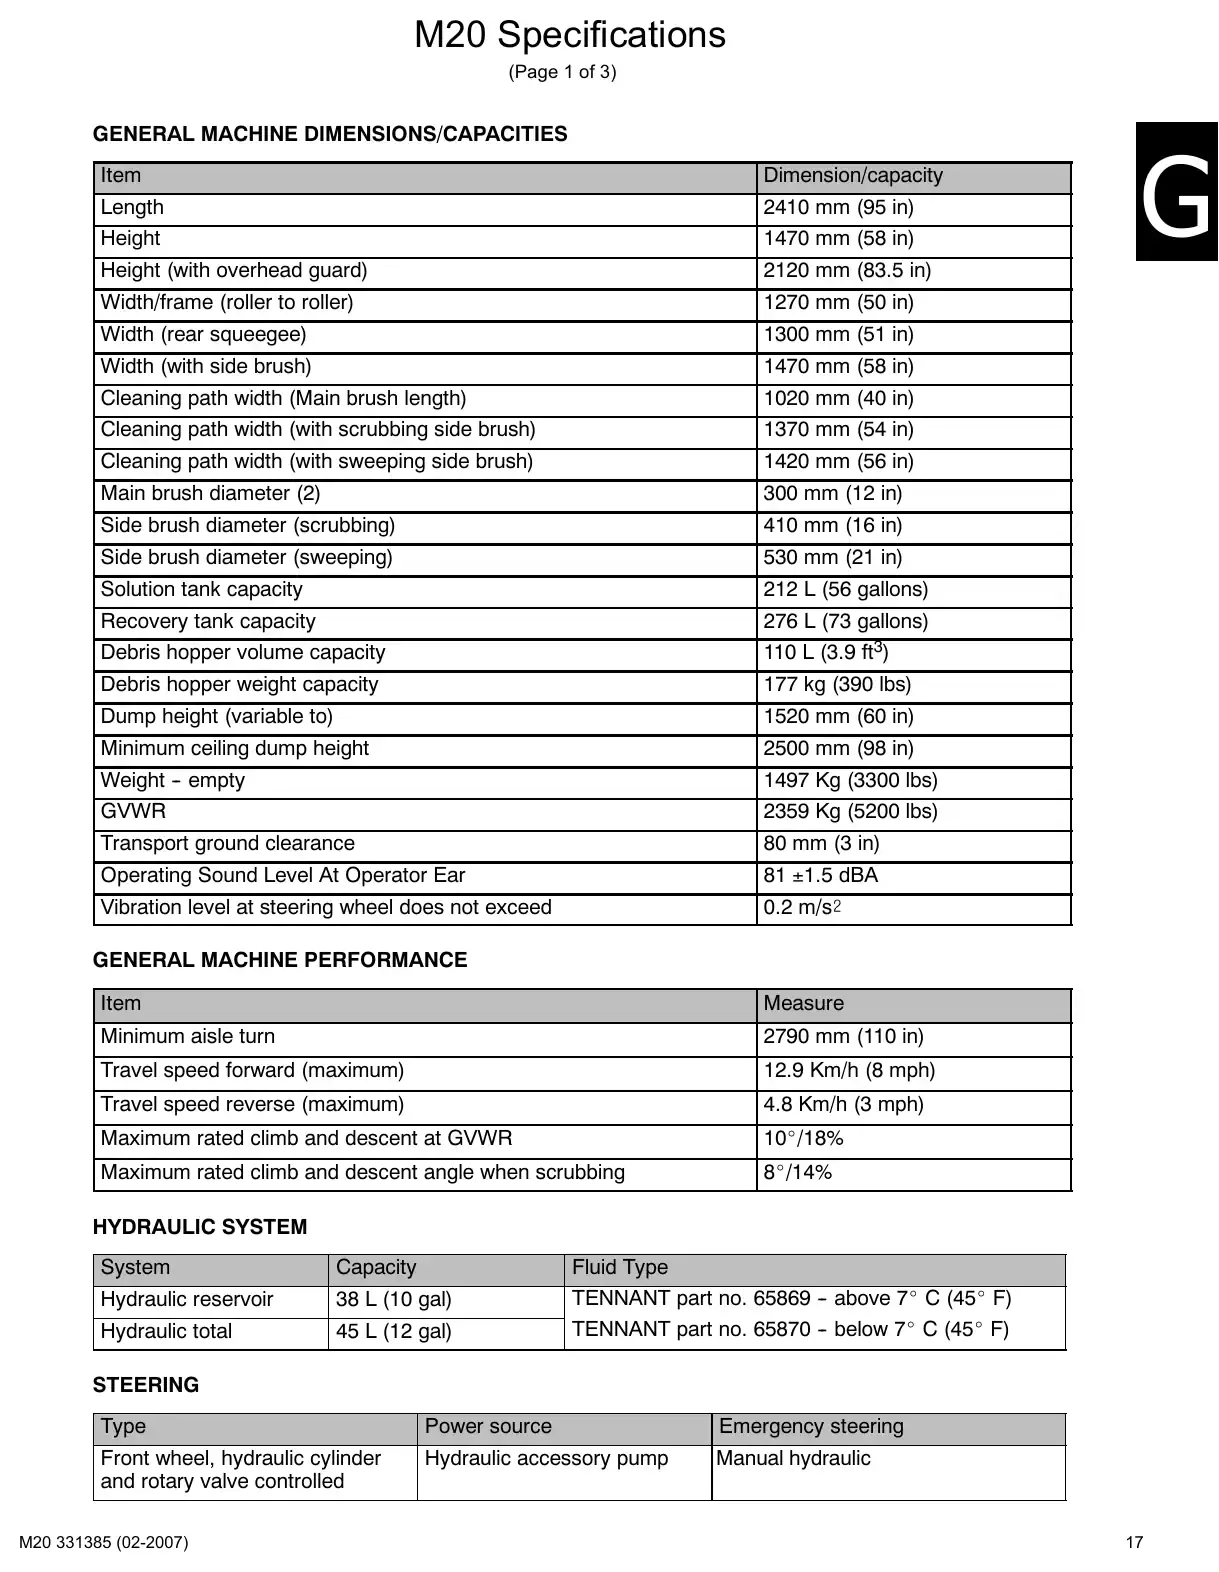
Text of manual page 17
M20 Specifications
(Page 1 of 3)
GENERAL MACHINE DIMENSIONS/CAPACITIES
Item
Dimension/capacity
Length
2410 mm (95 in)
Height
1470 mm (58 in)
Height (with overhead guard)
Width/frame (roller to roller)
2120 mm (83.5 in)
1270 mm (50 in)
Width (rear squeegee)
1300 mm (51 in)
Width (with side brush)
1470 mm (58 in)
Cleaning path width (Main brush length)
1020 mm (40 in)
Cleaning path width (with scrubbing side brush)
1370 mm (54 in)
Cleaning path width (with sweeping side brush)
Main brush diameter (2)
1420 mm (56 in)
300 mm (12 in)
Side brush diameter (scrubbing)
410 mm (16 in)
Side brush diameter (sweeping)
530 mm (21 in)
Solution tank capacity
212 L (56 gallons)
Recovery tank capacity
276 L (73 gallons)
Debris hopper volume capacity
110 L (3.9 ft3)
Debris hopper weight capacity
177 kg (390 lbs)
Dump height (variable to)
1520 mm (60 in)
Minimum ceiling dump height
2500 mm (98 in)
Weight - empty
GVWR
1497 Kg (3300 lbs)
2359 Kg (5200 lbs)
Transport ground clearance
80 mm (3 in)
Operating Sound Level At Operator Ear
81 r1.5 dBA
Vibration level at steering wheel does not exceed
0.2 m/s@
GENERAL MACHINE PERFORMANCE
Item
Measure
Minimum aisle turn
2790 mm (110 in)
Travel speed forward (maximum)
12.9 Km/h (8 mph)
Travel speed reverse (maximum)
4.8 Km/h (3 mph)
Maximum rated climb and descent at GVWR
10_/18%
Maximum rated climb and descent angle when scrubbing
8_/14%
HYDRAULIC SYSTEM
System
Capacity
Hydraulic reservoir
38 L (10 gal)
Hydraulic total
45 L (12 gal)
Fluid Type
TENNANT part no. 65869 - above 7_ C (45_ F)
TENNANT part no. 65870 - below 7_ C (45_ F)
STEERING
Type
Power source
Emergency steering
Front wheel, hydraulic cylinder
and rotary valve controlled
Hydraulic accessory pump
Manual hydraulic
17
Text of manual page 18
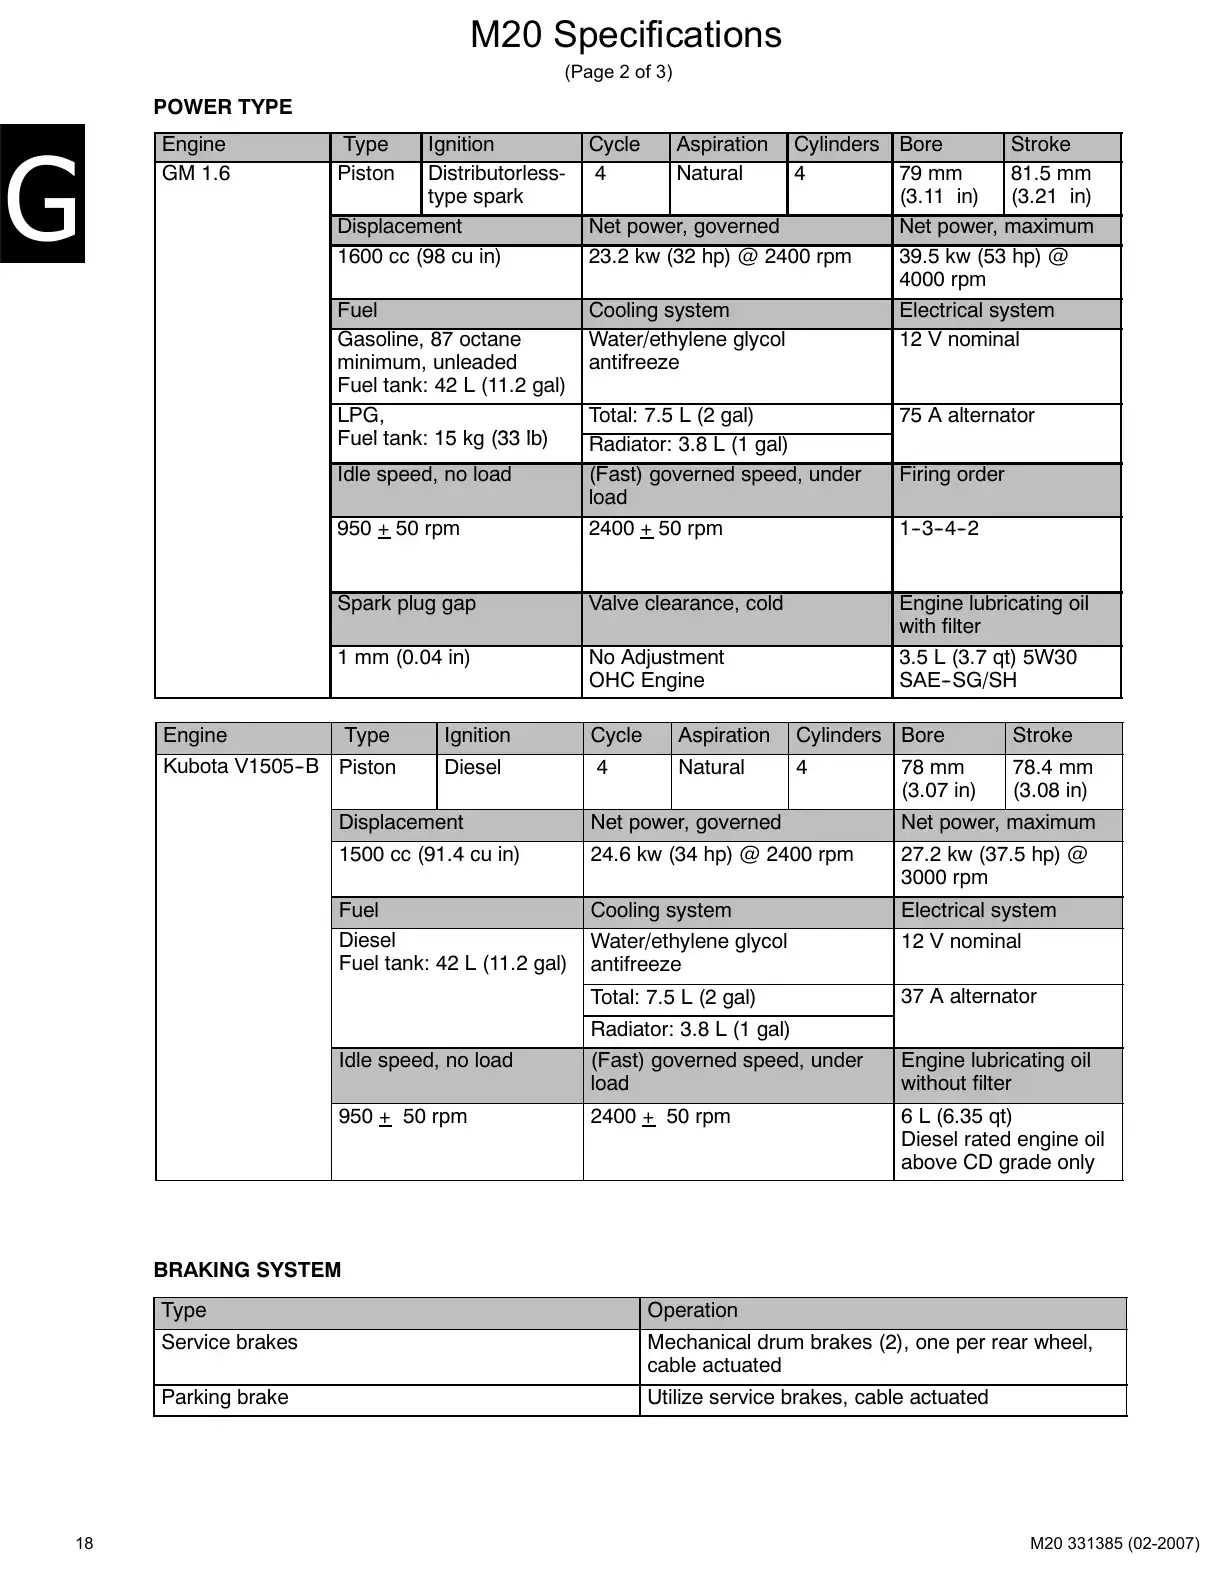
M20 Specifications
(Page 2 of 3)
POWER TYPE
Engine
GM 1.6
Type
Piston
Ignition
Distributorlesstype spark
Displacement
1600 cc (98 cu in)
Fuel
Gasoline, 87 octane
minimum, unleaded
Fuel tank: 42 L (11.2 gal)
LPG,
Fuel tank: 15 kg (33 lb)
Cycle
4
Aspiration
Natural
Cylinders Bore
Stroke
4
79 mm
81.5 mm
(3.11 in) (3.21 in)
Net power, governed
Net power, maximum
23.2 kw (32 hp) @ 2400 rpm
39.5 kw (53 hp) @
4000 rpm
Cooling system
Electrical system
Water/ethylene glycol
12 V nominal
antifreeze
75 A alternator
950 + 50 rpm
Total: 7.5 L (2 gal)
Radiator: 3.8 L (1 gal)
(Fast) governed speed, under
load
2400 + 50 rpm
Spark plug gap
Valve clearance, cold
1 mm (0.04 in)
No Adjustment
OHC Engine
Engine lubricating oil
with filter
3.5 L (3.7 qt) 5W30
SAE-SG/SH
Idle speed, no load
Engine
Type
Kubota V1505-B Piston
Firing order
1-3-4-2
Ignition
Cycle
Aspiration
Cylinders Bore
Stroke
Diesel
4
Natural
4
78.4 mm
(3.08 in)
78 mm
(3.07 in)
Displacement
Net power, governed
Net power, maximum
1500 cc (91.4 cu in)
24.6 kw (34 hp) @ 2400 rpm
27.2 kw (37.5 hp) @
3000 rpm
Fuel
Diesel
Fuel tank: 42 L (11.2 gal)
Cooling system
Electrical system
Water/ethylene glycol
antifreeze
12 V nominal
Total: 7.5 L (2 gal)
37 A alternator
Radiator: 3.8 L (1 gal)
Idle speed, no load
(Fast) governed speed, under
load
Engine lubricating oil
without filter
950 + 50 rpm
2400 + 50 rpm
6 L (6.35 qt)
Diesel rated engine oil
above CD grade only
BRAKING SYSTEM
18
Type
Operation
Service brakes
Mechanical drum brakes (2), one per rear wheel,
cable actuated
Parking brake
Utilize service brakes, cable actuated
Text of manual page 19
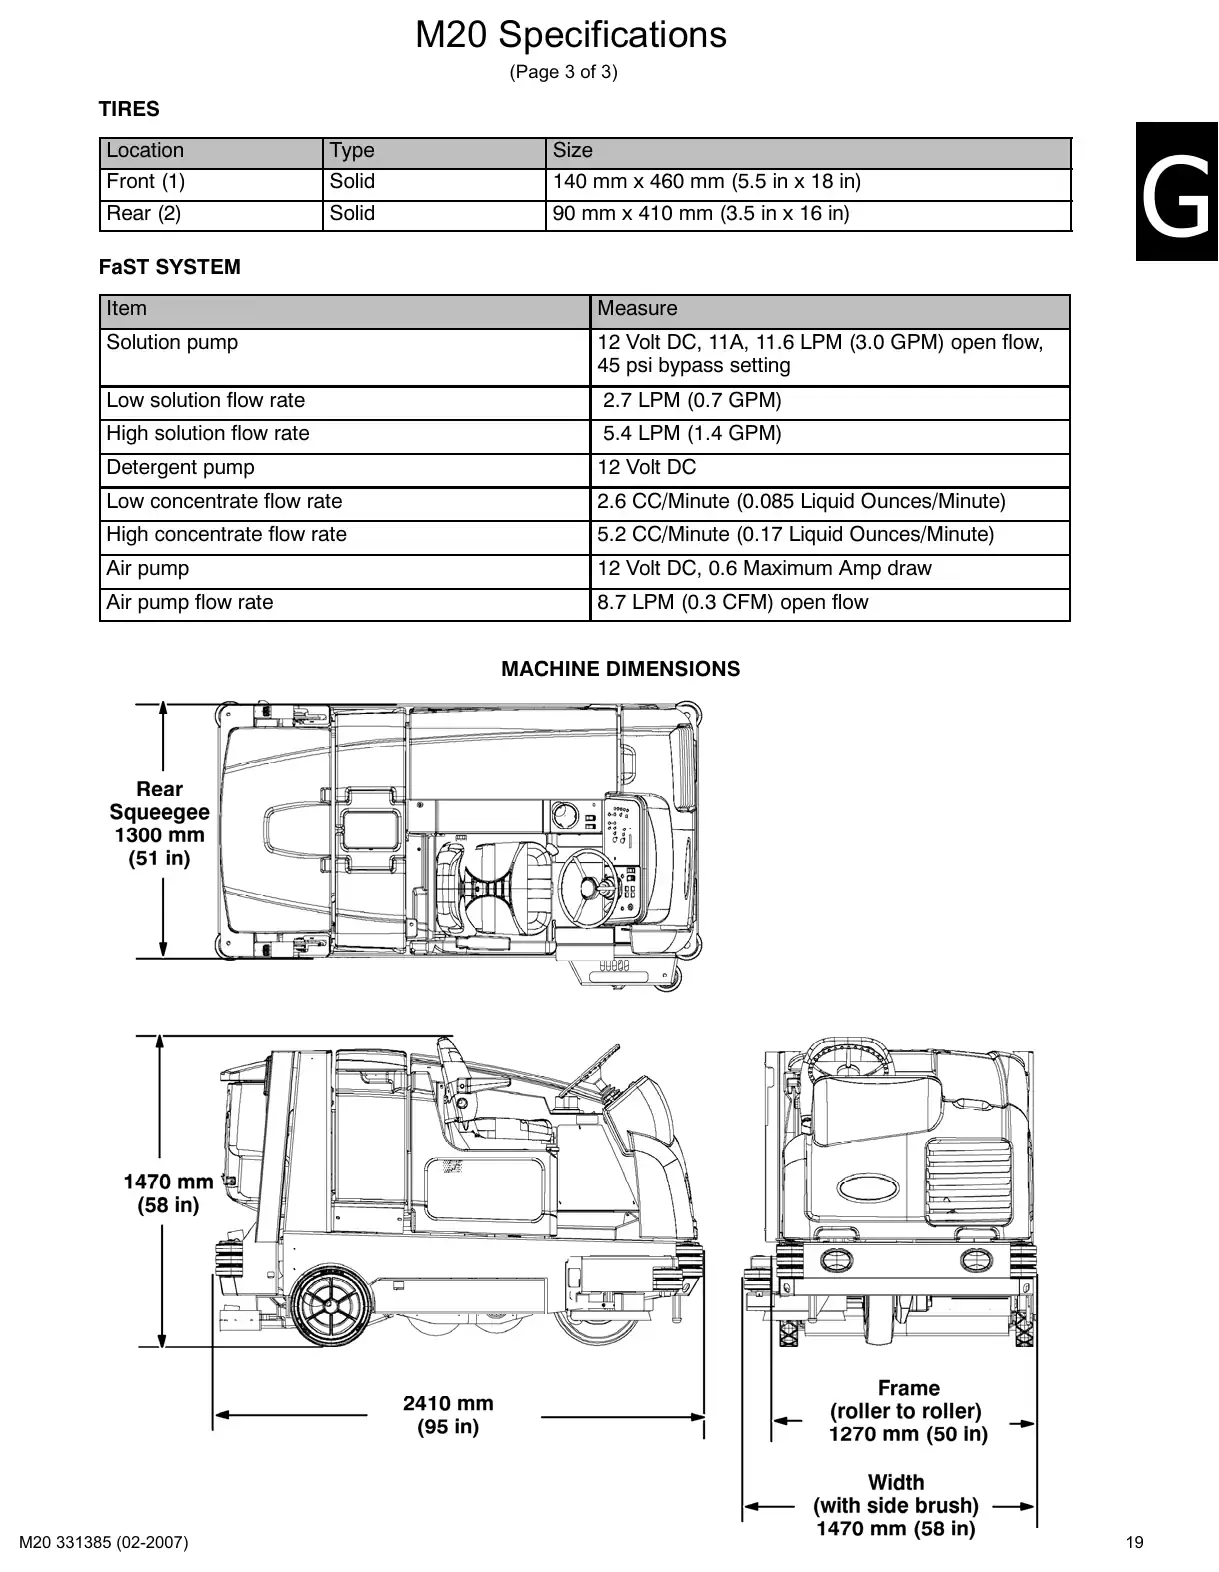
M20 Specifications
(Page 3 of 3)
TIRES
Location
Front (1)
Type
Solid
Size
140 mm x 460 mm (5.5 in x 18 in)
Rear (2)
Solid
90 mm x 410 mm (3.5 in x 16 in)
FaST SYSTEM
Item
Measure
Solution pump
12 Volt DC, 11A, 11.6 LPM (3.0 GPM) open flow,
45 psi bypass setting
Low solution flow rate
2.7 LPM (0.7 GPM)
High solution flow rate
5.4 LPM (1.4 GPM)
Detergent pump
12 Volt DC
Low concentrate flow rate
2.6 CC/Minute (0.085 Liquid Ounces/Minute)
High concentrate flow rate
5.2 CC/Minute (0.17 Liquid Ounces/Minute)
Air pump
12 Volt DC, 0.6 Maximum Amp draw
Air pump flow rate
8.7 LPM (0.3 CFM) open flow
MACHINE DIMENSIONS
19
Basic troubleshootingPages 20–21 · 2 pages
Text of manual page 20
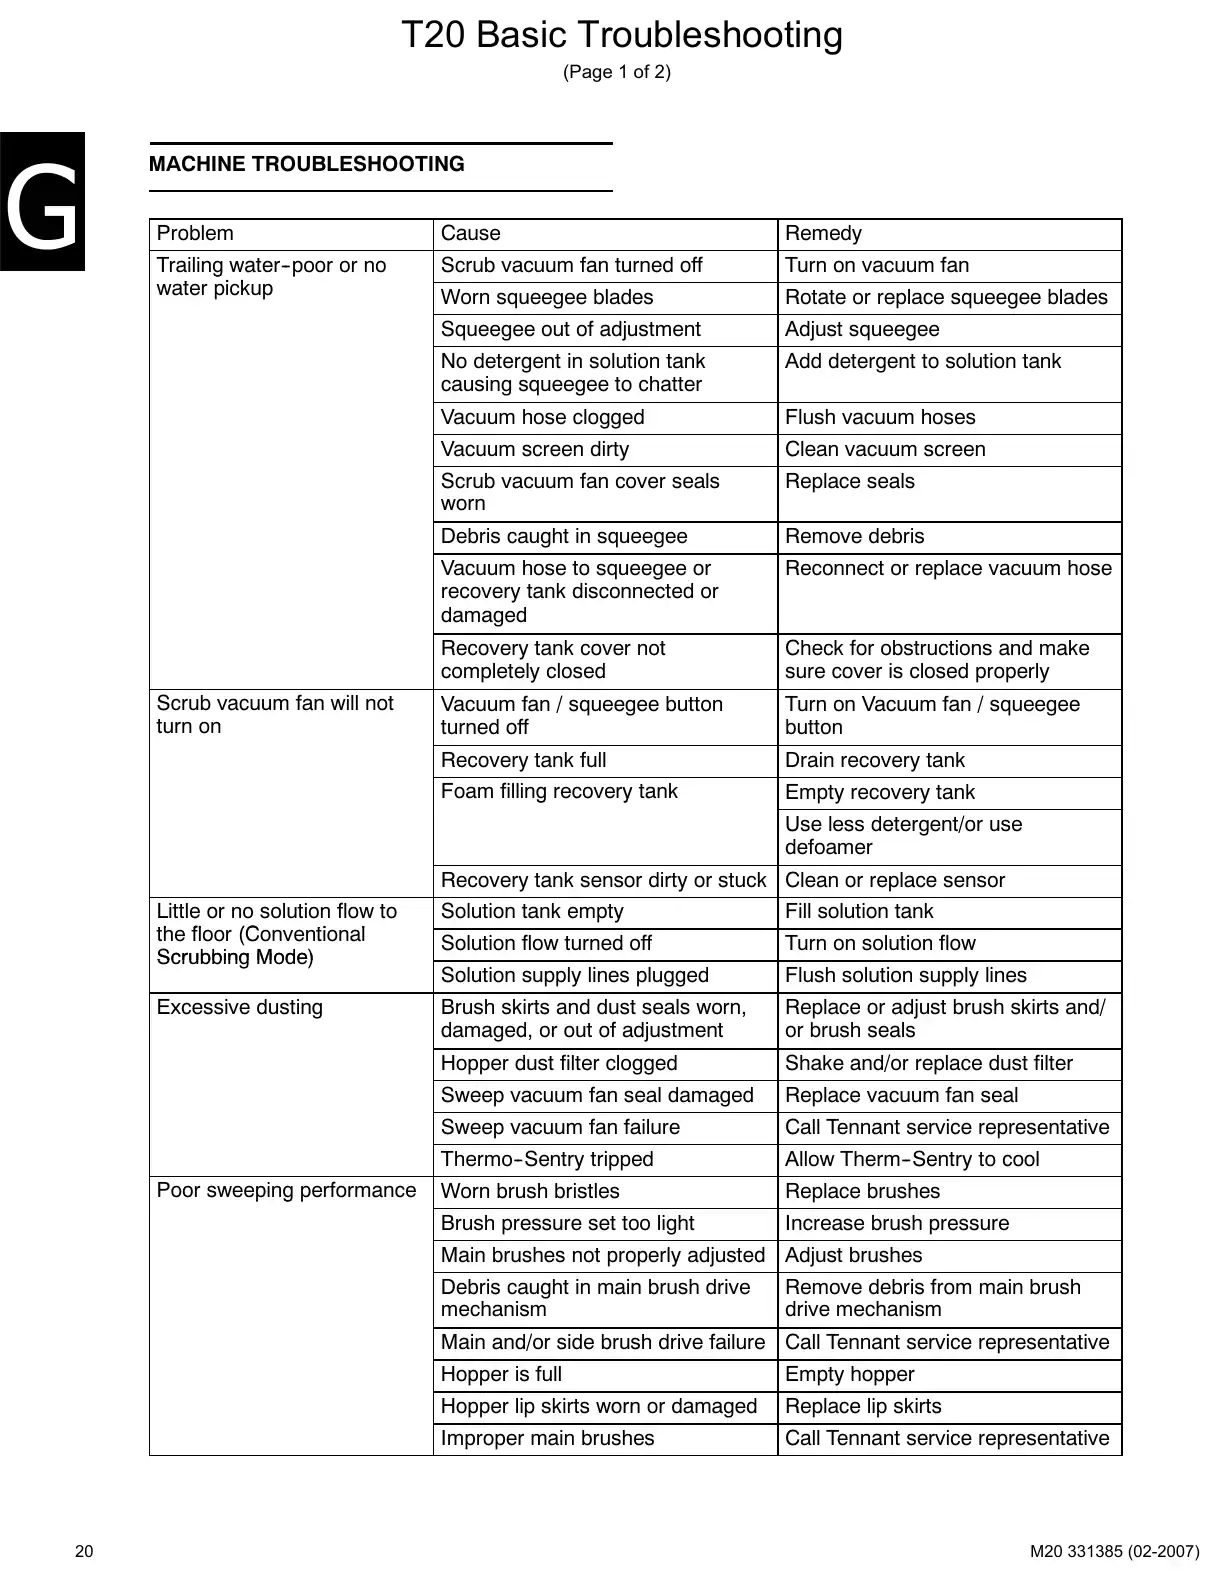
T20 Basic Troubleshooting
(Page 1 of 2)
MACHINE TROUBLESHOOTING
Problem
Cause
Remedy
Trailing water-poor or no
water i
pickup
Scrub vacuum fan turned off
Turn on vacuum fan
Worn squeegee blades
Rotate or replace squeegee blades
Squeegee out of adjustment
Adjust squeegee
No detergent in solution tank
causing squeegee to chatter
Add detergent to solution tank
Vacuum hose clogged
Flush vacuum hoses
Vacuum screen dirty
Clean vacuum screen
Scrub vacuum fan cover seals
worn
Replace seals
Debris caught in squeegee
Remove debris
Vacuum hose to squeegee or
recovery tank disconnected or
damaged
Reconnect or replace vacuum hose
Recovery tank cover not
completely closed
Check for obstructions and make
sure cover is closed properly
Vacuum fan / squeegee button
turned off
Turn on Vacuum fan / squeegee
button
Recovery tank full
Drain recovery tank
Foam filling recovery tank
Empty recovery tank
Scrub vacuum fan will not
turn on
Use less detergent/or use
defoamer
Recovery tank sensor dirty or stuck Clean or replace sensor
Little or no solution flow to
the floor (Conventional
Scrubbing Mode)
Solution tank empty
Fill solution tank
Solution flow turned off
Turn on solution flow
Solution supply lines plugged
Flush solution supply lines
Excessive dusting
Brush skirts and dust seals worn,
damaged, or out of adjustment
Replace or adjust brush skirts and/
or brush seals
Hopper dust filter clogged
Shake and/or replace dust filter
Sweep vacuum fan seal damaged
Replace vacuum fan seal
Sweep vacuum fan failure
Call Tennant service representative
Thermo-Sentry tripped
Allow Therm-Sentry to cool
Worn brush bristles
Replace brushes
Brush pressure set too light
Increase brush pressure
Poor sweeping performance
Main brushes not properly adjusted Adjust brushes
Debris caught in main brush drive
mechanism
Remove debris from main brush
drive mechanism
Main and/or side brush drive failure Call Tennant service representative
20
Hopper is full
Empty hopper
Hopper lip skirts worn or damaged
Replace lip skirts
Improper main brushes
Call Tennant service representative
Text of manual page 21
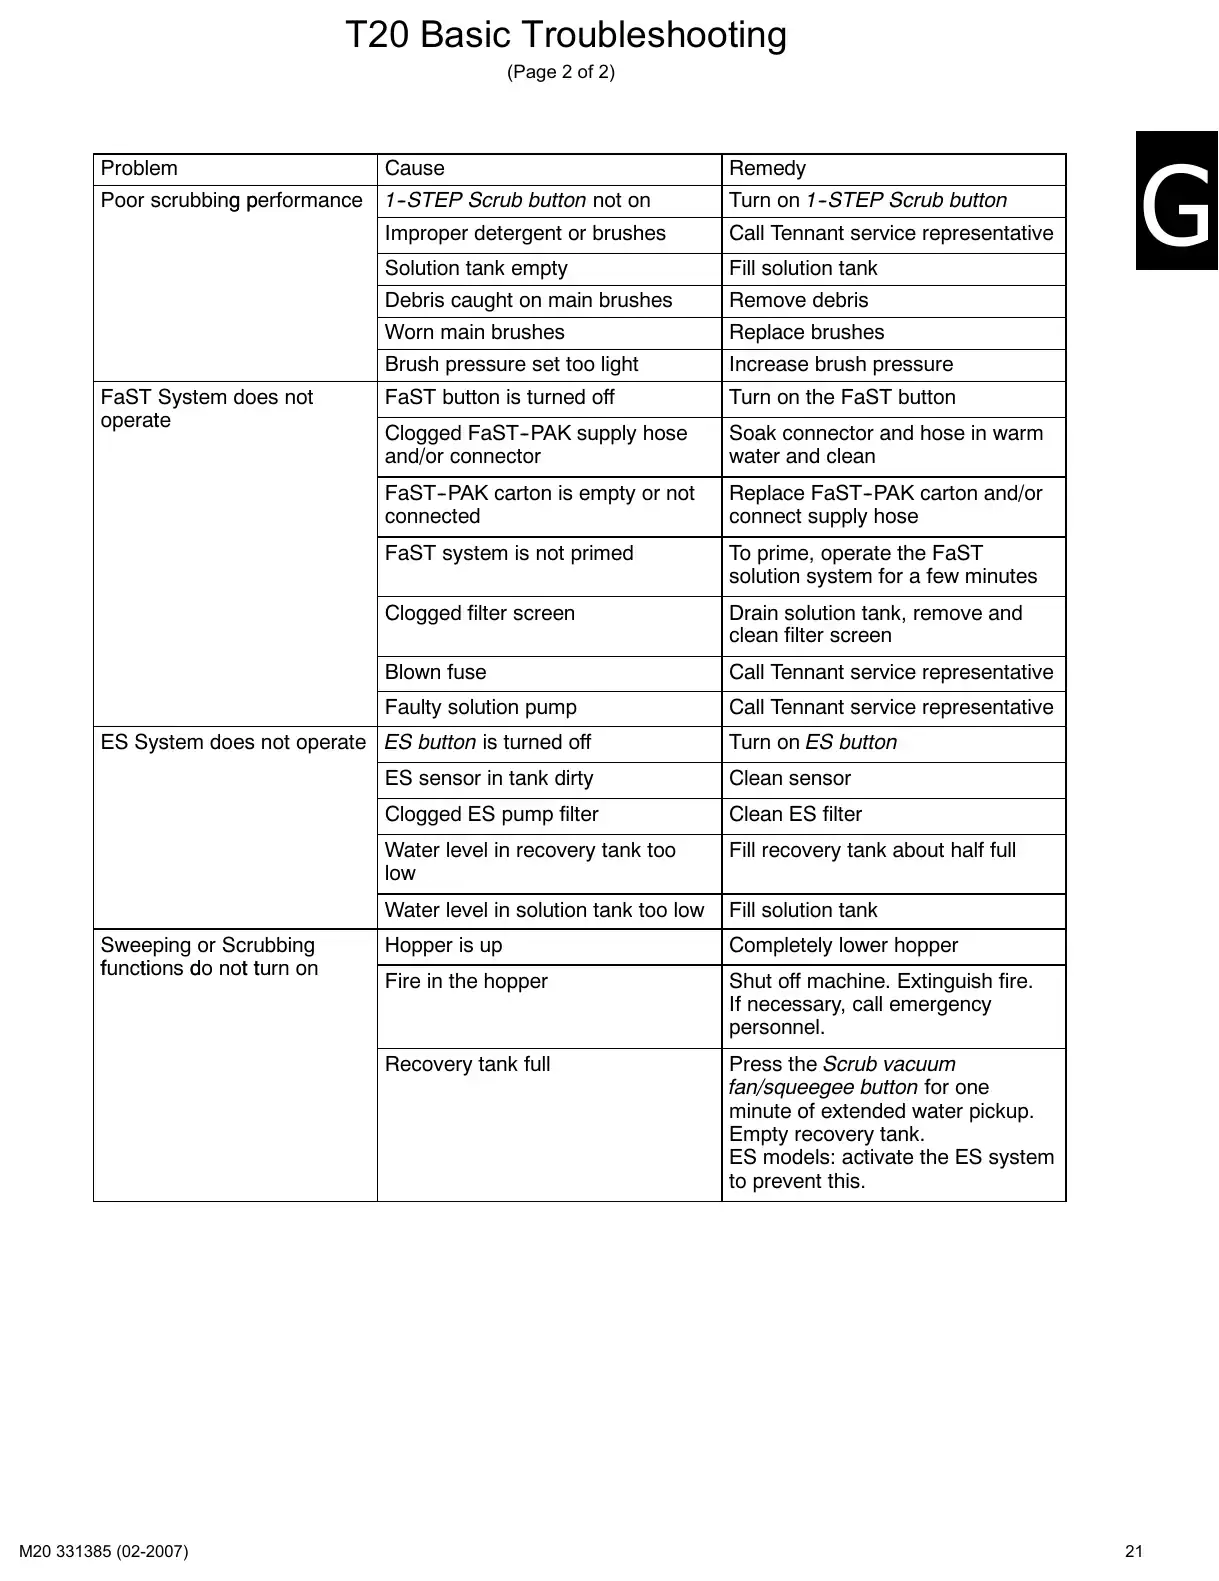
T20 Basic Troubleshooting
(Page 2 of 2)
Problem
Poor scrubbing performance
FaST System does not
operate
Cause
Remedy
1-STEP Scrub button not on
Turn on 1-STEP Scrub button
Improper detergent or brushes
Call Tennant service representative
Solution tank empty
Fill solution tank
Debris caught on main brushes
Remove debris
Worn main brushes
Replace brushes
Brush pressure set too light
Increase brush pressure
FaST button is turned off
Turn on the FaST button
Clogged FaST-PAK supply hose
and/or connector
Soak connector and hose in warm
water and clean
FaST-PAK carton is empty or not
connected
Replace FaST-PAK carton and/or
connect supply hose
FaST system is not primed
To prime, operate the FaST
solution system for a few minutes
Clogged filter screen
Drain solution tank, remove and
clean filter screen
Blown fuse
Call Tennant service representative
Faulty solution pump
Call Tennant service representative
ES System does not operate ES button is turned off
Sweeping or Scrubbing
functions do not turn on
Turn on ES button
ES sensor in tank dirty
Clean sensor
Clogged ES pump filter
Clean ES filter
Water level in recovery tank too
low
Fill recovery tank about half full
Water level in solution tank too low
Fill solution tank
Hopper is up
Completely lower hopper
Fire in the hopper
Shut off machine. Extinguish fire.
If necessary, call emergency
personnel.
Recovery tank full
Press the Scrub vacuum
fan/squeegee button for one
minute of extended water pickup.
Empty recovery tank.
ES models: activate the ES system
to prevent this.
21
Maintenance how-tos
Maintenance check pointsPage 24 · 1 page
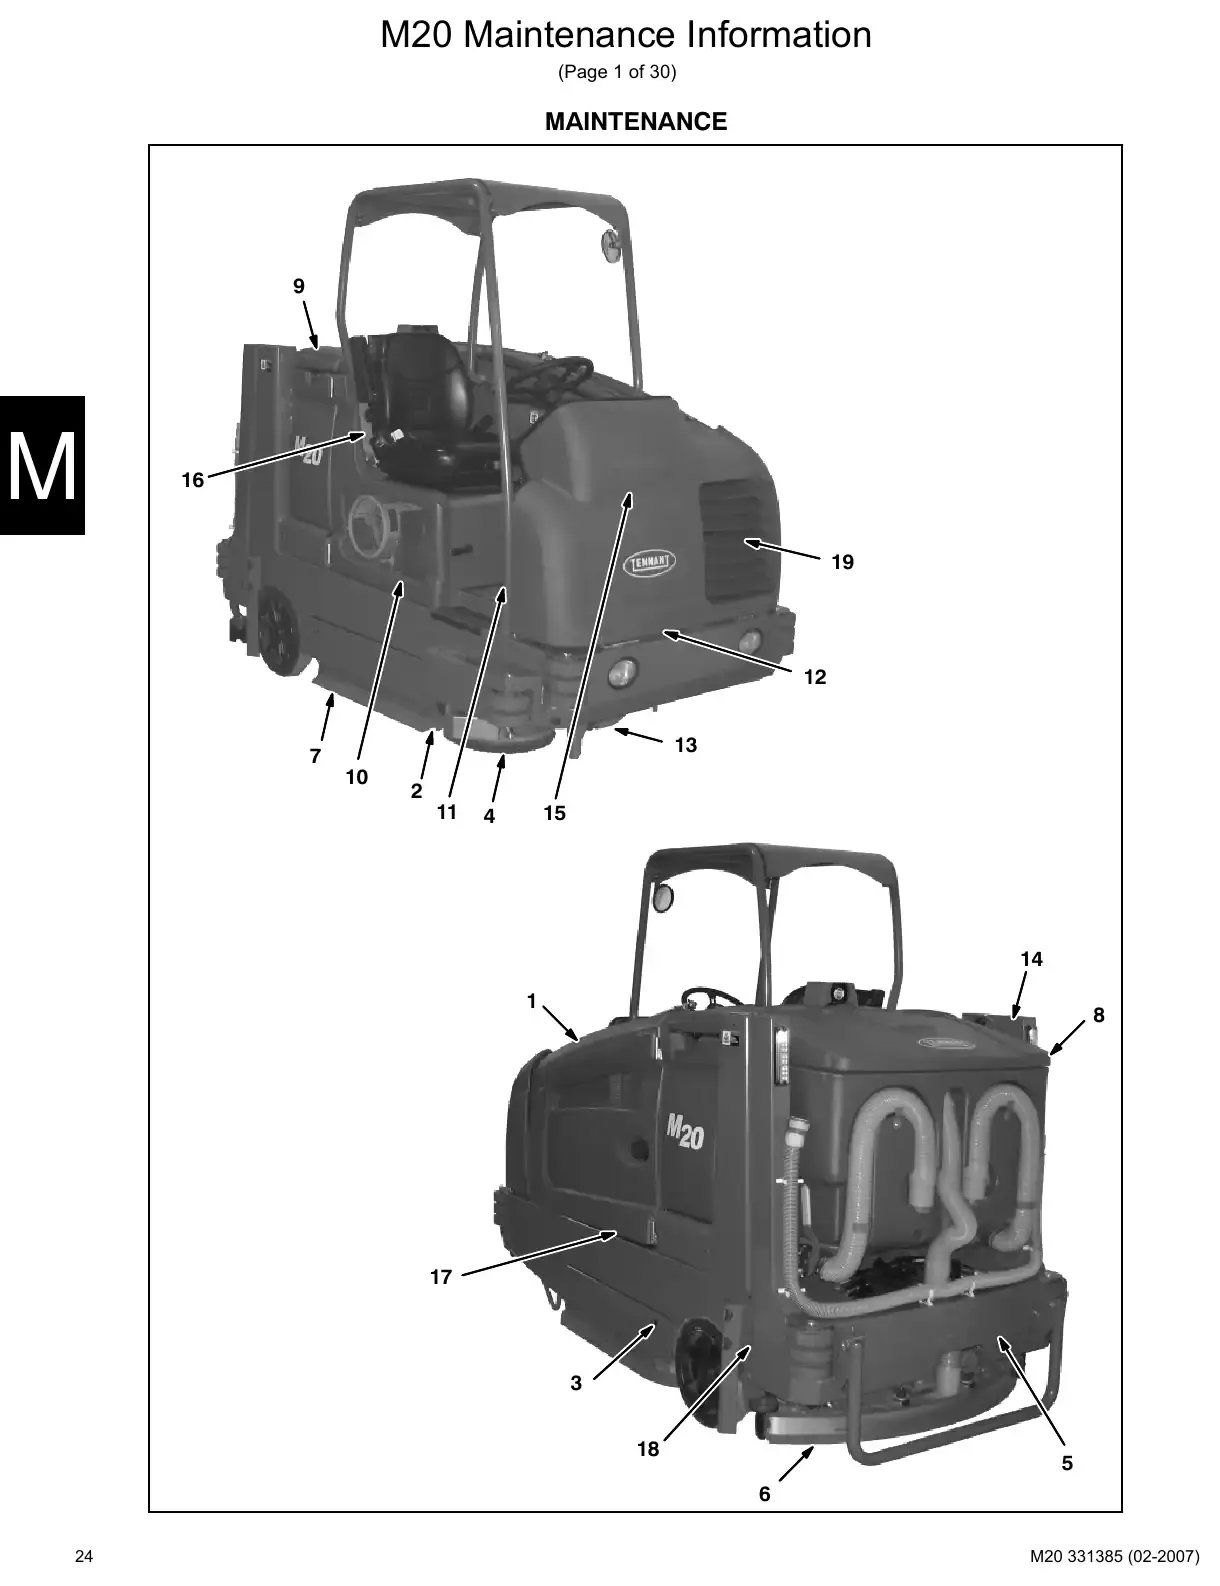
Text of manual page 24
M20 Maintenance Information
(Page 1 of 30)
MAINTENANCE
9
16
19
12
13
7
10
2
11
15
4
14
1
8
17
3
18
5
6
24
Maintenance chartPages 25–26 · 2 pages
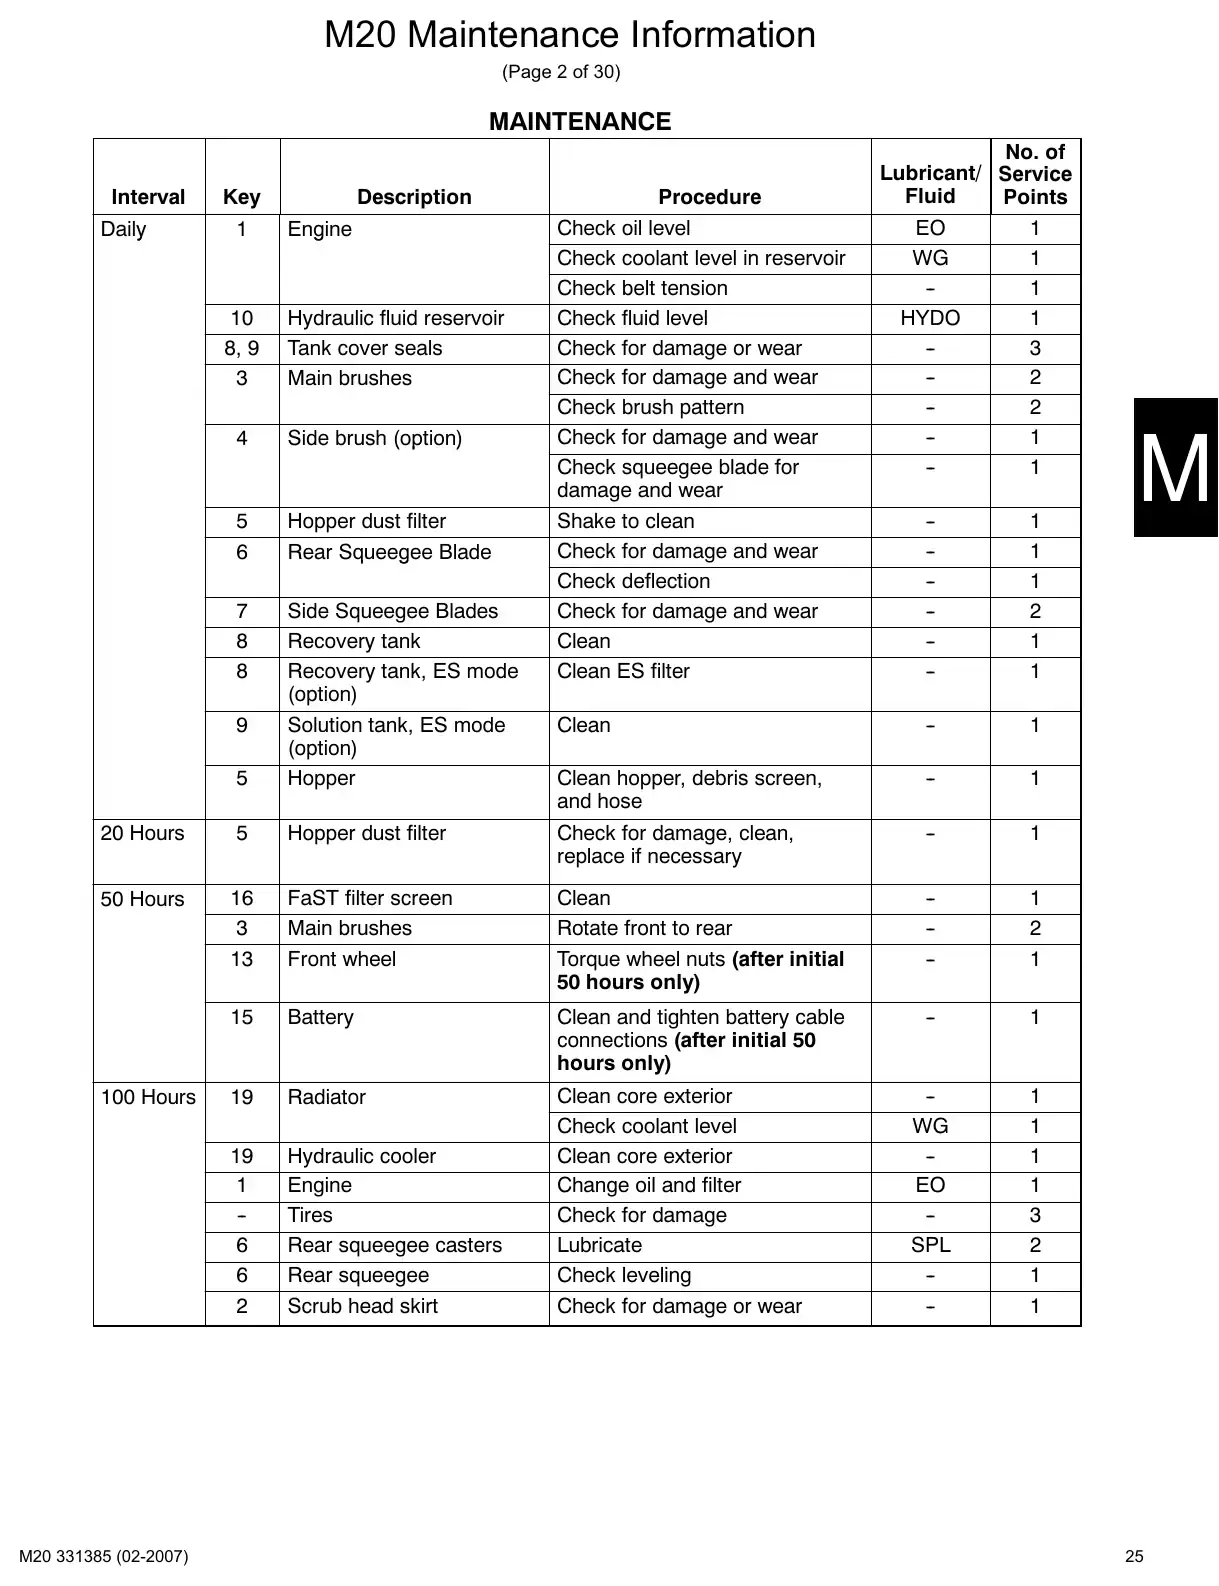
Text of manual page 25
M20 Maintenance Information
(Page 2 of 30)
MAINTENANCE
Interval
Key
Daily
1
Engine
g
10
8, 9
3
Hydraulic fluid reservoir
Tank cover seals
Main brushes
4
Side brush ( p
option)
5
6
Hopper dust filter
Rear q
Squeegee Blade
7
8
8
5
Side Squeegee Blades
Recovery tank
Recovery tank, ES mode
(option)
Solution tank, ES mode
(option)
Hopper
20 Hours
5
50 Hours
Procedure
Check oil level
Check coolant level in reservoir
Check belt tension
Check fluid level
Check for damage or wear
Check for damage and wear
Check brush pattern
Check for damage and wear
Check squeegee blade for
damage and wear
Shake to clean
Check for damage and wear
Check deflection
Check for damage and wear
Clean
Clean ES filter
----
1
1
1
2
1
1
Clean
-
1
Clean hopper, debris screen,
and hose
-
1
Hopper dust filter
Check for damage, clean,
replace if necessary
-
1
16
3
13
FaST filter screen
Main brushes
Front wheel
Clean
Rotate front to rear
Torque wheel nuts (after initial
50 hours only)
--
1
2
1
15
Battery
Clean and tighten battery cable
connections (after initial 50
hours only)
-
1
19
Radiator
19
1
-6
6
2
Hydraulic cooler
Engine
Tires
Rear squeegee casters
Rear squeegee
Scrub head skirt
Clean core exterior
Check coolant level
Clean core exterior
Change oil and filter
Check for damage
Lubricate
Check leveling
Check for damage or wear
-WG
-EO
-SPL
--
1
1
1
1
3
2
1
1
9
100 Hours
Description
No. of
Lubricant/ Service
Fluid
Points
EO
1
WG
1
-1
HYDO
1
-3
-2
-2
-1
-1
25
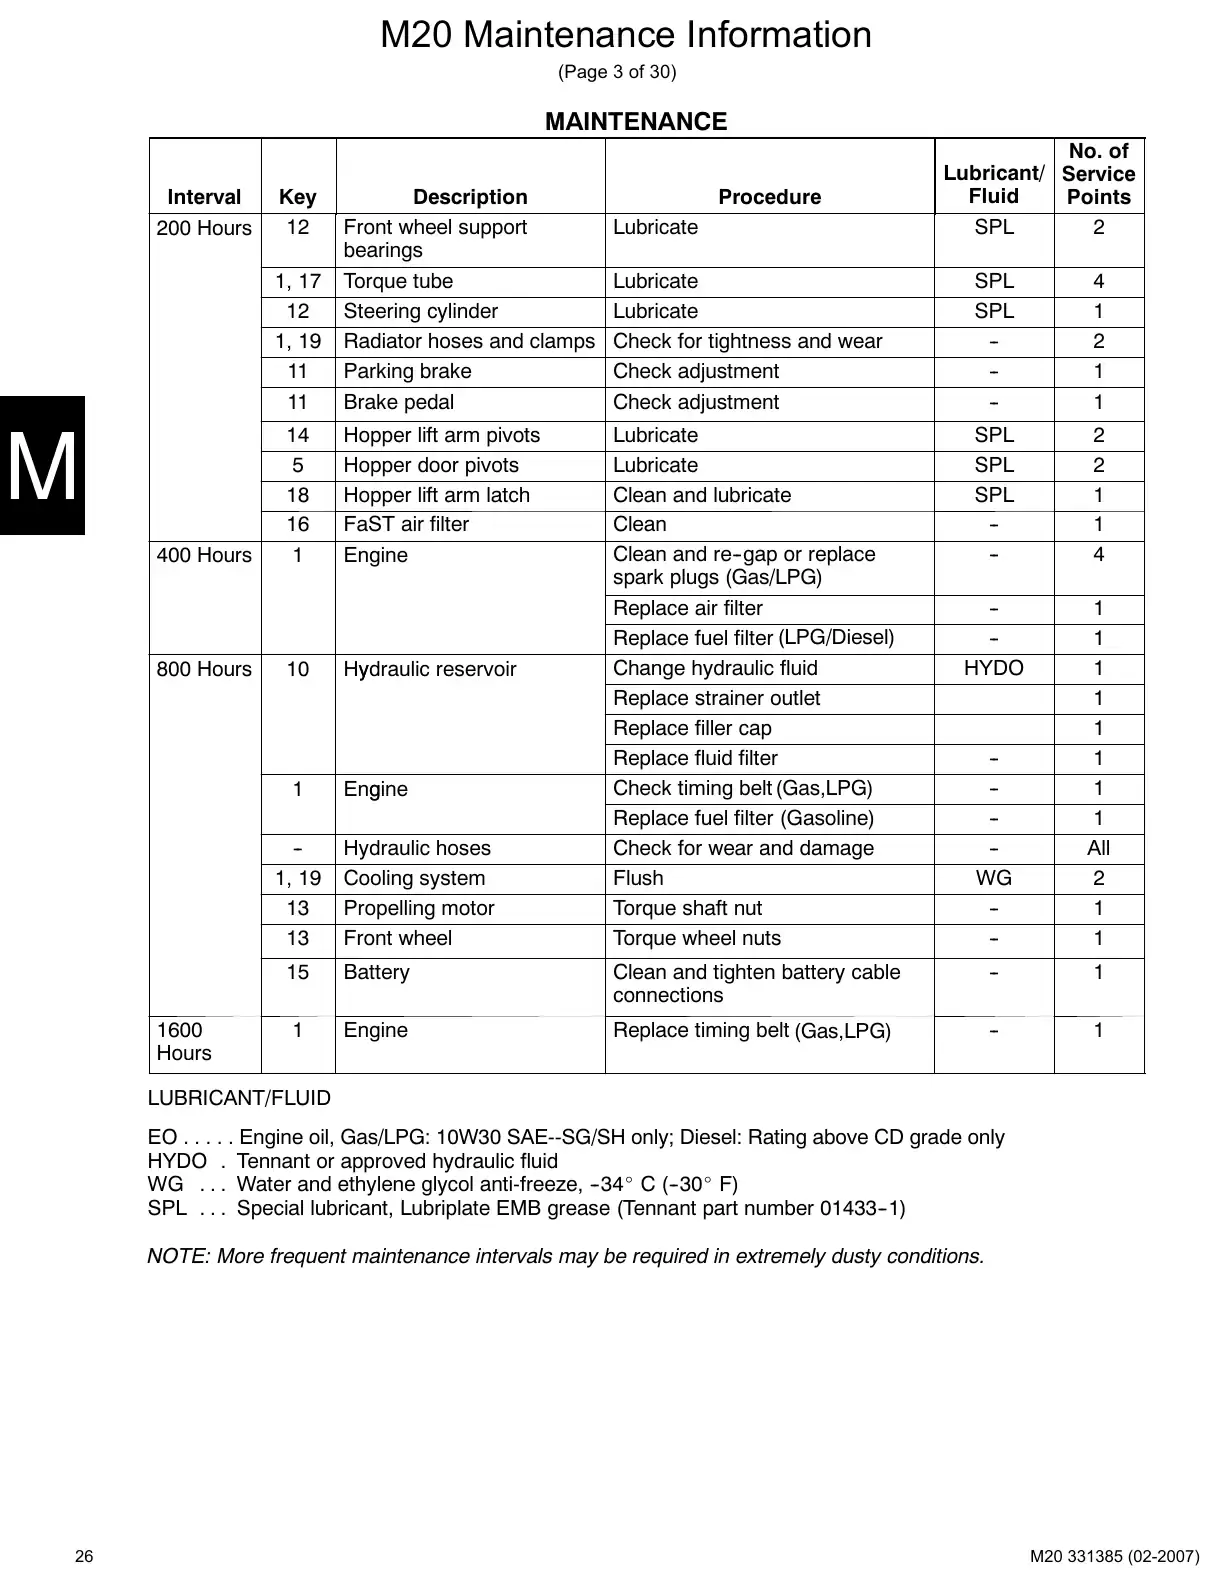
Text of manual page 26
M20 Maintenance Information
(Page 3 of 30)
MAINTENANCE
Interval
200 Hours
400 Hours
800 Hours
1600
Hours
Key
12
1, 17
12
1, 19
11
11
Description
Front wheel support
bearings
Torque tube
Steering cylinder
Radiator hoses and clamps
Parking brake
Brake pedal
14
5
18
16
1
Hopper lift arm pivots
Hopper door pivots
Hopper lift arm latch
FaST air filter
Engine
10
Hydraulic reservoir
y
1
Engine
g
Procedure
Lubricate
No. of
Lubricant/ Service
Fluid
Points
SPL
2
Lubricate
Lubricate
Check for tightness and wear
Check adjustment
Check adjustment
SPL
SPL
--
4
1
2
1
1
Lubricate
Lubricate
Clean and lubricate
Clean
Clean and re-gap or replace
spark plugs (Gas/LPG)
Replace air filter
Replace fuel filter (LPG/Diesel)
Change hydraulic fluid
Replace strainer outlet
Replace filler cap
Replace fluid filter
Check timing belt (Gas,LPG)
Replace fuel filter (Gasoline)
Check for wear and damage
Flush
Torque shaft nut
Torque wheel nuts
SPL
SPL
SPL
--
2
2
1
1
4
-HYDO
--WG
--
1
1
1
1
1
1
1
1
All
2
1
1
-1, 19
13
13
Hydraulic hoses
Cooling system
Propelling motor
Front wheel
15
Battery
Clean and tighten battery cable
connections
-
1
1
Engine
Replace timing belt (Gas,LPG)
-
1
LUBRICANT/FLUID
EO . . . . . Engine oil, Gas/LPG: 10W30 SAE-SG/SH only; Diesel: Rating above CD grade only
HYDO . Tennant or approved hydraulic fluid
WG . . . Water and ethylene glycol anti-freeze, -34_ C (-30_ F)
SPL . . . Special lubricant, Lubriplate EMB grease (Tennant part number 01433-1)
NOTE: More frequent maintenance intervals may be required in extremely dusty conditions.
26
LubricationPages 27–28 · 2 pages
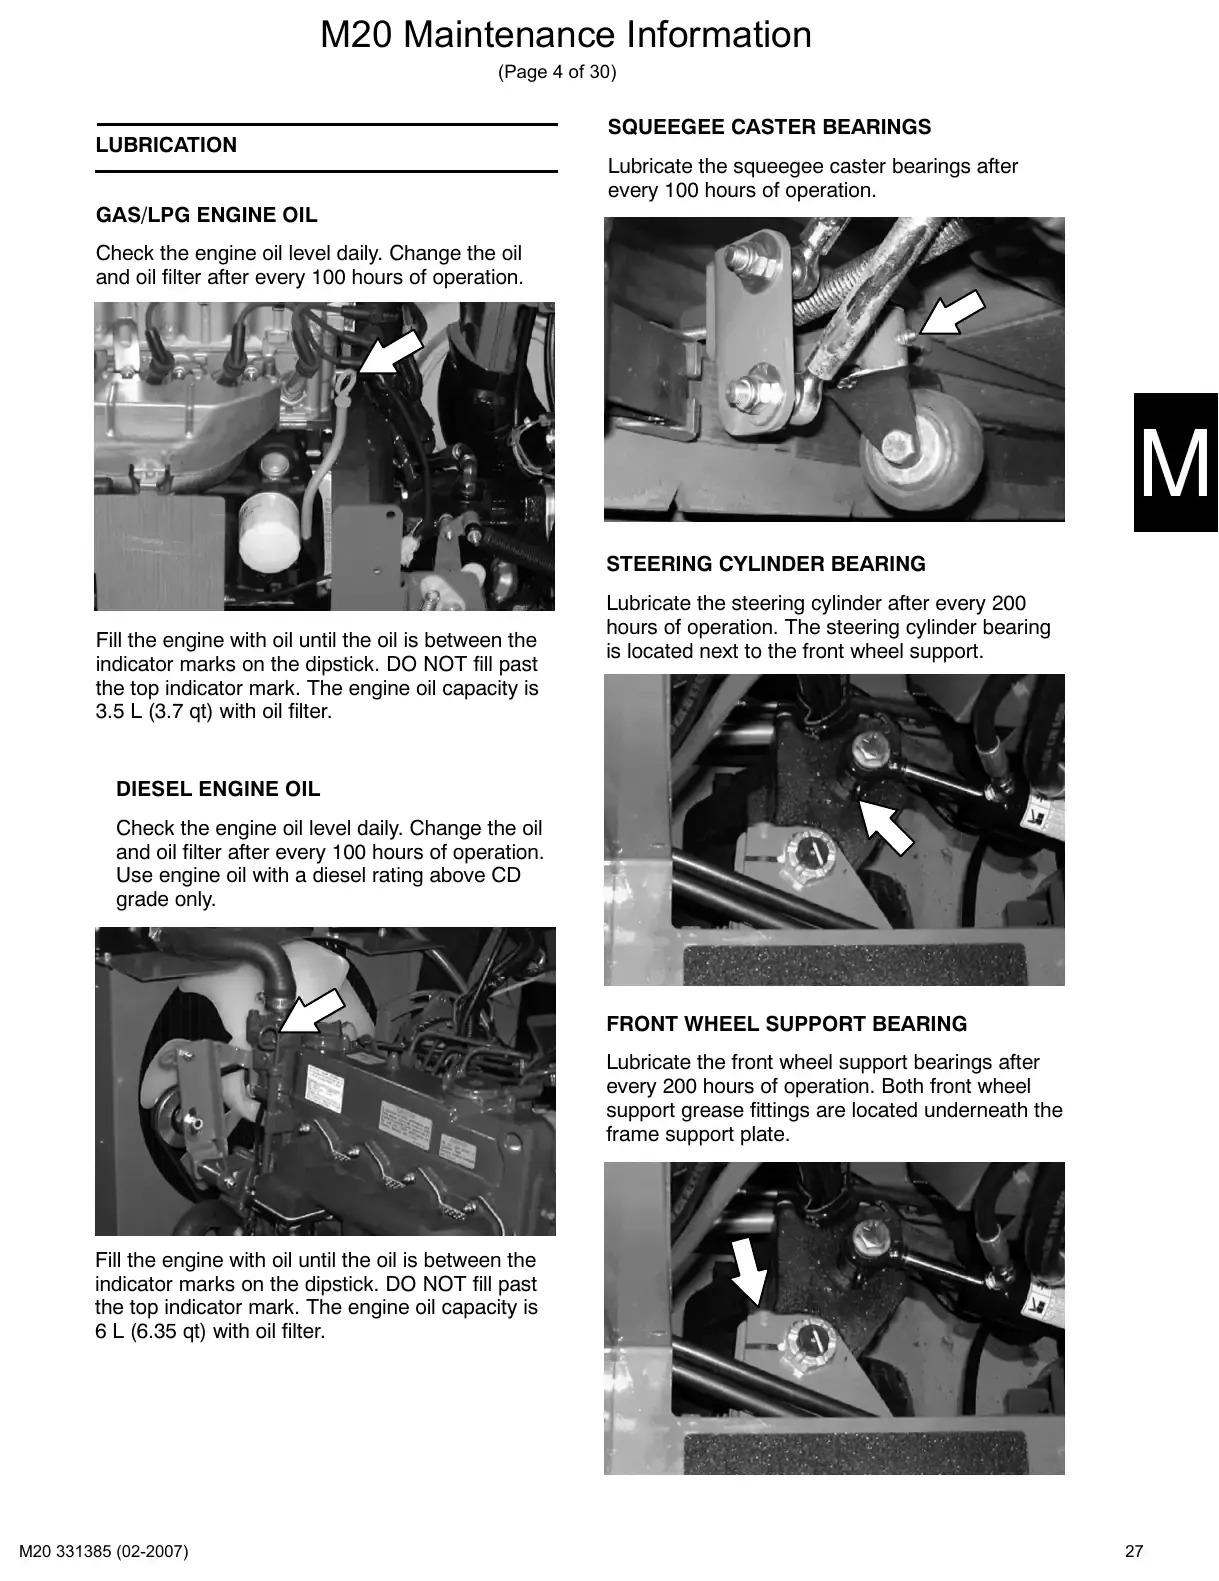
Text of manual page 27
M20 Maintenance Information
(Page 4 of 30)
LUBRICATION
SQUEEGEE CASTER BEARINGS
Lubricate the squeegee caster bearings after
every 100 hours of operation.
GAS/LPG ENGINE OIL
Check the engine oil level daily. Change the oil
and oil filter after every 100 hours of operation.
STEERING CYLINDER BEARING
Fill the engine with oil until the oil is between the
indicator marks on the dipstick. DO NOT fill past
the top indicator mark. The engine oil capacity is
3.5 L (3.7 qt) with oil filter.
Lubricate the steering cylinder after every 200
hours of operation. The steering cylinder bearing
is located next to the front wheel support.
DIESEL ENGINE OIL
Check the engine oil level daily. Change the oil
and oil filter after every 100 hours of operation.
Use engine oil with a diesel rating above CD
grade only.
FRONT WHEEL SUPPORT BEARING
Lubricate the front wheel support bearings after
every 200 hours of operation. Both front wheel
support grease fittings are located underneath the
frame support plate.
Fill the engine with oil until the oil is between the
indicator marks on the dipstick. DO NOT fill past
the top indicator mark. The engine oil capacity is
6 L (6.35 qt) with oil filter.
27
Text of manual page 28
M20 Maintenance Information
(Page 5 of 30)
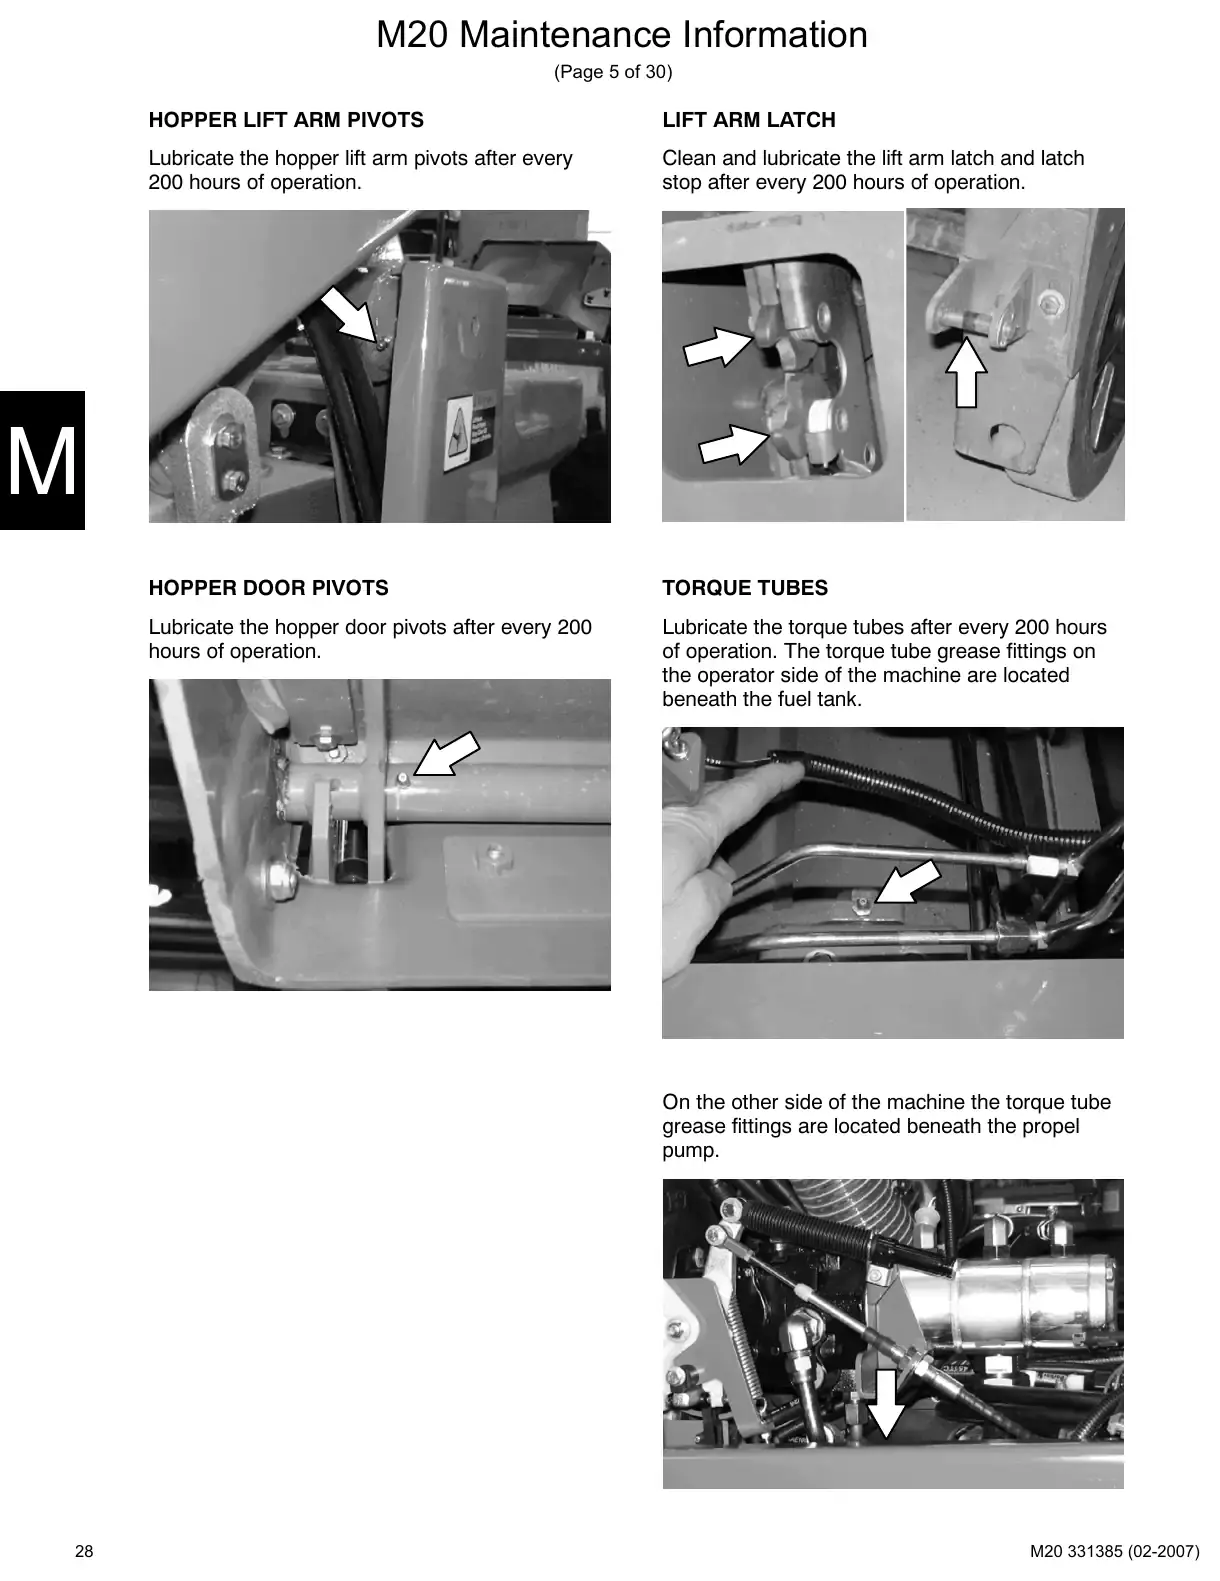
HOPPER LIFT ARM PIVOTS
LIFT ARM LATCH
Lubricate the hopper lift arm pivots after every
200 hours of operation.
Clean and lubricate the lift arm latch and latch
stop after every 200 hours of operation.
HOPPER DOOR PIVOTS
TORQUE TUBES
Lubricate the hopper door pivots after every 200
hours of operation.
Lubricate the torque tubes after every 200 hours
of operation. The torque tube grease fittings on
the operator side of the machine are located
beneath the fuel tank.
On the other side of the machine the torque tube
grease fittings are located beneath the propel
pump.
28
Hydraulics: fluid and hosesPage 29 · 1 page
Text of manual page 29
M20 Maintenance Information
(Page 6 of 30)
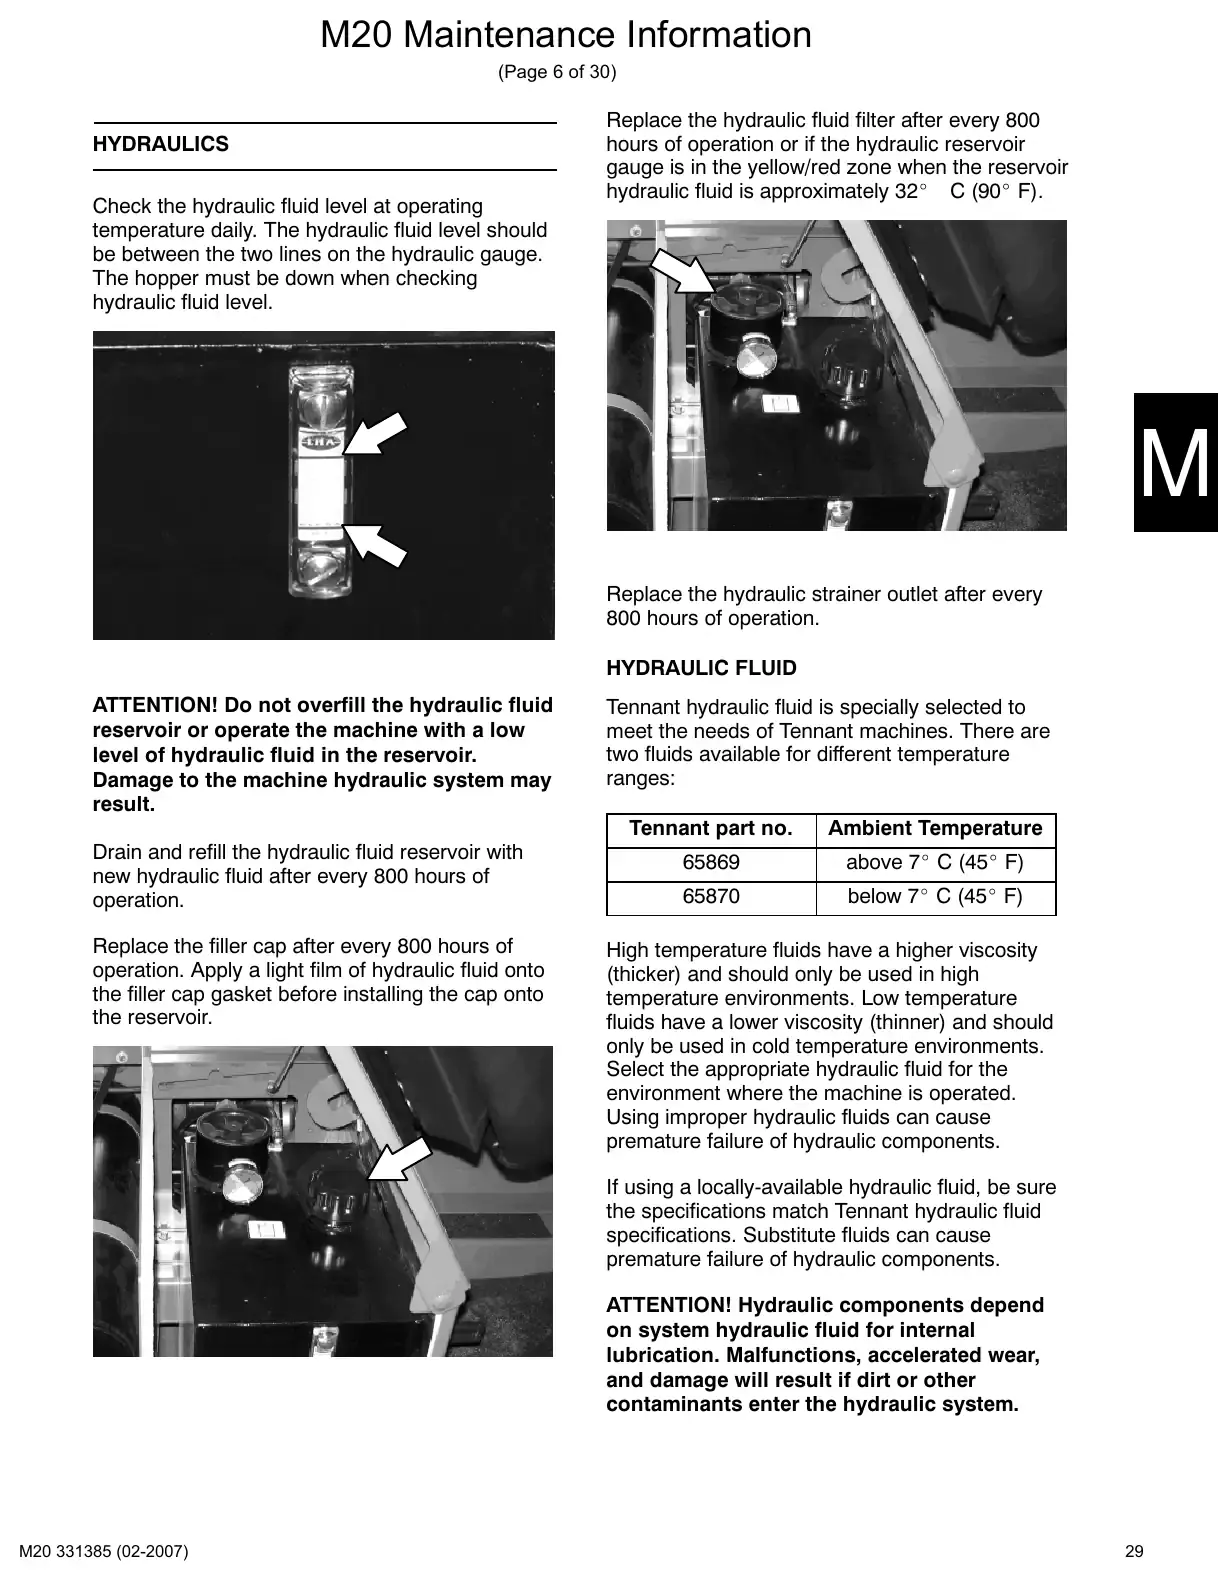
HYDRAULICS
Check the hydraulic fluid level at operating
temperature daily. The hydraulic fluid level should
be between the two lines on the hydraulic gauge.
The hopper must be down when checking
hydraulic fluid level.
Replace the hydraulic fluid filter after every 800
hours of operation or if the hydraulic reservoir
gauge is in the yellow/red zone when the reservoir
hydraulic fluid is approximately 32_ C (90_ F).
Replace the hydraulic strainer outlet after every
800 hours of operation.
HYDRAULIC FLUID
ATTENTION! Do not overfill the hydraulic fluid
reservoir or operate the machine with a low
level of hydraulic fluid in the reservoir.
Damage to the machine hydraulic system may
result.
Drain and refill the hydraulic fluid reservoir with
new hydraulic fluid after every 800 hours of
operation.
Replace the filler cap after every 800 hours of
operation. Apply a light film of hydraulic fluid onto
the filler cap gasket before installing the cap onto
the reservoir.
Tennant hydraulic fluid is specially selected to
meet the needs of Tennant machines. There are
two fluids available for different temperature
ranges:
Tennant part no.
Ambient Temperature
65869
above 7_ C (45_ F)
65870
below 7_ C (45_ F)
High temperature fluids have a higher viscosity
(thicker) and should only be used in high
temperature environments. Low temperature
fluids have a lower viscosity (thinner) and should
only be used in cold temperature environments.
Select the appropriate hydraulic fluid for the
environment where the machine is operated.
Using improper hydraulic fluids can cause
premature failure of hydraulic components.
If using a locally-available hydraulic fluid, be sure
the specifications match Tennant hydraulic fluid
specifications. Substitute fluids can cause
premature failure of hydraulic components.
ATTENTION! Hydraulic components depend
on system hydraulic fluid for internal
lubrication. Malfunctions, accelerated wear,
and damage will result if dirt or other
contaminants enter the hydraulic system.
29
Engine: oil, cooling, air and fuel filters, belts, spark plugsPages 30–32 · 3 pages
Text of manual page 30
M20 Maintenance Information
(Page 7 of 30)
HYDRAULIC HOSES
Check the hydraulic hoses after every 800 hours
of operation for wear or damage.
FOR SAFETY: When servicing machine, use
cardboard to locate leaking hydraulic fluid
under pressure.
High pressure fluid escaping from a very small
hole can almost be invisible, and can cause
serious injuries.
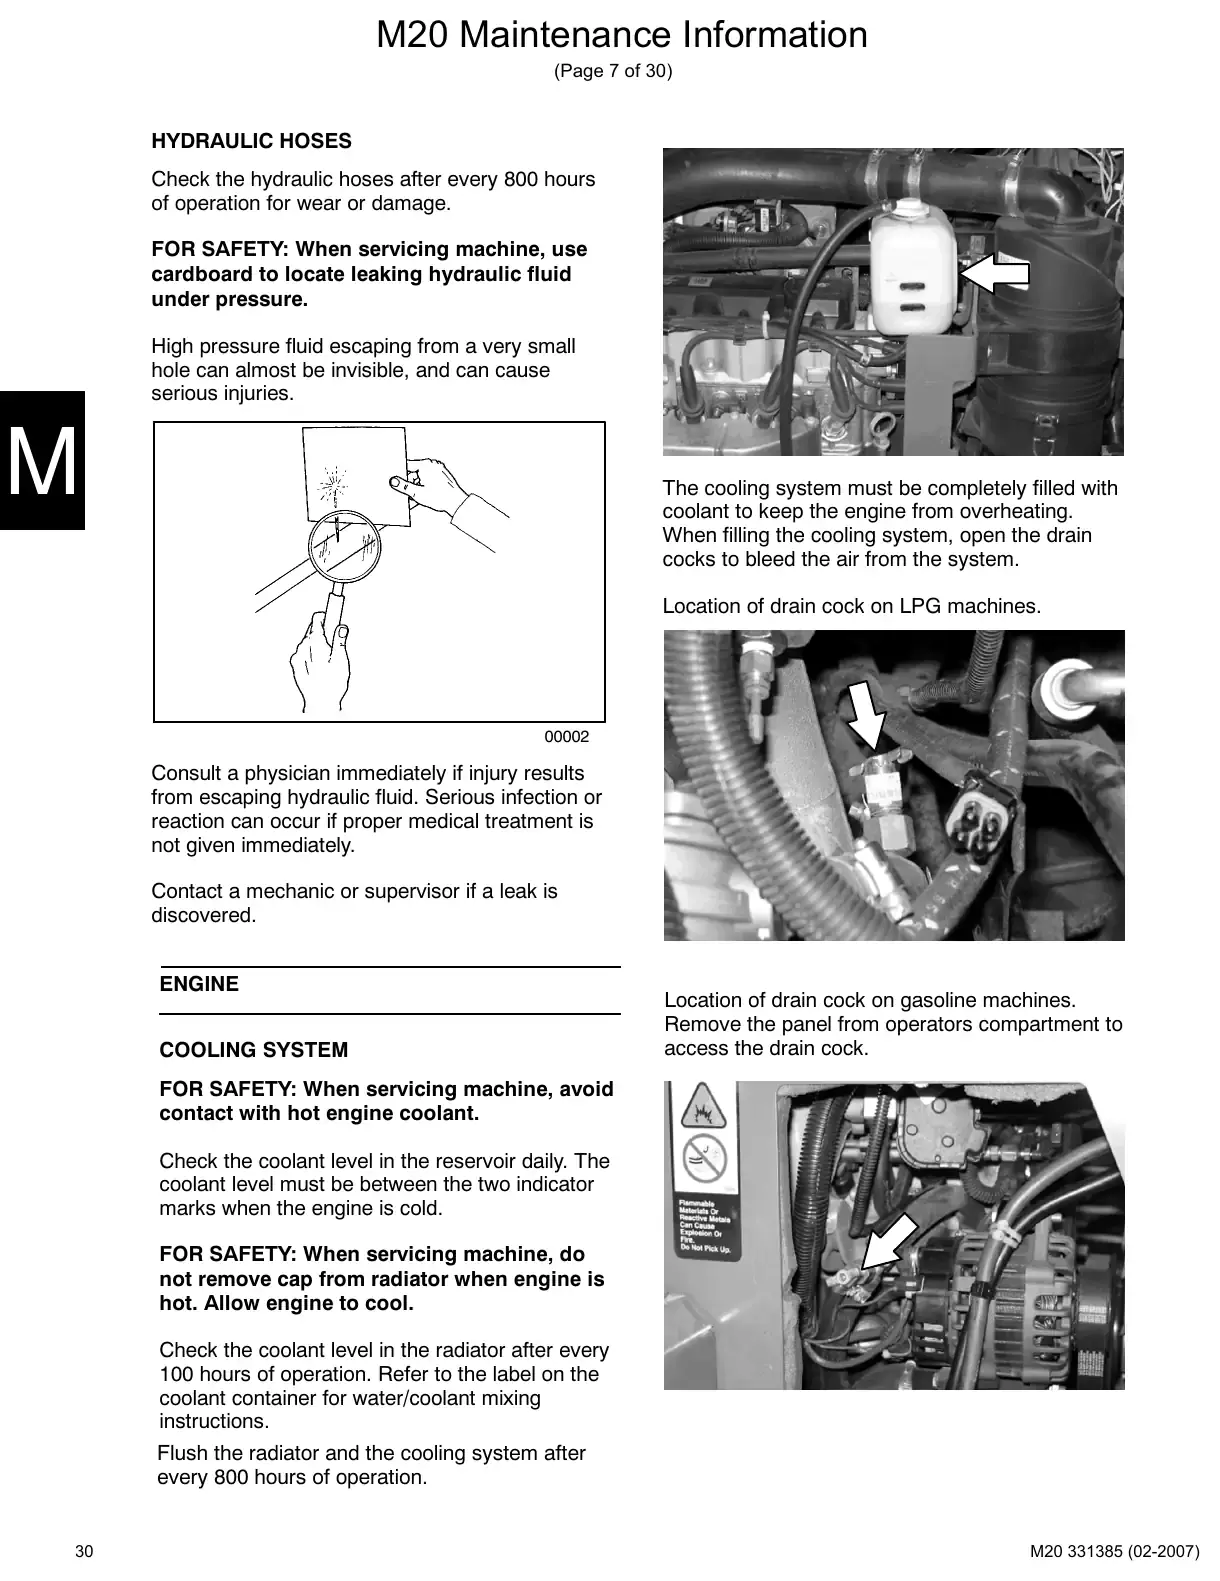
The cooling system must be completely filled with
coolant to keep the engine from overheating.
When filling the cooling system, open the drain
cocks to bleed the air from the system.
Location of drain cock on LPG machines.
00002
Consult a physician immediately if injury results
from escaping hydraulic fluid. Serious infection or
reaction can occur if proper medical treatment is
not given immediately.
Contact a mechanic or supervisor if a leak is
discovered.
ENGINE
COOLING SYSTEM
Location of drain cock on gasoline machines.
Remove the panel from operators compartment to
access the drain cock.
FOR SAFETY: When servicing machine, avoid
contact with hot engine coolant.
Check the coolant level in the reservoir daily. The
coolant level must be between the two indicator
marks when the engine is cold.
FOR SAFETY: When servicing machine, do
not remove cap from radiator when engine is
hot. Allow engine to cool.
Check the coolant level in the radiator after every
100 hours of operation. Refer to the label on the
coolant container for water/coolant mixing
instructions.
Flush the radiator and the cooling system after
every 800 hours of operation.
30
Text of manual page 31
M20 Maintenance Information
(Page 8 of 30)
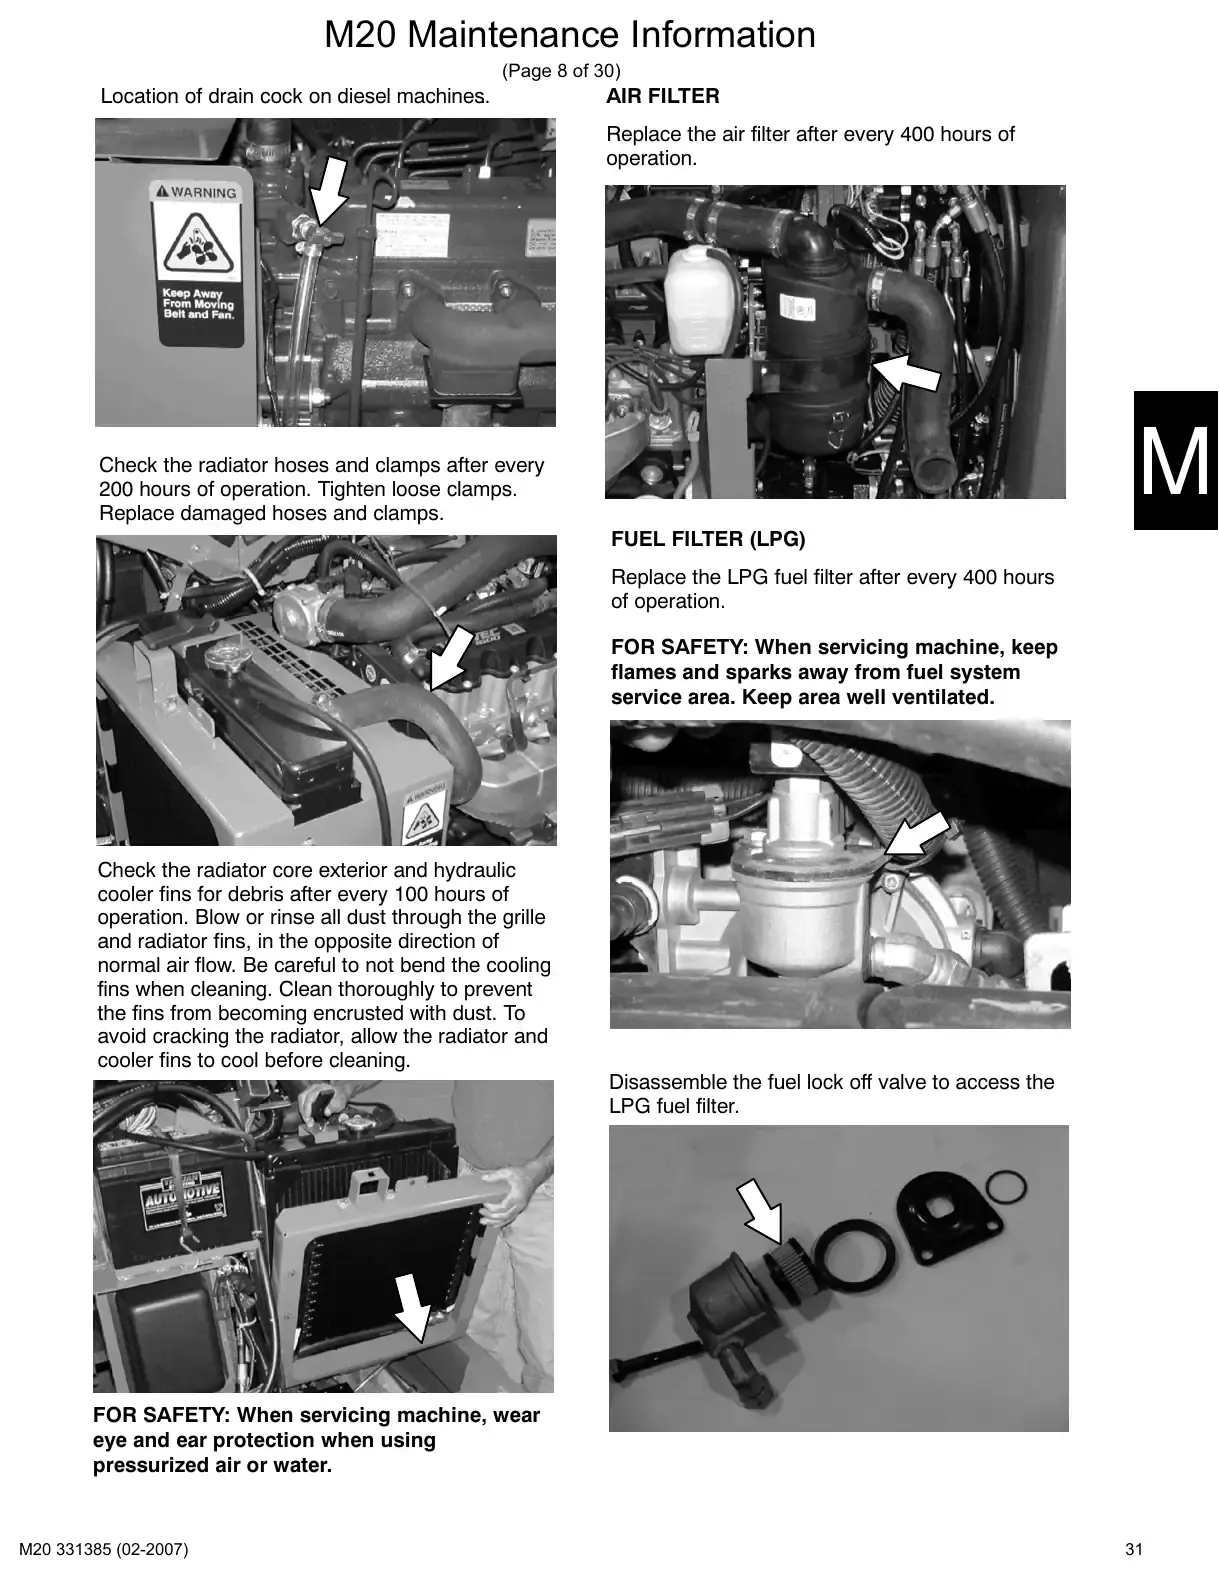
Location of drain cock on diesel machines..
AIR FILTER
Replace the air filter after every 400 hours of
operation.
Check the radiator hoses and clamps after every
200 hours of operation. Tighten loose clamps.
Replace damaged hoses and clamps.
FUEL FILTER (LPG)
Replace the LPG fuel filter after every 400 hours
of operation.
FOR SAFETY: When servicing machine, keep
flames and sparks away from fuel system
service area. Keep area well ventilated.
Check the radiator core exterior and hydraulic
cooler fins for debris after every 100 hours of
operation. Blow or rinse all dust through the grille
and radiator fins, in the opposite direction of
normal air flow. Be careful to not bend the cooling
fins when cleaning. Clean thoroughly to prevent
the fins from becoming encrusted with dust. To
avoid cracking the radiator, allow the radiator and
cooler fins to cool before cleaning.
Disassemble the fuel lock off valve to access the
LPG fuel filter.
FOR SAFETY: When servicing machine, wear
eye and ear protection when using
pressurized air or water.
31
Text of manual page 32
M20 Maintenance Information
(Page 9 of 30)
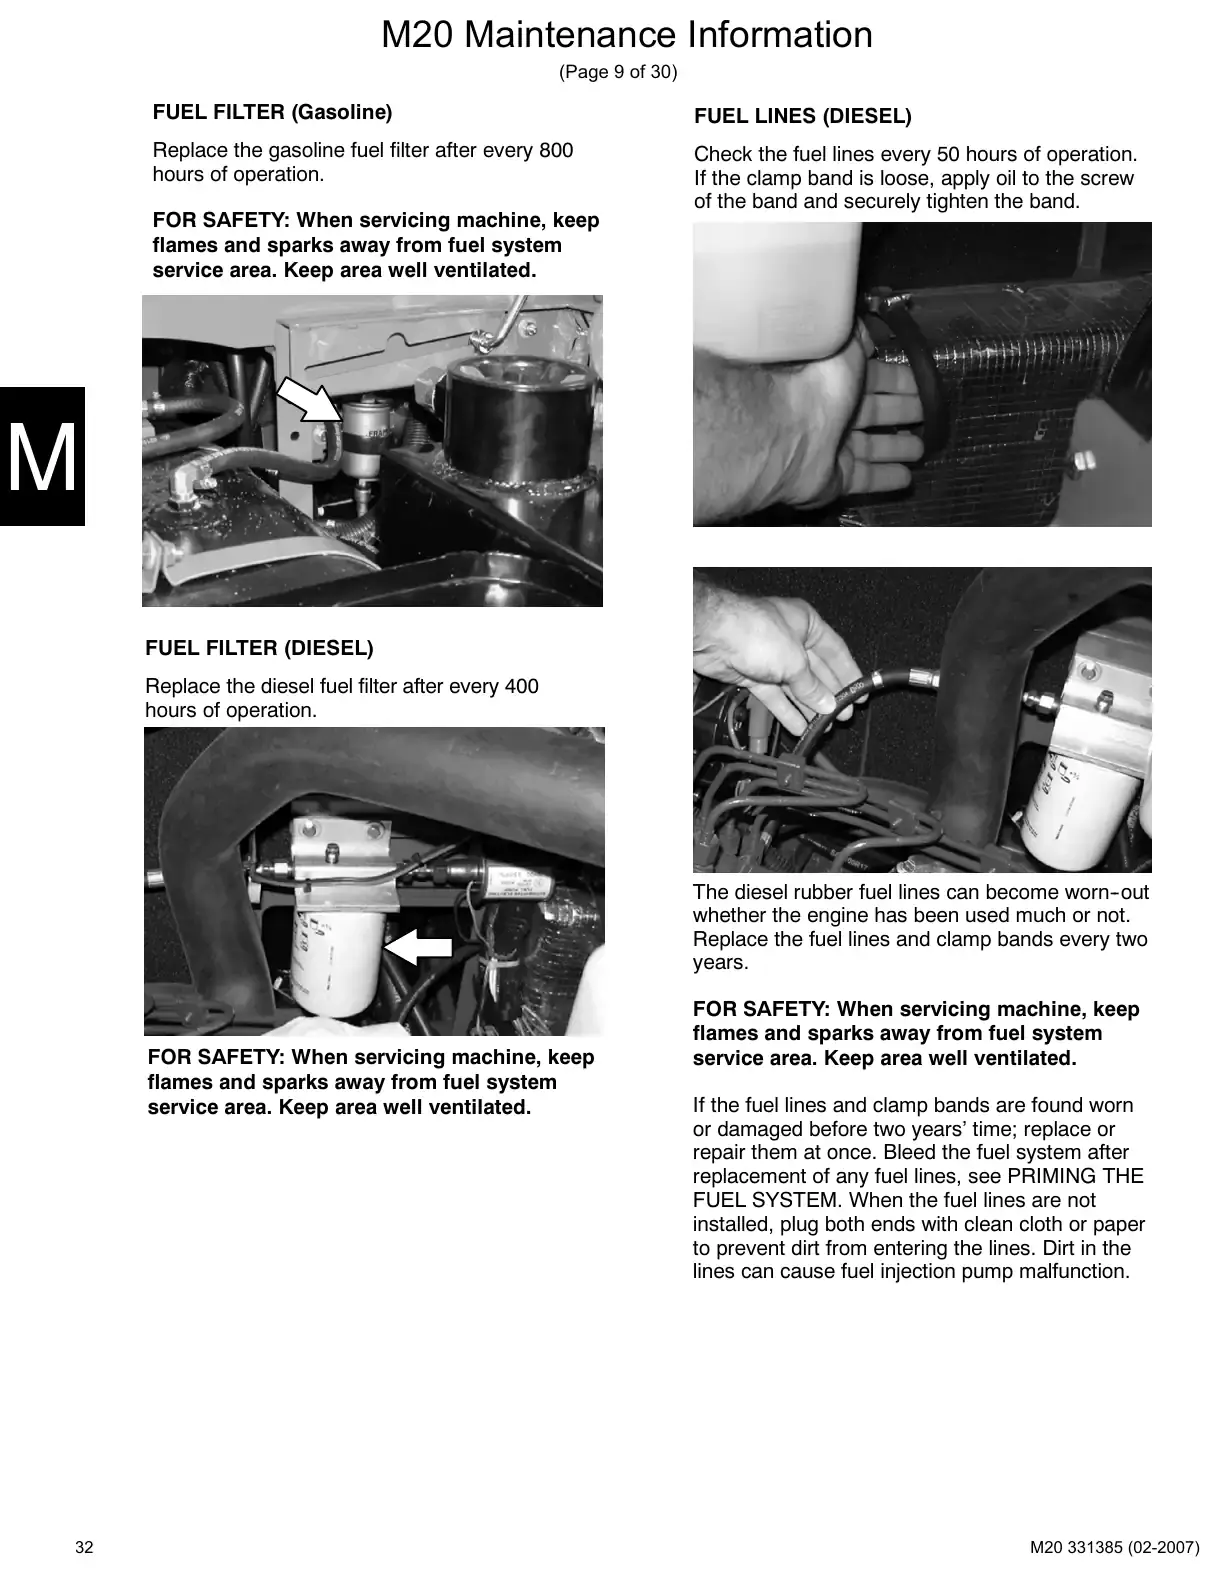
FUEL FILTER (Gasoline)
FUEL LINES (DIESEL)
Replace the gasoline fuel filter after every 800
hours of operation.
Check the fuel lines every 50 hours of operation.
If the clamp band is loose, apply oil to the screw
of the band and securely tighten the band.
FOR SAFETY: When servicing machine, keep
flames and sparks away from fuel system
service area. Keep area well ventilated.
FUEL FILTER (DIESEL)
Replace the diesel fuel filter after every 400
hours of operation.
The diesel rubber fuel lines can become worn-out
whether the engine has been used much or not.
Replace the fuel lines and clamp bands every two
years.
FOR SAFETY: When servicing machine, keep
flames and sparks away from fuel system
service area. Keep area well ventilated.
32
FOR SAFETY: When servicing machine, keep
flames and sparks away from fuel system
service area. Keep area well ventilated.
If the fuel lines and clamp bands are found worn
or damaged before two years' time; replace or
repair them at once. Bleed the fuel system after
replacement of any fuel lines, see PRIMING THE
FUEL SYSTEM. When the fuel lines are not
installed, plug both ends with clean cloth or paper
to prevent dirt from entering the lines. Dirt in the
lines can cause fuel injection pump malfunction.
Battery, fuses and relaysPages 33–34 · 2 pages
Text of manual page 33
M20 Maintenance Information
(Page 10 of 30)
PRIMING THE DIESEL FUEL SYSTEM
TIMING BELT
Typical diesel fuel systems require priming to
remove pockets of air from the fuel lines and fuel
components. This is usually required after running
out of fuel, changing fuel filter elements or
repairing a fuel system component. Air in the fuel
prevents smooth engine operation.
Check the timing belt after every 800 hours of
operation.
Replace the timing belt after every 2000 hours of
operation.
This fuel system however is self-priming. The
return line comes from the top of the injector that
allows the air to escape through the return line.
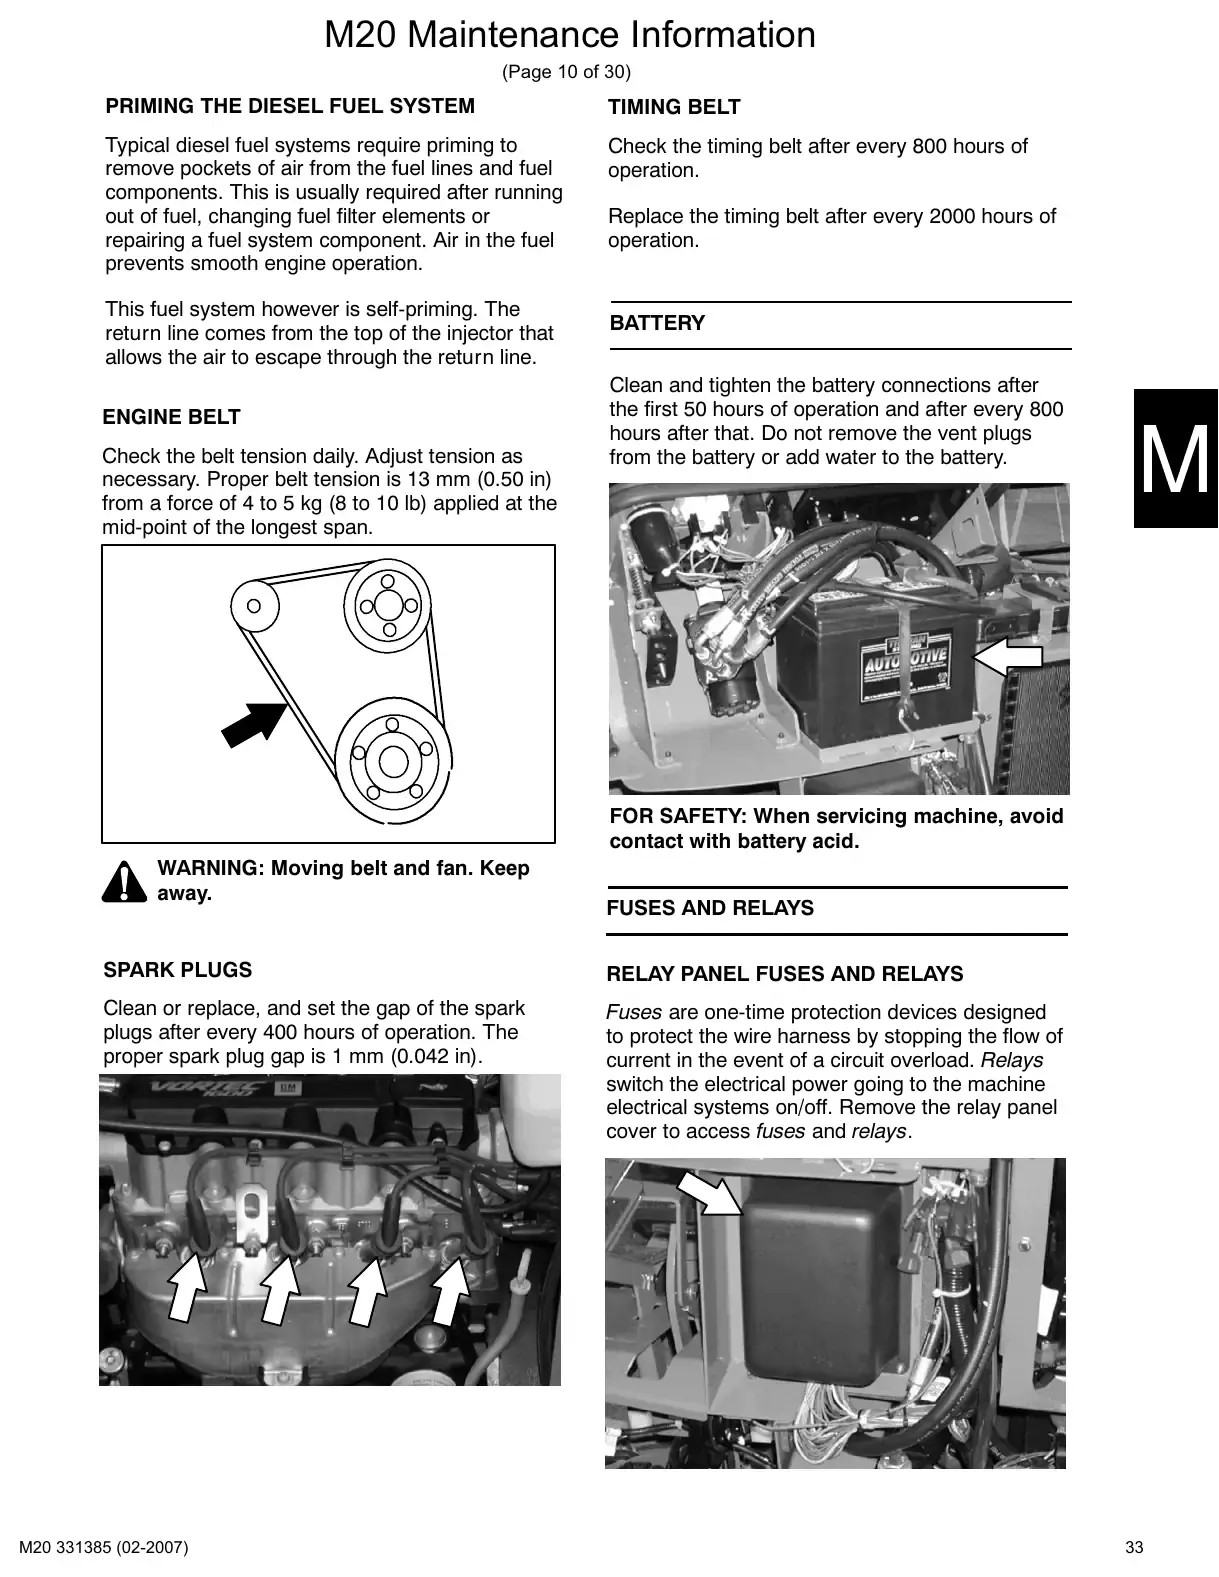
BATTERY
ENGINE BELT
Clean and tighten the battery connections after
the first 50 hours of operation and after every 800
hours after that. Do not remove the vent plugs
from the battery or add water to the battery.
Check the belt tension daily. Adjust tension as
necessary. Proper belt tension is 13 mm (0.50 in)
from a force of 4 to 5 kg (8 to 10 lb) applied at the
mid-point of the longest span.
FOR SAFETY: When servicing machine, avoid
contact with battery acid.
WARNING: Moving belt and fan. Keep
away.
FUSES AND RELAYS
SPARK PLUGS
RELAY PANEL FUSES AND RELAYS
Clean or replace, and set the gap of the spark
plugs after every 400 hours of operation. The
proper spark plug gap is 1 mm (0.042 in).
Fuses are one-time protection devices designed
to protect the wire harness by stopping the flow of
current in the event of a circuit overload. Relays
switch the electrical power going to the machine
electrical systems on/off. Remove the relay panel
cover to access fuses and relays.
33
Text of manual page 34
M20 Maintenance Information
(Page 11 of 30)
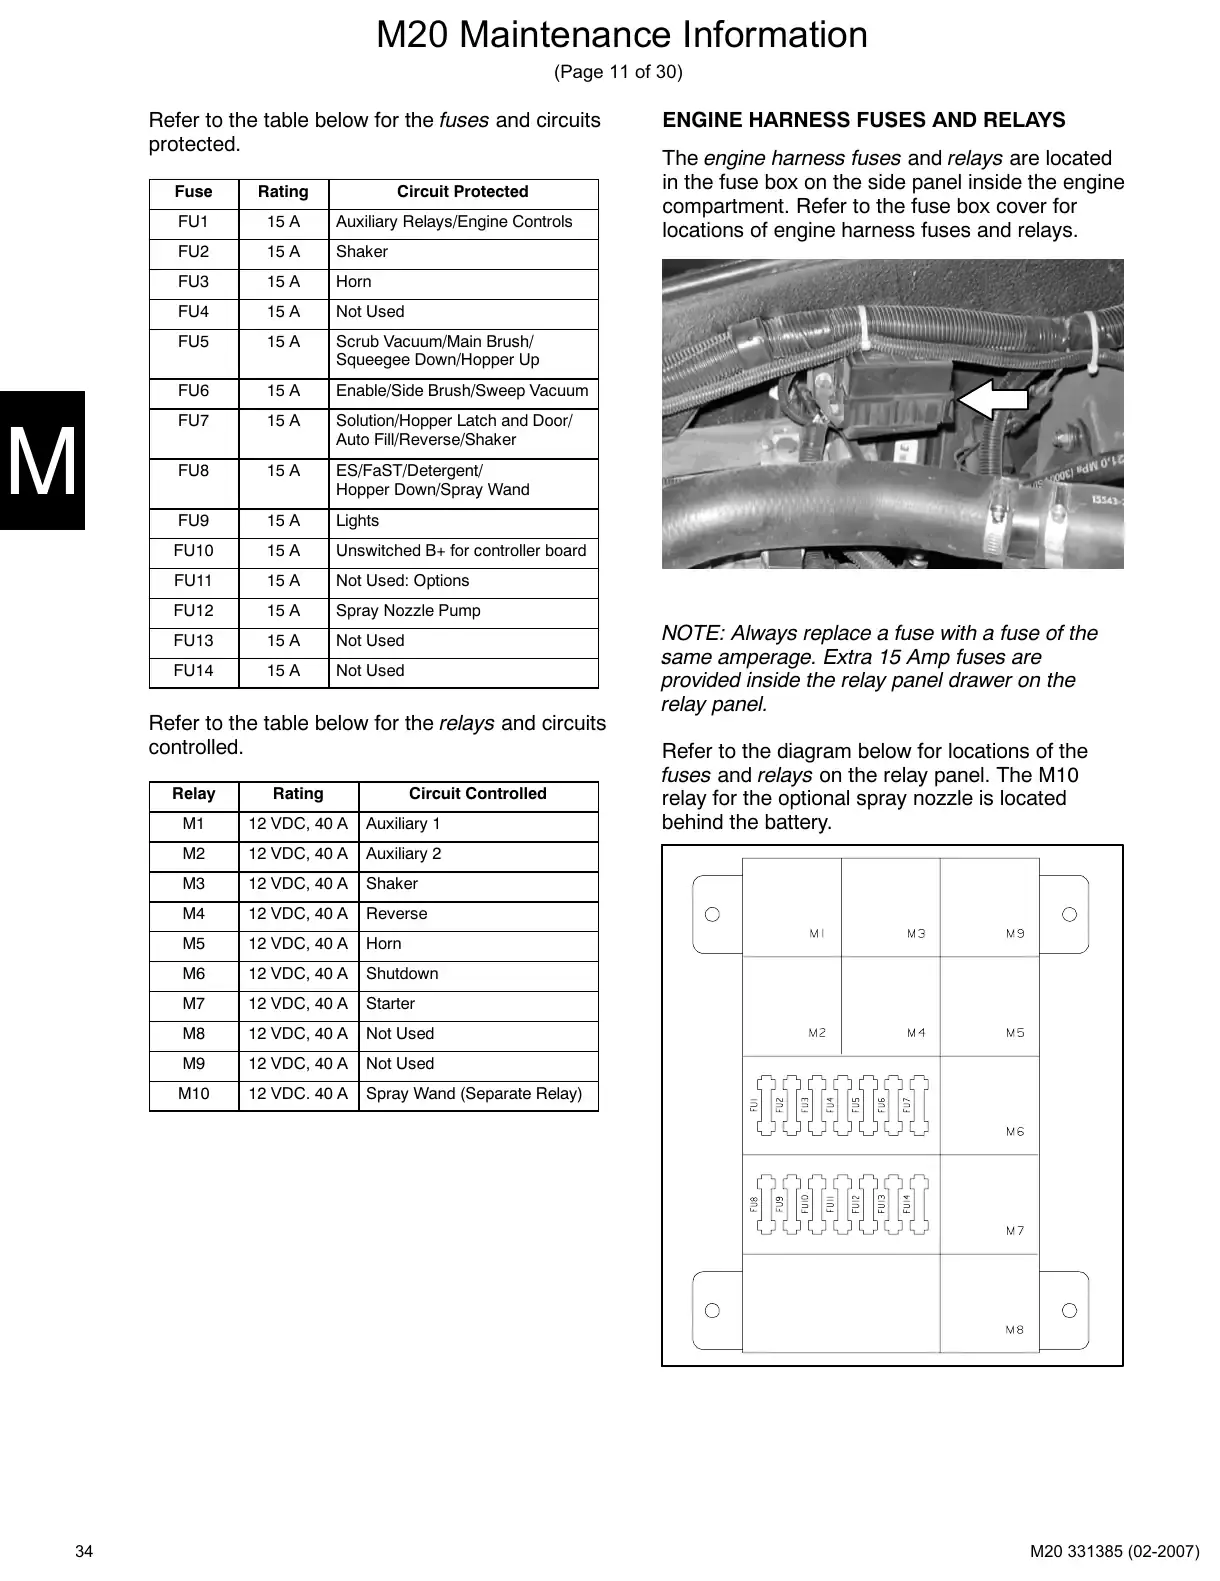
Refer to the table below for the fuses and circuits
protected.
Fuse
Rating
Circuit Protected
FU1
15 A
Auxiliary Relays/Engine Controls
FU2
15 A
Shaker
FU3
15 A
Horn
FU4
15 A
Not Used
FU5
15 A
Scrub Vacuum/Main Brush/
Squeegee Down/Hopper Up
FU6
15 A
Enable/Side Brush/Sweep Vacuum
FU7
15 A
Solution/Hopper Latch and Door/
Auto Fill/Reverse/Shaker
FU8
15 A
ES/FaST/Detergent/
Hopper Down/Spray Wand
FU9
15 A
Lights
FU10
15 A
Unswitched B+ for controller board
FU11
15 A
Not Used: Options
FU12
15 A
Spray Nozzle Pump
FU13
15 A
Not Used
FU14
15 A
Not Used
Refer to the table below for the relays and circuits
controlled.
34
Relay
Rating
Circuit Controlled
M1
12 VDC, 40 A
Auxiliary 1
M2
12 VDC, 40 A
Auxiliary 2
M3
12 VDC, 40 A
Shaker
M4
12 VDC, 40 A
Reverse
M5
12 VDC, 40 A
Horn
M6
12 VDC, 40 A
Shutdown
M7
12 VDC, 40 A
Starter
M8
12 VDC, 40 A
Not Used
M9
12 VDC, 40 A
Not Used
M10
12 VDC. 40 A
Spray Wand (Separate Relay)
ENGINE HARNESS FUSES AND RELAYS
The engine harness fuses and relays are located
in the fuse box on the side panel inside the engine
compartment. Refer to the fuse box cover for
locations of engine harness fuses and relays.
NOTE: Always replace a fuse with a fuse of the
.same amperage. Extra 15 Amp fuses are
provided inside the relay panel drawer on the
relay panel.
Refer to the diagram below for locations of the
fuses and relays on the relay panel. The M10
relay for the optional spray nozzle is located
behind the battery.
Hopper dust filter and main brushesPages 35–38 · 4 pages
Text of manual page 35
M20 Maintenance Information
(Page 12 of 30)
CLEANING THE HOPPER DUST FILTER
MAIN BRUSHES
Shake the dust filter before emptying the hopper
and at the end of every shift. Inspect and clean
the filter after every 20 hours of operation.
Replace damaged dust filters.
Check the main brushes daily for tangled wire or
string, wear, damage, and adjustment.
NOTE: The dust filter may need to be cleaned at
more frequent intervals if the machine is used in
extremely dusty conditions.
Use one of the following methods to clean the
dust filter:
Replace the brushes if large portions of the
bristles are missing or if the remaining bristles are
19 mm (0.75 in) or less in length.
For optimal cleaning performance, rotate the
brushes front to rear after every 50 hours of
operation.
SHAKING-Press the filter shaker button.
NOTE: Replace brushes in sets of two. Otherwise
one scrub brush may scrub more aggressively
than the other.
TAPPING-Tap the filter, with the dirty side down,
gently on a flat surface. Do not damage the
edges of the filter. The filter will not seal properly
in the filter frame if the edges of the filter are
damaged.
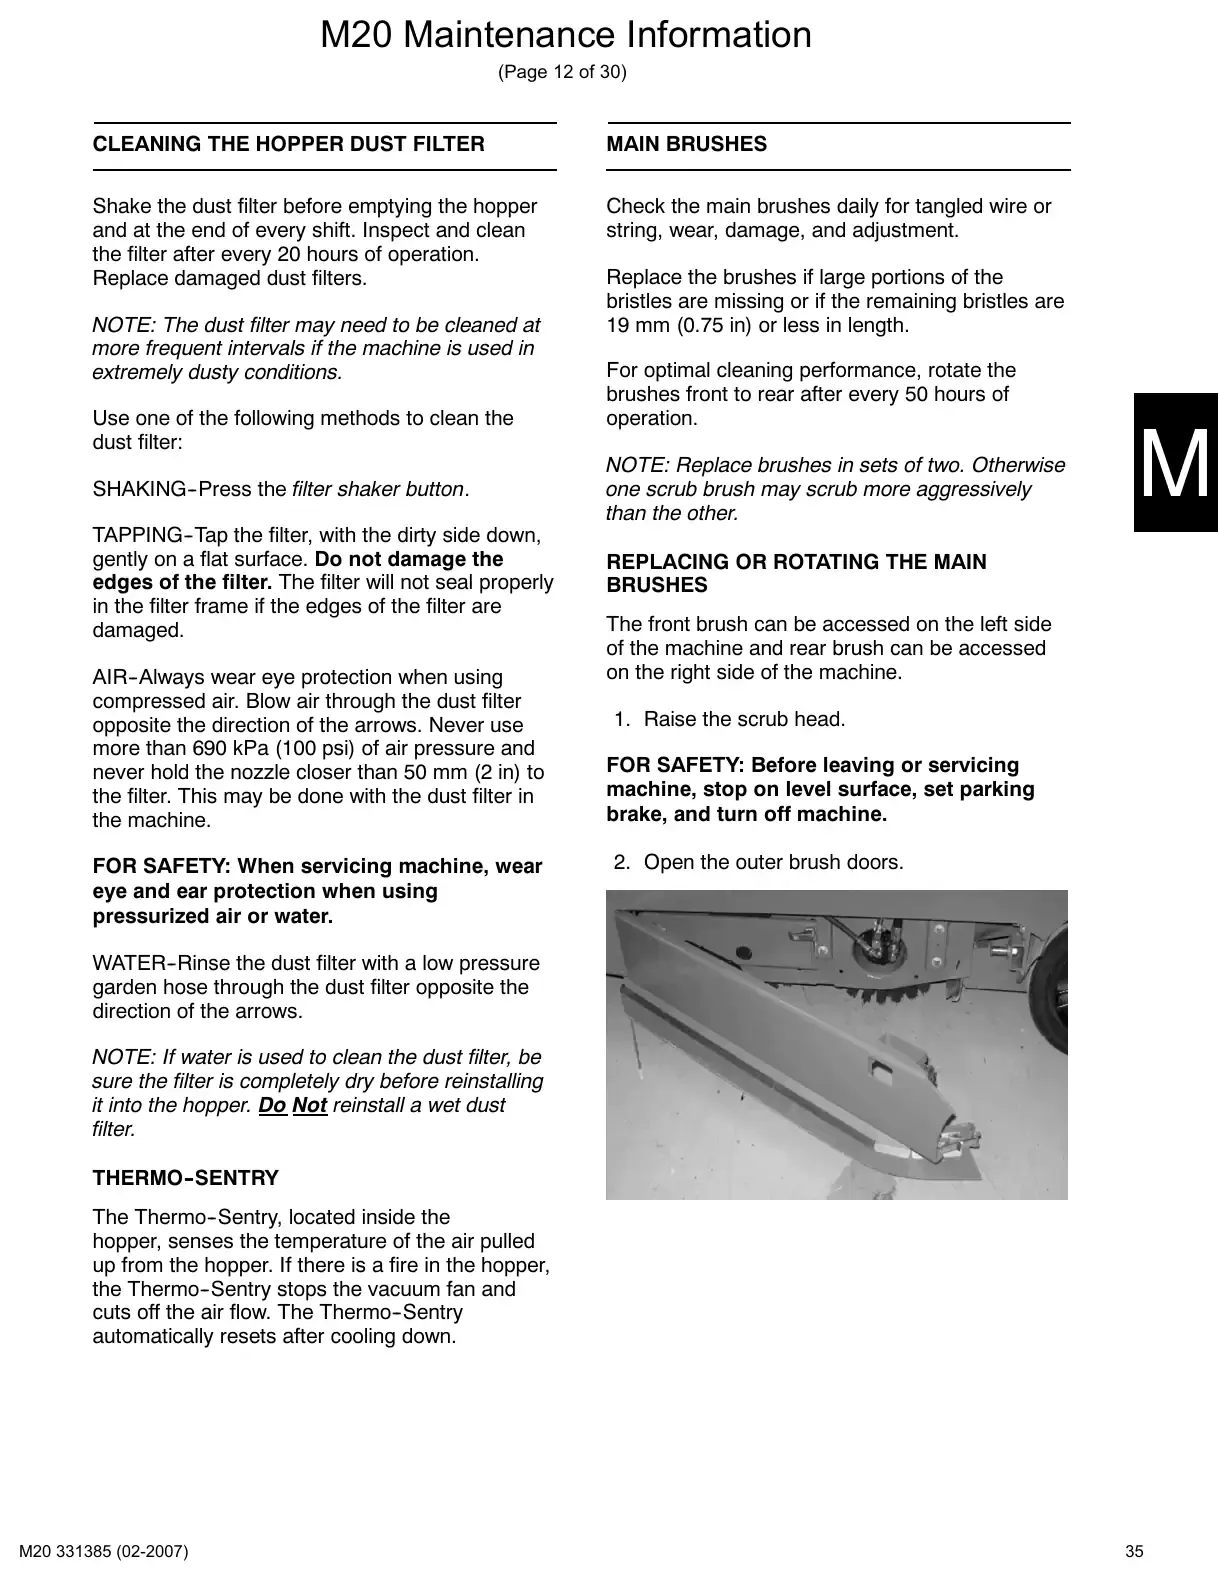
REPLACING OR ROTATING THE MAIN
BRUSHES
AIR-Always wear eye protection when using
compressed air. Blow air through the dust filter
opposite the direction of the arrows. Never use
more than 690 kPa (100 psi) of air pressure and
never hold the nozzle closer than 50 mm (2 in) to
the filter. This may be done with the dust filter in
the machine.
FOR SAFETY: When servicing machine, wear
eye and ear protection when using
pressurized air or water.
The front brush can be accessed on the left side
of the machine and rear brush can be accessed
on the right side of the machine.
1. Raise the scrub head.
FOR SAFETY: Before leaving or servicing
machine, stop on level surface, set parking
brake, and turn off machine.
2. Open the outer brush doors.
WATER-Rinse the dust filter with a low pressure
garden hose through the dust filter opposite the
direction of the arrows.
NOTE: If water is used to clean the dust filter, be
sure the filter is completely dry before reinstalling
it into the hopper. Do Not reinstall a wet dust
filter.
THERMO-SENTRY
The Thermo-Sentry, located inside the
hopper, senses the temperature of the air pulled
up from the hopper. If there is a fire in the hopper,
the Thermo-Sentry stops the vacuum fan and
cuts off the air flow. The Thermo-Sentry
automatically resets after cooling down.
35
Text of manual page 36
M20 Maintenance Information
(Page 13 of 30)
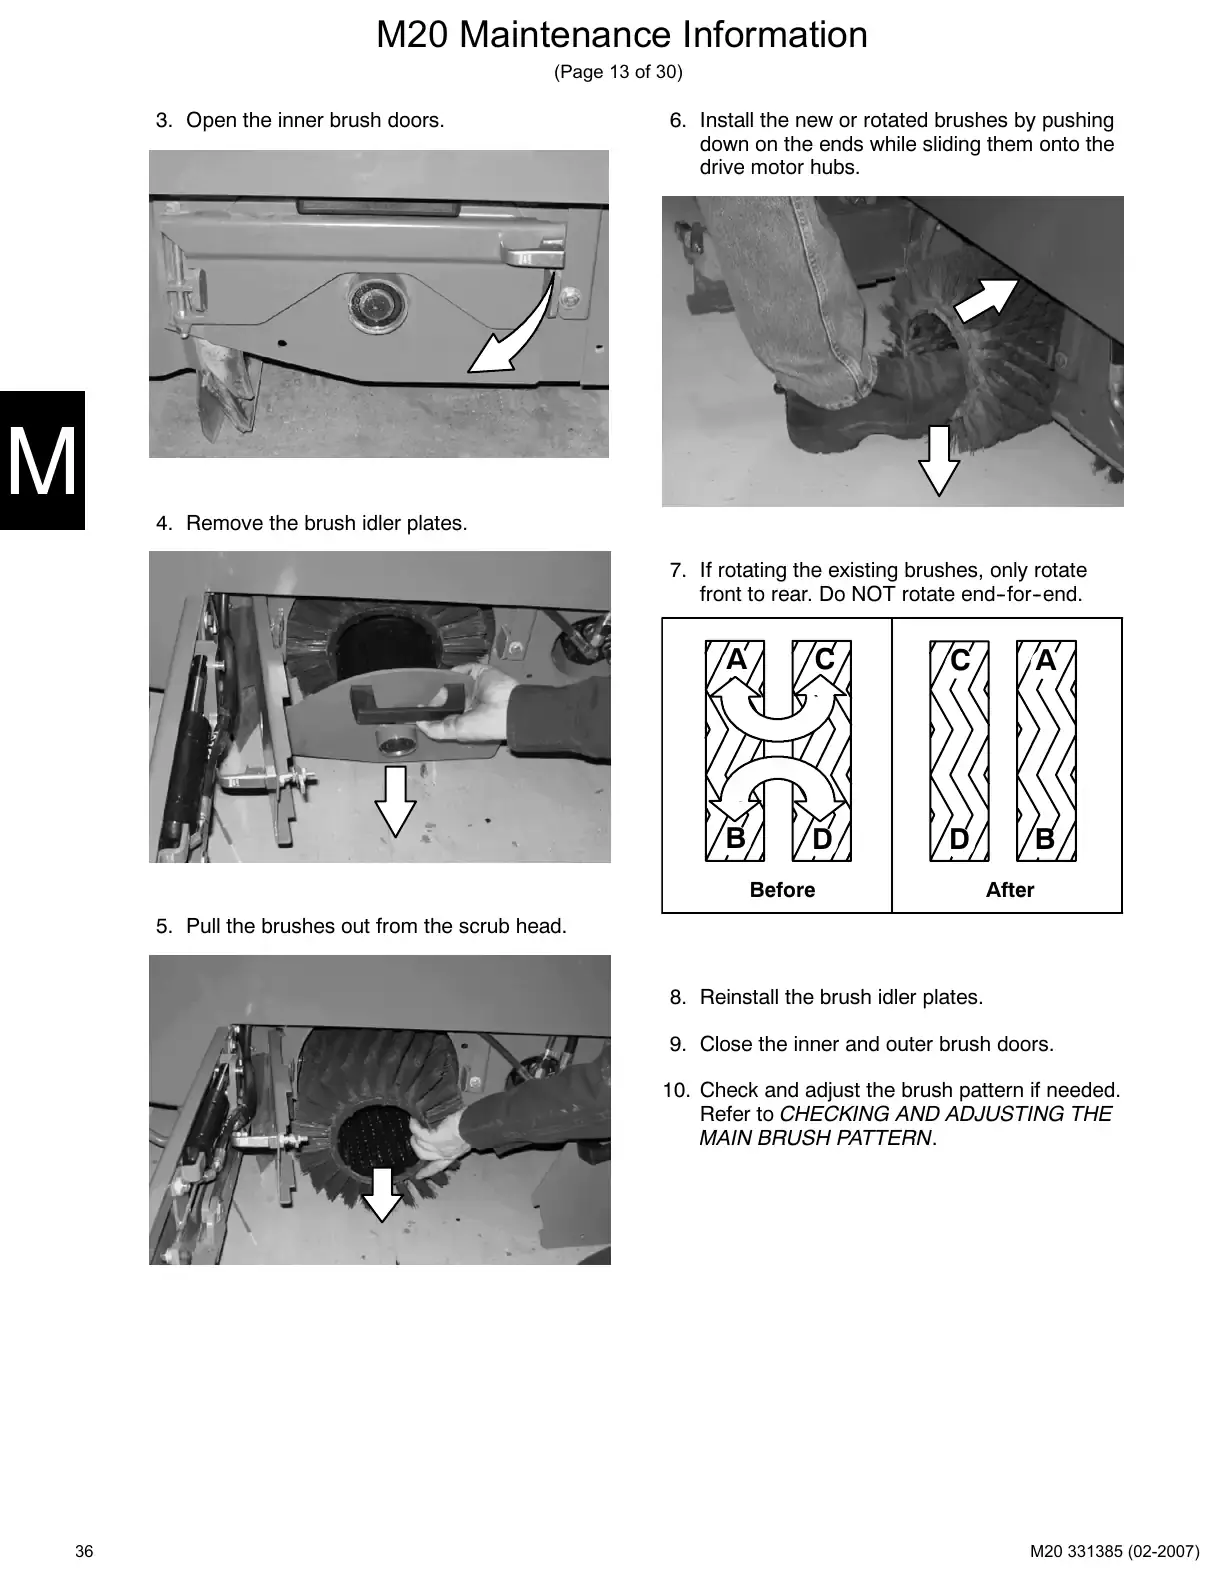
3. Open the inner brush doors.
6. Install the new or rotated brushes by pushing
down on the ends while sliding them onto the
drive motor hubs.
4. Remove the brush idler plates.
7. If rotating the existing brushes, only rotate
front to rear. Do NOT rotate end-for-end.
Before
After
5. Pull the brushes out from the scrub head.
8. Reinstall the brush idler plates.
9. Close the inner and outer brush doors.
10. Check and adjust the brush pattern if needed.
Refer to CHECKING AND ADJUSTING THE
MAIN BRUSH PATTERN.
36
Text of manual page 37
M20 Maintenance Information
(Page 14 of 30)
CHECKING THE MAIN BRUSH PATTERN
1. Apply chalk, or a similar marking material, to
a smooth and level section of the floor.
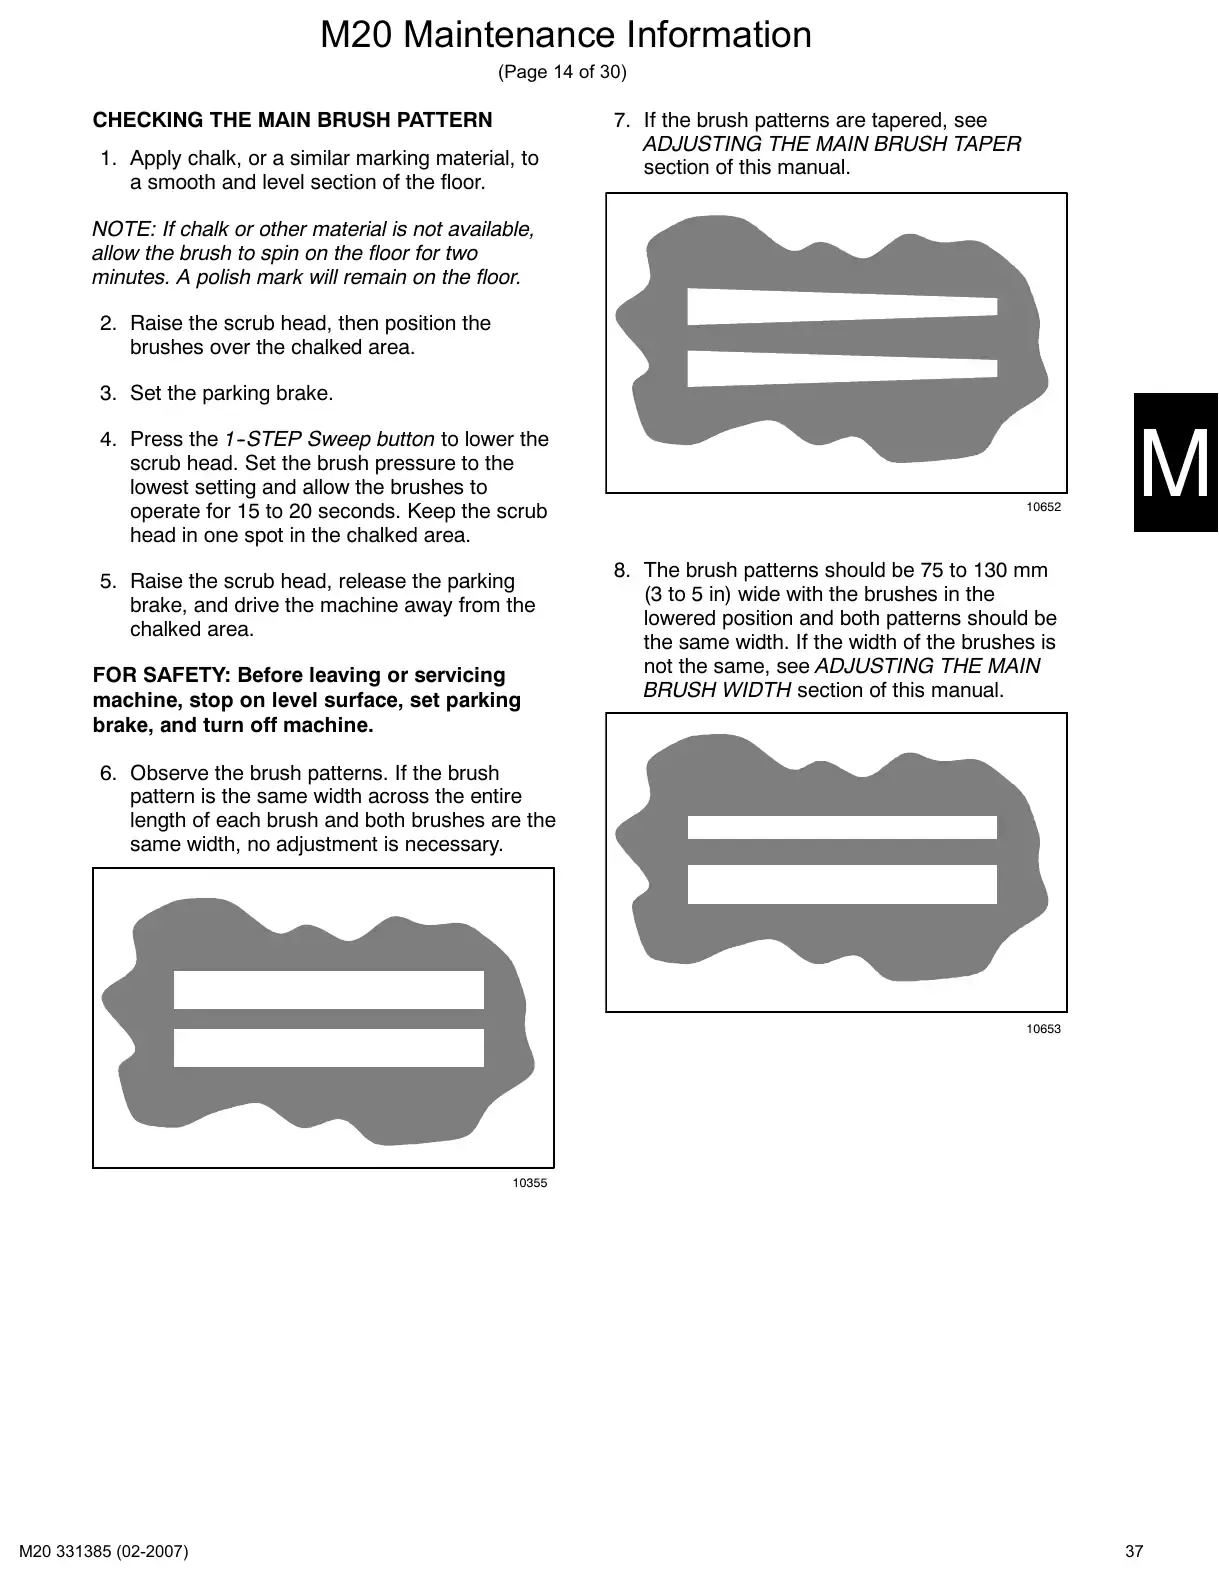
7. If the brush patterns are tapered, see
ADJUSTING THE MAIN BRUSH TAPER
section of this manual.
NOTE: If chalk or other material is not available,
allow the brush to spin on the floor for two
minutes. A polish mark will remain on the floor.
2. Raise the scrub head, then position the
brushes over the chalked area.
3. Set the parking brake.
4. Press the 1-STEP Sweep button to lower the
scrub head. Set the brush pressure to the
lowest setting and allow the brushes to
operate for 15 to 20 seconds. Keep the scrub
head in one spot in the chalked area.
5. Raise the scrub head, release the parking
brake, and drive the machine away from the
chalked area.
FOR SAFETY: Before leaving or servicing
machine, stop on level surface, set parking
brake, and turn off machine.
10652
8. The brush patterns should be 75 to 130 mm
(3 to 5 in) wide with the brushes in the
lowered position and both patterns should be
the same width. If the width of the brushes is
not the same, see ADJUSTING THE MAIN
BRUSH WIDTH section of this manual.
6. Observe the brush patterns. If the brush
pattern is the same width across the entire
length of each brush and both brushes are the
same width, no adjustment is necessary.
10653
10355
37
Text of manual page 38
M20 Maintenance Information
(Page 15 of 30)
ADJUSTING THE MAIN BRUSH TAPER
ADJUSTING THE MAIN BRUSH WIDTH
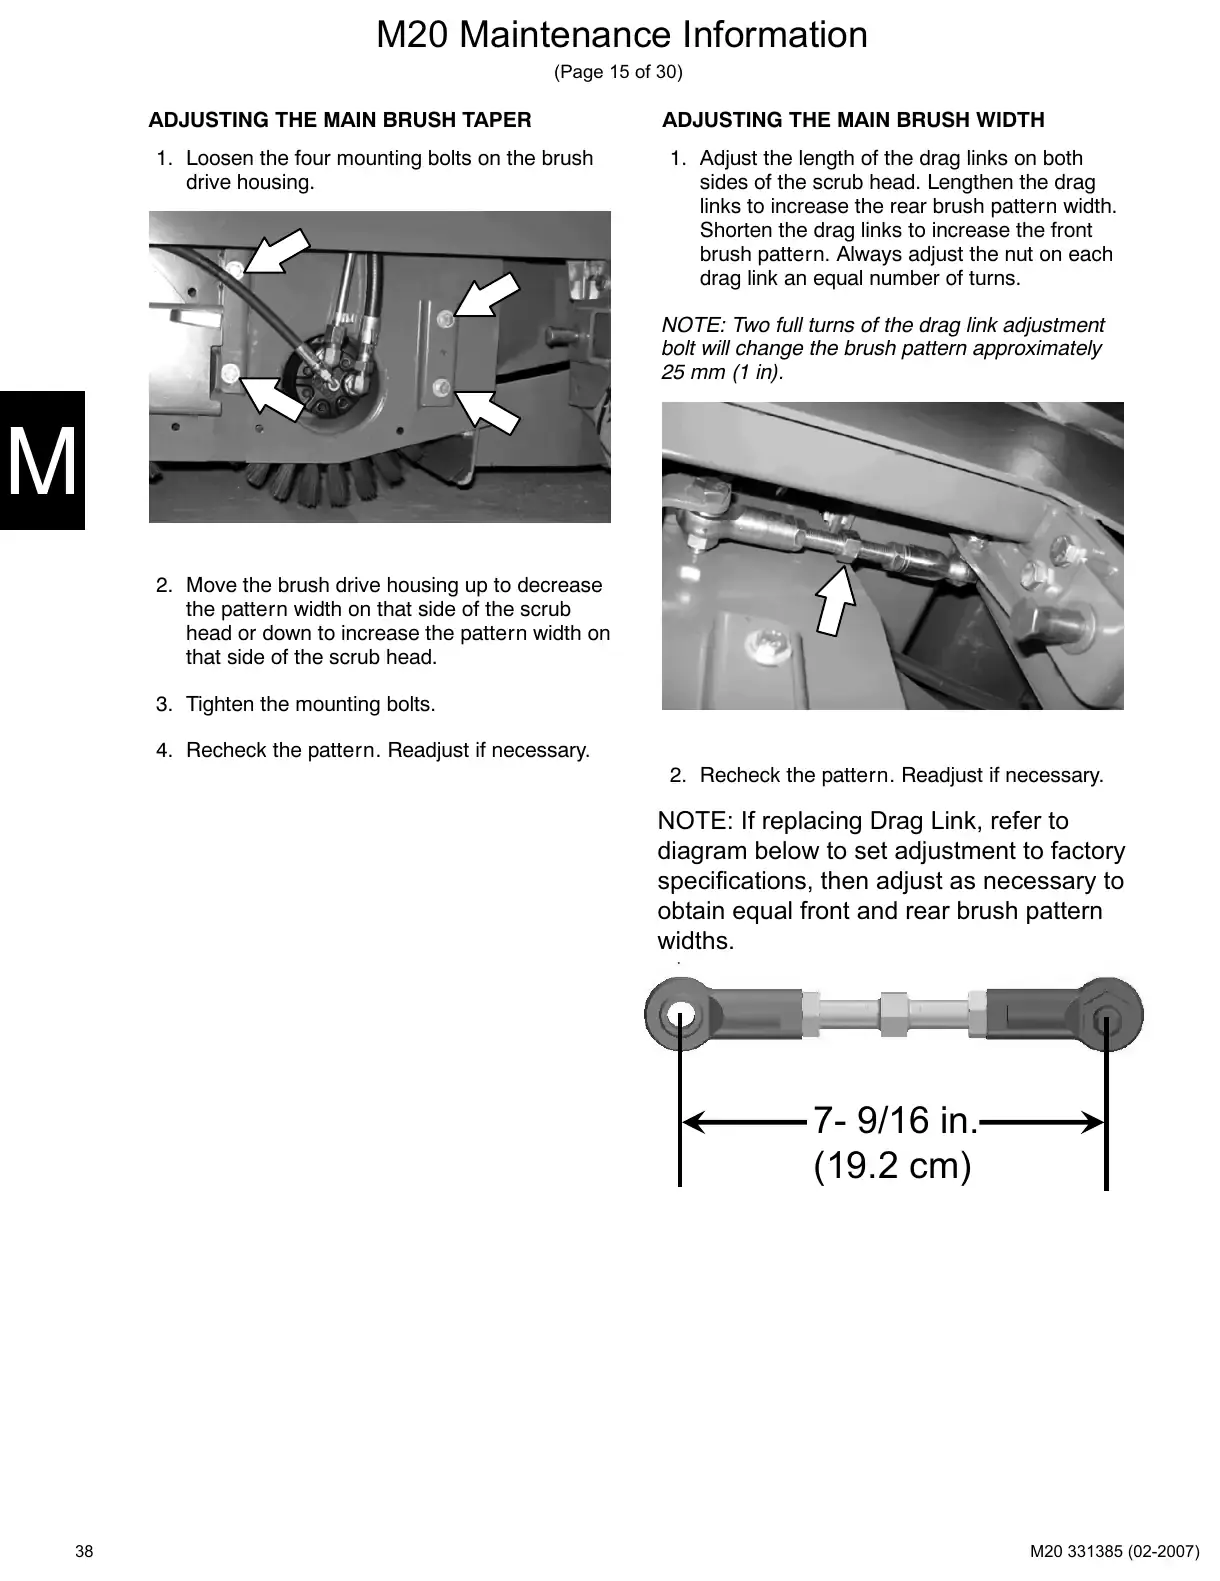
1. Loosen the four mounting bolts on the brush
drive housing.
1. Adjust the length of the drag links on both
sides of the scrub head. Lengthen the drag
links to increase the rear brush pattern width.
Shorten the drag links to increase the front
brush pattern. Always adjust the nut on each
drag link an equal number of turns.
NOTE: Two full turns of the drag link adjustment
bolt will change the brush pattern approximately
25 mm (1 in).
2. Move the brush drive housing up to decrease
the pattern width on that side of the scrub
head or down to increase the pattern width on
that side of the scrub head.
3. Tighten the mounting bolts.
4. Recheck the pattern. Readjust if necessary.
2. Recheck the pattern. Readjust if necessary.
NOTE: If replacing Drag Link, refer to
diagram below to set adjustment to factory
specifications, then adjust as necessary to
obtain equal front and rear brush pattern
widths.
7- 9/16 in.
(19.2 cm)
38
Side brushPage 39 · 1 page
Text of manual page 39
M20 Maintenance Information
(Page 16 of 30)
SIDE BRUSH (OPTION)
Check the side brush daily for wear or damage.
Remove any tangled string or wire from the side
brush or side brush drive hub.
REPLACING THE SIDE BRUSH
Replace the side brush when it no longer cleans
effectively or when the remaining bristles are
19 mm (0.75 in) or less in length for the scrub
brush or 64 mm (2.5 in) or less in length for the
sweep brush. The side brush may be changed
sooner if sweeping light litter. The bristles may be
worn shorter if sweeping heavy debris.
1. If necessary, raise the side brush.
FOR SAFETY: Before leaving or servicing
machine, stop on level surface, set parking
brake, and turn off machine.
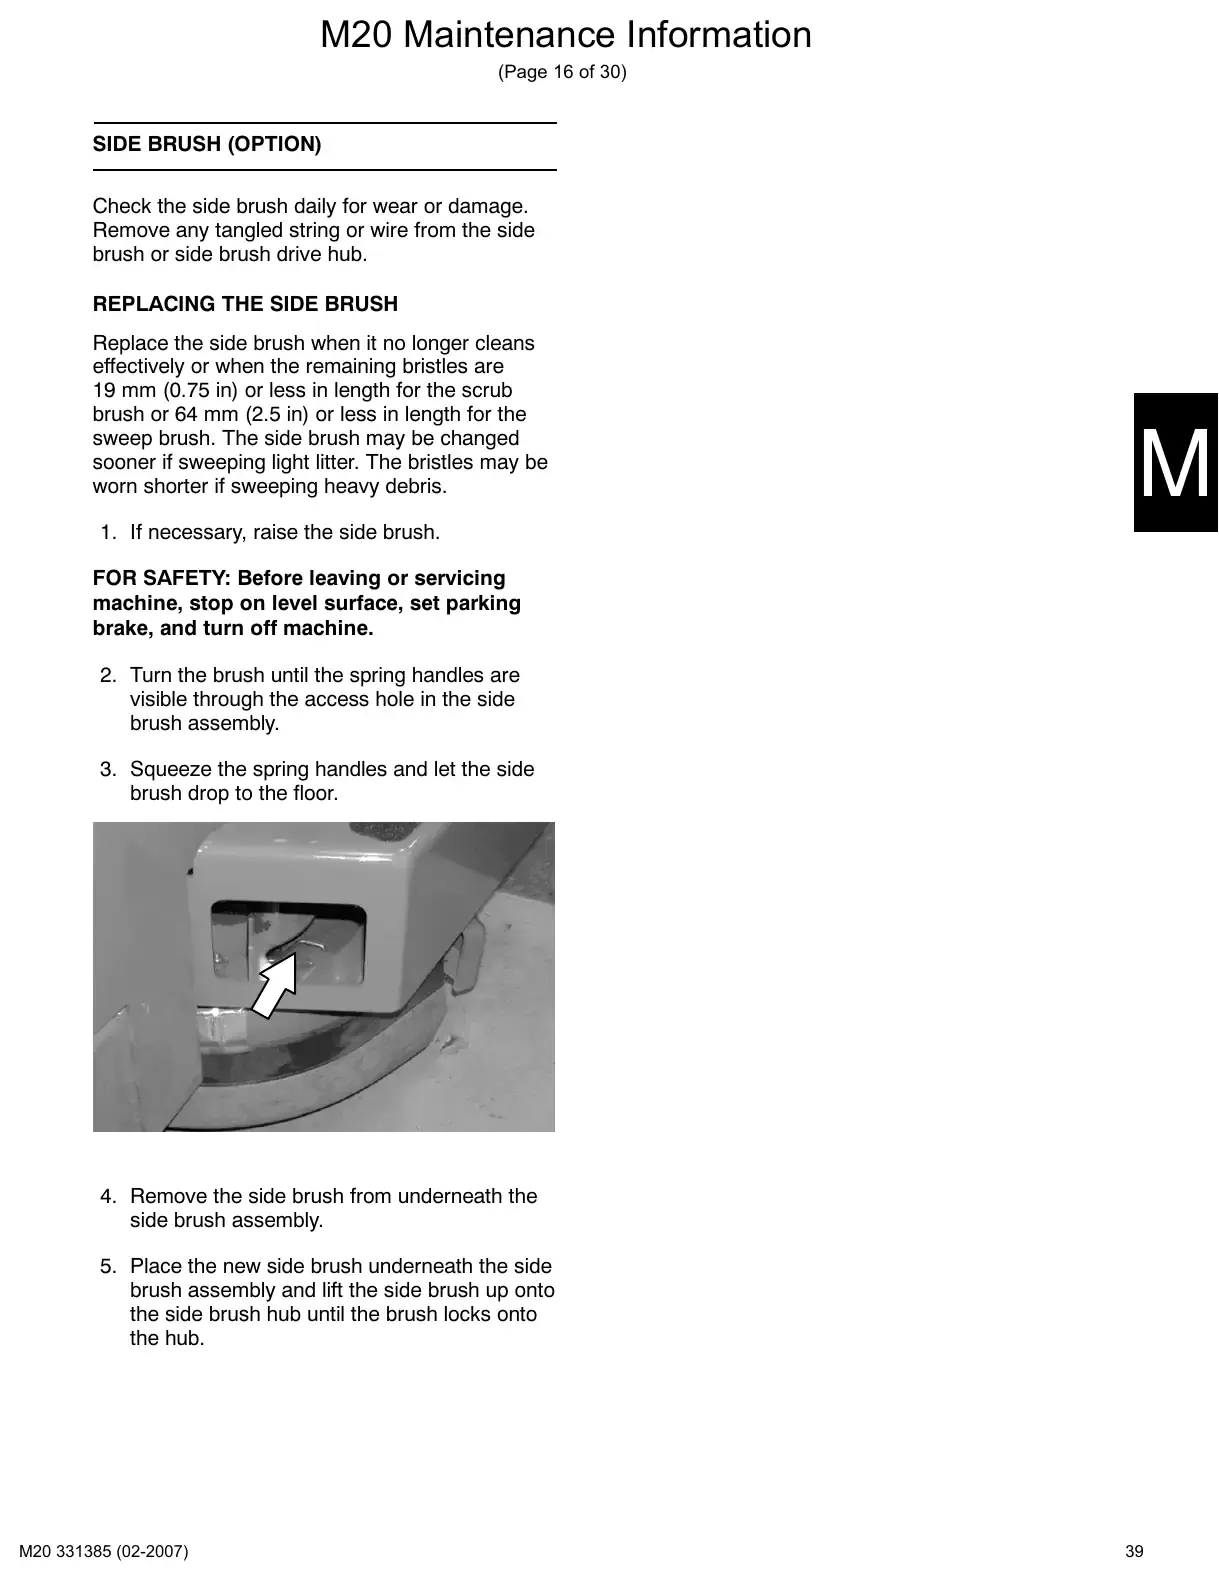
2. Turn the brush until the spring handles are
visible through the access hole in the side
brush assembly.
3. Squeeze the spring handles and let the side
brush drop to the floor.
4. Remove the side brush from underneath the
side brush assembly.
5. Place the new side brush underneath the side
brush assembly and lift the side brush up onto
the side brush hub until the brush locks onto
the hub.
39
FaST systemPages 40–41 · 2 pages
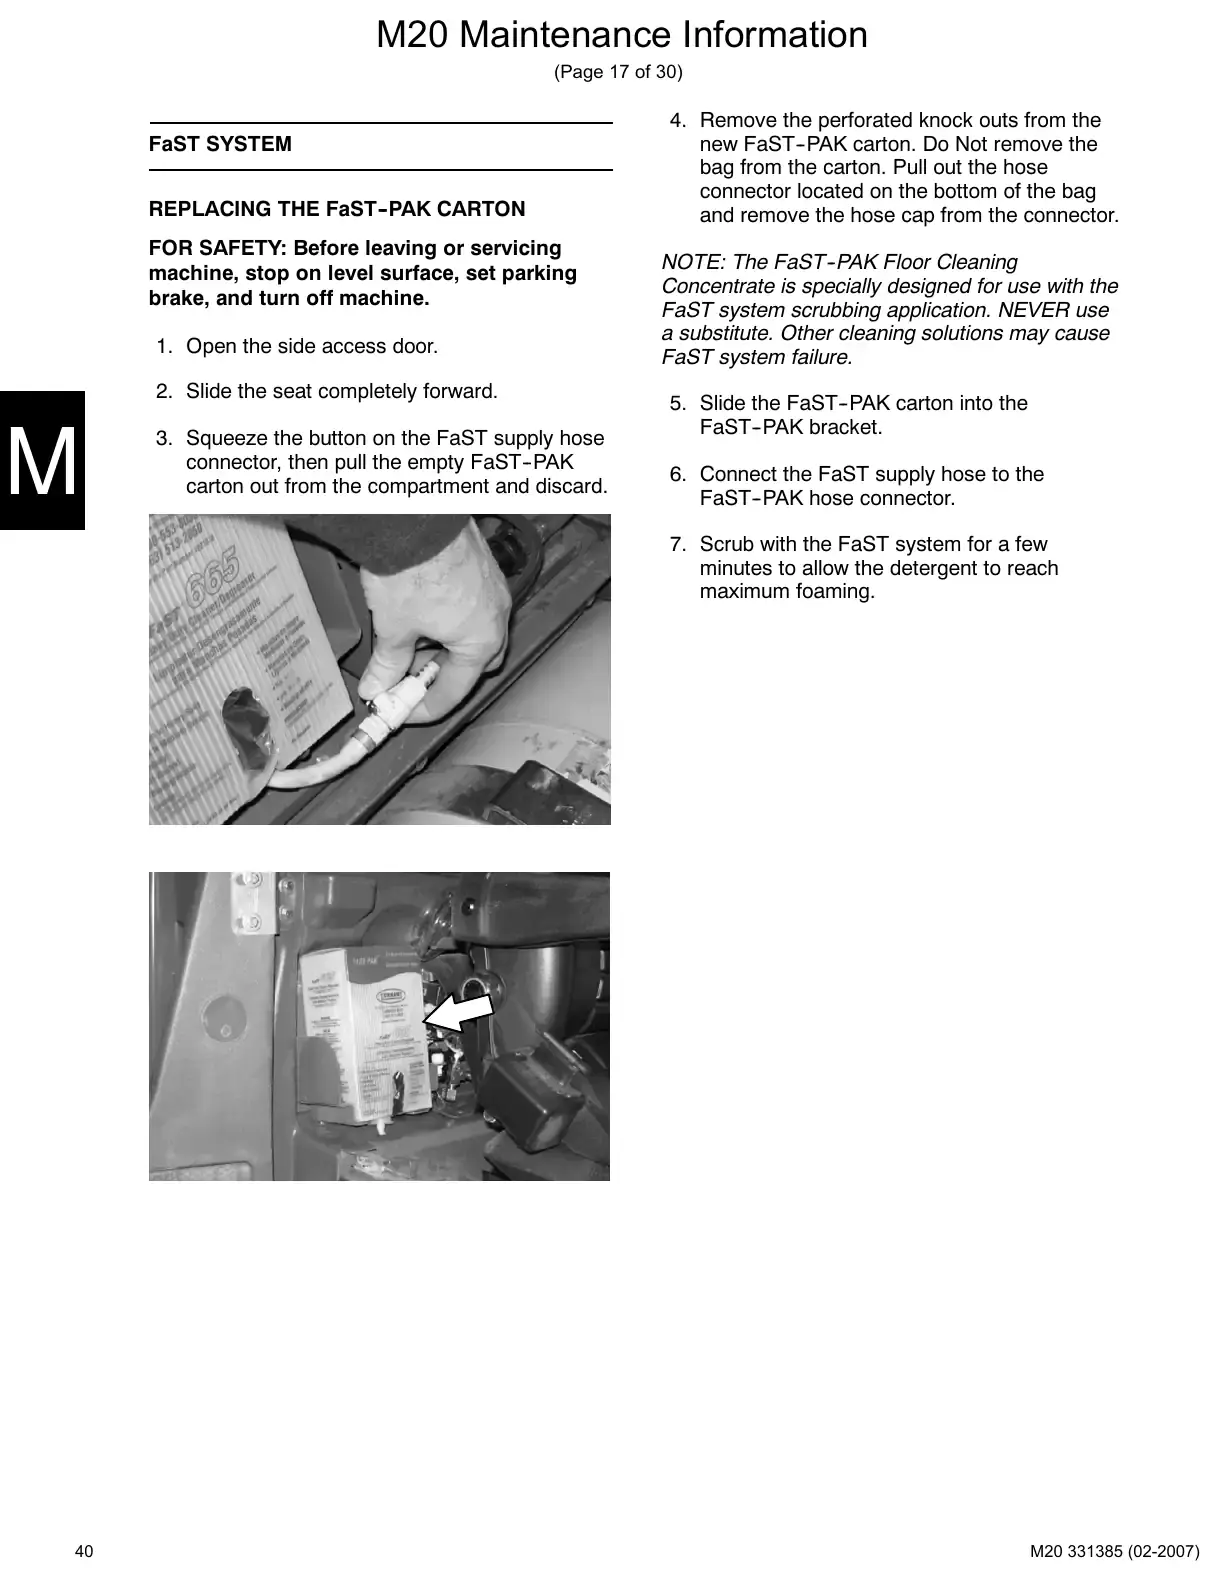
Text of manual page 40
M20 Maintenance Information
(Page 17 of 30)
FaST SYSTEM
REPLACING THE FaST-PAK CARTON
FOR SAFETY: Before leaving or servicing
machine, stop on level surface, set parking
brake, and turn off machine.
1. Open the side access door.
2. Slide the seat completely forward.
3. Squeeze the button on the FaST supply hose
connector, then pull the empty FaST-PAK
carton out from the compartment and discard.
4. Remove the perforated knock outs from the
new FaST-PAK carton. Do Not remove the
bag from the carton. Pull out the hose
connector located on the bottom of the bag
and remove the hose cap from the connector.
NOTE: The FaST-PAK Floor Cleaning
Concentrate is specially designed for use with the
FaST system scrubbing application. NEVER use
a substitute. Other cleaning solutions may cause
FaST system failure.
5. Slide the FaST-PAK carton into the
FaST-PAK bracket.
6. Connect the FaST supply hose to the
FaST-PAK hose connector.
7. Scrub with the FaST system for a few
minutes to allow the detergent to reach
maximum foaming.
40
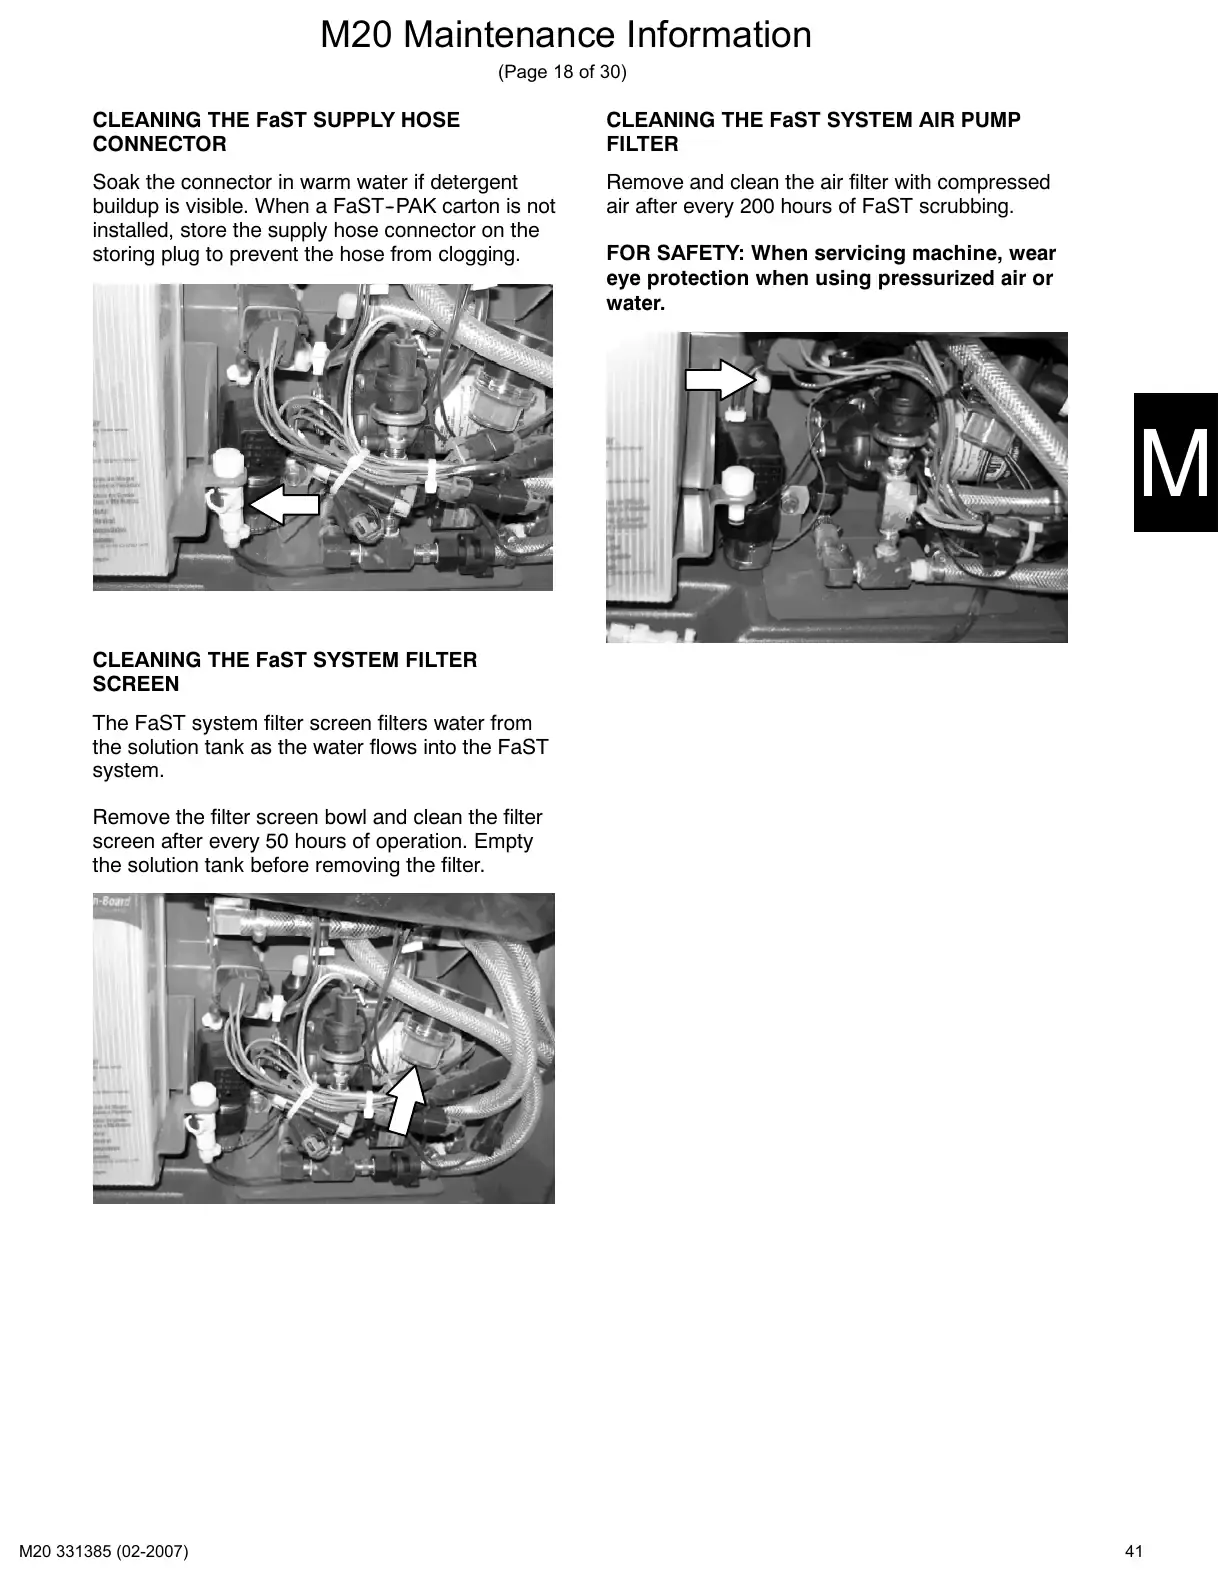
Text of manual page 41
M20 Maintenance Information
(Page 18 of 30)
CLEANING THE FaST SUPPLY HOSE
CONNECTOR
CLEANING THE FaST SYSTEM AIR PUMP
FILTER
Soak the connector in warm water if detergent
buildup is visible. When a FaST-PAK carton is not
installed, store the supply hose connector on the
storing plug to prevent the hose from clogging.
Remove and clean the air filter with compressed
air after every 200 hours of FaST scrubbing.
FOR SAFETY: When servicing machine, wear
eye protection when using pressurized air or
water.
CLEANING THE FaST SYSTEM FILTER
SCREEN
The FaST system filter screen filters water from
the solution tank as the water flows into the FaST
system.
Remove the filter screen bowl and clean the filter
screen after every 50 hours of operation. Empty
the solution tank before removing the filter.
41
Squeegee blades: replace, rotate, level and adjustPages 42–47 · 6 pages
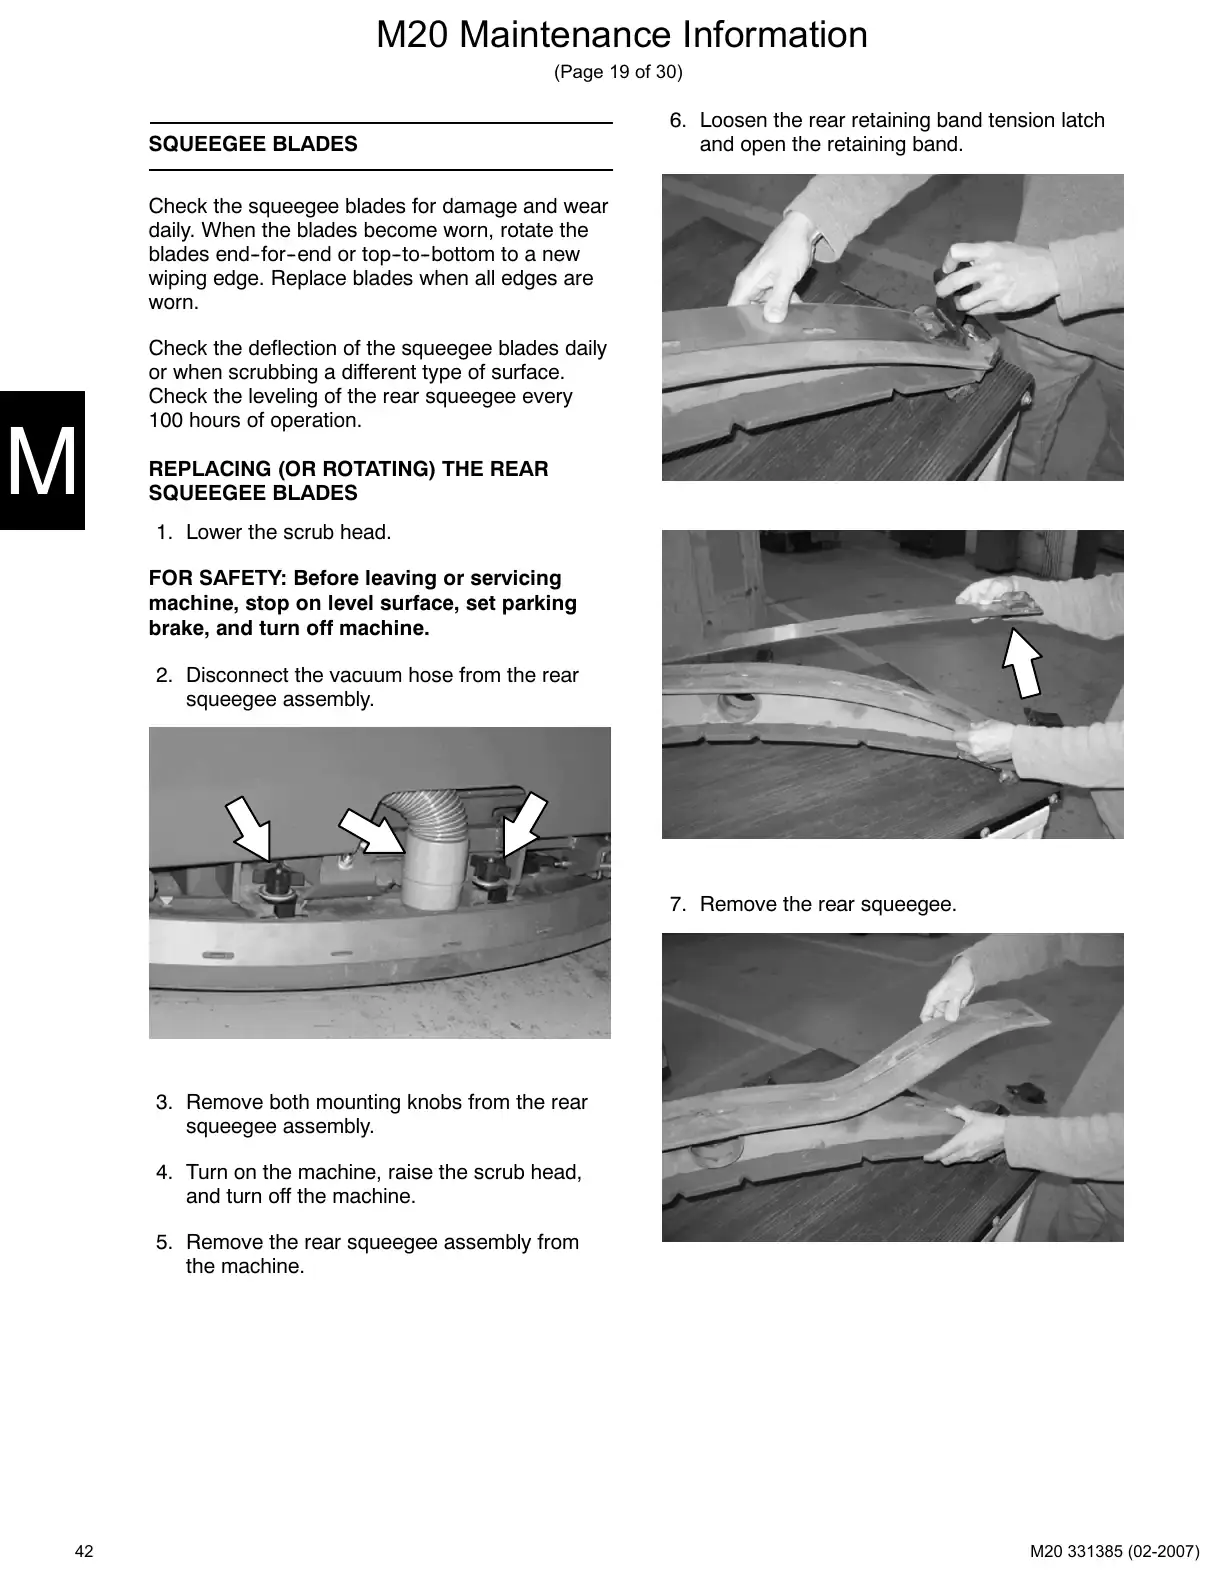
Text of manual page 42
M20 Maintenance Information
(Page 19 of 30)
SQUEEGEE BLADES
6. Loosen the rear retaining band tension latch
and open the retaining band.
Check the squeegee blades for damage and wear
daily. When the blades become worn, rotate the
blades end-for-end or top-to-bottom to a new
wiping edge. Replace blades when all edges are
worn.
Check the deflection of the squeegee blades daily
or when scrubbing a different type of surface.
Check the leveling of the rear squeegee every
100 hours of operation.
REPLACING (OR ROTATING) THE REAR
SQUEEGEE BLADES
1. Lower the scrub head.
FOR SAFETY: Before leaving or servicing
machine, stop on level surface, set parking
brake, and turn off machine.
2. Disconnect the vacuum hose from the rear
squeegee assembly.
7. Remove the rear squeegee.
3. Remove both mounting knobs from the rear
squeegee assembly.
4. Turn on the machine, raise the scrub head,
and turn off the machine.
5. Remove the rear squeegee assembly from
the machine.
42
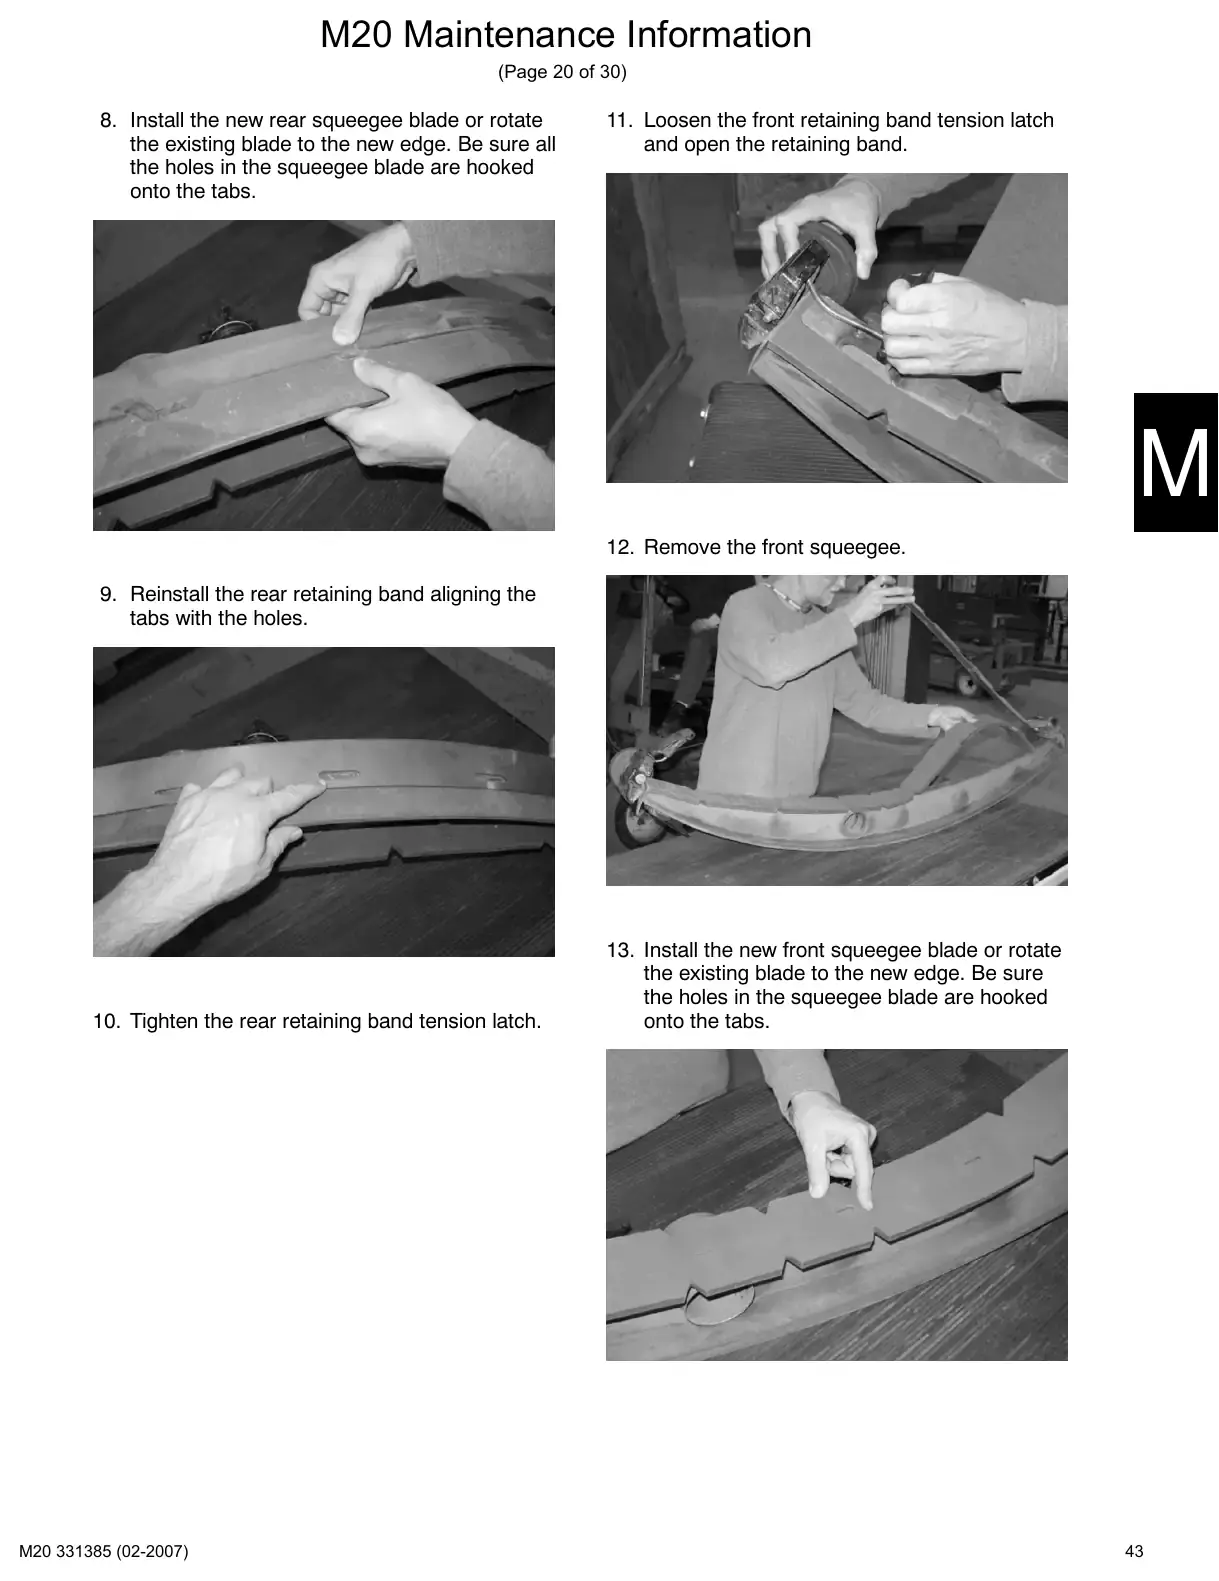
Text of manual page 43
M20 Maintenance Information
(Page 20 of 30)
8. Install the new rear squeegee blade or rotate
the existing blade to the new edge. Be sure all
the holes in the squeegee blade are hooked
onto the tabs.
11. Loosen the front retaining band tension latch
and open the retaining band.
12. Remove the front squeegee.
9. Reinstall the rear retaining band aligning the
tabs with the holes.
10. Tighten the rear retaining band tension latch.
13. Install the new front squeegee blade or rotate
the existing blade to the new edge. Be sure
the holes in the squeegee blade are hooked
onto the tabs.
43
Text of manual page 44
M20 Maintenance Information
(Page 21 of 30)
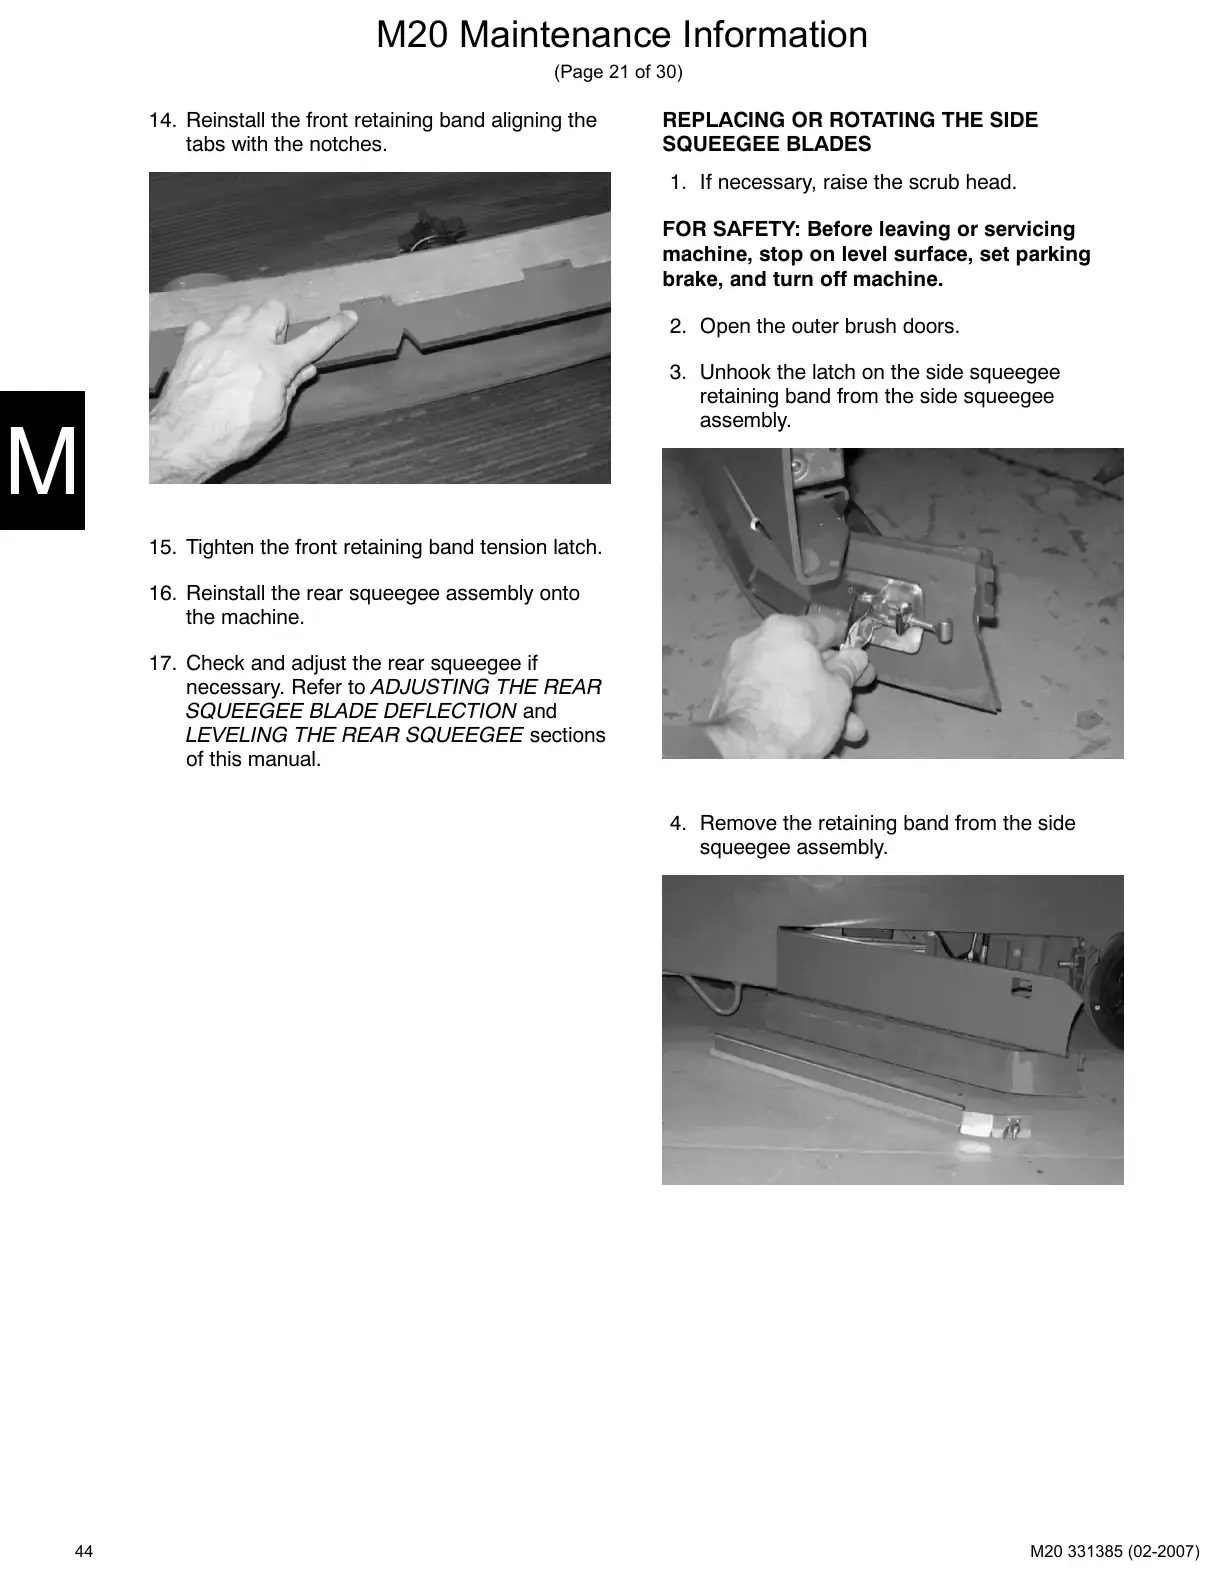
14. Reinstall the front retaining band aligning the
tabs with the notches.
REPLACING OR ROTATING THE SIDE
SQUEEGEE BLADES
1. If necessary, raise the scrub head.
FOR SAFETY: Before leaving or servicing
machine, stop on level surface, set parking
brake, and turn off machine.
2. Open the outer brush doors.
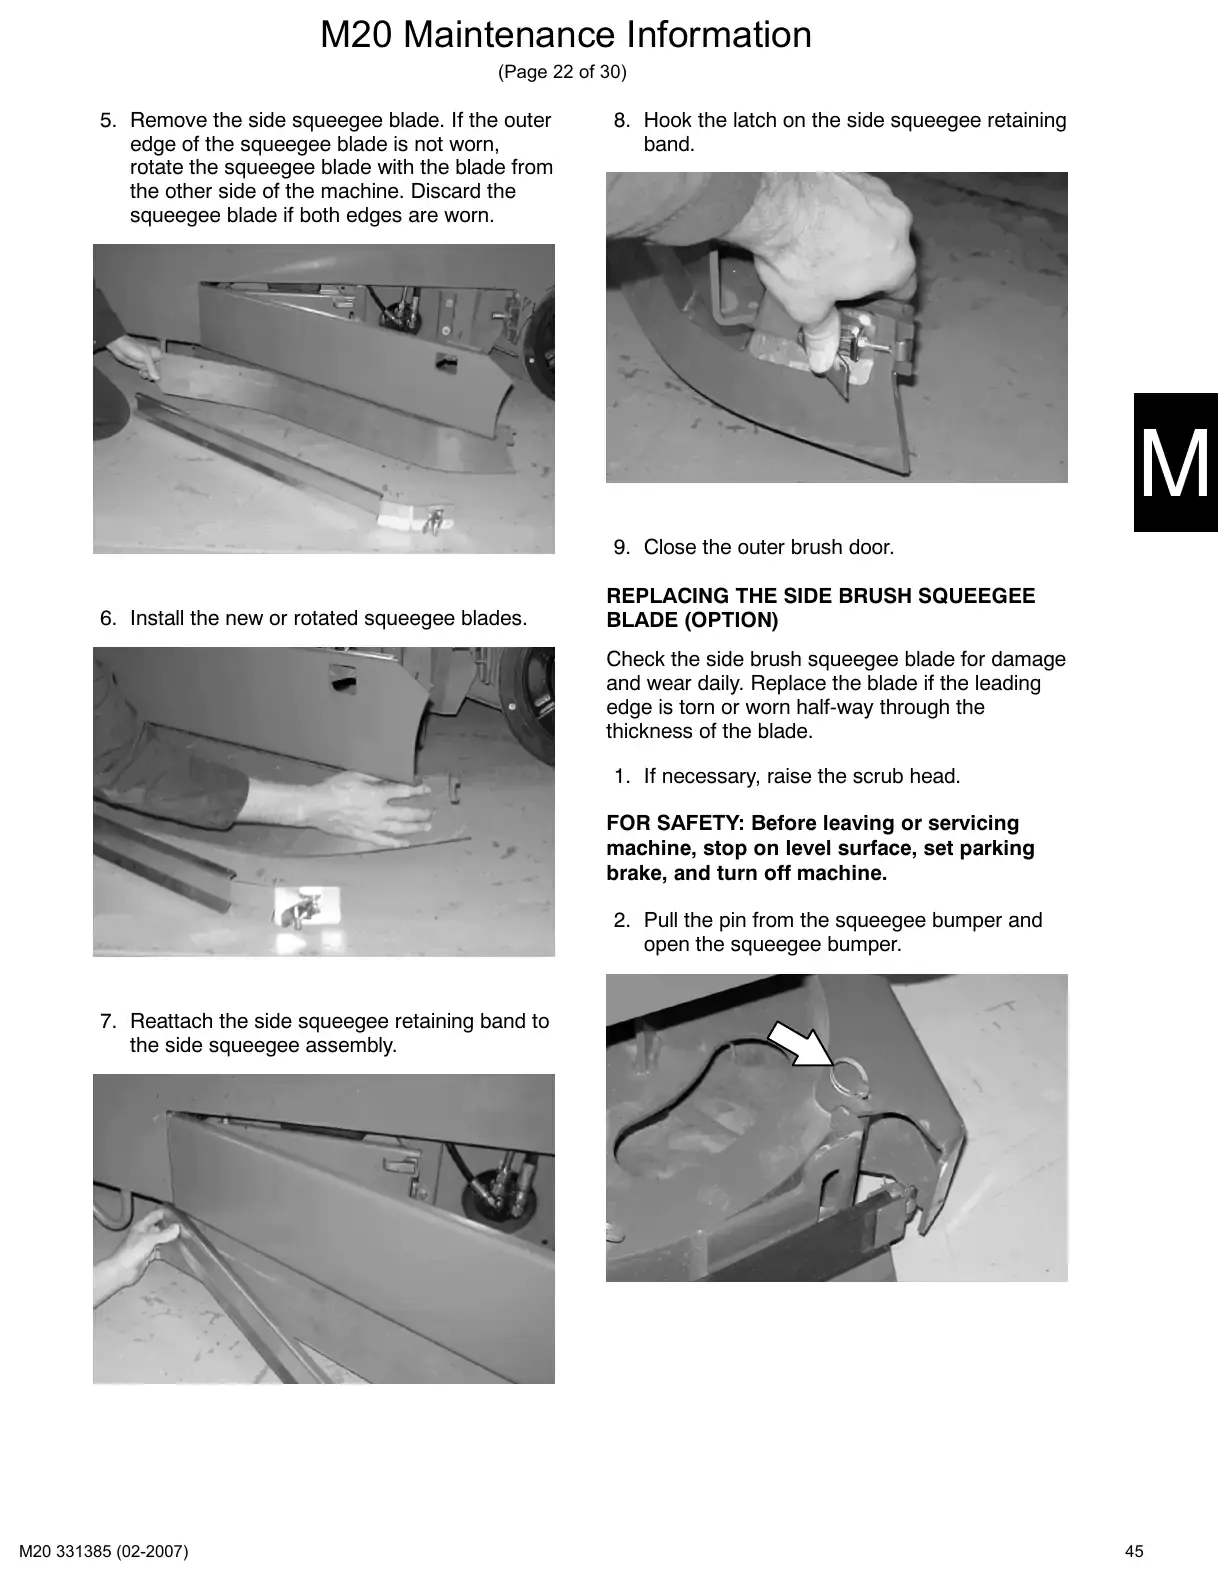
3. Unhook the latch on the side squeegee
retaining band from the side squeegee
assembly.
15. Tighten the front retaining band tension latch.
16. Reinstall the rear squeegee assembly onto
the machine.
17. Check and adjust the rear squeegee if
necessary. Refer to ADJUSTING THE REAR
SQUEEGEE BLADE DEFLECTION and
LEVELING THE REAR SQUEEGEE sections
of this manual.
4. Remove the retaining band from the side
squeegee assembly.
44
Text of manual page 45
M20 Maintenance Information
(Page 22 of 30)
5. Remove the side squeegee blade. If the outer
edge of the squeegee blade is not worn,
rotate the squeegee blade with the blade from
the other side of the machine. Discard the
squeegee blade if both edges are worn.
8. Hook the latch on the side squeegee retaining
band.
9. Close the outer brush door.
6. Install the new or rotated squeegee blades.
REPLACING THE SIDE BRUSH SQUEEGEE
BLADE (OPTION)
Check the side brush squeegee blade for damage
and wear daily. Replace the blade if the leading
edge is torn or worn half-way through the
thickness of the blade.
1. If necessary, raise the scrub head.
FOR SAFETY: Before leaving or servicing
machine, stop on level surface, set parking
brake, and turn off machine.
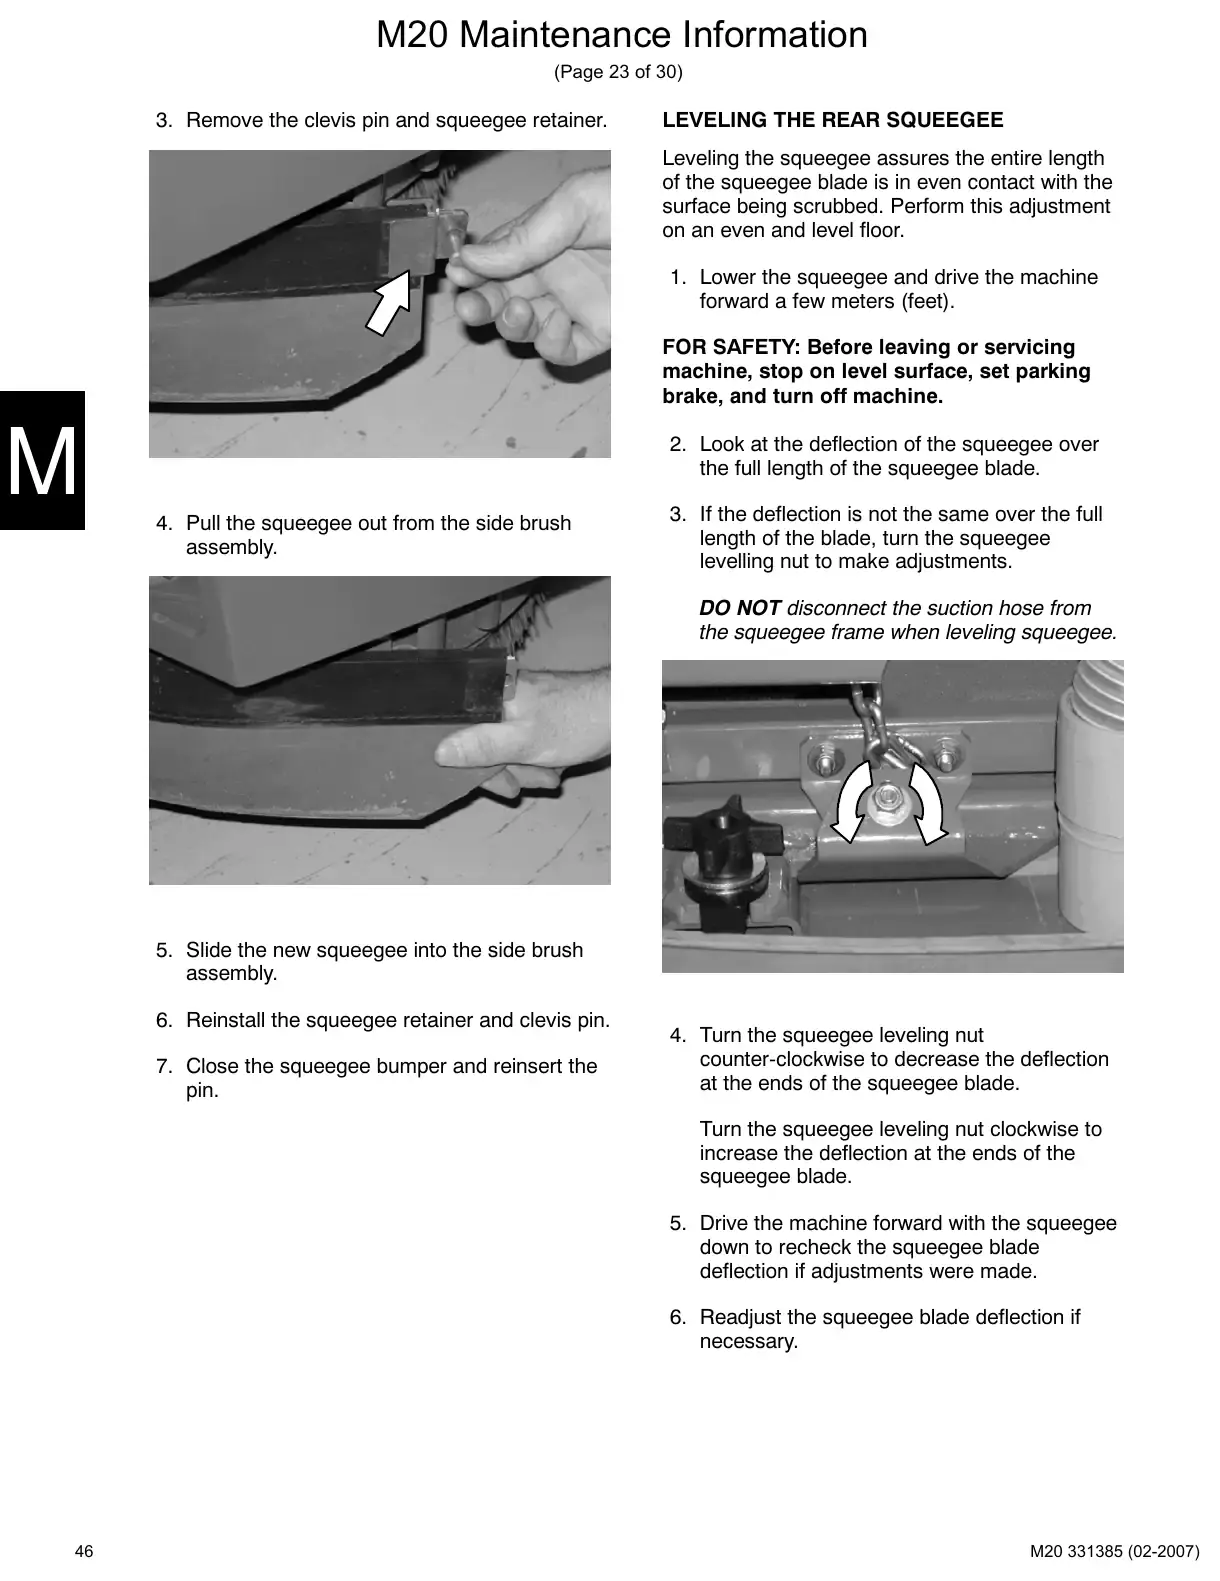
2. Pull the pin from the squeegee bumper and
open the squeegee bumper.
7. Reattach the side squeegee retaining band to
the side squeegee assembly.
45
Text of manual page 46
M20 Maintenance Information
(Page 23 of 30)
3. Remove the clevis pin and squeegee retainer.
LEVELING THE REAR SQUEEGEE
Leveling the squeegee assures the entire length
of the squeegee blade is in even contact with the
surface being scrubbed. Perform this adjustment
on an even and level floor.
1. Lower the squeegee and drive the machine
forward a few meters (feet).
FOR SAFETY: Before leaving or servicing
machine, stop on level surface, set parking
brake, and turn off machine.
2. Look at the deflection of the squeegee over
the full length of the squeegee blade.
4. Pull the squeegee out from the side brush
assembly.
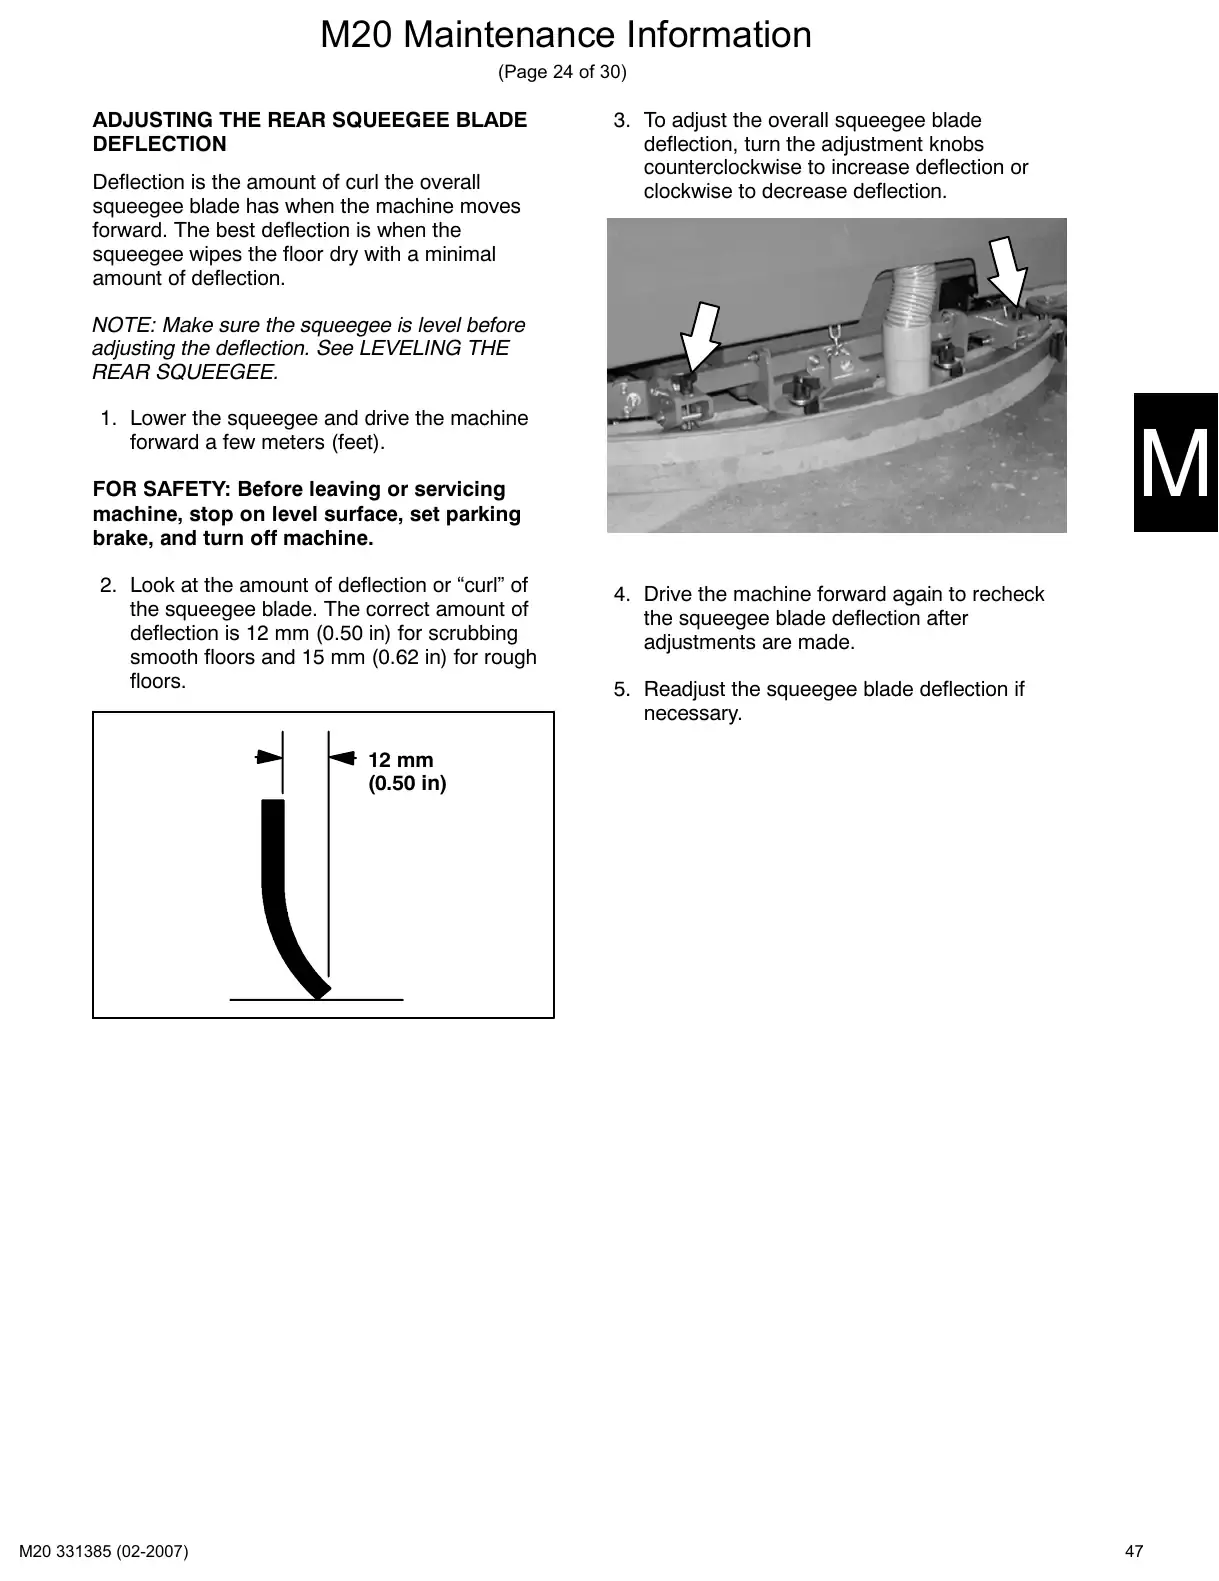
3. If the deflection is not the same over the full
length of the blade, turn the squeegee
levelling nut to make adjustments.
DO NOT disconnect the suction hose from
the squeegee frame when leveling squeegee.
5. Slide the new squeegee into the side brush
assembly.
6. Reinstall the squeegee retainer and clevis pin.
7. Close the squeegee bumper and reinsert the
pin.
4. Turn the squeegee leveling nut
counter-clockwise to decrease the deflection
at the ends of the squeegee blade.
Turn the squeegee leveling nut clockwise to
increase the deflection at the ends of the
squeegee blade.
5. Drive the machine forward with the squeegee
down to recheck the squeegee blade
deflection if adjustments were made.
6. Readjust the squeegee blade deflection if
necessary.
46
Text of manual page 47
M20 Maintenance Information
(Page 24 of 30)
ADJUSTING THE REAR SQUEEGEE BLADE
DEFLECTION
Deflection is the amount of curl the overall
squeegee blade has when the machine moves
forward. The best deflection is when the
squeegee wipes the floor dry with a minimal
amount of deflection.
3. To adjust the overall squeegee blade
deflection, turn the adjustment knobs
counterclockwise to increase deflection or
clockwise to decrease deflection.
NOTE: Make sure the squeegee is level before
adjusting the deflection. See LEVELING THE
REAR SQUEEGEE.
1. Lower the squeegee and drive the machine
forward a few meters (feet).
FOR SAFETY: Before leaving or servicing
machine, stop on level surface, set parking
brake, and turn off machine.
2. Look at the amount of deflection or "curl" of
the squeegee blade. The correct amount of
deflection is 12 mm (0.50 in) for scrubbing
smooth floors and 15 mm (0.62 in) for rough
floors.
4. Drive the machine forward again to recheck
the squeegee blade deflection after
adjustments are made.
5. Readjust the squeegee blade deflection if
necessary.
12 mm
(0.50 in)
47
Skirts and sealsPage 48 · 1 page
Text of manual page 48
M20 Maintenance Information
(Page 25 of 30)
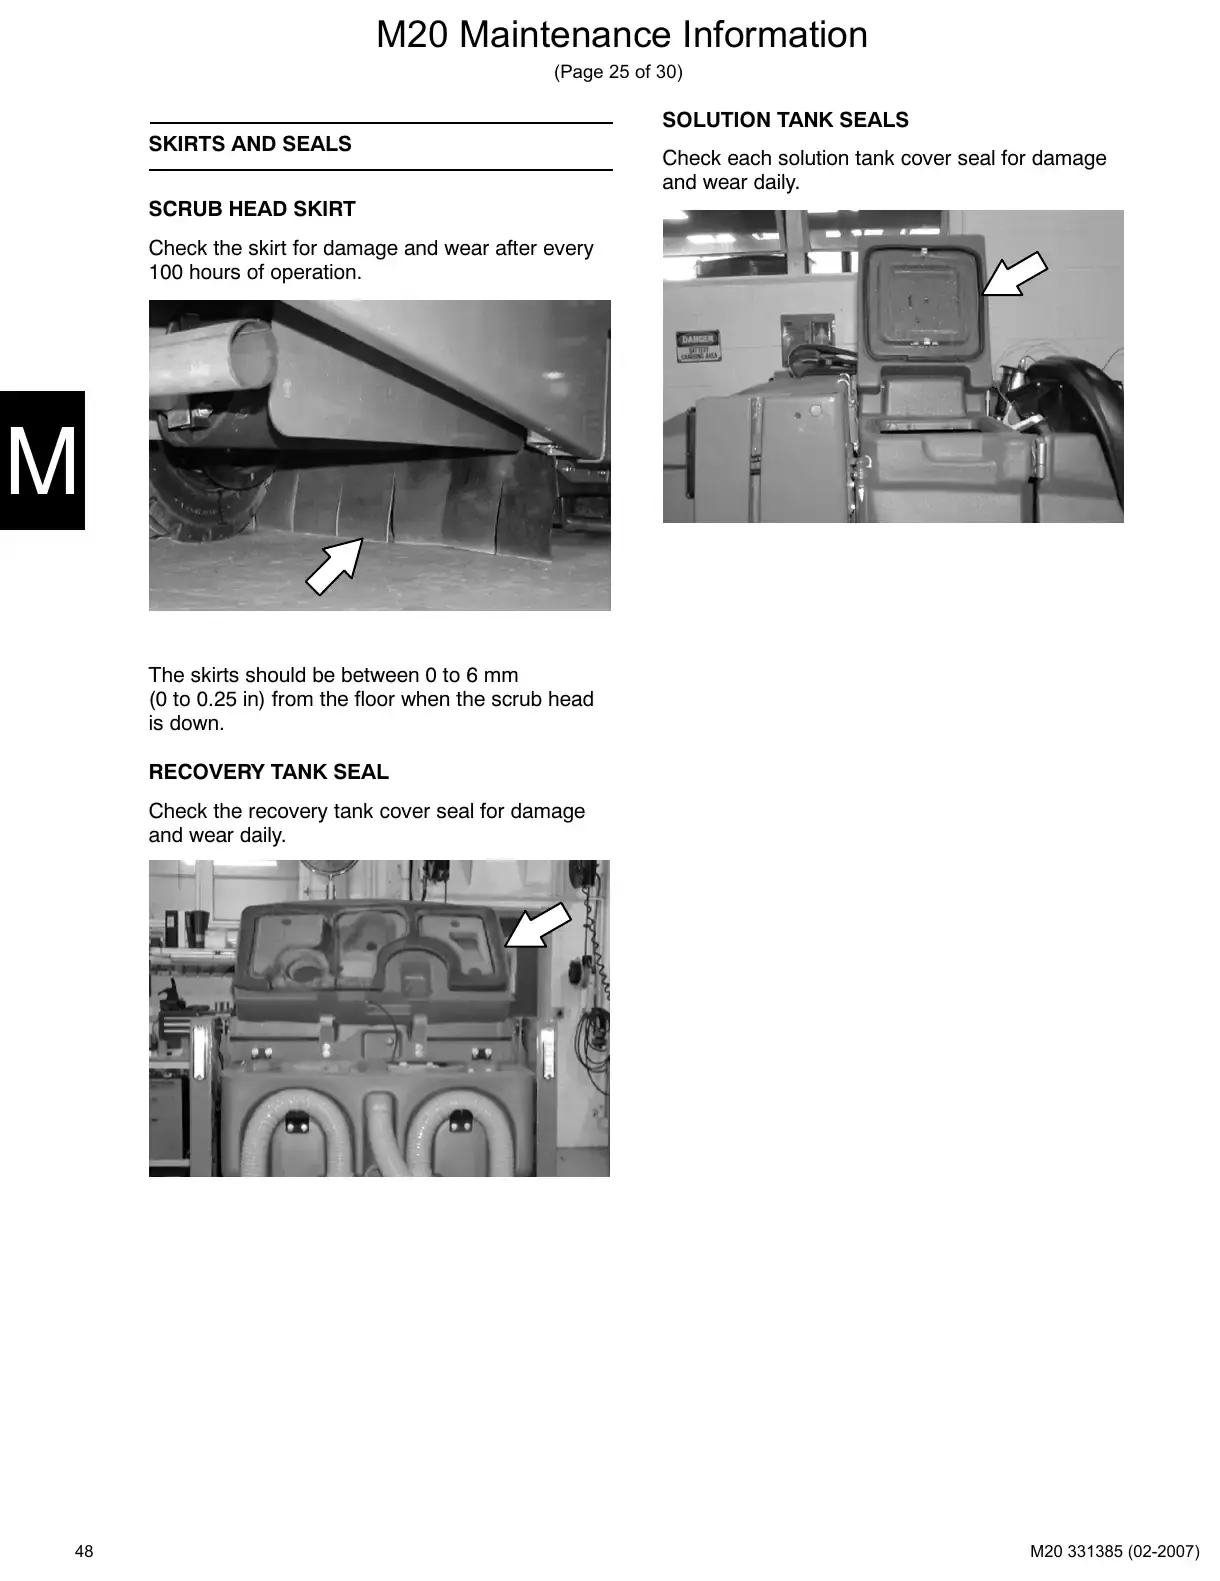
SOLUTION TANK SEALS
SKIRTS AND SEALS
Check each solution tank cover seal for damage
and wear daily.
SCRUB HEAD SKIRT
Check the skirt for damage and wear after every
100 hours of operation.
The skirts should be between 0 to 6 mm
(0 to 0.25 in) from the floor when the scrub head
is down.
RECOVERY TANK SEAL
Check the recovery tank cover seal for damage
and wear daily.
48
Brakes, tires and propelling motorPage 49 · 1 page
Text of manual page 49
M20 Maintenance Information
(Page 26 of 30)
BRAKES AND TIRES
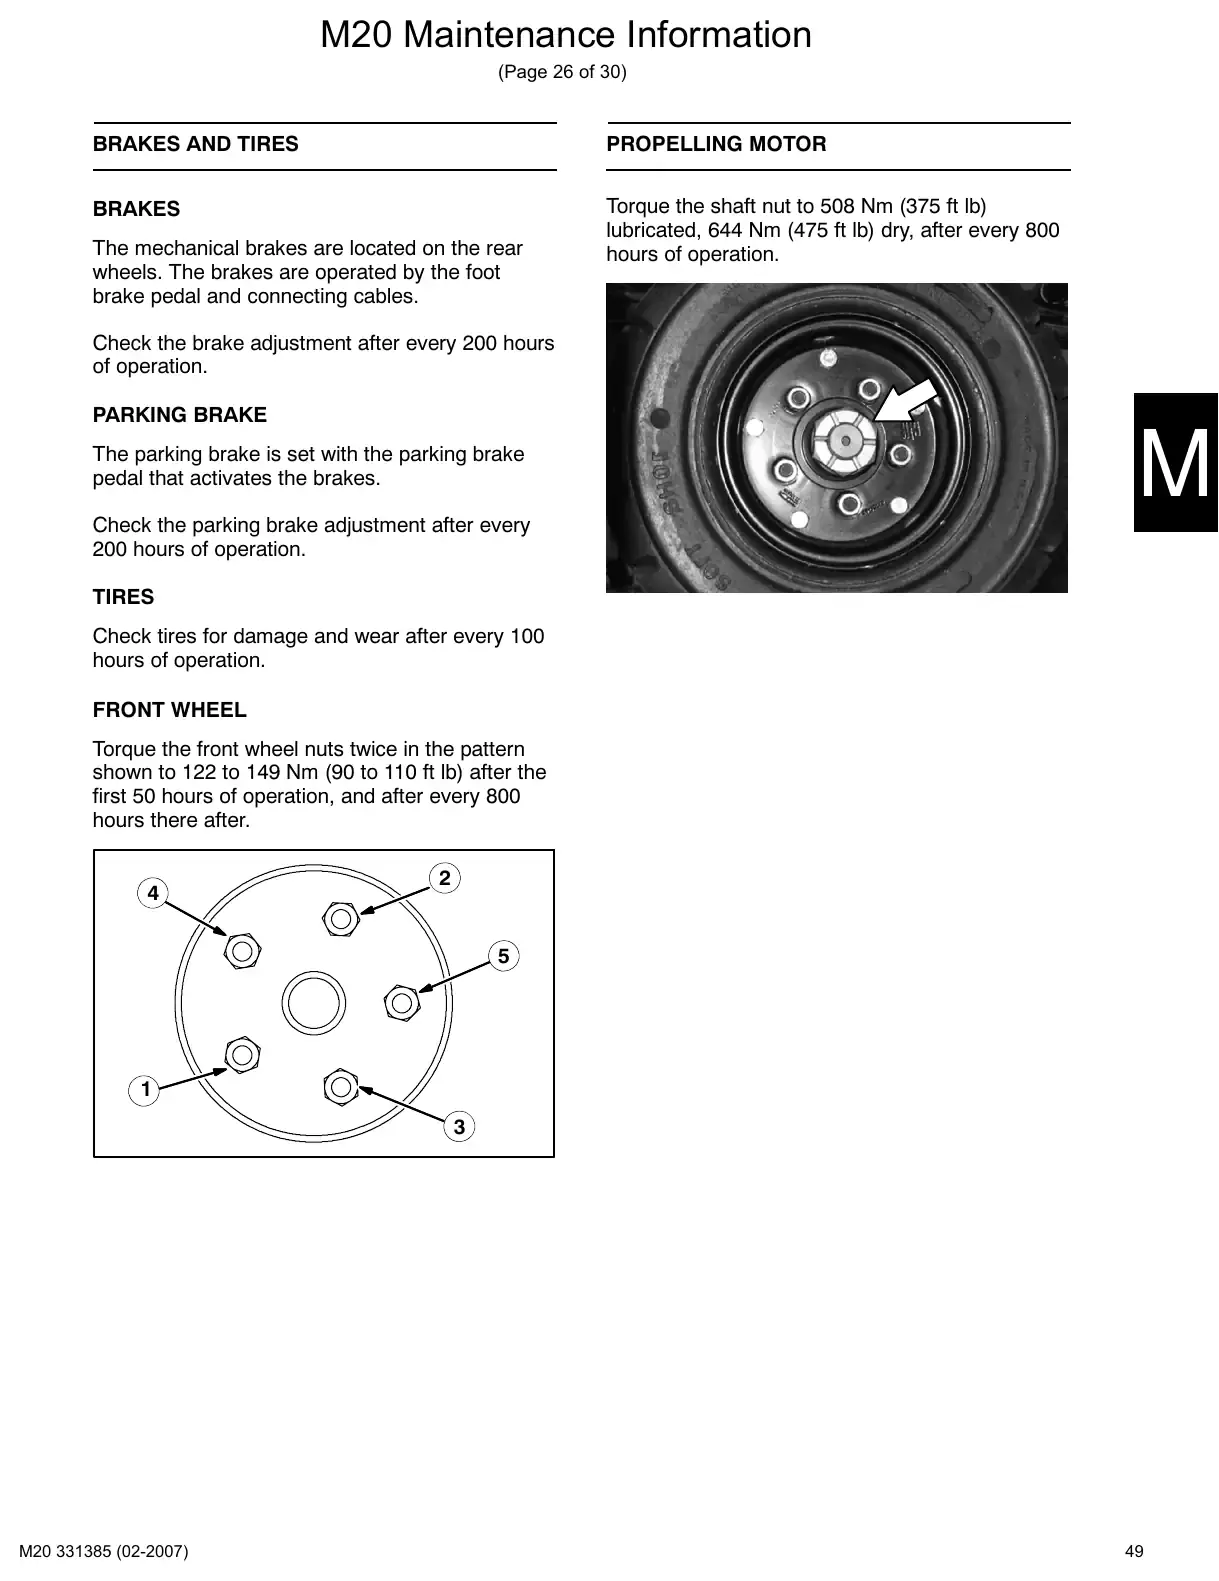
PROPELLING MOTOR
BRAKES
Torque the shaft nut to 508 Nm (375 ft lb)
lubricated, 644 Nm (475 ft lb) dry, after every 800
hours of operation.
The mechanical brakes are located on the rear
wheels. The brakes are operated by the foot
brake pedal and connecting cables.
Check the brake adjustment after every 200 hours
of operation.
PARKING BRAKE
The parking brake is set with the parking brake
pedal that activates the brakes.
Check the parking brake adjustment after every
200 hours of operation.
TIRES
Check tires for damage and wear after every 100
hours of operation.
FRONT WHEEL
Torque the front wheel nuts twice in the pattern
shown to 122 to 149 Nm (90 to 110 ft lb) after the
first 50 hours of operation, and after every 800
hours there after.
4
2
5
1
3
49
Pushing, towing and transportingPages 50–51 · 2 pages
Text of manual page 50
M20 Maintenance Information
(Page 27 of 30)
TRANSPORTING THE MACHINE
PUSHING, TOWING, AND TRANSPORTING
THE MACHINE
PUSHING OR TOWING THE MACHINE
If the machine becomes disabled, it can be
pushed from the front or rear, but only towed from
the front.
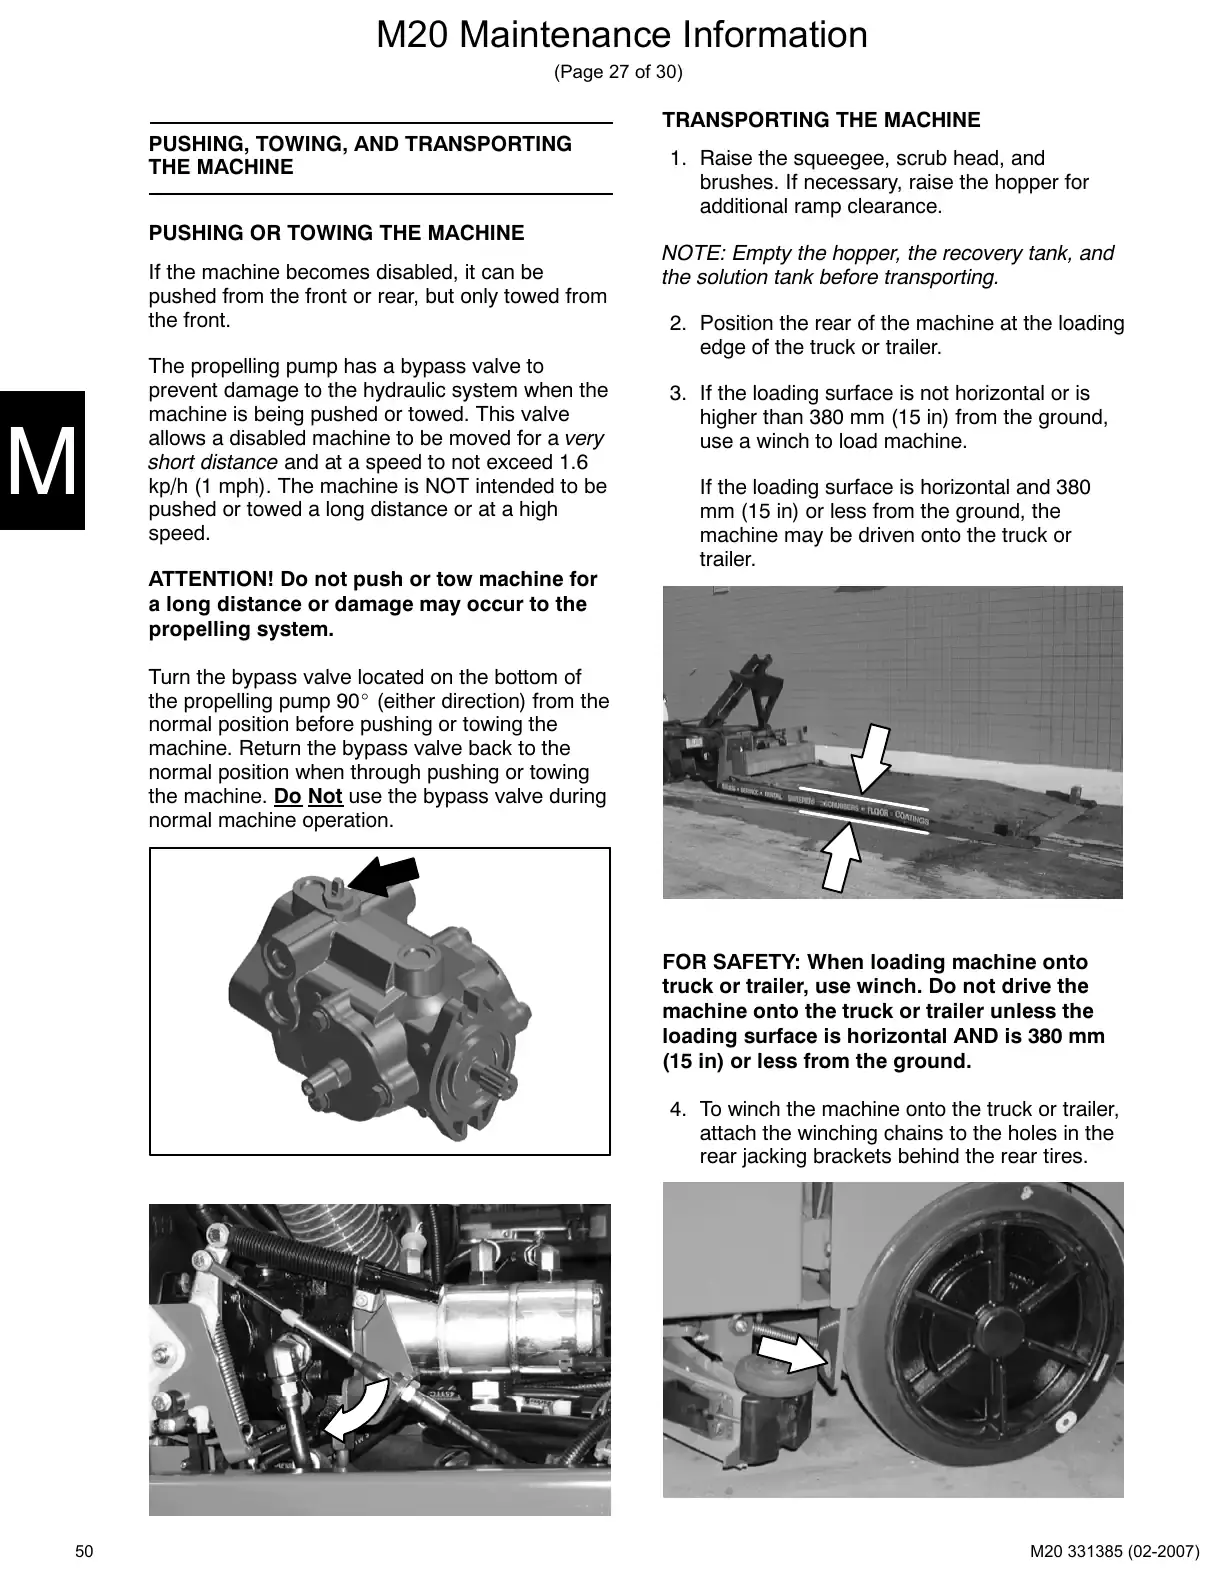
The propelling pump has a bypass valve to
prevent damage to the hydraulic system when the
machine is being pushed or towed. This valve
allows a disabled machine to be moved for a very
short distance and at a speed to not exceed 1.6
kp/h (1 mph). The machine is NOT intended to be
pushed or towed a long distance or at a high
speed.
1. Raise the squeegee, scrub head, and
brushes. If necessary, raise the hopper for
additional ramp clearance.
NOTE: Empty the hopper, the recovery tank, and
the solution tank before transporting.
2. Position the rear of the machine at the loading
edge of the truck or trailer.
3. If the loading surface is not horizontal or is
higher than 380 mm (15 in) from the ground,
use a winch to load machine.
If the loading surface is horizontal and 380
mm (15 in) or less from the ground, the
machine may be driven onto the truck or
trailer.
ATTENTION! Do not push or tow machine for
a long distance or damage may occur to the
propelling system.
Turn the bypass valve located on the bottom of
the propelling pump 90_ (either direction) from the
normal position before pushing or towing the
machine. Return the bypass valve back to the
normal position when through pushing or towing
the machine. Do Not use the bypass valve during
normal machine operation.
FOR SAFETY: When loading machine onto
truck or trailer, use winch. Do not drive the
machine onto the truck or trailer unless the
loading surface is horizontal AND is 380 mm
(15 in) or less from the ground.
4. To winch the machine onto the truck or trailer,
attach the winching chains to the holes in the
rear jacking brackets behind the rear tires.
50
Text of manual page 51
M20 Maintenance Information
(Page 28 of 30)
5. Position the machine as close to the front of
the trailer or truck as possible.
6. Set the parking brake and place a block
behind each wheel to prevent the machine
from rolling.
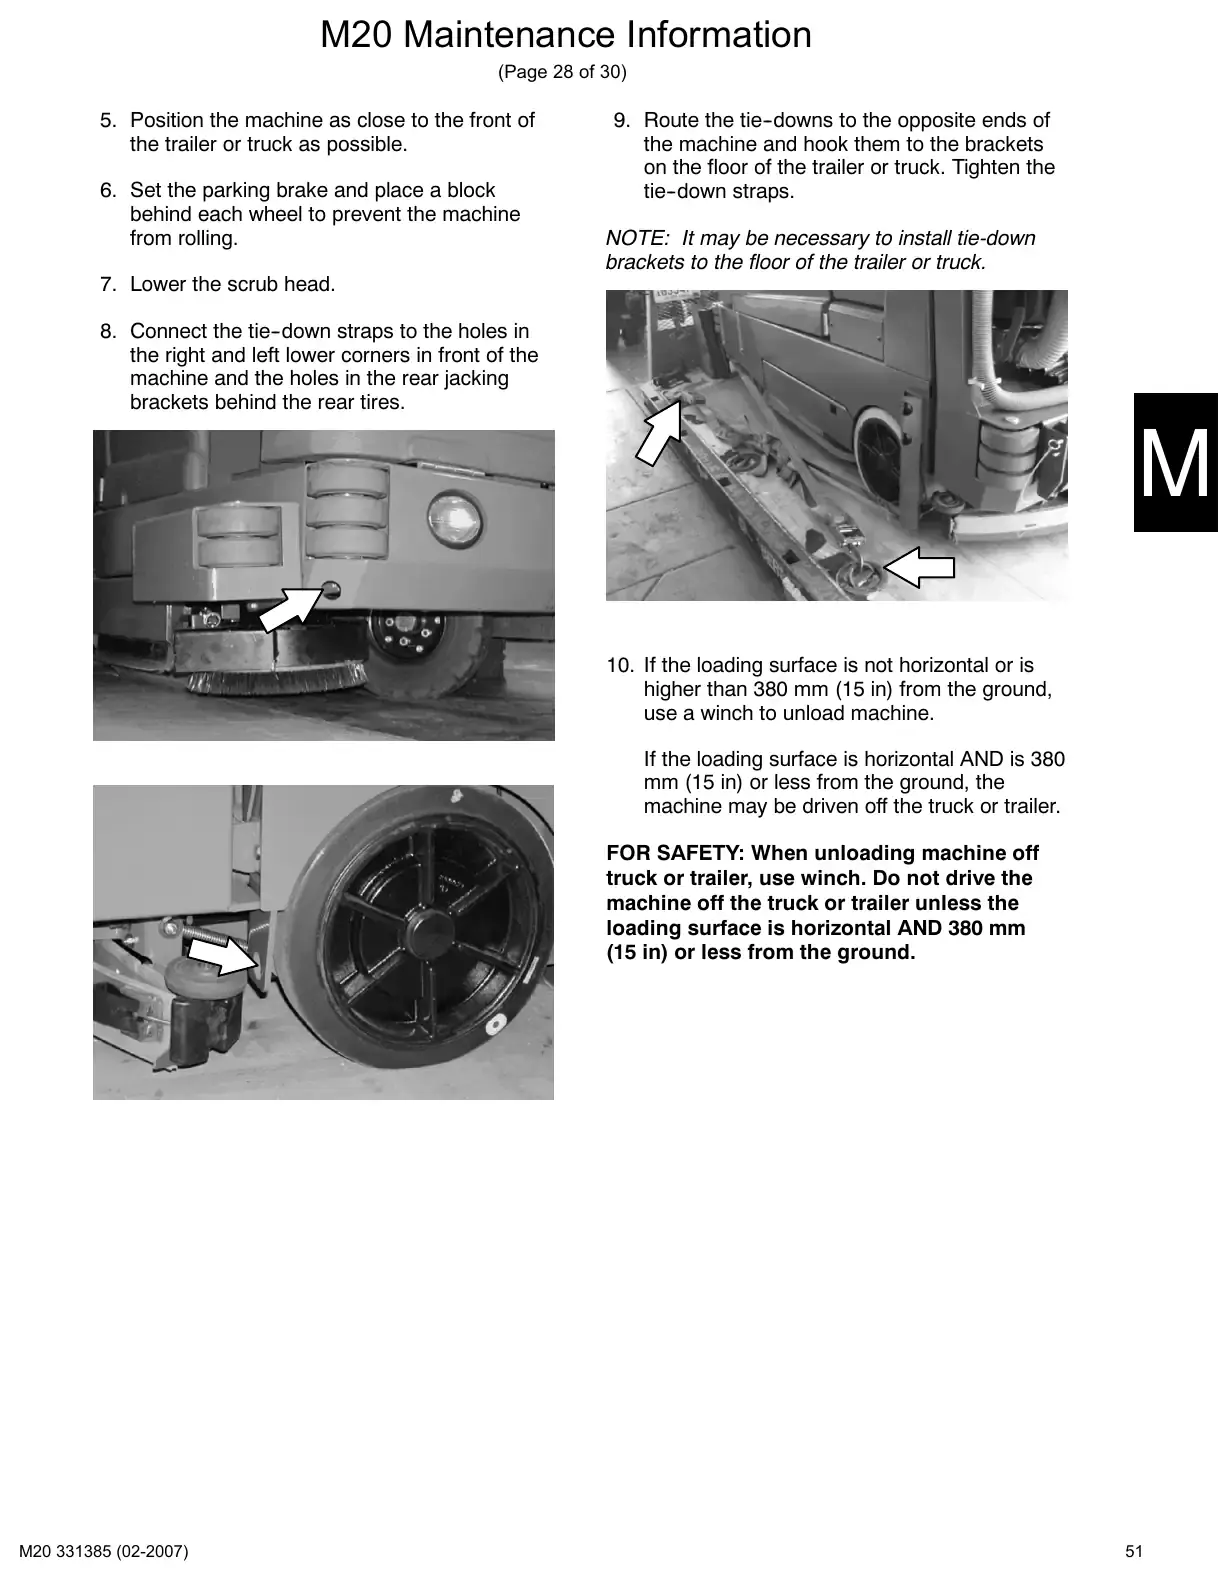
9. Route the tie-downs to the opposite ends of
the machine and hook them to the brackets
on the floor of the trailer or truck. Tighten the
tie-down straps.
NOTE: It may be necessary to install tie-down
brackets to the floor of the trailer or truck.
7. Lower the scrub head.
8. Connect the tie-down straps to the holes in
the right and left lower corners in front of the
machine and the holes in the rear jacking
brackets behind the rear tires.
10. If the loading surface is not horizontal or is
higher than 380 mm (15 in) from the ground,
use a winch to unload machine.
If the loading surface is horizontal AND is 380
mm (15 in) or less from the ground, the
machine may be driven off the truck or trailer.
FOR SAFETY: When unloading machine off
truck or trailer, use winch. Do not drive the
machine off the truck or trailer unless the
loading surface is horizontal AND 380 mm
(15 in) or less from the ground.
51
Machine jacking and storagePage 52 · 1 page
Text of manual page 52
M20 Maintenance Information
(Page 29 of 30)
MACHINE JACKING
STORAGE INFORMATION
Empty the hopper, recovery tank, and solution
tank before jacking up the machine. Jack up the
machine at the designated locations. Use a hoist
or jack capable of supporting the weight of the
machine. Use jackstands to support the machine.
Always stop the machine on a flat, level surface
and block the tires before jacking up the machine.
The following steps should be taken prior to
storing the machine for extended periods.
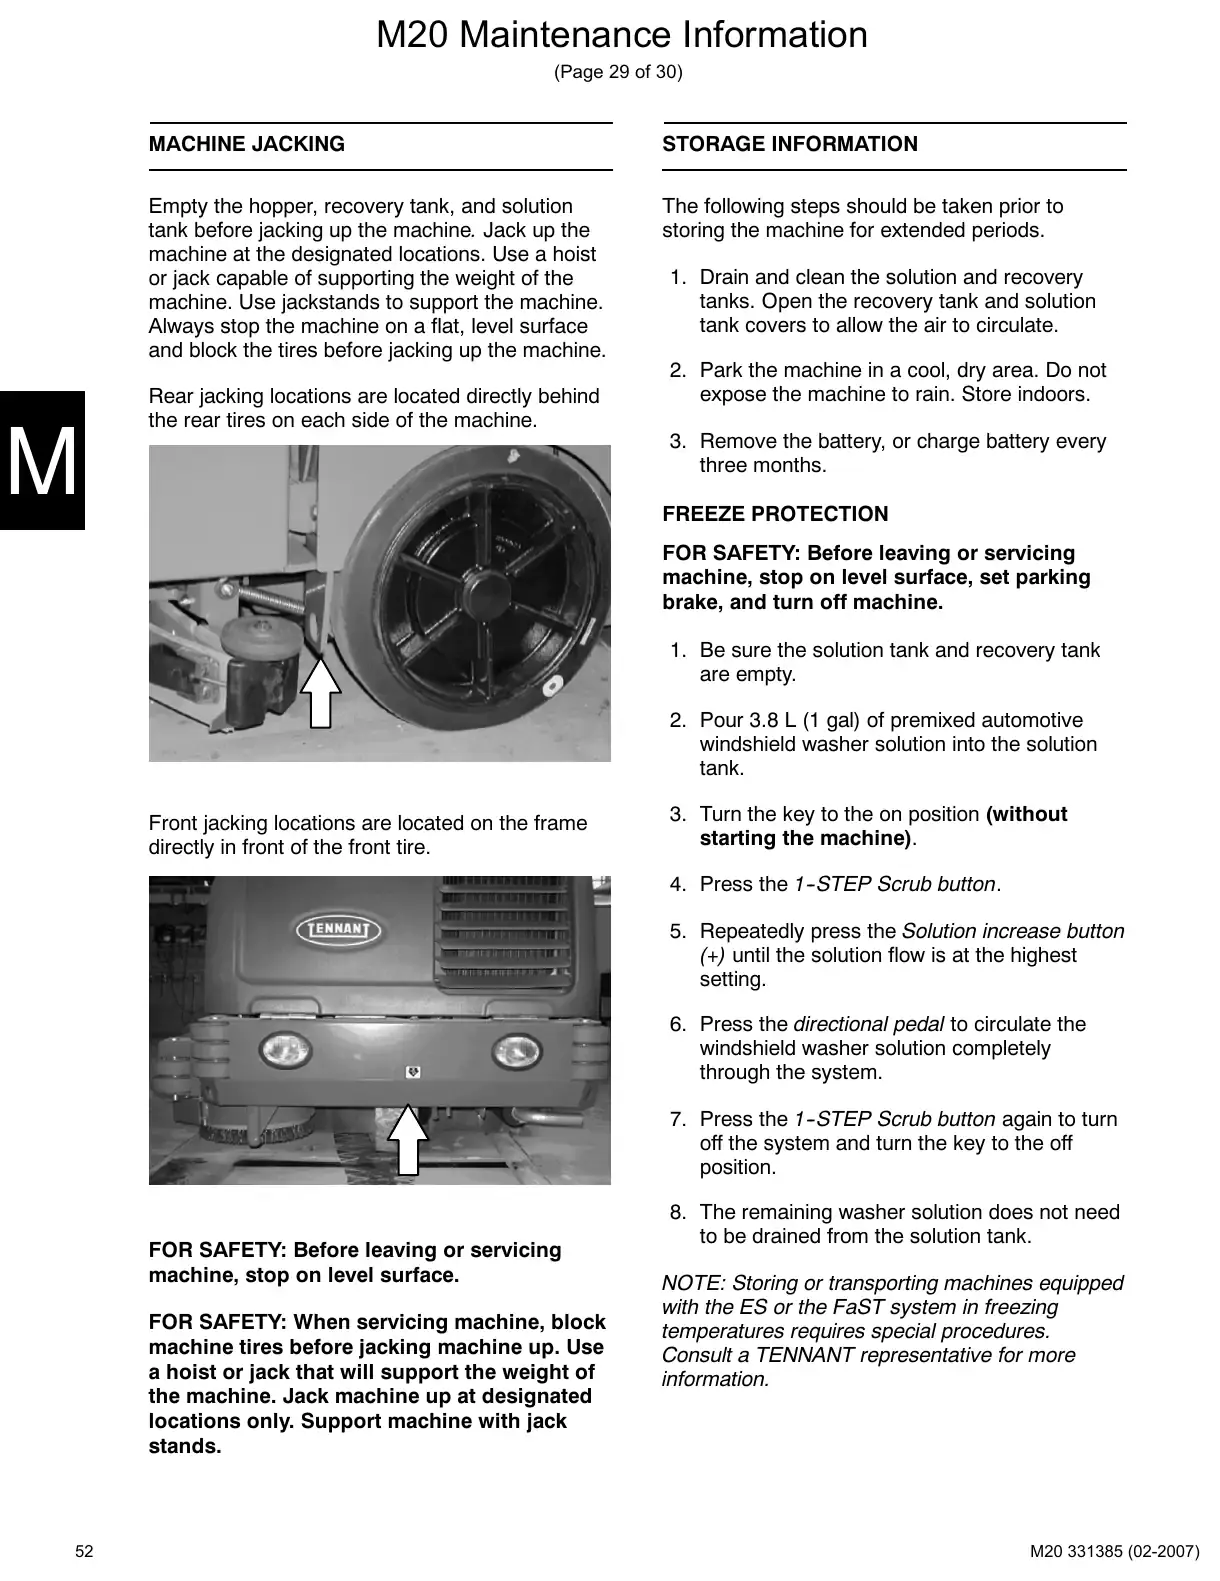
Rear jacking locations are located directly behind
the rear tires on each side of the machine.
1. Drain and clean the solution and recovery
tanks. Open the recovery tank and solution
tank covers to allow the air to circulate.
2. Park the machine in a cool, dry area. Do not
expose the machine to rain. Store indoors.
3. Remove the battery, or charge battery every
three months.
FREEZE PROTECTION
FOR SAFETY: Before leaving or servicing
machine, stop on level surface, set parking
brake, and turn off machine.
1. Be sure the solution tank and recovery tank
are empty.
2. Pour 3.8 L (1 gal) of premixed automotive
windshield washer solution into the solution
tank.
Front jacking locations are located on the frame
directly in front of the front tire.
3. Turn the key to the on position (without
starting the machine).
4. Press the 1-STEP Scrub button.
5. Repeatedly press the Solution increase button
(+) until the solution flow is at the highest
setting.
6. Press the directional pedal to circulate the
windshield washer solution completely
through the system.
7. Press the 1-STEP Scrub button again to turn
off the system and turn the key to the off
position.
FOR SAFETY: Before leaving or servicing
machine, stop on level surface.
FOR SAFETY: When servicing machine, block
machine tires before jacking machine up. Use
a hoist or jack that will support the weight of
the machine. Jack machine up at designated
locations only. Support machine with jack
stands.
52
8. The remaining washer solution does not need
to be drained from the solution tank.
NOTE: Storing or transporting machines equipped
with the ES or the FaST system in freezing
temperatures requires special procedures.
Consult a TENNANT representative for more
information.
Pinch valve adjustmentPages 53–54 · 2 pages
Text of manual page 53
M20 Maintenance Information
(Page 30 of 30)
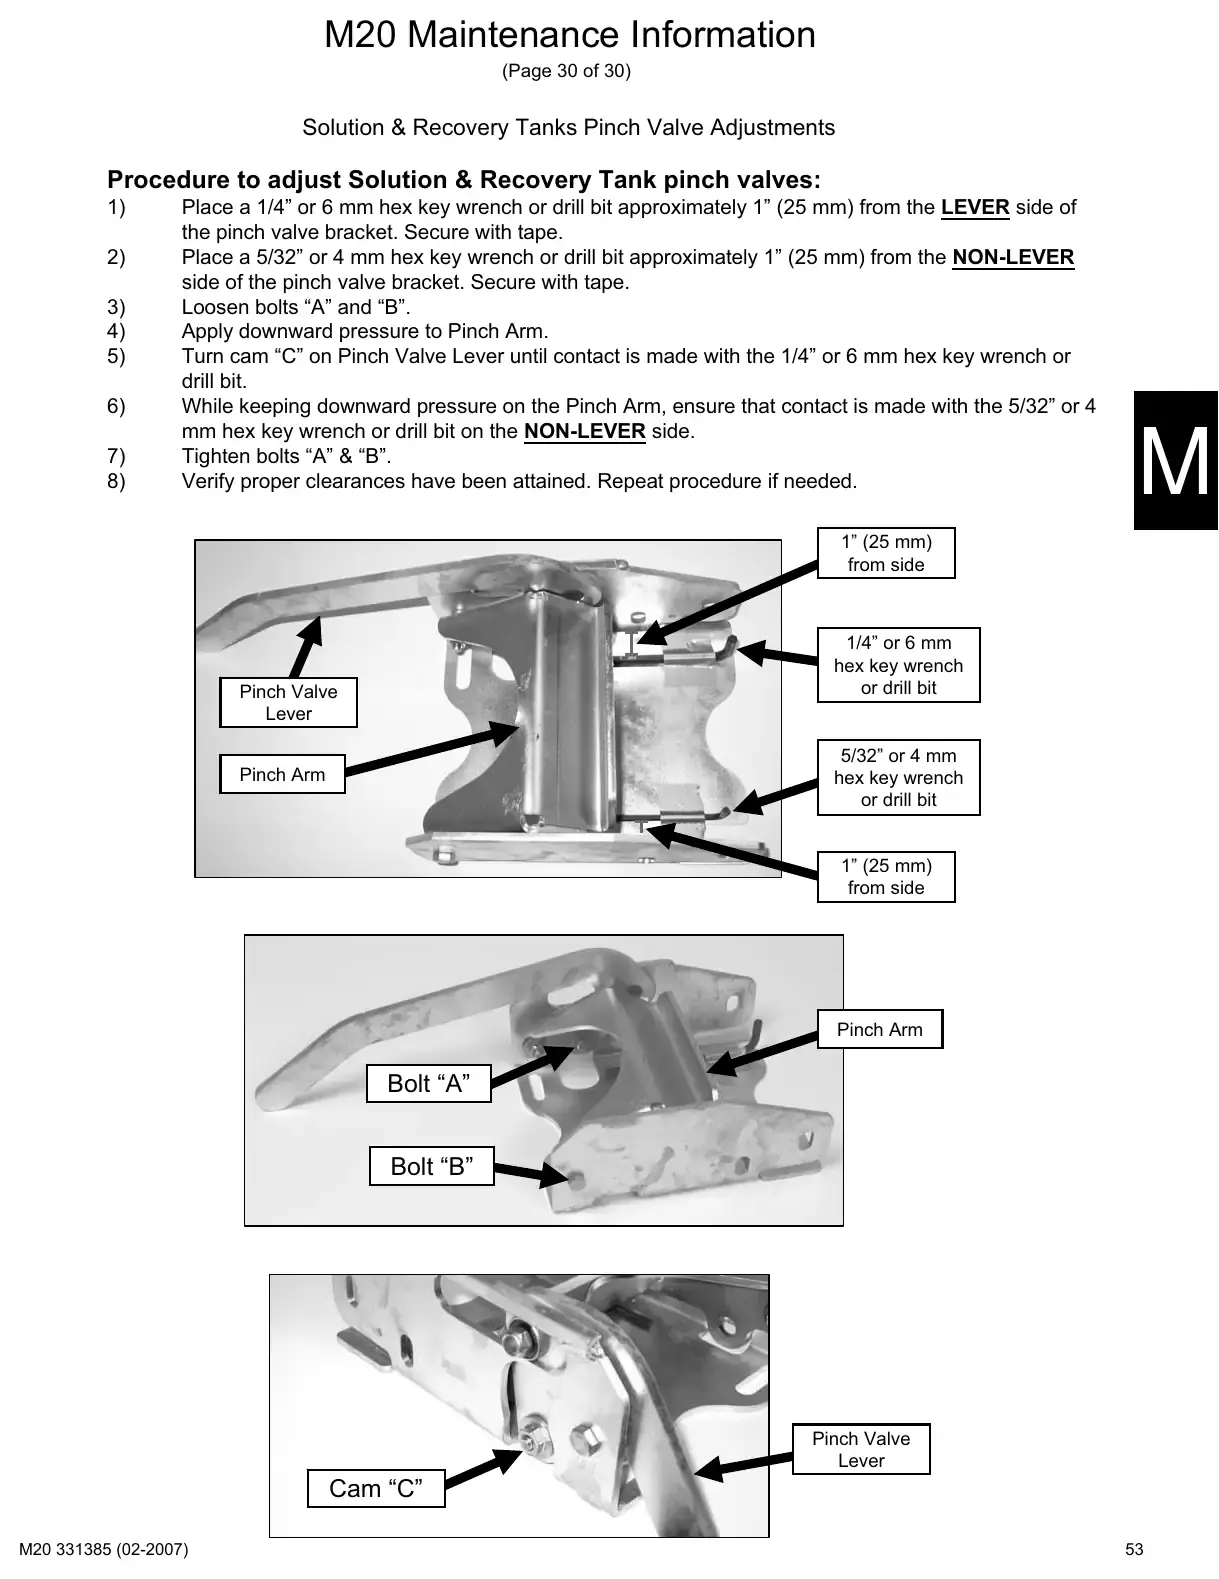
Solution & Recovery Tanks Pinch Valve Adjustments
Procedure to adjust Solution & Recovery Tank pinch valves:
1)
2)
3)
4)
5)
6)
7)
8)
Place a 1/4" or 6 mm hex key wrench or drill bit approximately 1" (25 mm) from the LEVER side of
the pinch valve bracket. Secure with tape.
Place a 5/32" or 4 mm hex key wrench or drill bit approximately 1" (25 mm) from the NON-LEVER
side of the pinch valve bracket. Secure with tape.
Loosen bolts "A" and "B".
Apply downward pressure to Pinch Arm.
Turn cam "C" on Pinch Valve Lever until contact is made with the 1/4" or 6 mm hex key wrench or
drill bit.
While keeping downward pressure on the Pinch Arm, ensure that contact is made with the 5/32" or 4
mm hex key wrench or drill bit on the NON-LEVER side.
Tighten bolts "A" & "B".
Verify proper clearances have been attained. Repeat procedure if needed.
1" (25 mm)
from side
1/4" or 6 mm
hex key wrench
or drill bit
Pinch Valve
Lever
5/32" or 4 mm
hex key wrench
or drill bit
Pinch Arm
1" (25 mm)
from side
Pinch Arm
Bolt "A"
Bolt "B"
Pinch Valve
Lever
Cam "C"
53

Text of manual page 54
54
Electrical
Electrical schematicPages 56–62 · 7 pages
Text of manual page 56
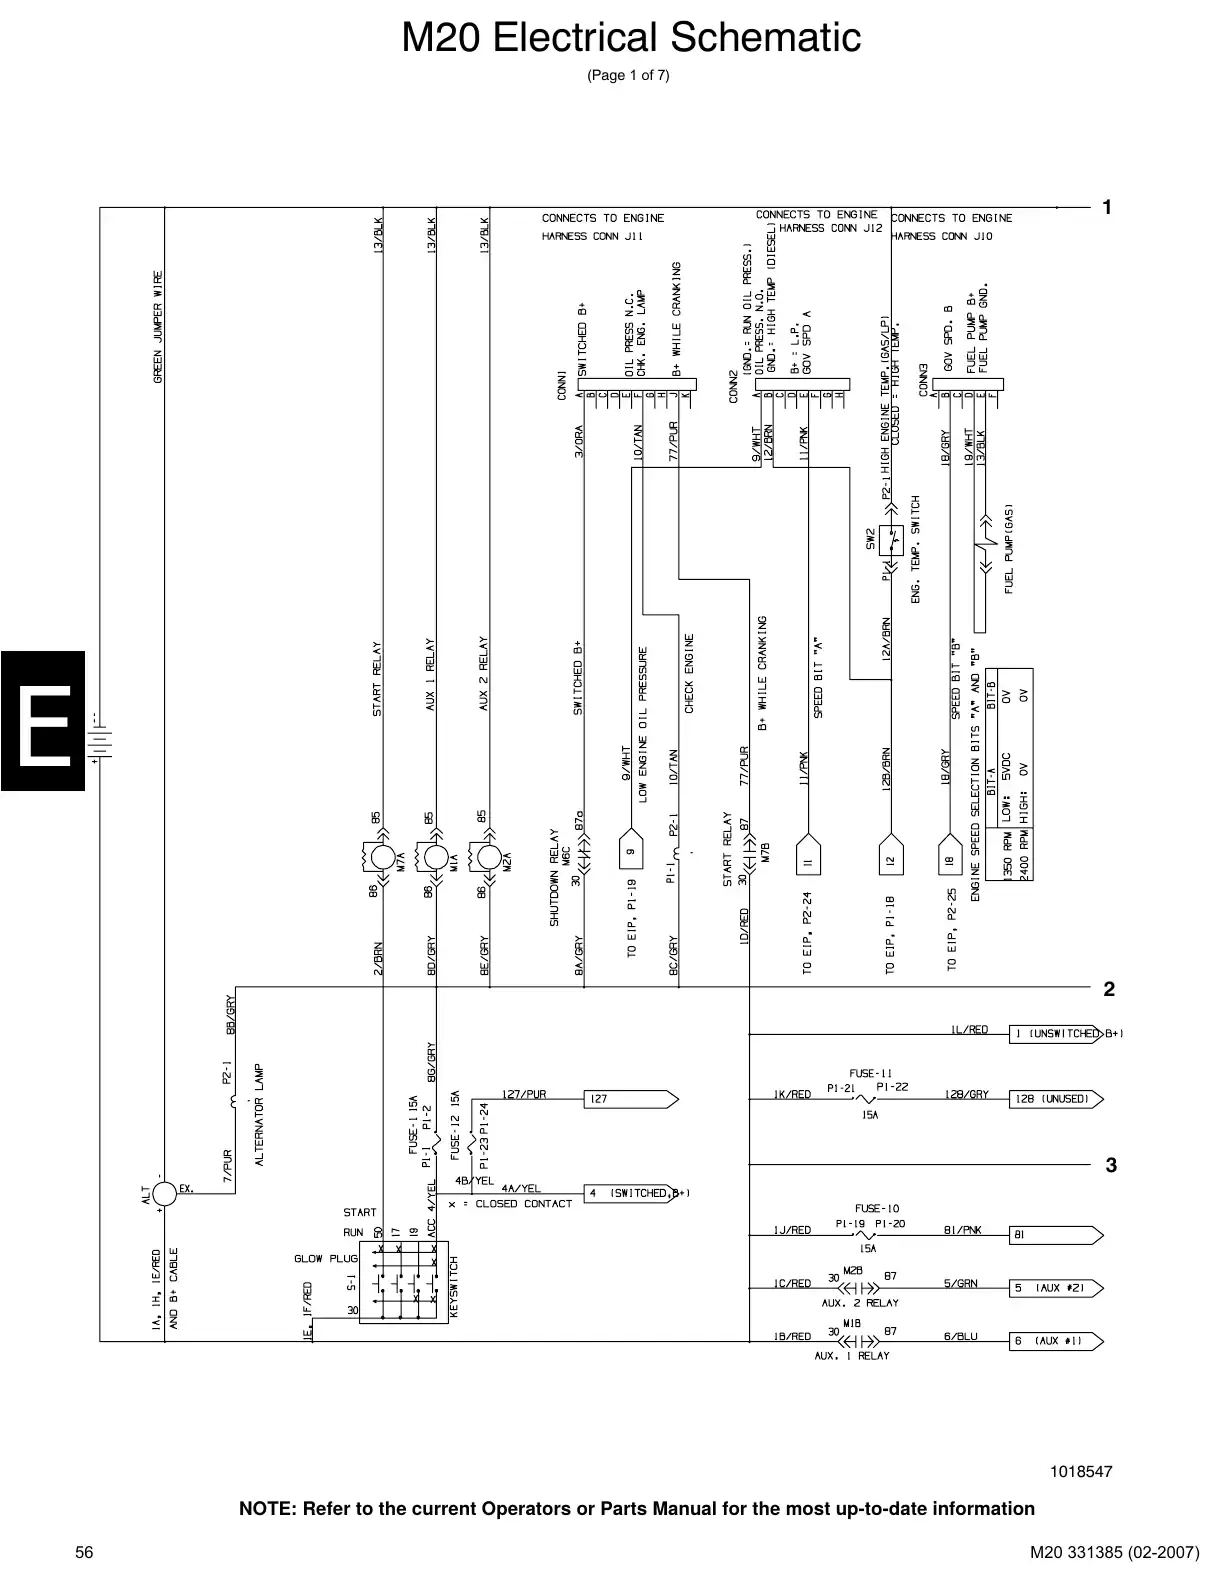
M20 Electrical Schematic
(Page 1 of 7)
1
2
3
1018547
NOTE: Refer to the current Operators or Parts Manual for the most up-to-date information
56
Text of manual page 57
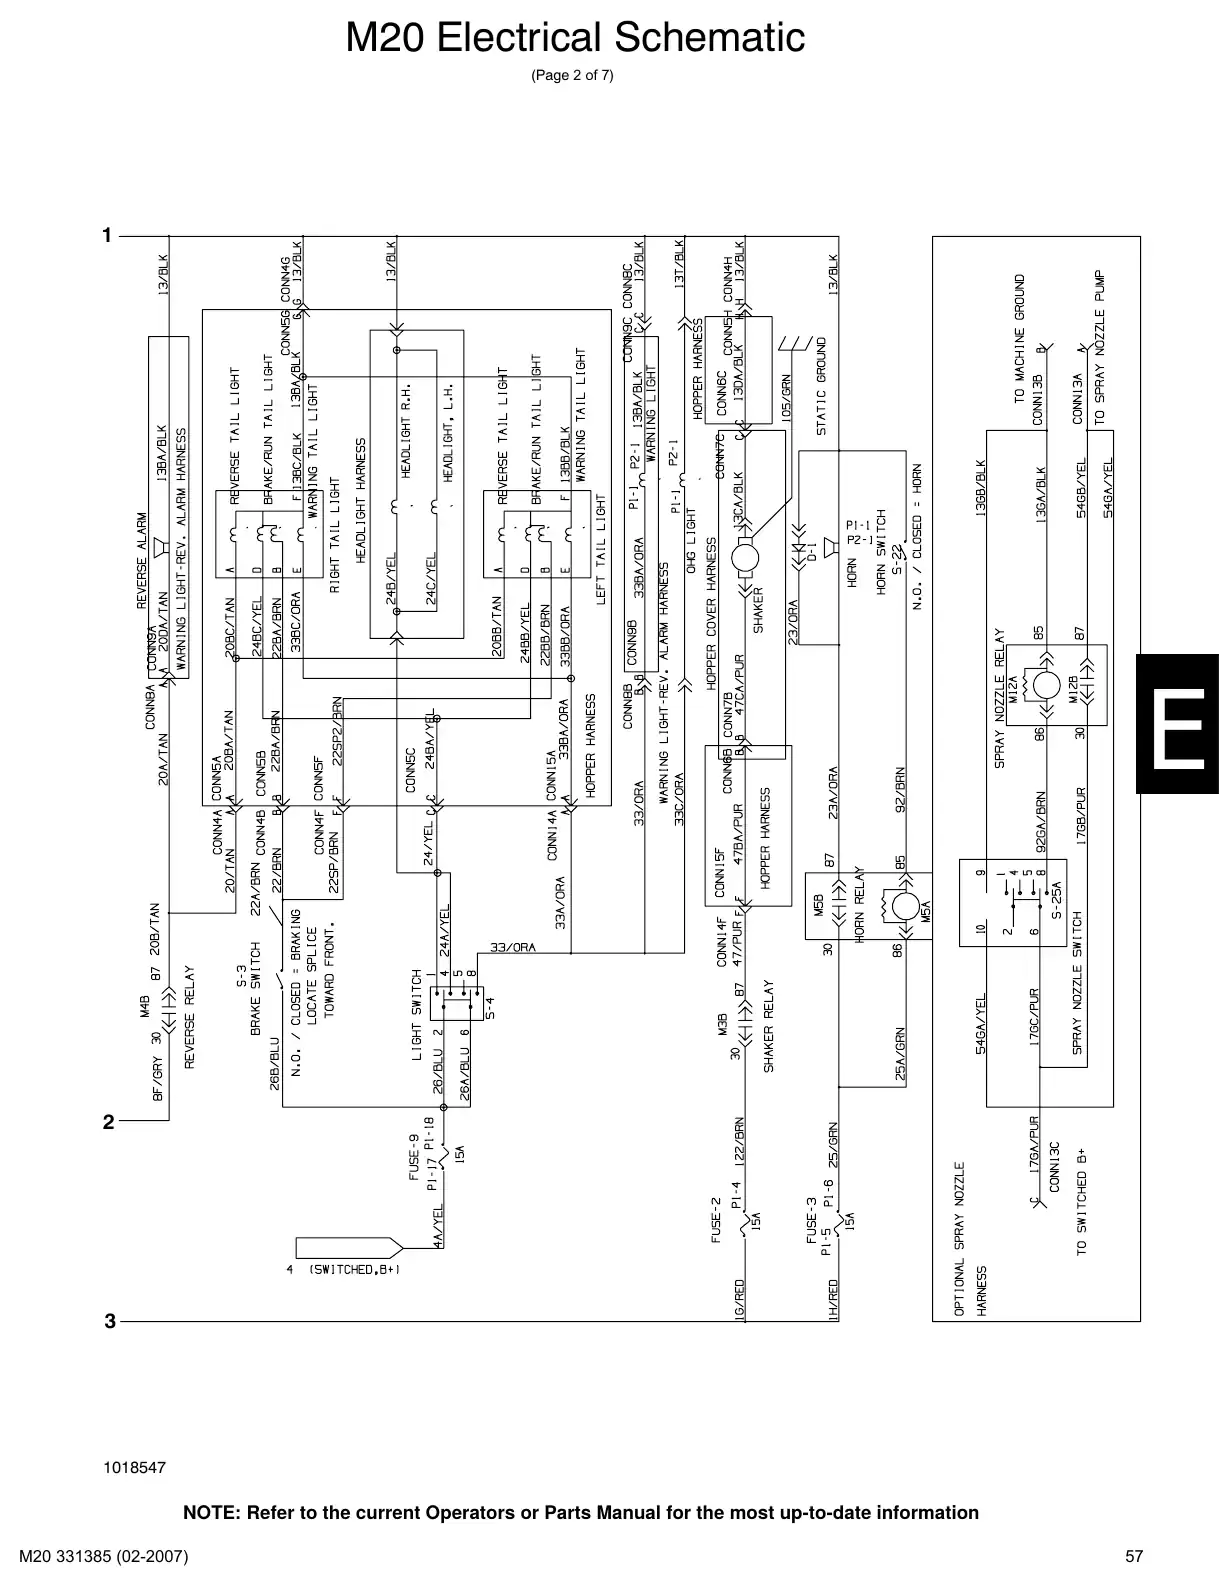
M20 Electrical Schematic
(Page 2 of 7)
1
2
3
1018547
NOTE: Refer to the current Operators or Parts Manual for the most up-to-date information
57
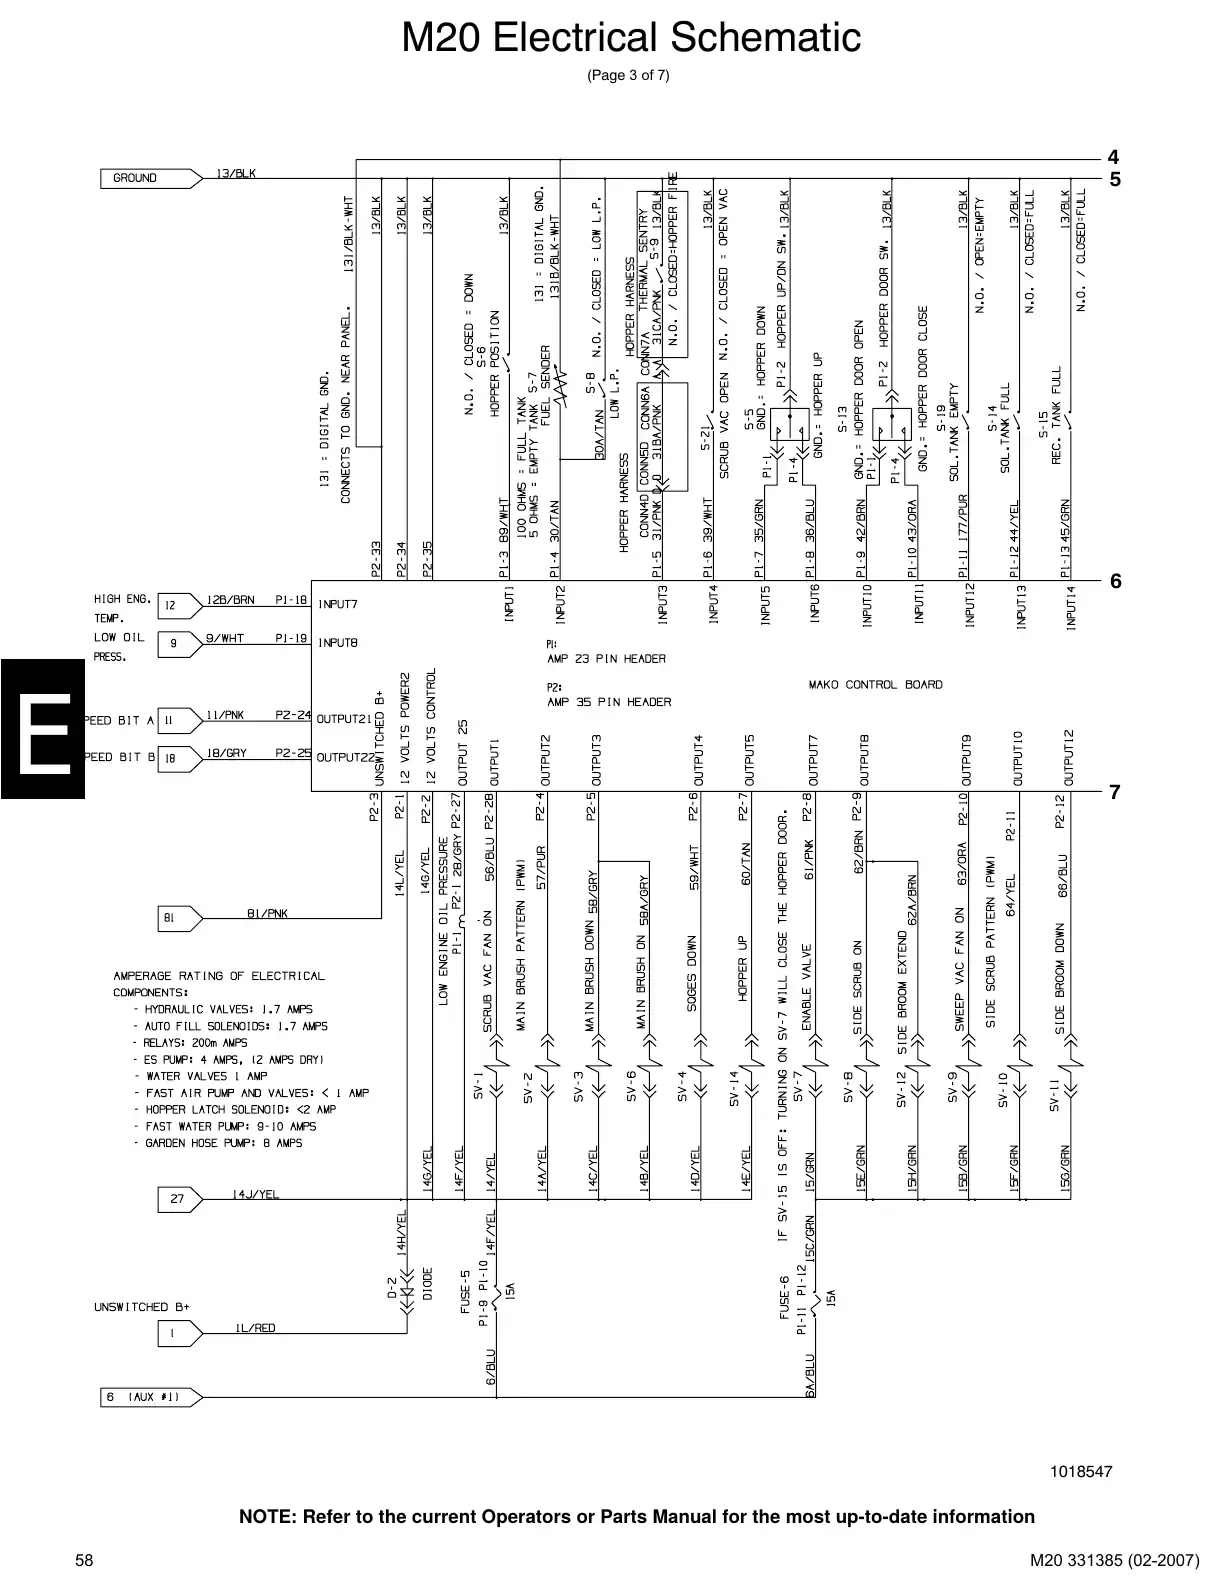
Text of manual page 58
M20 Electrical Schematic
(Page 3 of 7)
4
5
6
7
1018547
NOTE: Refer to the current Operators or Parts Manual for the most up-to-date information
58
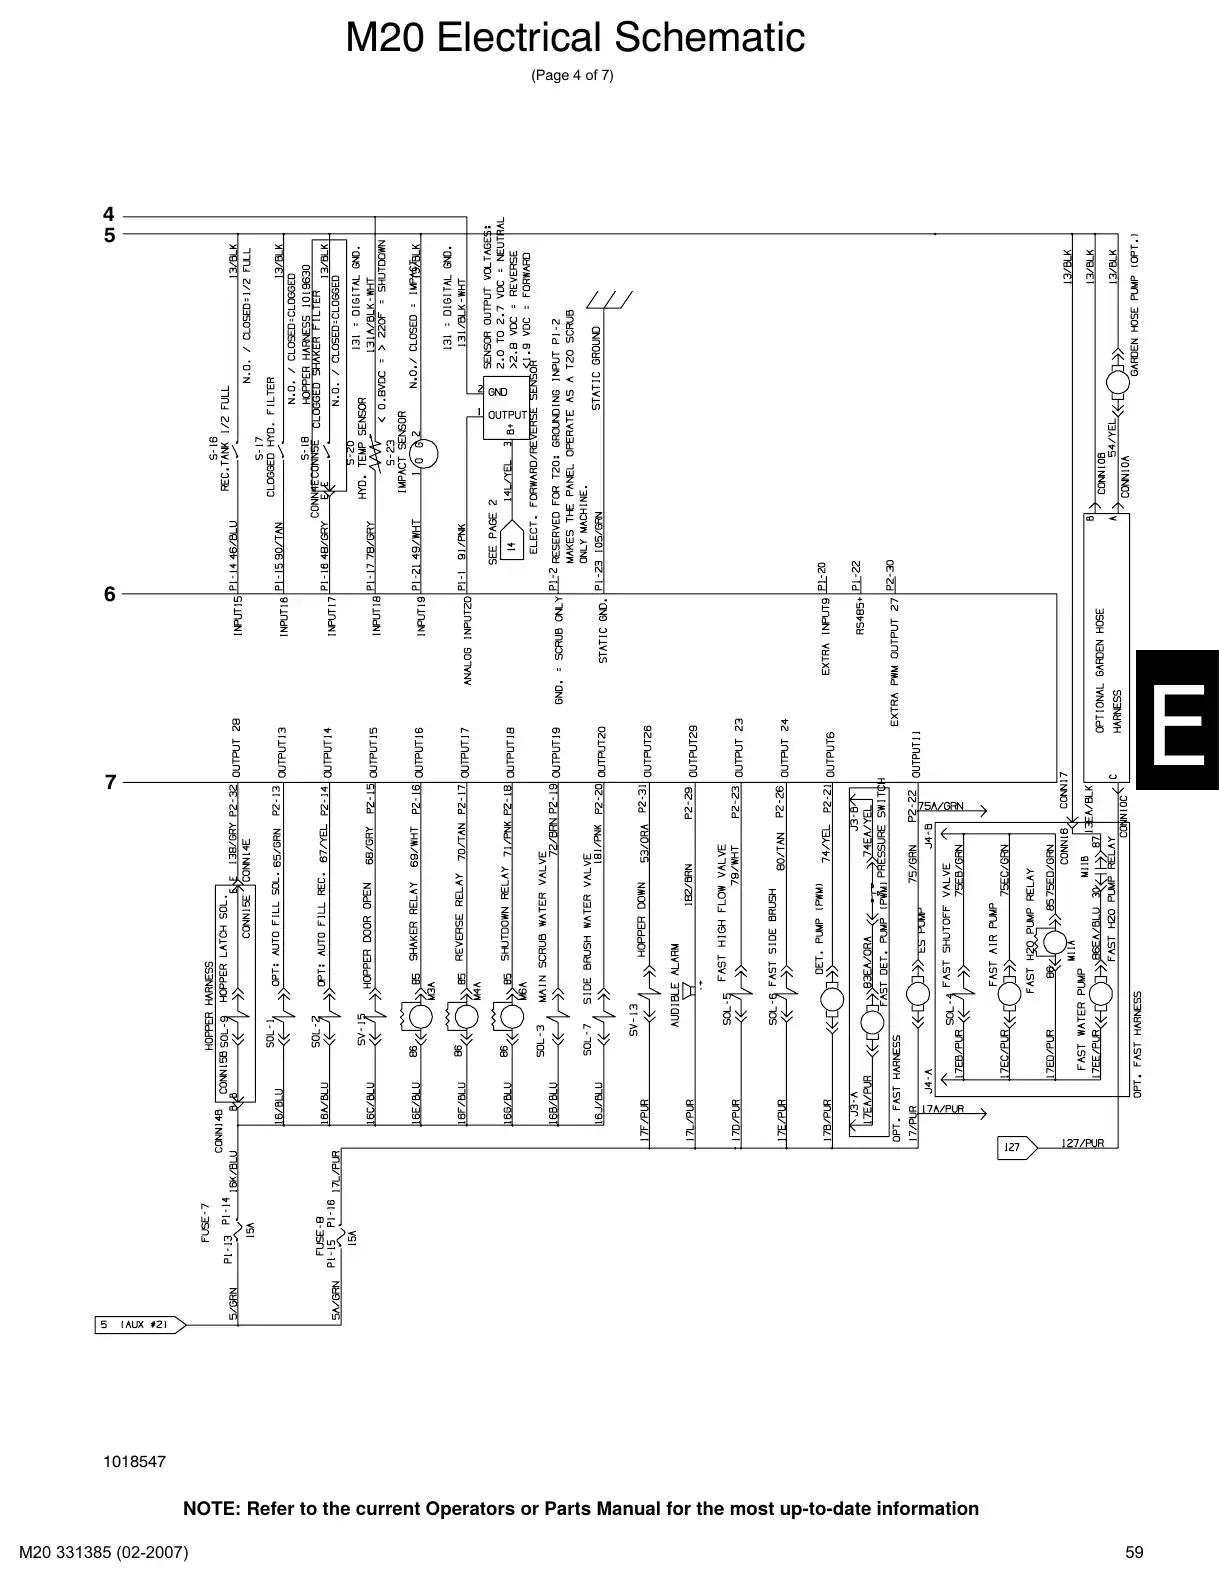
Text of manual page 59
M20 Electrical Schematic
(Page 4 of 7)
4
5
6
7
1018547
NOTE: Refer to the current Operators or Parts Manual for the most up-to-date information
59
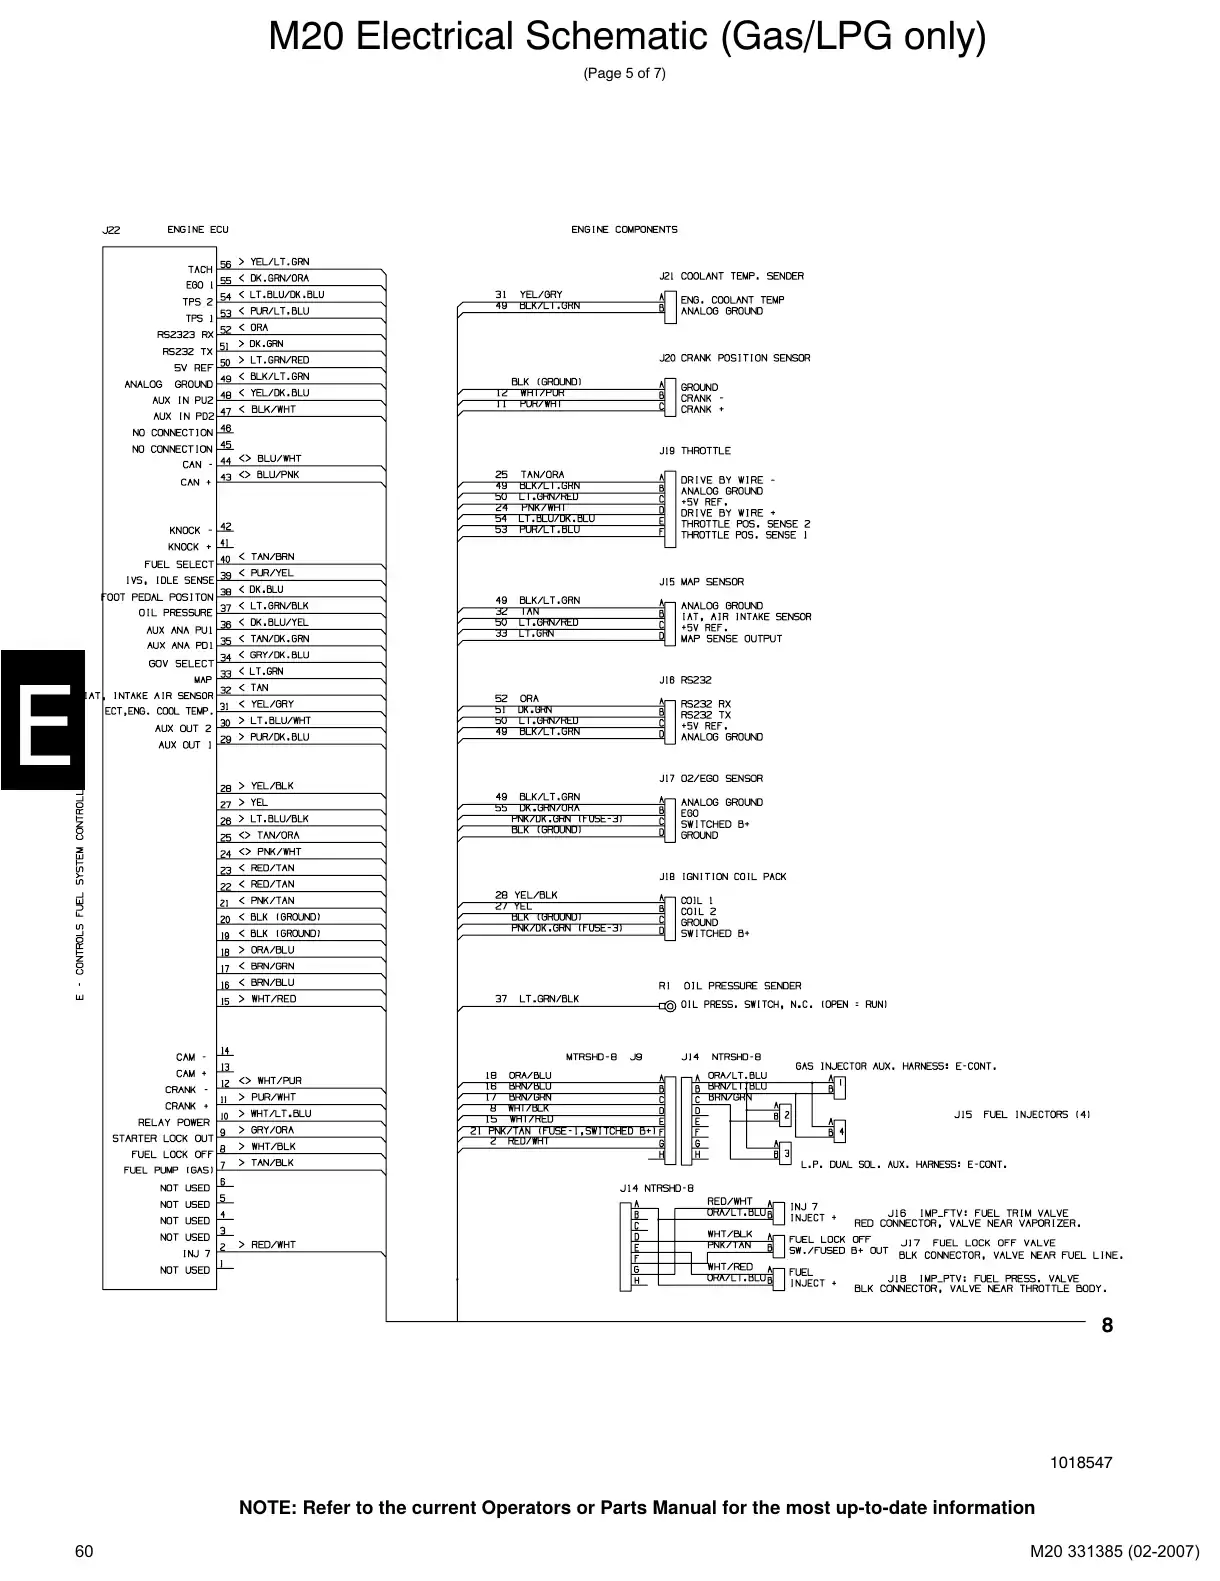
Text of manual page 60
M20 Electrical Schematic (Gas/LPG only)
(Page 5 of 7)
8
1018547
NOTE: Refer to the current Operators or Parts Manual for the most up-to-date information
60
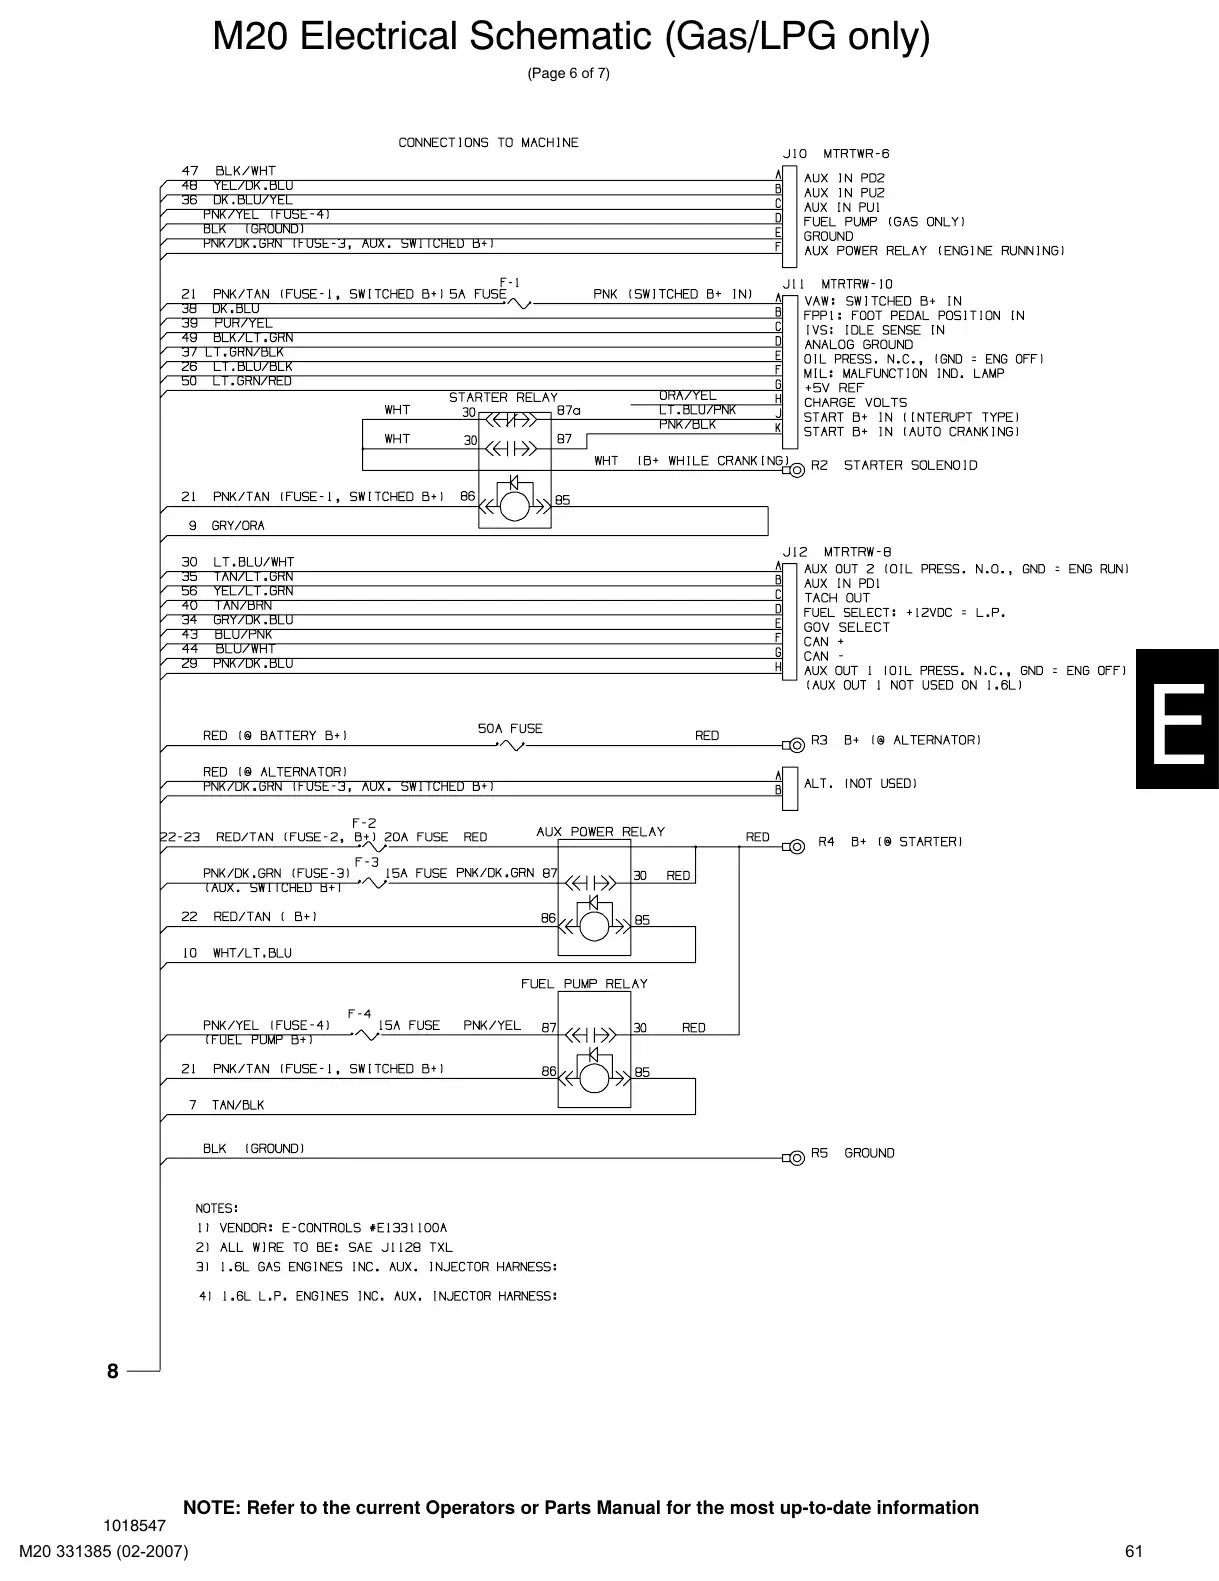
Text of manual page 61
M20 Electrical Schematic (Gas/LPG only)
(Page 6 of 7)
8
NOTE: Refer to the current Operators or Parts Manual for the most up-to-date information
1018547
61
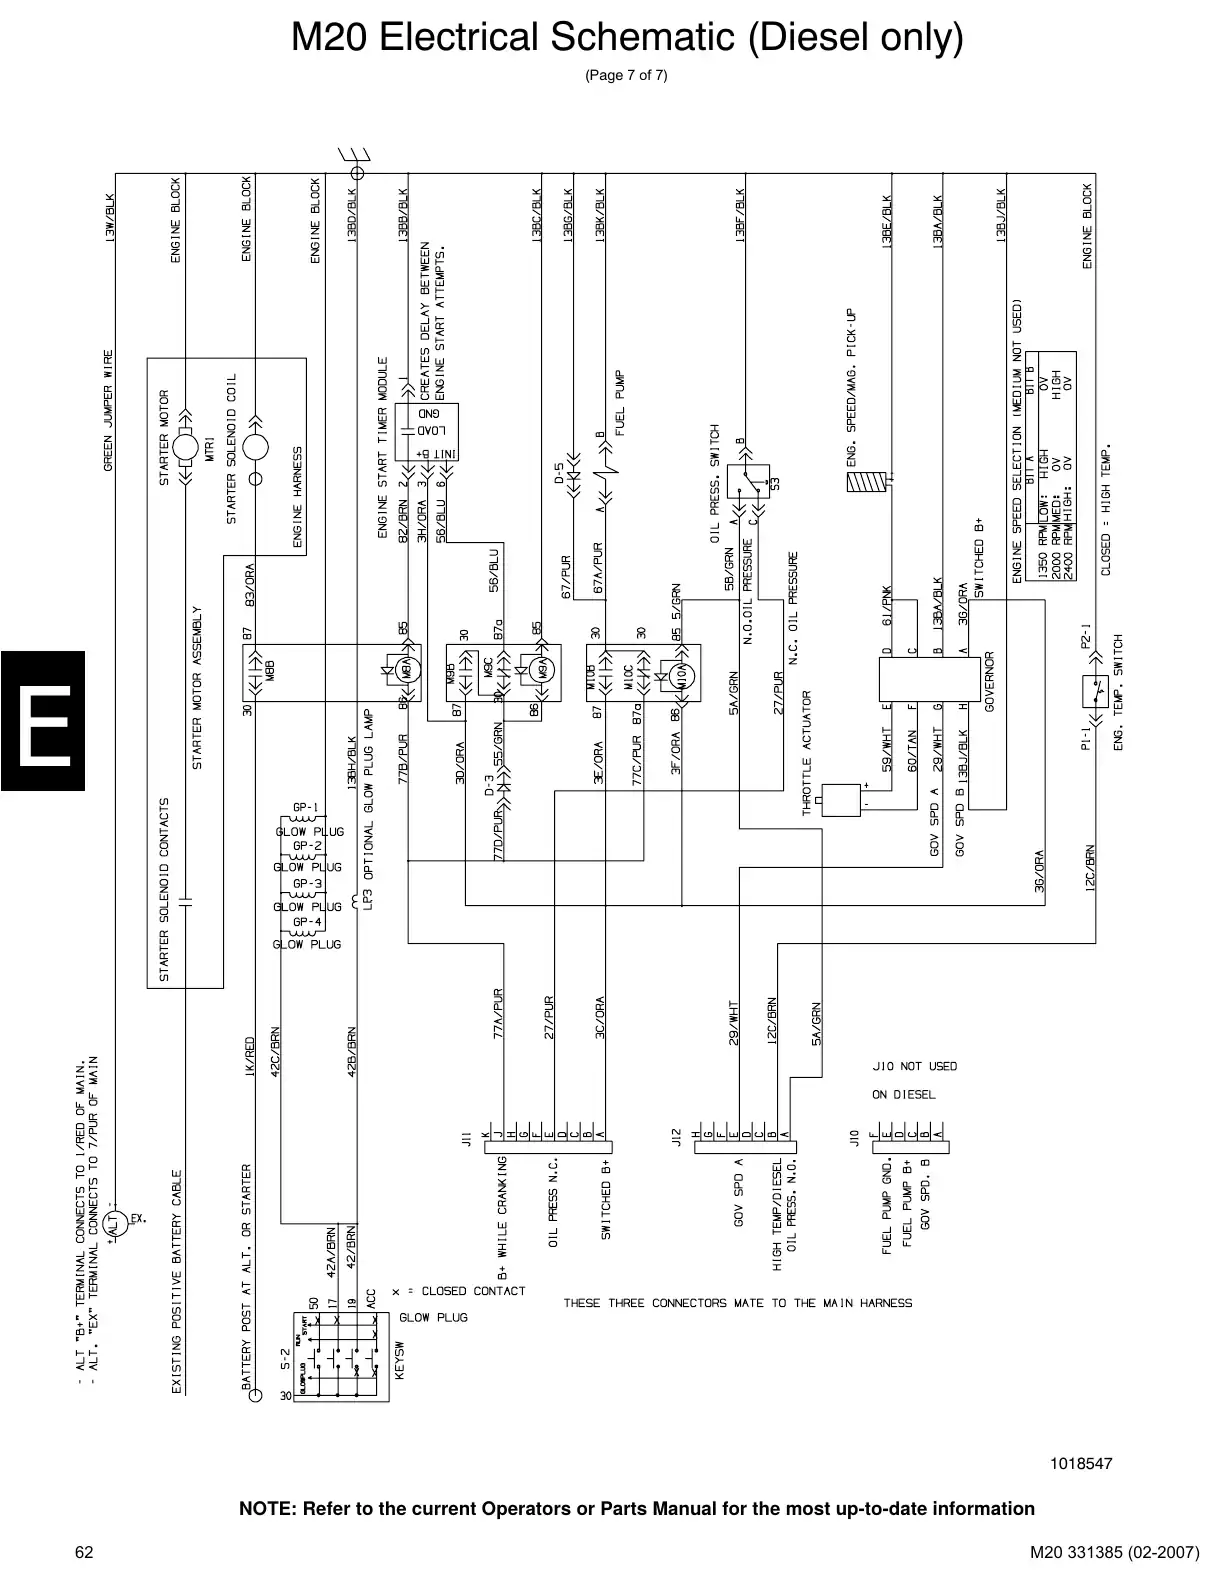
Text of manual page 62
M20 Electrical Schematic (Diesel only)
(Page 7 of 7)
1018547
NOTE: Refer to the current Operators or Parts Manual for the most up-to-date information
62
Main wire harnessPages 63–69 · 7 pages
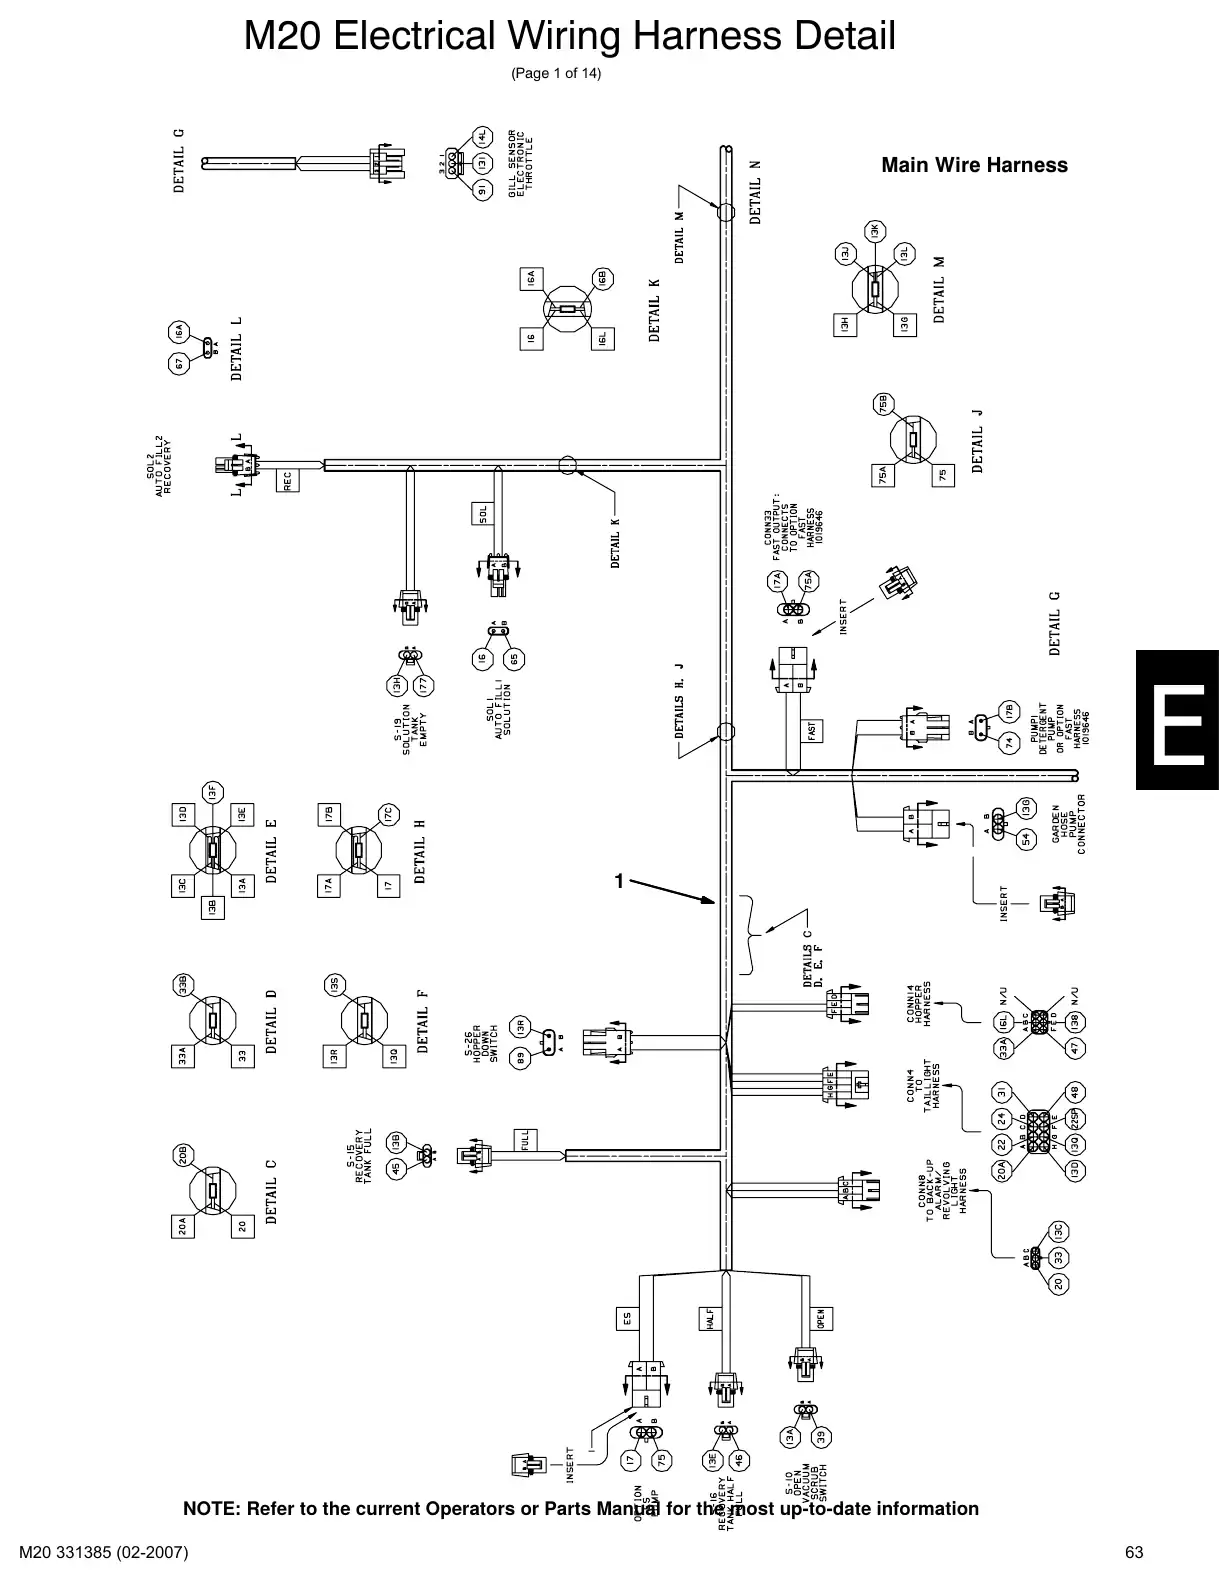
Text of manual page 63
M20 Electrical Wiring Harness Detail
(Page 1 of 14)
Main Wire Harness
1
NOTE: Refer to the current Operators or Parts Manual for the most up-to-date information
63
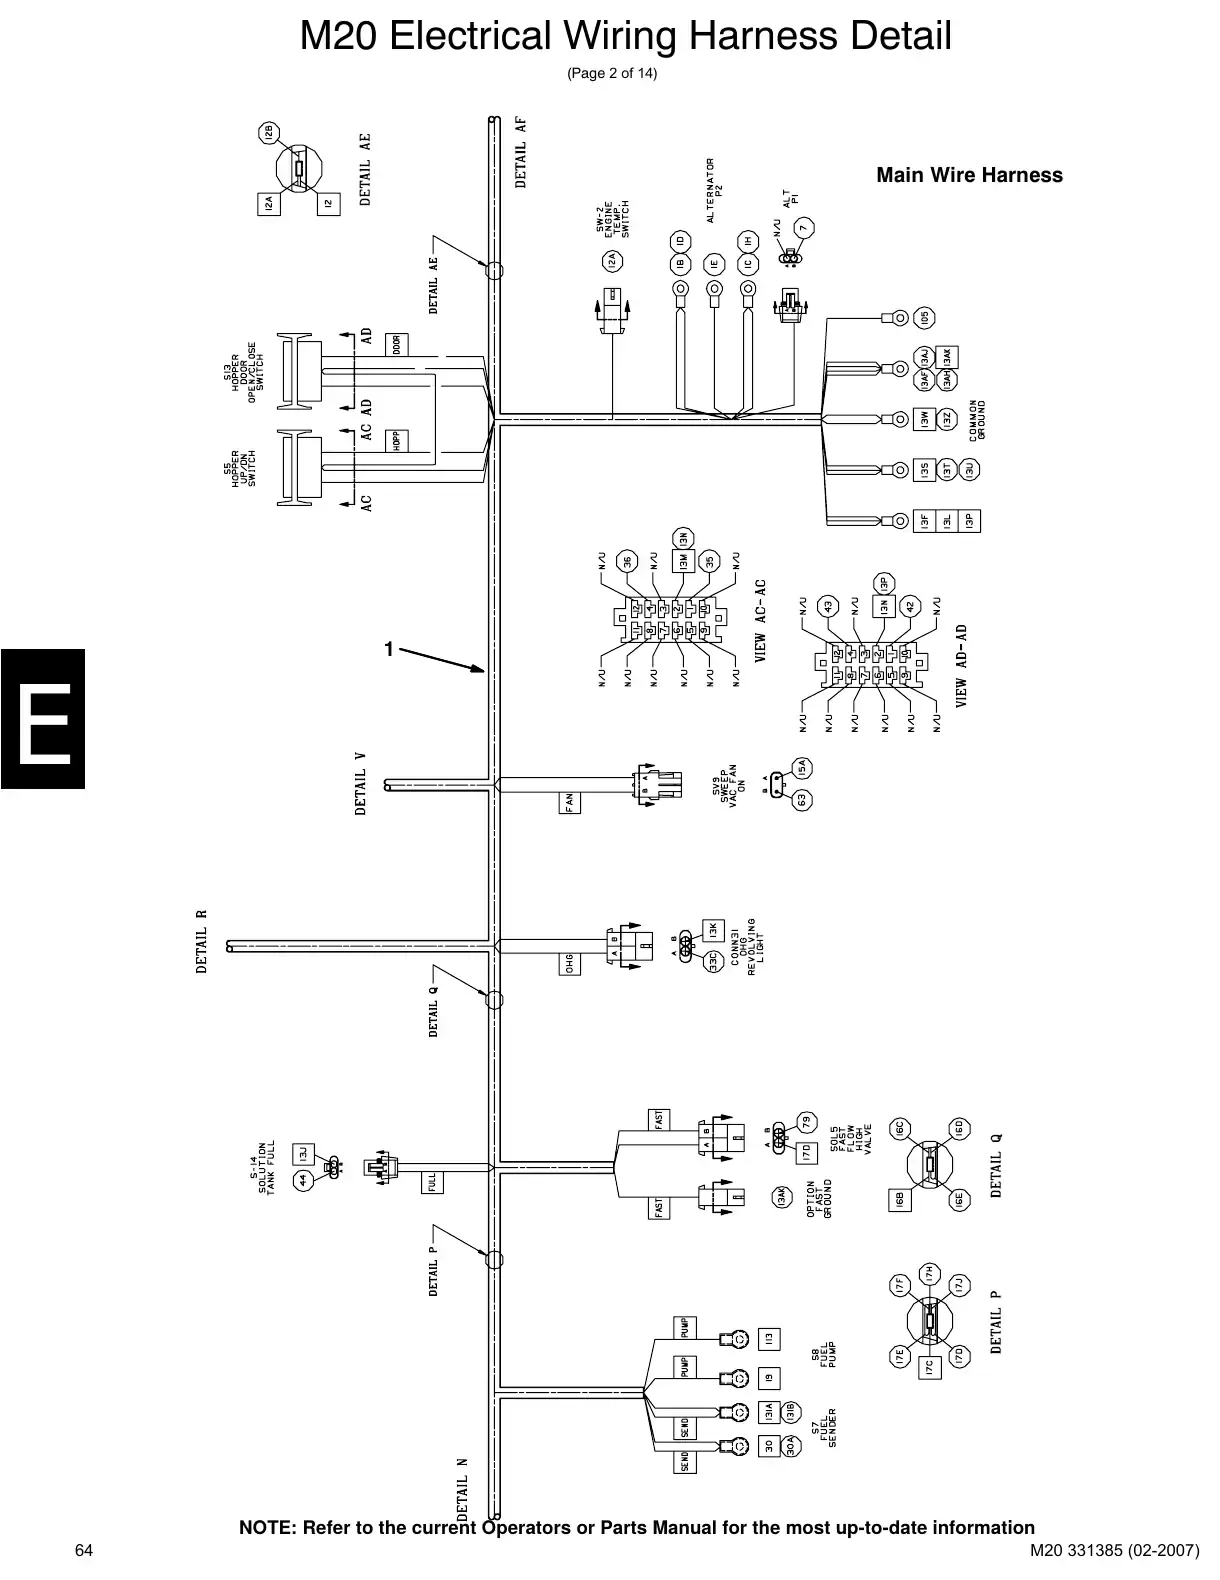
Text of manual page 64
M20 Electrical Wiring Harness Detail
(Page 2 of 14)
Main Wire Harness
1
NOTE: Refer to the current Operators or Parts Manual for the most up-to-date information
64
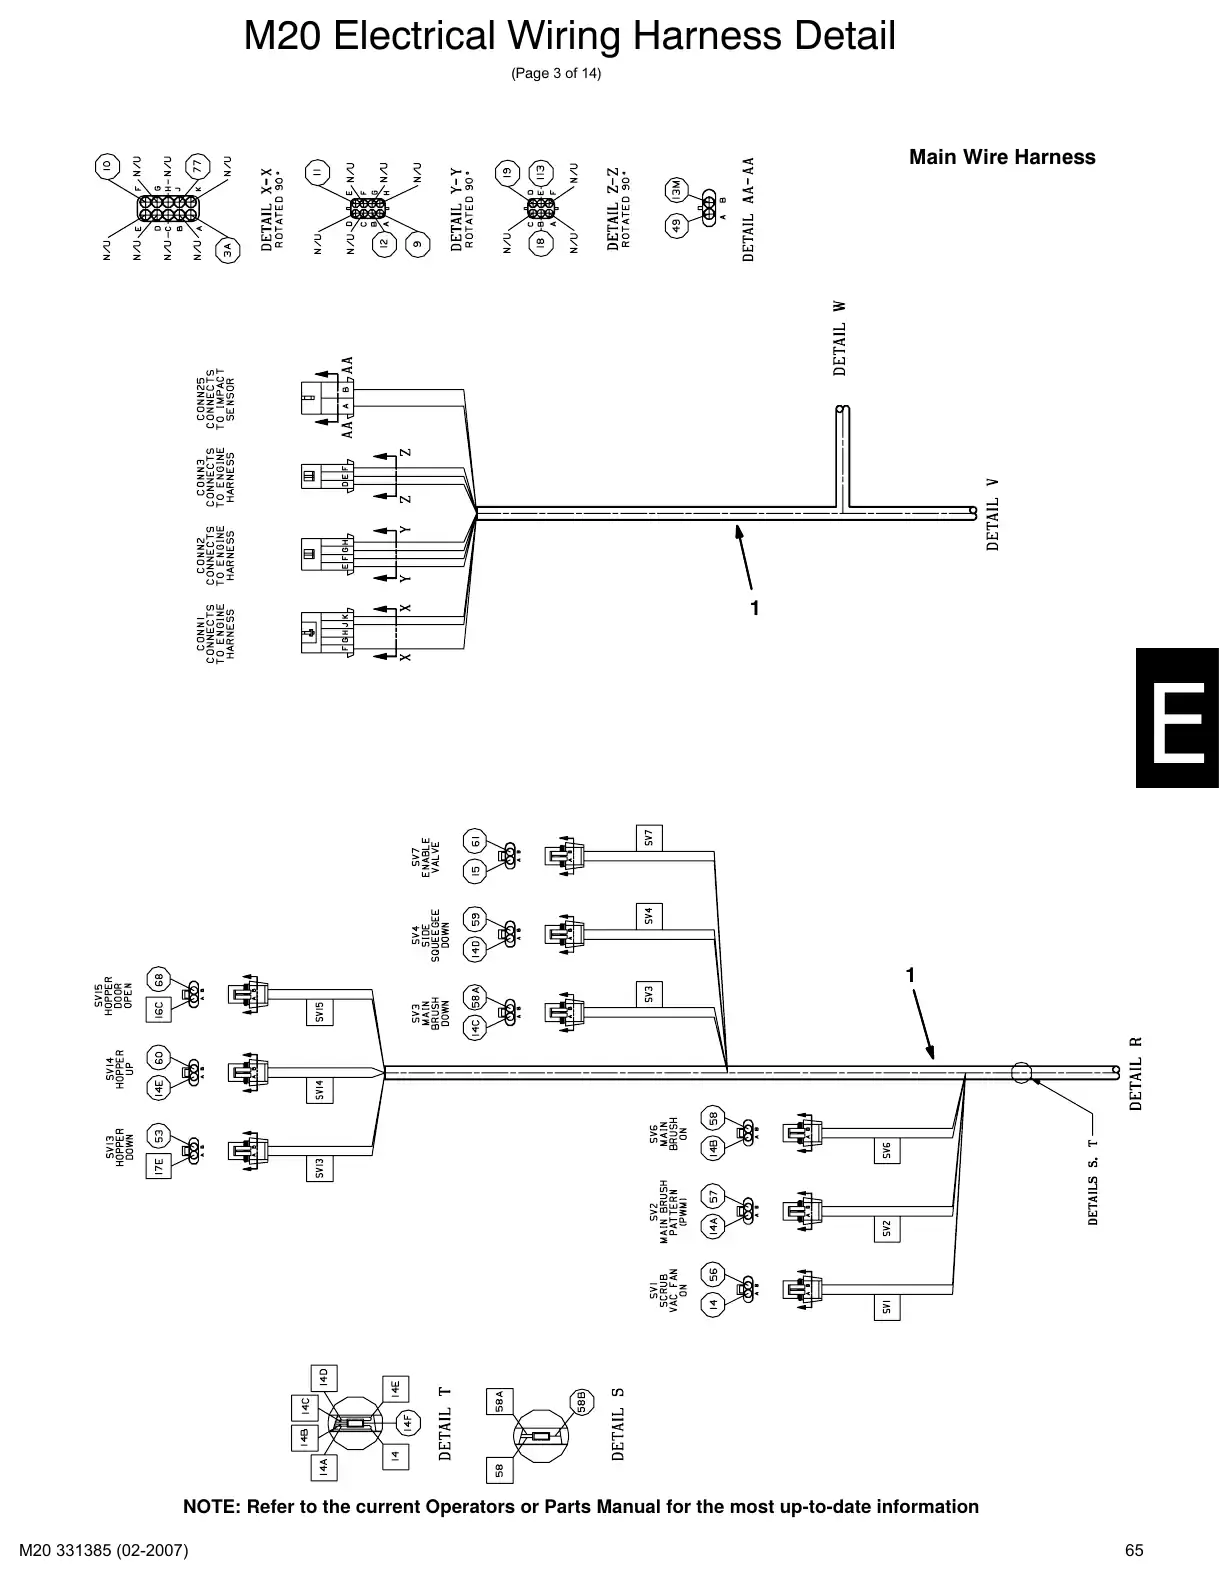
Text of manual page 65
M20 Electrical Wiring Harness Detail
(Page 3 of 14)
Main Wire Harness
1
1
NOTE: Refer to the current Operators or Parts Manual for the most up-to-date information
65
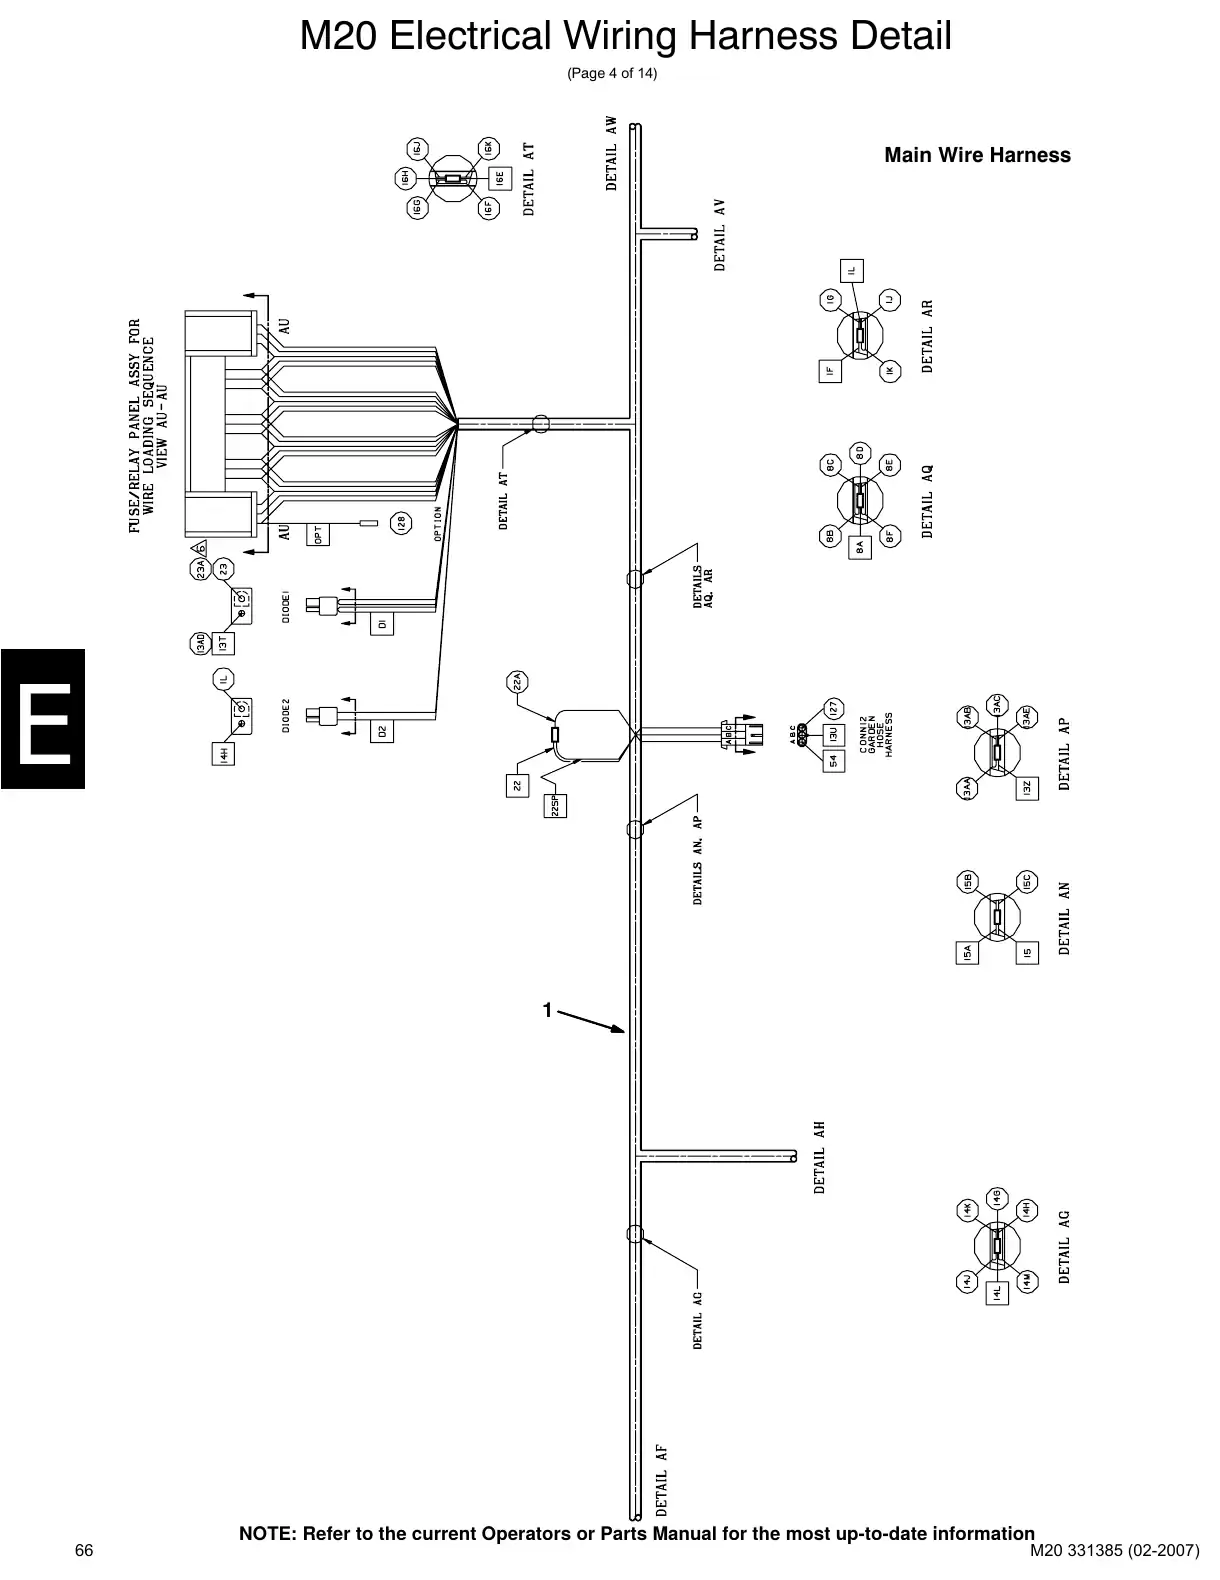
Text of manual page 66
M20 Electrical Wiring Harness Detail
(Page 4 of 14)
Main Wire Harness
1
66
NOTE: Refer to the current Operators or Parts Manual for the most up-to-date information
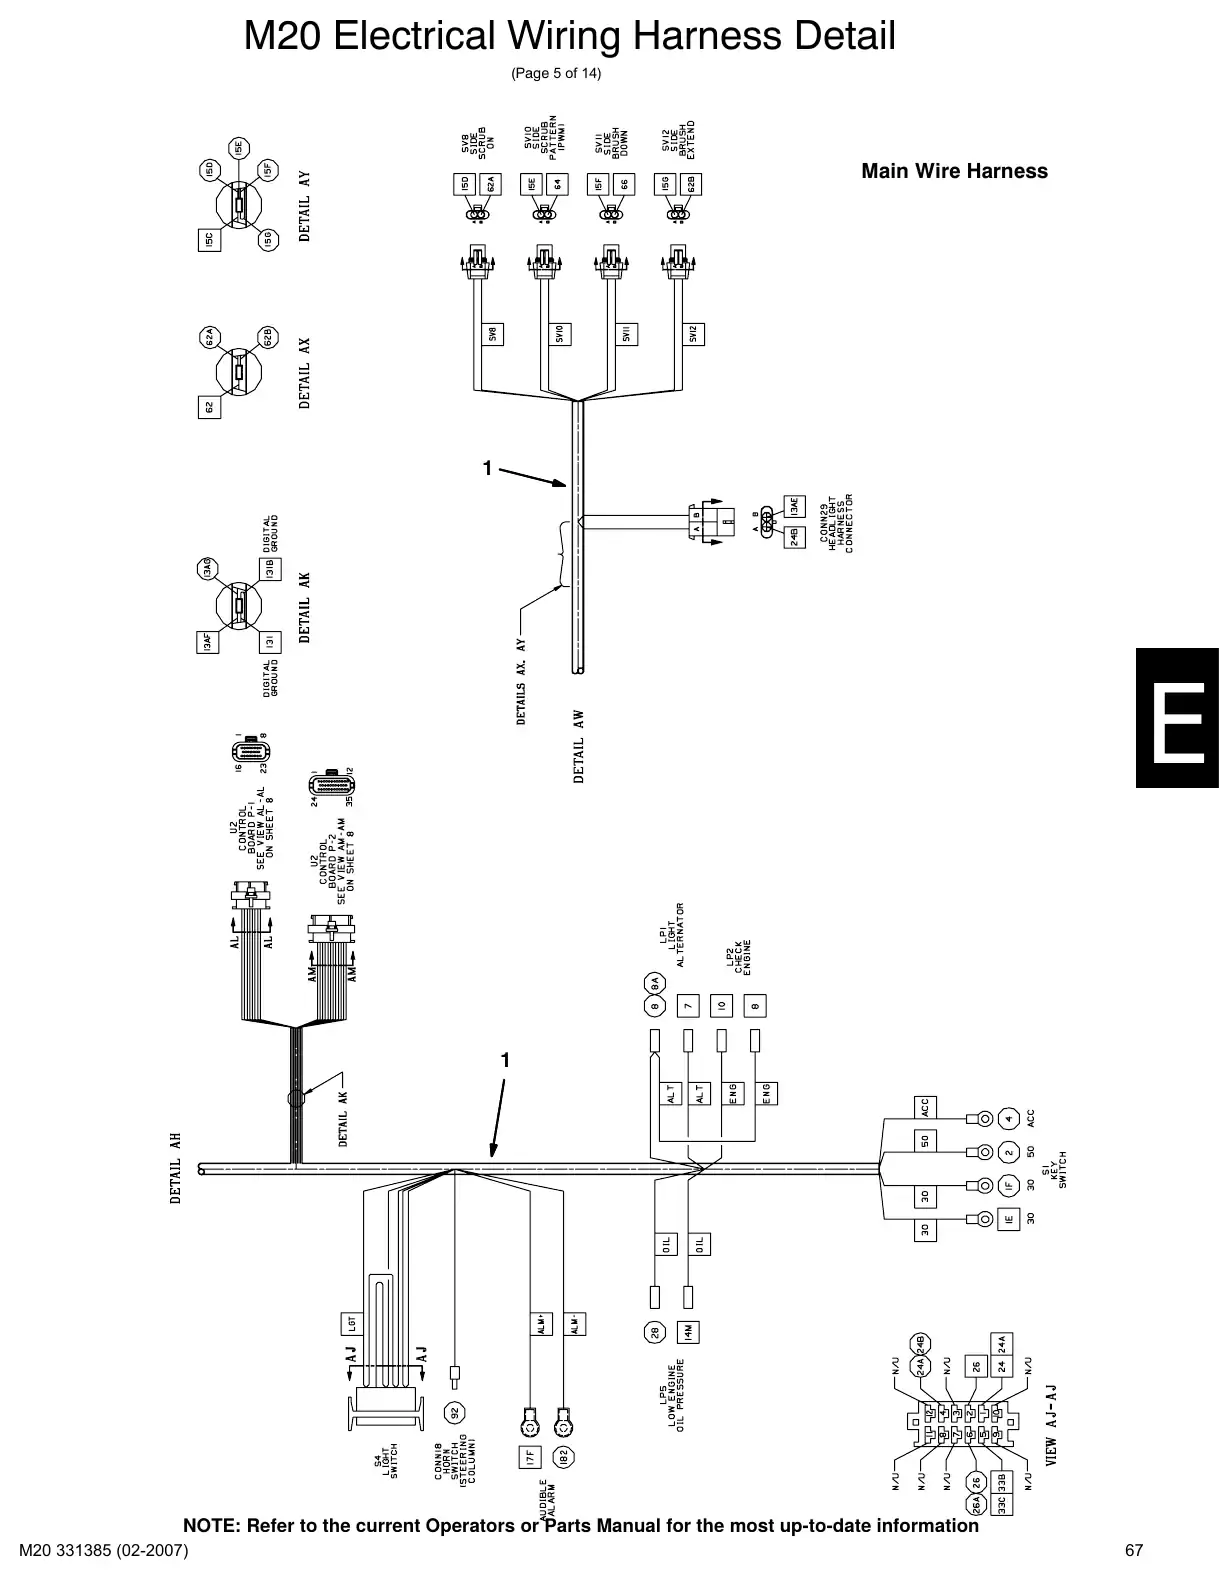
Text of manual page 67
M20 Electrical Wiring Harness Detail
(Page 5 of 14)
Main Wire Harness
1
1
NOTE: Refer to the current Operators or Parts Manual for the most up-to-date information
67
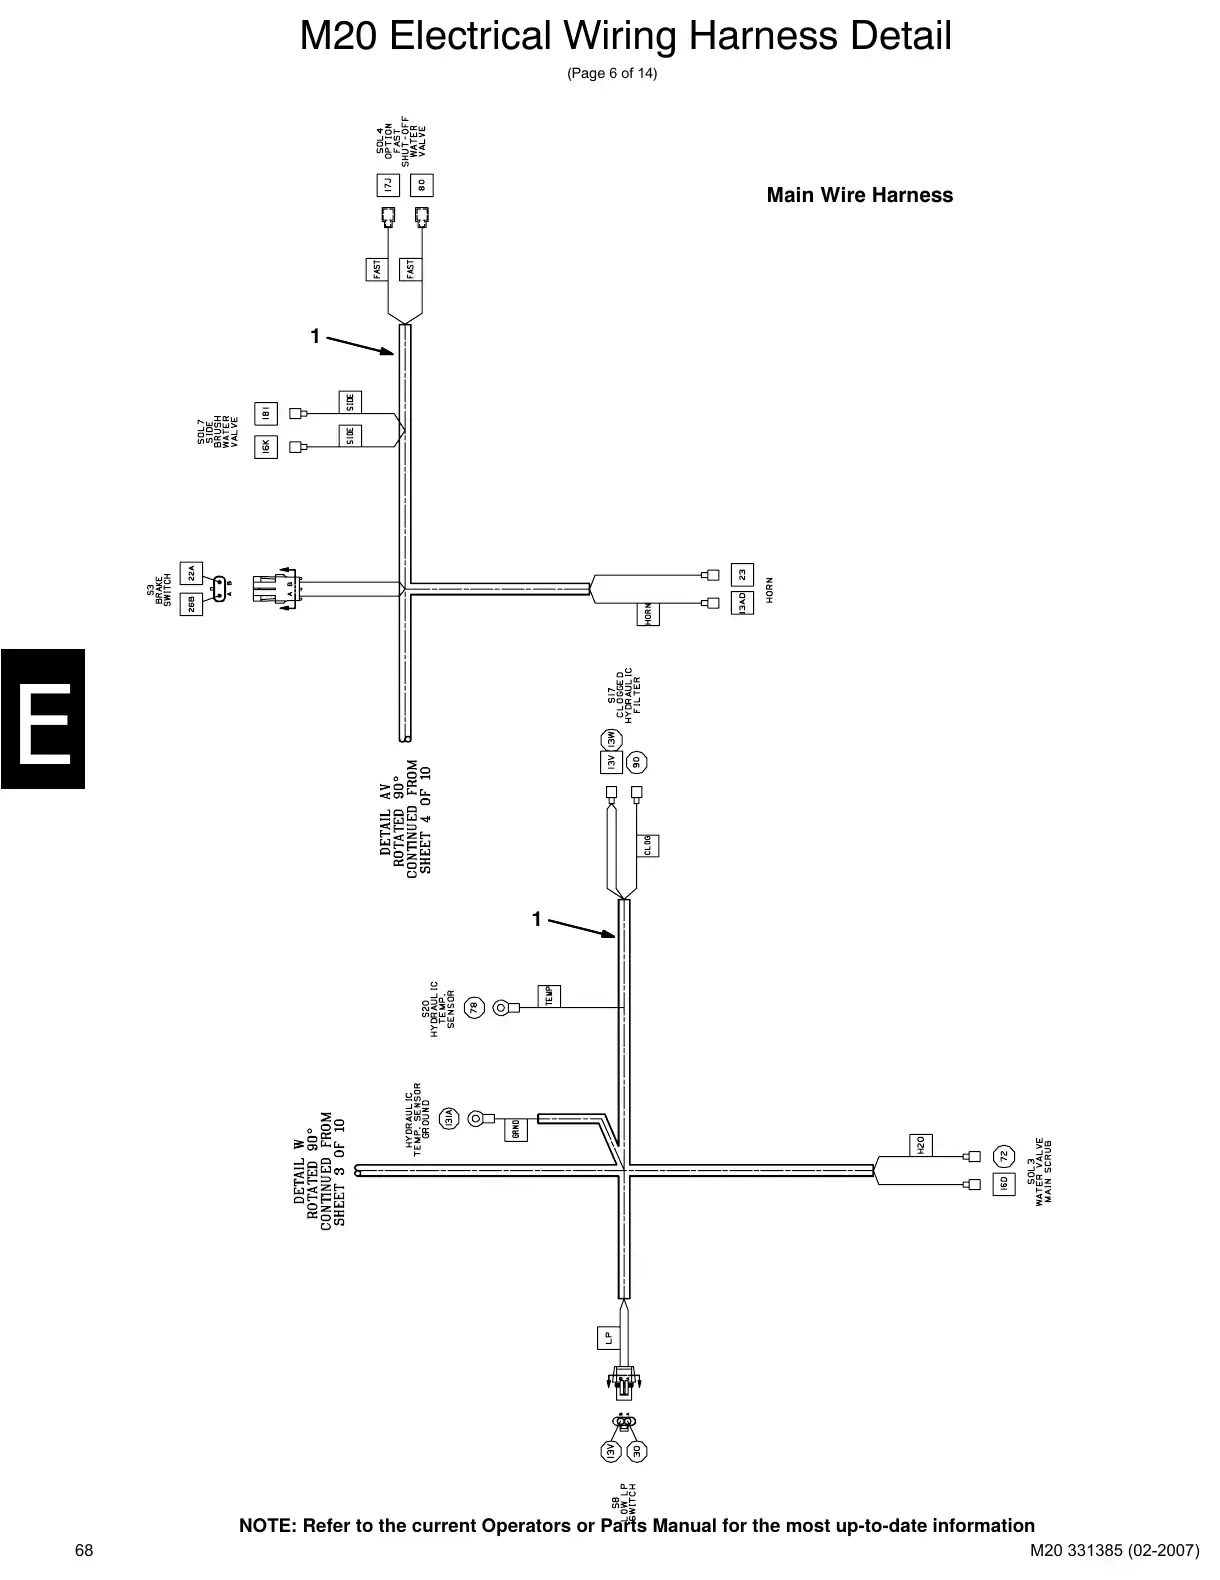
Text of manual page 68
M20 Electrical Wiring Harness Detail
(Page 6 of 14)
Main Wire Harness
1
1
NOTE: Refer to the current Operators or Parts Manual for the most up-to-date information
68
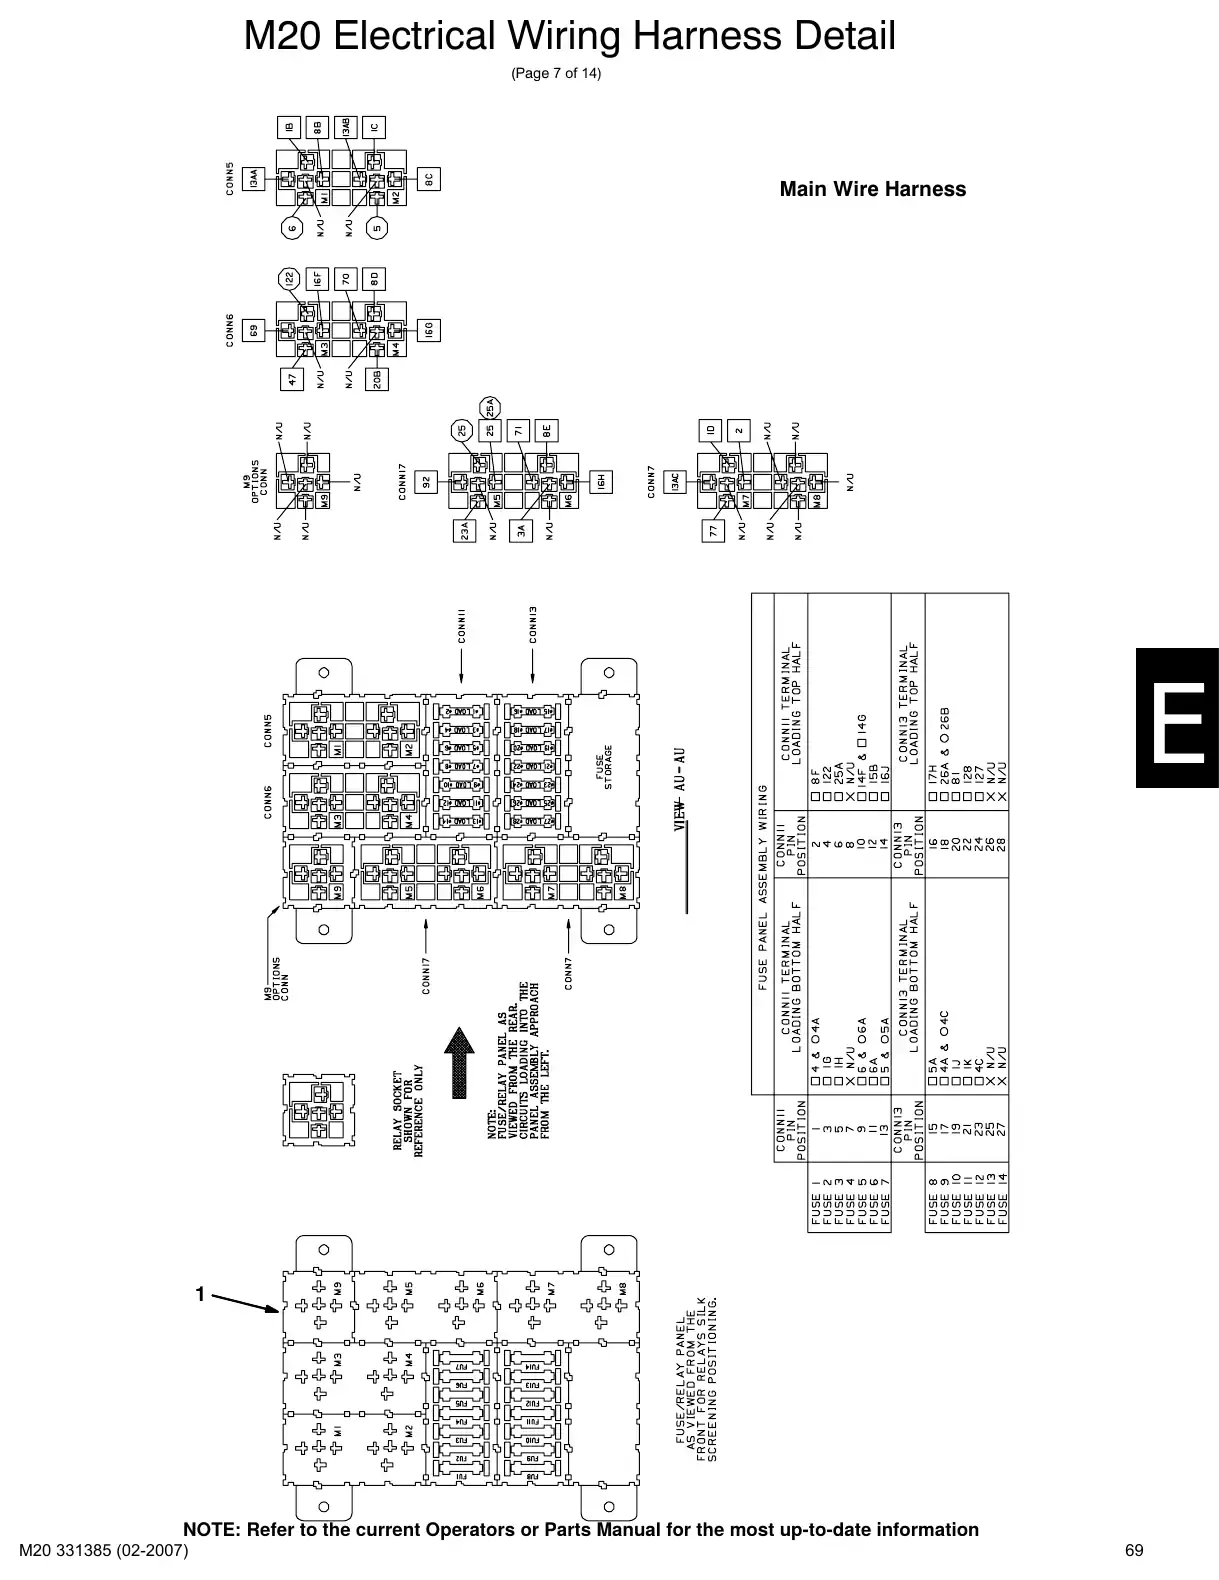
Text of manual page 69
M20 Electrical Wiring Harness Detail
(Page 7 of 14)
Main Wire Harness
1
NOTE: Refer to the current Operators or Parts Manual for the most up-to-date information
69
Headlight wire harnessPage 70 · 1 page
Text of manual page 70
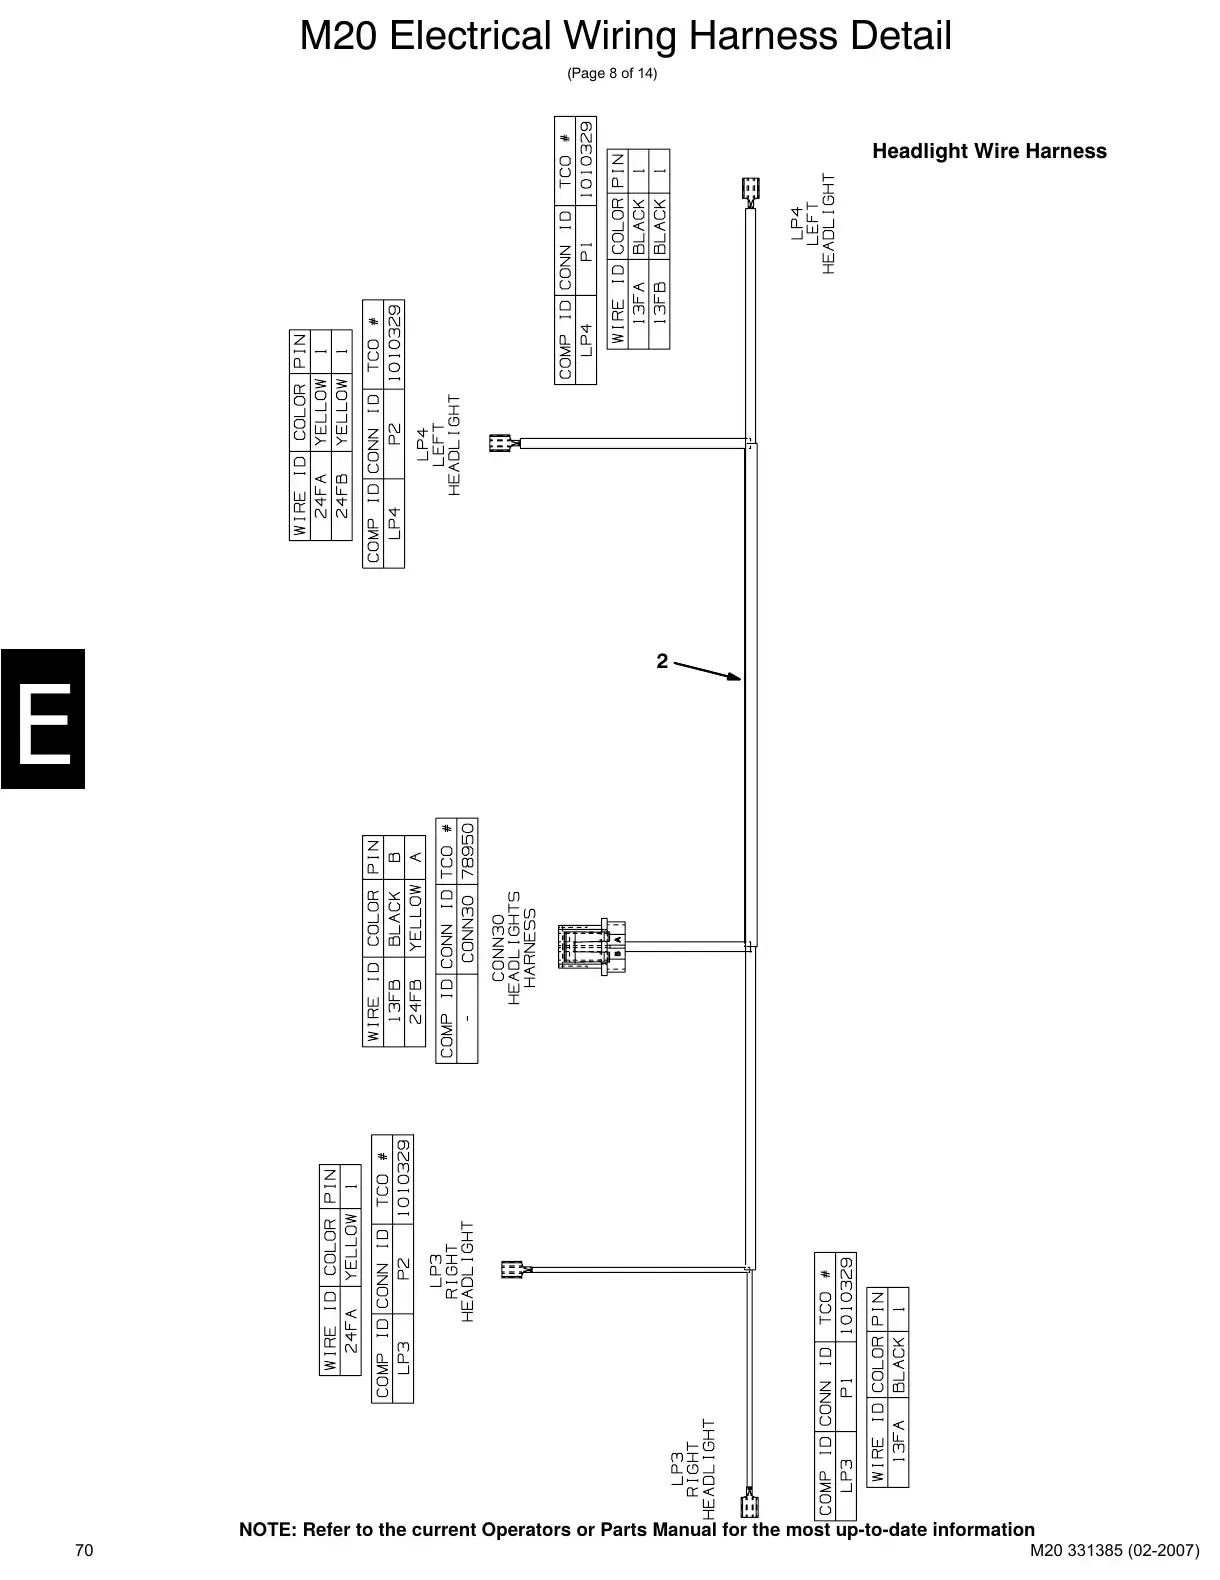
M20 Electrical Wiring Harness Detail
(Page 8 of 14)
Headlight Wire Harness
2
70
NOTE: Refer to the current Operators or Parts Manual for the most up-to-date information
Hopper wire harnessPage 71 · 1 page
Text of manual page 71
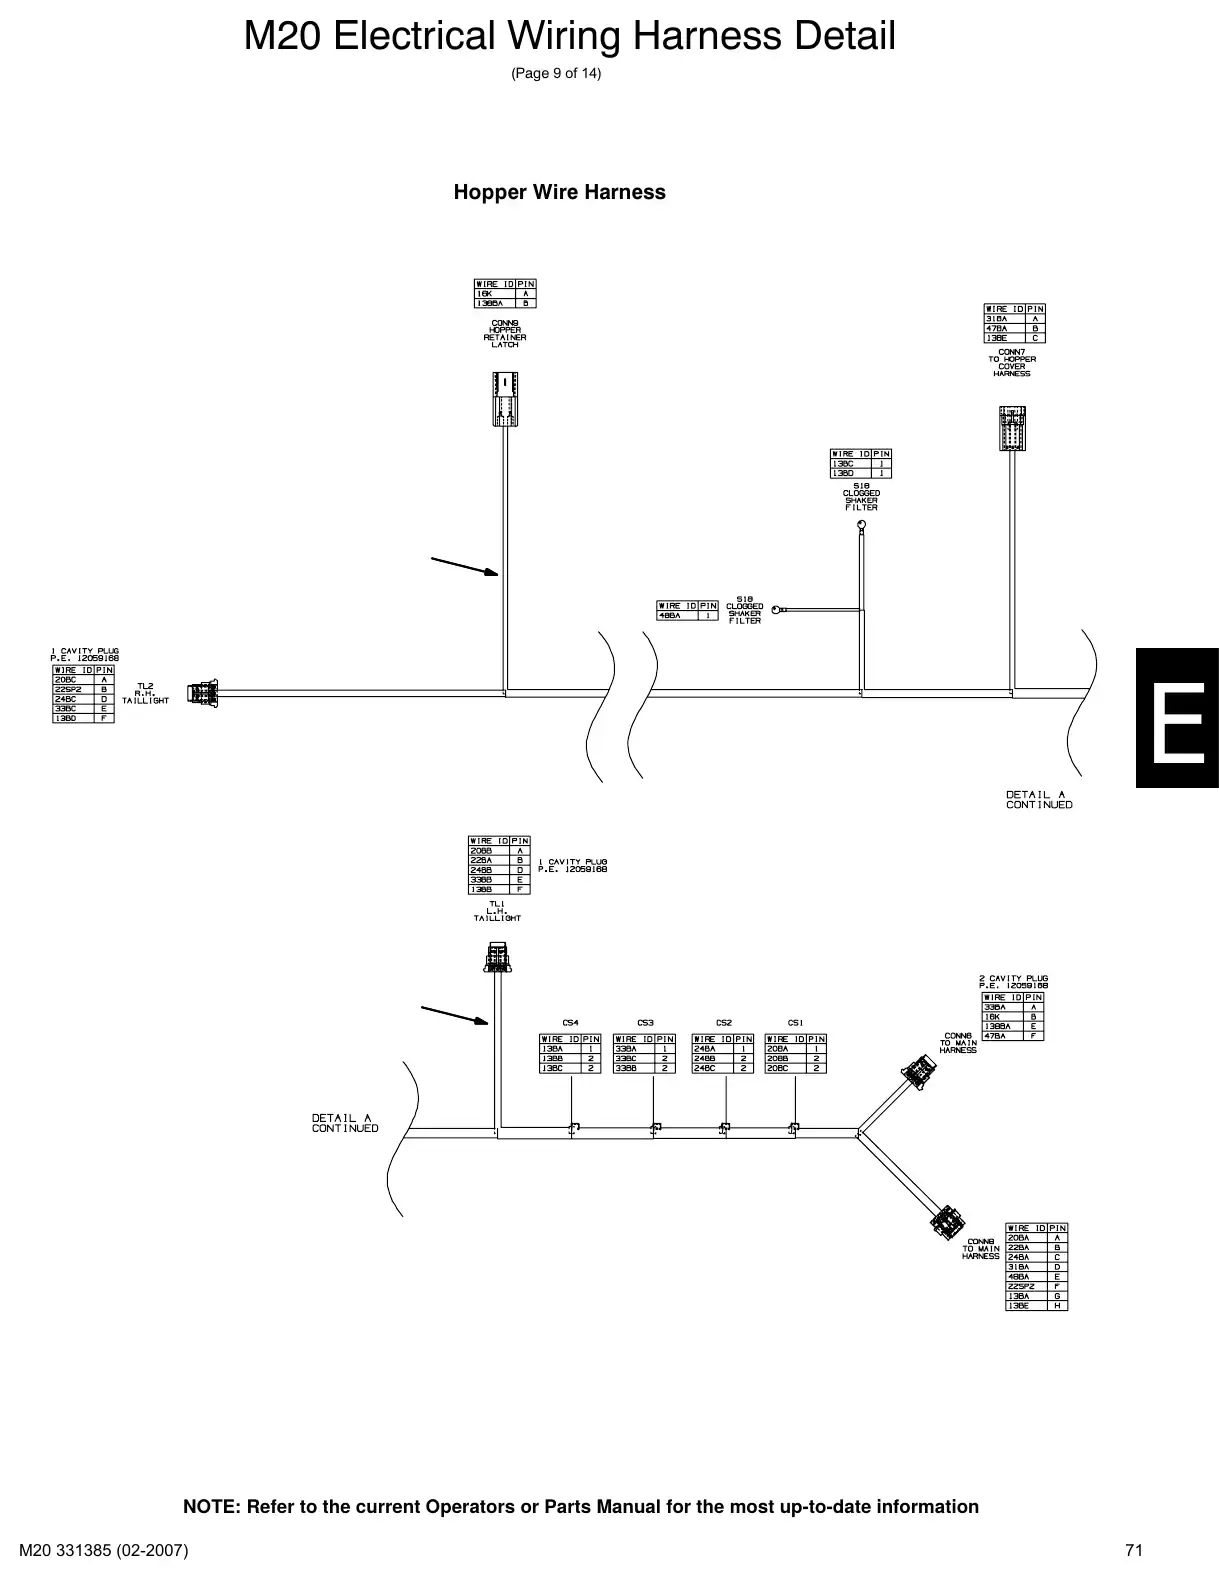
M20 Electrical Wiring Harness Detail
(Page 9 of 14)
Hopper Wire Harness
NOTE: Refer to the current Operators or Parts Manual for the most up-to-date information
71
Hopper cover wire harnessPage 72 · 1 page
Text of manual page 72
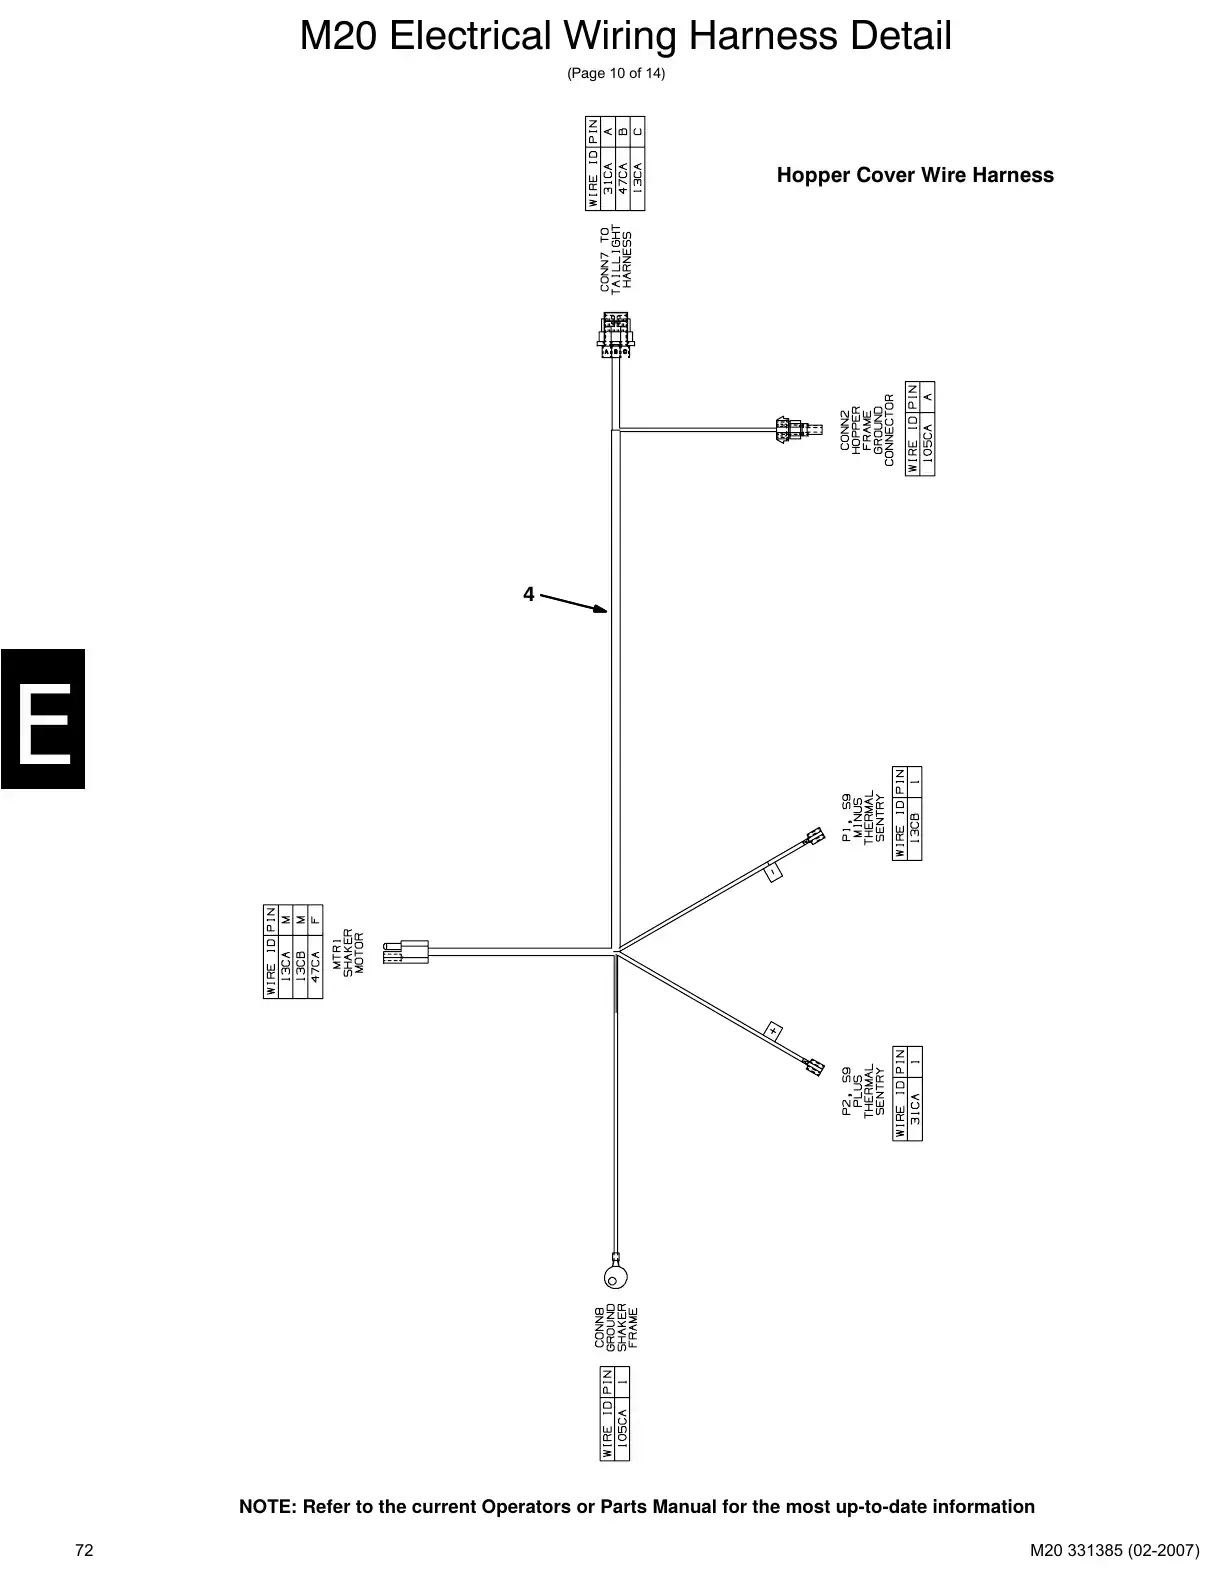
M20 Electrical Wiring Harness Detail
(Page 10 of 14)
Hopper Cover Wire Harness
4
NOTE: Refer to the current Operators or Parts Manual for the most up-to-date information
72
Gas/LPG engine wiringPages 73–76 · 4 pages
Text of manual page 73
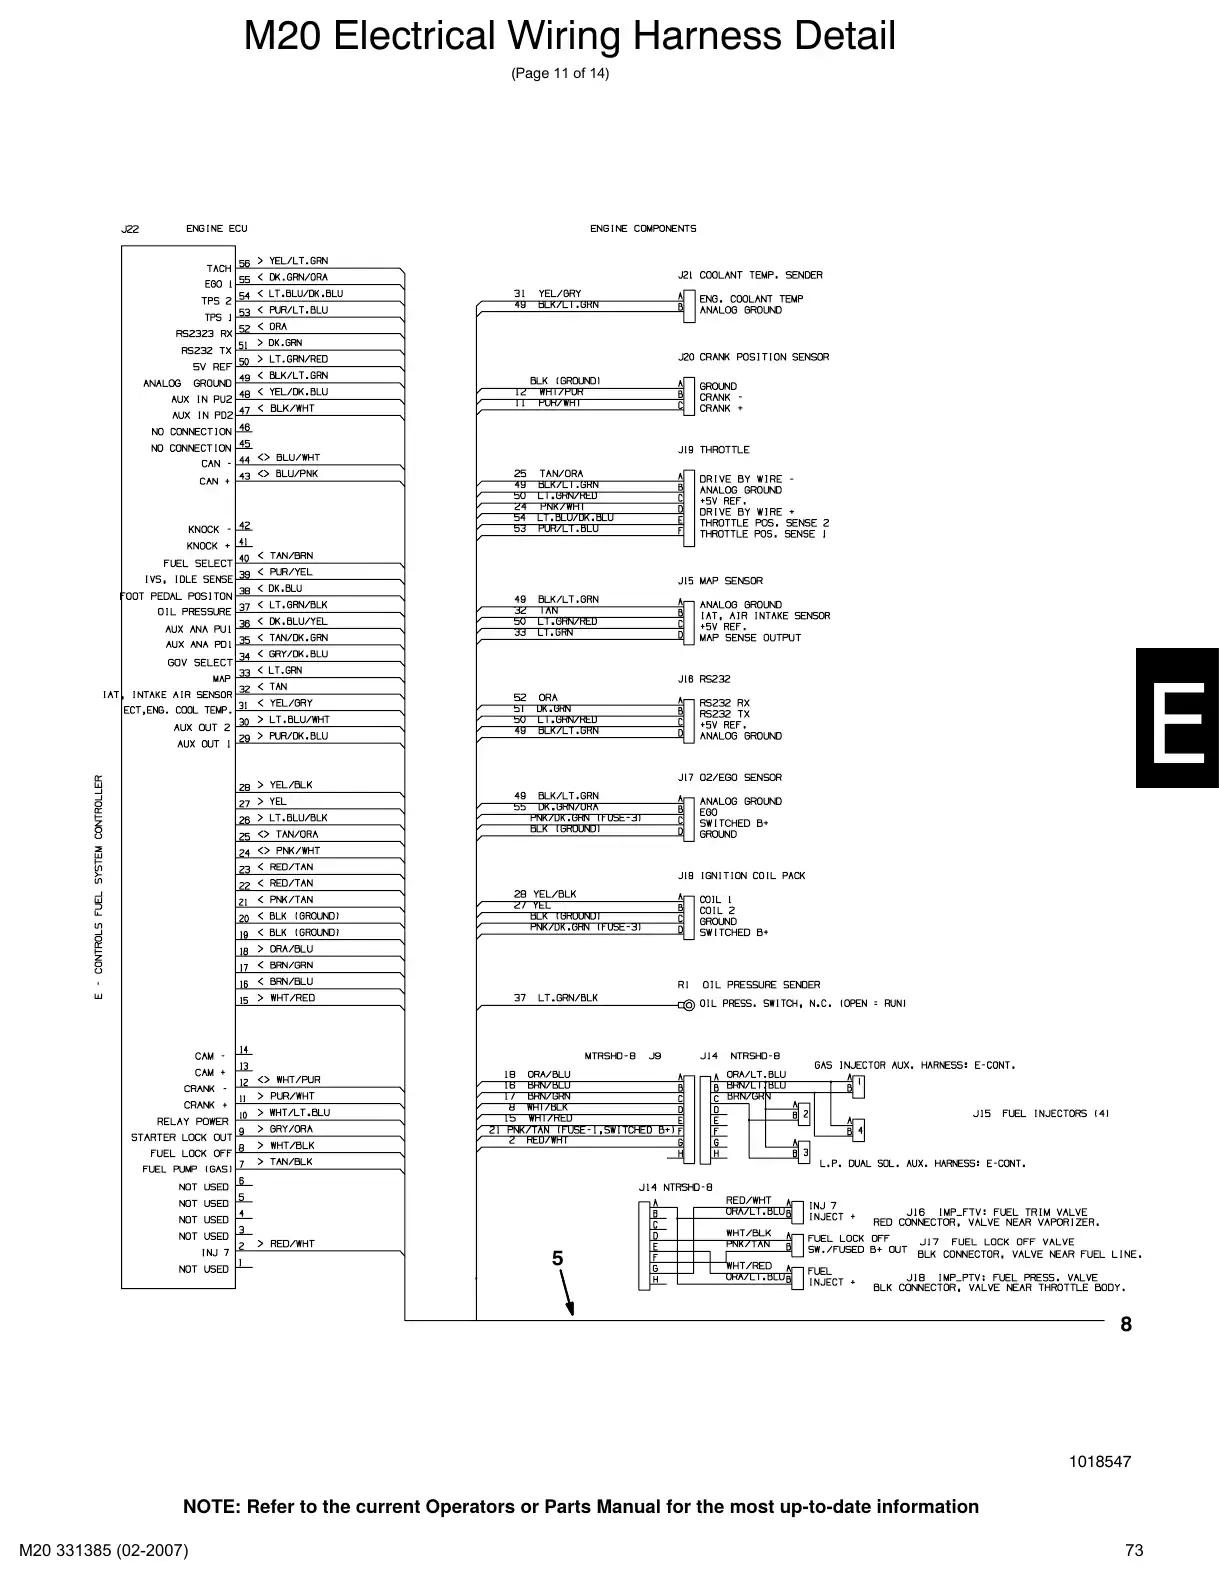
M20 Electrical Wiring Harness Detail
(Page 11 of 14)
5
8
1018547
NOTE: Refer to the current Operators or Parts Manual for the most up-to-date information
73
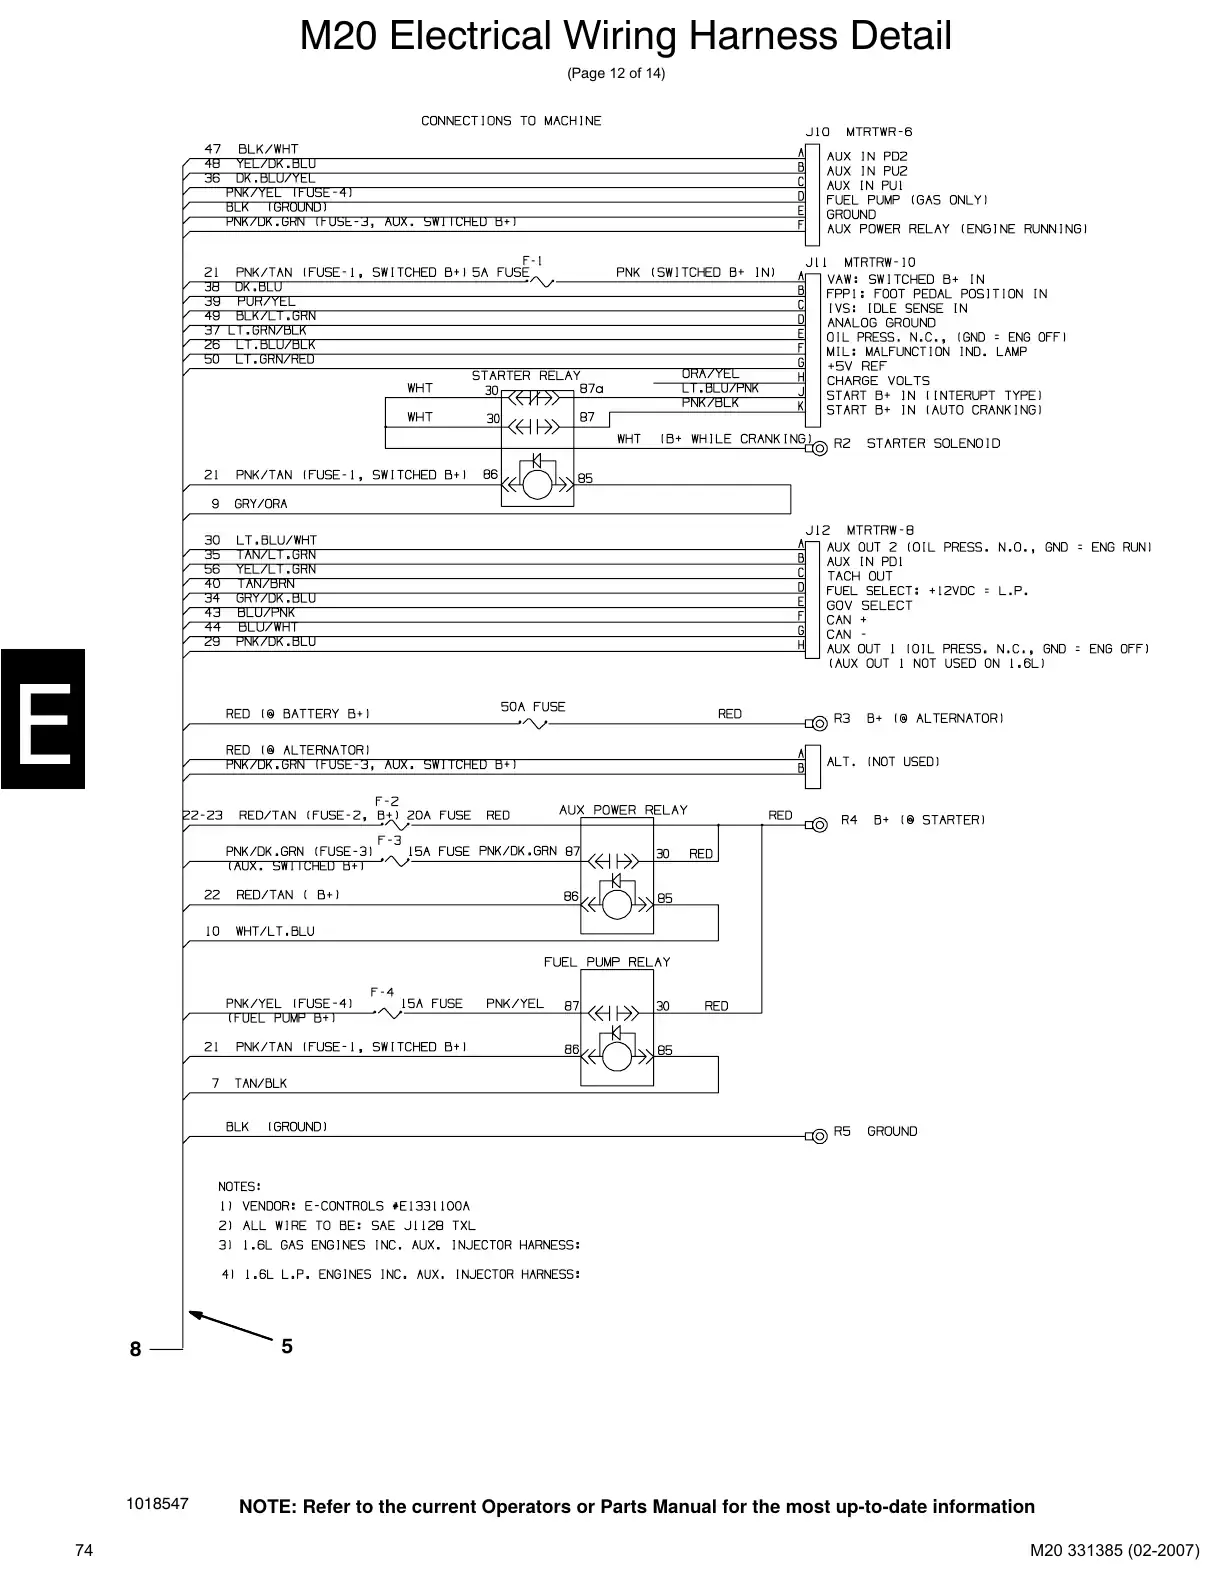
Text of manual page 74
M20 Electrical Wiring Harness Detail
(Page 12 of 14)
8
1018547
74
5
NOTE: Refer to the current Operators or Parts Manual for the most up-to-date information
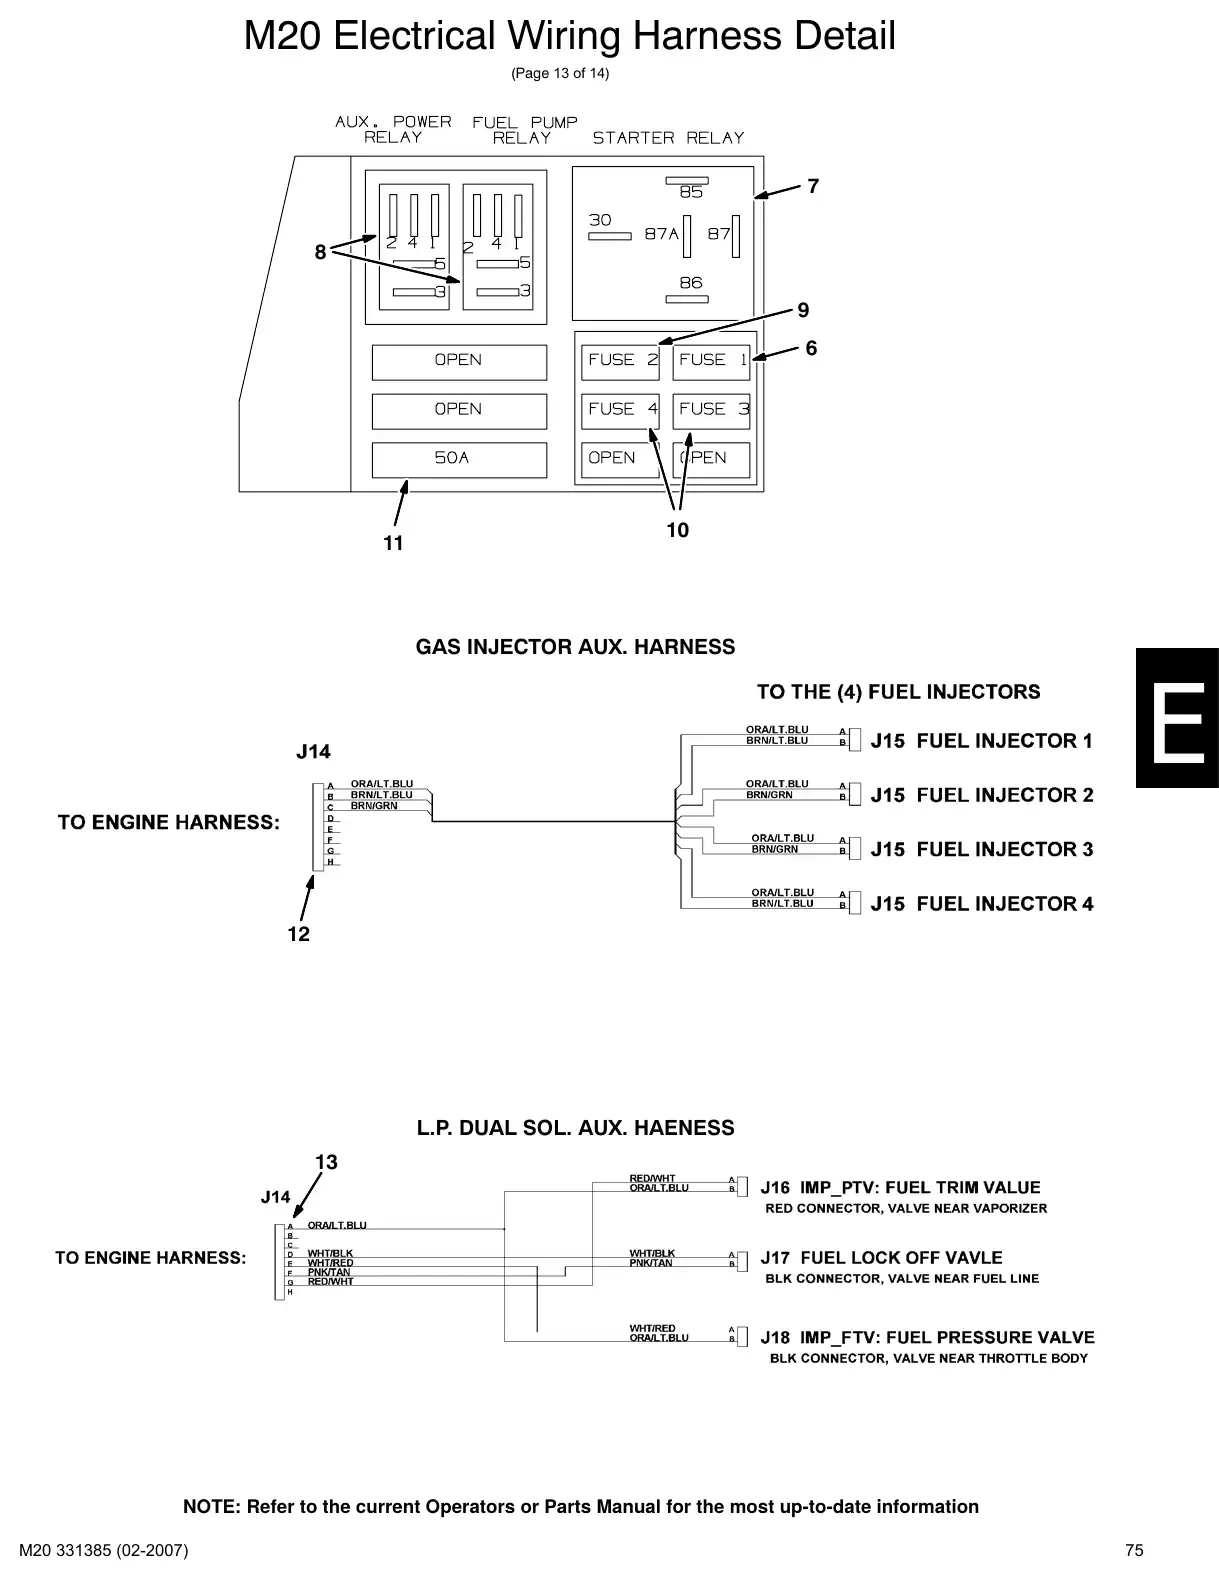
Text of manual page 75
M20 Electrical Wiring Harness Detail
(Page 13 of 14)
7
8
9
6
11
10
GAS INJECTOR AUX. HARNESS
12
L.P. DUAL SOL. AUX. HAENESS
13
NOTE: Refer to the current Operators or Parts Manual for the most up-to-date information
75
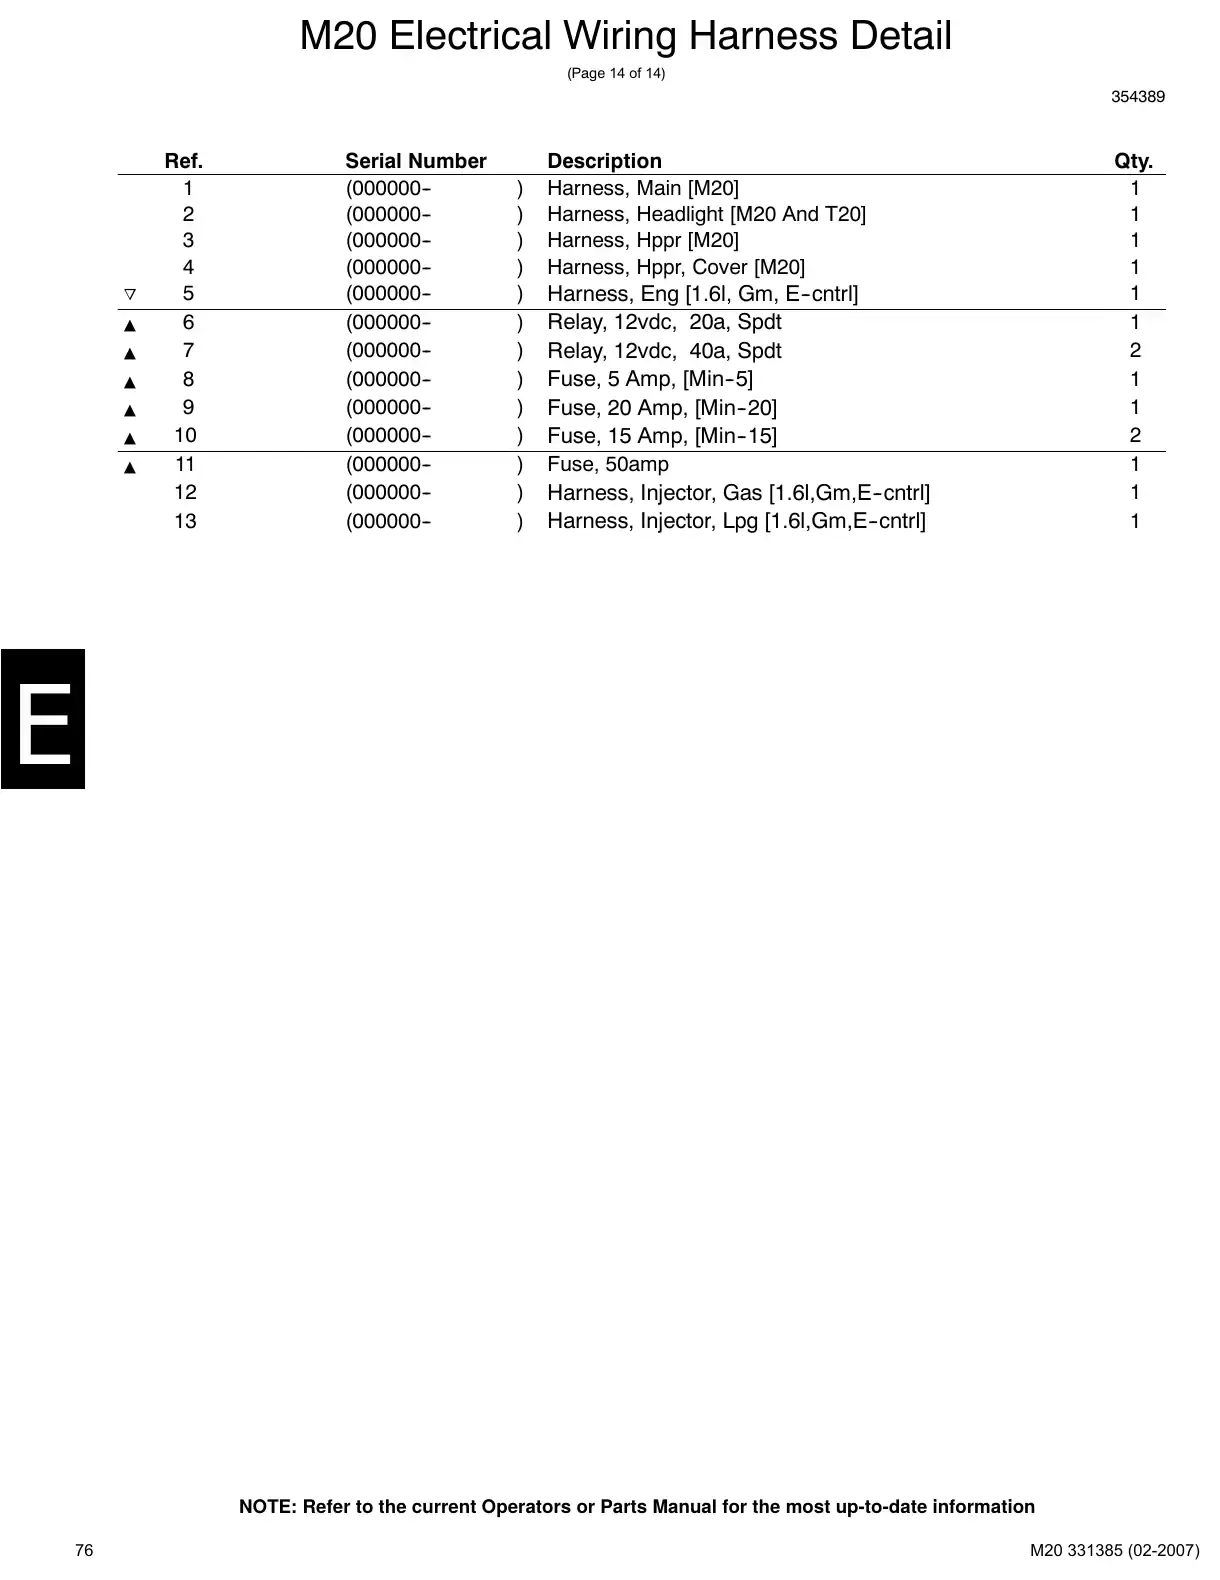
Text of manual page 76
M20 Electrical Wiring Harness Detail
(Page 14 of 14)
354389
o
Ref.
1
2
3
4
5
6
7
8
9
10
11
12
13
Serial Number
(000000-(000000-(000000-(000000-(000000-(000000-(000000-(000000-(000000-(000000-(000000-(000000-(000000-
)
)
)
)
)
)
)
)
)
)
)
)
)
Description
Harness, Main [M20]
Harness, Headlight [M20 And T20]
Harness, Hppr [M20]
Harness, Hppr, Cover [M20]
Harness, Eng [1.6l, Gm, E-cntrl]
Relay, 12vdc, 20a, Spdt
Relay, 12vdc, 40a, Spdt
Fuse, 5 Amp, [Min-5]
Fuse, 20 Amp, [Min-20]
Fuse, 15 Amp, [Min-15]
Fuse, 50amp
Harness, Injector, Gas [1.6l,Gm,E-cntrl]
Harness, Injector, Lpg [1.6l,Gm,E-cntrl]
Qty.
1
1
1
1
1
1
2
1
1
2
1
1
1
NOTE: Refer to the current Operators or Parts Manual for the most up-to-date information
76
FaST wire harnessPage 77 · 1 page
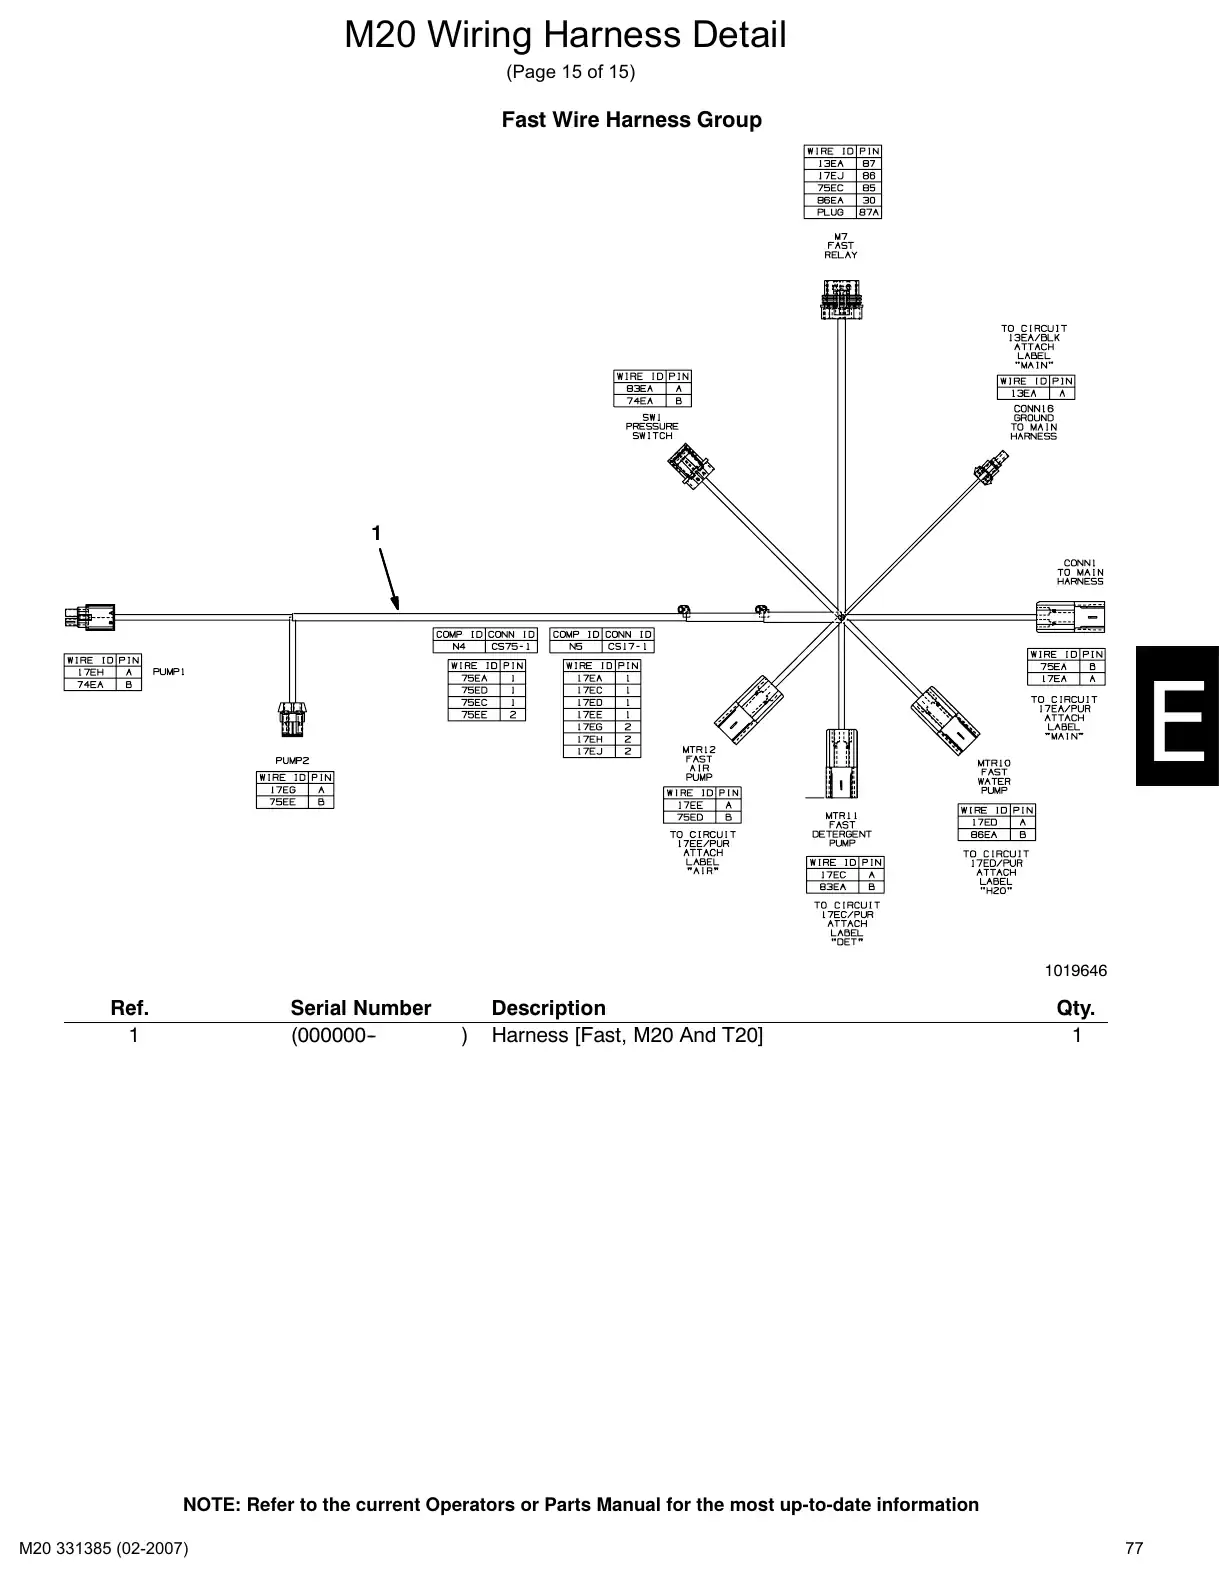
Text of manual page 77
M20 Wiring Harness Detail
(Page 15 of 15)
Fast Wire Harness Group
1
1019646
Ref.
1
Serial Number
(000000-
)
Description
Harness [Fast, M20 And T20]
Qty.
1
NOTE: Refer to the current Operators or Parts Manual for the most up-to-date information
77
Electrical symbols and termsPage 78 · 1 page
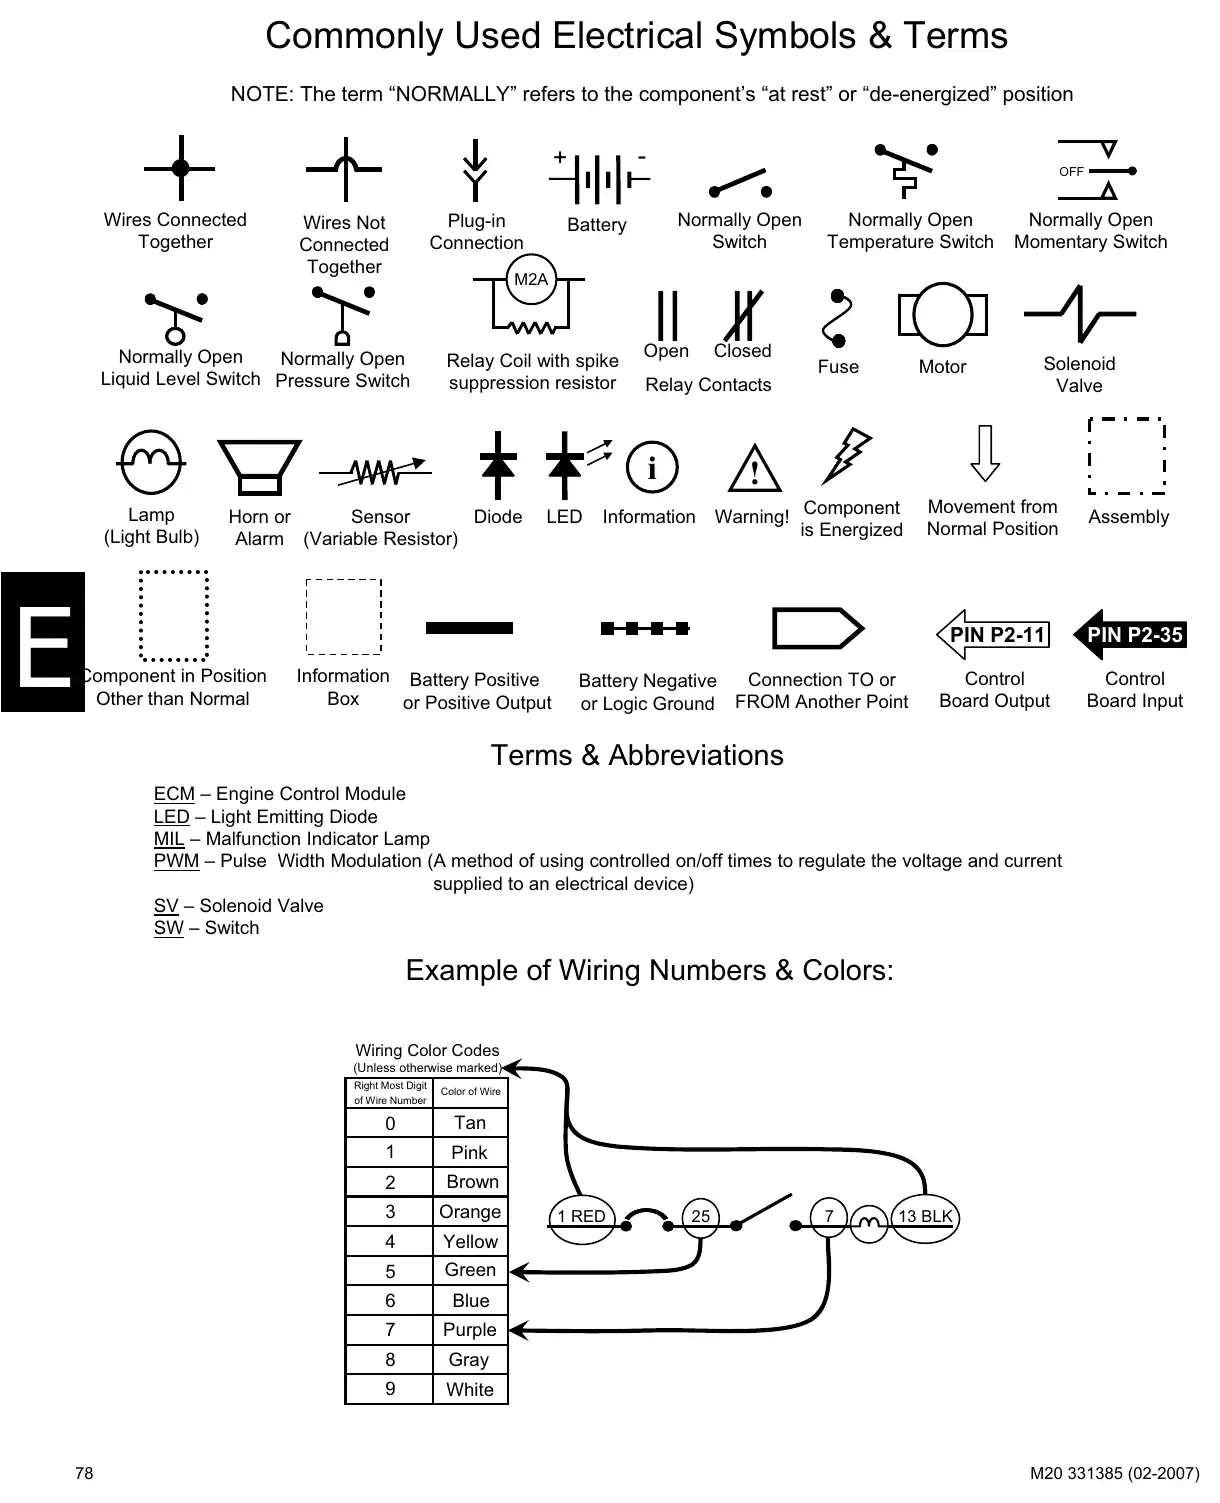
Text of manual page 78
Commonly Used Electrical Symbols & Terms
NOTE: The term "NORMALLY" refers to the component's "at rest" or "de-energized" position
-
+
Wires Connected
Together
Plug-in
Connection
Wires Not
Connected
Together
OFF
Normally Open
Switch
Battery
Relay Coil with spike
suppression resistor
Open
Closed
Horn or
Diode
Sensor
Alarm (Variable Resistor)
Component in Position
Other than Normal
LED
Information Battery Positive
Box
or Positive Output
Fuse
Motor
Relay Contacts
i
Normally Open
Momentary Switch
M2A
Normally Open
Normally Open
Liquid Level Switch Pressure Switch
Lamp
(Light Bulb)
Normally Open
Temperature Switch
Solenoid
Valve
!
Information
Warning! Component
is Energized
Connection TO or
Battery Negative
or Logic Ground FROM Another Point
Movement from
Normal Position
Assembly
PIN P2-11
PIN P2-35
Control
Board Output
Control
Board Input
Terms & Abbreviations
ECM - Engine Control Module
LED - Light Emitting Diode
MIL - Malfunction Indicator Lamp
PWM - Pulse Width Modulation (A method of using controlled on/off times to regulate the voltage and current
supplied to an electrical device)
SV - Solenoid Valve
SW - Switch
Example of Wiring Numbers & Colors:
Wiring Color Codes
(Unless otherwise marked)
Right Most Digit
of Wire Number
0
1
78
Color of Wire
Tan
Pink
2
Brown
3
Orange
4
Yellow
5
Green
6
Blue
7
Purple
8
Gray
9
White
1 RED
25
7
13 BLK
Touch panel detail and LEDsPages 79–80 · 2 pages
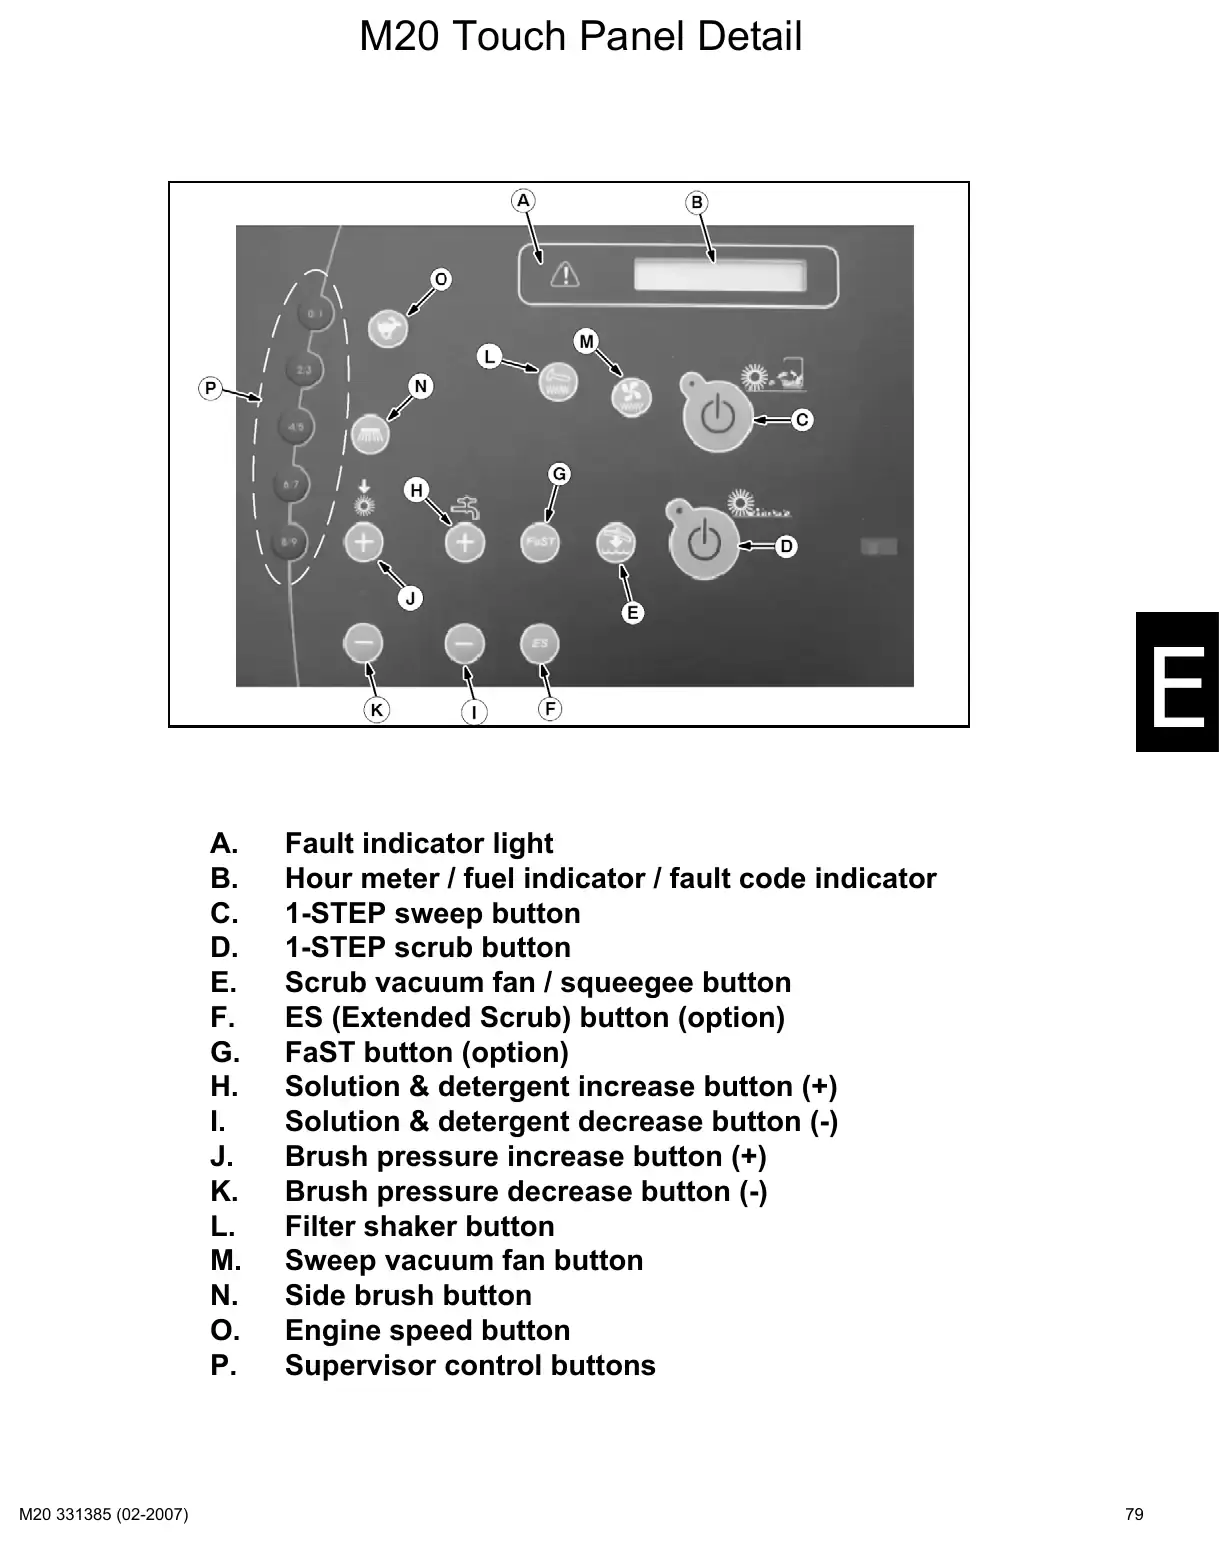
Text of manual page 79
M20 Touch Panel Detail
A.
B.
C.
D.
E.
F.
G.
H.
I.
J.
K.
L.
M.
N.
O.
P.
Fault indicator light
Hour meter / fuel indicator / fault code indicator
1-STEP sweep button
1-STEP scrub button
Scrub vacuum fan / squeegee button
ES (Extended Scrub) button (option)
FaST button (option)
Solution & detergent increase button (+)
Solution & detergent decrease button (-)
Brush pressure increase button (+)
Brush pressure decrease button (-)
Filter shaker button
Sweep vacuum fan button
Side brush button
Engine speed button
Supervisor control buttons
79
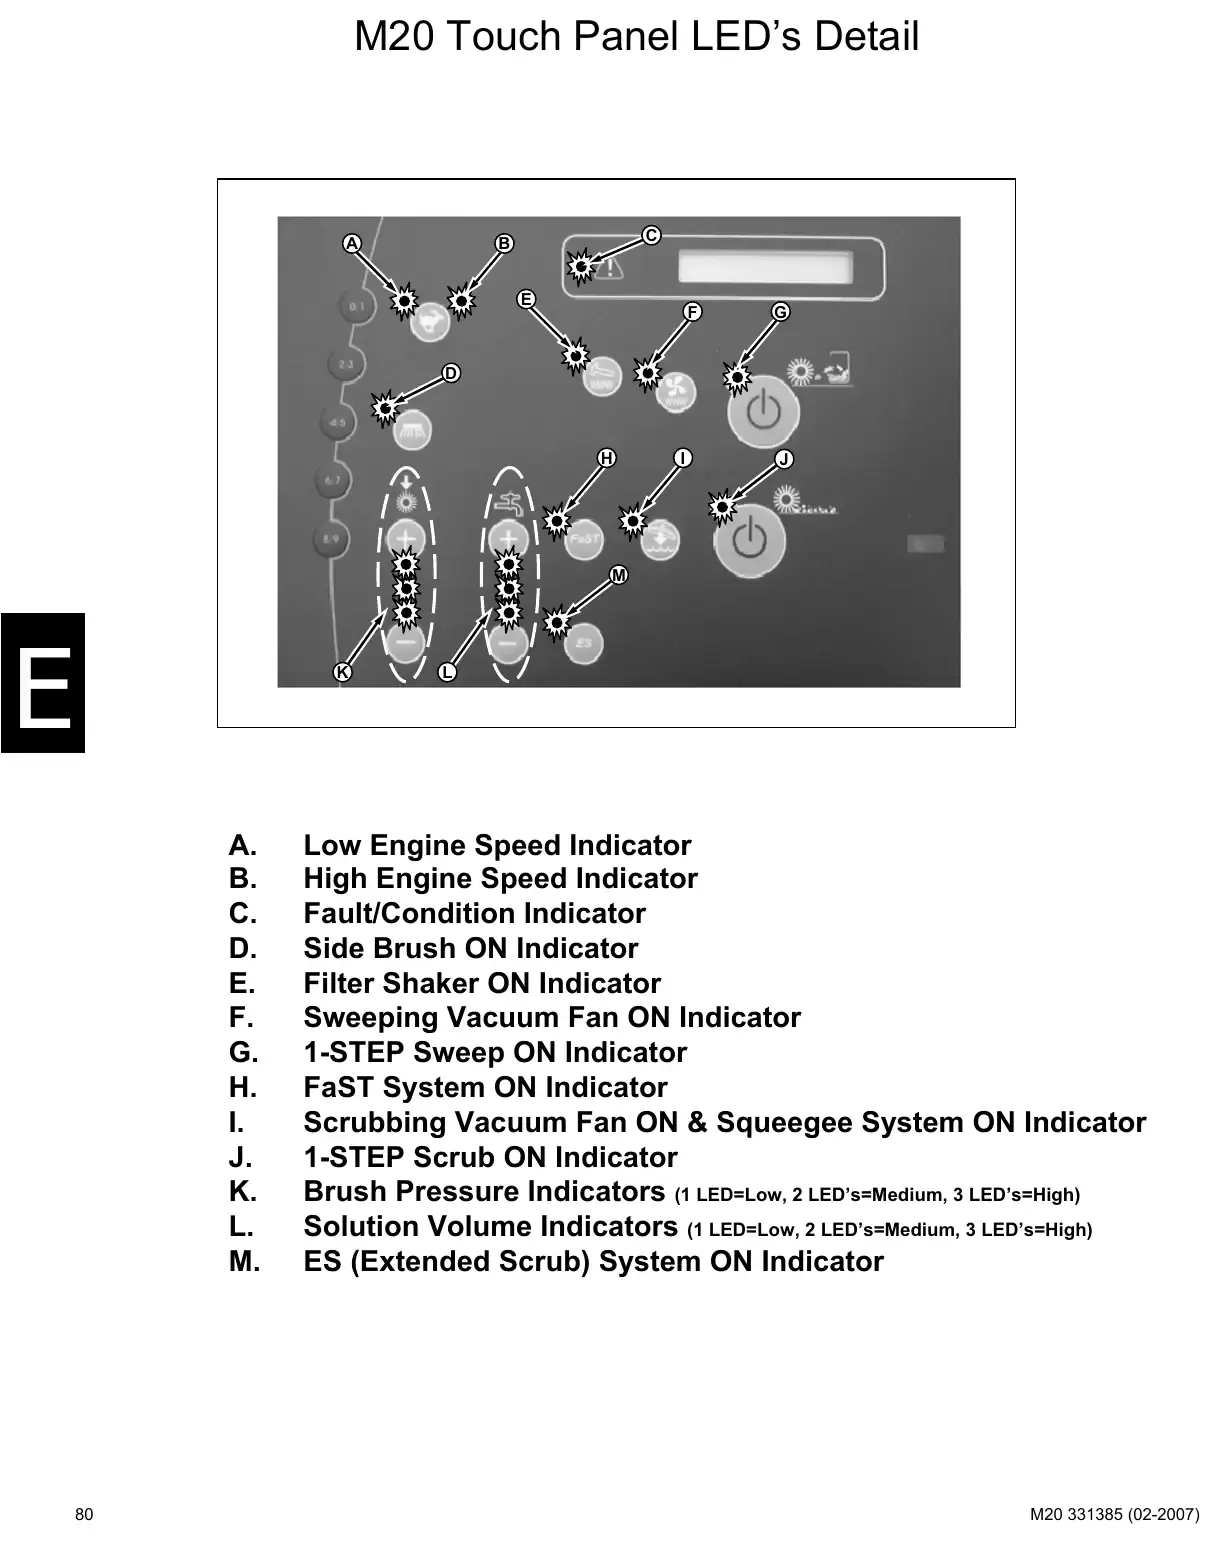
Text of manual page 80
M20 Touch Panel LED's Detail
A.
B.
C.
D.
E.
F.
G.
H.
I.
J.
K.
L.
M.
80
Low Engine Speed Indicator
High Engine Speed Indicator
Fault/Condition Indicator
Side Brush ON Indicator
Filter Shaker ON Indicator
Sweeping Vacuum Fan ON Indicator
1-STEP Sweep ON Indicator
FaST System ON Indicator
Scrubbing Vacuum Fan ON & Squeegee System ON Indicator
1-STEP Scrub ON Indicator
Brush Pressure Indicators (1 LED=Low, 2 LED's=Medium, 3 LED's=High)
Solution Volume Indicators (1 LED=Low, 2 LED's=Medium, 3 LED's=High)
ES (Extended Scrub) System ON Indicator
Option componentsPage 81 · 1 page
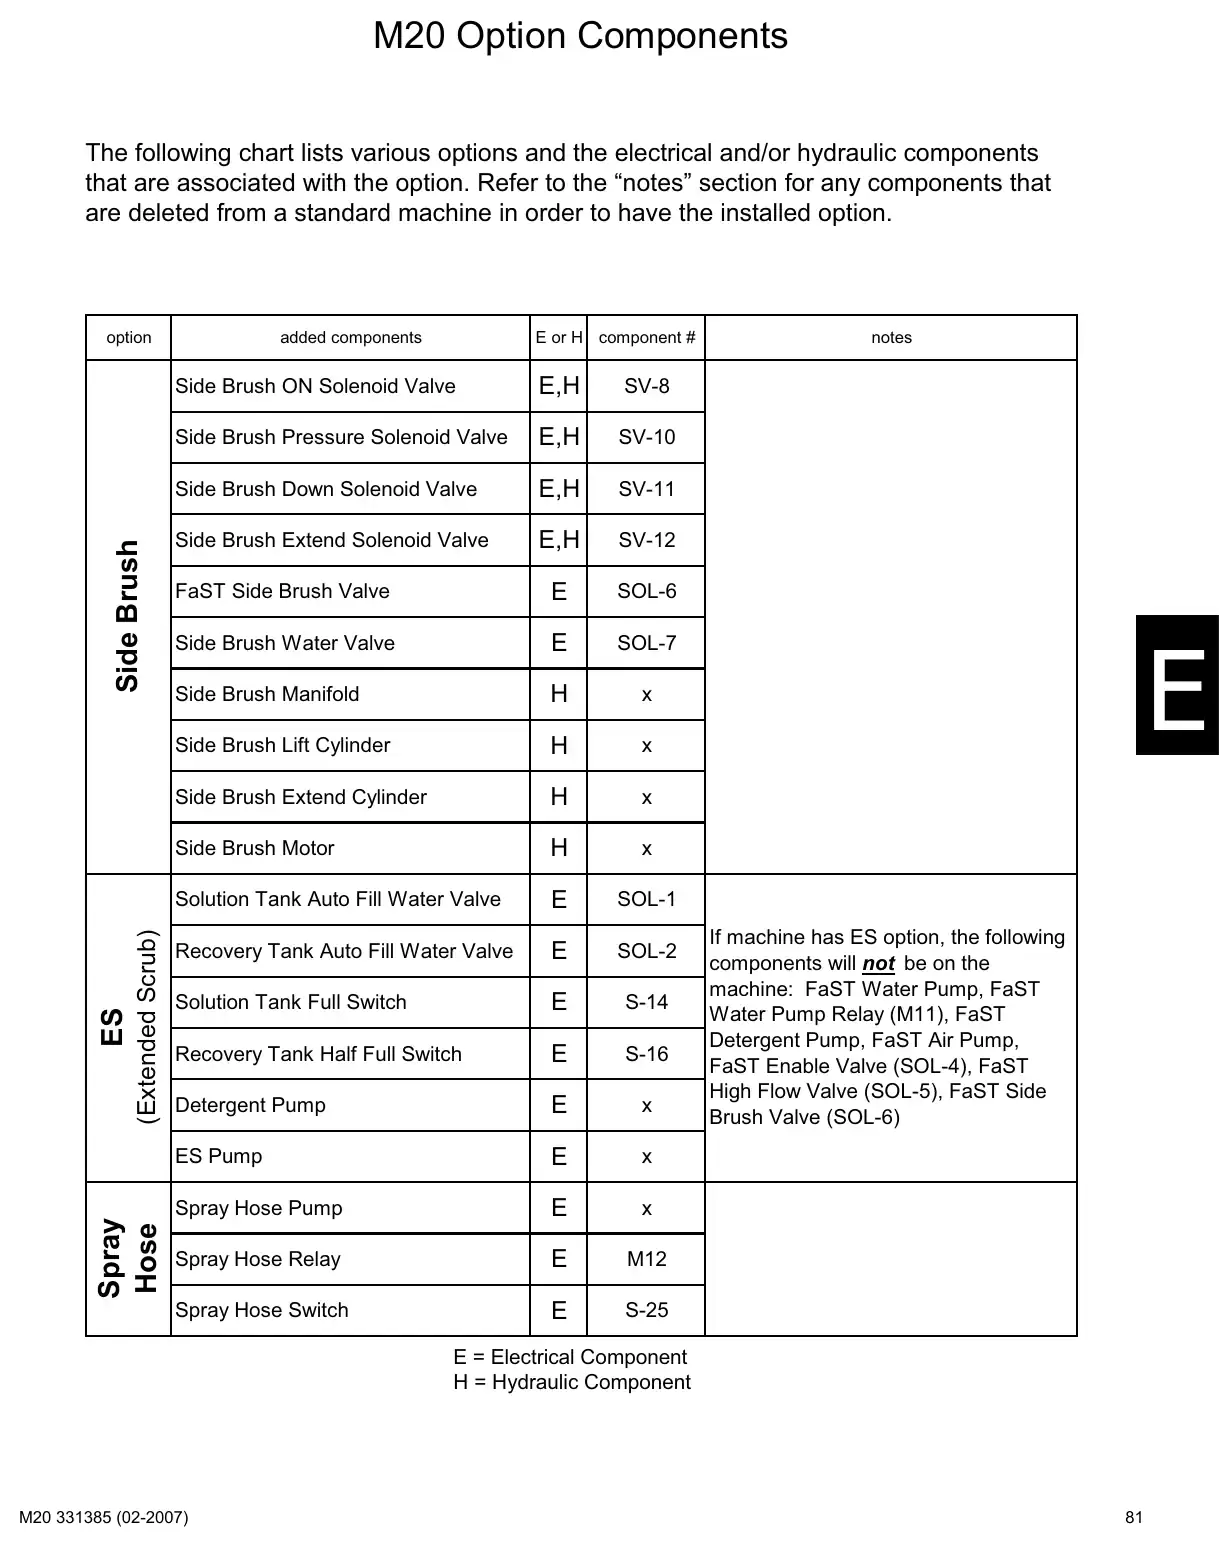
Text of manual page 81
M20 Option Components
The following chart lists various options and the electrical and/or hydraulic components
that are associated with the option. Refer to the "notes" section for any components that
are deleted from a standard machine in order to have the installed option.
(Extended Scrub)
Spray
Hose
ES
Side Brush
option
added components
E or H component #
Side Brush ON Solenoid Valve
E,H
SV-8
Side Brush Pressure Solenoid Valve
E,H
SV-10
Side Brush Down Solenoid Valve
E,H
SV-11
Side Brush Extend Solenoid Valve
E,H
SV-12
FaST Side Brush Valve
SOL-6
Side Brush Water Valve
SOL-7
Side Brush Manifold
x
Side Brush Lift Cylinder
x
Side Brush Extend Cylinder
x
Side Brush Motor
x
Solution Tank Auto Fill Water Valve
SOL-1
Recovery Tank Auto Fill Water Valve
SOL-2
Solution Tank Full Switch
S-14
Recovery Tank Half Full Switch
S-16
Detergent Pump
x
ES Pump
x
Spray Hose Pump
x
Spray Hose Relay
M12
Spray Hose Switch
S-25
notes
If machine has ES option, the following
components will not be on the
machine: FaST Water Pump, FaST
Water Pump Relay (M11), FaST
Detergent Pump, FaST Air Pump,
FaST Enable Valve (SOL-4), FaST
High Flow Valve (SOL-5), FaST Side
Brush Valve (SOL-6)
E = Electrical Component
H = Hydraulic Component
81
Circuit operation: key switch, power distribution and functionsPages 82–113 · 27 pages
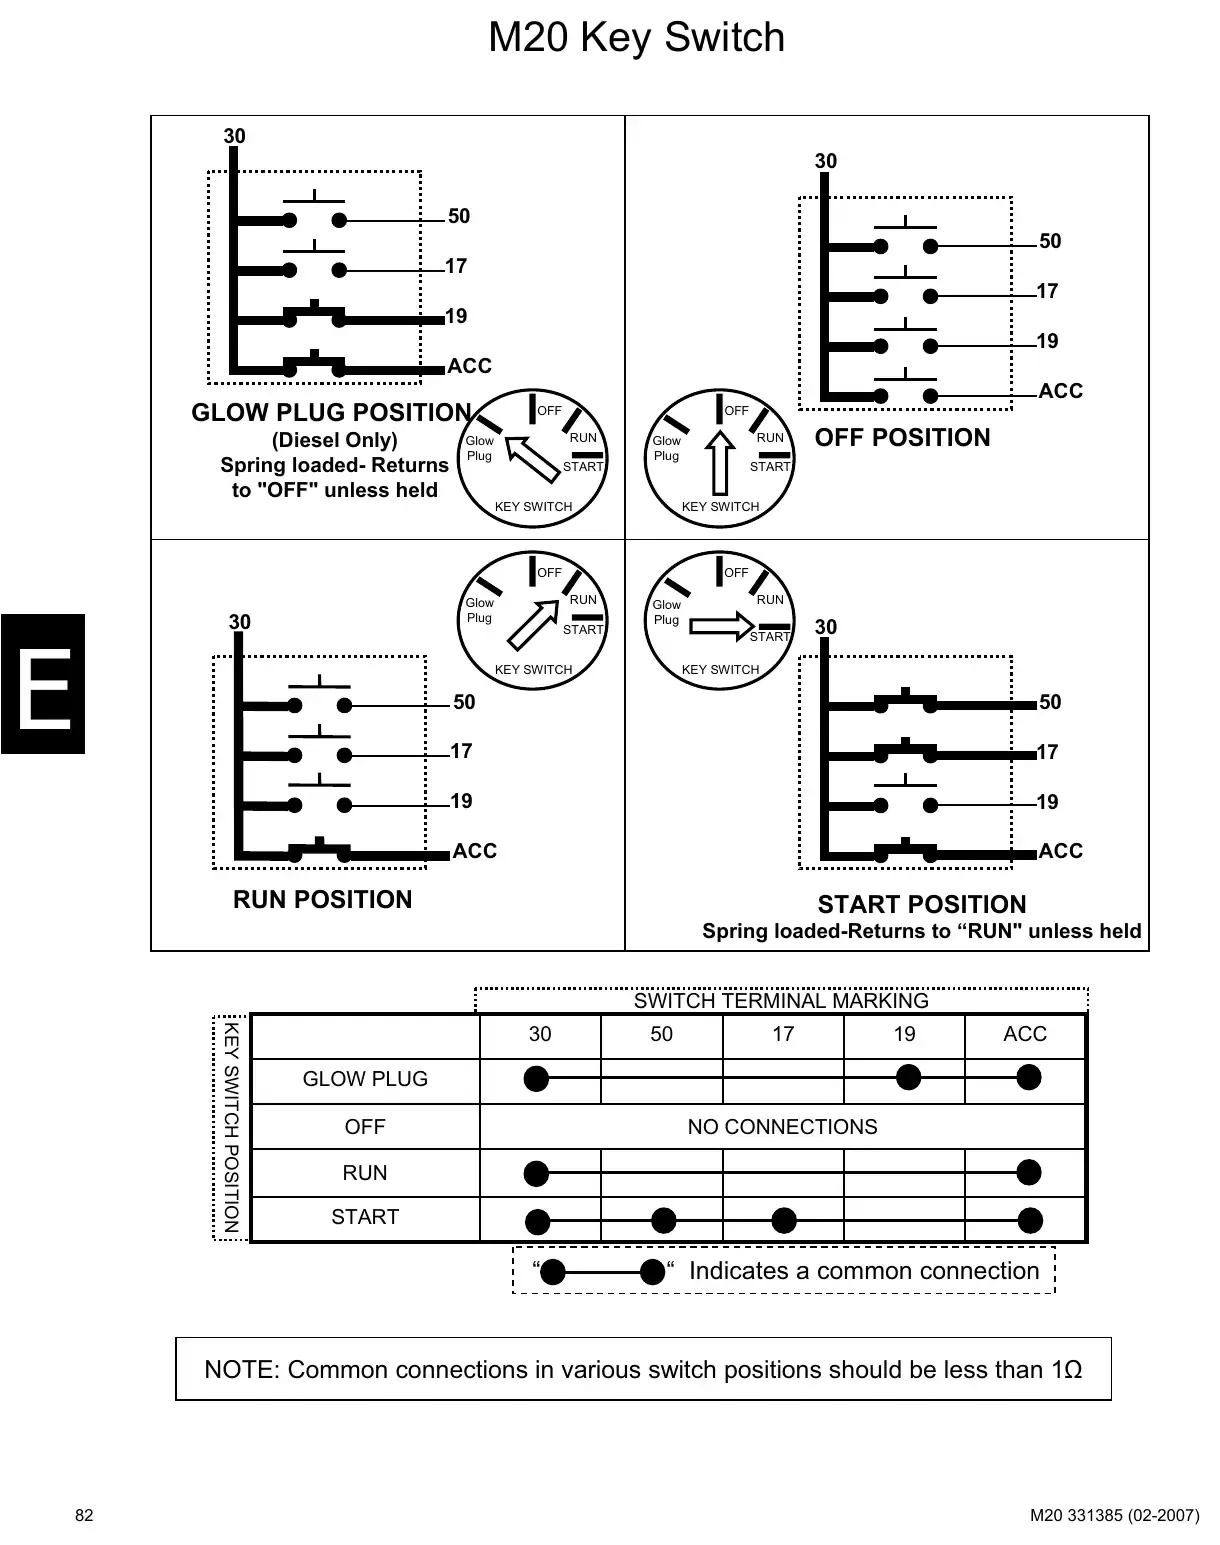
Text of manual page 82
M20 Key Switch
30
30
50
50
17
17
19
19
ACC
ACC
GLOW PLUG POSITION
(Diesel Only)
Spring loaded- Returns
to "OFF" unless held
OFF
OFF
RUN
Glow
Plug
START
KEY SWITCH
OFF
RUN
Glow
Plug
OFF POSITION
START
KEY SWITCH
OFF
30
RUN
Glow
Plug
START
Glow
Plug
RUN
START
KEY SWITCH
30
KEY SWITCH
50
50
17
17
19
19
ACC
ACC
RUN POSITION
START POSITION
Spring loaded-Returns to "RUN" unless held
SWITCH TERMINAL MARKING
KEY SWITCH POSITION
30
50
17
19
ACC
GLOW PLUG
OFF
NO CONNECTIONS
RUN
START
".
" Indicates a common connection
NOTE: Common connections in various switch positions should be less than 1o
82
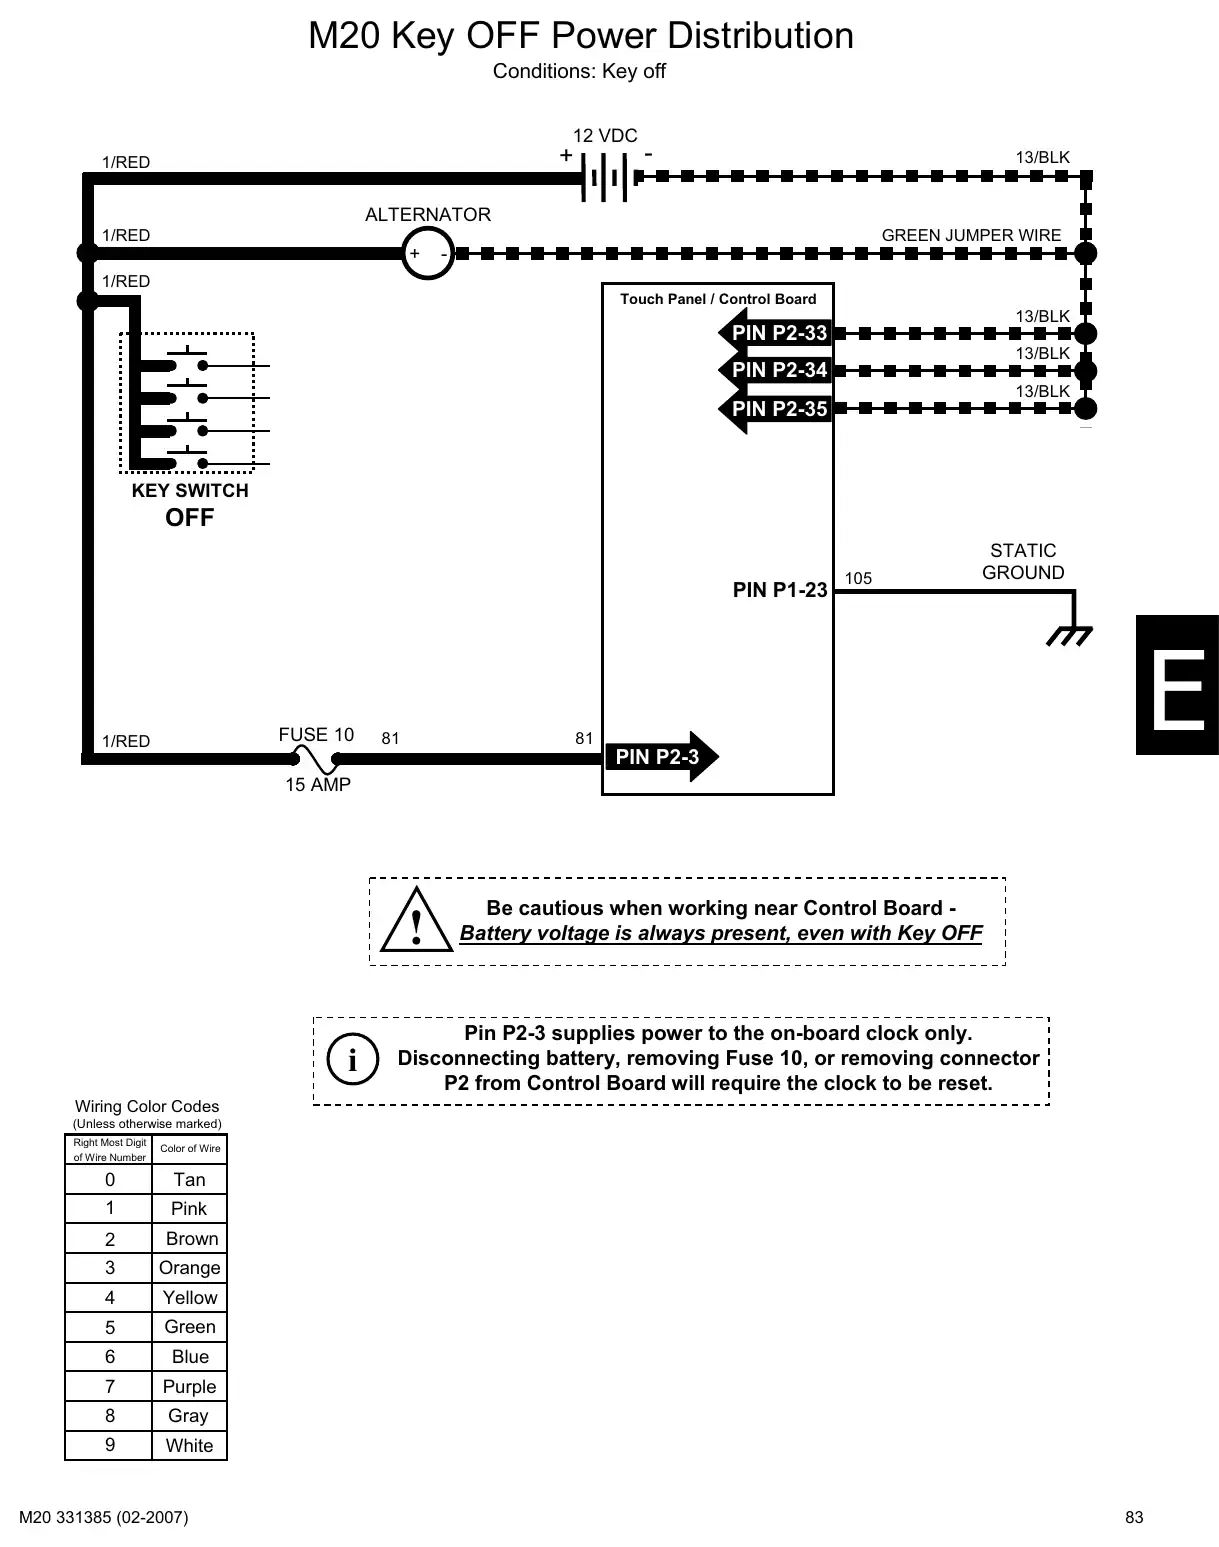
Text of manual page 83
M20 Key OFF Power Distribution
Conditions: Key off
12 VDC
+
1/RED
-
13/BLK
ALTERNATOR
1/RED
GREEN JUMPER WIRE
+
-
1/RED
Touch Panel / Control Board
13/BLK
PIN P2-33
13/BLK
PIN P2-34
13/BLK
PIN P2-35
KEY SWITCH
OFF
PIN P1-23
FUSE 10
1/RED
105
STATIC
GROUND
81
81
PIN P2-3
15 AMP
!
i
Be cautious when working near Control Board Battery voltage is always present, even with Key OFF
Pin P2-3 supplies power to the on-board clock only.
Disconnecting battery, removing Fuse 10, or removing connector
P2 from Control Board will require the clock to be reset.
Wiring Color Codes
(Unless otherwise marked)
Right Most Digit
of Wire Number
Color of Wire
Tan
0
1
Pink
2
Brown
3
Orange
4
Yellow
5
Green
6
Blue
7
Purple
8
Gray
9
White
83
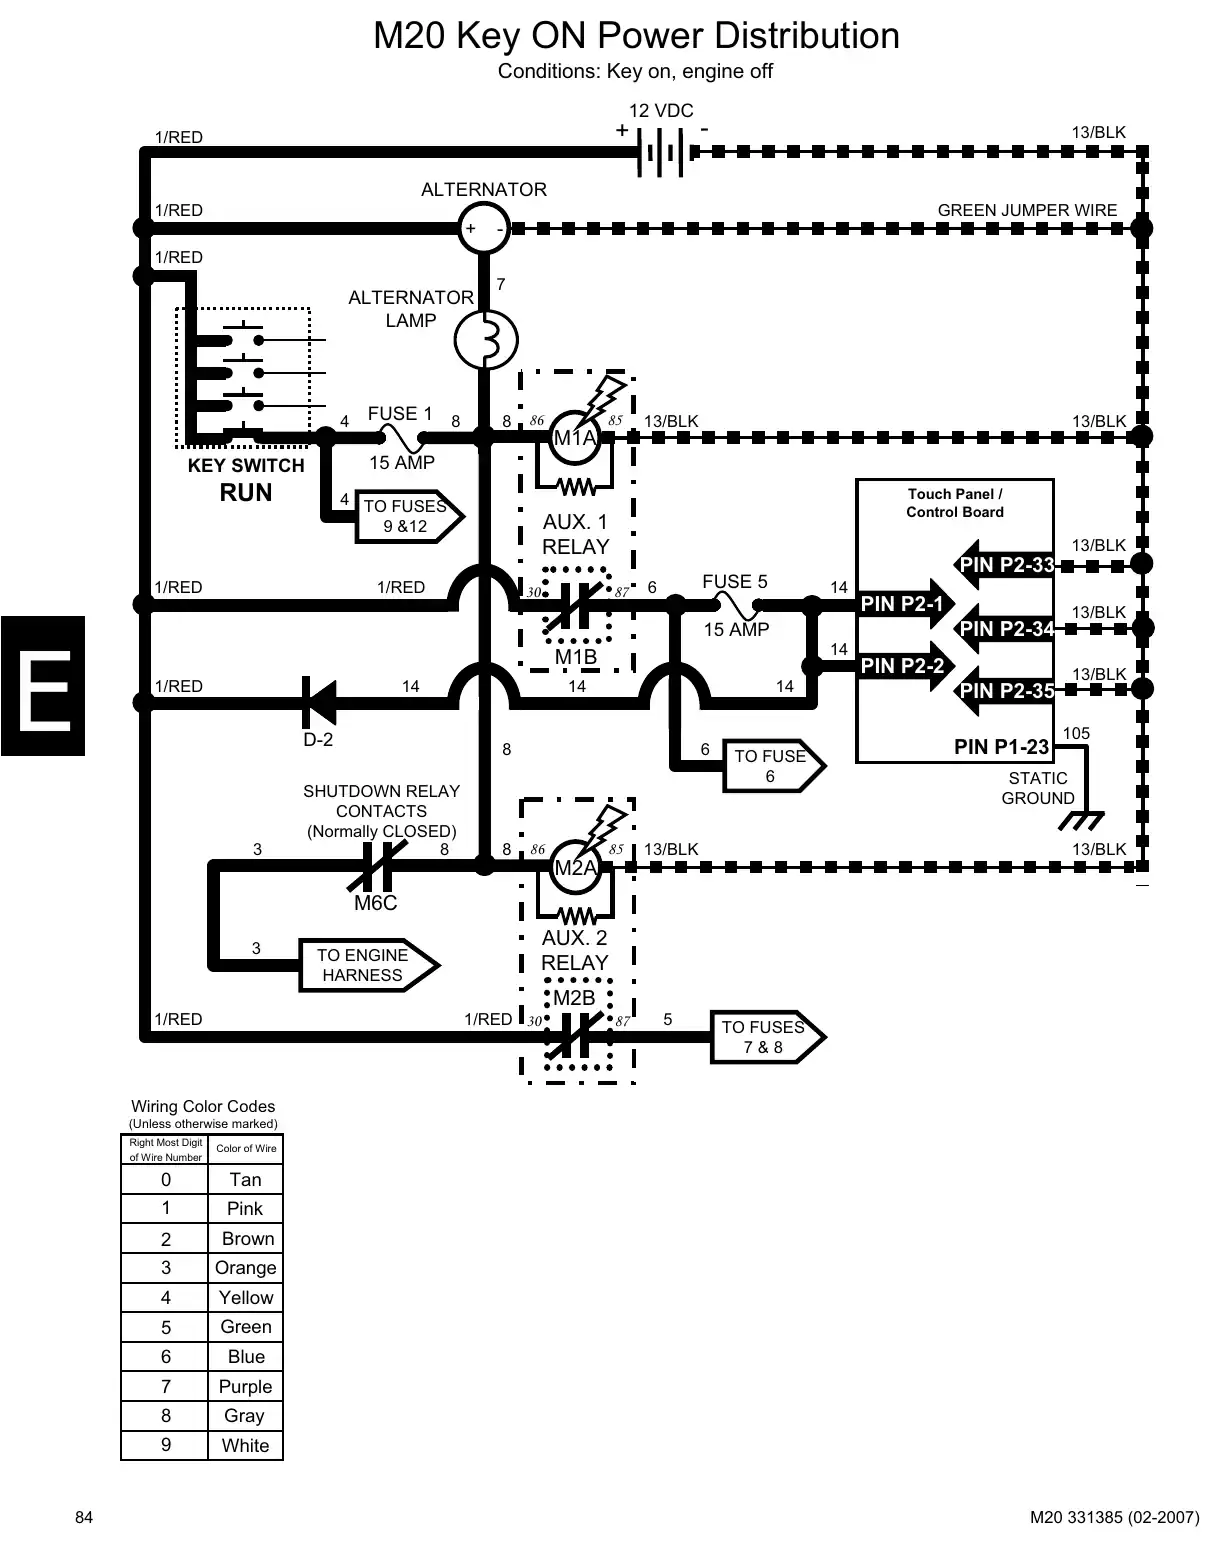
Text of manual page 84
M20 Key ON Power Distribution
Conditions: Key on, engine off
12 VDC
+
1/RED
-
13/BLK
ALTERNATOR
1/RED
GREEN JUMPER WIRE
+
-
1/RED
ALTERNATOR
LAMP
4
8
86
M1A
85
13/BLK
13/BLK
15 AMP
KEY SWITCH
RUN
4 TO FUSES
9 &12
1/RED
FUSE 1 8
7
Touch Panel /
Control Board
AUX. 1
RELAY
30
1/RED
13/BLK
87
PIN P2-33
FUSE 5
6
14
PIN P2-1
PIN P2-34
15 AMP
14
M1B
1/RED
14
D-2
3
14
14
8
SHUTDOWN RELAY
CONTACTS
(Normally CLOSED)
8
8
6
86
M2A
85
TO FUSE
6
PIN P2-2
PIN P2-35
PIN P1-23
13/BLK
13/BLK
105
STATIC
GROUND
13/BLK
13/BLK
M6C
3
AUX. 2
RELAY
TO ENGINE
HARNESS
M2B
1/RED 30
1/RED
87
5
TO FUSES
7&8
Wiring Color Codes
(Unless otherwise marked)
Right Most Digit
of Wire Number
84
Color of Wire
Tan
0
1
Pink
2
Brown
3
Orange
4
Yellow
5
Green
6
Blue
7
Purple
8
Gray
9
White
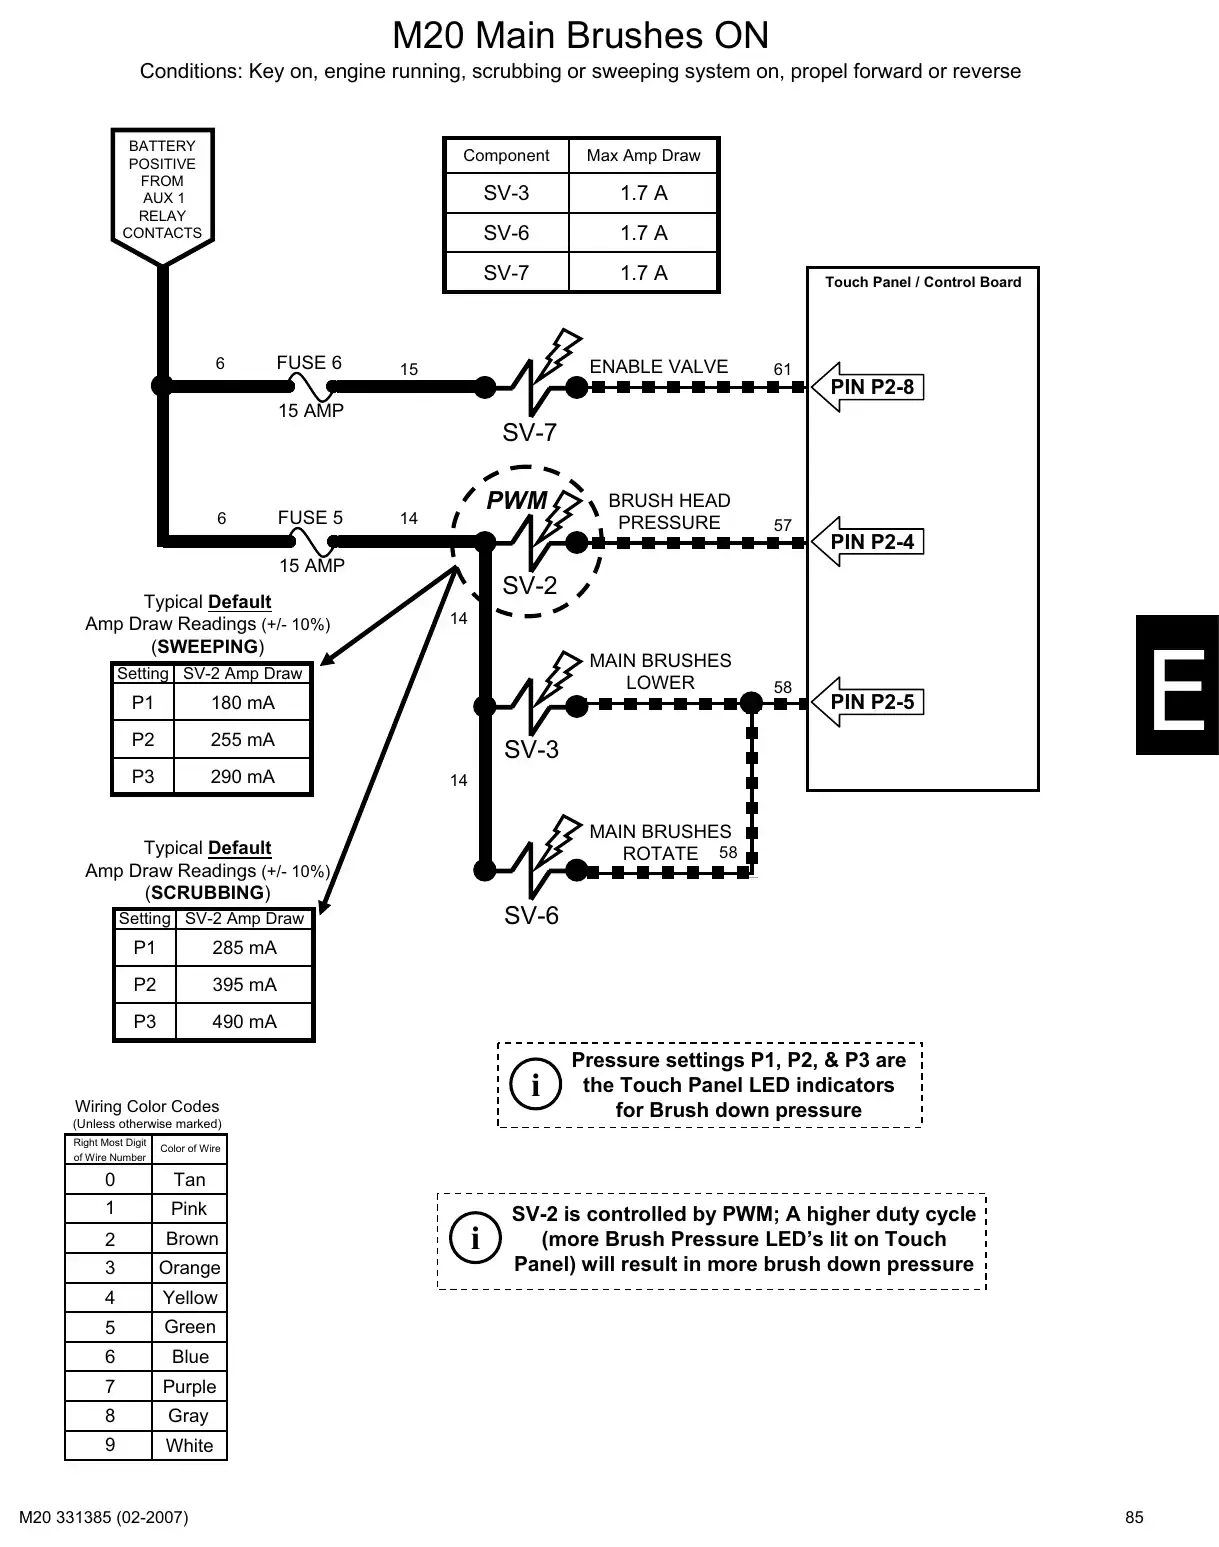
Text of manual page 85
M20 Main Brushes ON
Conditions: Key on, engine running, scrubbing or sweeping system on, propel forward or reverse
BATTERY
POSITIVE
FROM
AUX 1
RELAY
CONTACTS
6
FUSE 6
Component
Max Amp Draw
SV-3
1.7 A
SV-6
1.7 A
SV-7
1.7 A
ENABLE VALVE
15
Touch Panel / Control Board
61
PIN P2-8
15 AMP
SV-7
6
FUSE 5
PWM
14
BRUSH HEAD
PRESSURE
57
PIN P2-4
15 AMP
Typical Default
Amp Draw Readings (+/- 10%)
(SWEEPING)
SV-2
14
MAIN BRUSHES
LOWER
Setting SV-2 Amp Draw
P1
180 mA
P2
255 mA
P3
290 mA
SV-3
MAIN BRUSHES
ROTATE 58
SV-6
Setting SV-2 Amp Draw
285 mA
P2
395 mA
P3
490 mA
i
Wiring Color Codes
(Unless otherwise marked)
Right Most Digit
of Wire Number
PIN P2-5
14
Typical Default
Amp Draw Readings (+/- 10%)
(SCRUBBING)
P1
58
Pressure settings P1, P2, & P3 are
the Touch Panel LED indicators
for Brush down pressure
Color of Wire
Tan
0
1
Pink
2
Brown
3
Orange
4
Yellow
5
Green
6
Blue
7
Purple
8
Gray
9
White
i
SV-2 is controlled by PWM; A higher duty cycle
(more Brush Pressure LED's lit on Touch
Panel) will result in more brush down pressure
85
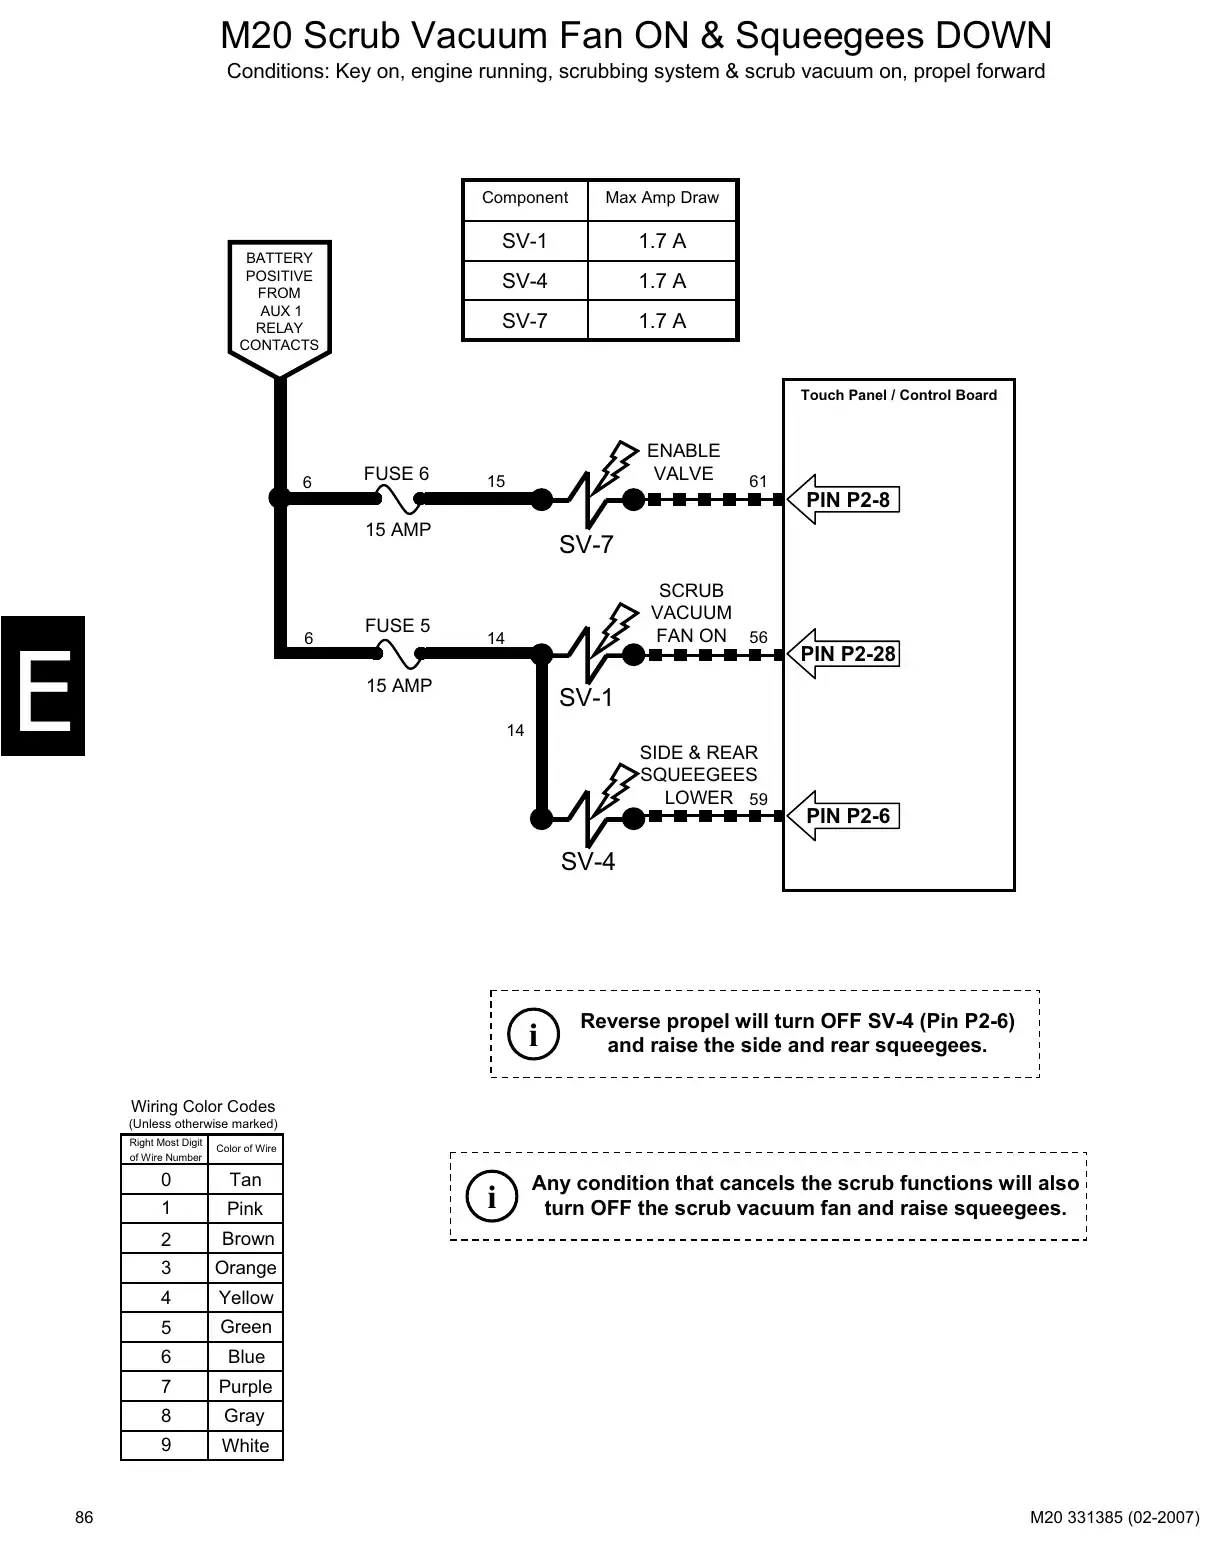
Text of manual page 86
M20 Scrub Vacuum Fan ON & Squeegees DOWN
Conditions: Key on, engine running, scrubbing system & scrub vacuum on, propel forward
Component
Max Amp Draw
SV-1
1.7 A
SV-4
1.7 A
SV-7
1.7 A
BATTERY
POSITIVE
FROM
AUX 1
RELAY
CONTACTS
Touch Panel / Control Board
6
FUSE 6
ENABLE
VALVE
15
61
PIN P2-8
15 AMP
6
FUSE 5
SV-7
SCRUB
VACUUM
FAN ON 56
14
15 AMP
PIN P2-28
SV-1
14
SIDE & REAR
SQUEEGEES
LOWER 59
PIN P2-6
SV-4
i
Reverse propel will turn OFF SV-4 (Pin P2-6)
and raise the side and rear squeegees.
Wiring Color Codes
(Unless otherwise marked)
Right Most Digit
of Wire Number
86
Color of Wire
Tan
0
1
Pink
2
Brown
3
Orange
4
Yellow
5
Green
6
Blue
7
Purple
8
Gray
9
White
i
Any condition that cancels the scrub functions will also
turn OFF the scrub vacuum fan and raise squeegees.
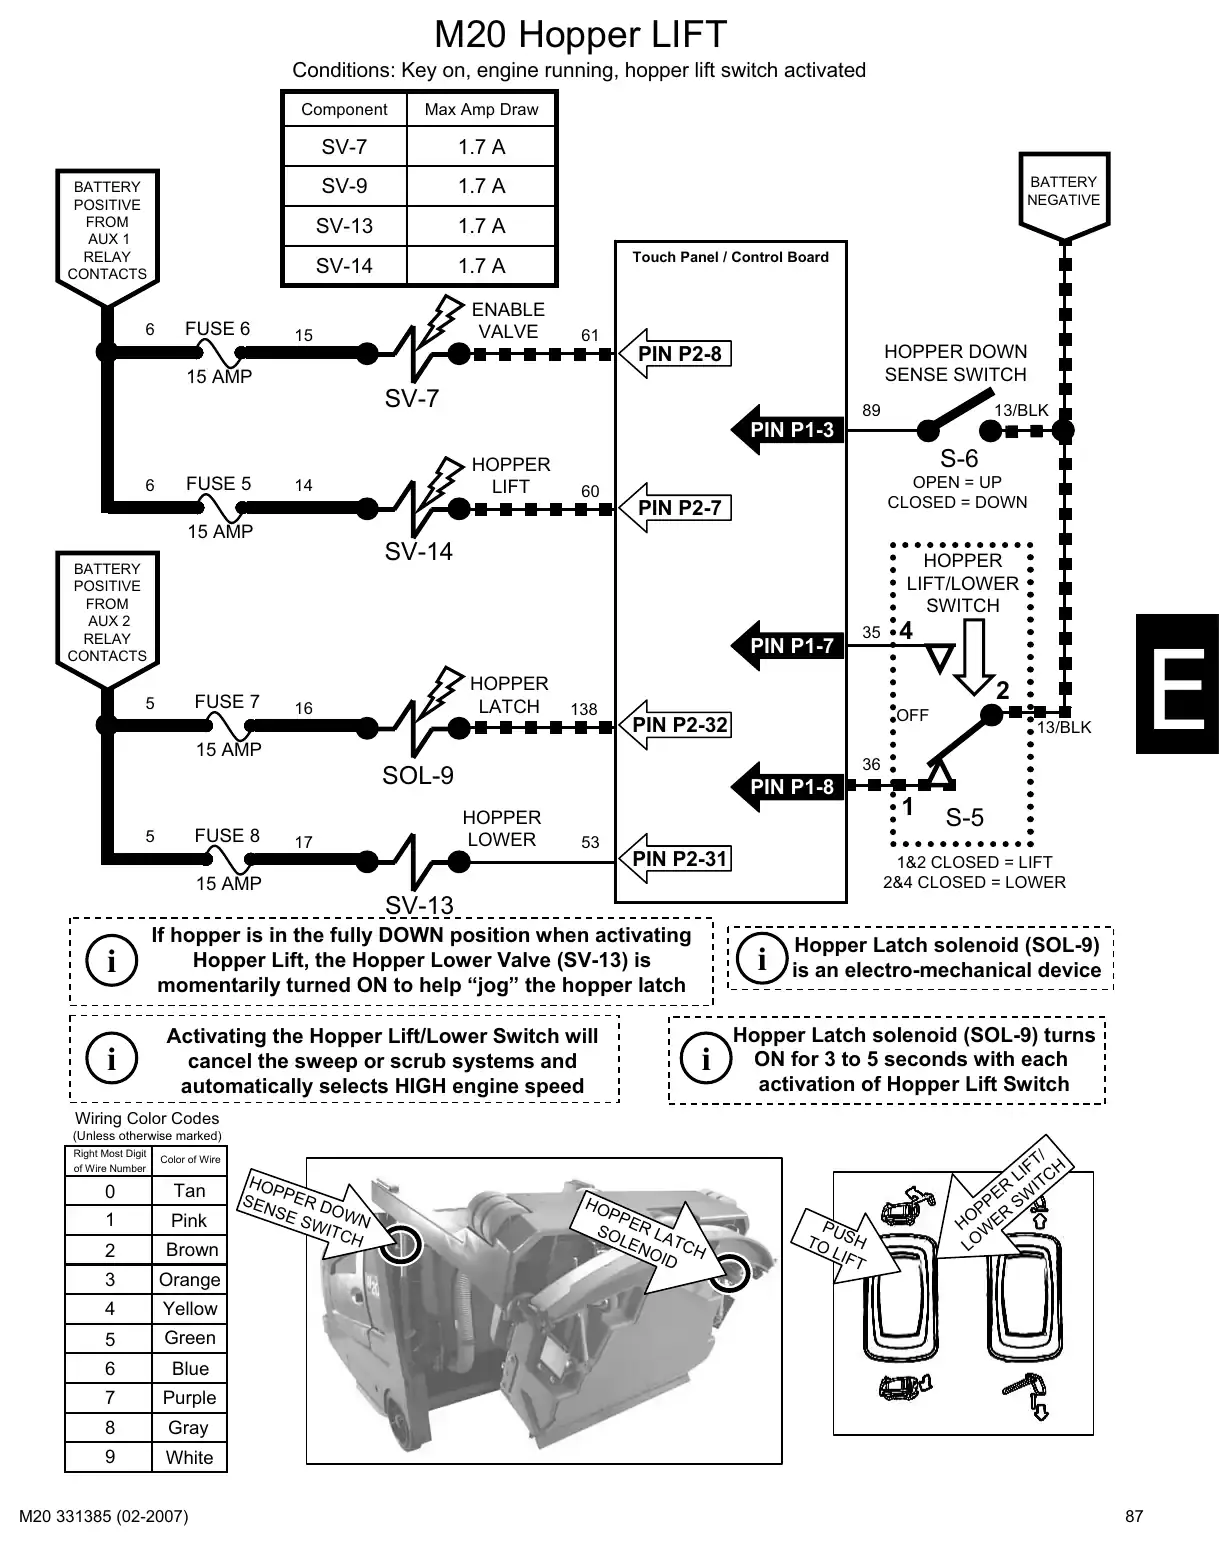
Text of manual page 87
M20 Hopper LIFT
Conditions: Key on, engine running, hopper lift switch activated
Component
Max Amp Draw
SV-7
1.7 A
SV-9
1.7 A
SV-13
1.7 A
SV-14
1.7 A
BATTERY
POSITIVE
FROM
AUX 1
RELAY
CONTACTS
6
FUSE 6
ENABLE
VALVE
15
BATTERY
NEGATIVE
Touch Panel / Control Board
61
HOPPER DOWN
SENSE SWITCH
PIN P2-8
15 AMP
SV-7
89
13/BLK
PIN P1-3
6
FUSE 5
HOPPER
LIFT
14
15 AMP
S-6
60
OPEN = UP
CLOSED = DOWN
PIN P2-7
SV-14
BATTERY
POSITIVE
FROM
AUX 2
RELAY
CONTACTS
HOPPER
LIFT/LOWER
SWITCH
PIN P1-7
FUSE 7
5
HOPPER
LATCH
16
138
2
PIN P2-32
PIN P1-8
HOPPER
LOWER
17
13/BLK
36
SOL-9
FUSE 8
4
OFF
15 AMP
5
35
53
PIN P2-31
1
S-5
1&2 CLOSED = LIFT
2&4 CLOSED = LOWER
15 AMP
SV-13
i
i
If hopper is in the fully DOWN position when activating
Hopper Lift, the Hopper Lower Valve (SV-13) is
momentarily turned ON to help "jog" the hopper latch
Activating the Hopper Lift/Lower Switch will
cancel the sweep or scrub systems and
automatically selects HIGH engine speed
i
i
Hopper Latch solenoid (SOL-9)
is an electro-mechanical device
Hopper Latch solenoid (SOL-9) turns
ON for 3 to 5 seconds with each
activation of Hopper Lift Switch
Wiring Color Codes
(Unless otherwise marked)
Right Most Digit
of Wire Number
0
1
Color of Wire
Tan
Pink
2
Brown
3
Orange
4
Yellow
5
Green
6
Blue
7
Purple
8
Gray
9
White
HOP
SEN PER D
SE
SW WN
ITC
HO
PP
SO ER LA
LEN TC
OID H
PU
TO SH
L IF
/
FT
LI TCH
ER W
PP R S
H O WE
LO
87
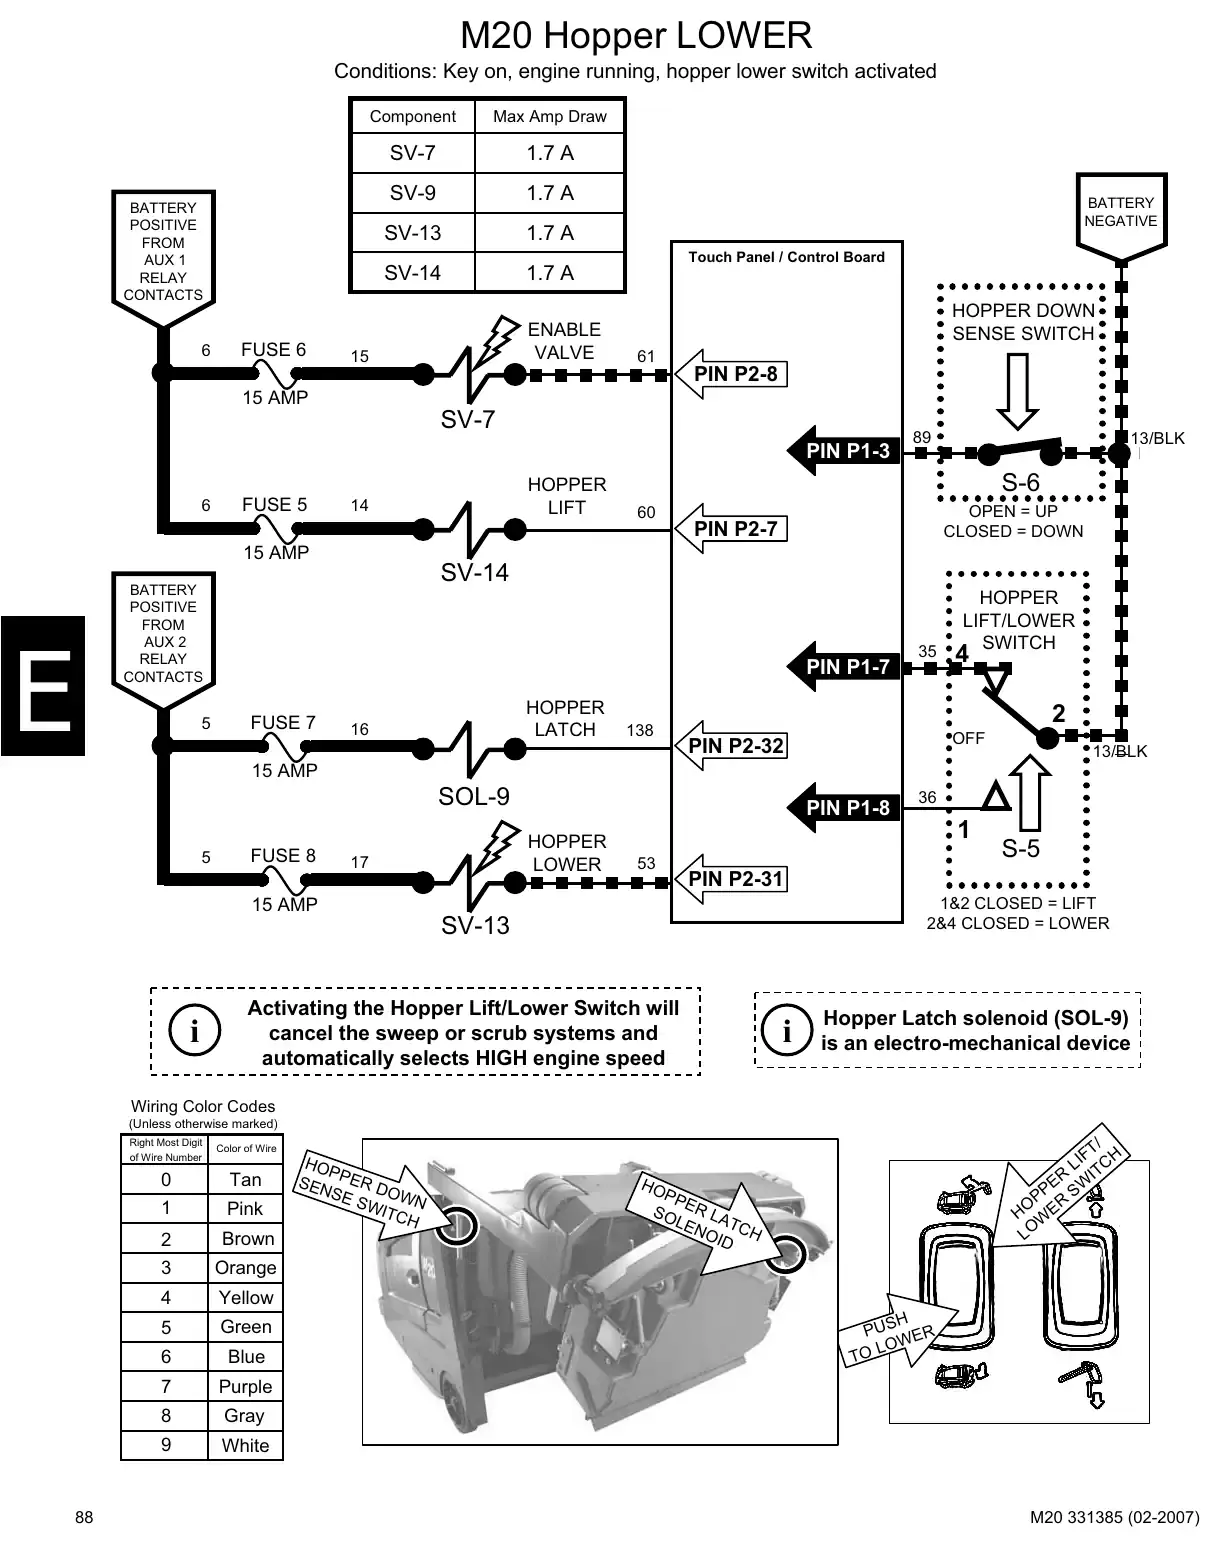
Text of manual page 88
M20 Hopper LOWER
Conditions: Key on, engine running, hopper lower switch activated
BATTERY
POSITIVE
FROM
AUX 1
RELAY
CONTACTS
6
FUSE 6
Component
Max Amp Draw
SV-7
1.7 A
SV-9
1.7 A
SV-13
1.7 A
SV-14
1.7 A
ENABLE
VALVE
15
BATTERY
NEGATIVE
Touch Panel / Control Board
HOPPER DOWN
SENSE SWITCH
61
PIN P2-8
15 AMP
SV-7
PIN P1-3
6
FUSE 5
HOPPER
LIFT
14
89
13/BLK
S-6
60
OPEN = UP
CLOSED = DOWN
PIN P2-7
15 AMP
SV-14
BATTERY
POSITIVE
FROM
AUX 2
RELAY
CONTACTS
5
PIN P1-7
FUSE 7
HOPPER
LATCH
16
138
35
HOPPER
LIFT/LOWER
SWITCH
4
2
OFF
PIN P2-32
13/BLK
15 AMP
SOL-9
5
FUSE 8
PIN P1-8
HOPPER
LOWER
17
1
53
S-5
PIN P2-31
1&2 CLOSED = LIFT
2&4 CLOSED = LOWER
15 AMP
SV-13
i
36
Activating the Hopper Lift/Lower Switch will
cancel the sweep or scrub systems and
automatically selects HIGH engine speed
i
Hopper Latch solenoid (SOL-9)
is an electro-mechanical device
Wiring Color Codes
(Unless otherwise marked)
Right Most Digit
of Wire Number
88
/
FT
LI TCH
ER W
PP R S
H O WE
LO
Color of Wire
Tan
0
1
Pink
2
Brown
3
Orange
4
Yellow
5
Green
6
Blue
7
Purple
8
Gray
9
White
HOP
SEN PER D
SE
SW WN
ITC
HO
PP
SO ER LA
LEN TC
OID H
PUS ER
OW
TO
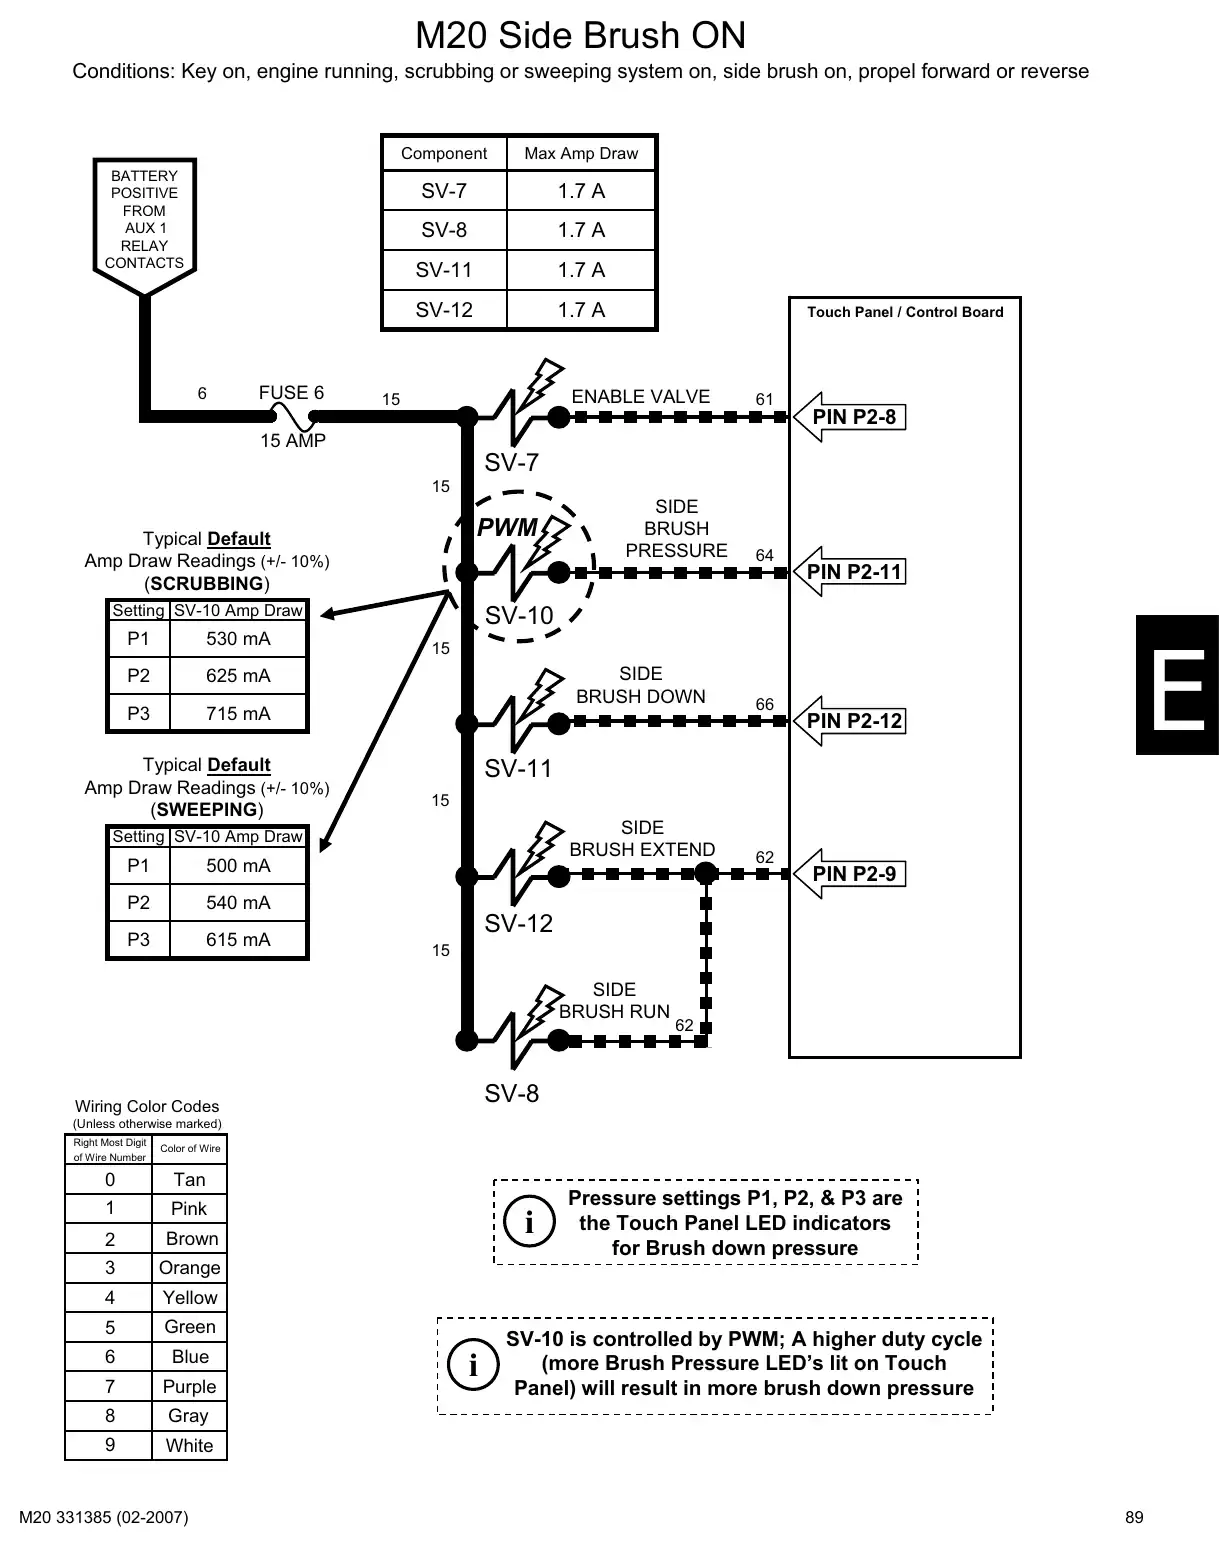
Text of manual page 89
M20 Side Brush ON
Conditions: Key on, engine running, scrubbing or sweeping system on, side brush on, propel forward or reverse
BATTERY
POSITIVE
FROM
AUX 1
RELAY
CONTACTS
6
FUSE 6
Component
Max Amp Draw
SV-7
1.7 A
SV-8
1.7 A
SV-11
1.7 A
SV-12
1.7 A
Touch Panel / Control Board
ENABLE VALVE
15
61
PIN P2-8
15 AMP
SV-7
15
PWM
Typical Default
Amp Draw Readings (+/- 10%)
(SCRUBBING)
Setting SV-10 Amp Draw
P1
530 mA
P2
625 mA
P3
715 mA
Typical Default
Amp Draw Readings (+/- 10%)
(SWEEPING)
500 mA
P2
540 mA
P3
615 mA
64
PIN P2-11
SV-10
15
SIDE
BRUSH DOWN
66
PIN P2-12
SV-11
15
SIDE
BRUSH EXTEND
Setting SV-10 Amp Draw
P1
SIDE
BRUSH
PRESSURE
62
PIN P2-9
SV-12
15
SIDE
BRUSH RUN
62
SV-8
Wiring Color Codes
(Unless otherwise marked)
Right Most Digit
of Wire Number
Color of Wire
Tan
0
1
Pink
2
Brown
3
Orange
4
Yellow
5
Green
6
Blue
7
Purple
8
Gray
9
White
i
i
Pressure settings P1, P2, & P3 are
the Touch Panel LED indicators
for Brush down pressure
SV-10 is controlled by PWM; A higher duty cycle
(more Brush Pressure LED's lit on Touch
Panel) will result in more brush down pressure
89
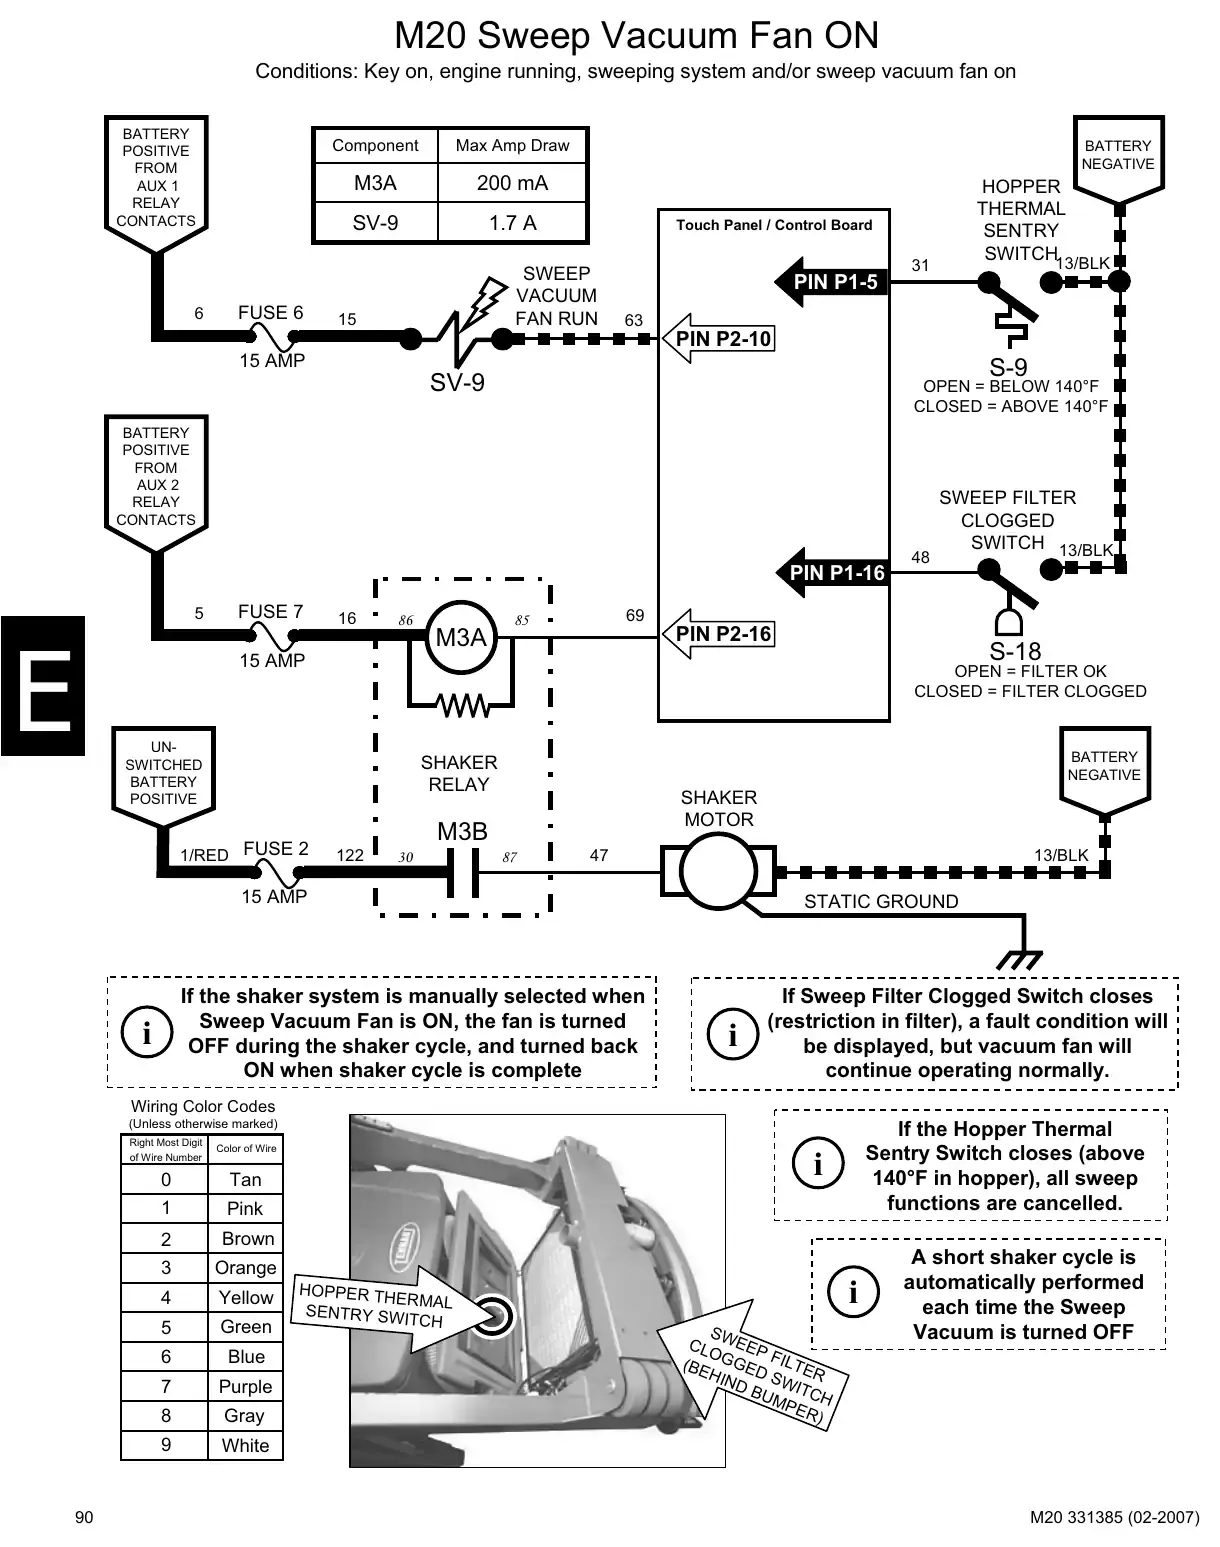
Text of manual page 90
M20 Sweep Vacuum Fan ON
Conditions: Key on, engine running, sweeping system and/or sweep vacuum fan on
BATTERY
POSITIVE
FROM
AUX 1
RELAY
CONTACTS
6
FUSE 6
Component
Max Amp Draw
M3A
200 mA
SV-9
1.7 A
BATTERY
NEGATIVE
Touch Panel / Control Board
SWEEP
VACUUM
FAN RUN
15
HOPPER
THERMAL
SENTRY
SWITCH13/BLK
PIN P1-5
31
63
PIN P2-10
15 AMP
S-9
SV-9
OPEN = BELOW 140?F
CLOSED = ABOVE 140?F
BATTERY
POSITIVE
FROM
AUX 2
RELAY
CONTACTS
PIN P1-16
5
FUSE 7
16
86
M3A
85
69
PIN P2-16
S-18
15 AMP
OPEN = FILTER OK
CLOSED = FILTER CLOGGED
UNSWITCHED
BATTERY
POSITIVE
BATTERY
NEGATIVE
SHAKER
RELAY
1/RED FUSE 2
SHAKER
MOTOR
M3B
122
30
87
47
13/BLK
15 AMP
If the shaker system is manually selected when
Sweep Vacuum Fan is ON, the fan is turned
OFF during the shaker cycle, and turned back
ON when shaker cycle is complete
i
48
SWEEP FILTER
CLOGGED
SWITCH 13/BLK
STATIC GROUND
i
If Sweep Filter Clogged Switch closes
(restriction in filter), a fault condition will
be displayed, but vacuum fan will
continue operating normally.
Wiring Color Codes
(Unless otherwise marked)
Right Most Digit
of Wire Number
90
Tan
0
1
Pink
2
Brown
3
Orange
4
Yellow
5
Green
6
Blue
7
Purple
8
Gray
9
White
If the Hopper Thermal
Sentry Switch closes (above
140?F in hopper), all sweep
functions are cancelled.
i
Color of Wire
HOPPER TH
ERMAL
SENTRY SW
ITCH
i
SW
CLO EEP
(BE GGED FILTE
HIN
D B SWITC
UM
P ER H
)
A short shaker cycle is
automatically performed
each time the Sweep
Vacuum is turned OFF
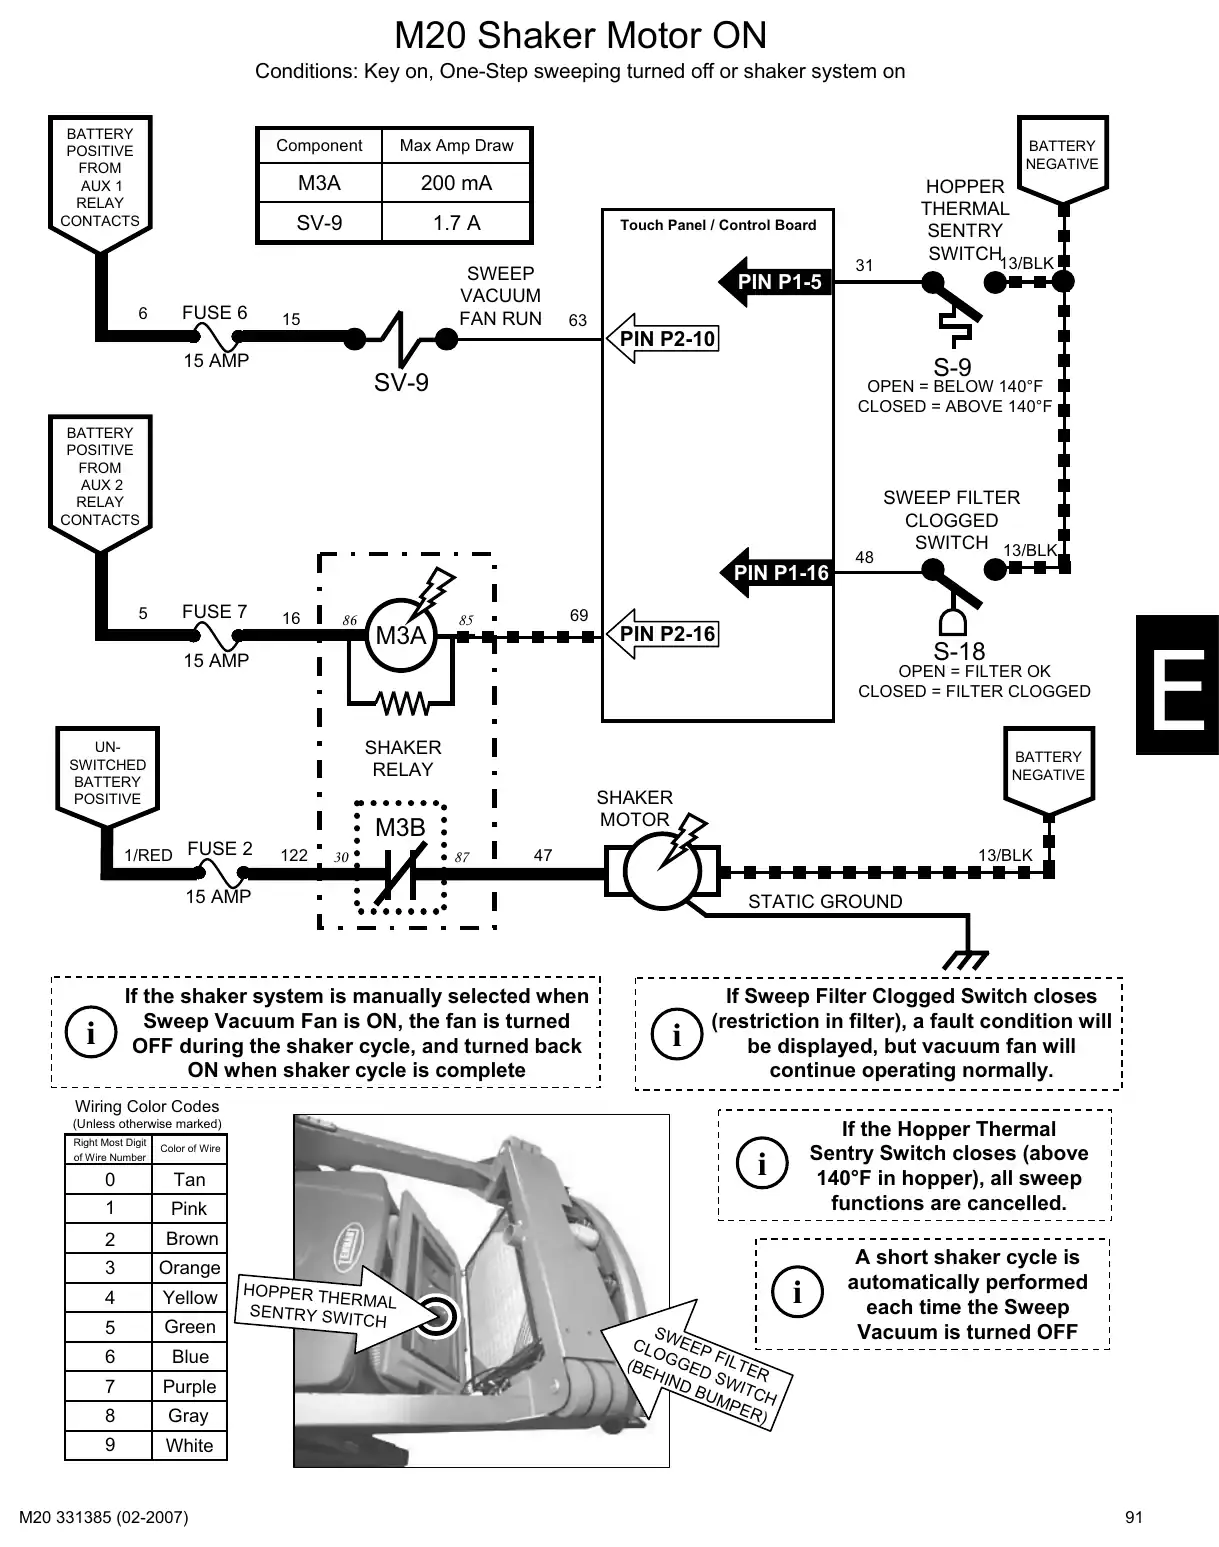
Text of manual page 91
M20 Shaker Motor ON
Conditions: Key on, One-Step sweeping turned off or shaker system on
BATTERY
POSITIVE
FROM
AUX 1
RELAY
CONTACTS
6
FUSE 6
Component
Max Amp Draw
M3A
200 mA
SV-9
1.7 A
BATTERY
NEGATIVE
Touch Panel / Control Board
SWEEP
VACUUM
FAN RUN
15
HOPPER
THERMAL
SENTRY
SWITCH13/BLK
PIN P1-5
31
63
PIN P2-10
15 AMP
S-9
SV-9
OPEN = BELOW 140?F
CLOSED = ABOVE 140?F
BATTERY
POSITIVE
FROM
AUX 2
RELAY
CONTACTS
PIN P1-16
5
FUSE 7
16
86
M3A
85
69
PIN P2-16
OPEN = FILTER OK
CLOSED = FILTER CLOGGED
SHAKER
RELAY
UNSWITCHED
BATTERY
POSITIVE
BATTERY
NEGATIVE
SHAKER
MOTOR
M3B
1/RED FUSE 2
S-18
15 AMP
122
30
87
47
13/BLK
15 AMP
If the shaker system is manually selected when
Sweep Vacuum Fan is ON, the fan is turned
OFF during the shaker cycle, and turned back
ON when shaker cycle is complete
i
48
SWEEP FILTER
CLOGGED
SWITCH 13/BLK
STATIC GROUND
i
If Sweep Filter Clogged Switch closes
(restriction in filter), a fault condition will
be displayed, but vacuum fan will
continue operating normally.
Wiring Color Codes
(Unless otherwise marked)
Right Most Digit
of Wire Number
Tan
0
1
Pink
2
Brown
3
Orange
4
Yellow
5
Green
6
Blue
7
Purple
8
Gray
9
White
If the Hopper Thermal
Sentry Switch closes (above
140?F in hopper), all sweep
functions are cancelled.
i
Color of Wire
HOPPER TH
ERMAL
SENTRY SW
ITCH
i
SW
CLO EEP
(BE GGED FILTE
HIN
D B SWITC
UM
P ER H
)
A short shaker cycle is
automatically performed
each time the Sweep
Vacuum is turned OFF
91
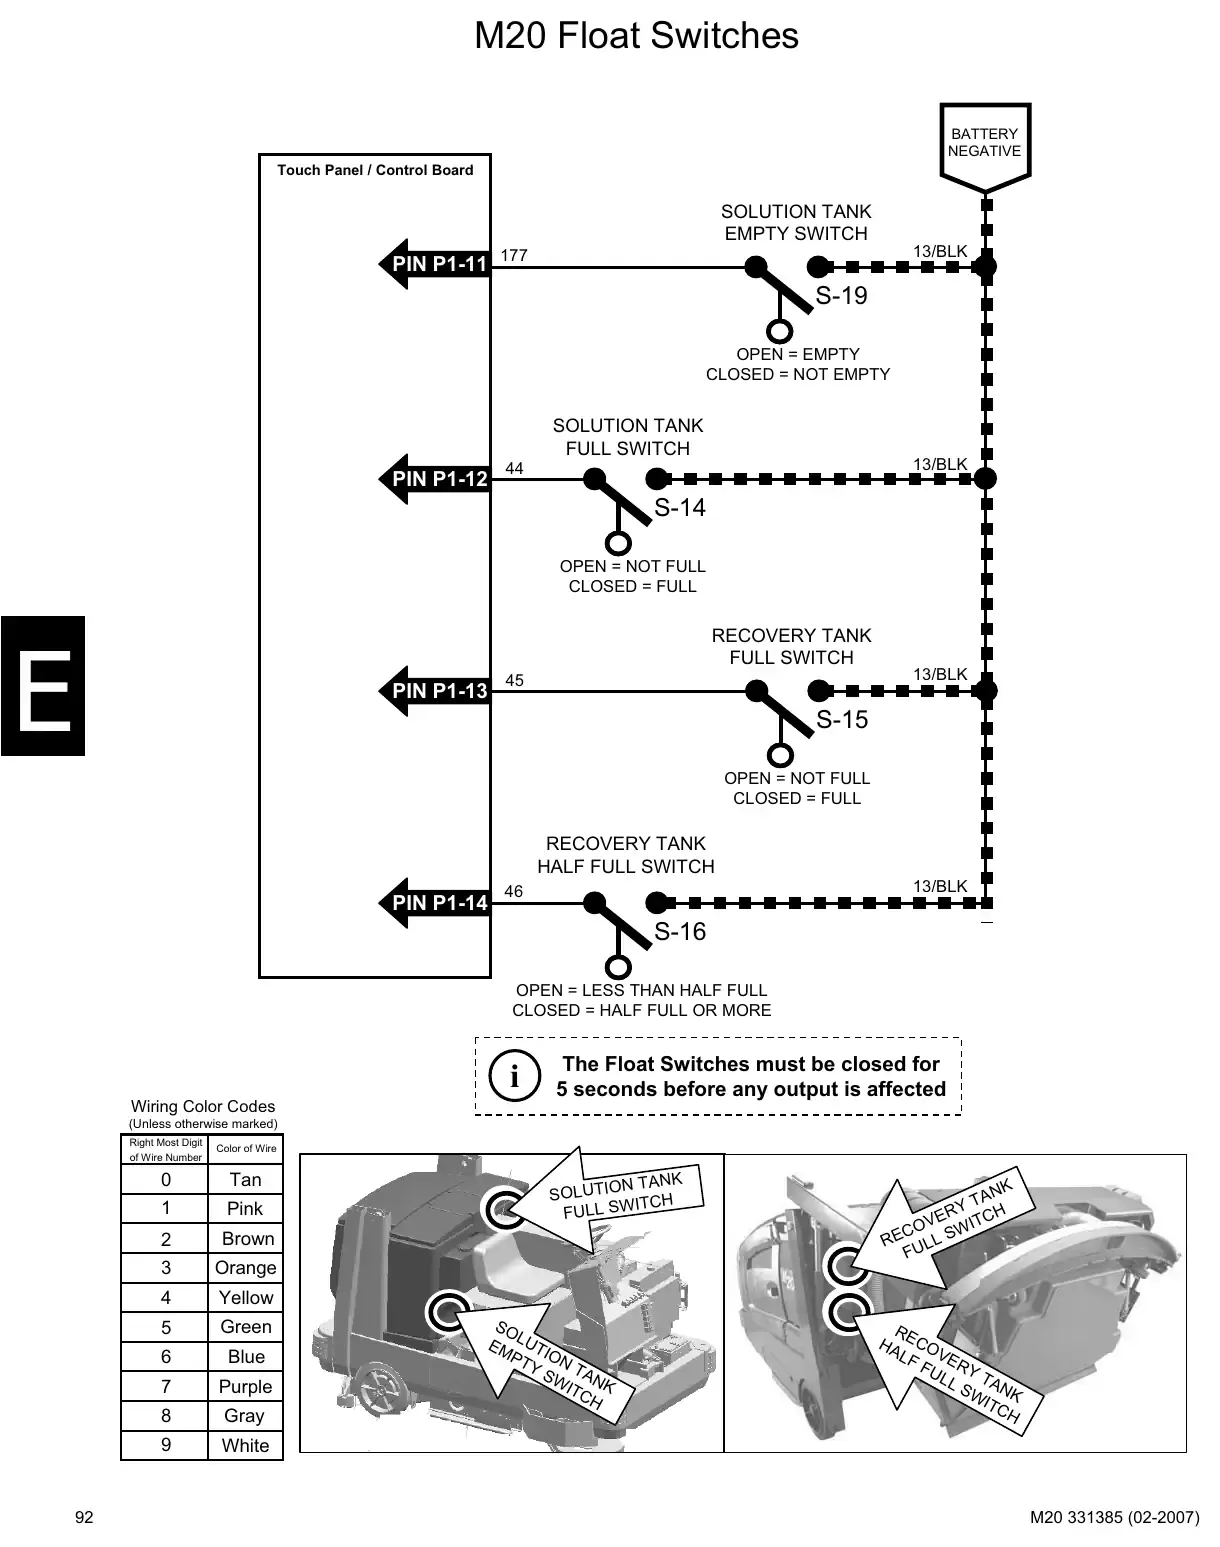
Text of manual page 92
M20 Float Switches
BATTERY
NEGATIVE
Touch Panel / Control Board
SOLUTION TANK
EMPTY SWITCH
PIN P1-11
13/BLK
177
S-19
OPEN = EMPTY
CLOSED = NOT EMPTY
SOLUTION TANK
FULL SWITCH
PIN P1-12
13/BLK
44
S-14
OPEN = NOT FULL
CLOSED = FULL
RECOVERY TANK
FULL SWITCH
PIN P1-13
13/BLK
45
S-15
OPEN = NOT FULL
CLOSED = FULL
RECOVERY TANK
HALF FULL SWITCH
PIN P1-14
13/BLK
46
S-16
OPEN = LESS THAN HALF FULL
CLOSED = HALF FULL OR MORE
i
The Float Switches must be closed for
5 seconds before any output is affected
Wiring Color Codes
(Unless otherwise marked)
Right Most Digit
of Wire Number
92
Color of Wire
Tan
0
1
Pink
2
Brown
3
Orange
4
Yellow
5
Green
6
Blue
7
Purple
8
Gray
9
White
N TA N K
SOLUTIO
ITCH
FUL
SO
EM LUTI
PT ON
Y S TA
WI N K
TC
NK
TA
RY CH
WI
CO
RE ULL S
H A E CO
LF V E
FU RY
LL
S W A NK
ITC
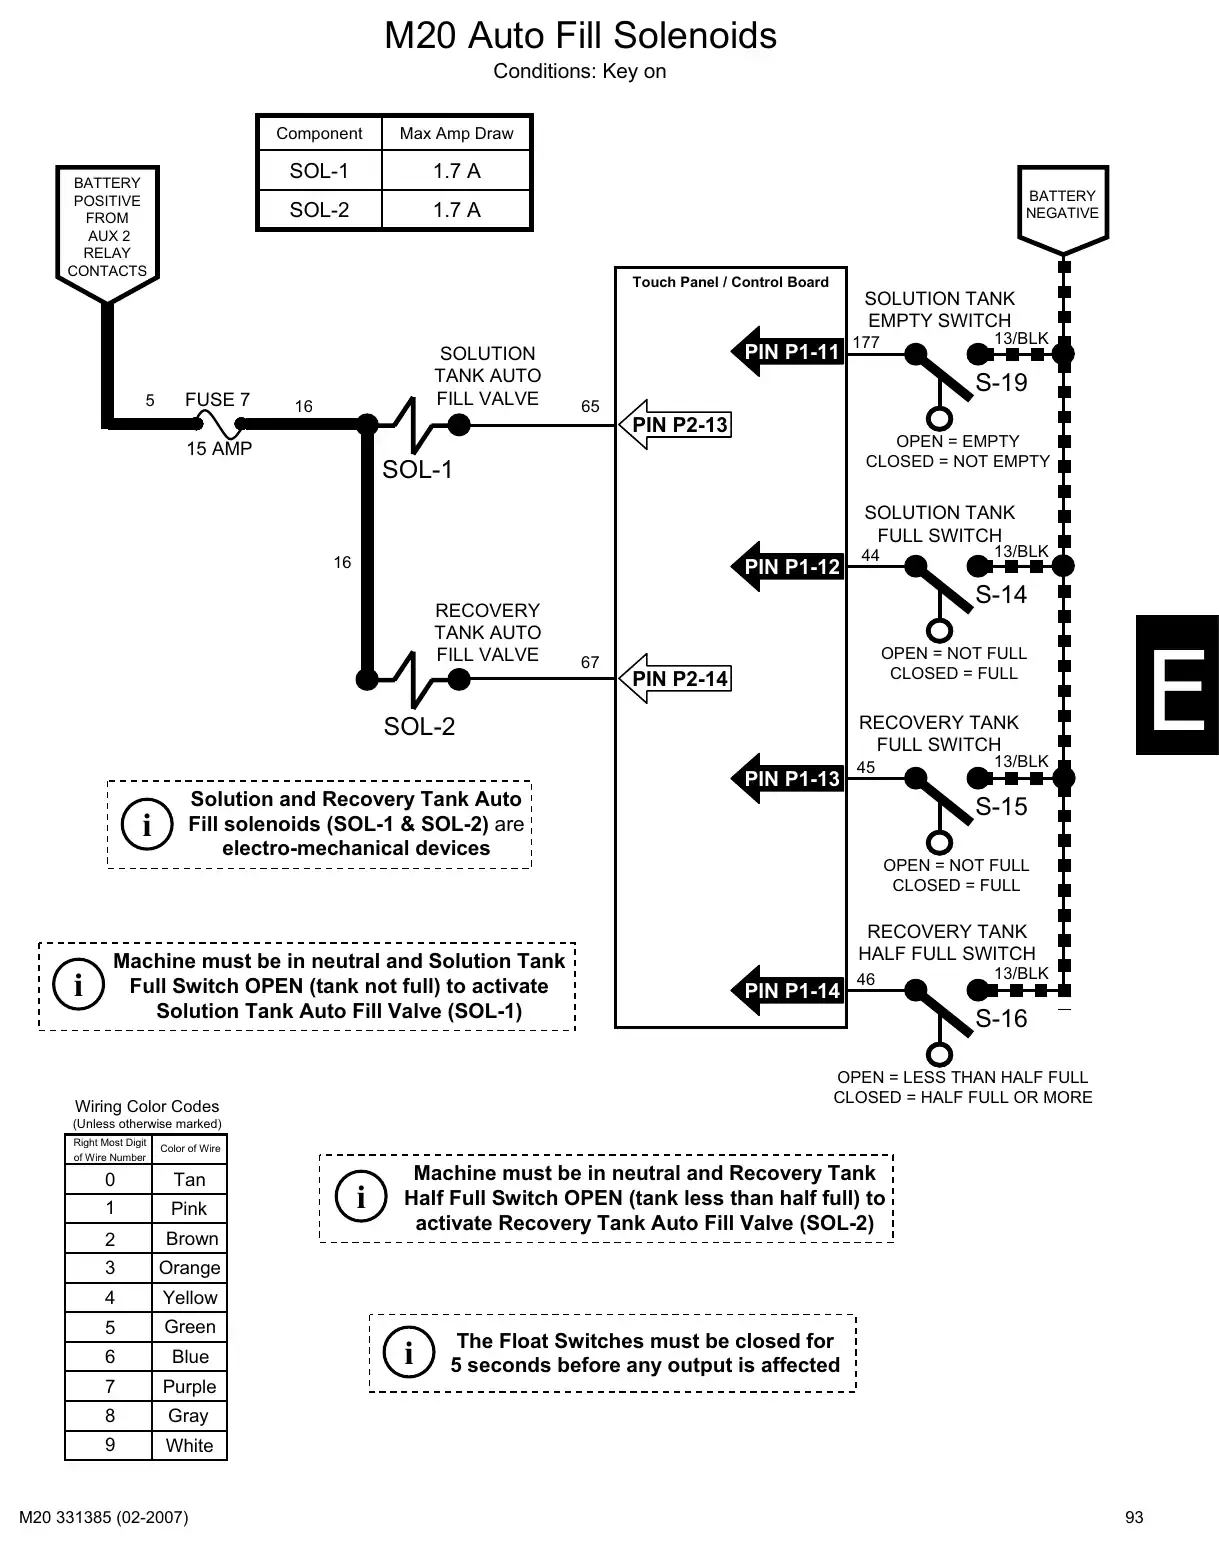
Text of manual page 93
M20 Auto Fill Solenoids
Conditions: Key on
BATTERY
POSITIVE
FROM
AUX 2
RELAY
CONTACTS
Component
Max Amp Draw
SOL-1
1.7 A
SOL-2
1.7 A
BATTERY
NEGATIVE
Touch Panel / Control Board
SOLUTION TANK
EMPTY SWITCH
5
FUSE 7
SOLUTION
TANK AUTO
FILL VALVE
16
PIN P1-11
13/BLK
177
S-19
65
PIN P2-13
OPEN = EMPTY
CLOSED = NOT EMPTY
15 AMP
SOL-1
SOLUTION TANK
FULL SWITCH
16
PIN P1-12
RECOVERY
TANK AUTO
FILL VALVE
S-14
67
RECOVERY TANK
FULL SWITCH
PIN P1-13
i
13/BLK
45
Solution and Recovery Tank Auto
Fill solenoids (SOL-1 & SOL-2) are
electro-mechanical devices
Machine must be in neutral and Solution Tank
Full Switch OPEN (tank not full) to activate
Solution Tank Auto Fill Valve (SOL-1)
OPEN = NOT FULL
CLOSED = FULL
PIN P2-14
SOL-2
i
13/BLK
44
S-15
OPEN = NOT FULL
CLOSED = FULL
RECOVERY TANK
HALF FULL SWITCH
PIN P1-14
46
13/BLK
S-16
OPEN = LESS THAN HALF FULL
CLOSED = HALF FULL OR MORE
Wiring Color Codes
(Unless otherwise marked)
Right Most Digit
of Wire Number
Color of Wire
Tan
0
1
Pink
2
Brown
3
Orange
4
Yellow
5
Green
6
Blue
7
Purple
8
Gray
9
White
i
Machine must be in neutral and Recovery Tank
Half Full Switch OPEN (tank less than half full) to
activate Recovery Tank Auto Fill Valve (SOL-2)
i
The Float Switches must be closed for
5 seconds before any output is affected
93
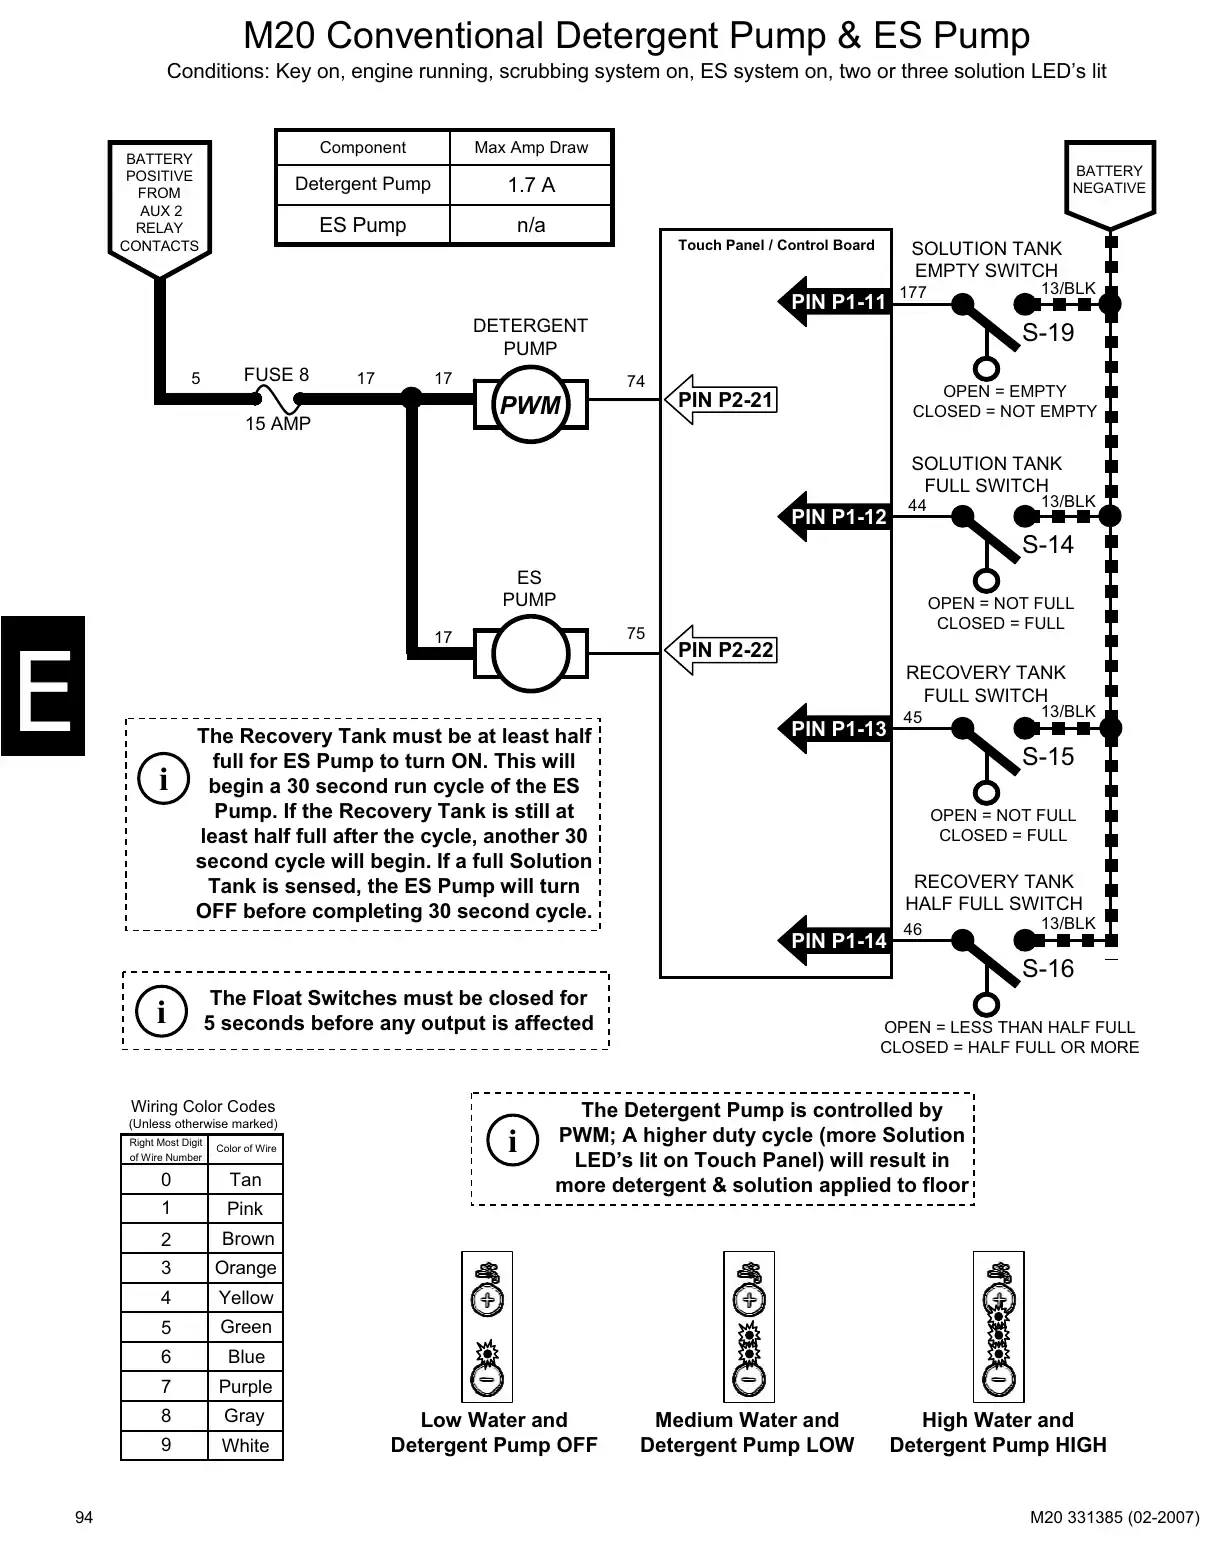
Text of manual page 94
M20 Conventional Detergent Pump & ES Pump
Conditions: Key on, engine running, scrubbing system on, ES system on, two or three solution LED's lit
BATTERY
POSITIVE
FROM
AUX 2
RELAY
CONTACTS
Component
Max Amp Draw
Detergent Pump
1.7 A
ES Pump
n/a
BATTERY
NEGATIVE
Touch Panel / Control Board
SOLUTION TANK
EMPTY SWITCH
PIN P1-11
13/BLK
177
DETERGENT
PUMP
5
FUSE 8
17
17
S-19
74
15 AMP
OPEN = EMPTY
CLOSED = NOT EMPTY
PIN P2-21
PWM
SOLUTION TANK
FULL SWITCH
PIN P1-12
13/BLK
44
S-14
ES
PUMP
75
17
OPEN = NOT FULL
CLOSED = FULL
PIN P2-22
RECOVERY TANK
FULL SWITCH
i
The Recovery Tank must be at least half
full for ES Pump to turn ON. This will
begin a 30 second run cycle of the ES
Pump. If the Recovery Tank is still at
least half full after the cycle, another 30
second cycle will begin. If a full Solution
Tank is sensed, the ES Pump will turn
OFF before completing 30 second cycle.
PIN P1-13
13/BLK
45
S-15
OPEN = NOT FULL
CLOSED = FULL
RECOVERY TANK
HALF FULL SWITCH
PIN P1-14
46
13/BLK
S-16
i
The Float Switches must be closed for
5 seconds before any output is affected
Wiring Color Codes
(Unless otherwise marked)
Right Most Digit
of Wire Number
94
Color of Wire
Tan
0
1
Pink
2
Brown
3
Orange
4
Yellow
5
Green
6
Blue
7
Purple
8
Gray
9
White
i
OPEN = LESS THAN HALF FULL
CLOSED = HALF FULL OR MORE
The Detergent Pump is controlled by
PWM; A higher duty cycle (more Solution
LED's lit on Touch Panel) will result in
more detergent & solution applied to floor
Low Water and
Detergent Pump OFF
Medium Water and
Detergent Pump LOW
High Water and
Detergent Pump HIGH
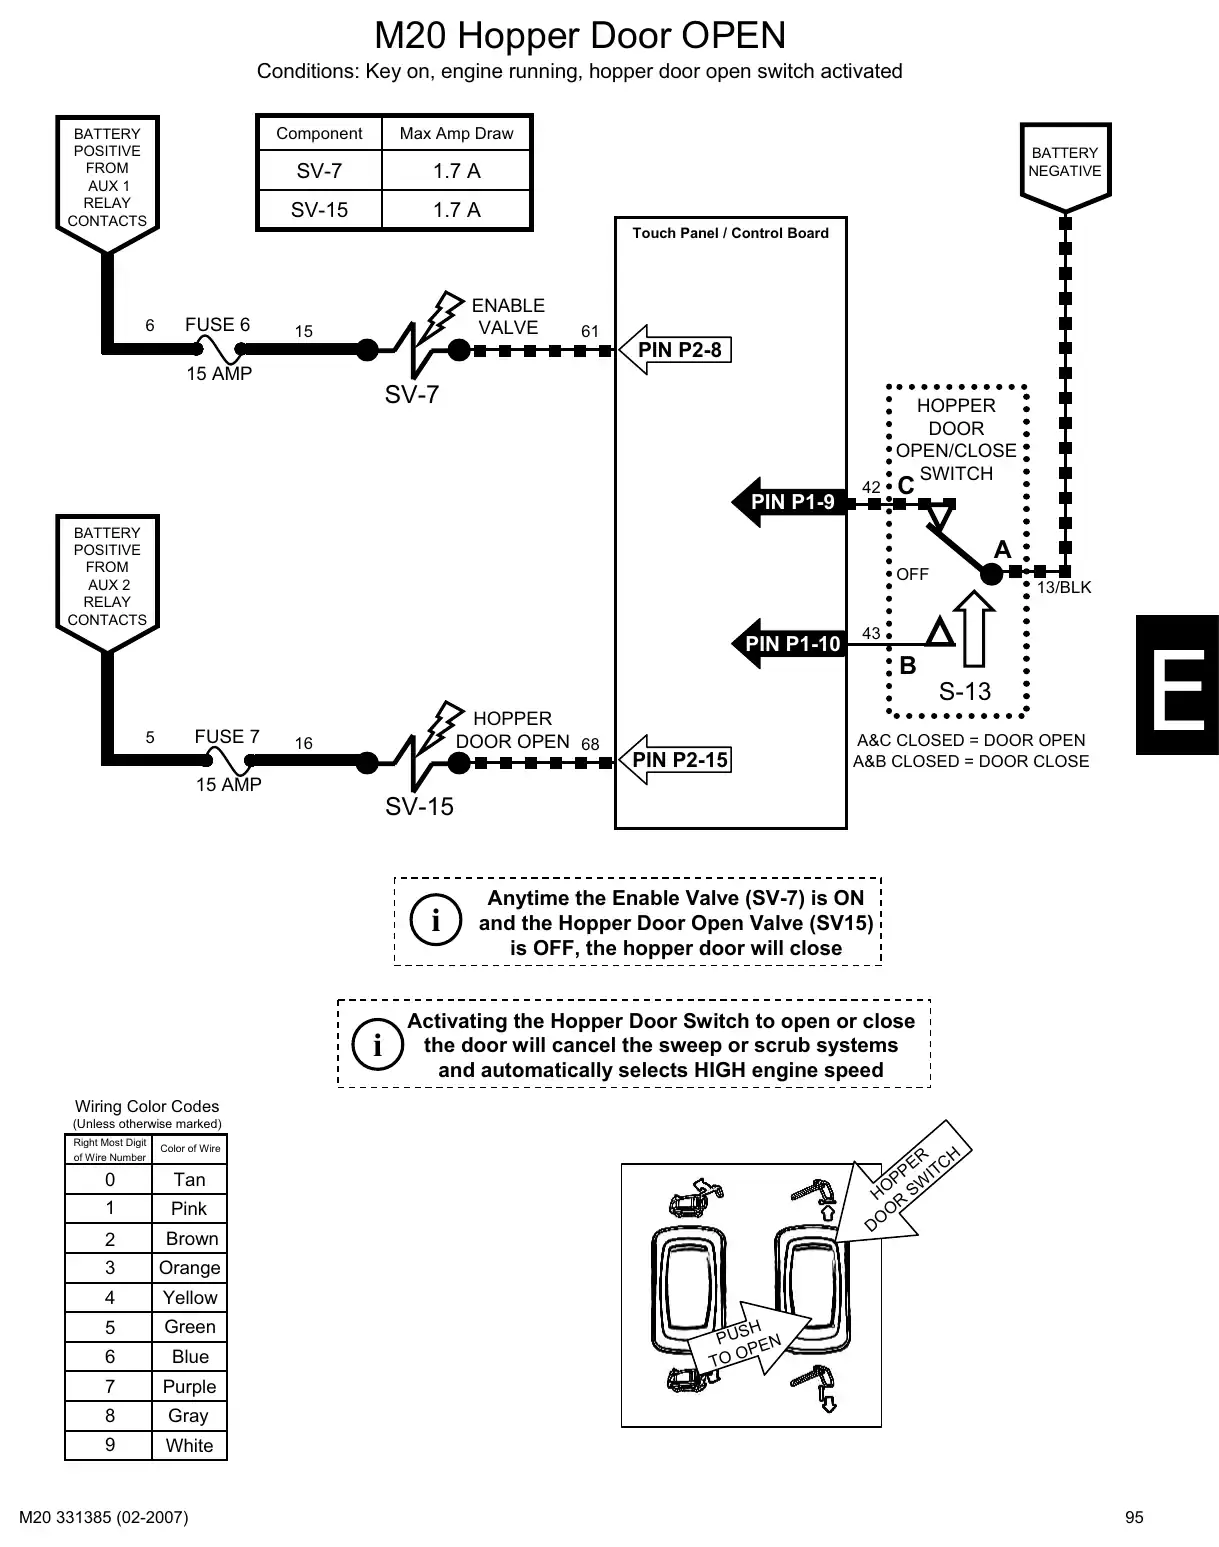
Text of manual page 95
M20 Hopper Door OPEN
Conditions: Key on, engine running, hopper door open switch activated
BATTERY
POSITIVE
FROM
AUX 1
RELAY
CONTACTS
6
Component
Max Amp Draw
SV-7
1.7 A
SV-15
1.7 A
BATTERY
NEGATIVE
Touch Panel / Control Board
FUSE 6
ENABLE
VALVE
15
61
PIN P2-8
15 AMP
SV-7
PIN P1-9
BATTERY
POSITIVE
FROM
AUX 2
RELAY
CONTACTS
42
HOPPER
DOOR
OPEN/CLOSE
SWITCH
OFF
PIN P1-10
13/BLK
43
S-13
FUSE 7
5
HOPPER
DOOR OPEN 68
16
PIN P2-15
A&C CLOSED = DOOR OPEN
A&B CLOSED = DOOR CLOSE
15 AMP
SV-15
i
i
Anytime the Enable Valve (SV-7) is ON
and the Hopper Door Open Valve (SV15)
is OFF, the hopper door will close
Activating the Hopper Door Switch to open or close
the door will cancel the sweep or scrub systems
and automatically selects HIGH engine speed
Wiring Color Codes
(Unless otherwise marked)
Right Most Digit
of Wire Number
Color of Wire
ER TC
PP WI
HO R S
DO
Tan
0
1
Pink
2
Brown
3
Orange
4
Yellow
5
Green
6
Blue
7
Purple
8
Gray
9
White
PUS EN
OP
95
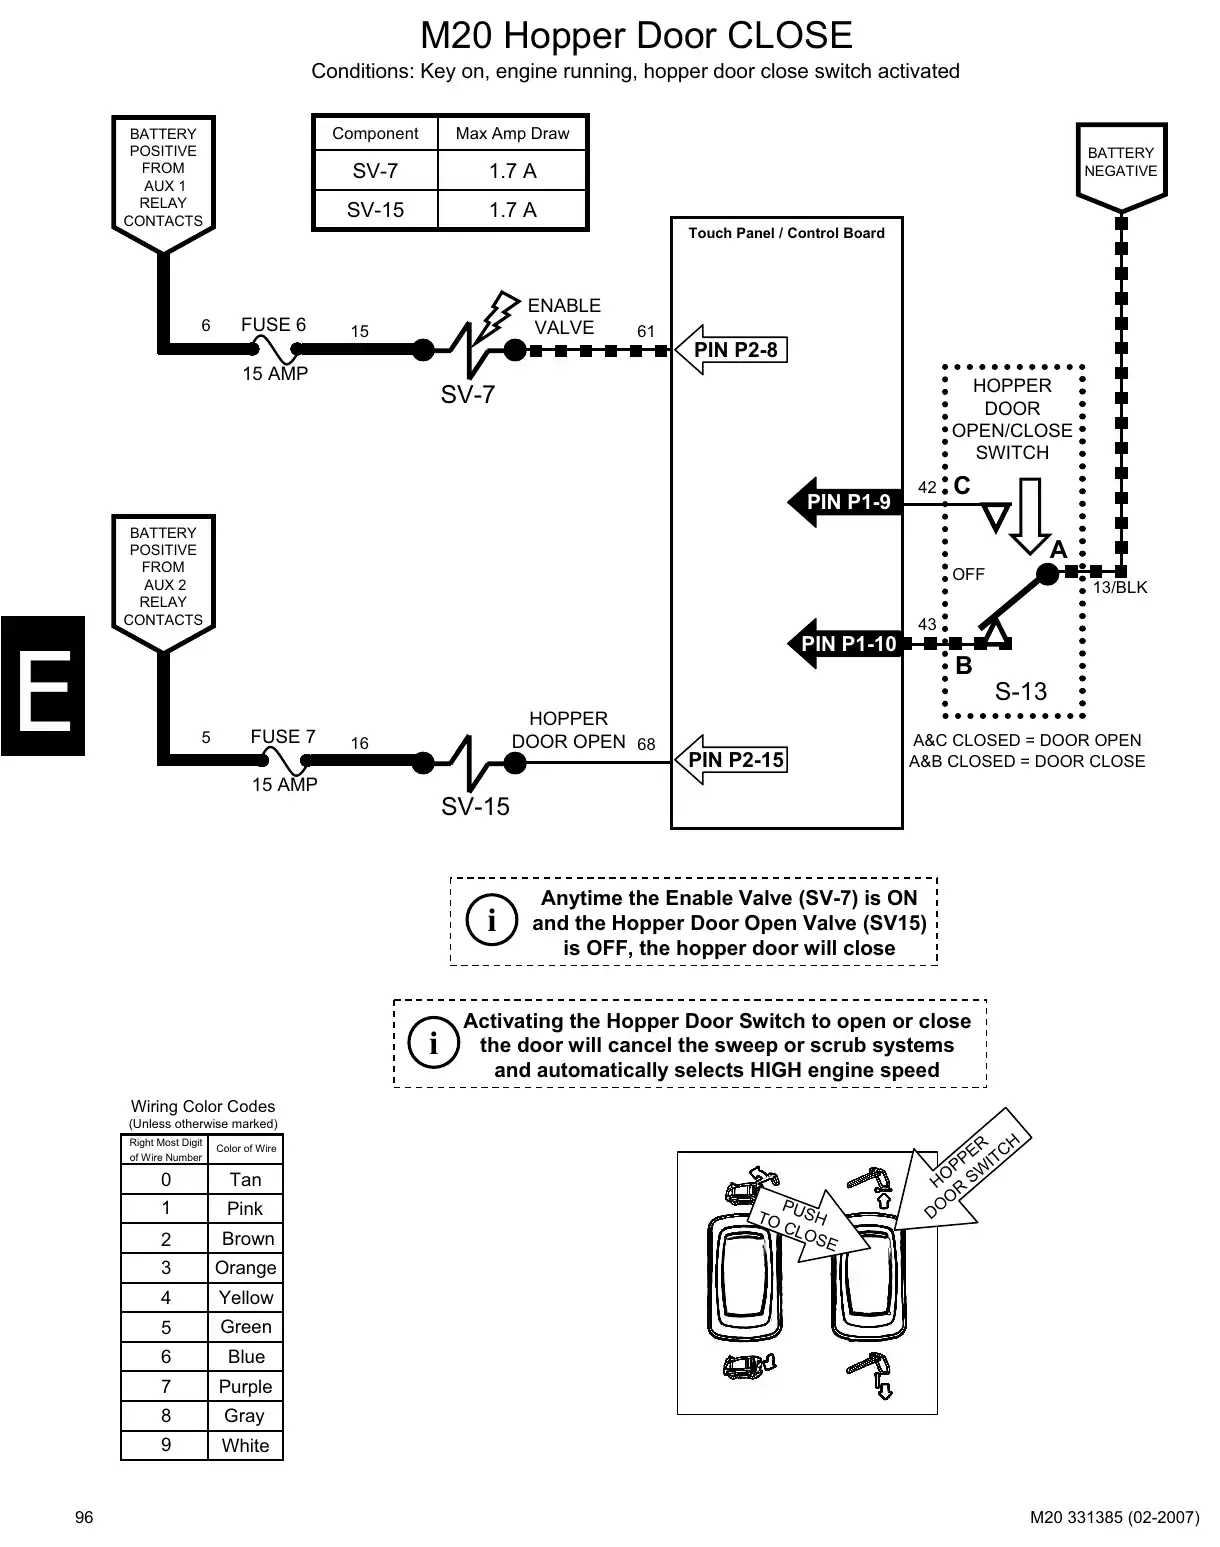
Text of manual page 96
M20 Hopper Door CLOSE
Conditions: Key on, engine running, hopper door close switch activated
BATTERY
POSITIVE
FROM
AUX 1
RELAY
CONTACTS
6
Component
Max Amp Draw
SV-7
1.7 A
SV-15
1.7 A
BATTERY
NEGATIVE
Touch Panel / Control Board
FUSE 6
ENABLE
VALVE
15
61
PIN P2-8
15 AMP
HOPPER
DOOR
OPEN/CLOSE
SWITCH
SV-7
PIN P1-9
BATTERY
POSITIVE
FROM
AUX 2
RELAY
CONTACTS
42
OFF
13/BLK
43
PIN P1-10
S-13
5
FUSE 7
HOPPER
DOOR OPEN 68
16
A&C CLOSED = DOOR OPEN
A&B CLOSED = DOOR CLOSE
PIN P2-15
15 AMP
SV-15
i
i
Anytime the Enable Valve (SV-7) is ON
and the Hopper Door Open Valve (SV15)
is OFF, the hopper door will close
Activating the Hopper Door Switch to open or close
the door will cancel the sweep or scrub systems
and automatically selects HIGH engine speed
Wiring Color Codes
(Unless otherwise marked)
Right Most Digit
of Wire Number
96
ER TC
PP WI
H RS
DO
Color of Wire
Tan
0
1
Pink
2
Brown
3
Orange
4
Yellow
5
Green
6
Blue
7
Purple
8
Gray
9
White
TO U S H
CL O
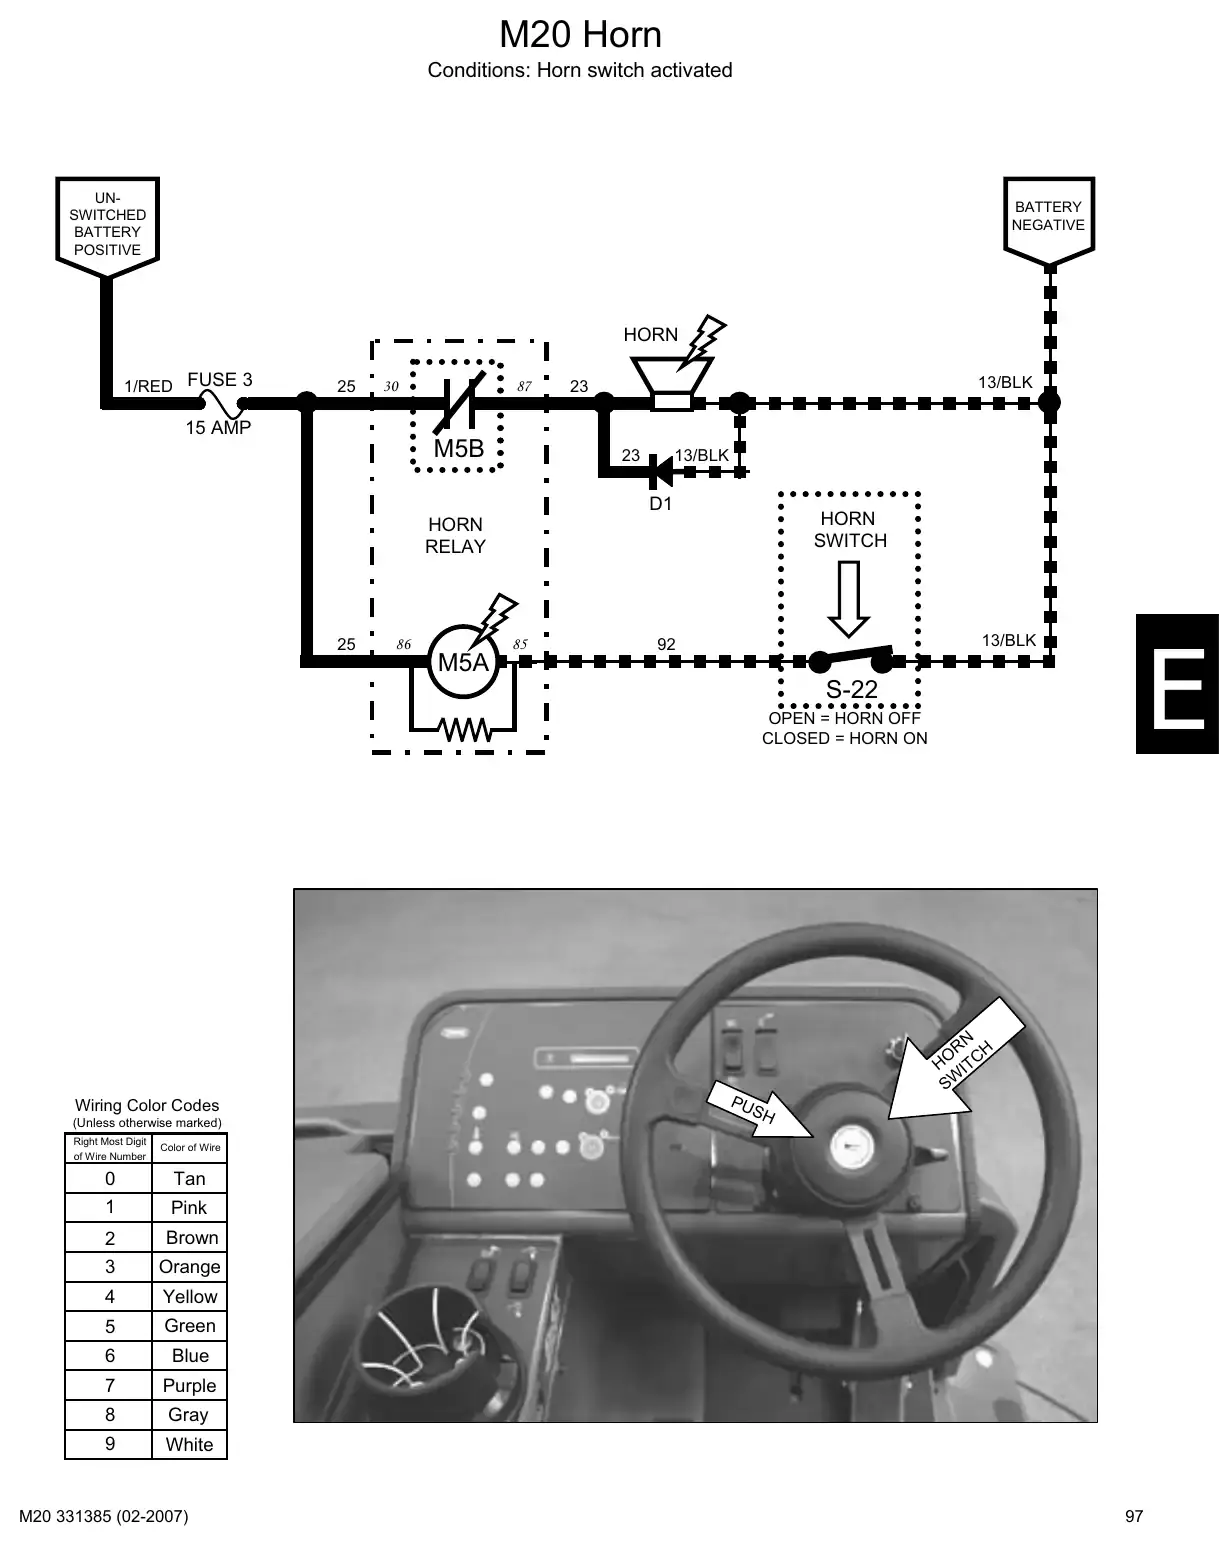
Text of manual page 97
M20 Horn
Conditions: Horn switch activated
UNSWITCHED
BATTERY
POSITIVE
BATTERY
NEGATIVE
HORN
1/RED FUSE 3
25
30
87
13/BLK
23
15 AMP
M5B
23
13/BLK
D1
HORN
SWITCH
HORN
RELAY
25
86
M5A
85
13/BLK
92
S-22
OPEN = HORN OFF
CLOSED = HORN ON
Wiring Color Codes
(Unless otherwise marked)
Right Most Digit
of Wire Number
PU
RN H
HO ITC
SW
SH
Color of Wire
Tan
0
1
Pink
2
Brown
3
Orange
4
Yellow
5
Green
6
Blue
7
Purple
8
Gray
9
White
97
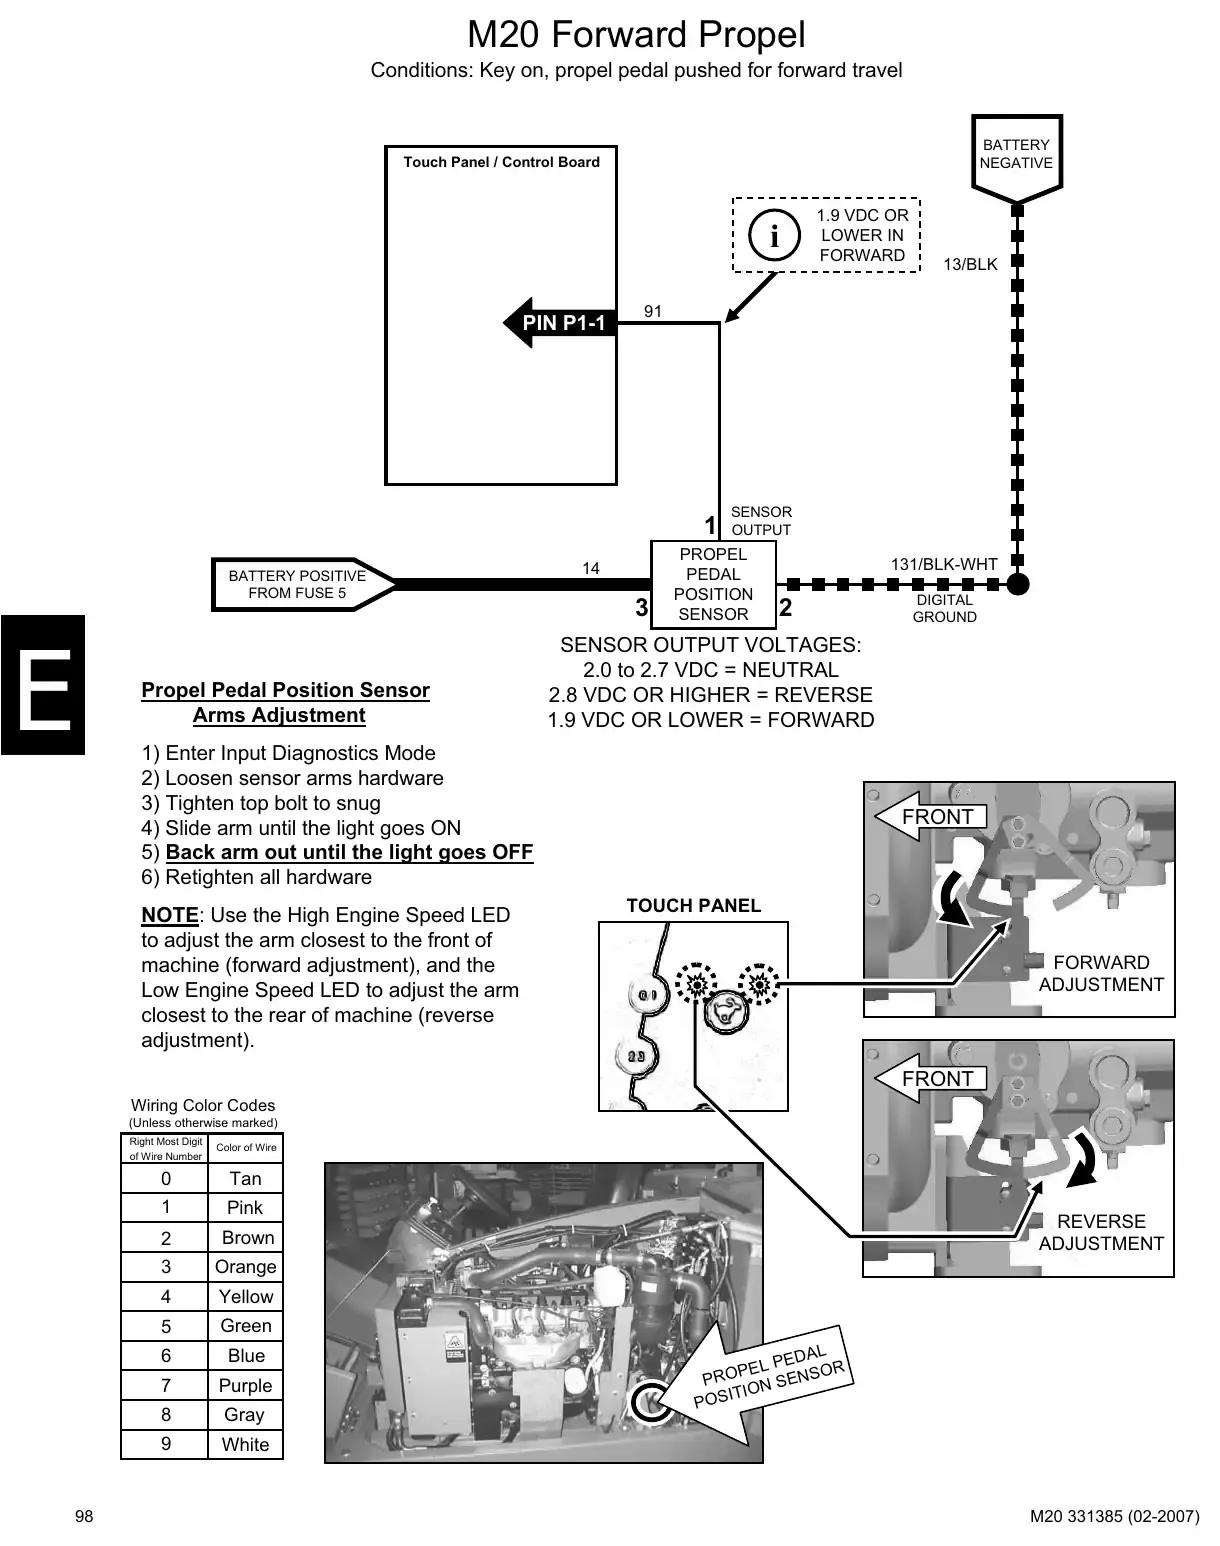
Text of manual page 98
M20 Forward Propel
Conditions: Key on, propel pedal pushed for forward travel
BATTERY
NEGATIVE
Touch Panel / Control Board
i
PIN P1-1
1.9 VDC OR
LOWER IN
FORWARD
13/BLK
91
SENSOR
1 OUTPUT
BATTERY POSITIVE
FROM FUSE 5
Propel Pedal Position Sensor
Arms Adjustment
14
3
PROPEL
PEDAL
POSITION
SENSOR
131/BLK-WHT
2
SENSOR OUTPUT VOLTAGES:
2.0 to 2.7 VDC = NEUTRAL
2.8 VDC OR HIGHER = REVERSE
1.9 VDC OR LOWER = FORWARD
1) Enter Input Diagnostics Mode
2) Loosen sensor arms hardware
3) Tighten top bolt to snug
4) Slide arm until the light goes ON
5) Back arm out until the light goes OFF
6) Retighten all hardware
NOTE: Use the High Engine Speed LED
to adjust the arm closest to the front of
machine (forward adjustment), and the
Low Engine Speed LED to adjust the arm
closest to the rear of machine (reverse
adjustment).
DIGITAL
GROUND
FRONT
TOUCH PANEL
FORWARD
ADJUSTMENT
FRONT
Wiring Color Codes
(Unless otherwise marked)
Right Most Digit
of Wire Number
98
Color of Wire
Tan
0
1
Pink
2
Brown
3
Orange
4
Yellow
5
Green
6
Blue
7
Purple
8
Gray
9
White
REVERSE
ADJUSTMENT
AL
PED
OR
PE L
PRO N SENS
IO
PO
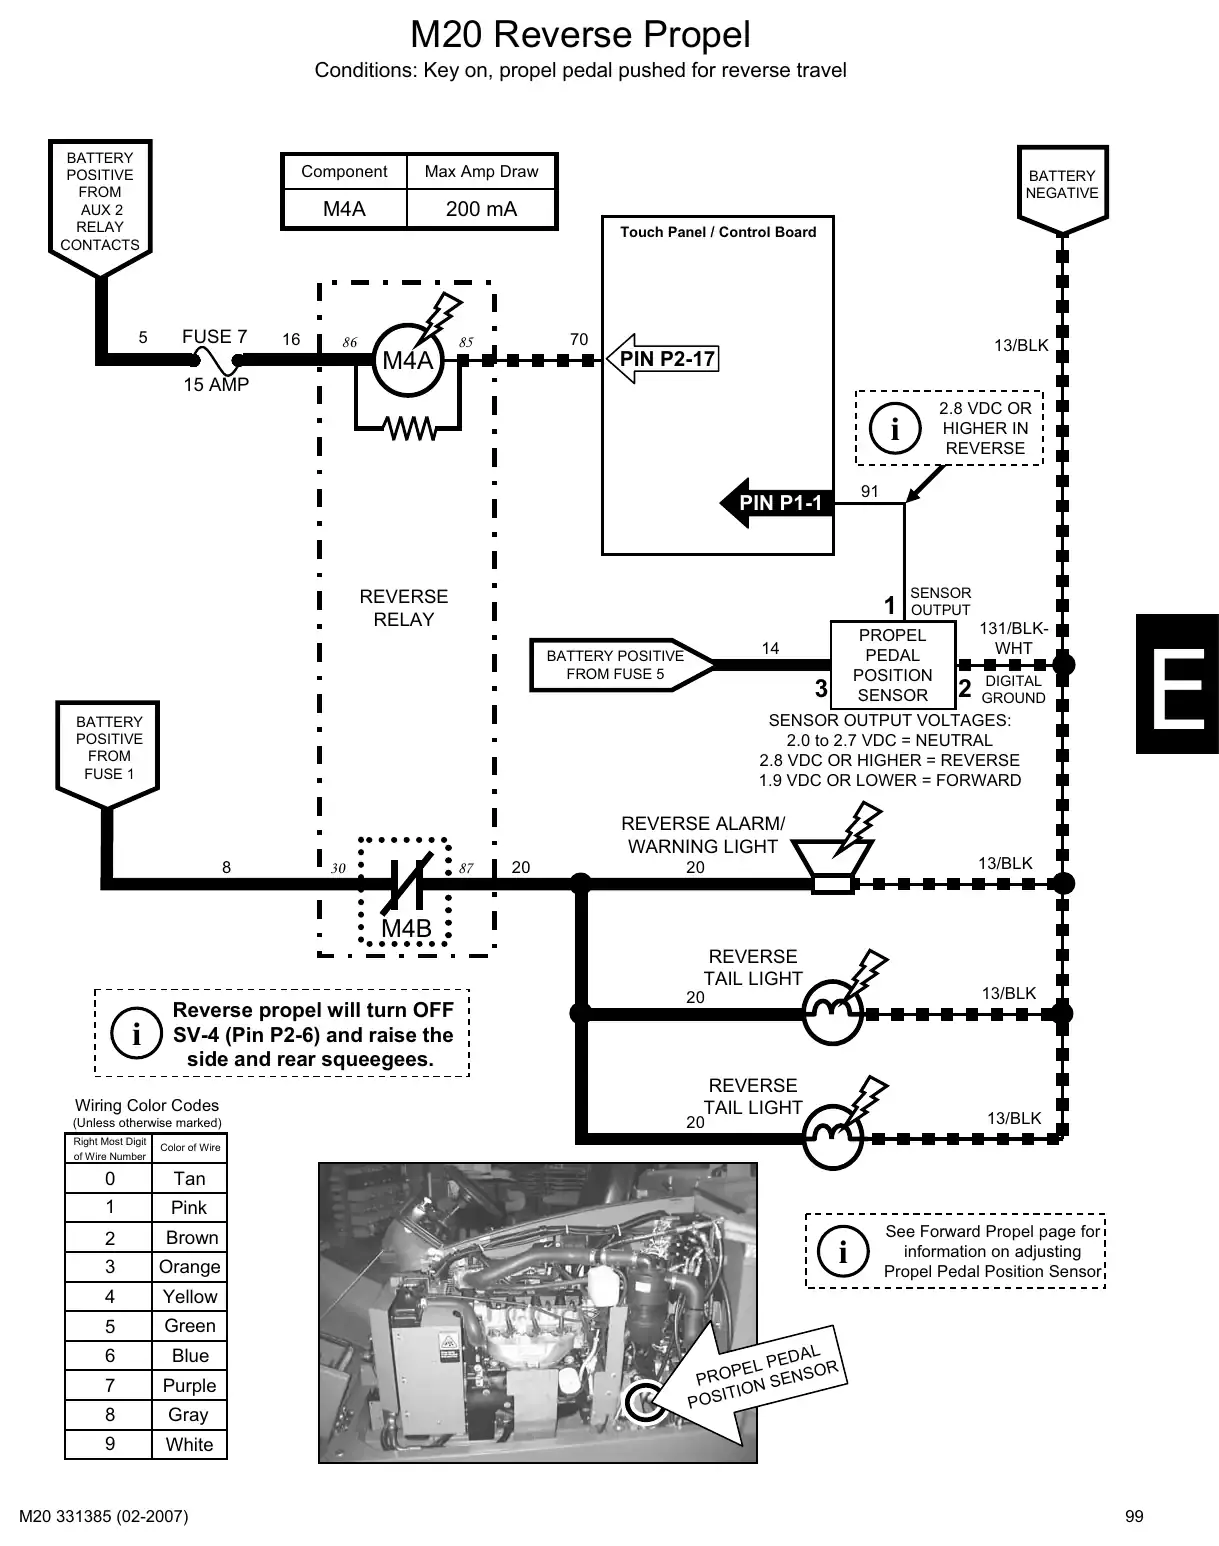
Text of manual page 99
M20 Reverse Propel
Conditions: Key on, propel pedal pushed for reverse travel
BATTERY
POSITIVE
FROM
AUX 2
RELAY
CONTACTS
5
Component
Max Amp Draw
M4A
200 mA
BATTERY
NEGATIVE
Touch Panel / Control Board
FUSE 7
16
86
M4A
85
70
13/BLK
PIN P2-17
15 AMP
2.8 VDC OR
HIGHER IN
REVERSE
i
91
PIN P1-1
SENSOR
REVERSE
RELAY
1 OUTPUT
PROPEL
PEDAL
POSITION
SENSOR
14
BATTERY POSITIVE
FROM FUSE 5
3
131/BLKWHT
DIGITAL
2 GROUND
SENSOR OUTPUT VOLTAGES:
2.0 to 2.7 VDC = NEUTRAL
2.8 VDC OR HIGHER = REVERSE
1.9 VDC OR LOWER = FORWARD
BATTERY
POSITIVE
FROM
FUSE 1
REVERSE ALARM/
WARNING LIGHT
8
30
87
20
13/BLK
20
M4B
REVERSE
TAIL LIGHT
i
Reverse propel will turn OFF
SV-4 (Pin P2-6) and raise the
side and rear squeegees.
Wiring Color Codes
(Unless otherwise marked)
Right Most Digit
of Wire Number
13/BLK
20
REVERSE
TAIL LIGHT
13/BLK
20
Color of Wire
Tan
0
1
Pink
2
Brown
3
Orange
4
Yellow
5
Green
6
Blue
7
Purple
8
Gray
9
White
i
See Forward Propel page for
information on adjusting
Propel Pedal Position Sensor
AL
PED
OR
PE L
PRO N SENS
IO
PO
99
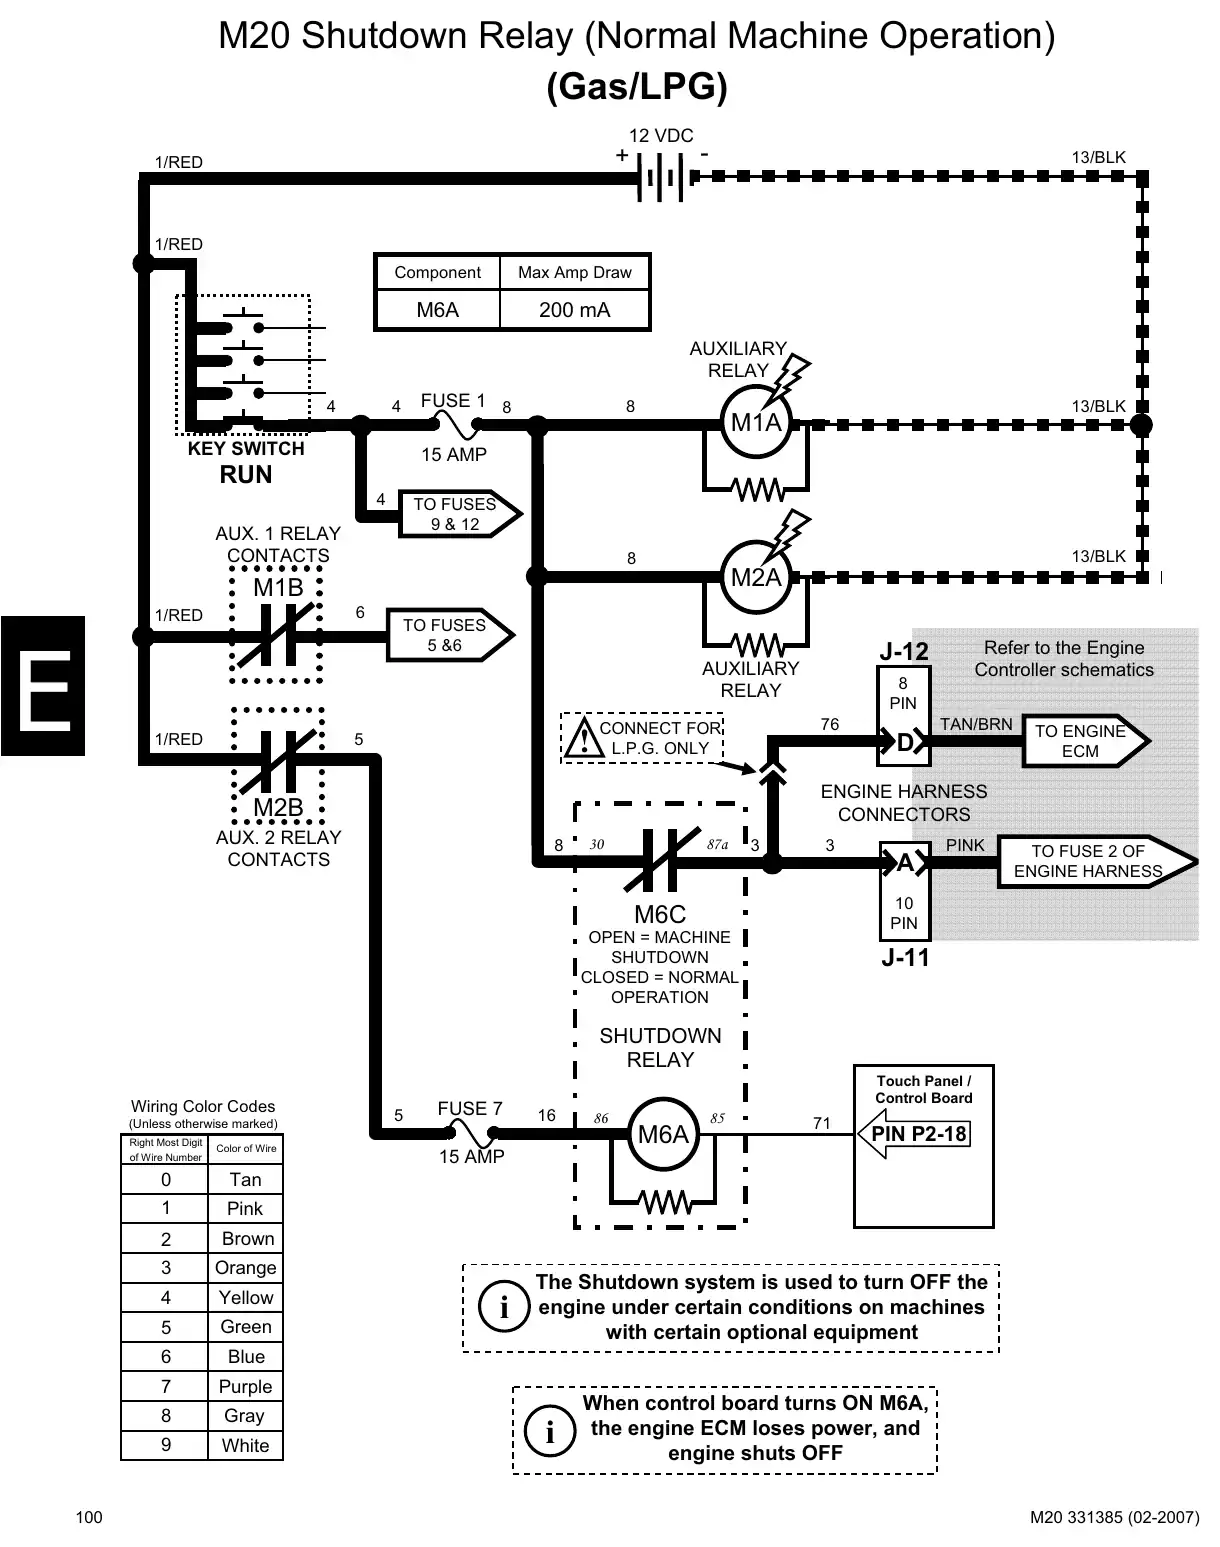
Text of manual page 100
M20 Shutdown Relay (Normal Machine Operation)
(Gas/LPG)
12 VDC
+
1/RED
-
13/BLK
1/RED
Component
Max Amp Draw
M6A
200 mA
AUXILIARY
RELAY
FUSE 1 8
4
4
KEY SWITCH
8
15 AMP
RUN
4
TO FUSES
9 & 12
AUX. 1 RELAY
CONTACTS
13/BLK
8
M2A
M1B
6
1/RED
13/BLK
M1A
TO FUSES
5 &6
1/RED
8
PIN
76
! L.P.G. ONLY
CONNECT FOR
5
Refer to the Engine
Controller schematics
J-12
AUXILIARY
RELAY
TAN/BRN
TO ENGINE
ECM
ENGINE HARNESS
CONNECTORS
M2B
AUX. 2 RELAY
CONTACTS
8
30
87a
3
3
PINK
TO FUSE 2 OF
ENGINE HARNESS
10
PIN
M6C
OPEN = MACHINE
SHUTDOWN
CLOSED = NORMAL
OPERATION
J-11
SHUTDOWN
RELAY
Wiring Color Codes
(Unless otherwise marked)
Right Most Digit
of Wire Number
100
Color of Wire
5
FUSE 7
Touch Panel /
Control Board
16
86
M6A
85
71
PIN P2-18
15 AMP
Tan
0
1
Pink
2
Brown
3
Orange
4
Yellow
5
Green
6
Blue
7
Purple
8
Gray
9
White
i
The Shutdown system is used to turn OFF the
engine under certain conditions on machines
with certain optional equipment
i
When control board turns ON M6A,
the engine ECM loses power, and
engine shuts OFF
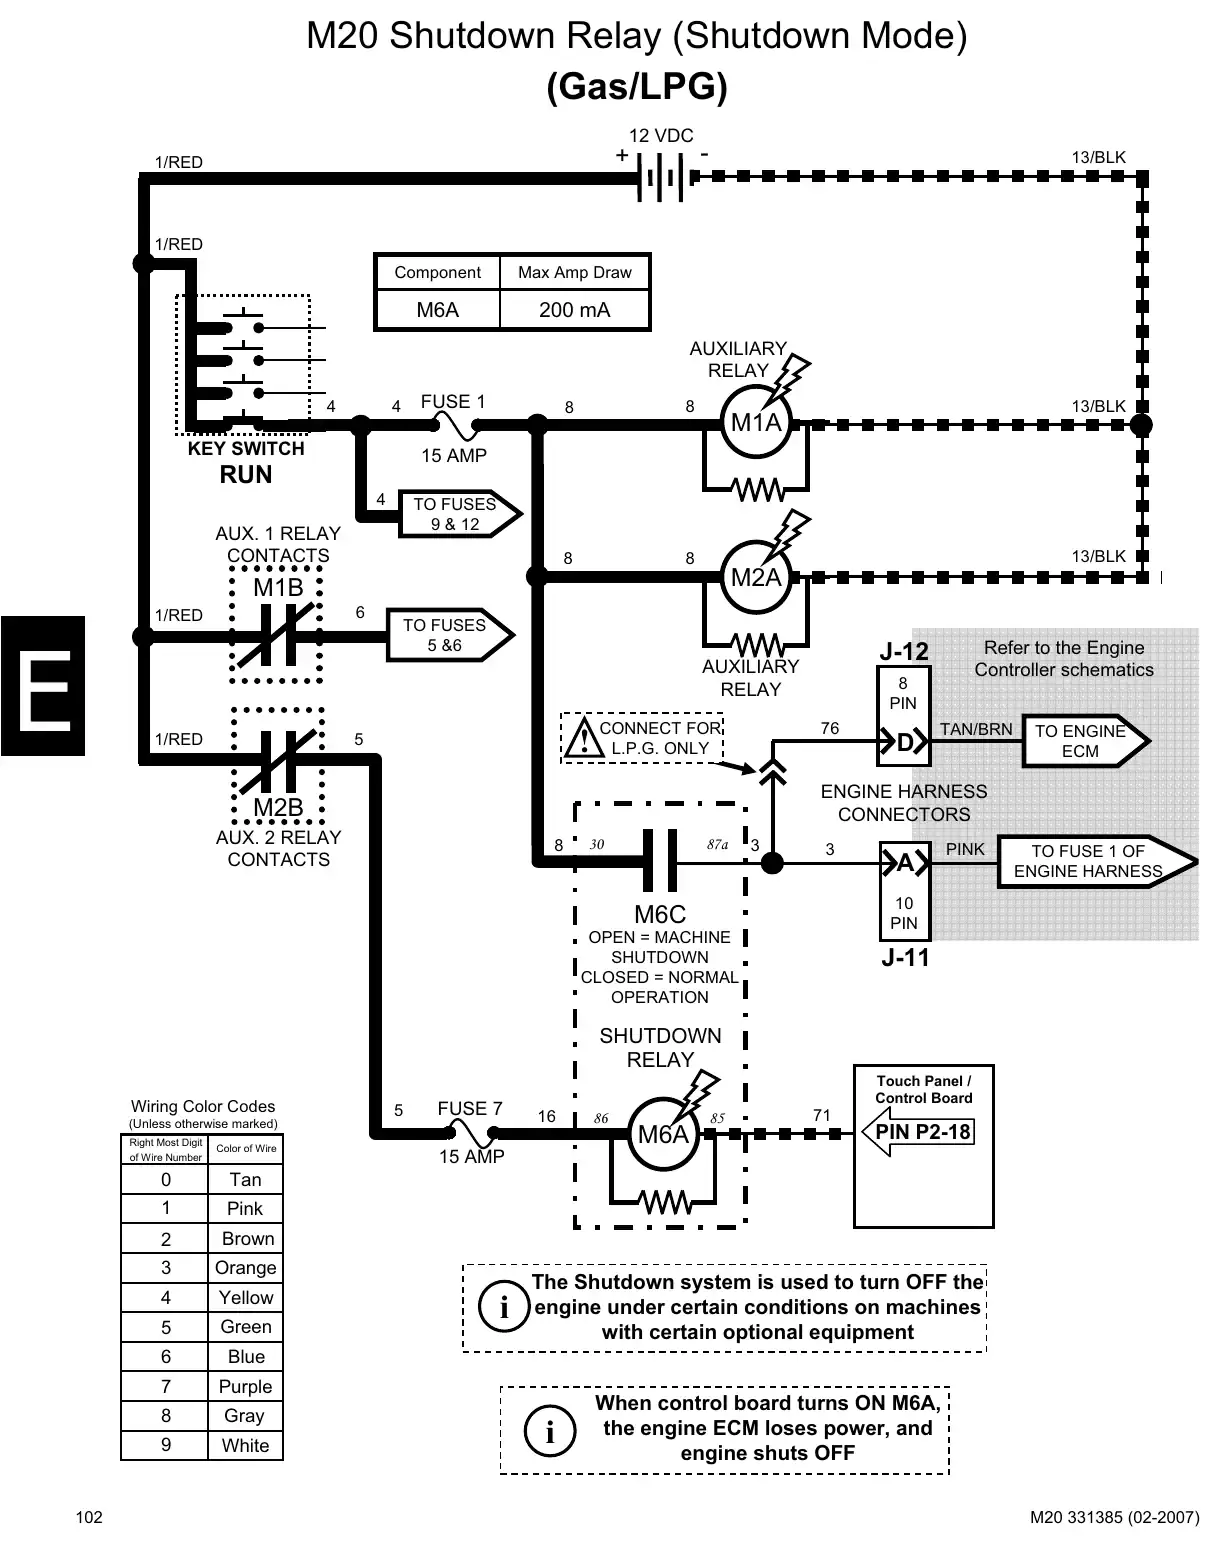
Text of manual page 102
M20 Shutdown Relay (Shutdown Mode)
(Gas/LPG)
12 VDC
+
1/RED
-
13/BLK
1/RED
Component
Max Amp Draw
M6A
200 mA
AUXILIARY
RELAY
FUSE 1
4
4
KEY SWITCH
8
8
8
8
15 AMP
RUN
4
TO FUSES
9 & 12
AUX. 1 RELAY
CONTACTS
13/BLK
M2A
M1B
6
1/RED
13/BLK
M1A
TO FUSES
5 &6
1/RED
! L.P.G. ONLY
CONNECT FOR
5
Refer to the Engine
Controller schematics
J-12
AUXILIARY
RELAY
8
PIN
76
TAN/BRN
TO ENGINE
ECM
ENGINE HARNESS
CONNECTORS
M2B
AUX. 2 RELAY
CONTACTS
8
30
87a
3
3
PINK
TO FUSE 1 OF
ENGINE HARNESS
10
PIN
M6C
OPEN = MACHINE
SHUTDOWN
CLOSED = NORMAL
OPERATION
J-11
SHUTDOWN
RELAY
Wiring Color Codes
5
FUSE 7
(Unless otherwise marked)
Right Most Digit
of Wire Number
102
Color of Wire
Touch Panel /
Control Board
16
86
M6A
85
71
PIN P2-18
15 AMP
Tan
0
1
Pink
2
Brown
3
Orange
4
Yellow
5
Green
6
Blue
7
Purple
8
Gray
9
White
i
The Shutdown system is used to turn OFF the
engine under certain conditions on machines
with certain optional equipment
i
When control board turns ON M6A,
the engine ECM loses power, and
engine shuts OFF
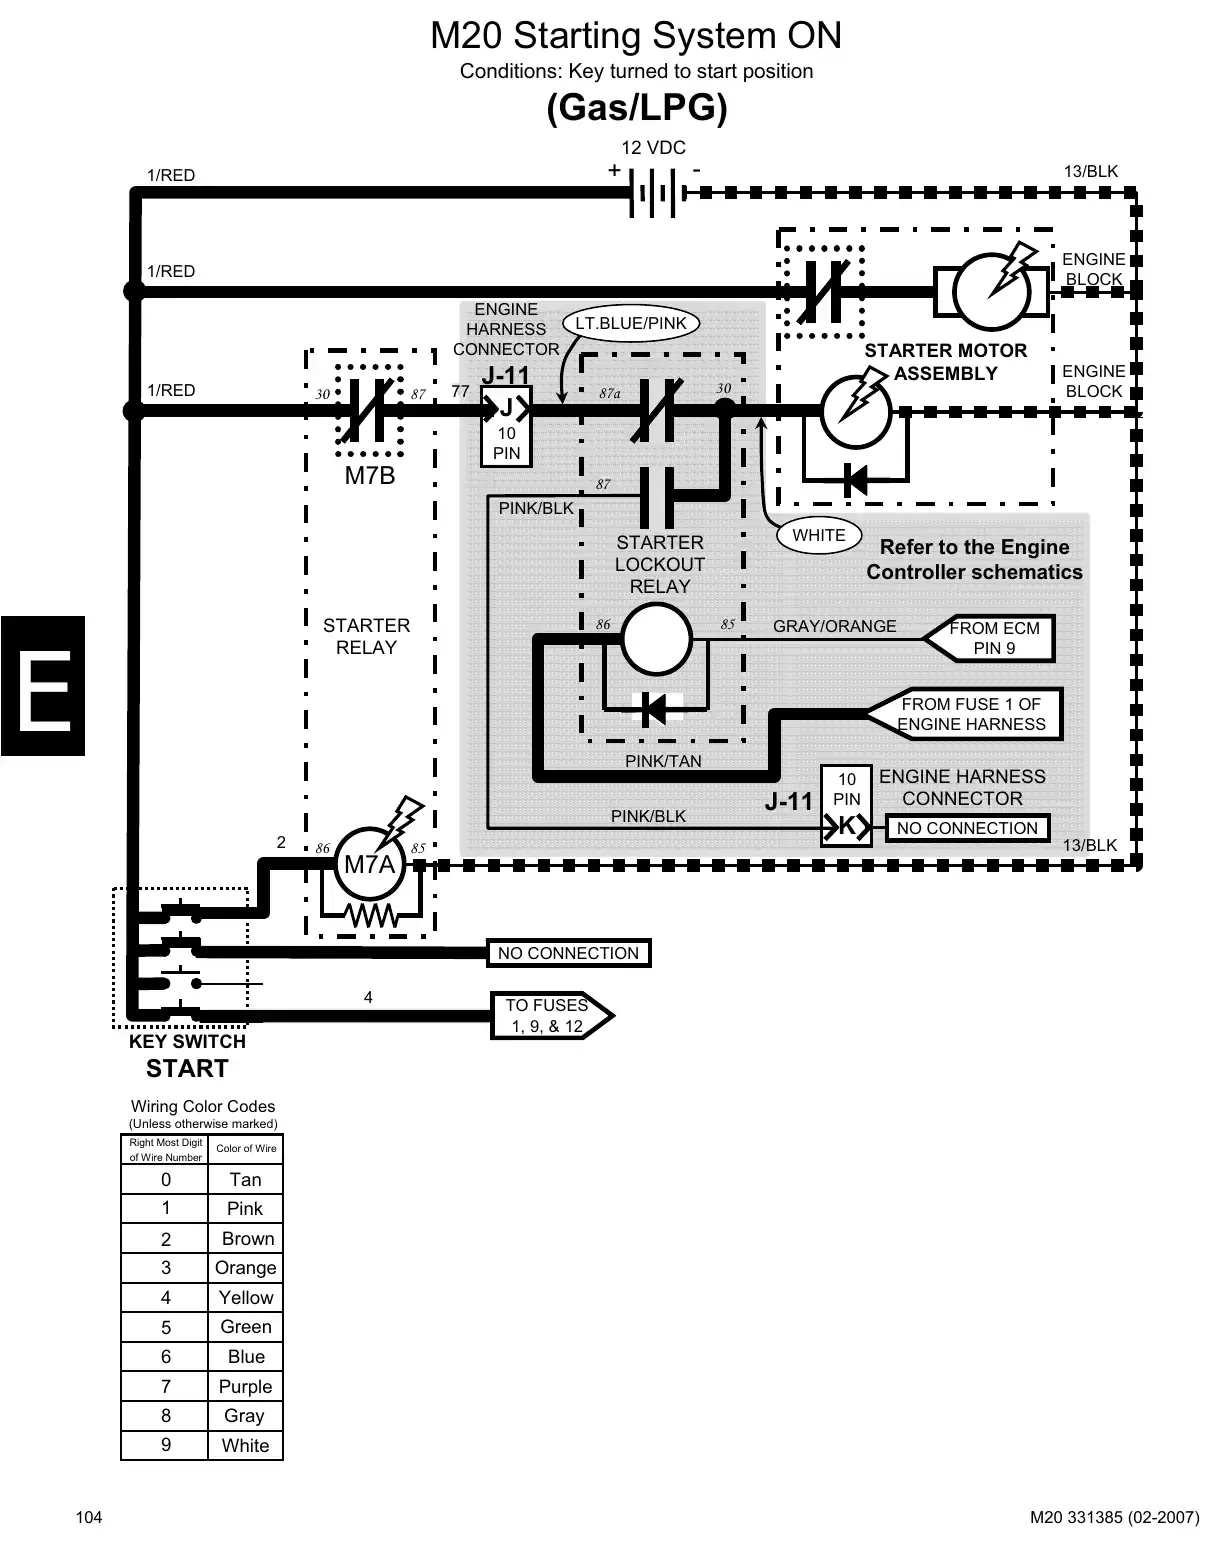
Text of manual page 104
M20 Starting System ON
Conditions: Key turned to start position
(Gas/LPG)
12 VDC
-
+
1/RED
13/BLK
ENGINE
BLOCK
1/RED
ENGINE
LT.BLUE/PINK
HARNESS
CONNECTOR
30
1/RED
87
J-11
77
STARTER MOTOR
ASSEMBLY
30
87a
ENGINE
BLOCK
10
PIN
M7B
87
PINK/BLK
WHITE
STARTER
LOCKOUT
RELAY
86
STARTER
RELAY
85
Refer to the Engine
Controller schematics
GRAY/ORANGE
FROM ECM
PIN 9
FROM FUSE 1 OF
ENGINE HARNESS
PINK/TAN
PINK/BLK
2
86
M7A
85
J-11
10
PIN
ENGINE HARNESS
CONNECTOR
NO CONNECTION
13/BLK
NO CONNECTION
4
KEY SWITCH
TO FUSES
1, 9, & 12
START
Wiring Color Codes
(Unless otherwise marked)
Right Most Digit
of Wire Number
104
Color of Wire
Tan
0
1
Pink
2
Brown
3
Orange
4
Yellow
5
Green
6
Blue
7
Purple
8
Gray
9
White
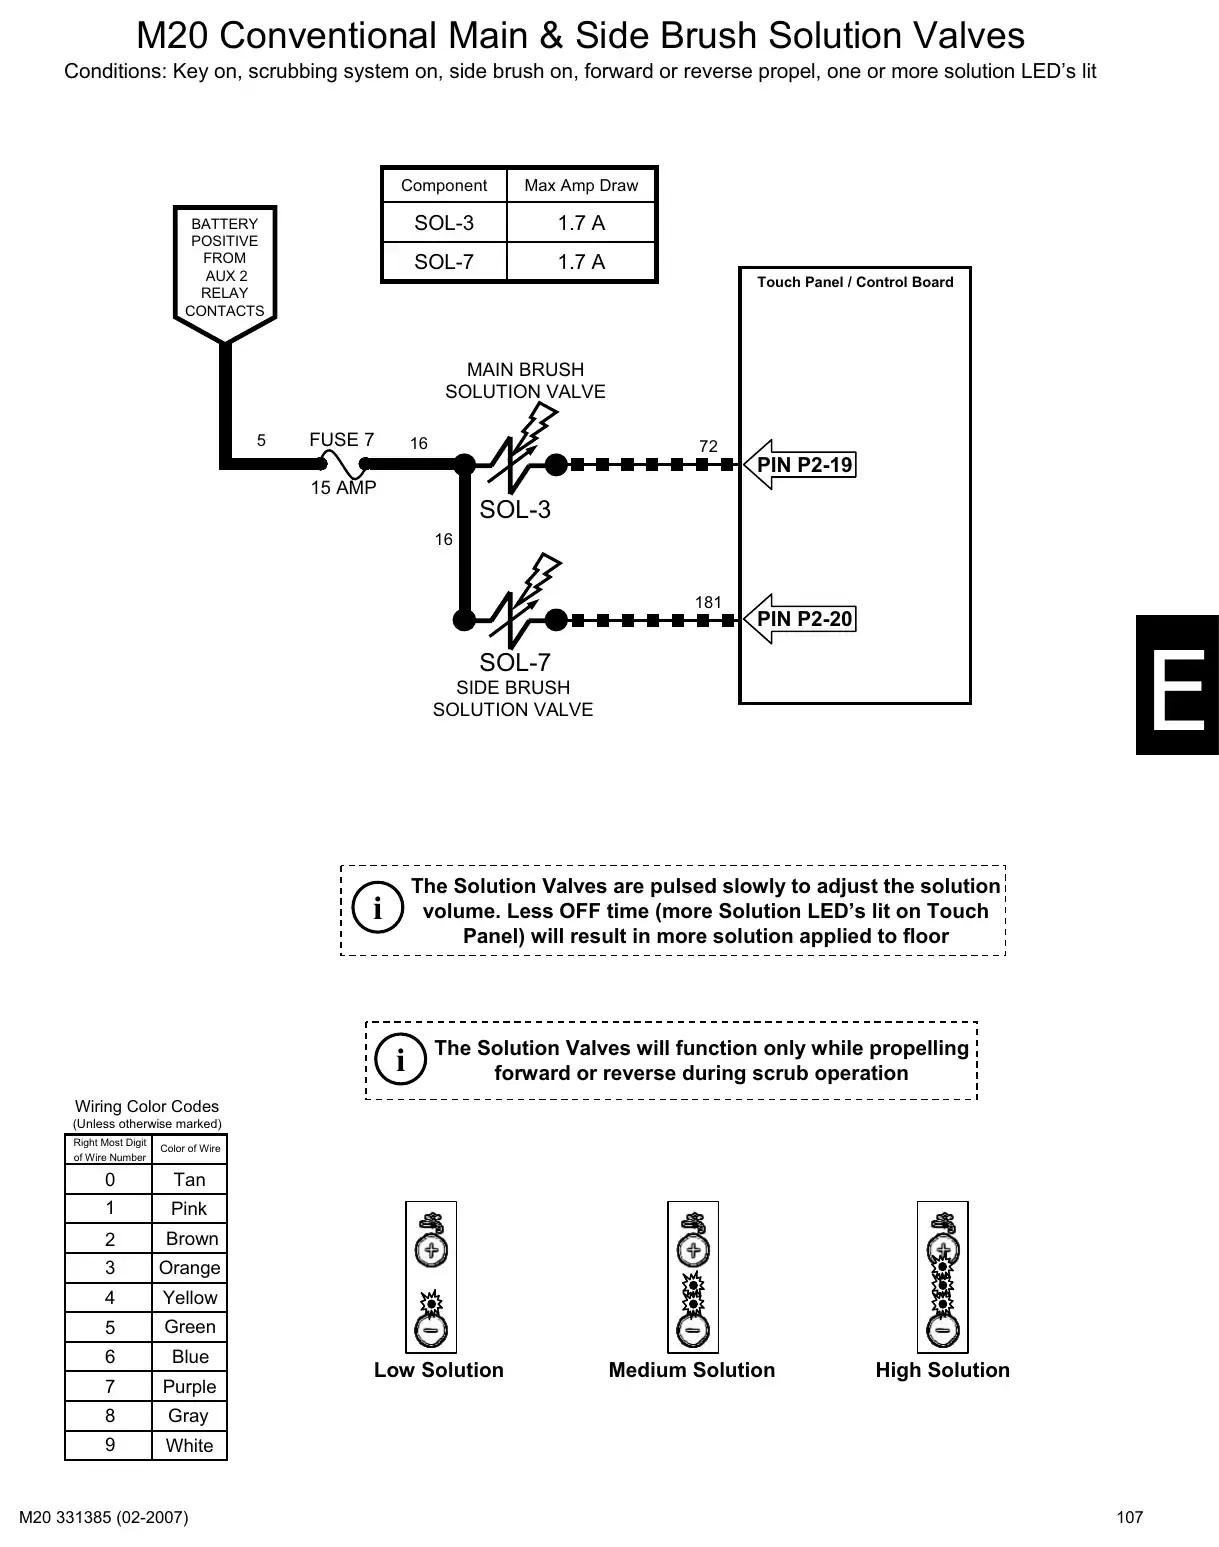
Text of manual page 107
M20 Conventional Main & Side Brush Solution Valves
Conditions: Key on, scrubbing system on, side brush on, forward or reverse propel, one or more solution LED's lit
Component
Max Amp Draw
SOL-3
1.7 A
SOL-7
1.7 A
BATTERY
POSITIVE
FROM
AUX 2
RELAY
CONTACTS
Touch Panel / Control Board
MAIN BRUSH
SOLUTION VALVE
5
FUSE 7
16
72
PIN P2-19
15 AMP
SOL-3
16
181
PIN P2-20
SOL-7
SIDE BRUSH
SOLUTION VALVE
The Solution Valves are pulsed slowly to adjust the solution
volume. Less OFF time (more Solution LED's lit on Touch
Panel) will result in more solution applied to floor
i
i
The Solution Valves will function only while propelling
forward or reverse during scrub operation
Wiring Color Codes
(Unless otherwise marked)
Right Most Digit
of Wire Number
Color of Wire
Tan
0
1
Pink
2
Brown
3
Orange
4
Yellow
5
Green
6
Blue
7
Purple
8
Gray
9
White
Low Solution
Medium Solution
High Solution
107
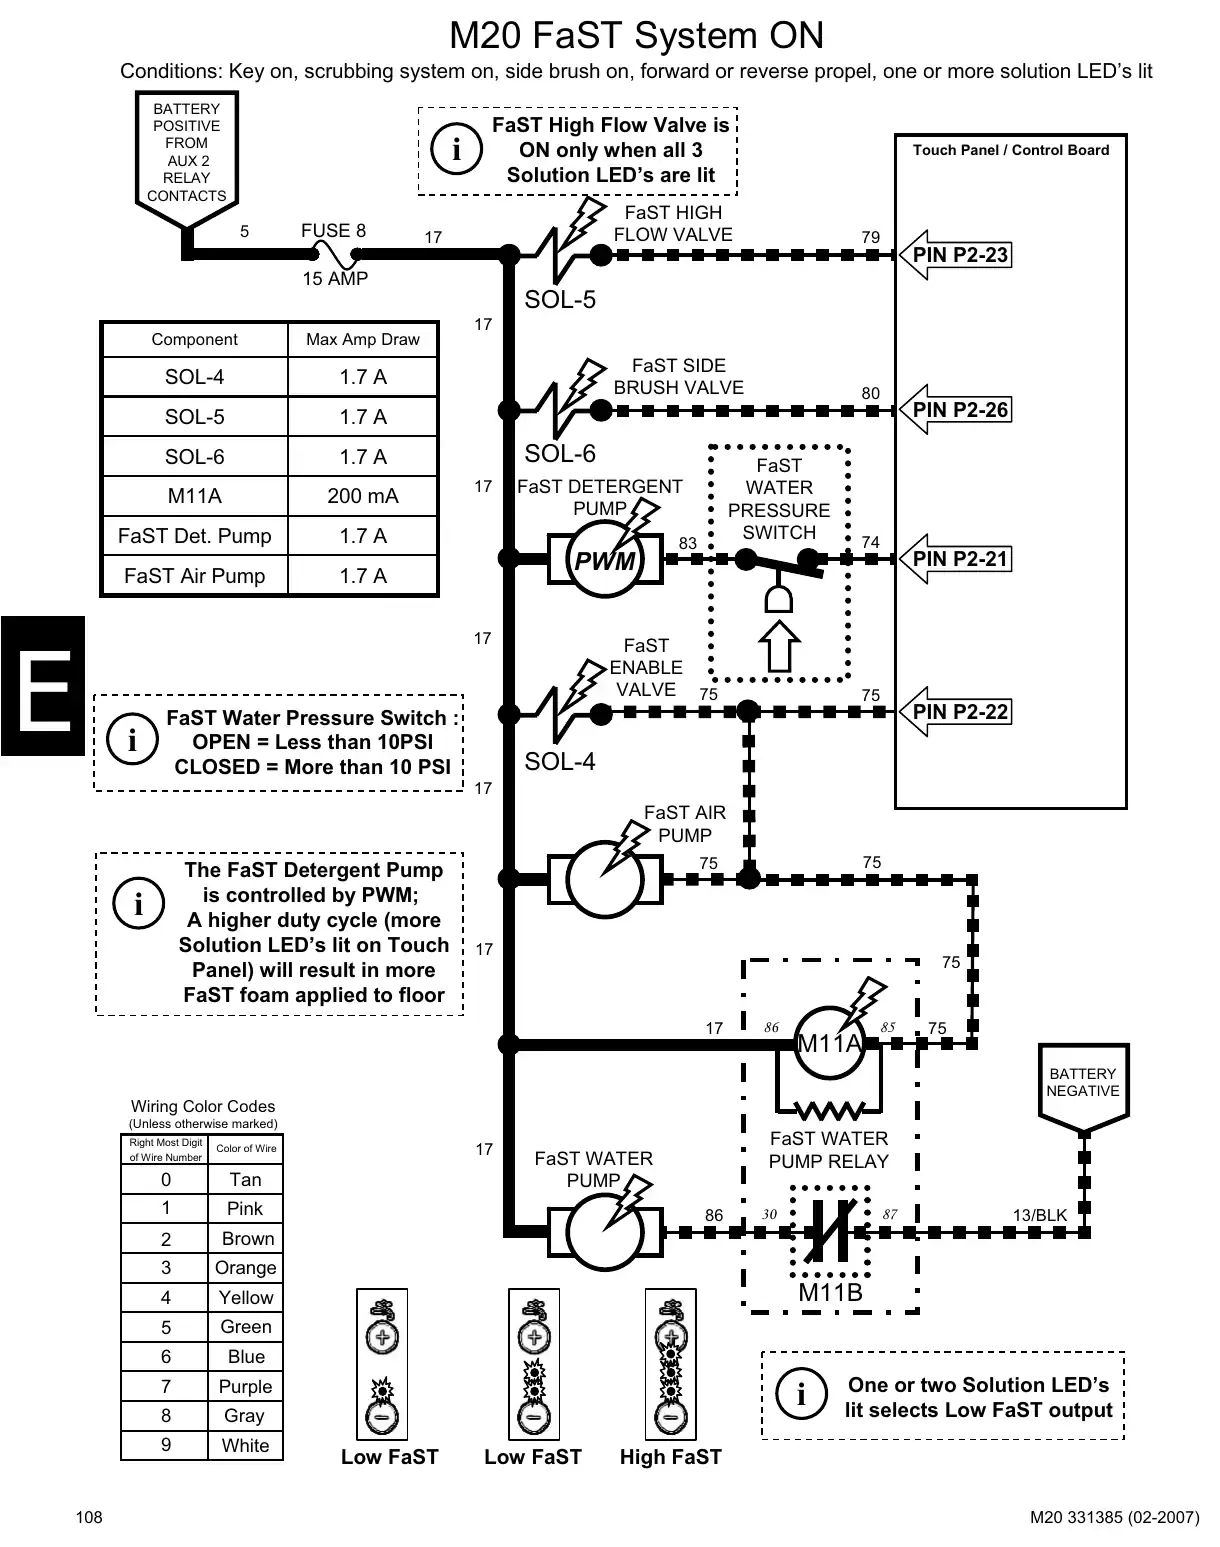
Text of manual page 108
M20 FaST System ON
Conditions: Key on, scrubbing system on, side brush on, forward or reverse propel, one or more solution LED's lit
BATTERY
POSITIVE
FROM
AUX 2
RELAY
CONTACTS
FaST High Flow Valve is
ON only when all 3
Solution LED's are lit
i
5
FUSE 8
Touch Panel / Control Board
FaST HIGH
FLOW VALVE
17
79
PIN P2-23
15 AMP
SOL-5
Component
Max Amp Draw
SOL-4
1.7 A
SOL-5
1.7 A
SOL-6
1.7 A
M11A
200 mA
FaST Det. Pump
1.7 A
FaST Air Pump
17
FaST SIDE
BRUSH VALVE
SOL-6
17
1.7 A
17
i
FaST Water Pressure Switch :
OPEN = Less than 10PSI
CLOSED = More than 10 PSI
FaST
WATER
PRESSURE
SWITCH
FaST DETERGENT
PUMP
83
PWM
80
FaST
ENABLE
VALVE 75
PIN P2-26
74
PIN P2-21
75
PIN P2-22
SOL-4
17
FaST AIR
PUMP
The FaST Detergent Pump
is controlled by PWM;
A higher duty cycle (more
Solution LED's lit on Touch
Panel) will result in more
FaST foam applied to floor
i
75
75
17
75
17
86
M11A
85
75
BATTERY
NEGATIVE
Wiring Color Codes
(Unless otherwise marked)
Right Most Digit
of Wire Number
108
17
Color of Wire
Tan
0
1
Pink
2
Brown
3
Orange
4
Yellow
5
Green
6
Blue
7
Purple
8
Gray
9
White
FaST WATER
PUMP RELAY
FaST WATER
PUMP
86
30
87
13/BLK
M11B
i
Low FaST
Low FaST
One or two Solution LED's
lit selects Low FaST output
High FaST
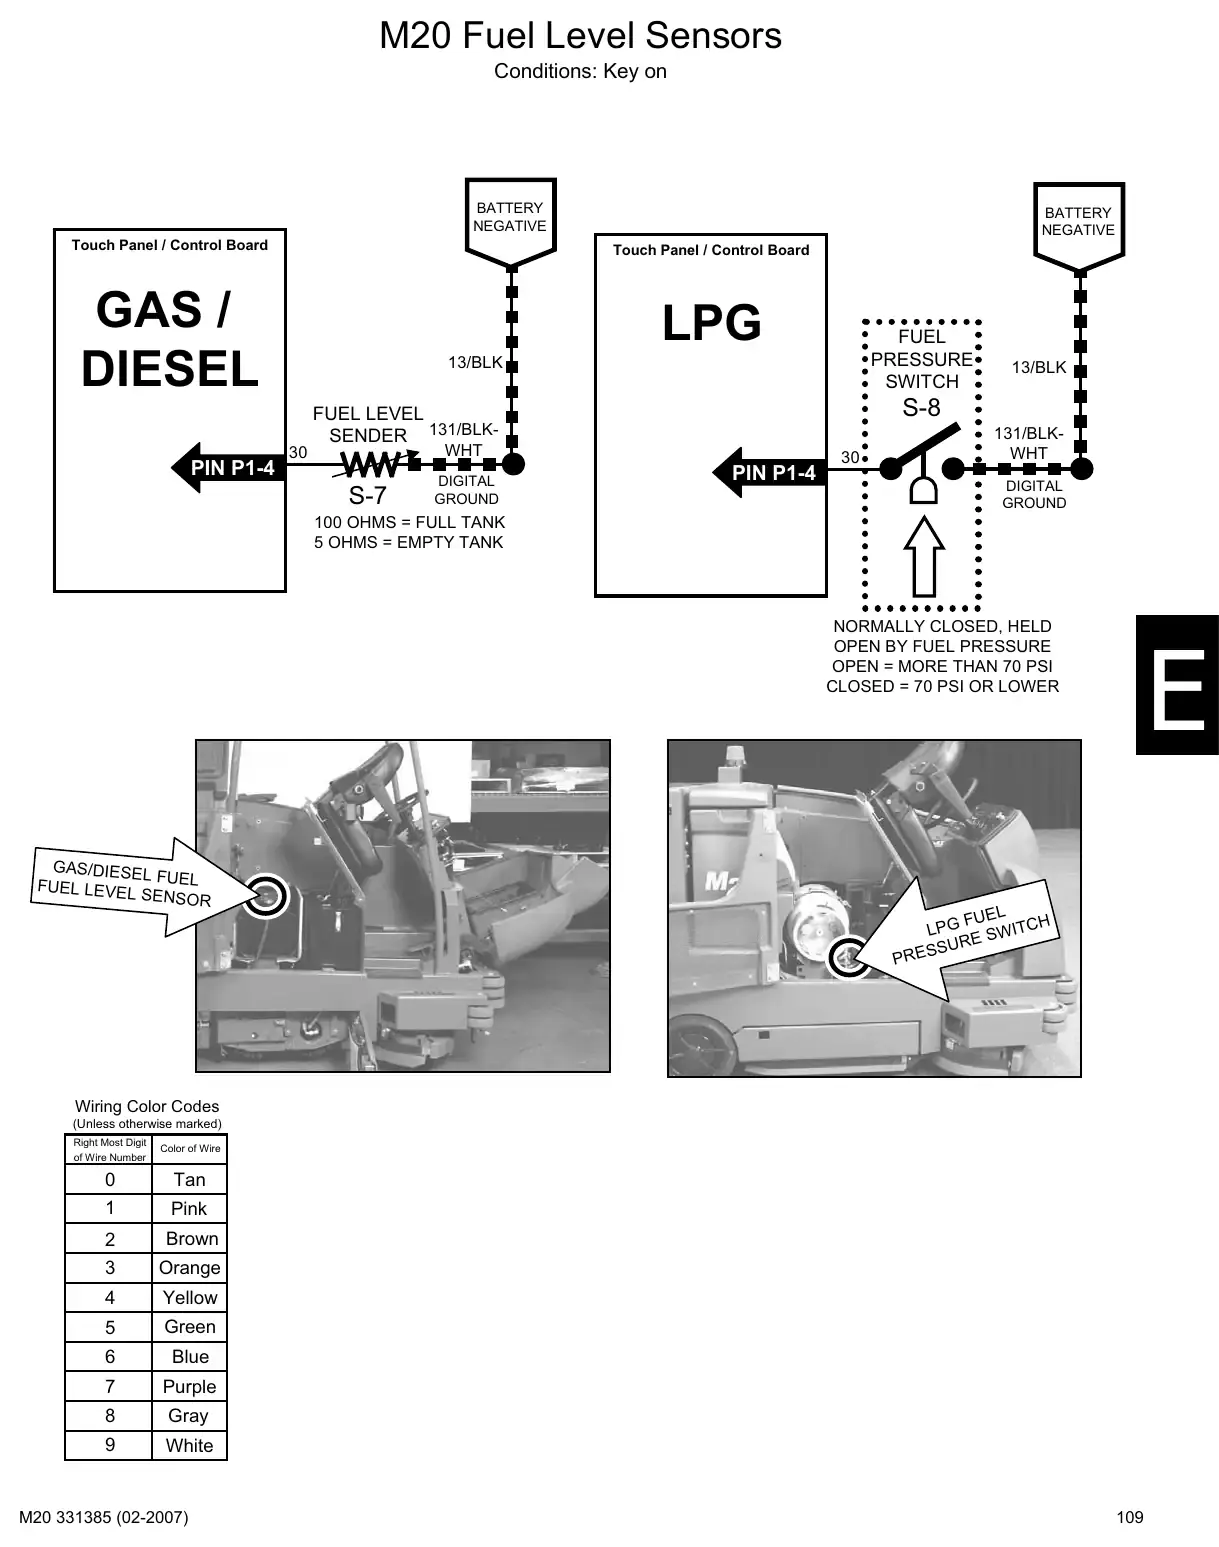
Text of manual page 109
M20 Fuel Level Sensors
Conditions: Key on
BATTERY
NEGATIVE
Touch Panel / Control Board
BATTERY
NEGATIVE
Touch Panel / Control Board
GAS /
DIESEL
LPG
FUEL
PRESSURE
SWITCH
13/BLK
S-8
FUEL LEVEL
SENDER 131/BLK-
PIN P1-4
WHT
30
S-7
DIGITAL
GROUND
13/BLK
PIN P1-4
131/BLKWHT
30
S-8
DIGITAL
GROUND
100 OHMS = FULL TANK
5 OHMS = EMPTY TANK
NORMALLY CLOSED, HELD
OPEN BY FUEL PRESSURE
OPEN = MORE THAN 70 PSI
CLOSED = 70 PSI OR LOWER
GAS/DIESEL
FUEL
FUEL LEVEL
SENSOR
FUEL TCH
LPG
E SW
SSU
PRE
Wiring Color Codes
(Unless otherwise marked)
Right Most Digit
of Wire Number
Color of Wire
Tan
0
1
Pink
2
Brown
3
Orange
4
Yellow
5
Green
6
Blue
7
Purple
8
Gray
9
White
109
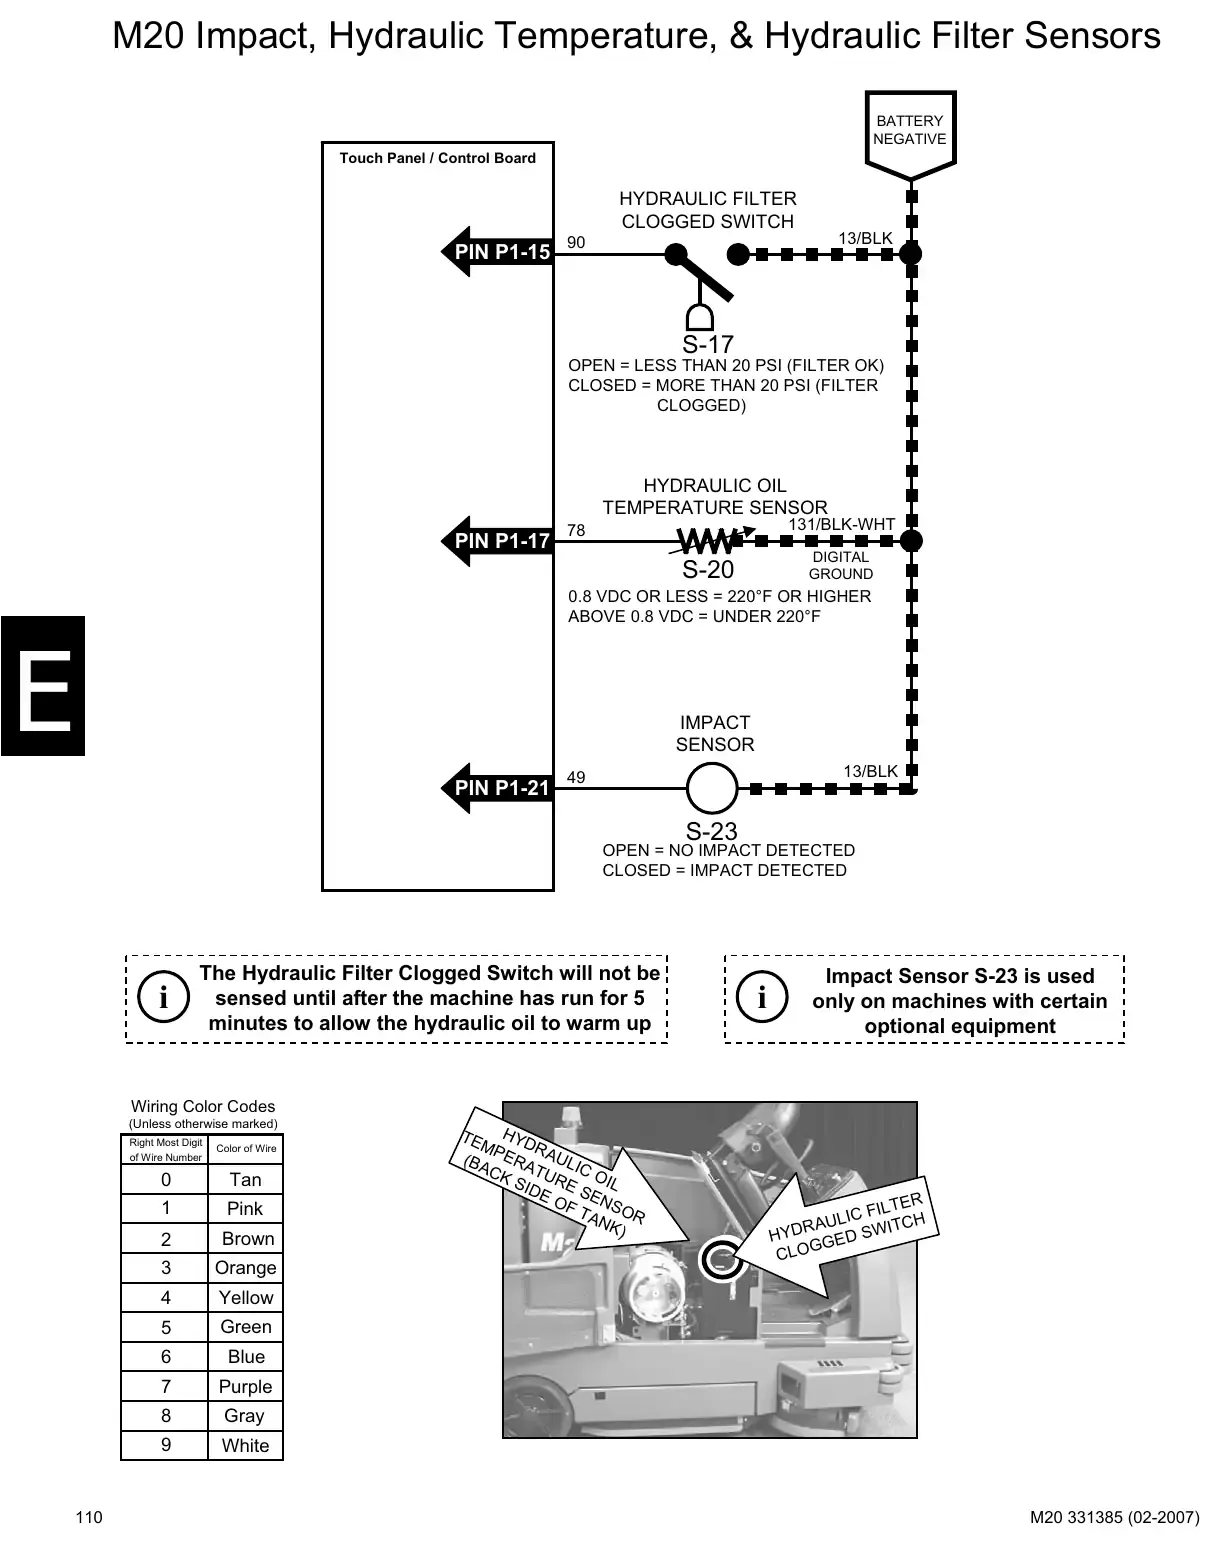
Text of manual page 110
M20 Impact, Hydraulic Temperature, & Hydraulic Filter Sensors
BATTERY
NEGATIVE
Touch Panel / Control Board
HYDRAULIC FILTER
CLOGGED SWITCH
PIN P1-15
13/BLK
90
S-17
OPEN = LESS THAN 20 PSI (FILTER OK)
CLOSED = MORE THAN 20 PSI (FILTER
CLOGGED)
HYDRAULIC OIL
TEMPERATURE SENSOR
PIN P1-17
131/BLK-WHT
78
DIGITAL
GROUND
S-20
0.8 VDC OR LESS = 220?F OR HIGHER
ABOVE 0.8 VDC = UNDER 220?F
IMPACT
SENSOR
PIN P1-21
13/BLK
49
S-23
OPEN = NO IMPACT DETECTED
CLOSED = IMPACT DETECTED
i
The Hydraulic Filter Clogged Switch will not be
sensed until after the machine has run for 5
minutes to allow the hydraulic oil to warm up
i
Impact Sensor S-23 is used
only on machines with certain
optional equipment
Wiring Color Codes
(Unless otherwise marked)
Right Most Digit
of Wire Number
110
Color of Wire
Tan
0
1
Pink
2
Brown
3
Orange
4
Yellow
5
Green
6
Blue
7
Purple
8
Gray
9
White
TE HYD
MP
(BA ERA AULI
CK TUR C O
IL
SID
E O SEN
F T SO
AN R
K)
I L TE
LIC F ITCH
HYD GED SW
CLO
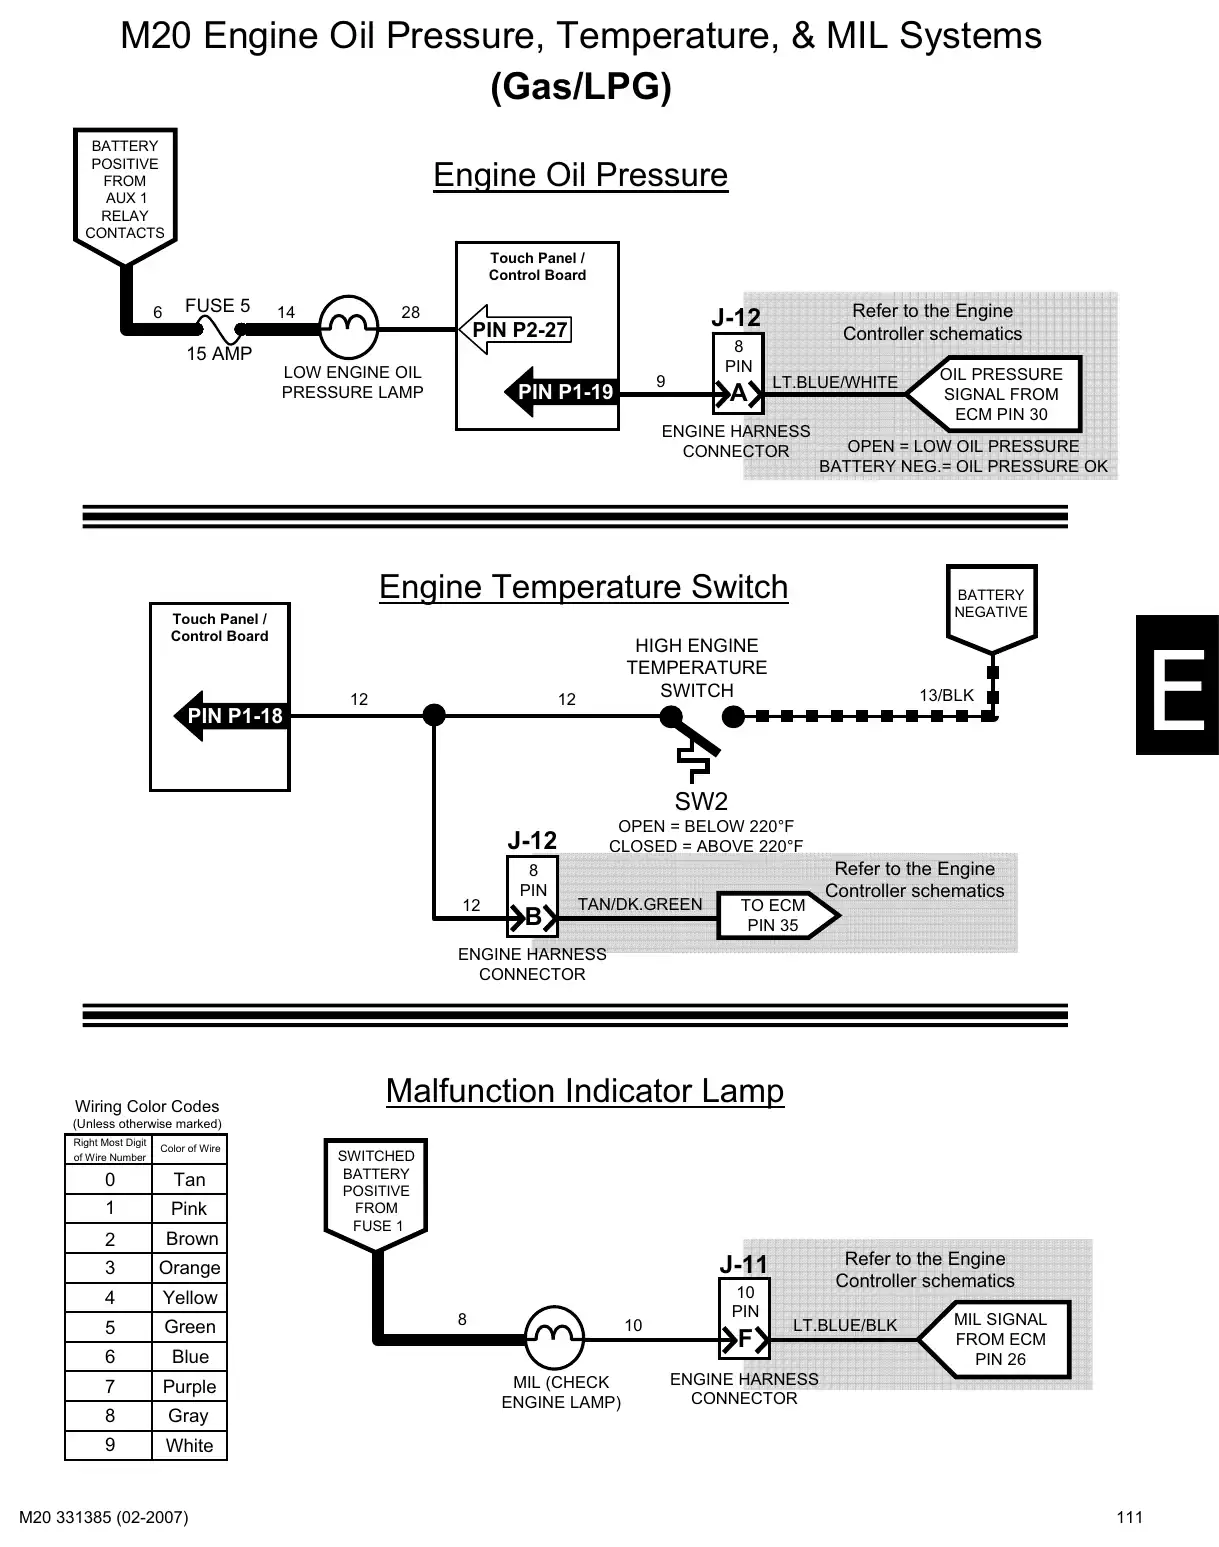
Text of manual page 111
M20 Engine Oil Pressure, Temperature, & MIL Systems
(Gas/LPG)
BATTERY
POSITIVE
FROM
AUX 1
RELAY
CONTACTS
Engine Oil Pressure
Touch Panel /
Control Board
6
FUSE 5
14
28
8
PIN
15 AMP
LOW ENGINE OIL
PRESSURE LAMP
Refer to the Engine
Controller schematics
J-12
PIN P2-27
9
PIN P1-19
LT.BLUE/WHITE
ENGINE HARNESS
CONNECTOR
OPEN = LOW OIL PRESSURE
BATTERY NEG.= OIL PRESSURE OK
Engine Temperature Switch
Touch Panel /
Control Board
PIN P1-18
12
BATTERY
NEGATIVE
HIGH ENGINE
TEMPERATURE
SWITCH
12
OIL PRESSURE
SIGNAL FROM
ECM PIN 30
13/BLK
SW2
OPEN = BELOW 220?F
CLOSED = ABOVE 220?F
J-12
12
8
PIN
TAN/DK.GREEN
TO ECM
PIN 35
Refer to the Engine
Controller schematics
ENGINE HARNESS
CONNECTOR
Wiring Color Codes
Malfunction Indicator Lamp
(Unless otherwise marked)
Right Most Digit
of Wire Number
Color of Wire
Tan
SWITCHED
BATTERY
POSITIVE
FROM
FUSE 1
0
1
Pink
2
Brown
3
Orange
J-11
4
Yellow
5
Green
10
PIN
6
Blue
7
Purple
8
Gray
9
White
8
10
MIL (CHECK
ENGINE LAMP)
Refer to the Engine
Controller schematics
LT.BLUE/BLK
MIL SIGNAL
FROM ECM
PIN 26
ENGINE HARNESS
CONNECTOR
111
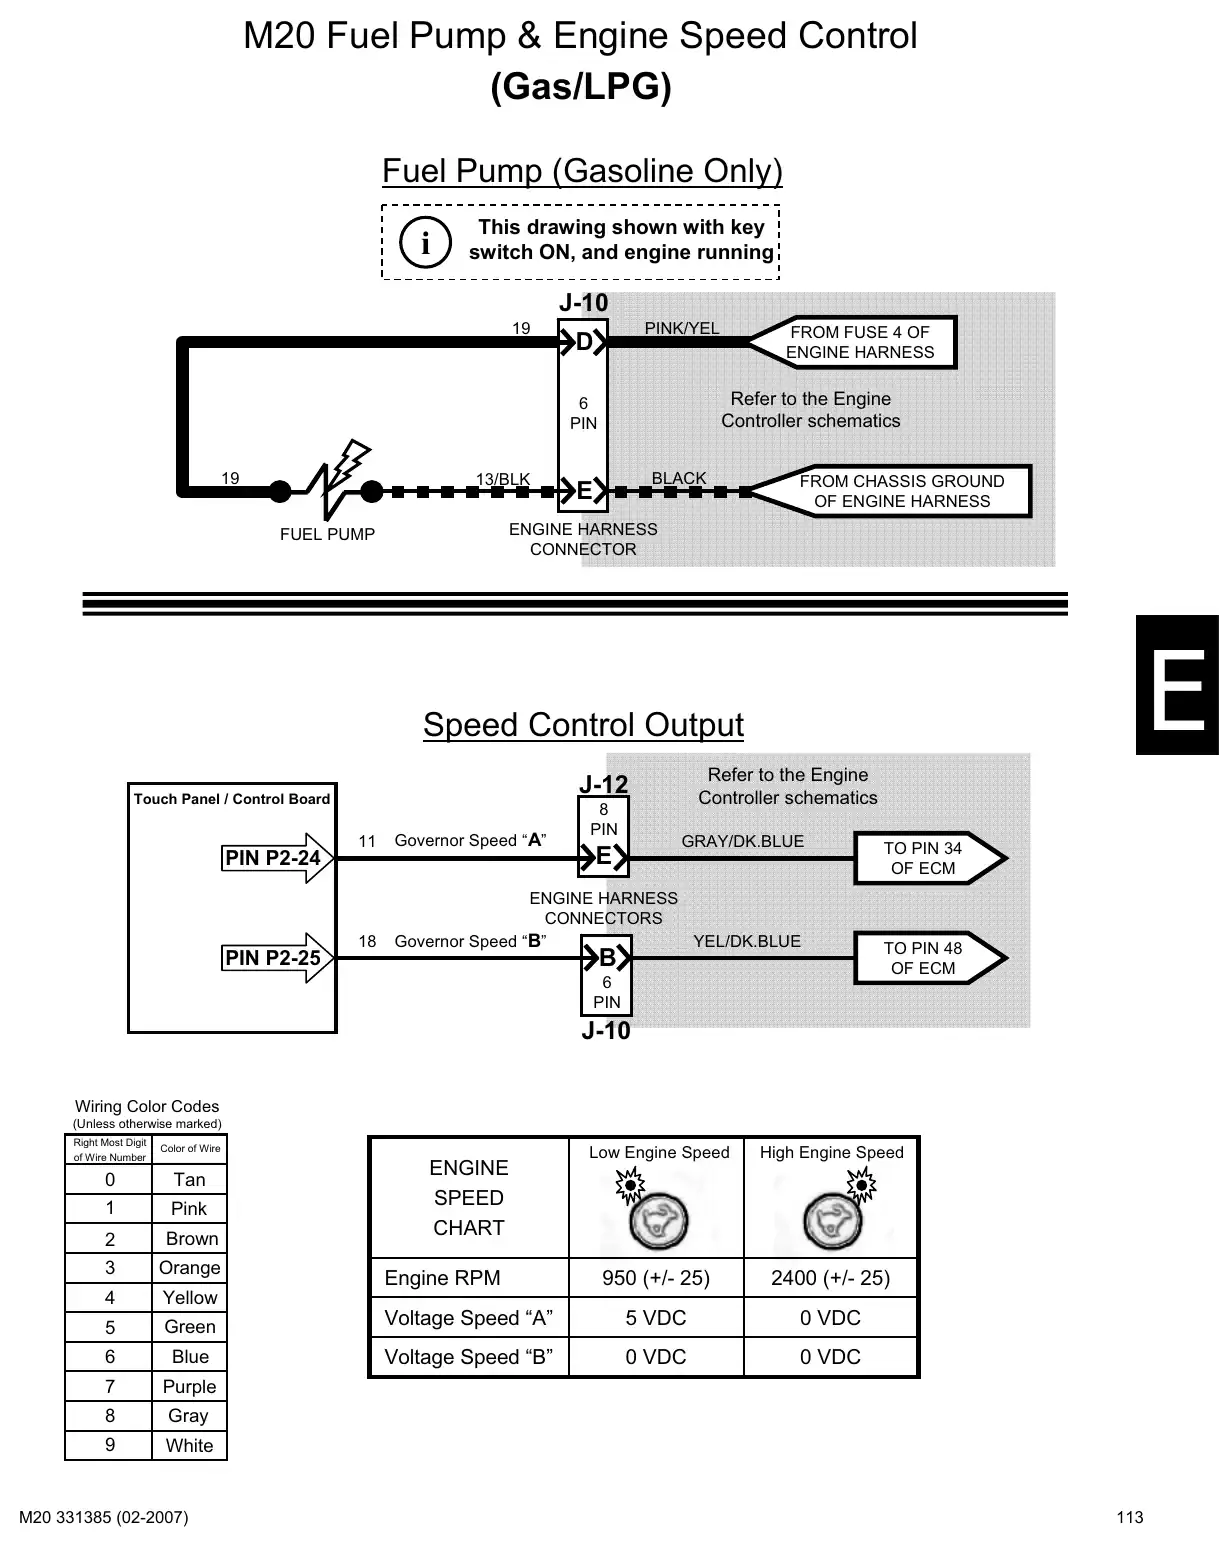
Text of manual page 113
M20 Fuel Pump & Engine Speed Control
(Gas/LPG)
Fuel Pump (Gasoline Only)
i
This drawing shown with key
switch ON, and engine running
J-10
19
PINK/YEL
Refer to the Engine
Controller schematics
6
PIN
19
13/BLK
FROM FUSE 4 OF
ENGINE HARNESS
BLACK
FROM CHASSIS GROUND
OF ENGINE HARNESS
ENGINE HARNESS
CONNECTOR
FUEL PUMP
Speed Control Output
8
PIN
11
Governor Speed "A"
18
ENGINE HARNESS
CONNECTORS
YEL/DK.BLUE
Governor Speed "B"
PIN P2-24
PIN P2-25
Refer to the Engine
Controller schematics
J-12
Touch Panel / Control Board
GRAY/DK.BLUE
6
PIN
TO PIN 34
OF ECM
TO PIN 48
OF ECM
J-10
Wiring Color Codes
(Unless otherwise marked)
Right Most Digit
of Wire Number
Color of Wire
Tan
0
1
Pink
2
Brown
3
Orange
4
Yellow
5
Green
6
Blue
7
Purple
8
Gray
9
White
Low Engine Speed
High Engine Speed
950 (+/- 25)
2400 (+/- 25)
Voltage Speed "A"
5 VDC
0 VDC
Voltage Speed "B"
0 VDC
0 VDC
ENGINE
SPEED
CHART
Engine RPM
113
Enable/disable chartPages 116–117 · 2 pages
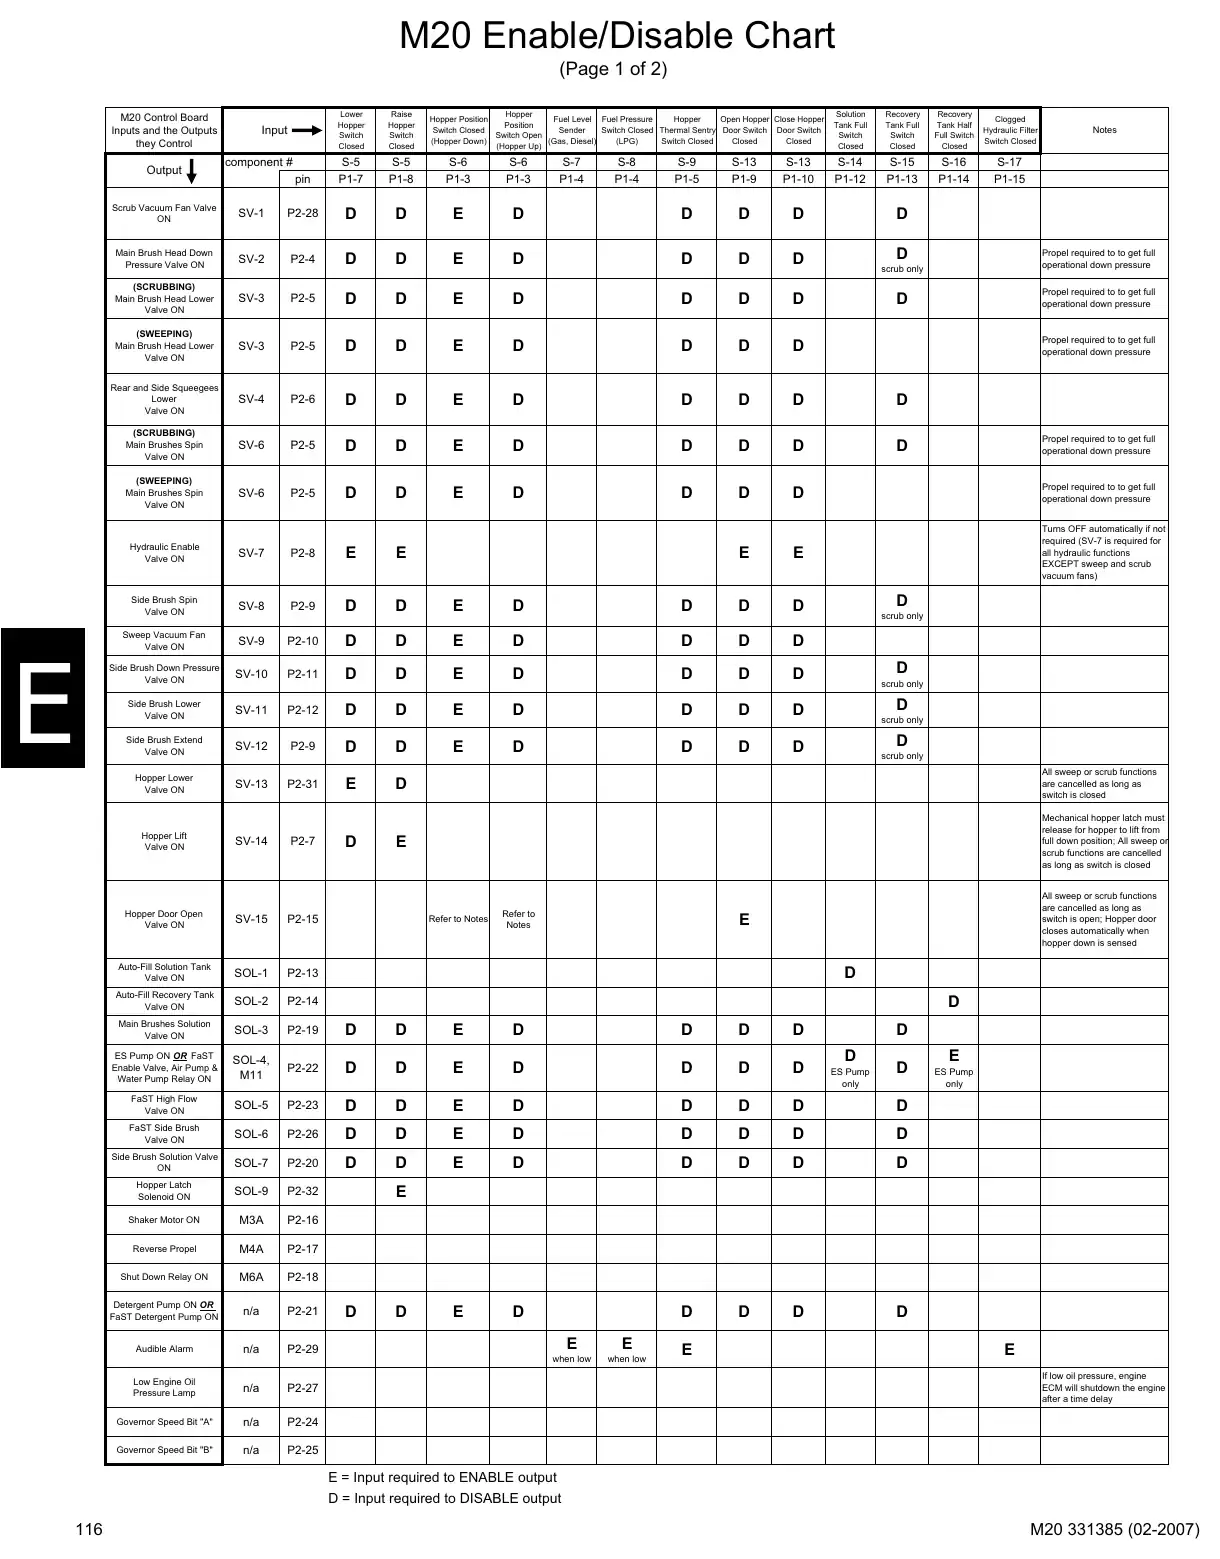
Text of manual page 116
M20 Enable/Disable Chart
(Page 1 of 2)
M20 Control Board
Inputs and the Outputs
they Control
Output
Lower
Hopper
Switch
Closed
Raise
Hopper
Switch
Closed
pin
S-5
P1-7
S-5
P1-8
S-6
P1-3
S-6
P1-3
Input
component #
Hopper
Hopper Position
Fuel Level Fuel Pressure
Hopper
Open Hopper Close Hopper
Position
Switch Closed
Sender
Switch Closed Thermal Sentry Door Switch Door Switch
Switch Open
Closed
(Hopper Down)
(Gas, Diesel)
(LPG)
Switch Closed
Closed
(Hopper Up)
S-7
P1-4
S-8
P1-4
S-9
P1-5
S-13
P1-9
S-13
P1-10
Solution
Tank Full
Switch
Closed
Recovery
Tank Full
Switch
Closed
Recovery
Tank Half
Full Switch
Closed
Clogged
Hydraulic Filter
Switch Closed
S-14
P1-12
S-15
P1-13
S-16
P1-14
S-17
P1-15
Notes
Scrub Vacuum Fan Valve
ON
SV-1
P2-28
Main Brush Head Down
Pressure Valve ON
SV-2
P2-4
(SCRUBBING)
Main Brush Head Lower
Valve ON
SV-3
P2-5
(SWEEPING)
Main Brush Head Lower
Valve ON
SV-3
P2-5
Rear and Side Squeegees
Lower
Valve ON
SV-4
P2-6
(SCRUBBING)
Main Brushes Spin
Valve ON
SV-6
P2-5
(SWEEPING)
Main Brushes Spin
Valve ON
SV-6
P2-5
Propel required to to get full
operational down pressure
Hydraulic Enable
Valve ON
SV-7
P2-8
Turns OFF automatically if not
required (SV-7 is required for
all hydraulic functions
EXCEPT sweep and scrub
vacuum fans)
Side Brush Spin
Valve ON
SV-8
P2-9
Sweep Vacuum Fan
Valve ON
SV-9
P2-10
Side Brush Down Pressure
Valve ON
SV-10
P2-11
Side Brush Lower
Valve ON
SV-11
Side Brush Extend
Valve ON
SV-12
Hopper Lower
Valve ON
SV-13
P2-31
All sweep or scrub functions
are cancelled as long as
switch is closed
Hopper Lift
Valve ON
SV-14
P2-7
Mechanical hopper latch must
release for hopper to lift from
full down position; All sweep or
scrub functions are cancelled
as long as switch is closed
Hopper Door Open
Valve ON
SV-15
P2-15
P2-12
P2-9
Refer to Notes
Refer to
Notes
scrub only
Propel required to to get full
operational down pressure
Propel required to to get full
operational down pressure
Propel required to to get full
operational down pressure
scrub only
scrub only
scrub only
scrub only
All sweep or scrub functions
are cancelled as long as
switch is open; Hopper door
closes automatically when
hopper down is sensed
Auto-Fill Solution Tank
Valve ON
SOL-1
P2-13
Auto-Fill Recovery Tank
Valve ON
SOL-2
P2-14
Main Brushes Solution
Valve ON
SOL-3
P2-19
ES Pump ON OR FaST
Enable Valve, Air Pump &
Water Pump Relay ON
SOL-4,
M11
P2-22
FaST High Flow
Valve ON
SOL-5
P2-23
FaST Side Brush
Valve ON
SOL-6
P2-26
Side Brush Solution Valve
ON
SOL-7
P2-20
Hopper Latch
Solenoid ON
SOL-9
P2-32
Shaker Motor ON
M3A
P2-16
Reverse Propel
M4A
P2-17
Shut Down Relay ON
M6A
P2-18
Detergent Pump ON OR
FaST Detergent Pump ON
n/a
P2-21
Audible Alarm
n/a
P2-29
Low Engine Oil
Pressure Lamp
n/a
P2-27
Governor Speed Bit "A"
n/a
P2-24
Governor Speed Bit "B"
n/a
P2-25
Propel required to to get full
operational down pressure
ES Pump
only
ES Pump
only
when low
when low
If low oil pressure, engine
ECM will shutdown the engine
after a time delay
E = Input required to ENABLE output
D = Input required to DISABLE output
116
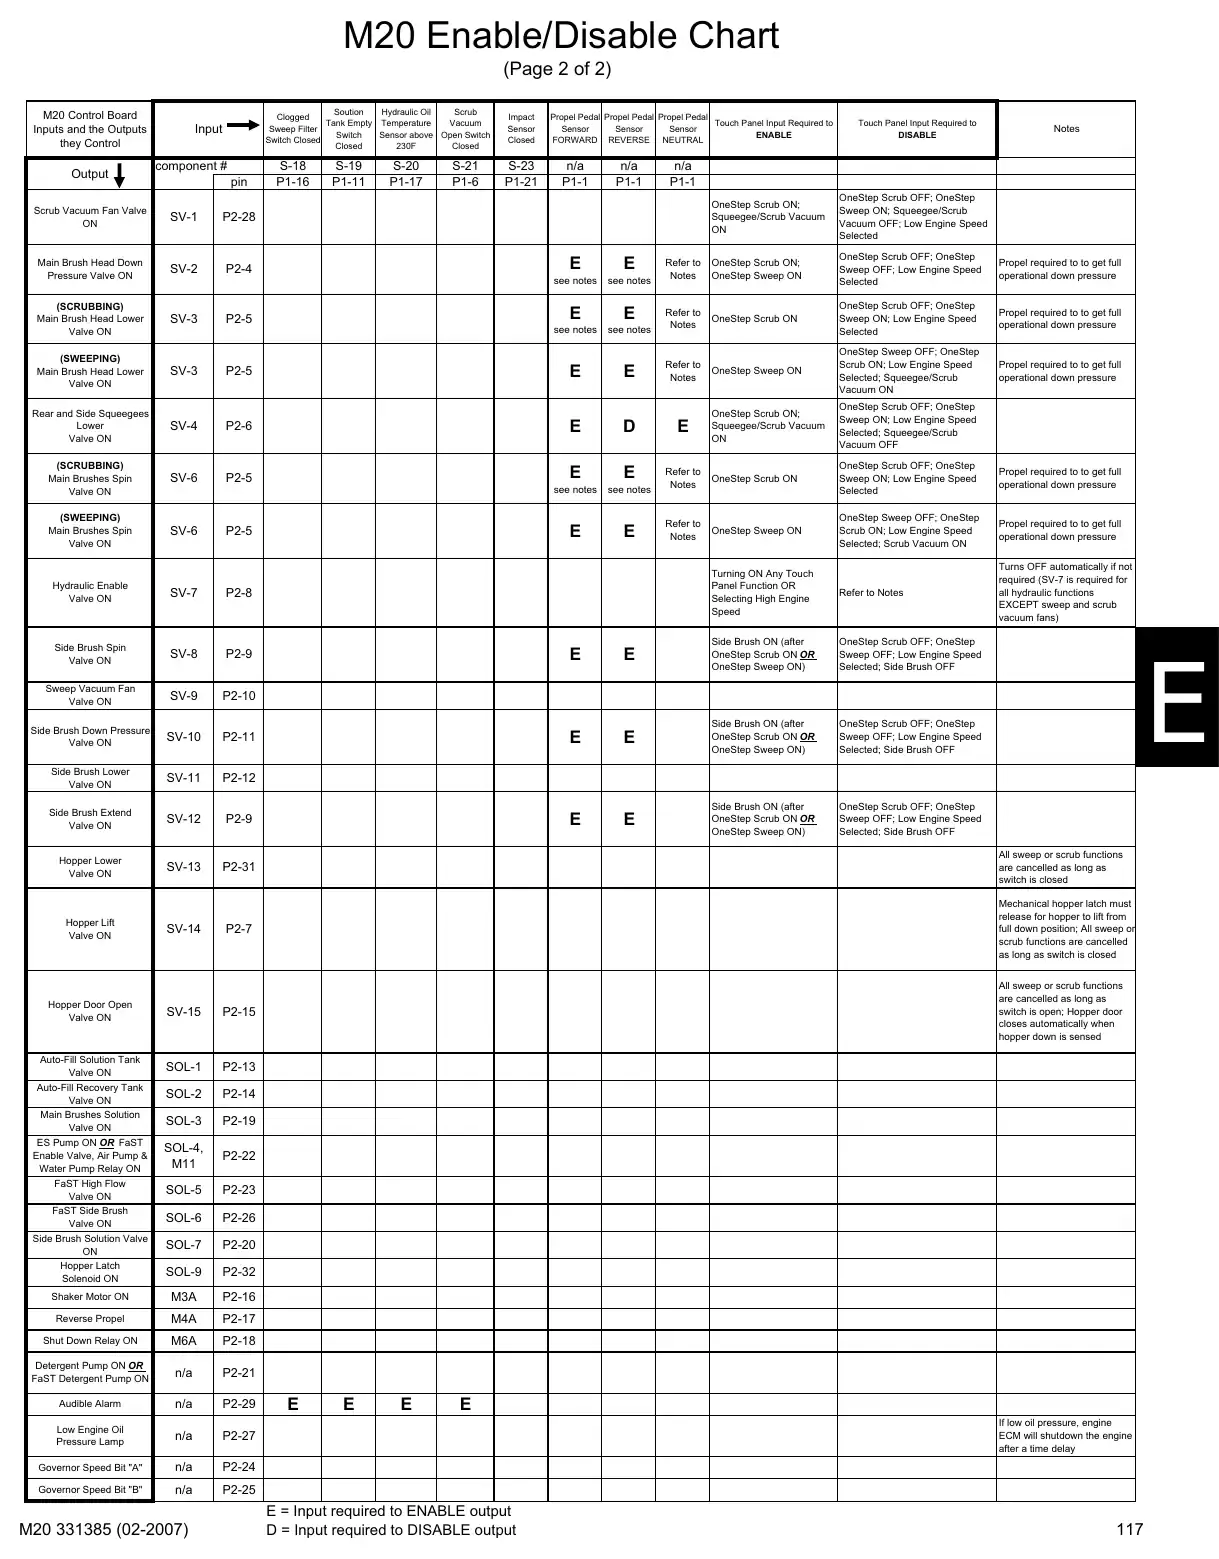
Text of manual page 117
M20 Enable/Disable Chart
(Page 2 of 2)
M20 Control Board
Inputs and the Outputs
they Control
Output
Soution
Hydraulic Oil
Scrub
Clogged
Tank Empty Temperature
Vacuum
Sweep Filter
Switch
Sensor above Open Switch
Switch Closed
Closed
230F
Closed
Input
component #
pin
Scrub Vacuum Fan Valve
ON
SV-1
P2-28
Main Brush Head Down
Pressure Valve ON
SV-2
P2-4
(SCRUBBING)
Main Brush Head Lower
Valve ON
SV-3
(SWEEPING)
Main Brush Head Lower
Valve ON
SV-3
Rear and Side Squeegees
Lower
Valve ON
S-18
P1-16
S-19
P1-11
S-20
P1-17
S-21
P1-6
Impact
Sensor
Closed
S-23
P1-21
Propel Pedal Propel Pedal Propel Pedal
Touch Panel Input Required to
Sensor
Sensor
Sensor
ENABLE
FORWARD REVERSE NEUTRAL
n/a
P1-1
n/a
P1-1
see notes
see notes
Touch Panel Input Required to
DISABLE
Notes
n/a
P1-1
OneStep Scrub ON;
Squeegee/Scrub Vacuum
ON
OneStep Scrub OFF; OneStep
Sweep ON; Squeegee/Scrub
Vacuum OFF; Low Engine Speed
Selected
Refer to
Notes
OneStep Scrub ON;
OneStep Sweep ON
OneStep Scrub OFF; OneStep
Sweep OFF; Low Engine Speed
Selected
Propel required to to get full
operational down pressure
see notes
Refer to
Notes
OneStep Scrub ON
see notes
OneStep Scrub OFF; OneStep
Sweep ON; Low Engine Speed
Selected
Propel required to to get full
operational down pressure
P2-5
Refer to
Notes
OneStep Sweep ON
OneStep Sweep OFF; OneStep
Scrub ON; Low Engine Speed
Selected; Squeegee/Scrub
Vacuum ON
Propel required to to get full
operational down pressure
SV-4
P2-6
OneStep Scrub ON;
Squeegee/Scrub Vacuum
ON
OneStep Scrub OFF; OneStep
Sweep ON; Low Engine Speed
Selected; Squeegee/Scrub
Vacuum OFF
(SCRUBBING)
Main Brushes Spin
Valve ON
SV-6
P2-5
(SWEEPING)
Main Brushes Spin
Valve ON
SV-6
P2-5
Hydraulic Enable
Valve ON
SV-7
P2-8
Side Brush Spin
Valve ON
SV-8
P2-9
Sweep Vacuum Fan
Valve ON
SV-9
P2-10
Side Brush Down Pressure
Valve ON
SV-10
P2-11
Side Brush Lower
Valve ON
SV-11
P2-12
Side Brush Extend
Valve ON
SV-12
P2-9
Hopper Lower
Valve ON
SV-13
P2-31
All sweep or scrub functions
are cancelled as long as
switch is closed
Hopper Lift
Valve ON
SV-14
P2-7
Mechanical hopper latch must
release for hopper to lift from
full down position; All sweep or
scrub functions are cancelled
as long as switch is closed
Hopper Door Open
Valve ON
SV-15
P2-15
All sweep or scrub functions
are cancelled as long as
switch is open; Hopper door
closes automatically when
hopper down is sensed
SOL-1
P2-13
SOL-2
P2-14
SOL-3
P2-19
SOL-4,
M11
P2-22
SOL-5
P2-23
SOL-6
P2-26
SOL-7
P2-20
SOL-9
P2-32
Shaker Motor ON
M3A
P2-16
Reverse Propel
M4A
P2-17
Shut Down Relay ON
M6A
P2-18
Detergent Pump ON OR
FaST Detergent Pump ON
n/a
P2-21
Auto-Fill Solution Tank
Valve ON
Auto-Fill Recovery Tank
Valve ON
Main Brushes Solution
Valve ON
ES Pump ON OR FaST
Enable Valve, Air Pump &
Water Pump Relay ON
FaST High Flow
Valve ON
FaST Side Brush
Valve ON
Side Brush Solution Valve
ON
Hopper Latch
Solenoid ON
P2-5
Audible Alarm
n/a
P2-29
Low Engine Oil
Pressure Lamp
n/a
P2-27
Governor Speed Bit "A"
n/a
P2-24
Governor Speed Bit "B"
n/a
P2-25
see notes
Refer to
Notes
OneStep Scrub ON
see notes
OneStep Scrub OFF; OneStep
Sweep ON; Low Engine Speed
Selected
Propel required to to get full
operational down pressure
Refer to
Notes
OneStep Sweep ON
OneStep Sweep OFF; OneStep
Scrub ON; Low Engine Speed
Selected; Scrub Vacuum ON
Propel required to to get full
operational down pressure
Turning ON Any Touch
Panel Function OR
Selecting High Engine
Speed
Refer to Notes
Turns OFF automatically if not
required (SV-7 is required for
all hydraulic functions
EXCEPT sweep and scrub
vacuum fans)
Side Brush ON (after
OneStep Scrub ON OR
OneStep Sweep ON)
OneStep Scrub OFF; OneStep
Sweep OFF; Low Engine Speed
Selected; Side Brush OFF
Side Brush ON (after
OneStep Scrub ON OR
OneStep Sweep ON)
OneStep Scrub OFF; OneStep
Sweep OFF; Low Engine Speed
Selected; Side Brush OFF
Side Brush ON (after
OneStep Scrub ON OR
OneStep Sweep ON)
OneStep Scrub OFF; OneStep
Sweep OFF; Low Engine Speed
Selected; Side Brush OFF
If low oil pressure, engine
ECM will shutdown the engine
after a time delay
E = Input required to ENABLE output
D = Input required to DISABLE output
117
Control board connectorsPage 118 · 1 page
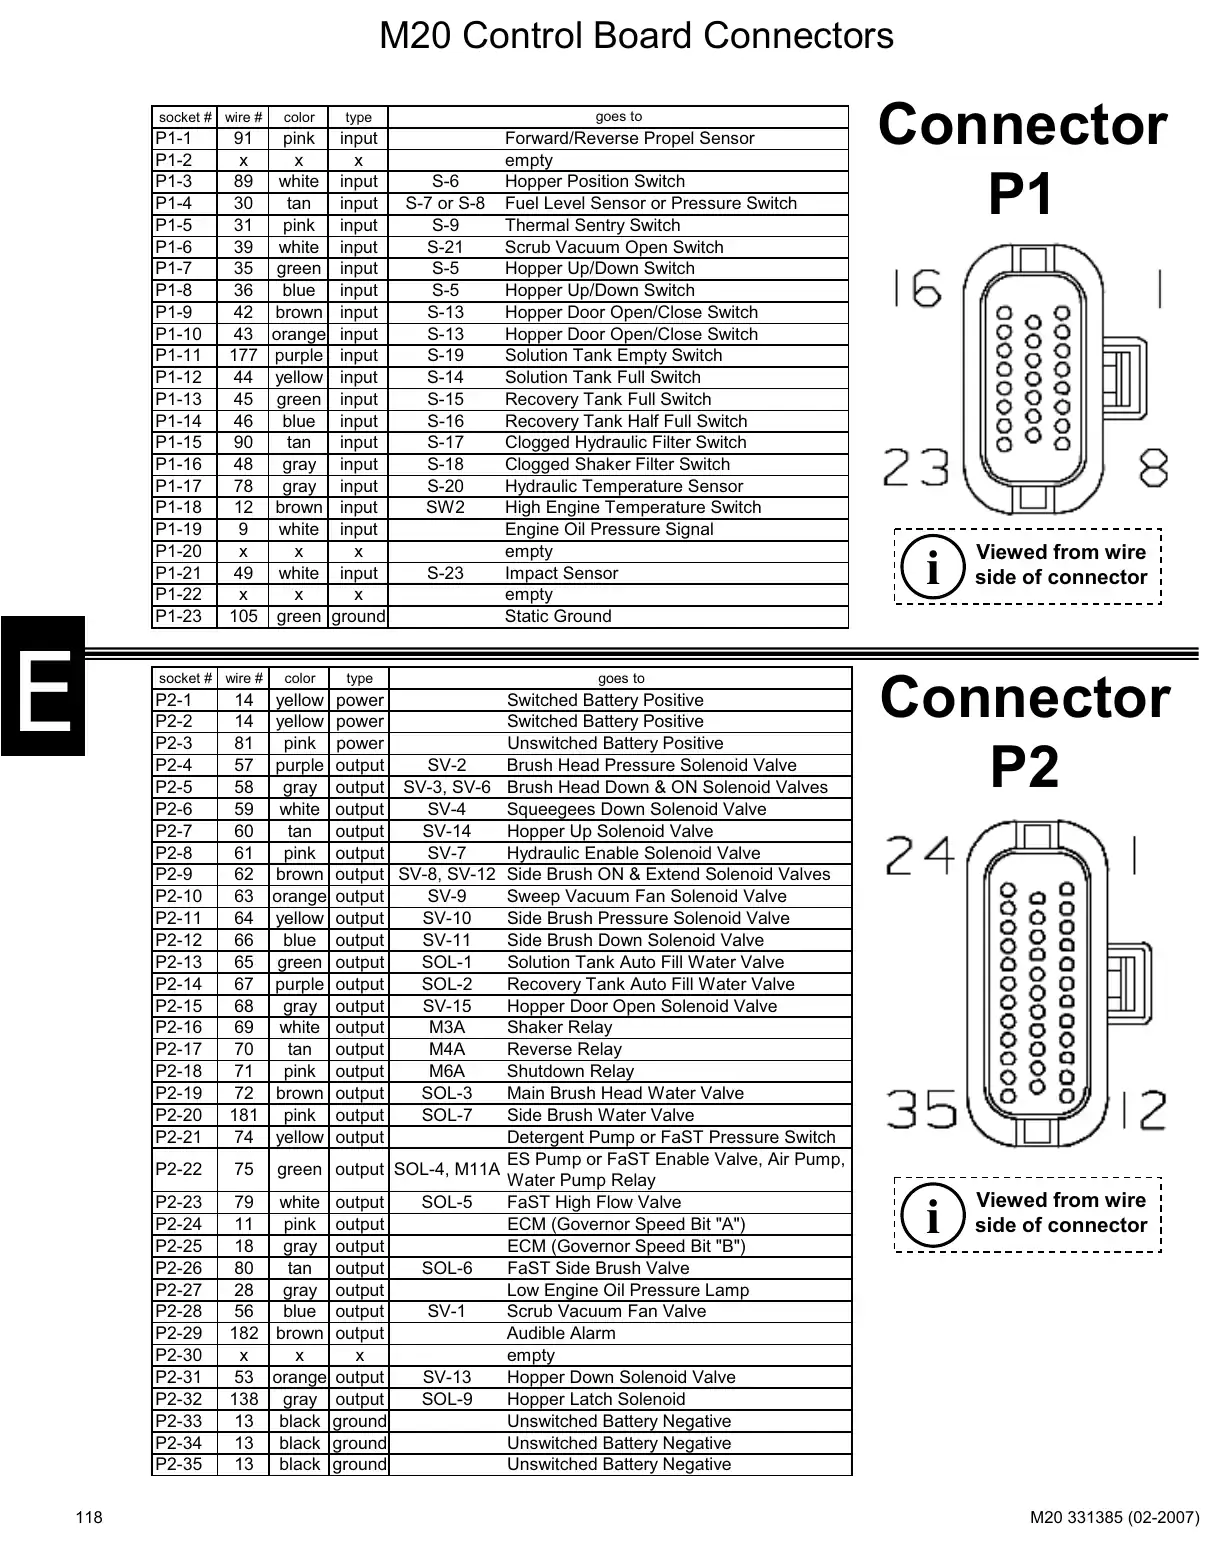
Text of manual page 118
M20 Control Board Connectors
socket # wire #
P1-1
P1-2
P1-3
P1-4
P1-5
P1-6
P1-7
P1-8
P1-9
P1-10
P1-11
P1-12
P1-13
P1-14
P1-15
P1-16
P1-17
P1-18
P1-19
P1-20
P1-21
P1-22
P1-23
91
x
89
30
31
39
35
36
42
43
177
44
45
46
90
48
78
12
9
x
49
x
105
socket # wire #
P2-1
P2-2
P2-3
P2-4
P2-5
P2-6
P2-7
P2-8
P2-9
P2-10
P2-11
P2-12
P2-13
P2-14
P2-15
P2-16
P2-17
P2-18
P2-19
P2-20
P2-21
P2-22
P2-23
P2-24
P2-25
P2-26
P2-27
P2-28
P2-29
P2-30
P2-31
P2-32
P2-33
P2-34
P2-35
118
14
14
81
57
58
59
60
61
62
63
64
66
65
67
68
69
70
71
72
181
74
color
color
goes to
type
pink input
x
x
white input
tan
input
pink input
white input
green input
blue input
brown input
orange input
purple input
yellow input
green input
blue input
tan
input
gray input
gray input
brown input
white input
x
x
white input
x
x
green ground
type
S-6
S-7 or S-8
S-9
S-21
S-5
S-5
S-13
S-13
S-19
S-14
S-15
S-16
S-17
S-18
S-20
SW2
S-23
Forward/Reverse Propel Sensor
empty
Hopper Position Switch
Fuel Level Sensor or Pressure Switch
Thermal Sentry Switch
Scrub Vacuum Open Switch
Hopper Up/Down Switch
Hopper Up/Down Switch
Hopper Door Open/Close Switch
Hopper Door Open/Close Switch
Solution Tank Empty Switch
Solution Tank Full Switch
Recovery Tank Full Switch
Recovery Tank Half Full Switch
Clogged Hydraulic Filter Switch
Clogged Shaker Filter Switch
Hydraulic Temperature Sensor
High Engine Temperature Switch
Engine Oil Pressure Signal
empty
Impact Sensor
empty
Static Ground
goes to
yellow power
Switched Battery Positive
yellow power
Switched Battery Positive
pink power
Unswitched Battery Positive
purple output
SV-2
Brush Head Pressure Solenoid Valve
gray output SV-3, SV-6 Brush Head Down & ON Solenoid Valves
white output
SV-4
Squeegees Down Solenoid Valve
tan output
SV-14
Hopper Up Solenoid Valve
pink output
SV-7
Hydraulic Enable Solenoid Valve
brown output SV-8, SV-12 Side Brush ON & Extend Solenoid Valves
orange output
SV-9
Sweep Vacuum Fan Solenoid Valve
yellow output
SV-10
Side Brush Pressure Solenoid Valve
blue output
SV-11
Side Brush Down Solenoid Valve
green output
SOL-1
Solution Tank Auto Fill Water Valve
purple output
SOL-2
Recovery Tank Auto Fill Water Valve
gray output
SV-15
Hopper Door Open Solenoid Valve
white output
M3A
Shaker Relay
tan output
M4A
Reverse Relay
pink output
M6A
Shutdown Relay
brown output
SOL-3
Main Brush Head Water Valve
pink output
SOL-7
Side Brush Water Valve
yellow output
Detergent Pump or FaST Pressure Switch
ES Pump or FaST Enable Valve, Air Pump,
75 green output SOL-4, M11A
Water Pump Relay
79 white output
SOL-5
FaST High Flow Valve
11
pink output
ECM (Governor Speed Bit "A")
18
gray output
ECM (Governor Speed Bit "B")
80
tan output
SOL-6
FaST Side Brush Valve
28
gray output
Low Engine Oil Pressure Lamp
56
blue output
SV-1
Scrub Vacuum Fan Valve
182 brown output
Audible Alarm
x
x
x
empty
53 orange output
SV-13
Hopper Down Solenoid Valve
138 gray output
SOL-9
Hopper Latch Solenoid
13 black ground
Unswitched Battery Negative
13 black ground
Unswitched Battery Negative
13 black ground
Unswitched Battery Negative
Connector
P1
i side of connector
Viewed from wire
Connector
P2
i side of connector
Viewed from wire
Fault, condition and warning indicatorsPages 119–120 · 2 pages
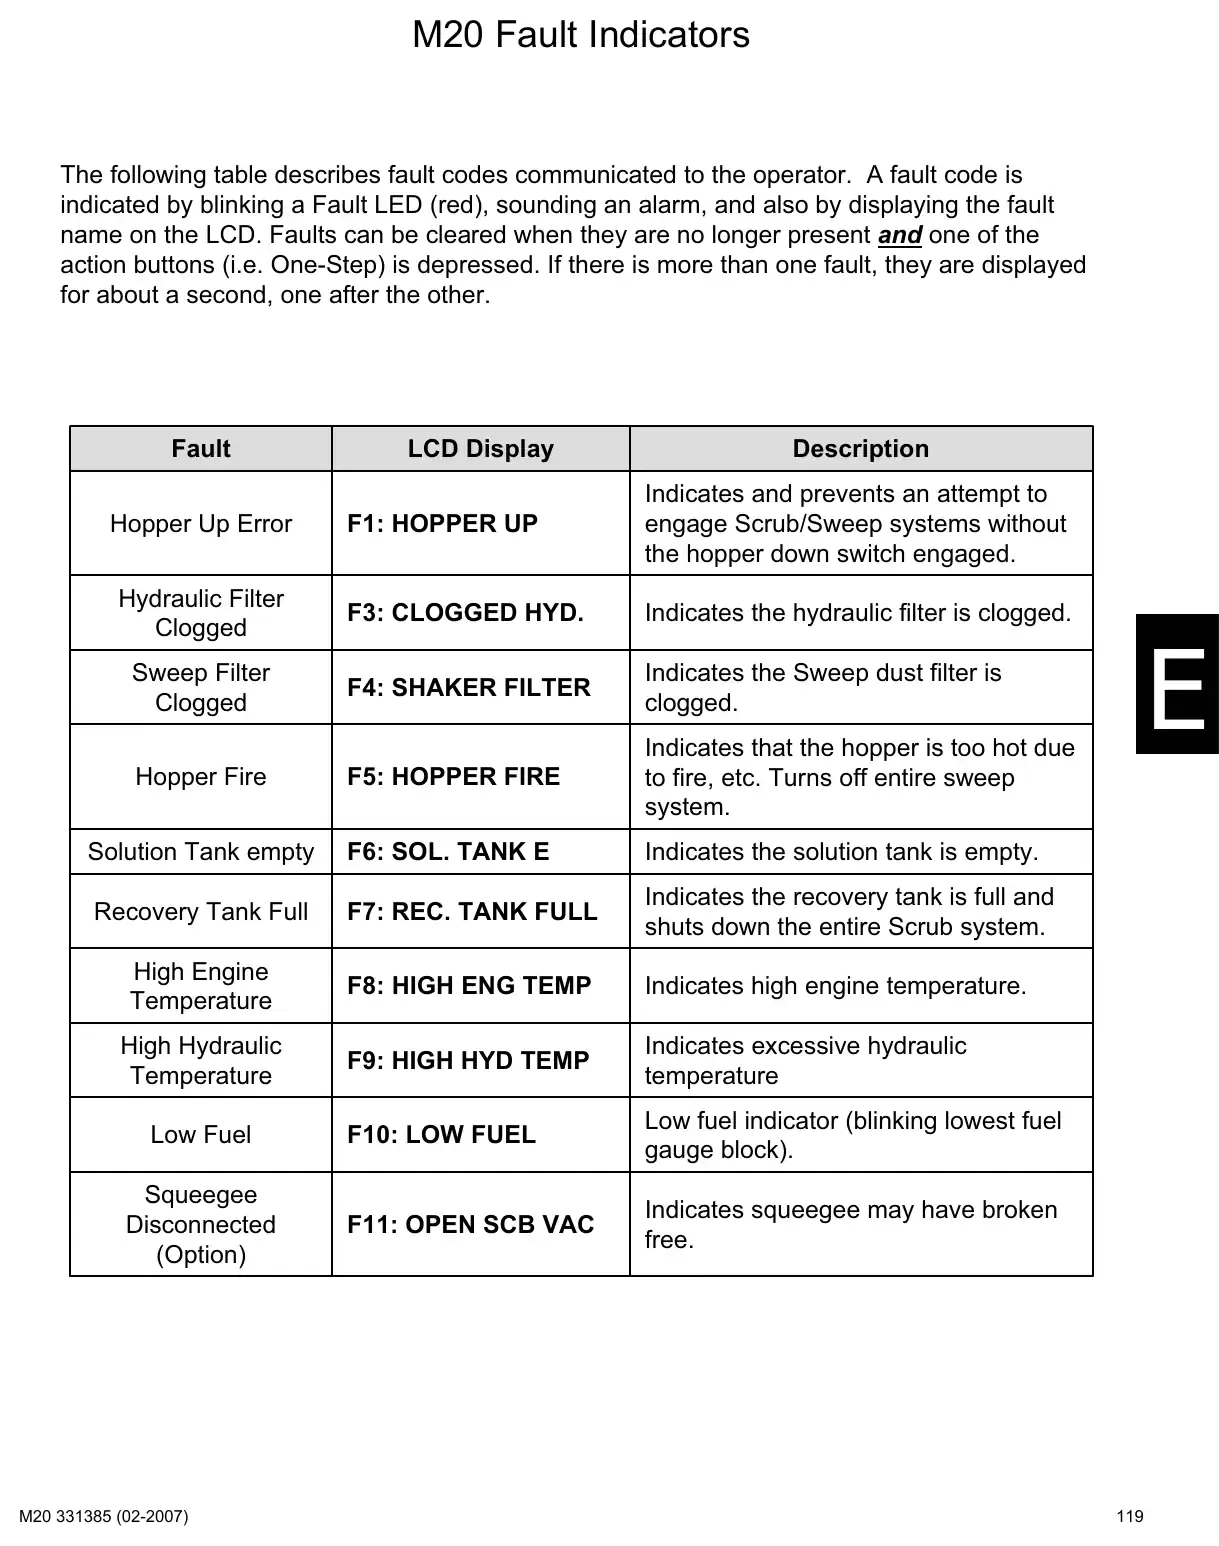
Text of manual page 119
M20 Fault Indicators
The following table describes fault codes communicated to the operator. A fault code is
indicated by blinking a Fault LED (red), sounding an alarm, and also by displaying the fault
name on the LCD. Faults can be cleared when they are no longer present and one of the
action buttons (i.e. One-Step) is depressed. If there is more than one fault, they are displayed
for about a second, one after the other.
Fault
LCD Display
Description
Hopper Up Error
F1: HOPPER UP
Indicates and prevents an attempt to
engage Scrub/Sweep systems without
the hopper down switch engaged.
Hydraulic Filter
Clogged
F3: CLOGGED HYD.
Indicates the hydraulic filter is clogged.
Sweep Filter
Clogged
F4: SHAKER FILTER
Indicates the Sweep dust filter is
clogged.
Hopper Fire
F5: HOPPER FIRE
Indicates that the hopper is too hot due
to fire, etc. Turns off entire sweep
system.
Solution Tank empty
F6: SOL. TANK E
Indicates the solution tank is empty.
Recovery Tank Full
F7: REC. TANK FULL
Indicates the recovery tank is full and
shuts down the entire Scrub system.
High Engine
Temperature
F8: HIGH ENG TEMP
Indicates high engine temperature.
High Hydraulic
Temperature
F9: HIGH HYD TEMP
Indicates excessive hydraulic
temperature
F10: LOW FUEL
Low fuel indicator (blinking lowest fuel
gauge block).
F11: OPEN SCB VAC
Indicates squeegee may have broken
free.
Low Fuel
Squeegee
Disconnected
(Option)
119
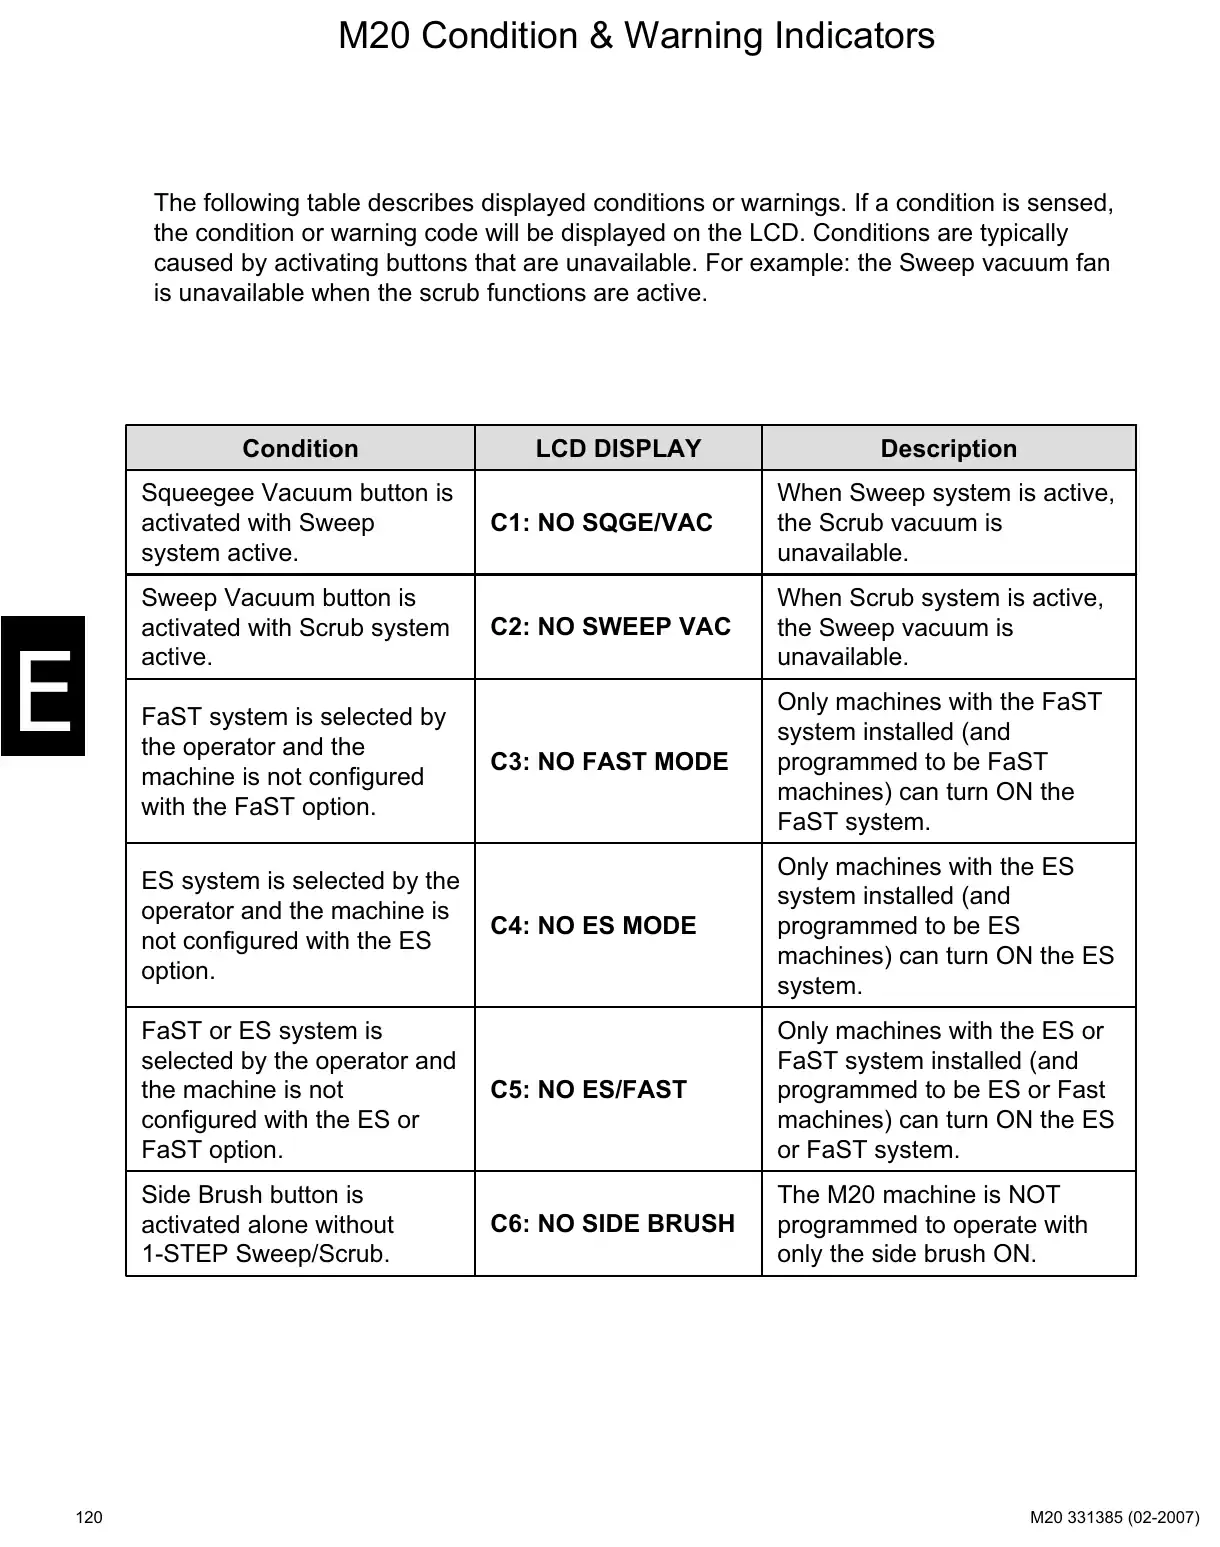
Text of manual page 120
M20 Condition & Warning Indicators
The following table describes displayed conditions or warnings. If a condition is sensed,
the condition or warning code will be displayed on the LCD. Conditions are typically
caused by activating buttons that are unavailable. For example: the Sweep vacuum fan
is unavailable when the scrub functions are active.
Condition
LCD DISPLAY
Description
Squeegee Vacuum button is
activated with Sweep
system active.
C1: NO SQGE/VAC
When Sweep system is active,
the Scrub vacuum is
unavailable.
C2: NO SWEEP VAC
When Scrub system is active,
the Sweep vacuum is
unavailable.
C3: NO FAST MODE
Only machines with the FaST
system installed (and
programmed to be FaST
machines) can turn ON the
FaST system.
C4: NO ES MODE
Only machines with the ES
system installed (and
programmed to be ES
machines) can turn ON the ES
system.
C5: NO ES/FAST
Only machines with the ES or
FaST system installed (and
programmed to be ES or Fast
machines) can turn ON the ES
or FaST system.
C6: NO SIDE BRUSH
The M20 machine is NOT
programmed to operate with
only the side brush ON.
Sweep Vacuum button is
activated with Scrub system
active.
FaST system is selected by
the operator and the
machine is not configured
with the FaST option.
ES system is selected by the
operator and the machine is
not configured with the ES
option.
FaST or ES system is
selected by the operator and
the machine is not
configured with the ES or
FaST option.
Side Brush button is
activated alone without
1-STEP Sweep/Scrub.
120
Configuration and diagnostic modesPages 121–126 · 6 pages
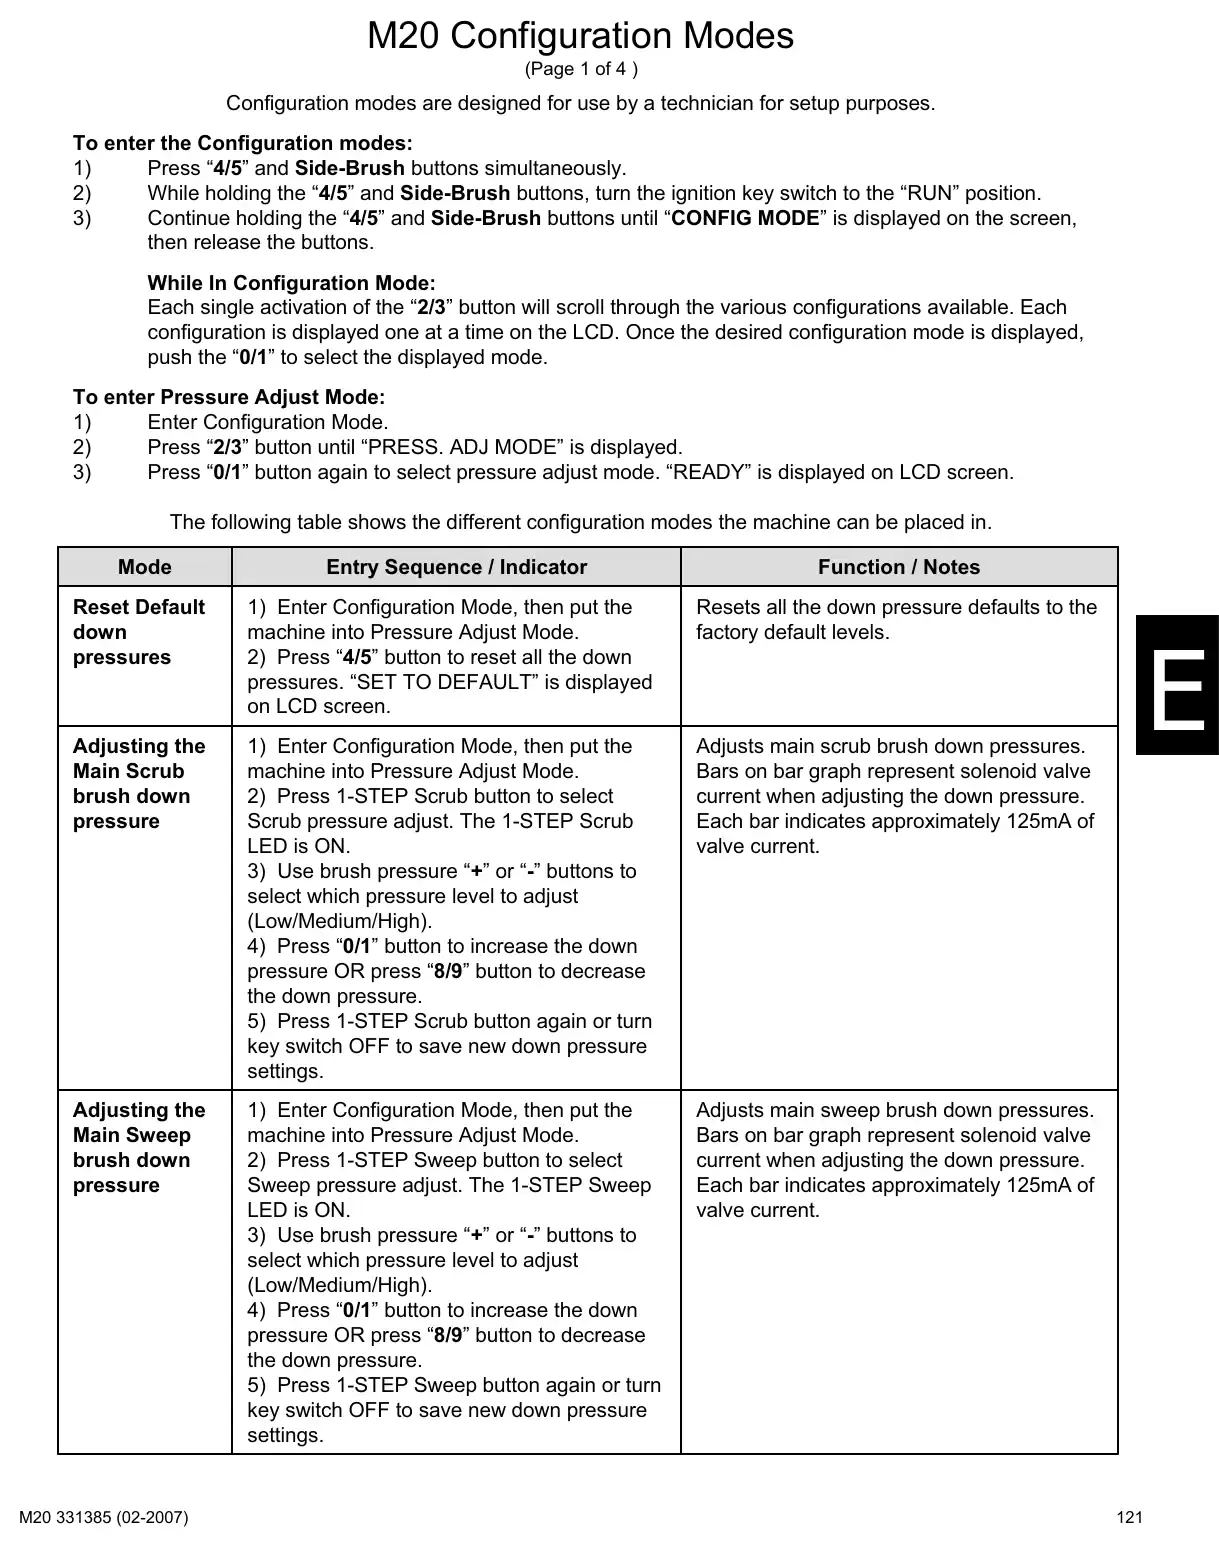
Text of manual page 121
M20 Configuration Modes
(Page 1 of 4 )
Configuration modes are designed for use by a technician for setup purposes.
To enter the Configuration modes:
1)
Press "4/5" and Side-Brush buttons simultaneously.
2)
While holding the "4/5" and Side-Brush buttons, turn the ignition key switch to the "RUN" position.
3)
Continue holding the "4/5" and Side-Brush buttons until "CONFIG MODE" is displayed on the screen,
then release the buttons.
While In Configuration Mode:
Each single activation of the "2/3" button will scroll through the various configurations available. Each
configuration is displayed one at a time on the LCD. Once the desired configuration mode is displayed,
push the "0/1" to select the displayed mode.
To enter Pressure Adjust Mode:
1)
Enter Configuration Mode.
2)
Press "2/3" button until "PRESS. ADJ MODE" is displayed.
3)
Press "0/1" button again to select pressure adjust mode. "READY" is displayed on LCD screen.
The following table shows the different configuration modes the machine can be placed in.
Mode
Entry Sequence / Indicator
Function / Notes
Reset Default
down
pressures
1) Enter Configuration Mode, then put the
machine into Pressure Adjust Mode.
2) Press "4/5" button to reset all the down
pressures. "SET TO DEFAULT" is displayed
on LCD screen.
Resets all the down pressure defaults to the
factory default levels.
Adjusting the
Main Scrub
brush down
pressure
1) Enter Configuration Mode, then put the
machine into Pressure Adjust Mode.
2) Press 1-STEP Scrub button to select
Scrub pressure adjust. The 1-STEP Scrub
LED is ON.
3) Use brush pressure "+" or "-" buttons to
select which pressure level to adjust
(Low/Medium/High).
4) Press "0/1" button to increase the down
pressure OR press "8/9" button to decrease
the down pressure.
5) Press 1-STEP Scrub button again or turn
key switch OFF to save new down pressure
settings.
Adjusts main scrub brush down pressures.
Bars on bar graph represent solenoid valve
current when adjusting the down pressure.
Each bar indicates approximately 125mA of
valve current.
Adjusting the
Main Sweep
brush down
pressure
1) Enter Configuration Mode, then put the
machine into Pressure Adjust Mode.
2) Press 1-STEP Sweep button to select
Sweep pressure adjust. The 1-STEP Sweep
LED is ON.
3) Use brush pressure "+" or "-" buttons to
select which pressure level to adjust
(Low/Medium/High).
4) Press "0/1" button to increase the down
pressure OR press "8/9" button to decrease
the down pressure.
5) Press 1-STEP Sweep button again or turn
key switch OFF to save new down pressure
settings.
Adjusts main sweep brush down pressures.
Bars on bar graph represent solenoid valve
current when adjusting the down pressure.
Each bar indicates approximately 125mA of
valve current.
121
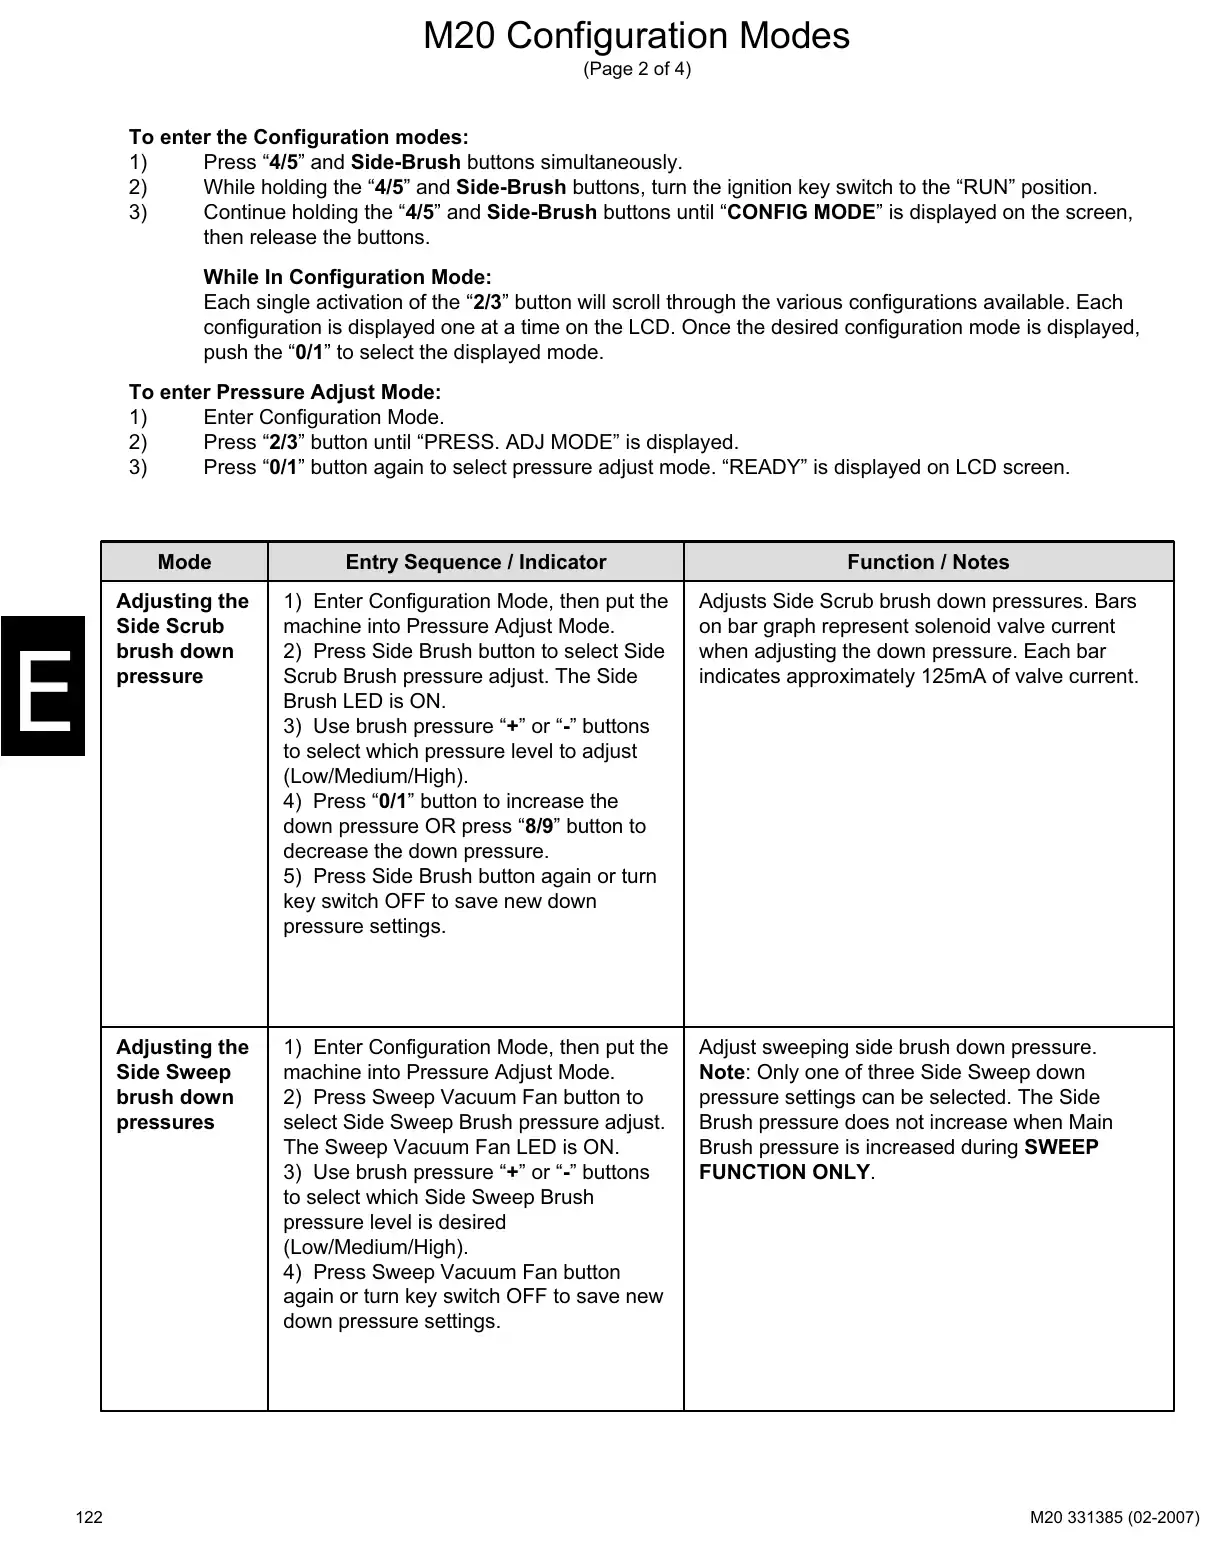
Text of manual page 122
M20 Configuration Modes
(Page 2 of 4)
To enter the Configuration modes:
1)
Press "4/5" and Side-Brush buttons simultaneously.
2)
While holding the "4/5" and Side-Brush buttons, turn the ignition key switch to the "RUN" position.
3)
Continue holding the "4/5" and Side-Brush buttons until "CONFIG MODE" is displayed on the screen,
then release the buttons.
While In Configuration Mode:
Each single activation of the "2/3" button will scroll through the various configurations available. Each
configuration is displayed one at a time on the LCD. Once the desired configuration mode is displayed,
push the "0/1" to select the displayed mode.
To enter Pressure Adjust Mode:
1)
Enter Configuration Mode.
2)
Press "2/3" button until "PRESS. ADJ MODE" is displayed.
3)
Press "0/1" button again to select pressure adjust mode. "READY" is displayed on LCD screen.
122
Mode
Entry Sequence / Indicator
Function / Notes
Adjusting the
Side Scrub
brush down
pressure
1) Enter Configuration Mode, then put the
machine into Pressure Adjust Mode.
2) Press Side Brush button to select Side
Scrub Brush pressure adjust. The Side
Brush LED is ON.
3) Use brush pressure "+" or "-" buttons
to select which pressure level to adjust
(Low/Medium/High).
4) Press "0/1" button to increase the
down pressure OR press "8/9" button to
decrease the down pressure.
5) Press Side Brush button again or turn
key switch OFF to save new down
pressure settings.
Adjusts Side Scrub brush down pressures. Bars
on bar graph represent solenoid valve current
when adjusting the down pressure. Each bar
indicates approximately 125mA of valve current.
Adjusting the
Side Sweep
brush down
pressures
1) Enter Configuration Mode, then put the
machine into Pressure Adjust Mode.
2) Press Sweep Vacuum Fan button to
select Side Sweep Brush pressure adjust.
The Sweep Vacuum Fan LED is ON.
3) Use brush pressure "+" or "-" buttons
to select which Side Sweep Brush
pressure level is desired
(Low/Medium/High).
4) Press Sweep Vacuum Fan button
again or turn key switch OFF to save new
down pressure settings.
Adjust sweeping side brush down pressure.
Note: Only one of three Side Sweep down
pressure settings can be selected. The Side
Brush pressure does not increase when Main
Brush pressure is increased during SWEEP
FUNCTION ONLY.
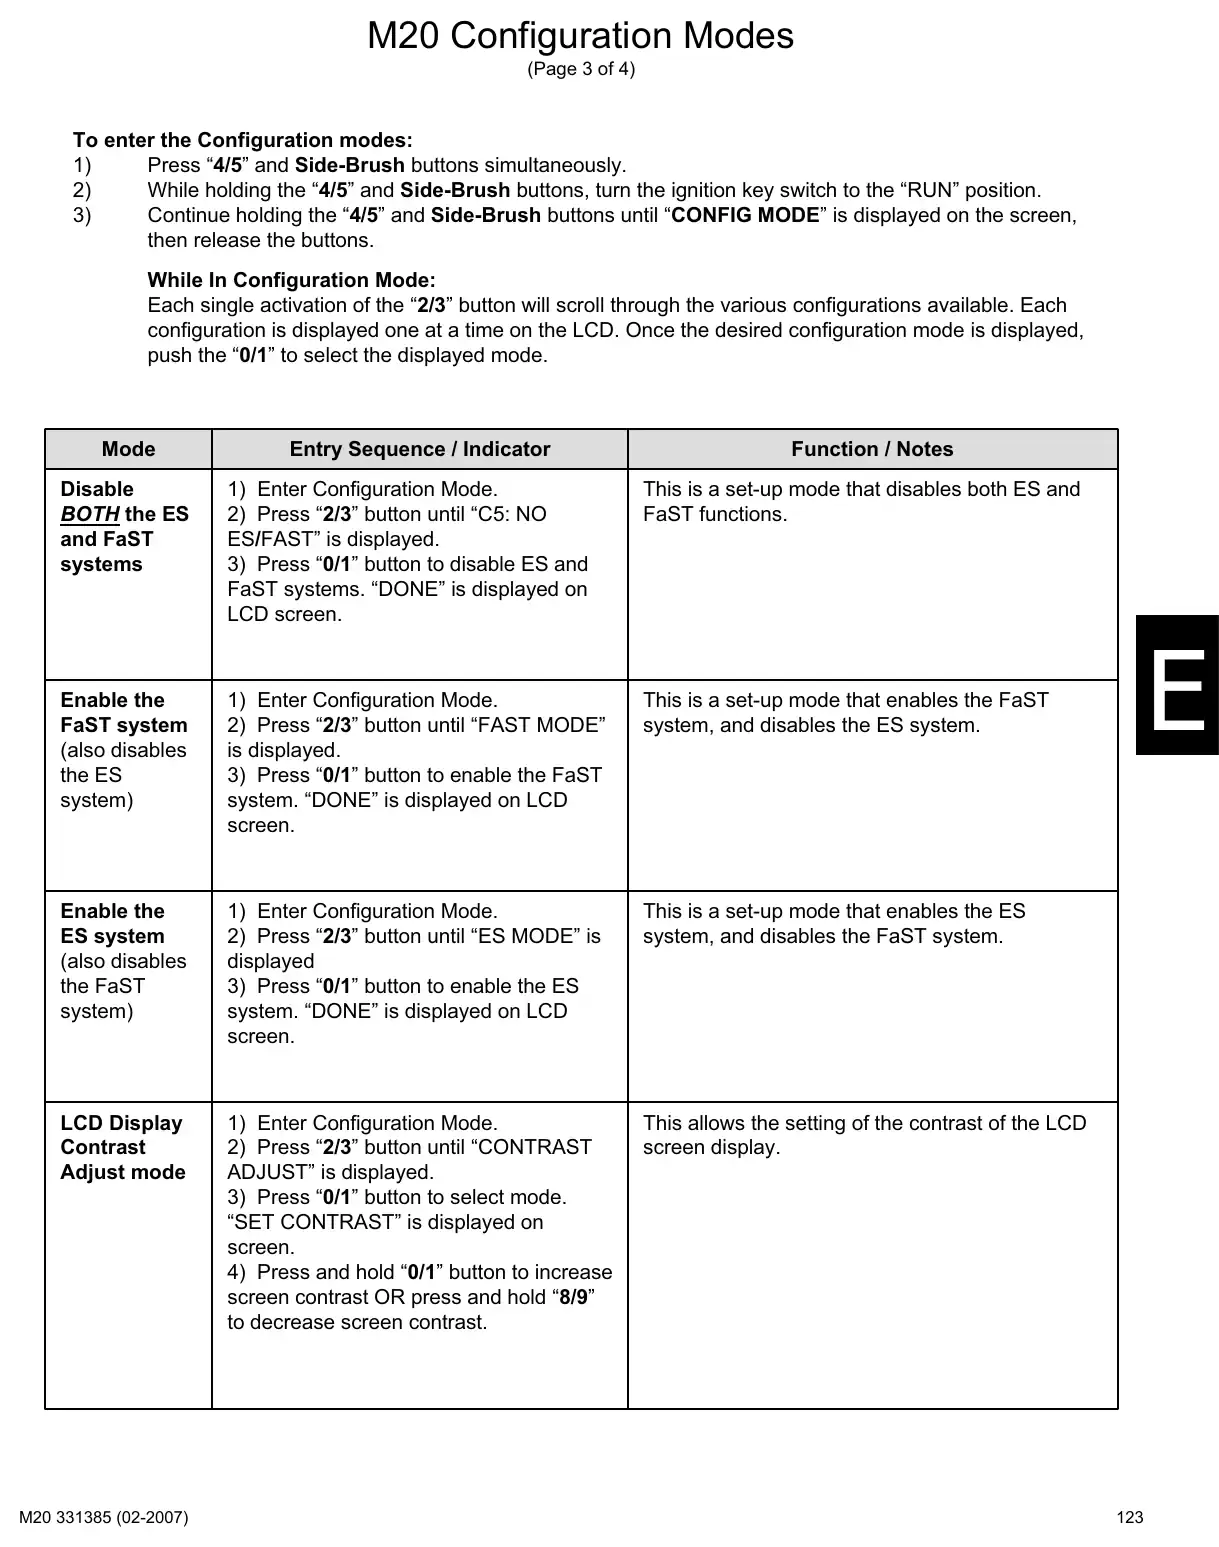
Text of manual page 123
M20 Configuration Modes
(Page 3 of 4)
To enter the Configuration modes:
1)
Press "4/5" and Side-Brush buttons simultaneously.
2)
While holding the "4/5" and Side-Brush buttons, turn the ignition key switch to the "RUN" position.
3)
Continue holding the "4/5" and Side-Brush buttons until "CONFIG MODE" is displayed on the screen,
then release the buttons.
While In Configuration Mode:
Each single activation of the "2/3" button will scroll through the various configurations available. Each
configuration is displayed one at a time on the LCD. Once the desired configuration mode is displayed,
push the "0/1" to select the displayed mode.
Mode
Entry Sequence / Indicator
Function / Notes
Disable
BOTH the ES
and FaST
systems
1) Enter Configuration Mode.
2) Press "2/3" button until "C5: NO
ES/FAST" is displayed.
3) Press "0/1" button to disable ES and
FaST systems. "DONE" is displayed on
LCD screen.
This is a set-up mode that disables both ES and
FaST functions.
Enable the
FaST system
(also disables
the ES
system)
1) Enter Configuration Mode.
2) Press "2/3" button until "FAST MODE"
is displayed.
3) Press "0/1" button to enable the FaST
system. "DONE" is displayed on LCD
screen.
This is a set-up mode that enables the FaST
system, and disables the ES system.
Enable the
ES system
(also disables
the FaST
system)
1) Enter Configuration Mode.
2) Press "2/3" button until "ES MODE" is
displayed
3) Press "0/1" button to enable the ES
system. "DONE" is displayed on LCD
screen.
This is a set-up mode that enables the ES
system, and disables the FaST system.
LCD Display
Contrast
Adjust mode
1) Enter Configuration Mode.
2) Press "2/3" button until "CONTRAST
ADJUST" is displayed.
3) Press "0/1" button to select mode.
"SET CONTRAST" is displayed on
screen.
4) Press and hold "0/1" button to increase
screen contrast OR press and hold "8/9"
to decrease screen contrast.
This allows the setting of the contrast of the LCD
screen display.
123
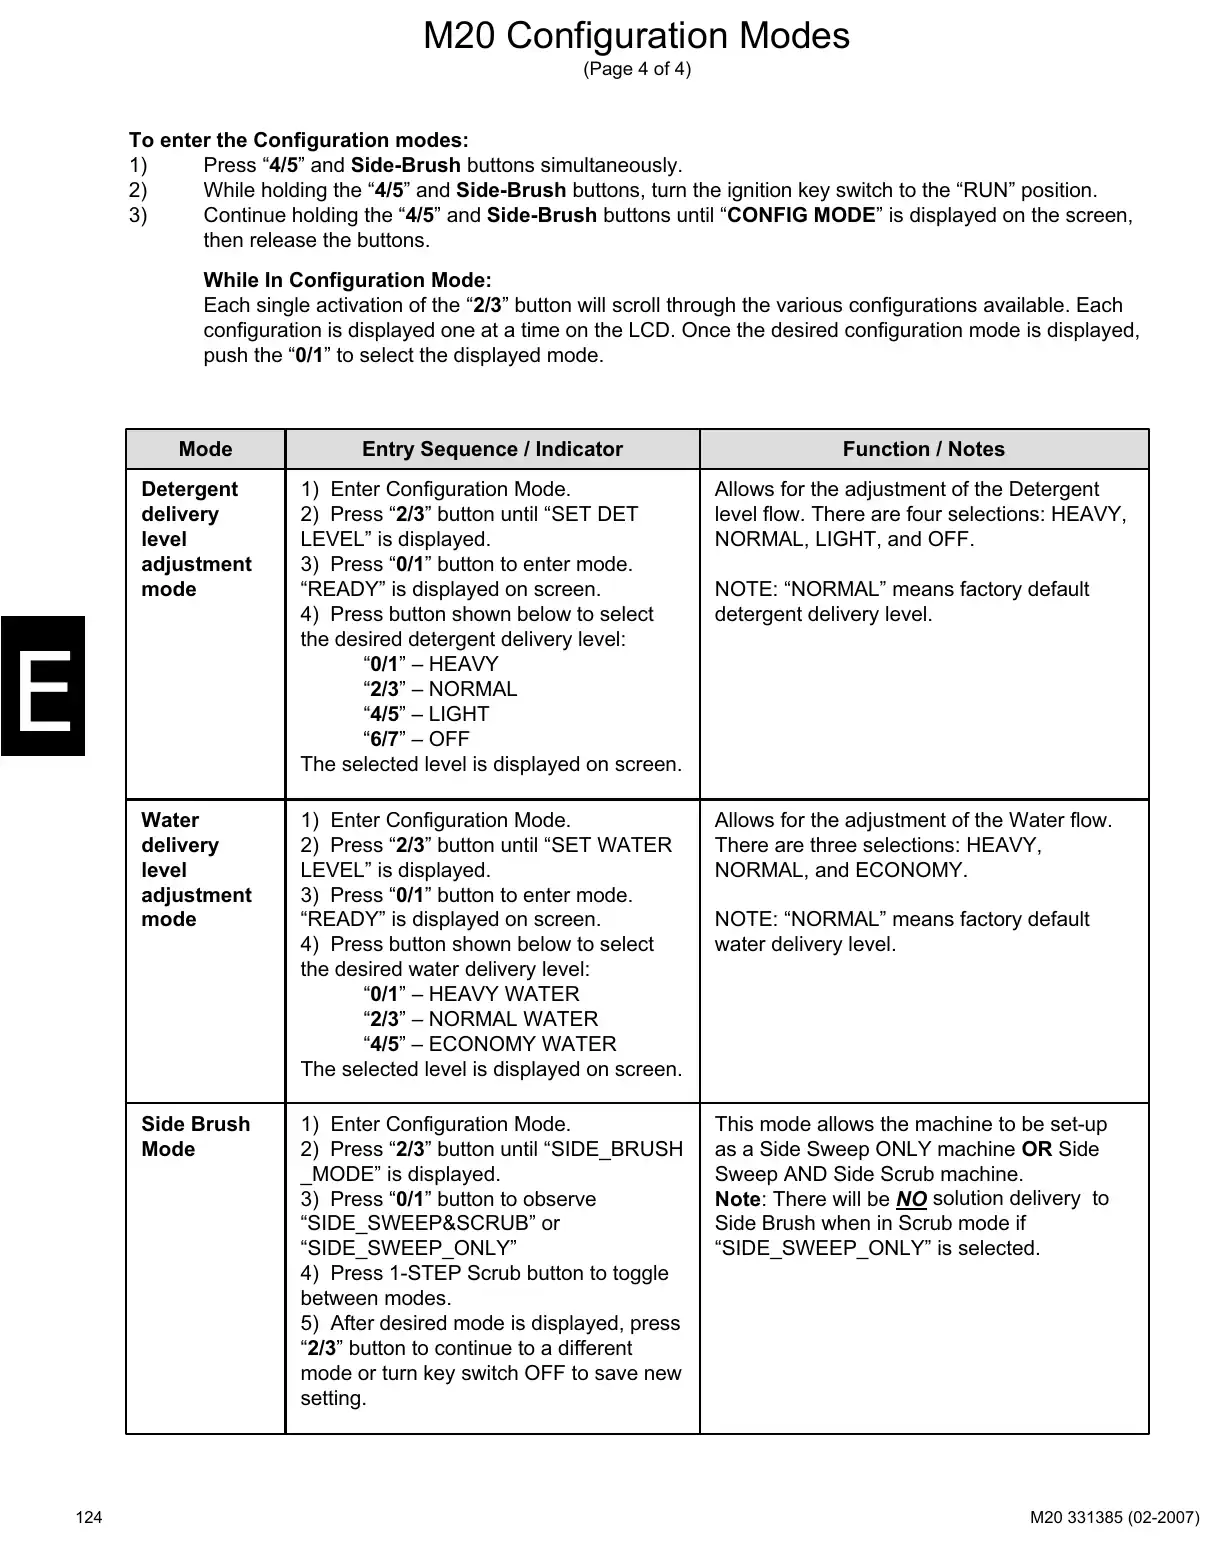
Text of manual page 124
M20 Configuration Modes
(Page 4 of 4)
To enter the Configuration modes:
1)
Press "4/5" and Side-Brush buttons simultaneously.
2)
While holding the "4/5" and Side-Brush buttons, turn the ignition key switch to the "RUN" position.
3)
Continue holding the "4/5" and Side-Brush buttons until "CONFIG MODE" is displayed on the screen,
then release the buttons.
While In Configuration Mode:
Each single activation of the "2/3" button will scroll through the various configurations available. Each
configuration is displayed one at a time on the LCD. Once the desired configuration mode is displayed,
push the "0/1" to select the displayed mode.
Mode
Entry Sequence / Indicator
Function / Notes
Detergent
delivery
level
adjustment
mode
1) Enter Configuration Mode.
2) Press "2/3" button until "SET DET
LEVEL" is displayed.
3) Press "0/1" button to enter mode.
"READY" is displayed on screen.
4) Press button shown below to select
the desired detergent delivery level:
"0/1" - HEAVY
"2/3" - NORMAL
"4/5" - LIGHT
"6/7" - OFF
The selected level is displayed on screen.
Allows for the adjustment of the Detergent
level flow. There are four selections: HEAVY,
NORMAL, LIGHT, and OFF.
Water
delivery
level
adjustment
mode
1) Enter Configuration Mode.
2) Press "2/3" button until "SET WATER
LEVEL" is displayed.
3) Press "0/1" button to enter mode.
"READY" is displayed on screen.
4) Press button shown below to select
the desired water delivery level:
"0/1" - HEAVY WATER
"2/3" - NORMAL WATER
"4/5" - ECONOMY WATER
The selected level is displayed on screen.
Allows for the adjustment of the Water flow.
There are three selections: HEAVY,
NORMAL, and ECONOMY.
Side Brush
Mode
1) Enter Configuration Mode.
2) Press "2/3" button until "SIDE_BRUSH
_MODE" is displayed.
3) Press "0/1" button to observe
"SIDE_SWEEP&SCRUB" or
"SIDE_SWEEP_ONLY"
4) Press 1-STEP Scrub button to toggle
between modes.
5) After desired mode is displayed, press
"2/3" button to continue to a different
mode or turn key switch OFF to save new
setting.
This mode allows the machine to be set-up
as a Side Sweep ONLY machine OR Side
Sweep AND Side Scrub machine.
Note: There will be NO solution delivery to
Side Brush when in Scrub mode if
"SIDE_SWEEP_ONLY" is selected.
124
NOTE: "NORMAL" means factory default
detergent delivery level.
NOTE: "NORMAL" means factory default
water delivery level.
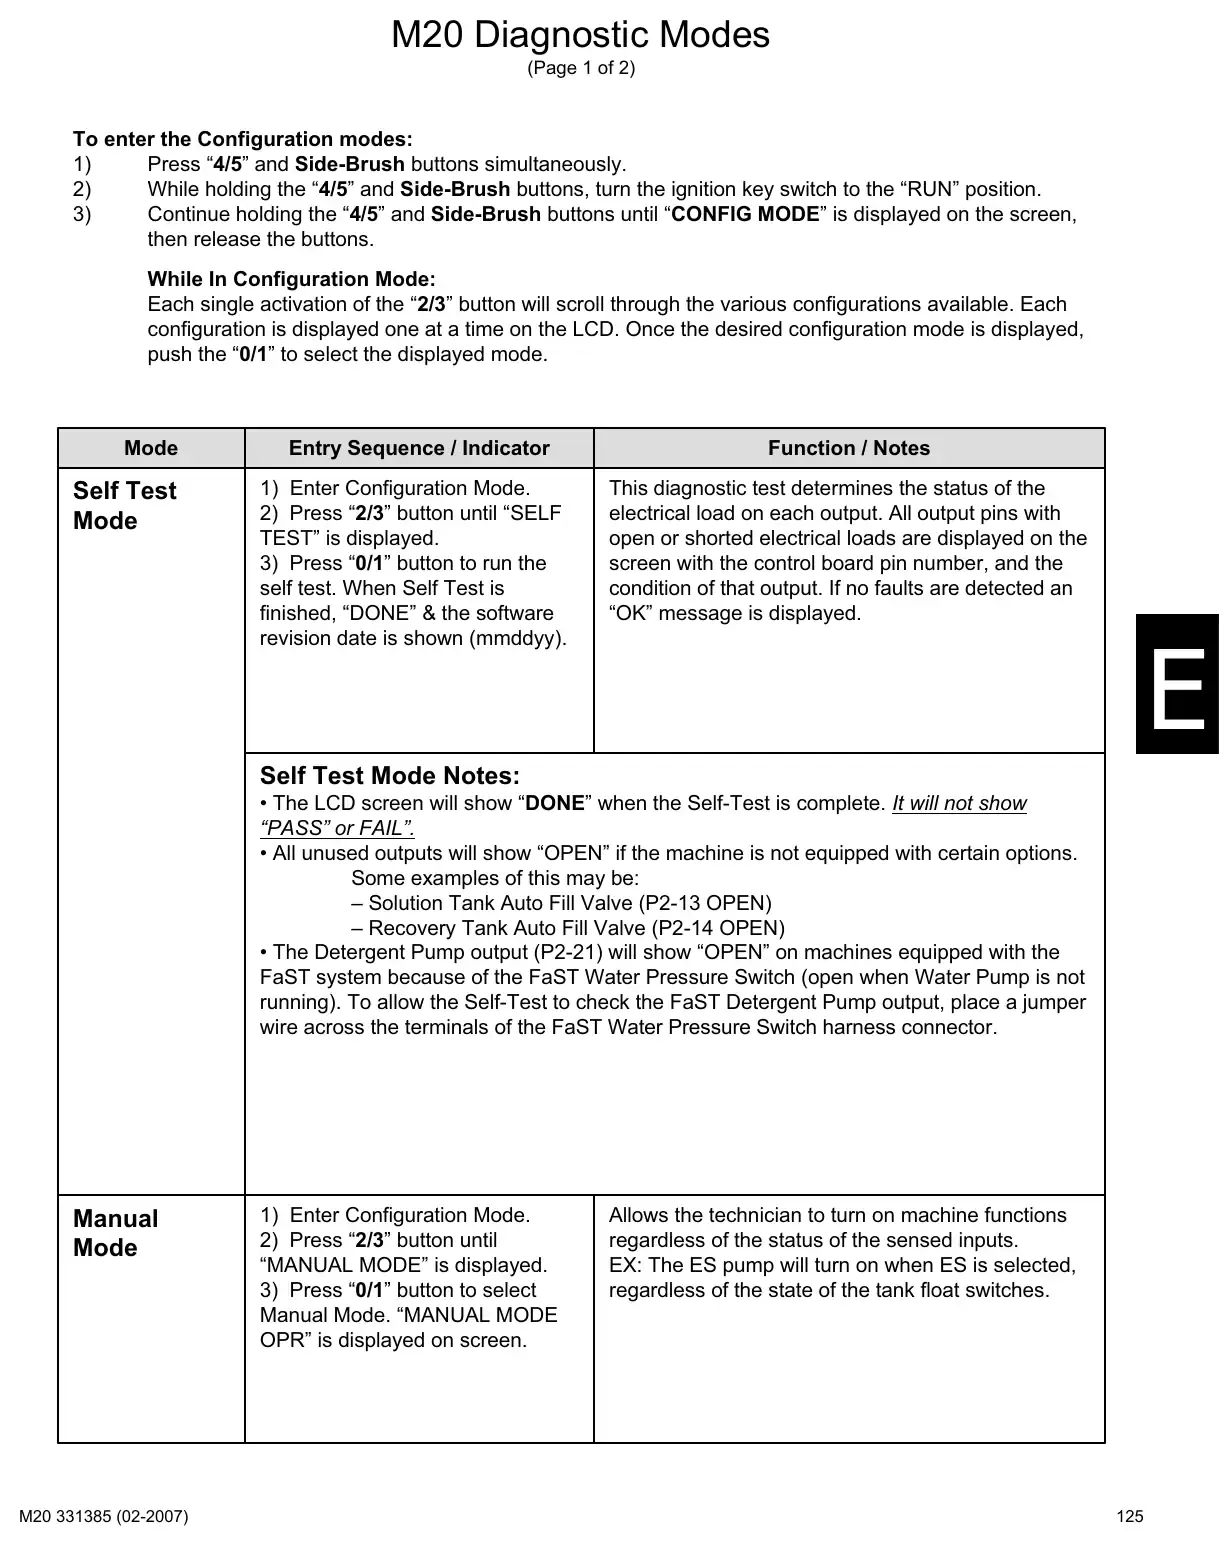
Text of manual page 125
M20 Diagnostic Modes
(Page 1 of 2)
To enter the Configuration modes:
1)
Press "4/5" and Side-Brush buttons simultaneously.
2)
While holding the "4/5" and Side-Brush buttons, turn the ignition key switch to the "RUN" position.
3)
Continue holding the "4/5" and Side-Brush buttons until "CONFIG MODE" is displayed on the screen,
then release the buttons.
While In Configuration Mode:
Each single activation of the "2/3" button will scroll through the various configurations available. Each
configuration is displayed one at a time on the LCD. Once the desired configuration mode is displayed,
push the "0/1" to select the displayed mode.
Mode
Self Test
Mode
Entry Sequence / Indicator
Function / Notes
1) Enter Configuration Mode.
2) Press "2/3" button until "SELF
TEST" is displayed.
3) Press "0/1" button to run the
self test. When Self Test is
finished, "DONE" & the software
revision date is shown (mmddyy).
This diagnostic test determines the status of the
electrical load on each output. All output pins with
open or shorted electrical loads are displayed on the
screen with the control board pin number, and the
condition of that output. If no faults are detected an
"OK" message is displayed.
Self Test Mode Notes:
o The LCD screen will show "DONE" when the Self-Test is complete. It will not show
"PASS" or FAIL".
o All unused outputs will show "OPEN" if the machine is not equipped with certain options.
Some examples of this may be:
- Solution Tank Auto Fill Valve (P2-13 OPEN)
- Recovery Tank Auto Fill Valve (P2-14 OPEN)
o The Detergent Pump output (P2-21) will show "OPEN" on machines equipped with the
FaST system because of the FaST Water Pressure Switch (open when Water Pump is not
running). To allow the Self-Test to check the FaST Detergent Pump output, place a jumper
wire across the terminals of the FaST Water Pressure Switch harness connector.
Manual
Mode
1) Enter Configuration Mode.
2) Press "2/3" button until
"MANUAL MODE" is displayed.
3) Press "0/1" button to select
Manual Mode. "MANUAL MODE
OPR" is displayed on screen.
Allows the technician to turn on machine functions
regardless of the status of the sensed inputs.
EX: The ES pump will turn on when ES is selected,
regardless of the state of the tank float switches.
125
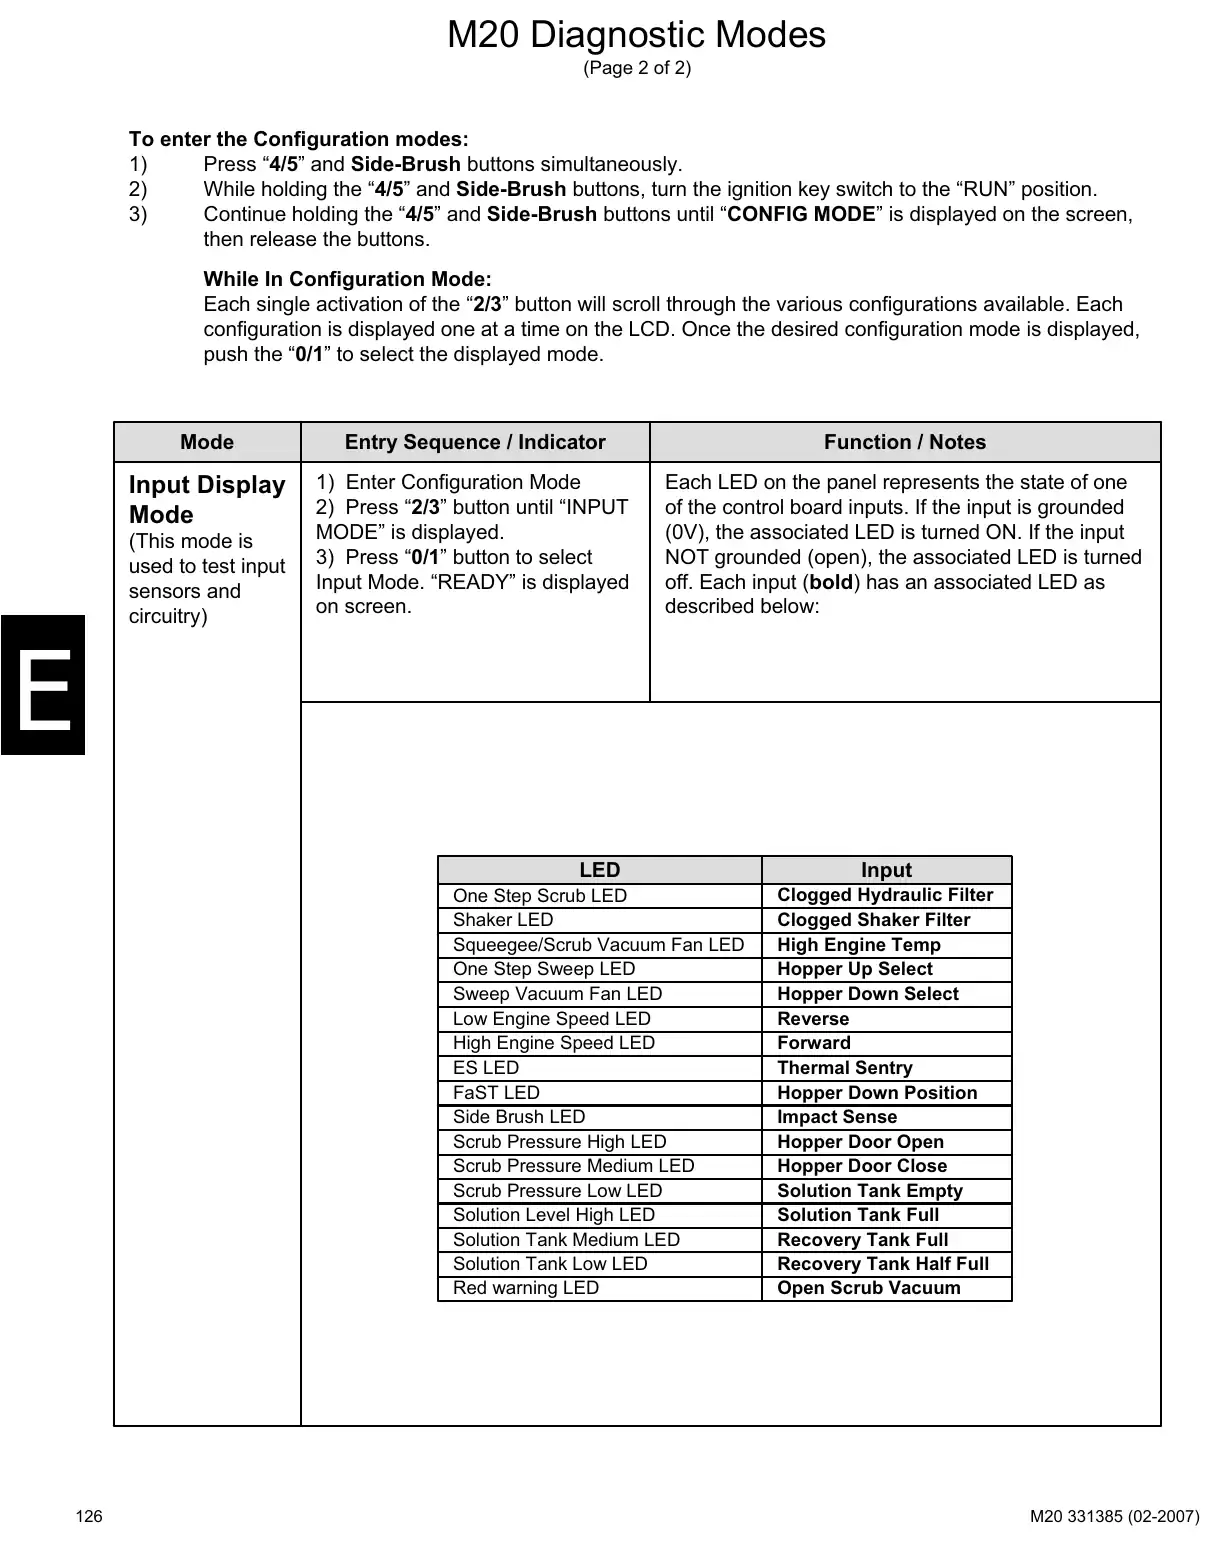
Text of manual page 126
M20 Diagnostic Modes
(Page 2 of 2)
To enter the Configuration modes:
1)
Press "4/5" and Side-Brush buttons simultaneously.
2)
While holding the "4/5" and Side-Brush buttons, turn the ignition key switch to the "RUN" position.
3)
Continue holding the "4/5" and Side-Brush buttons until "CONFIG MODE" is displayed on the screen,
then release the buttons.
While In Configuration Mode:
Each single activation of the "2/3" button will scroll through the various configurations available. Each
configuration is displayed one at a time on the LCD. Once the desired configuration mode is displayed,
push the "0/1" to select the displayed mode.
Mode
Entry Sequence / Indicator
Function / Notes
Input Display
Mode
1) Enter Configuration Mode
2) Press "2/3" button until "INPUT
MODE" is displayed.
3) Press "0/1" button to select
Input Mode. "READY" is displayed
on screen.
Each LED on the panel represents the state of one
of the control board inputs. If the input is grounded
(0V), the associated LED is turned ON. If the input
NOT grounded (open), the associated LED is turned
off. Each input (bold) has an associated LED as
described below:
(This mode is
used to test input
sensors and
circuitry)
126
LED
Input
One Step Scrub LED
Shaker LED
Squeegee/Scrub Vacuum Fan LED
One Step Sweep LED
Sweep Vacuum Fan LED
Low Engine Speed LED
High Engine Speed LED
ES LED
FaST LED
Side Brush LED
Scrub Pressure High LED
Scrub Pressure Medium LED
Scrub Pressure Low LED
Solution Level High LED
Solution Tank Medium LED
Solution Tank Low LED
Red warning LED
Clogged Hydraulic Filter
Clogged Shaker Filter
High Engine Temp
Hopper Up Select
Hopper Down Select
Reverse
Forward
Thermal Sentry
Hopper Down Position
Impact Sense
Hopper Door Open
Hopper Door Close
Solution Tank Empty
Solution Tank Full
Recovery Tank Full
Recovery Tank Half Full
Open Scrub Vacuum
Hydraulics
Hydraulic schematicPage 128 · 1 page
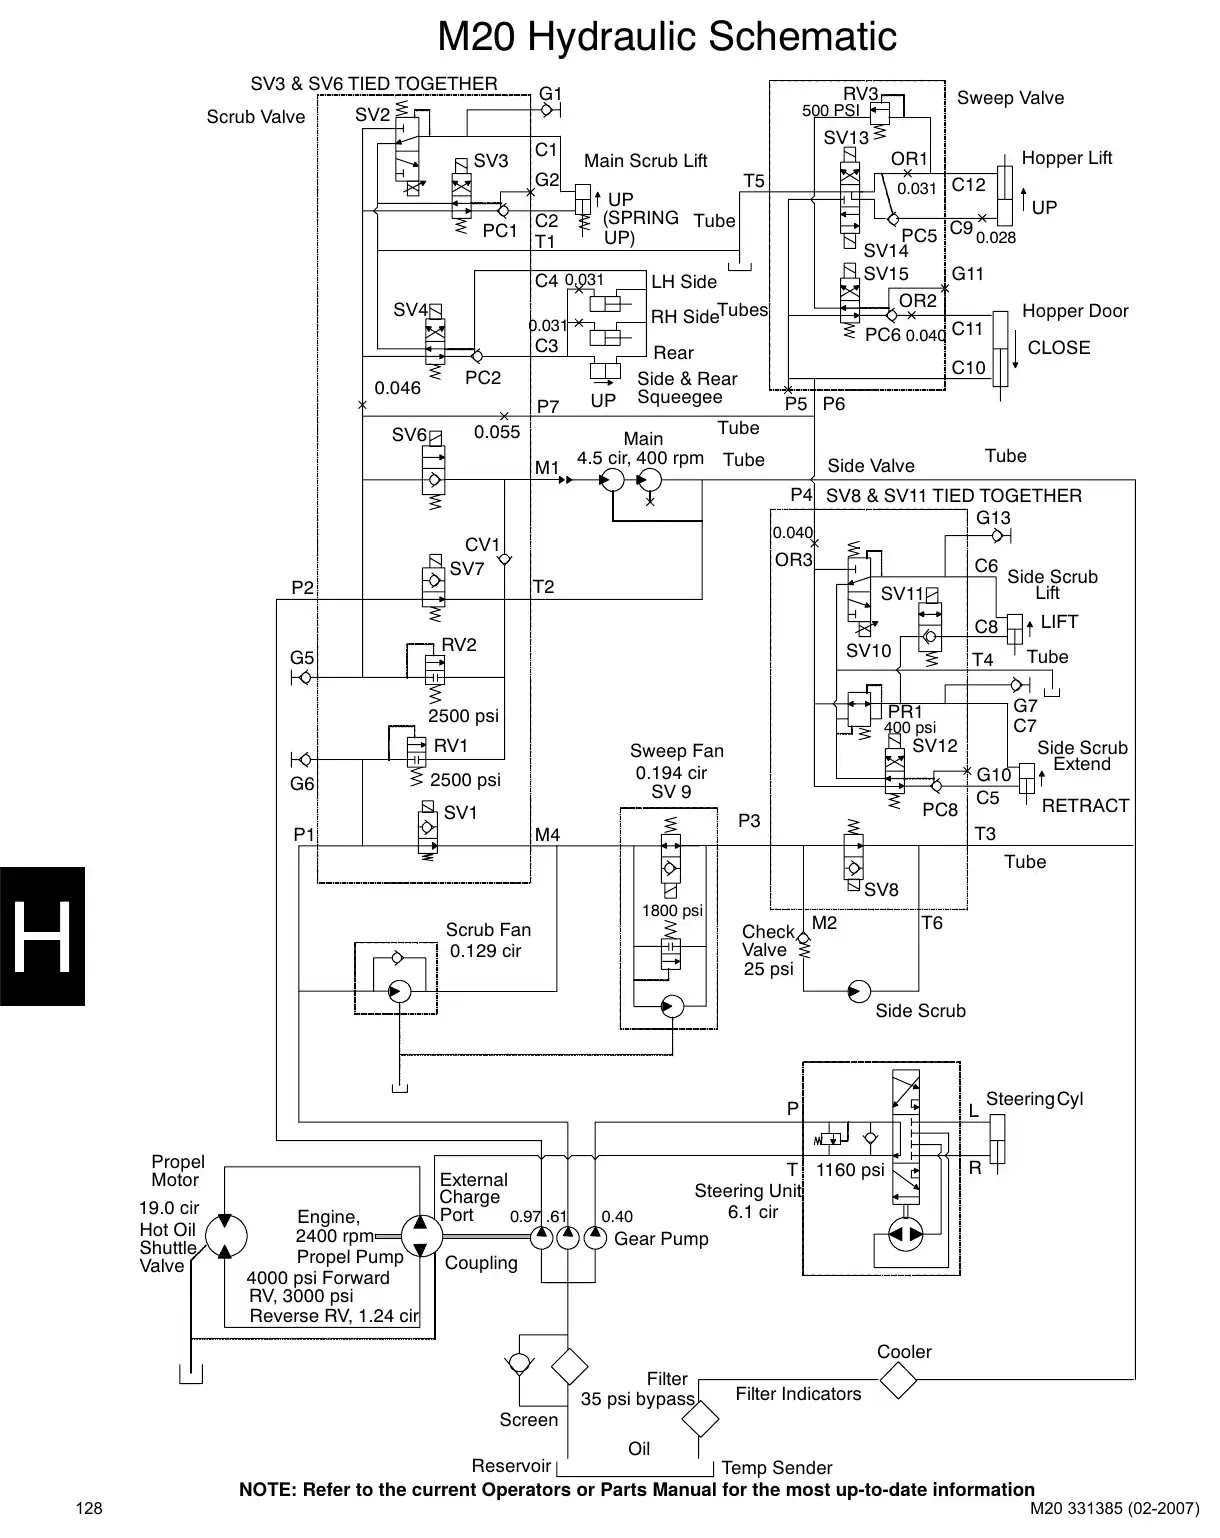
Text of manual page 128
M20 Hydraulic Schematic
SV3 & SV6 TIED TOGETHER
Scrub Valve
G1
RV3
Sweep Valve
500 PSI
SV2
C1
SV3
SV13
G2
C2
T1
PC1
SV4
T5
0.046
LH Side
0.031
RH SideTubes
PC2
P7
SV6
UP
C4 0.031
0.055
M1
0.031 C12
UP
(SPRING Tube
UP)
C3
UP
Rear
Side & Rear
Squeegee
Main
4.5 cir, 400 rpm
Hopper Lift
OR1
Main Scrub Lift
PC5 C9 0.028
SV14
SV15
G11
OR2
Hopper Door
PC6 0.040 C11
CLOSE
C10
P5 P6
Tube
Tube
Tube
Side Valve
P4 SV8 & SV11 TIED TOGETHER
G13
0.040
CV1
SV7
G5
OR3
C6
T2
P2
SV11
RV2
SV10
C8
LIFT
T4
Tube
PR1
2500 psi
400 psi
RV1
G6
Side Scrub
Lift
2500 psi
SV1
P1
SV12
Sweep Fan
0.194 cir
SV 9
PC8
P3
M4
G10
C5
G7
C7
Side Scrub
Extend
RETRACT
T3
Tube
SV8
1800 psi
Scrub Fan
0.129 cir
Check M2
Valve
25 psi
T6
Side Scrub
Propel
Motor
19.0 cir
Hot Oil
Shuttle
Valve
Engine,
2400 rpm
Propel Pump
4000 psi Forward
RV, 3000 psi
Reverse RV, 1.24 cir
External
Charge
Port
0.97 .61
T 1160 psi
Steering Unit
6.1 cir
0.40
Gear Pump
SteeringCyl
Coupling
Cooler
Filter
35 psi bypass
Filter Indicators
Screen
128
Oil
Reservoir
Temp Sender
NOTE: Refer to the current Operators or Parts Manual for the most up-to-date information
Steering and propel hosesPage 129 · 1 page
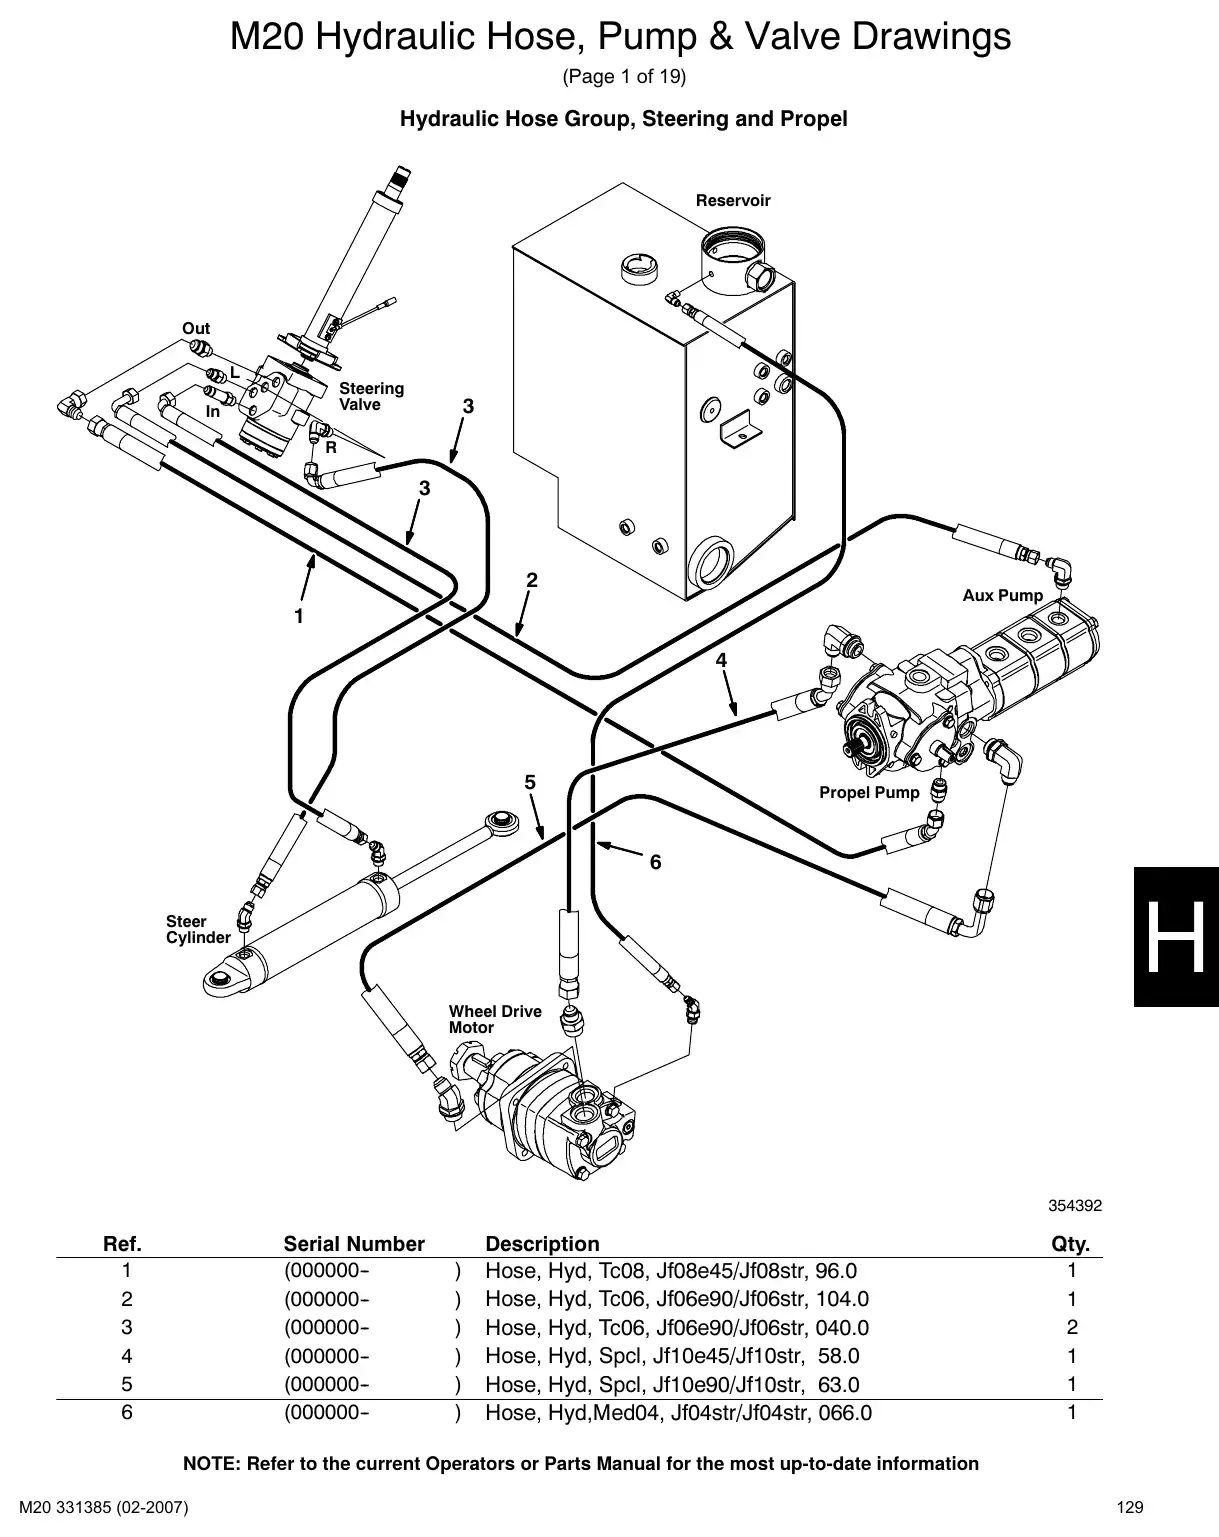
Text of manual page 129
M20 Hydraulic Hose, Pump & Valve Drawings
(Page 1 of 19)
Hydraulic Hose Group, Steering and Propel
Reservoir
Out
Steering
Valve
In
3
3
2
Aux Pump
1
4
5
Propel Pump
6
Steer
Cylinder
Wheel Drive
Motor
354392
Ref.
1
2
3
4
5
6
Part No.
1023608
396221
1023489
1023488
Serial Number
(000000-(000000-(000000-(000000-(000000-(000000-
)
)
)
)
)
)
Description
Hose, Hyd, Tc08, Jf08e45/Jf08str, 96.0
Hose, Hyd, Tc06, Jf06e90/Jf06str, 104.0
Hose, Hyd, Tc06, Jf06e90/Jf06str, 040.0
Hose, Hyd, Spcl, Jf10e45/Jf10str, 58.0
Hose, Hyd, Spcl, Jf10e90/Jf10str, 63.0
Hose, Hyd,Med04, Jf04str/Jf04str, 066.0
Qty.
1
1
2
1
1
1
NOTE: Refer to the current Operators or Parts Manual for the most up-to-date information
129
Pumps and vacuum fan hosesPages 130–131 · 2 pages
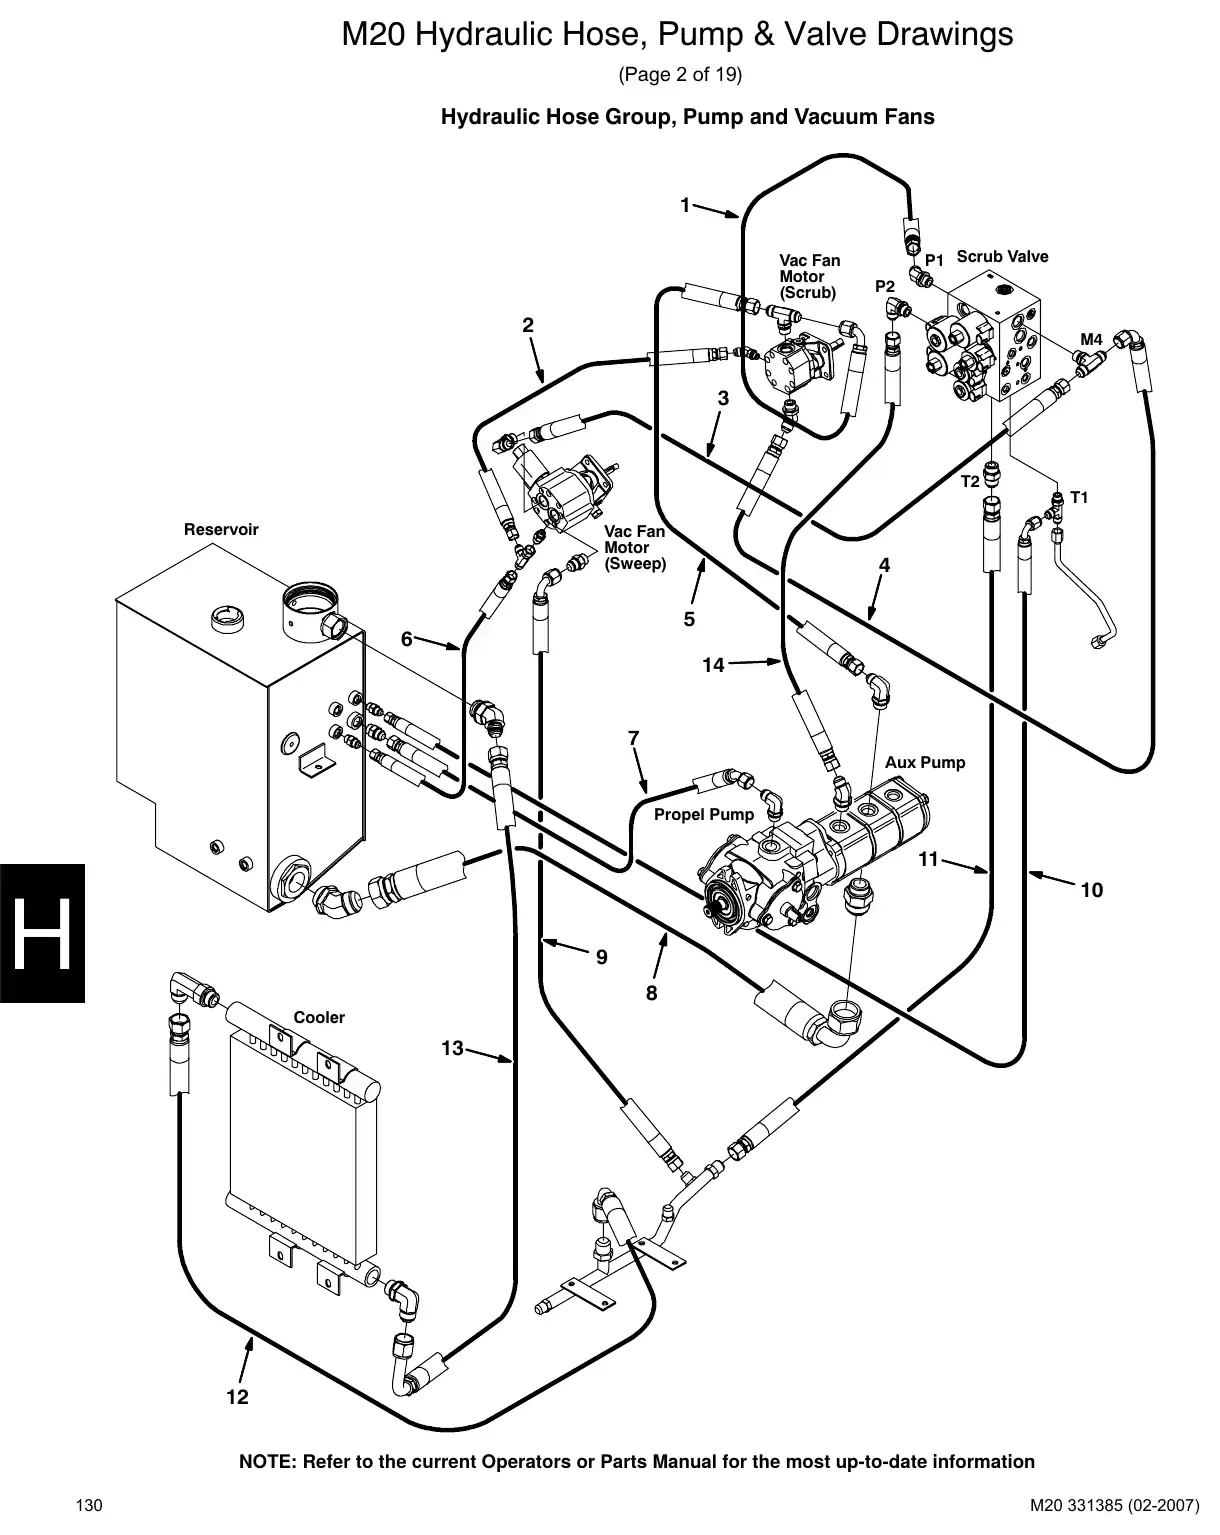
Text of manual page 130
M20 Hydraulic Hose, Pump & Valve Drawings
(Page 2 of 19)
Hydraulic Hose Group, Pump and Vacuum Fans
1
Vac Fan
Motor
(Scrub)
P1 Scrub Valve
P2
2
M4
3
T2
T1
Reservoir
Vac Fan
Motor
(Sweep)
4
5
6
14
7
Aux Pump
Propel Pump
11
10
9
8
Cooler
13
12
NOTE: Refer to the current Operators or Parts Manual for the most up-to-date information
130
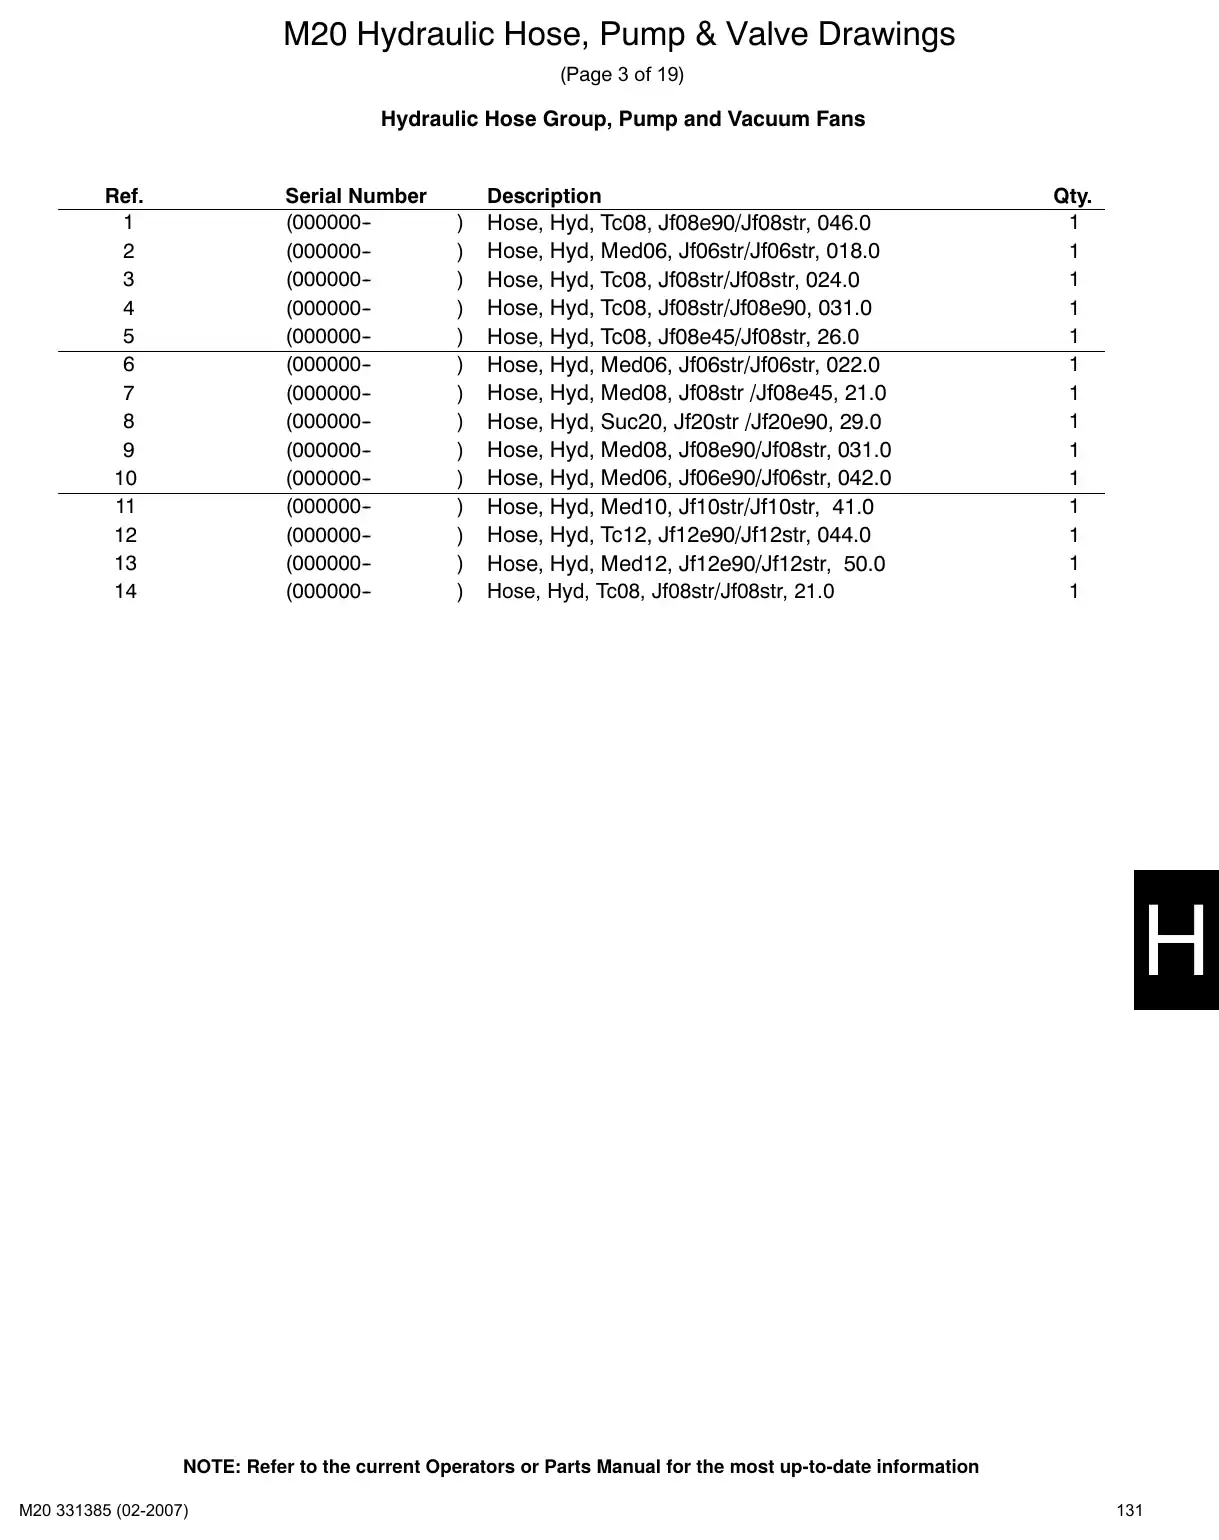
Text of manual page 131
M20 Hydraulic Hose, Pump & Valve Drawings
(Page 3 of 19)
Hydraulic Hose Group, Pump and Vacuum Fans
Ref.
1
2
3
4
5
6
7
8
9
10
11
12
13
14
Part No.
361044
381862
396255
1026645
1023607
1023611
396266
71735
396438
1023487
1023606
Serial Number
(000000-(000000-(000000-(000000-(000000-(000000-(000000-(000000-(000000-(000000-(000000-(000000-(000000-(000000-
)
)
)
)
)
)
)
)
)
)
)
)
)
)
Description
Hose, Hyd, Tc08, Jf08e90/Jf08str, 046.0
Hose, Hyd, Med06, Jf06str/Jf06str, 018.0
Hose, Hyd, Tc08, Jf08str/Jf08str, 024.0
Hose, Hyd, Tc08, Jf08str/Jf08e90, 031.0
Hose, Hyd, Tc08, Jf08e45/Jf08str, 26.0
Hose, Hyd, Med06, Jf06str/Jf06str, 022.0
Hose, Hyd, Med08, Jf08str /Jf08e45, 21.0
Hose, Hyd, Suc20, Jf20str /Jf20e90, 29.0
Hose, Hyd, Med08, Jf08e90/Jf08str, 031.0
Hose, Hyd, Med06, Jf06e90/Jf06str, 042.0
Hose, Hyd, Med10, Jf10str/Jf10str, 41.0
Hose, Hyd, Tc12, Jf12e90/Jf12str, 044.0
Hose, Hyd, Med12, Jf12e90/Jf12str, 50.0
Hose, Hyd, Tc08, Jf08str/Jf08str, 21.0
Qty.
1
1
1
1
1
1
1
1
1
1
1
1
1
1
NOTE: Refer to the current Operators or Parts Manual for the most up-to-date information
131
Brush and hopper hosesPages 132–133 · 2 pages
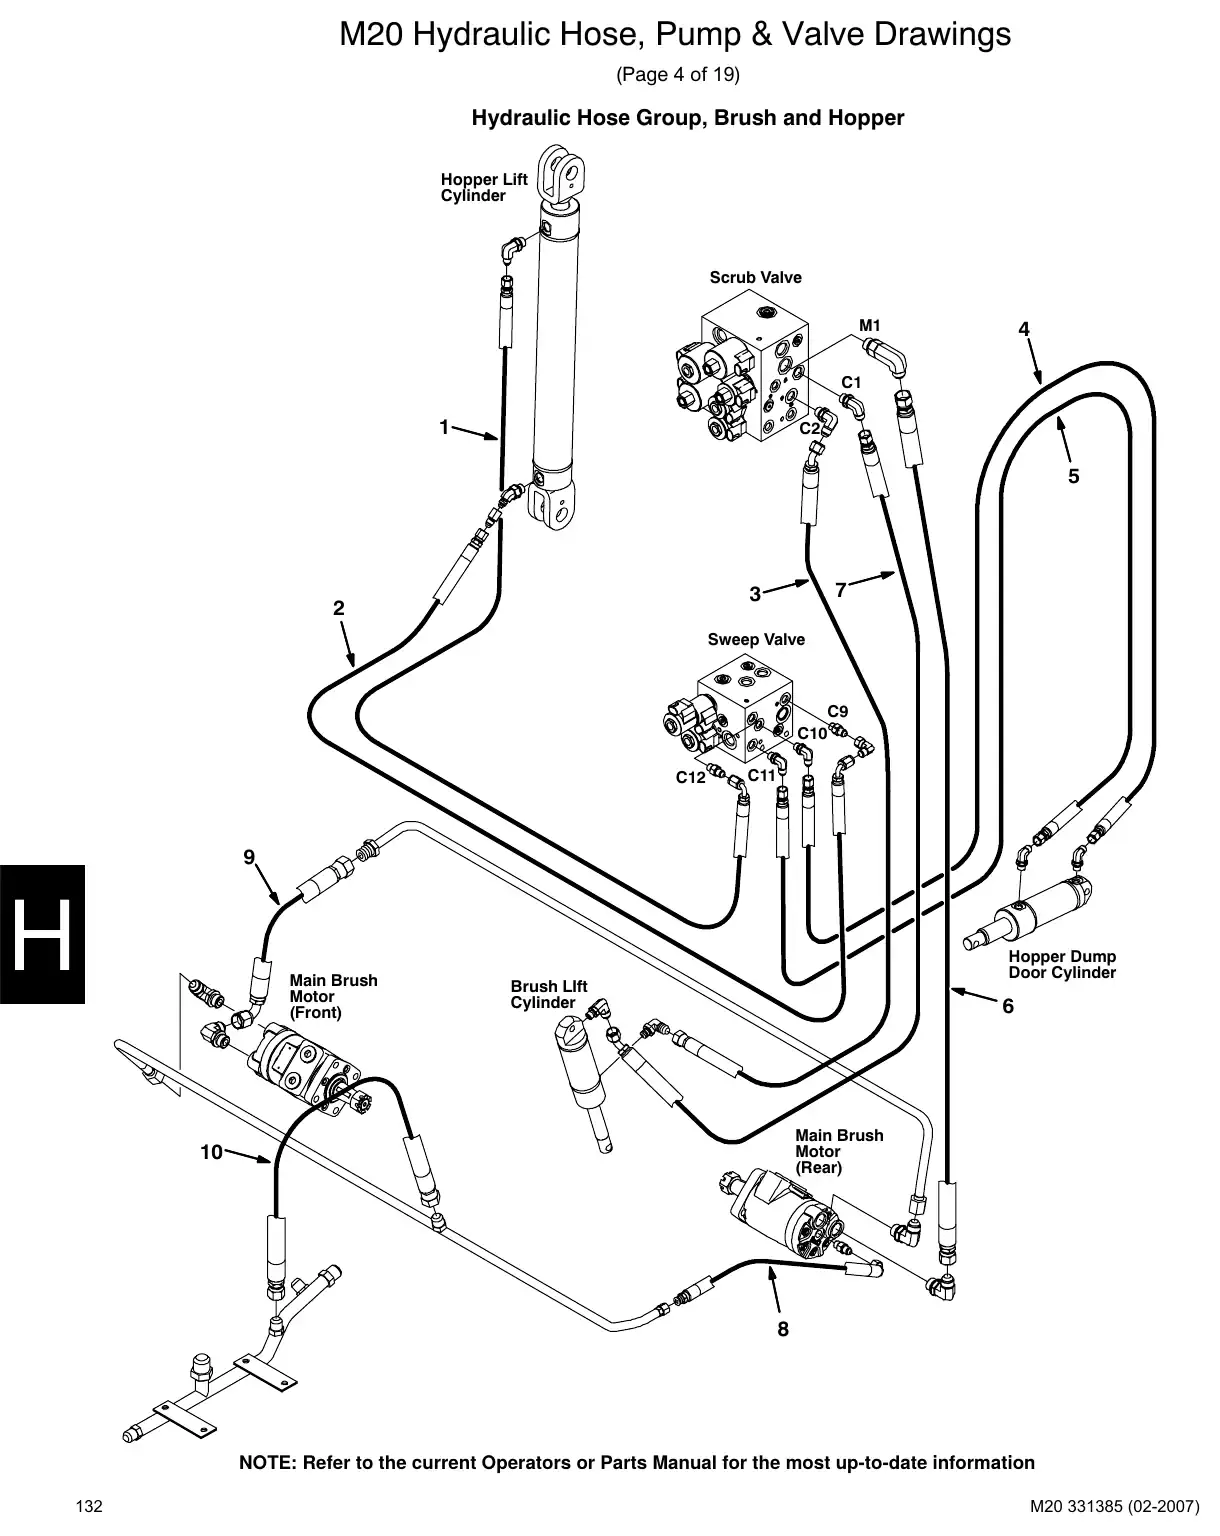
Text of manual page 132
M20 Hydraulic Hose, Pump & Valve Drawings
(Page 4 of 19)
Hydraulic Hose Group, Brush and Hopper
Hopper Lift
Cylinder
Scrub Valve
M1
4
C1
1
C2
5
7
3
2
Sweep Valve
C9
C10
C12
C11
9
Main Brush
Motor
(Front)
Hopper Dump
Door Cylinder
Brush LIft
Cylinder
6
Main Brush
Motor
(Rear)
10
8
NOTE: Refer to the current Operators or Parts Manual for the most up-to-date information
132
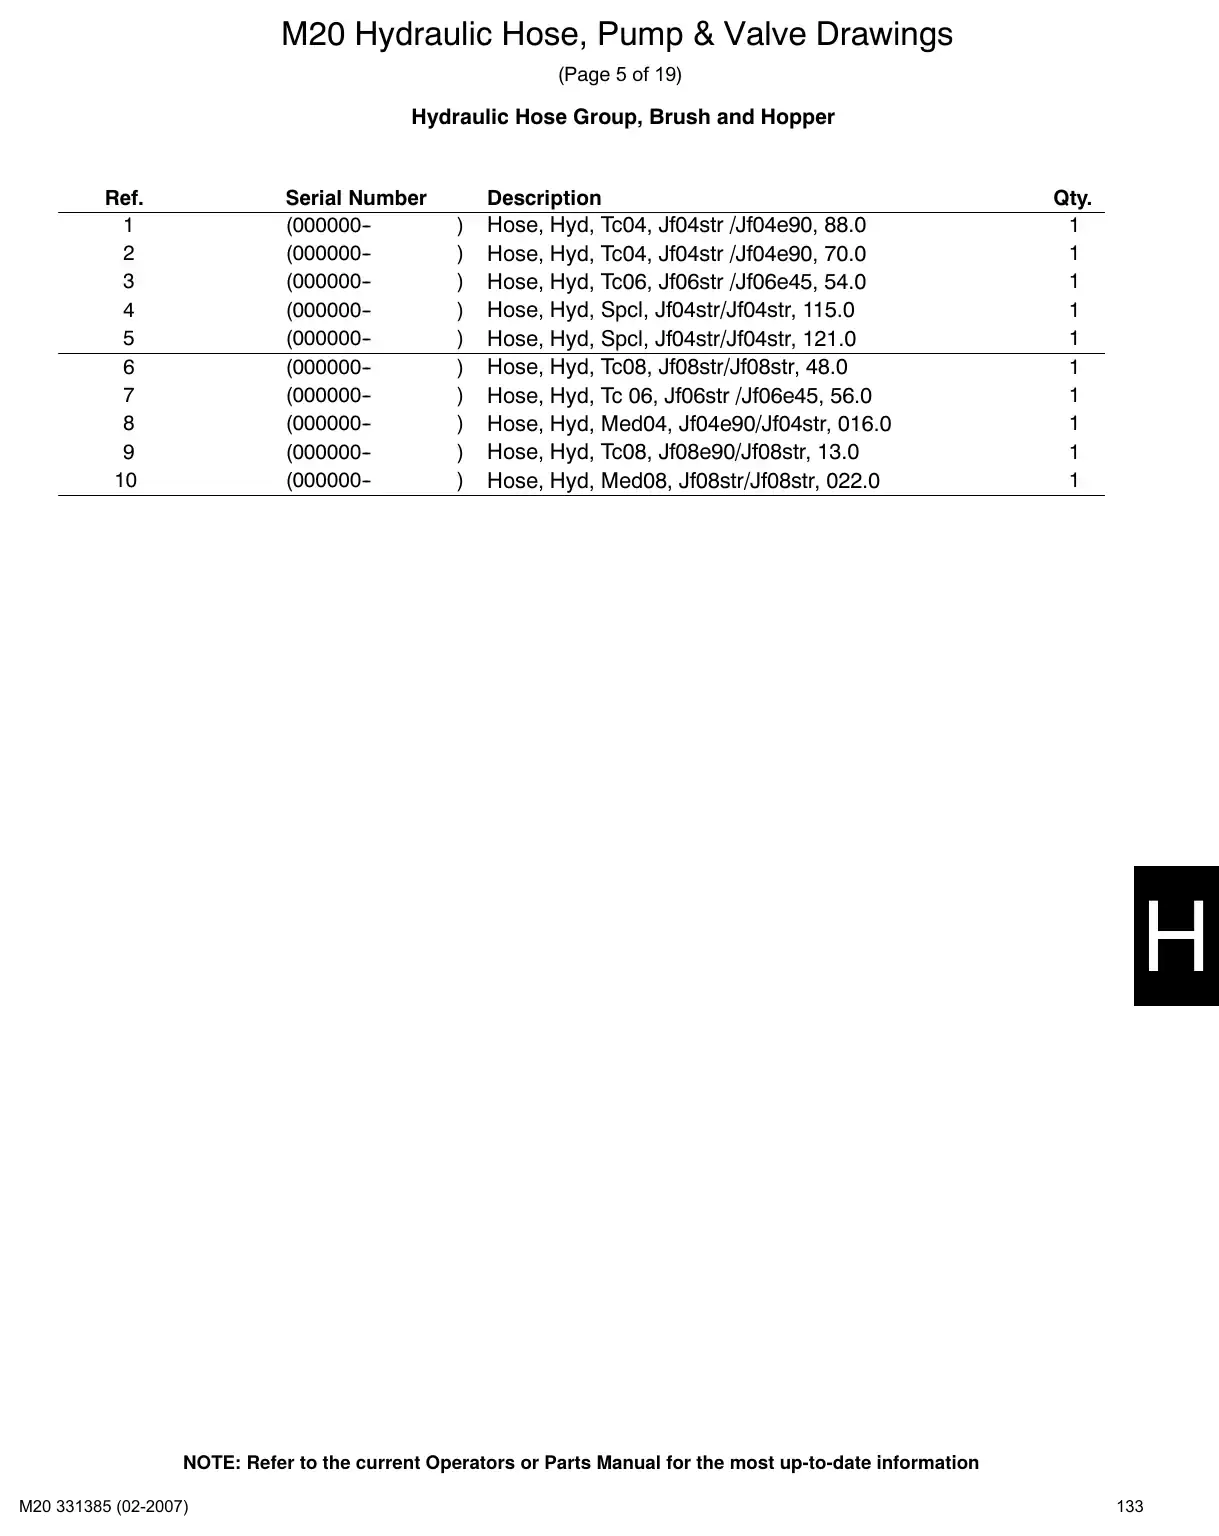
Text of manual page 133
M20 Hydraulic Hose, Pump & Valve Drawings
(Page 5 of 19)
Hydraulic Hose Group, Brush and Hopper
Ref.
1
2
3
4
5
6
7
8
9
10
Part No.
1027321
1025548
1026733
1024688
1023769
57946
1025544
Serial Number
(000000-(000000-(000000-(000000-(000000-(000000-(000000-(000000-(000000-(000000-
)
)
)
)
)
)
)
)
)
)
Description
Hose, Hyd, Tc04, Jf04str /Jf04e90, 88.0
Hose, Hyd, Tc04, Jf04str /Jf04e90, 70.0
Hose, Hyd, Tc06, Jf06str /Jf06e45, 54.0
Hose, Hyd, Spcl, Jf04str/Jf04str, 115.0
Hose, Hyd, Spcl, Jf04str/Jf04str, 121.0
Hose, Hyd, Tc08, Jf08str/Jf08str, 48.0
Hose, Hyd, Tc 06, Jf06str /Jf06e45, 56.0
Hose, Hyd, Med04, Jf04e90/Jf04str, 016.0
Hose, Hyd, Tc08, Jf08e90/Jf08str, 13.0
Hose, Hyd, Med08, Jf08str/Jf08str, 022.0
Qty.
1
1
1
1
1
1
1
1
1
1
NOTE: Refer to the current Operators or Parts Manual for the most up-to-date information
133
Squeegee lift hosesPages 134–135 · 2 pages
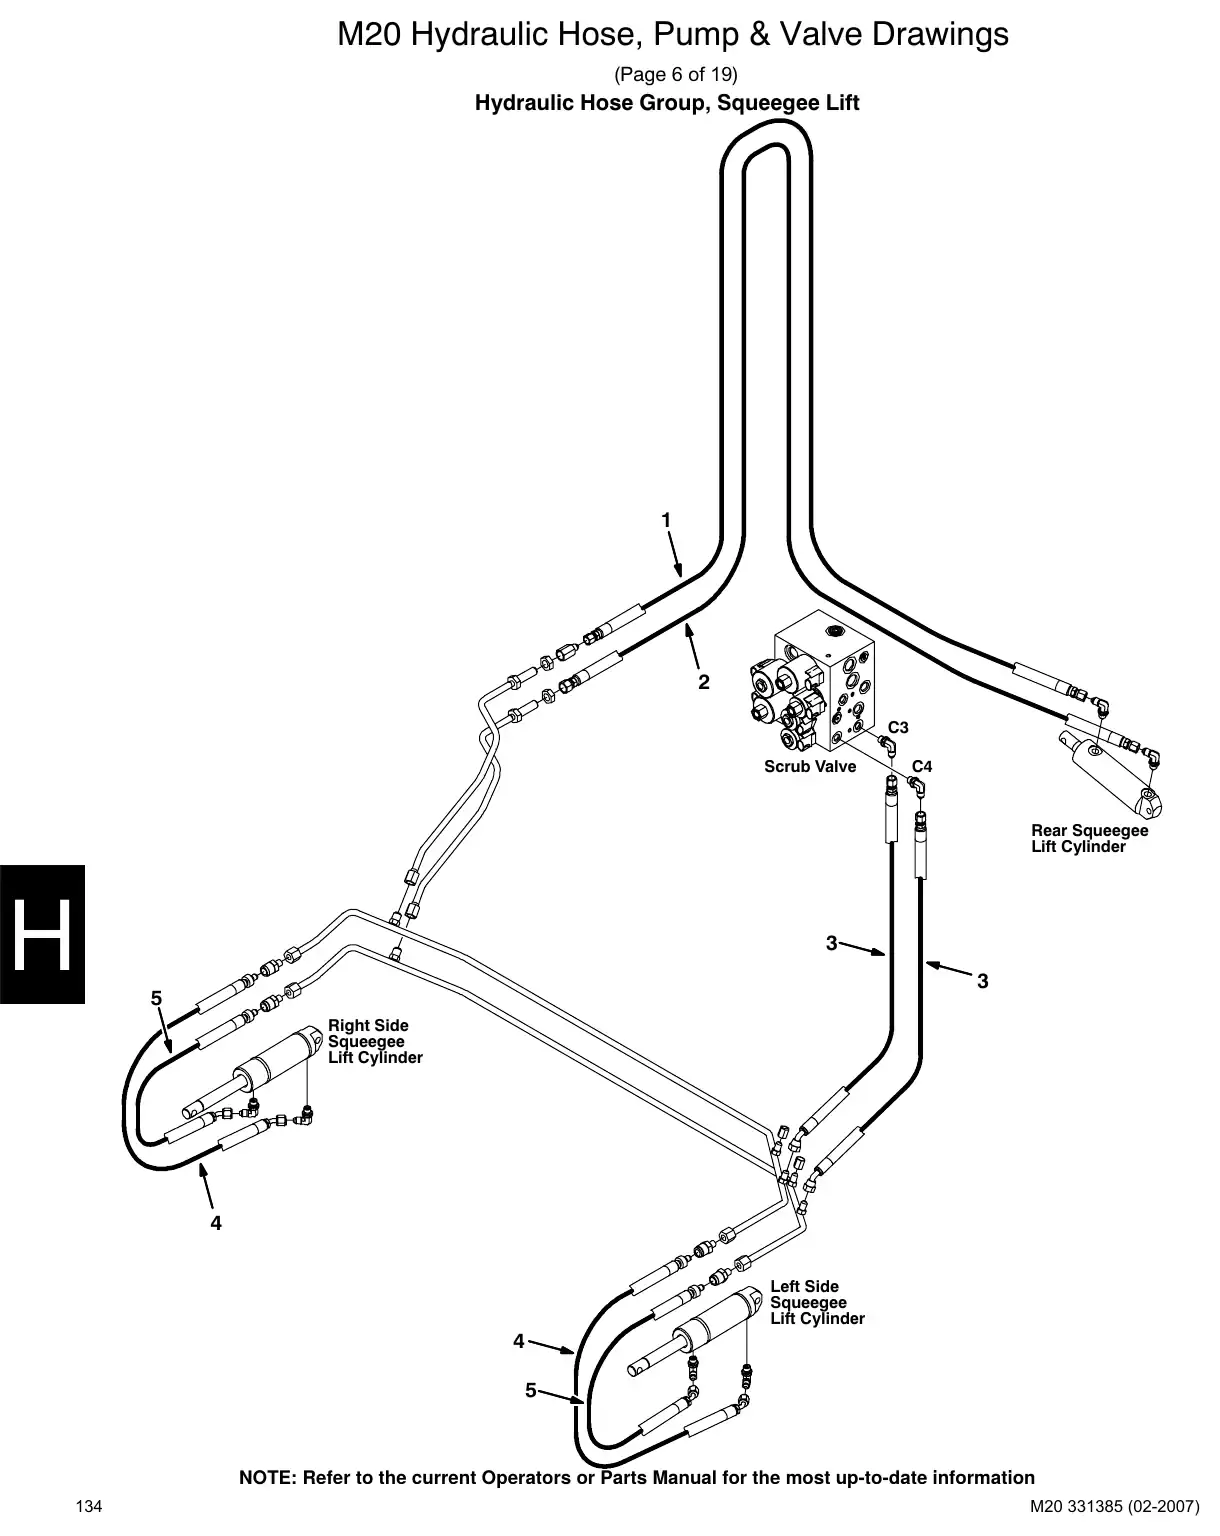
Text of manual page 134
M20 Hydraulic Hose, Pump & Valve Drawings
(Page 6 of 19)
Hydraulic Hose Group, Squeegee Lift
1
2
C3
Scrub Valve
C4
Rear Squeegee
Lift Cylinder
3
3
5
Right Side
Squeegee
Lift Cylinder
4
Left Side
Squeegee
Lift Cylinder
4
5
NOTE: Refer to the current Operators or Parts Manual for the most up-to-date information
134
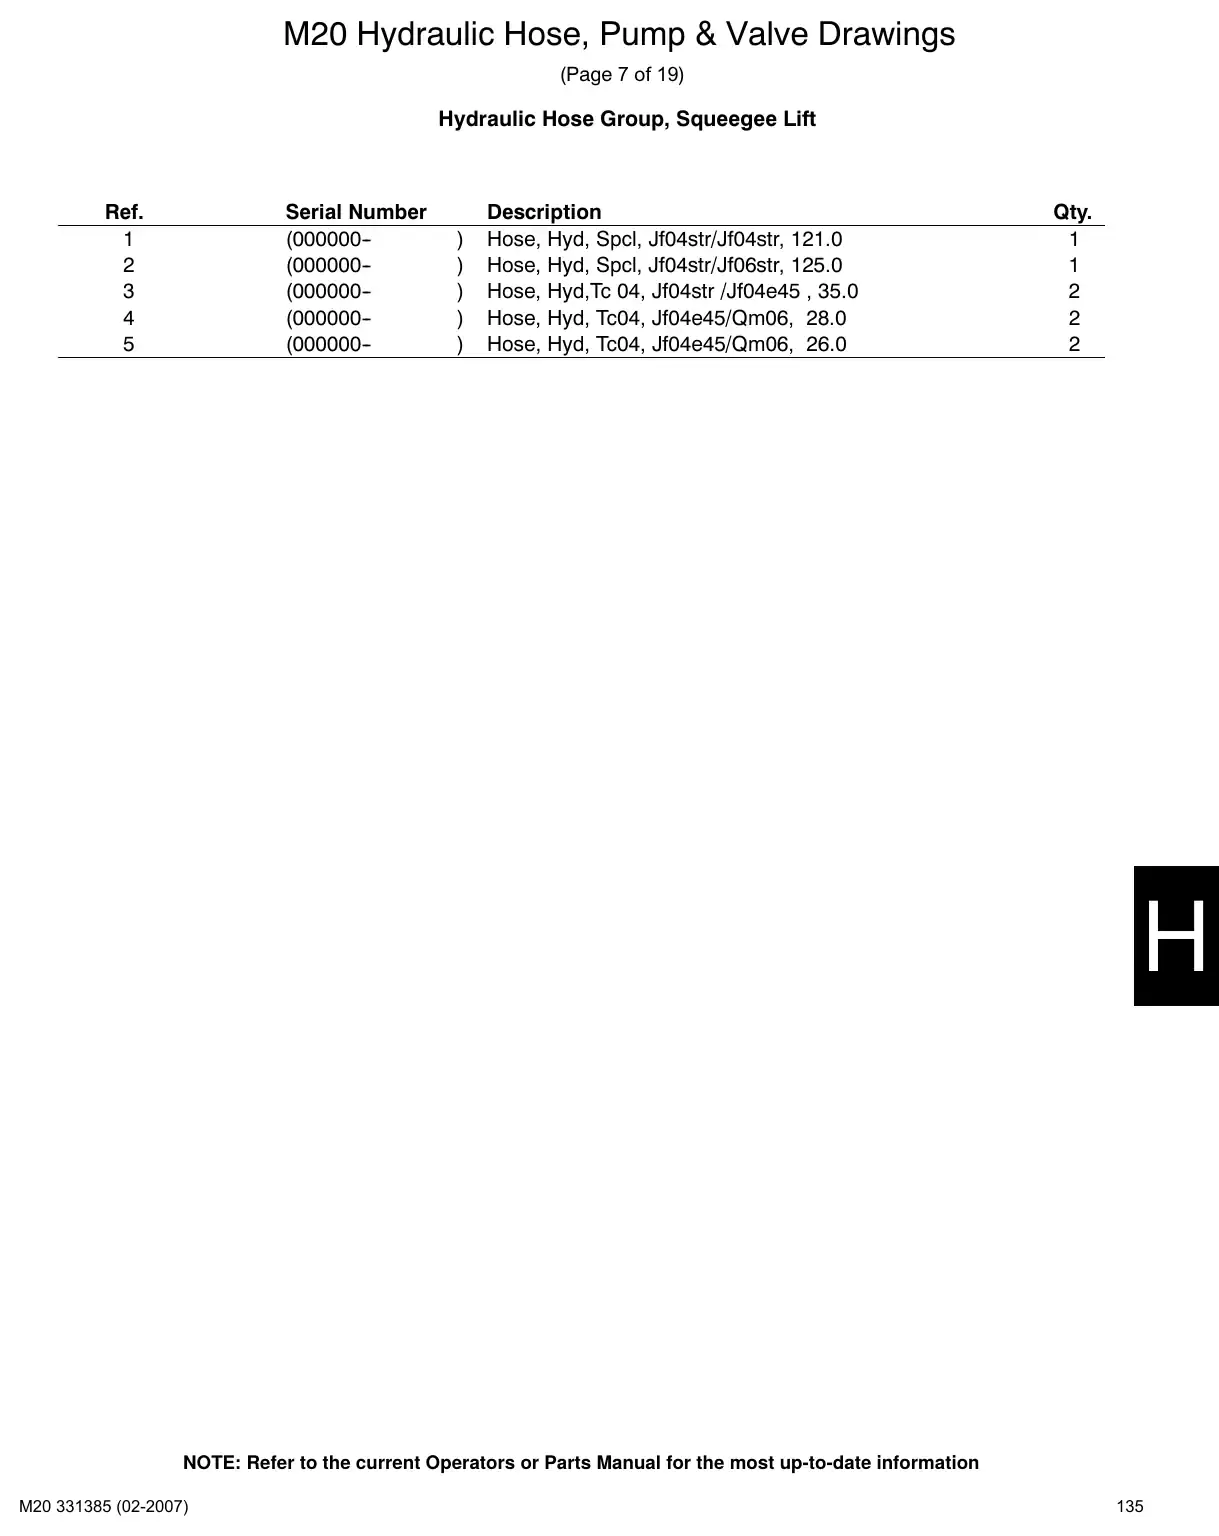
Text of manual page 135
M20 Hydraulic Hose, Pump & Valve Drawings
(Page 7 of 19)
Hydraulic Hose Group, Squeegee Lift
Ref.
1
2
3
4
5
Part No.
1025551
1030709
1025550
Serial Number
(000000-(000000-(000000-(000000-(000000-
)
)
)
)
)
Description
Hose, Hyd, Spcl, Jf04str/Jf04str, 121.0
Hose, Hyd, Spcl, Jf04str/Jf06str, 125.0
Hose, Hyd,Tc 04, Jf04str /Jf04e45 , 35.0
Hose, Hyd, Tc04, Jf04e45/Qm06, 28.0
Hose, Hyd, Tc04, Jf04e45/Qm06, 26.0
Qty.
1
1
2
2
2
NOTE: Refer to the current Operators or Parts Manual for the most up-to-date information
135
Pumps groupPages 136–137 · 2 pages
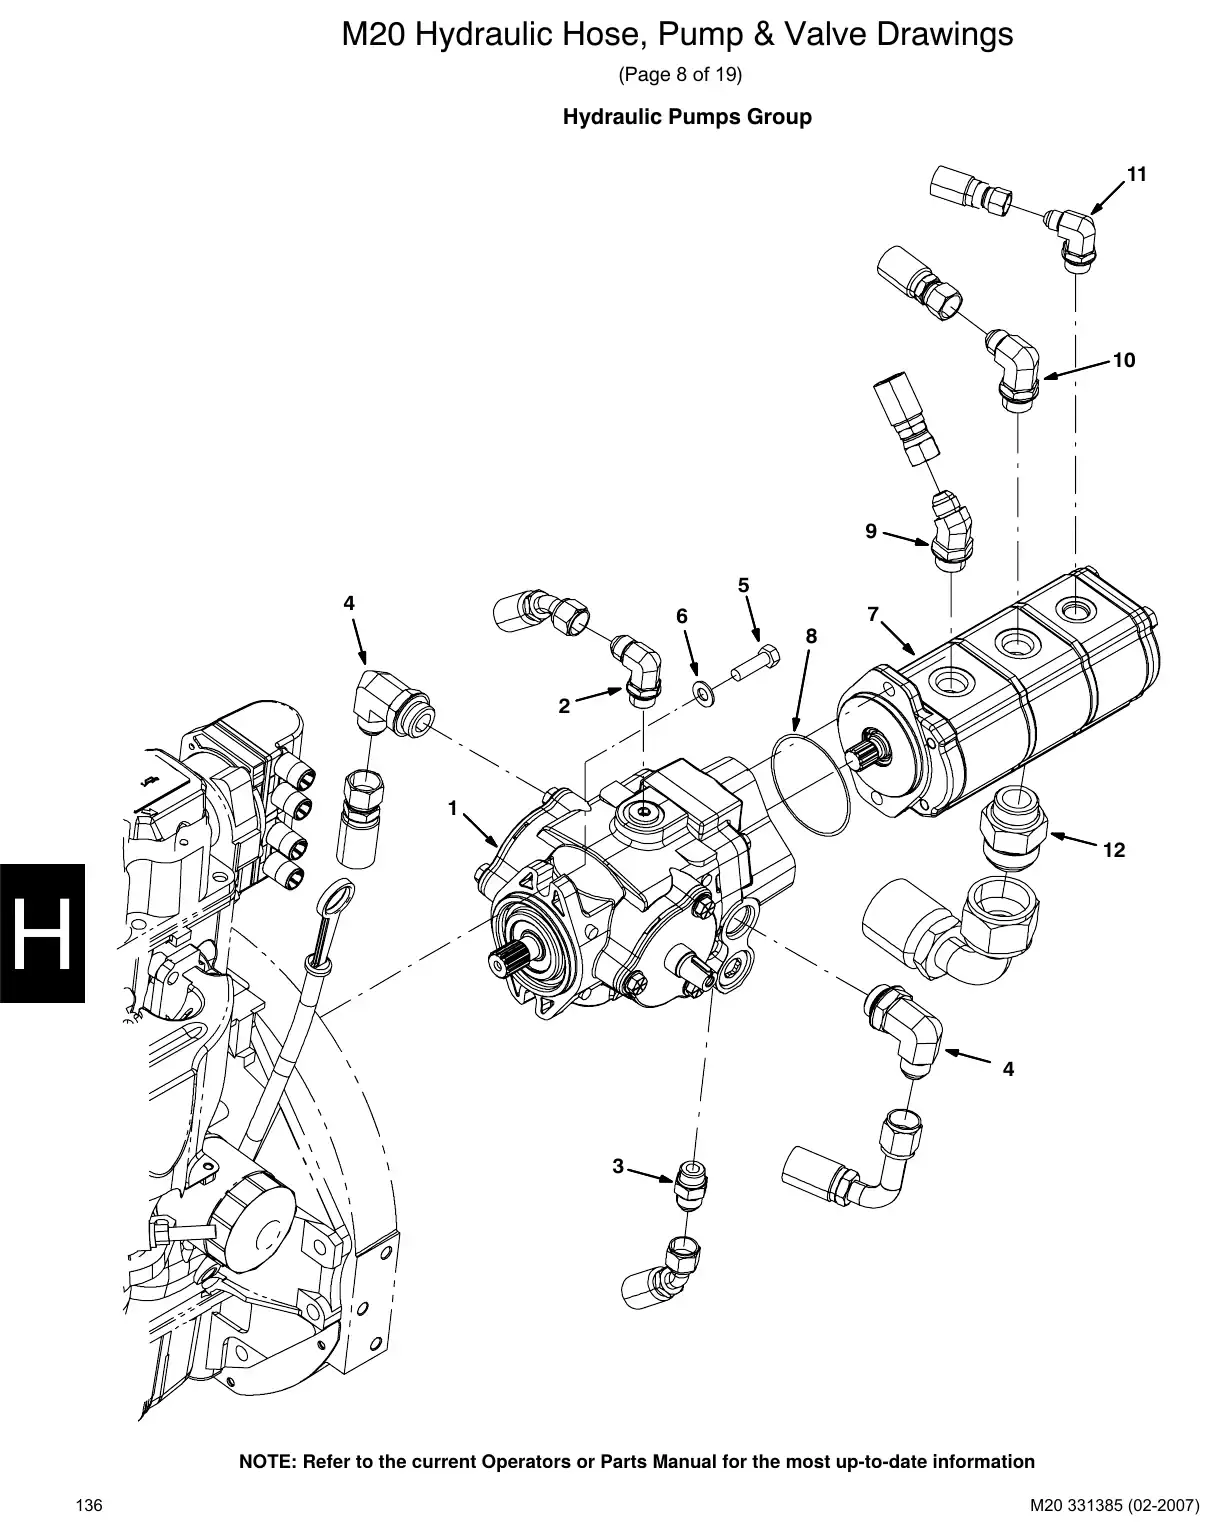
Text of manual page 136
M20 Hydraulic Hose, Pump & Valve Drawings
(Page 8 of 19)
Hydraulic Pumps Group
11
10
9
5
4
7
6
8
2
1
12
4
3
NOTE: Refer to the current Operators or Parts Manual for the most up-to-date information
136
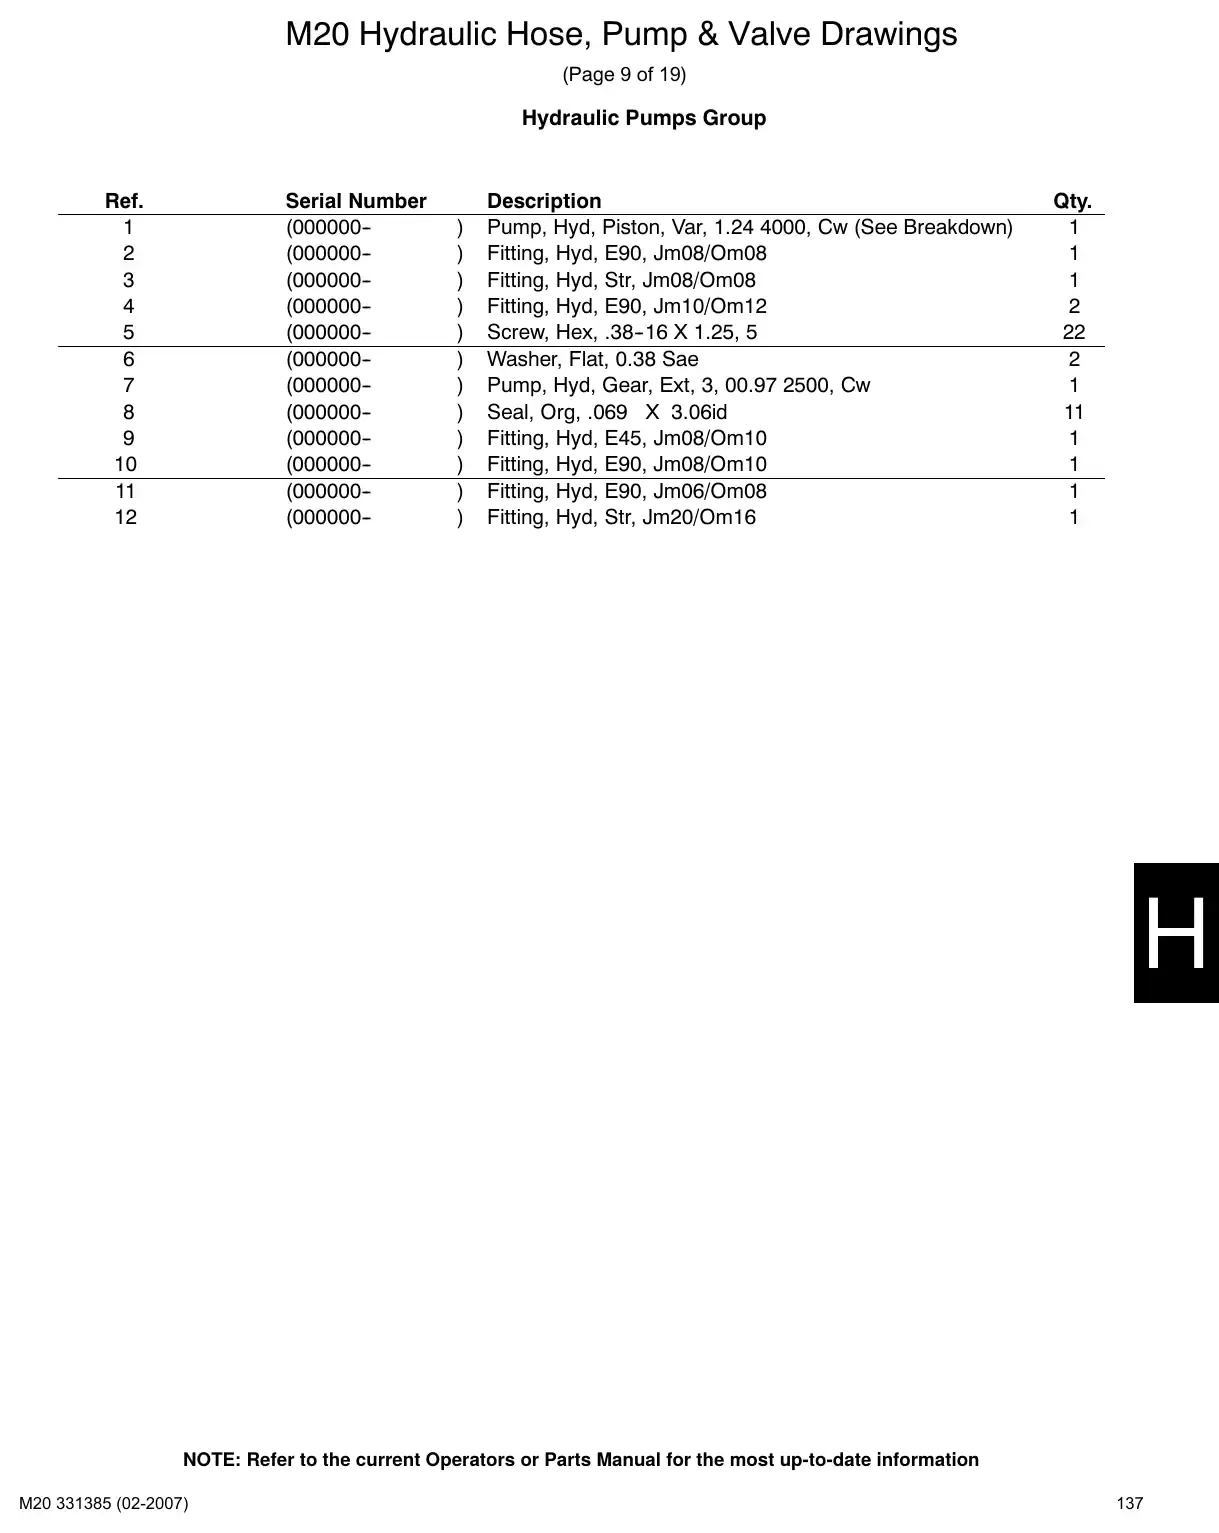
Text of manual page 137
M20 Hydraulic Hose, Pump & Valve Drawings
(Page 9 of 19)
Hydraulic Pumps Group
Ref.
1
2
3
4
5
6
7
8
9
10
11
12
Part No.
44868
44869
53076
21198
1022666
65145-1
47513
56821
67811
Serial Number
(000000-(000000-(000000-(000000-(000000-(000000-(000000-(000000-(000000-(000000-(000000-(000000-
)
)
)
)
)
)
)
)
)
)
)
)
Description
Pump, Hyd, Piston, Var, 1.24 4000, Cw (See Breakdown)
Fitting, Hyd, E90, Jm08/Om08
Fitting, Hyd, Str, Jm08/Om08
Fitting, Hyd, E90, Jm10/Om12
Screw, Hex, .38-16 X 1.25, 5
Washer, Flat, 0.38 Sae
Pump, Hyd, Gear, Ext, 3, 00.97 2500, Cw
Seal, Org, .069 X 3.06id
Fitting, Hyd, E45, Jm08/Om10
Fitting, Hyd, E90, Jm08/Om10
Fitting, Hyd, E90, Jm06/Om08
Fitting, Hyd, Str, Jm20/Om16
Qty.
1
1
1
2
22
2
1
11
1
1
1
1
NOTE: Refer to the current Operators or Parts Manual for the most up-to-date information
137
Cooler and tubes groupPages 138–139 · 2 pages
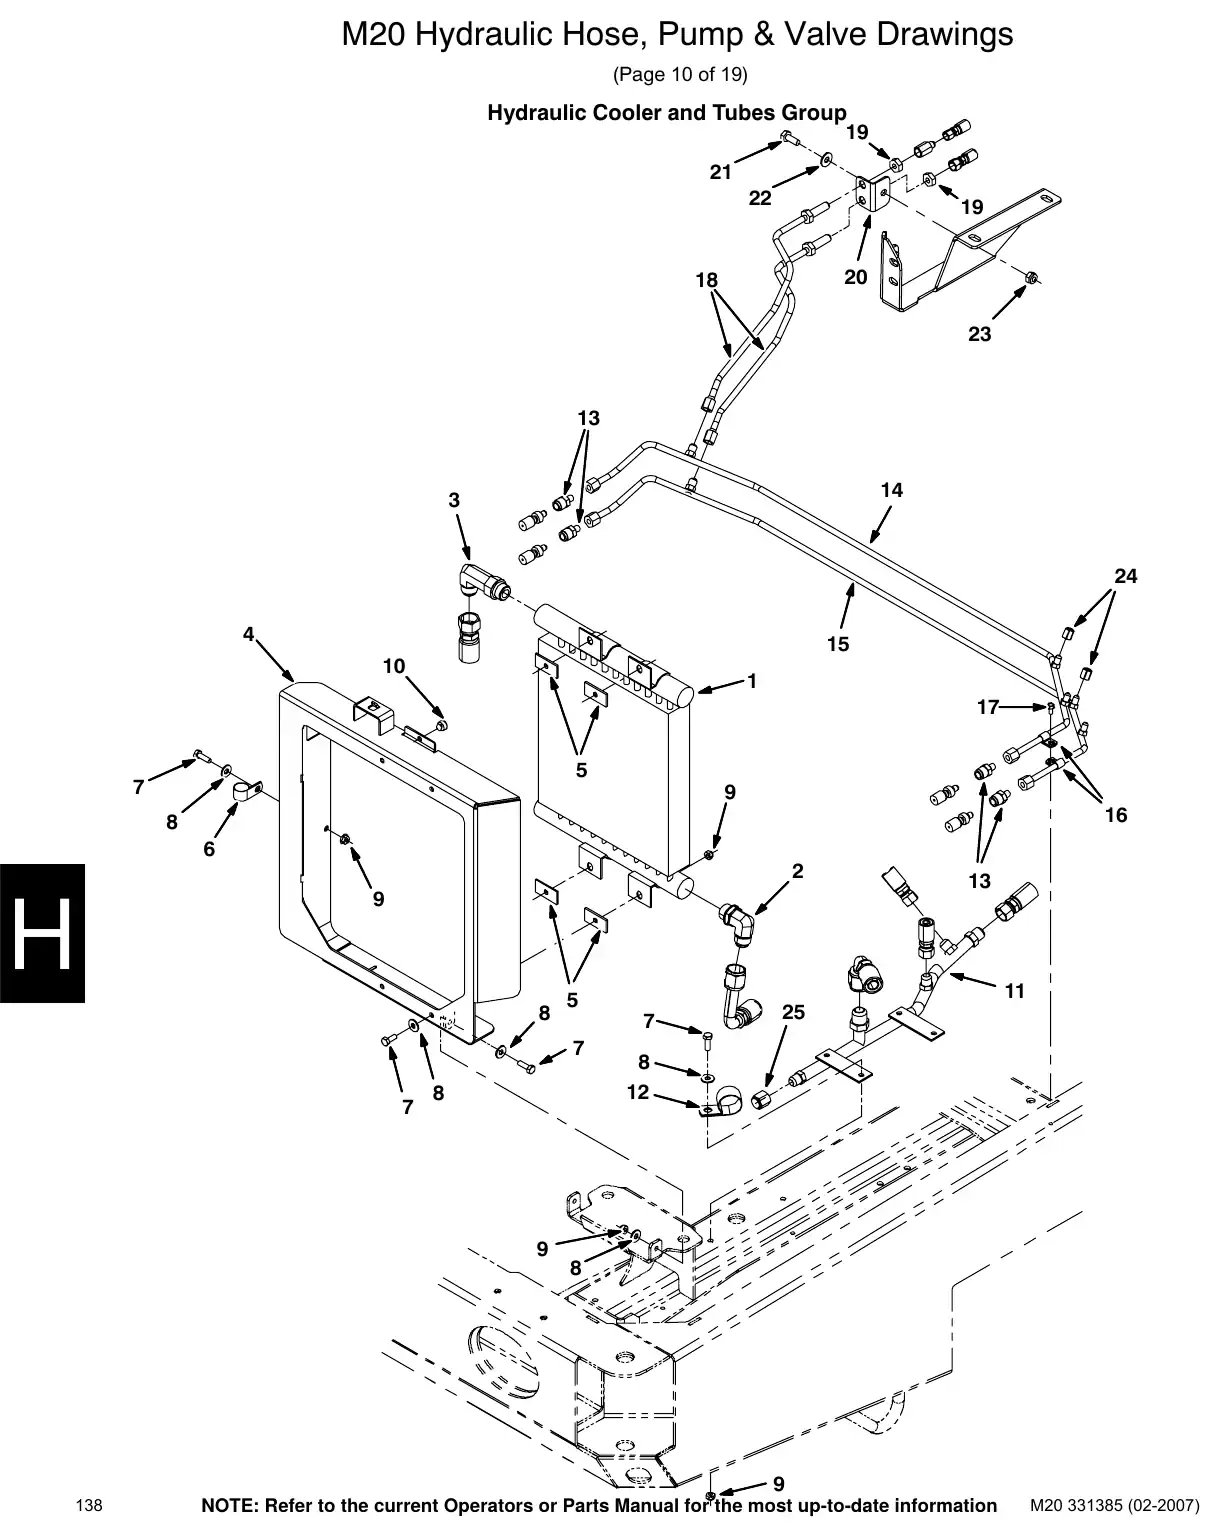
Text of manual page 138
M20 Hydraulic Hose, Pump & Valve Drawings
(Page 10 of 19)
Hydraulic Cooler and Tubes Group
19
21
22
19
20
18
23
13
14
3
24
4
15
10
1
17
5
7
9
16
8
6
2
9
8
7
7
8
9
138
11
5
7
13
25
8
12
8
9
NOTE: Refer to the current Operators or Parts Manual for the most up-to-date information
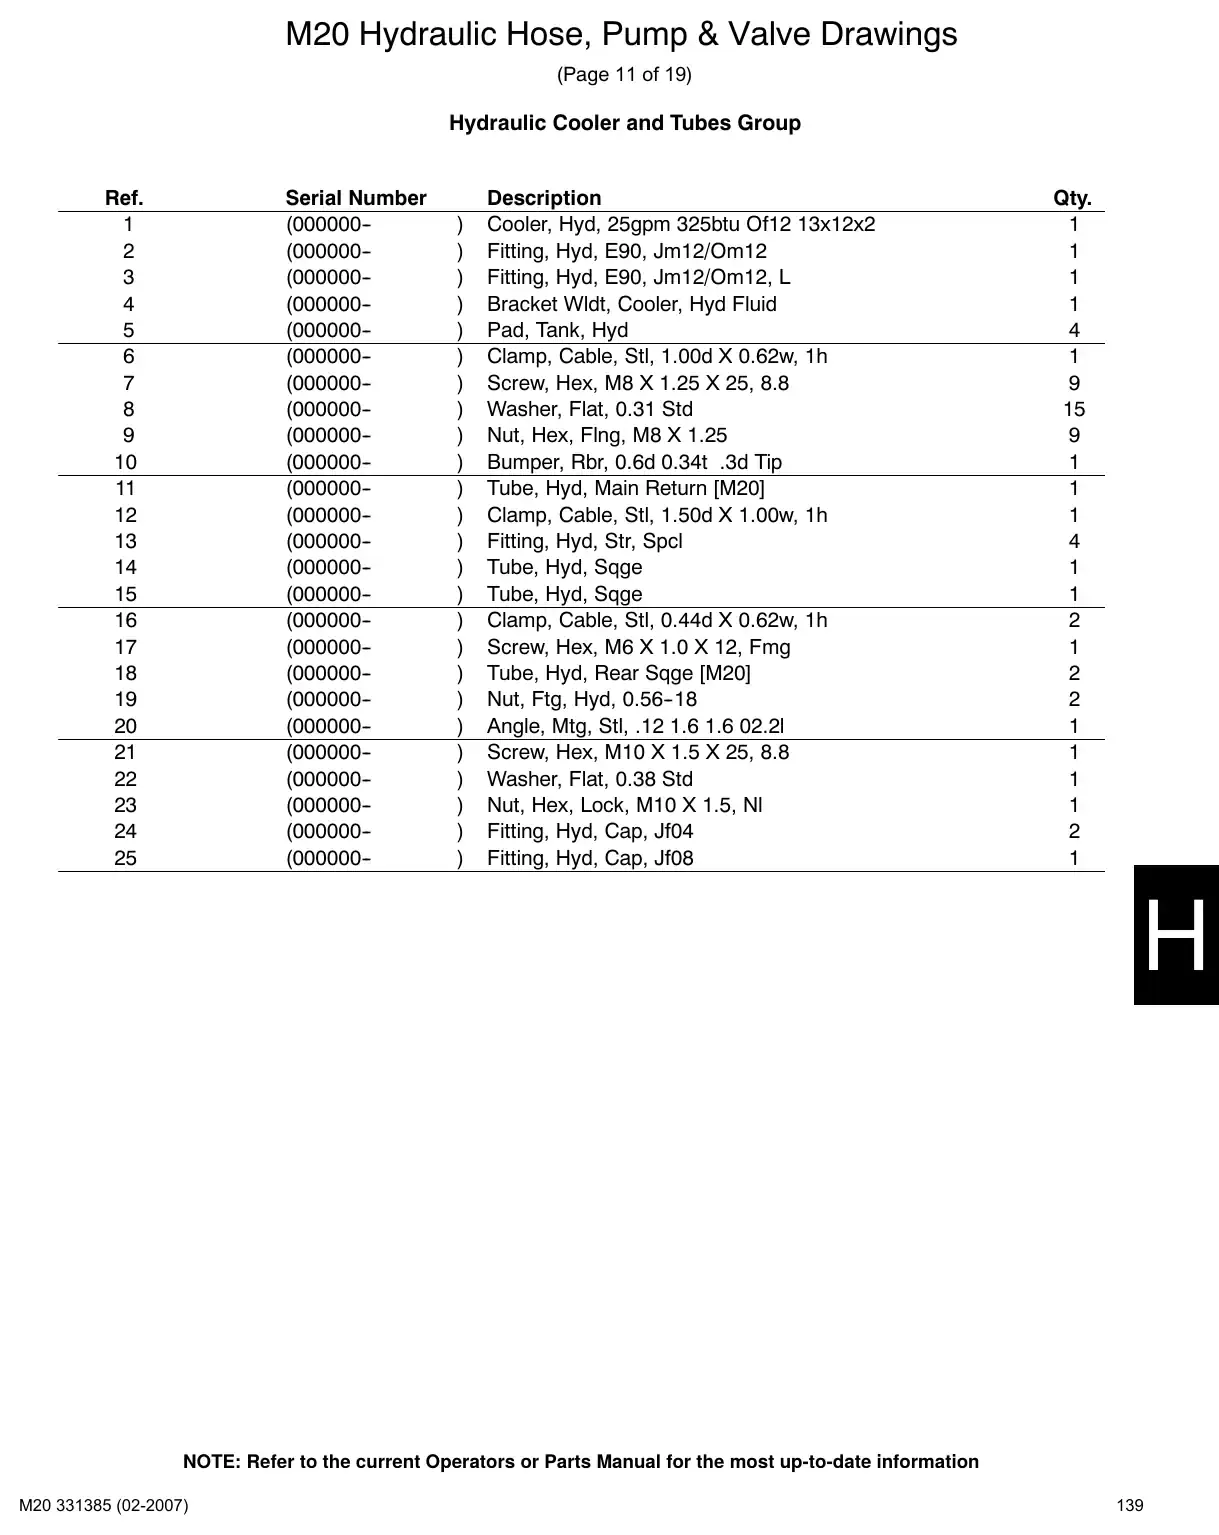
Text of manual page 139
M20 Hydraulic Hose, Pump & Valve Drawings
(Page 11 of 19)
Hydraulic Cooler and Tubes Group
Ref.
1
2
3
4
5
6
7
8
9
10
11
12
13
14
15
16
17
18
19
20
21
22
23
24
25
Part No.
46481
62471
1026319
1026126
39277
32491
07791
51787
53466
1027002
1028821
1028822
74455
1028823
35904
1026647
32492
41430
50161
Serial Number
(000000-(000000-(000000-(000000-(000000-(000000-(000000-(000000-(000000-(000000-(000000-(000000-(000000-(000000-(000000-(000000-(000000-(000000-(000000-(000000-(000000-(000000-(000000-(000000-(000000-
)
)
)
)
)
)
)
)
)
)
)
)
)
)
)
)
)
)
)
)
)
)
)
)
)
Description
Cooler, Hyd, 25gpm 325btu Of12 13x12x2
Fitting, Hyd, E90, Jm12/Om12
Fitting, Hyd, E90, Jm12/Om12, L
Bracket Wldt, Cooler, Hyd Fluid
Pad, Tank, Hyd
Clamp, Cable, Stl, 1.00d X 0.62w, 1h
Screw, Hex, M8 X 1.25 X 25, 8.8
Washer, Flat, 0.31 Std
Nut, Hex, Flng, M8 X 1.25
Bumper, Rbr, 0.6d 0.34t .3d Tip
Tube, Hyd, Main Return [M20]
Clamp, Cable, Stl, 1.50d X 1.00w, 1h
Fitting, Hyd, Str, Spcl
Tube, Hyd, Sqge
Tube, Hyd, Sqge
Clamp, Cable, Stl, 0.44d X 0.62w, 1h
Screw, Hex, M6 X 1.0 X 12, Fmg
Tube, Hyd, Rear Sqge [M20]
Nut, Ftg, Hyd, 0.56-18
Angle, Mtg, Stl, .12 1.6 1.6 02.2l
Screw, Hex, M10 X 1.5 X 25, 8.8
Washer, Flat, 0.38 Std
Nut, Hex, Lock, M10 X 1.5, Nl
Fitting, Hyd, Cap, Jf04
Fitting, Hyd, Cap, Jf08
Qty.
1
1
1
1
4
1
9
15
9
1
1
1
4
1
1
2
1
2
2
1
1
1
1
2
1
NOTE: Refer to the current Operators or Parts Manual for the most up-to-date information
139
Reservoir groupPages 140–141 · 2 pages
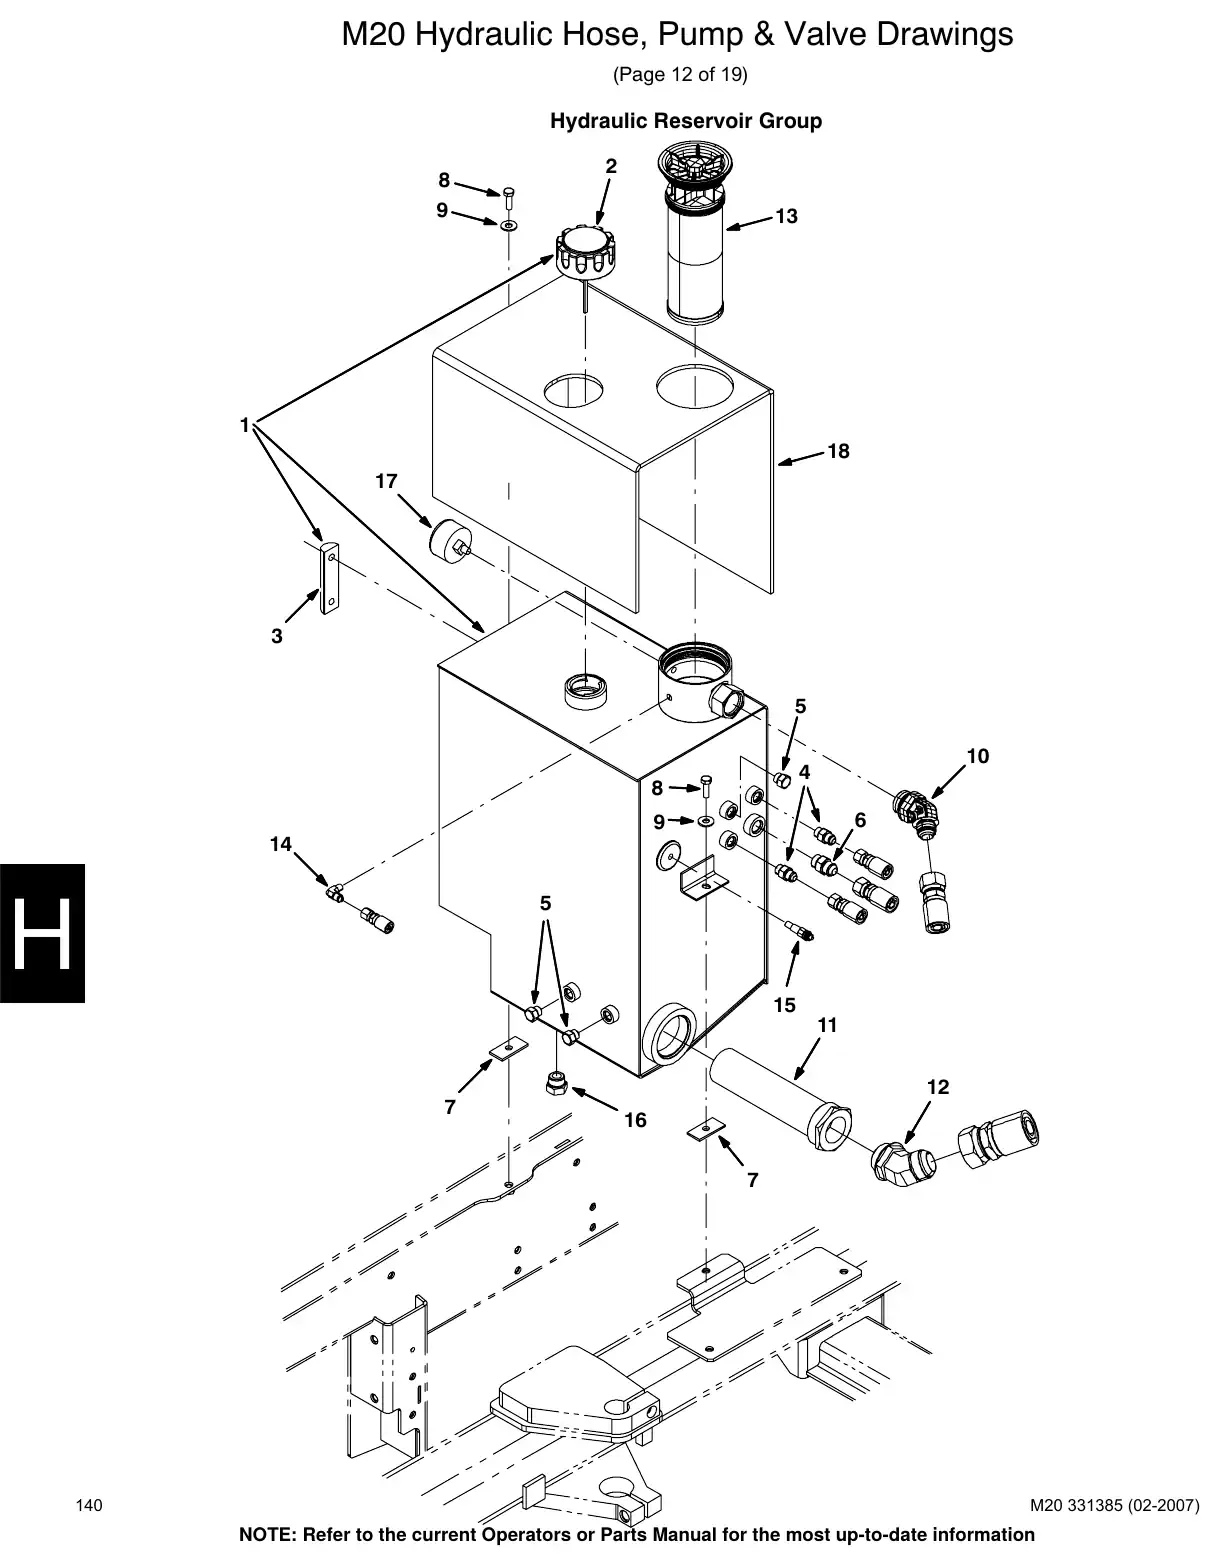
Text of manual page 140
M20 Hydraulic Hose, Pump & Valve Drawings
(Page 12 of 19)
Hydraulic Reservoir Group
2
8
9
13
1
18
17
3
5
10
4
8
6
9
14
5
15
11
12
7
16
7
140
NOTE: Refer to the current Operators or Parts Manual for the most up-to-date information
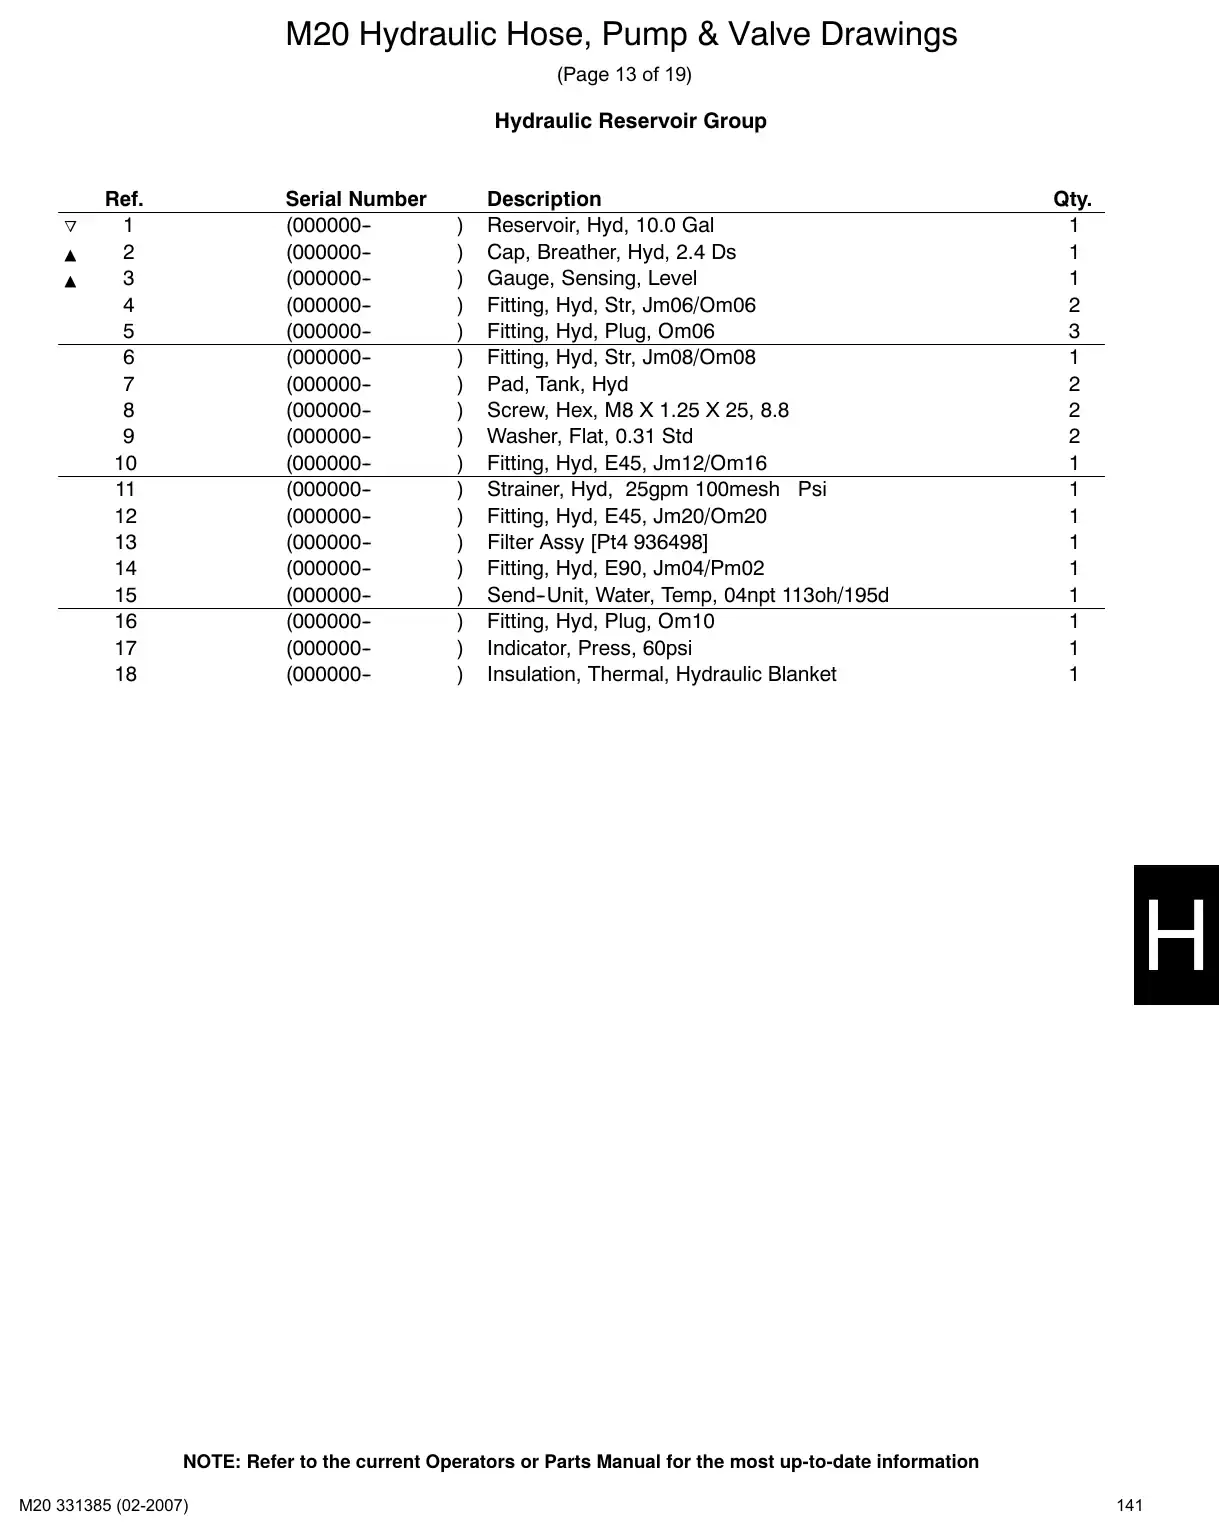
Text of manual page 141
M20 Hydraulic Hose, Pump & Valve Drawings
(Page 13 of 19)
Hydraulic Reservoir Group
o
Ref.
1
2
3
4
5
6
7
8
9
10
11
12
13
14
15
16
17
18
Part No.
25122
65215
56690
46482
1026126
39277
32491
1023545
71726
1021579
55455
58592
1025132
1034878
Serial Number
(000000-(000000-(000000-(000000-(000000-(000000-(000000-(000000-(000000-(000000-(000000-(000000-(000000-(000000-(000000-(000000-(000000-(000000-
)
)
)
)
)
)
)
)
)
)
)
)
)
)
)
)
)
)
Description
Reservoir, Hyd, 10.0 Gal
Cap, Breather, Hyd, 2.4 Ds
Gauge, Sensing, Level
Fitting, Hyd, Str, Jm06/Om06
Fitting, Hyd, Plug, Om06
Fitting, Hyd, Str, Jm08/Om08
Pad, Tank, Hyd
Screw, Hex, M8 X 1.25 X 25, 8.8
Washer, Flat, 0.31 Std
Fitting, Hyd, E45, Jm12/Om16
Strainer, Hyd, 25gpm 100mesh Psi
Fitting, Hyd, E45, Jm20/Om20
Filter Assy [Pt4 936498]
Fitting, Hyd, E90, Jm04/Pm02
Send-Unit, Water, Temp, 04npt 113oh/195d
Fitting, Hyd, Plug, Om10
Indicator, Press, 60psi
Insulation, Thermal, Hydraulic Blanket
Qty.
1
1
1
2
3
1
2
2
2
1
1
1
1
1
1
1
1
1
NOTE: Refer to the current Operators or Parts Manual for the most up-to-date information
141
Scrub/sweep manifold valvesPages 142–143 · 2 pages
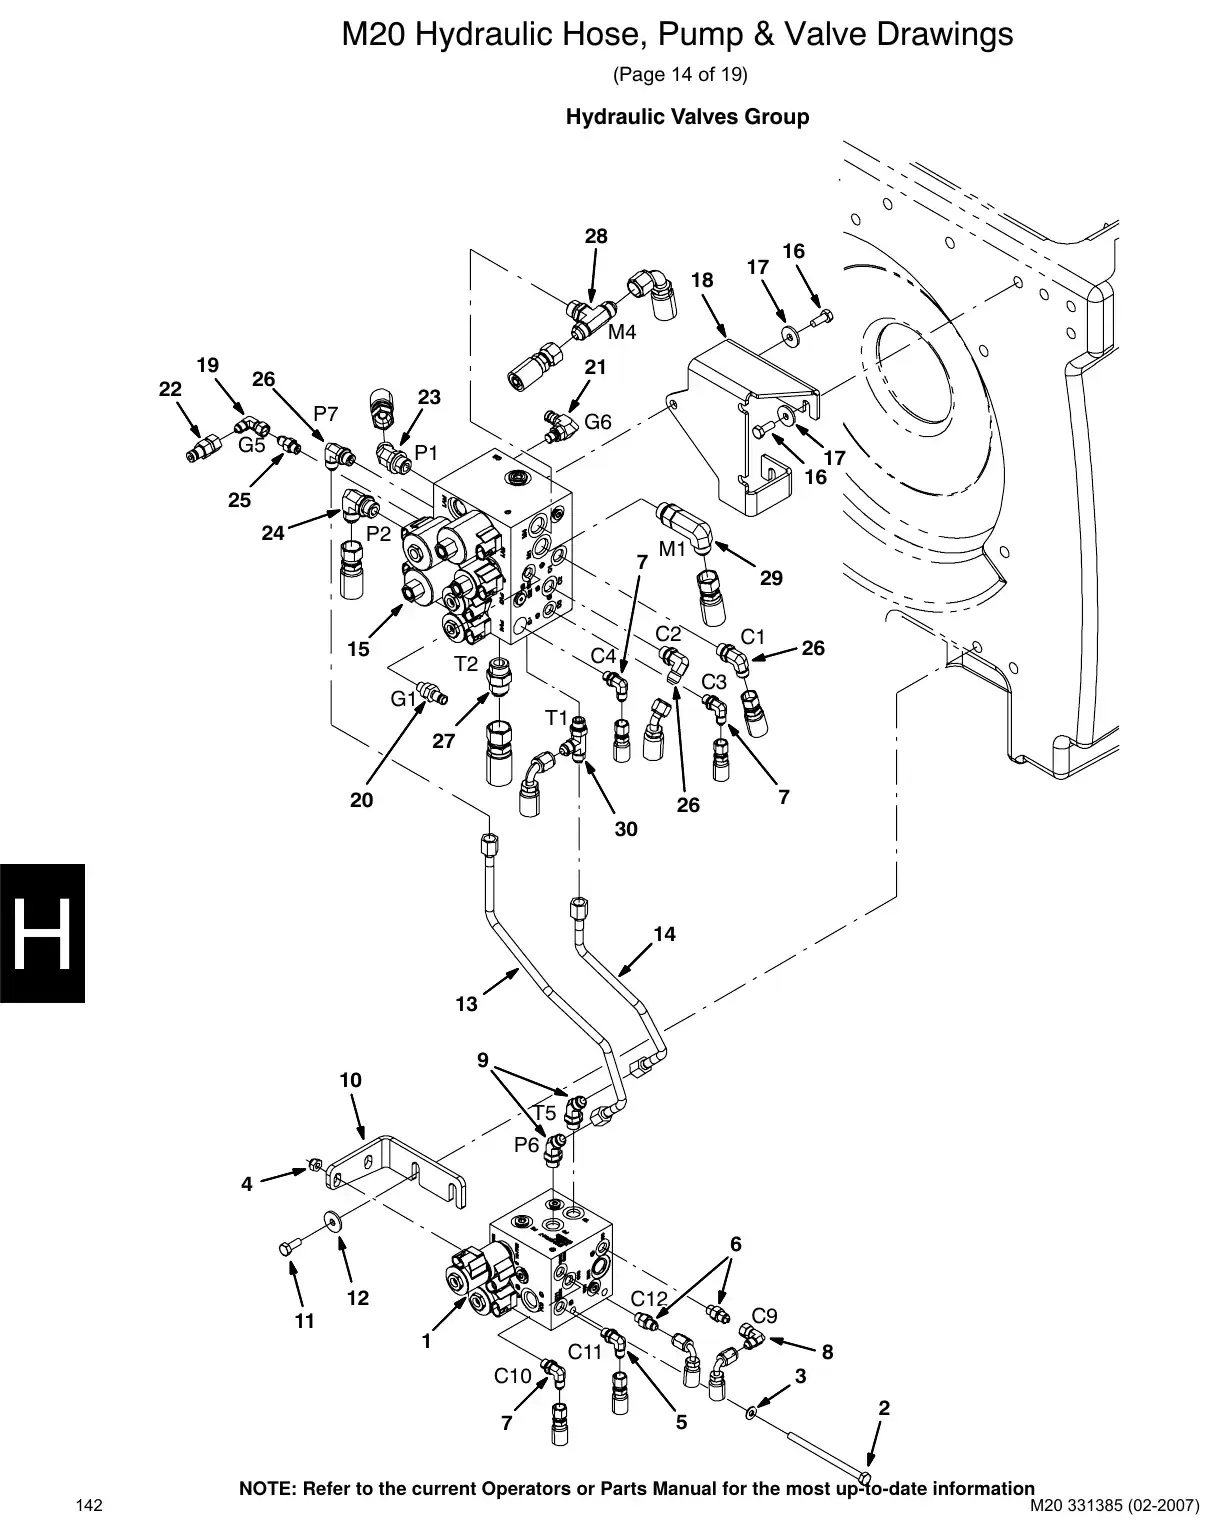
Text of manual page 142
M20 Hydraulic Hose, Pump & Valve Drawings
(Page 14 of 19)
Hydraulic Valves Group
28
17
18
16
M4
19
21
26
22
23
P7
G6
G5
P1
17
16
25
24
P2
7
M1
29
C2
15
C1
C4
T2
26
C3
G1
T1
27
20
7
26
30
14
13
9
10
T5
P6
4
6
12
C12
C9
11
1
8
C11
C10
7
142
3
5
2
NOTE: Refer to the current Operators or Parts Manual for the most up-to-date information
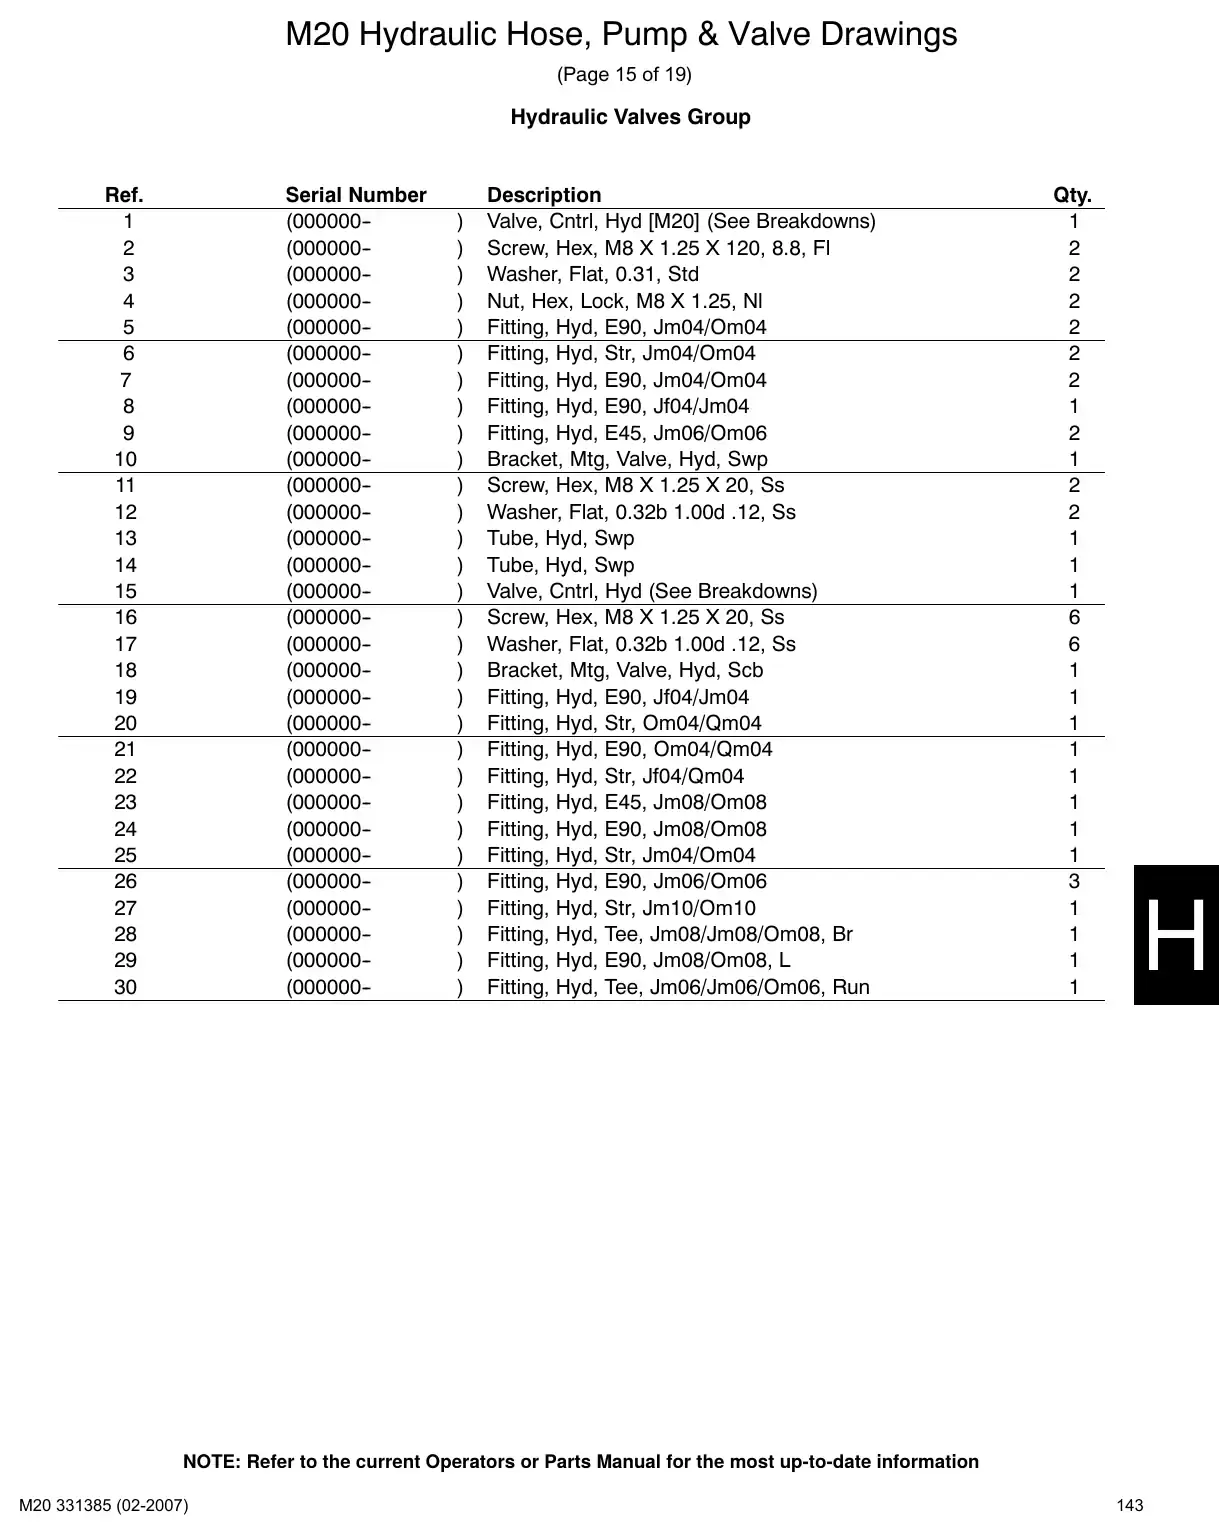
Text of manual page 143
M20 Hydraulic Hose, Pump & Valve Drawings
(Page 15 of 19)
Hydraulic Valves Group
Ref.
1
2
3
4
5
6
7
8
9
10
11
12
13
14
15
16
17
18
19
20
21
22
23
24
25
26
27
28
29
30
Part No.
49883
32491
08709
77097
77097
39210
47522
1020708
1017218
1022482
1022484
1020394
1017218
1021991
39210
395973
396476
42226
44868
55586
46480
49933
69173
Serial Number
(000000-(000000-(000000-(000000-(000000-(000000-(000000-(000000-(000000-(000000-(000000-(000000-(000000-(000000-(000000-(000000-(000000-(000000-(000000-(000000-(000000-(000000-(000000-(000000-(000000-(000000-(000000-(000000-(000000-(000000-
)
)
)
)
)
)
)
)
)
)
)
)
)
)
)
)
)
)
)
)
)
)
)
)
)
)
)
)
)
)
Description
Valve, Cntrl, Hyd [M20] (See Breakdowns)
Screw, Hex, M8 X 1.25 X 120, 8.8, Fl
Washer, Flat, 0.31, Std
Nut, Hex, Lock, M8 X 1.25, Nl
Fitting, Hyd, E90, Jm04/Om04
Fitting, Hyd, Str, Jm04/Om04
Fitting, Hyd, E90, Jm04/Om04
Fitting, Hyd, E90, Jf04/Jm04
Fitting, Hyd, E45, Jm06/Om06
Bracket, Mtg, Valve, Hyd, Swp
Screw, Hex, M8 X 1.25 X 20, Ss
Washer, Flat, 0.32b 1.00d .12, Ss
Tube, Hyd, Swp
Tube, Hyd, Swp
Valve, Cntrl, Hyd (See Breakdowns)
Screw, Hex, M8 X 1.25 X 20, Ss
Washer, Flat, 0.32b 1.00d .12, Ss
Bracket, Mtg, Valve, Hyd, Scb
Fitting, Hyd, E90, Jf04/Jm04
Fitting, Hyd, Str, Om04/Qm04
Fitting, Hyd, E90, Om04/Qm04
Fitting, Hyd, Str, Jf04/Qm04
Fitting, Hyd, E45, Jm08/Om08
Fitting, Hyd, E90, Jm08/Om08
Fitting, Hyd, Str, Jm04/Om04
Fitting, Hyd, E90, Jm06/Om06
Fitting, Hyd, Str, Jm10/Om10
Fitting, Hyd, Tee, Jm08/Jm08/Om08, Br
Fitting, Hyd, E90, Jm08/Om08, L
Fitting, Hyd, Tee, Jm06/Jm06/Om06, Run
Qty.
1
2
2
2
2
2
2
1
2
1
2
2
1
1
1
6
6
1
1
1
1
1
1
1
1
3
1
1
1
1
NOTE: Refer to the current Operators or Parts Manual for the most up-to-date information
143
Side brush manifold valvesPages 144–145 · 2 pages
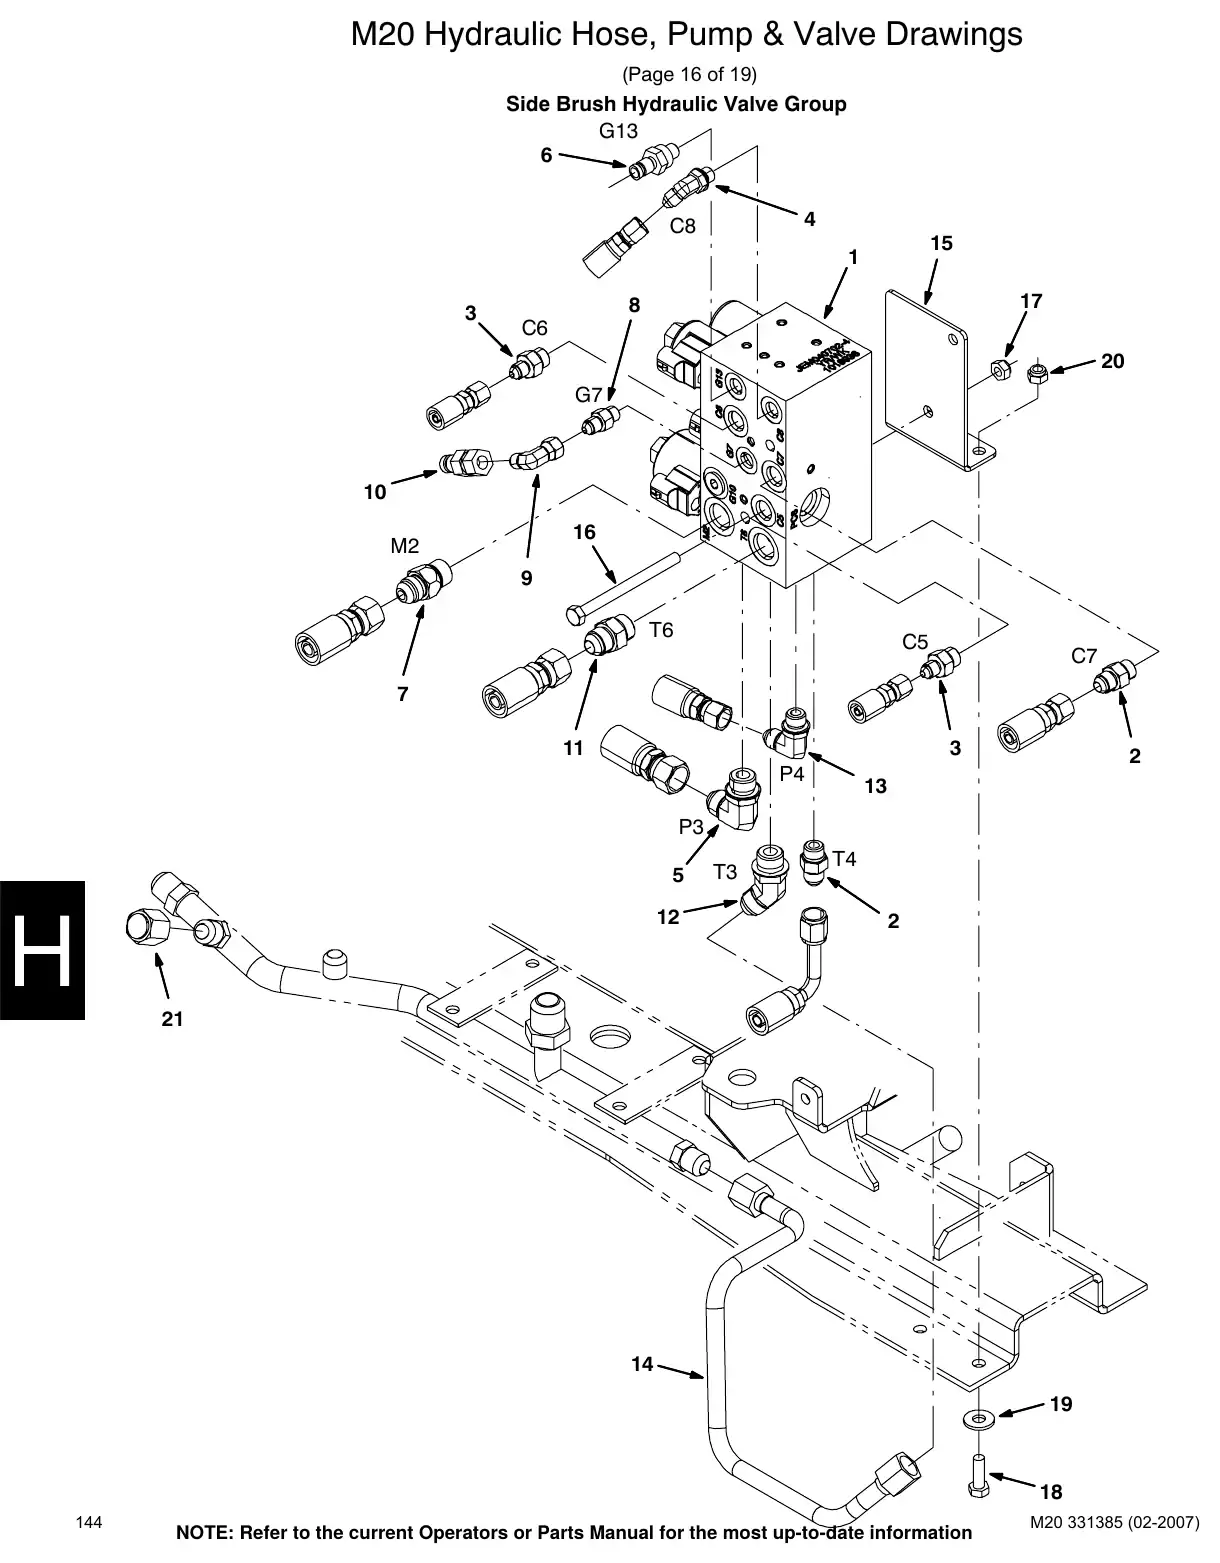
Text of manual page 144
M20 Hydraulic Hose, Pump & Valve Drawings
(Page 16 of 19)
Side Brush Hydraulic Valve Group
G13
6
4
C8
15
1
3
17
8
C6
20
G7
10
16
M2
9
T6
C5
C7
7
11
3
P4
2
13
P3
5
12
T3
T4
2
21
14
19
18
144
NOTE: Refer to the current Operators or Parts Manual for the most up-to-date information
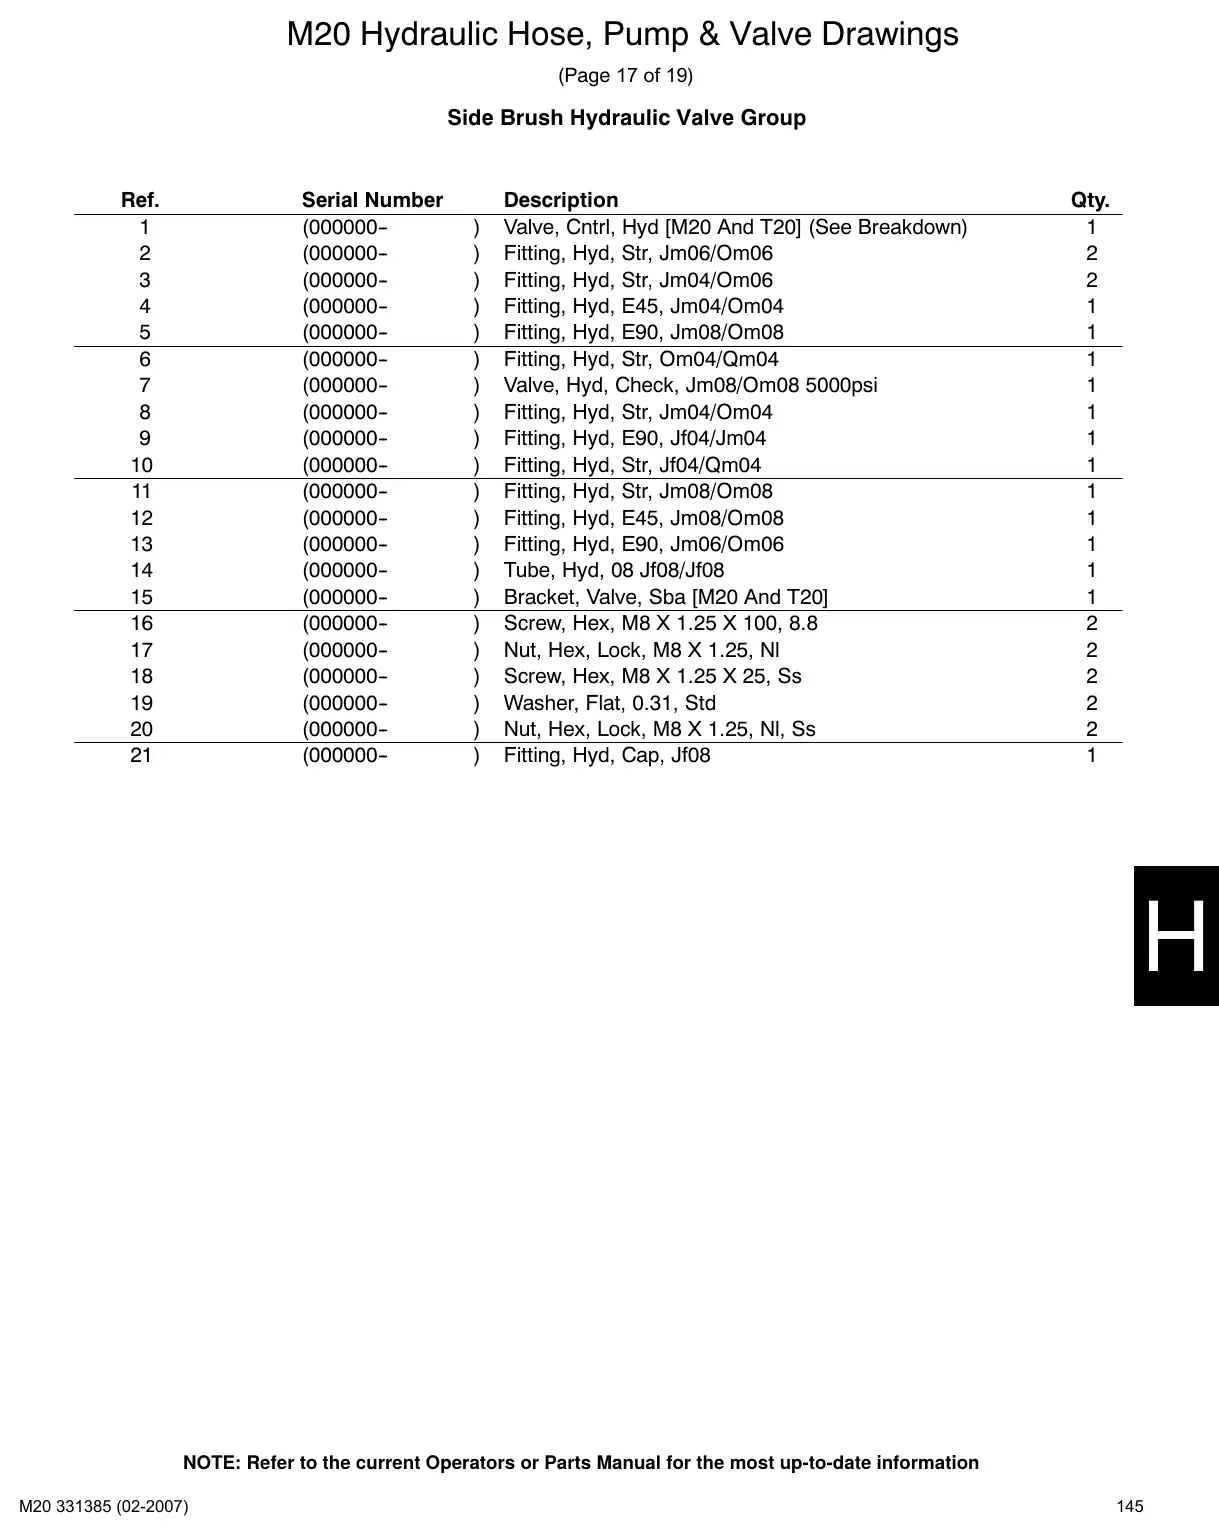
Text of manual page 145
M20 Hydraulic Hose, Pump & Valve Drawings
(Page 17 of 19)
Side Brush Hydraulic Valve Group
Ref.
1
2
3
4
5
6
7
8
9
10
11
12
13
14
15
16
17
18
19
20
21
Part No.
56690
55685
34359
44868
1026119
55586
39210
396476
42226
56820
1025405
1025834
08709
09010
32491
08713
Serial Number
(000000-(000000-(000000-(000000-(000000-(000000-(000000-(000000-(000000-(000000-(000000-(000000-(000000-(000000-(000000-(000000-(000000-(000000-(000000-(000000-(000000-
)
)
)
)
)
)
)
)
)
)
)
)
)
)
)
)
)
)
)
)
)
Description
Valve, Cntrl, Hyd [M20 And T20] (See Breakdown)
Fitting, Hyd, Str, Jm06/Om06
Fitting, Hyd, Str, Jm04/Om06
Fitting, Hyd, E45, Jm04/Om04
Fitting, Hyd, E90, Jm08/Om08
Fitting, Hyd, Str, Om04/Qm04
Valve, Hyd, Check, Jm08/Om08 5000psi
Fitting, Hyd, Str, Jm04/Om04
Fitting, Hyd, E90, Jf04/Jm04
Fitting, Hyd, Str, Jf04/Qm04
Fitting, Hyd, Str, Jm08/Om08
Fitting, Hyd, E45, Jm08/Om08
Fitting, Hyd, E90, Jm06/Om06
Tube, Hyd, 08 Jf08/Jf08
Bracket, Valve, Sba [M20 And T20]
Screw, Hex, M8 X 1.25 X 100, 8.8
Nut, Hex, Lock, M8 X 1.25, Nl
Screw, Hex, M8 X 1.25 X 25, Ss
Washer, Flat, 0.31, Std
Nut, Hex, Lock, M8 X 1.25, Nl, Ss
Fitting, Hyd, Cap, Jf08
Qty.
1
2
2
1
1
1
1
1
1
1
1
1
1
1
1
2
2
2
2
2
1
NOTE: Refer to the current Operators or Parts Manual for the most up-to-date information
145
Side brush hosesPages 146–147 · 2 pages
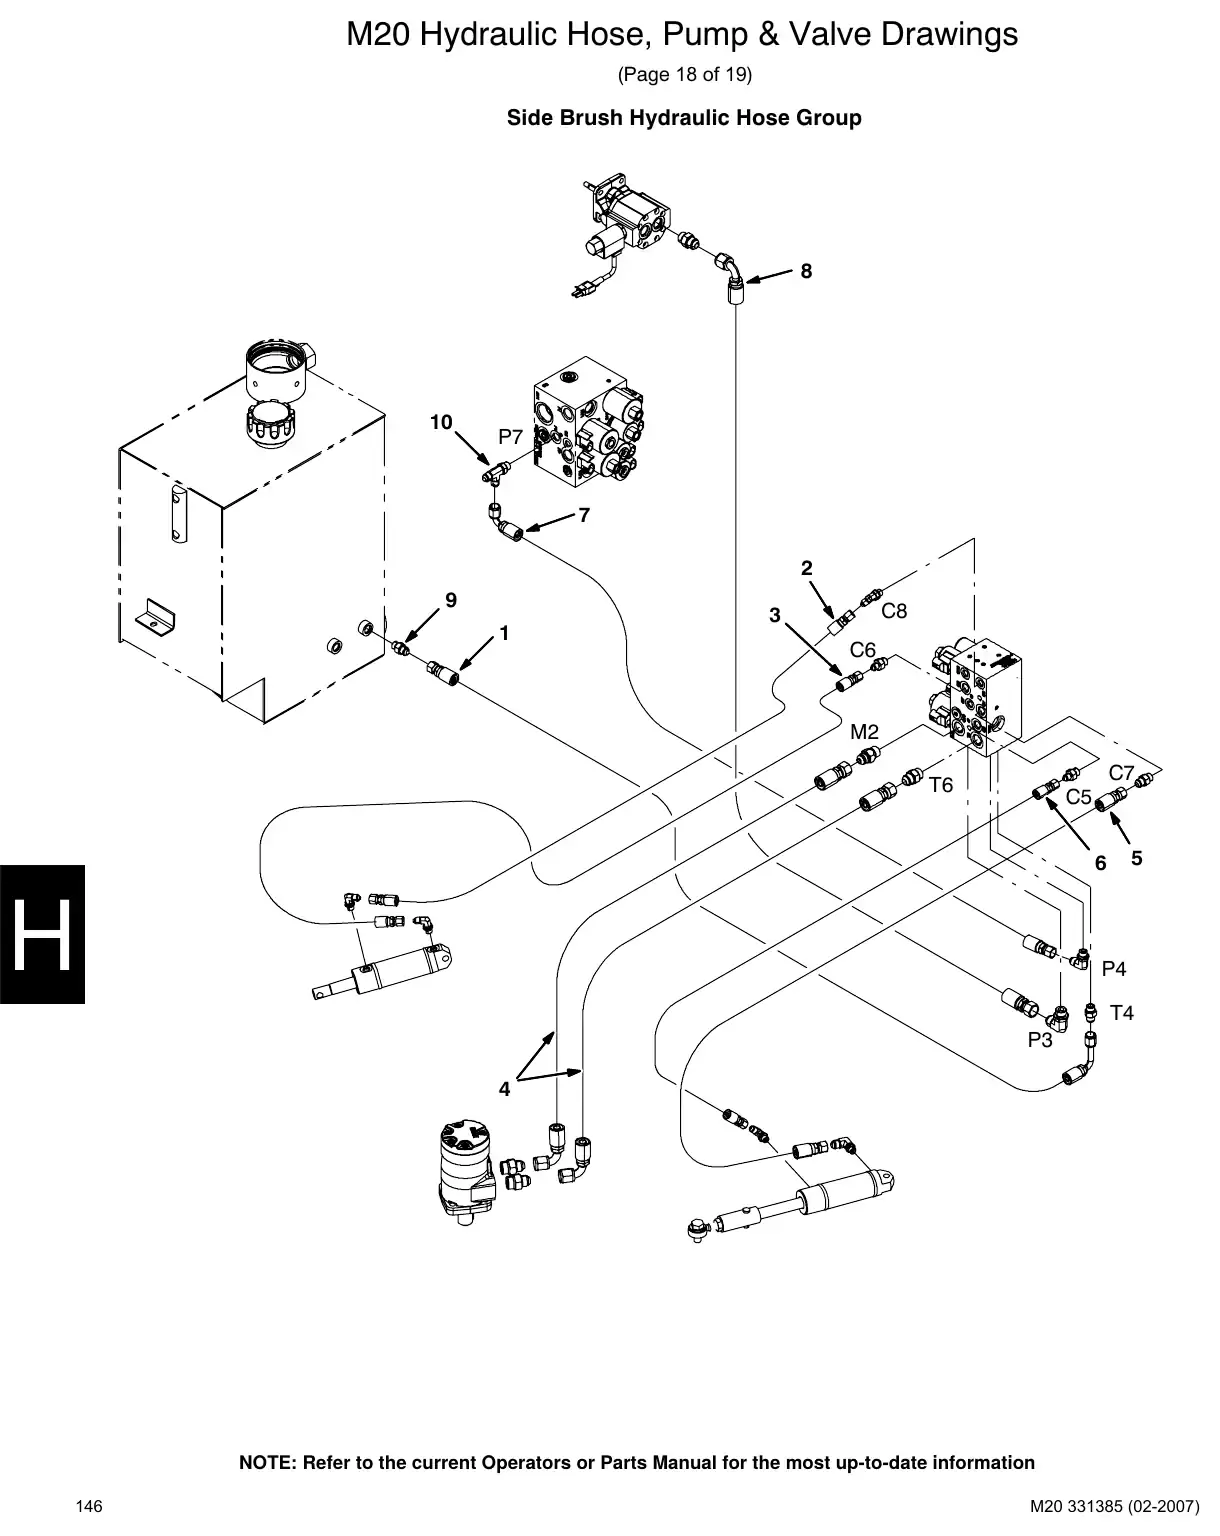
Text of manual page 146
M20 Hydraulic Hose, Pump & Valve Drawings
(Page 18 of 19)
Side Brush Hydraulic Hose Group
8
10
P7
7
2
9
1
C8
3
C6
M2
C7
T6
C5
5
6
P4
T4
P3
4
NOTE: Refer to the current Operators or Parts Manual for the most up-to-date information
146
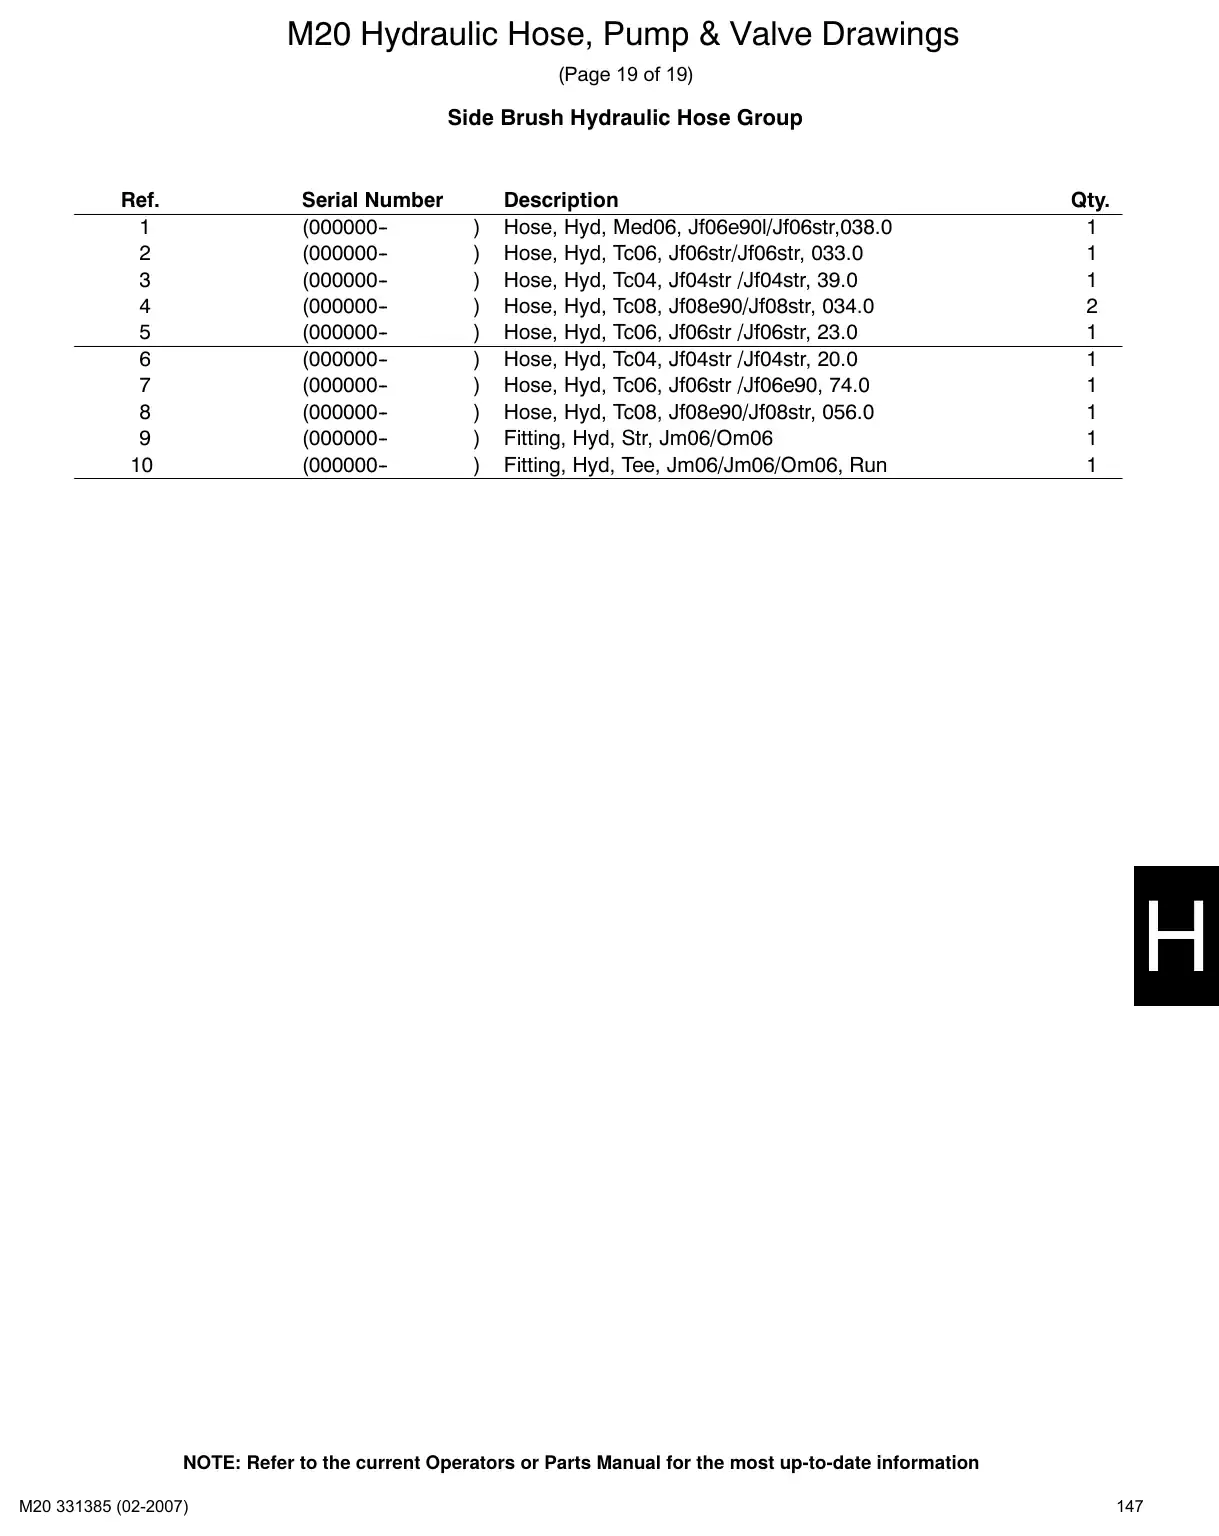
Text of manual page 147
M20 Hydraulic Hose, Pump & Valve Drawings
(Page 19 of 19)
Side Brush Hydraulic Hose Group
Ref.
1
2
3
4
5
6
7
8
9
10
Part No.
1023485
1025990
1023486
1025991
1025445
365004
56690
Serial Number
(000000-(000000-(000000-(000000-(000000-(000000-(000000-(000000-(000000-(000000-
)
)
)
)
)
)
)
)
)
)
Description
Hose, Hyd, Med06, Jf06e90l/Jf06str,038.0
Hose, Hyd, Tc06, Jf06str/Jf06str, 033.0
Hose, Hyd, Tc04, Jf04str /Jf04str, 39.0
Hose, Hyd, Tc08, Jf08e90/Jf08str, 034.0
Hose, Hyd, Tc06, Jf06str /Jf06str, 23.0
Hose, Hyd, Tc04, Jf04str /Jf04str, 20.0
Hose, Hyd, Tc06, Jf06str /Jf06e90, 74.0
Hose, Hyd, Tc08, Jf08e90/Jf08str, 056.0
Fitting, Hyd, Str, Jm06/Om06
Fitting, Hyd, Tee, Jm06/Jm06/Om06, Run
Qty.
1
1
1
2
1
1
1
1
1
1
NOTE: Refer to the current Operators or Parts Manual for the most up-to-date information
147
Hydraulic solenoid valve detailsPage 148 · 1 page
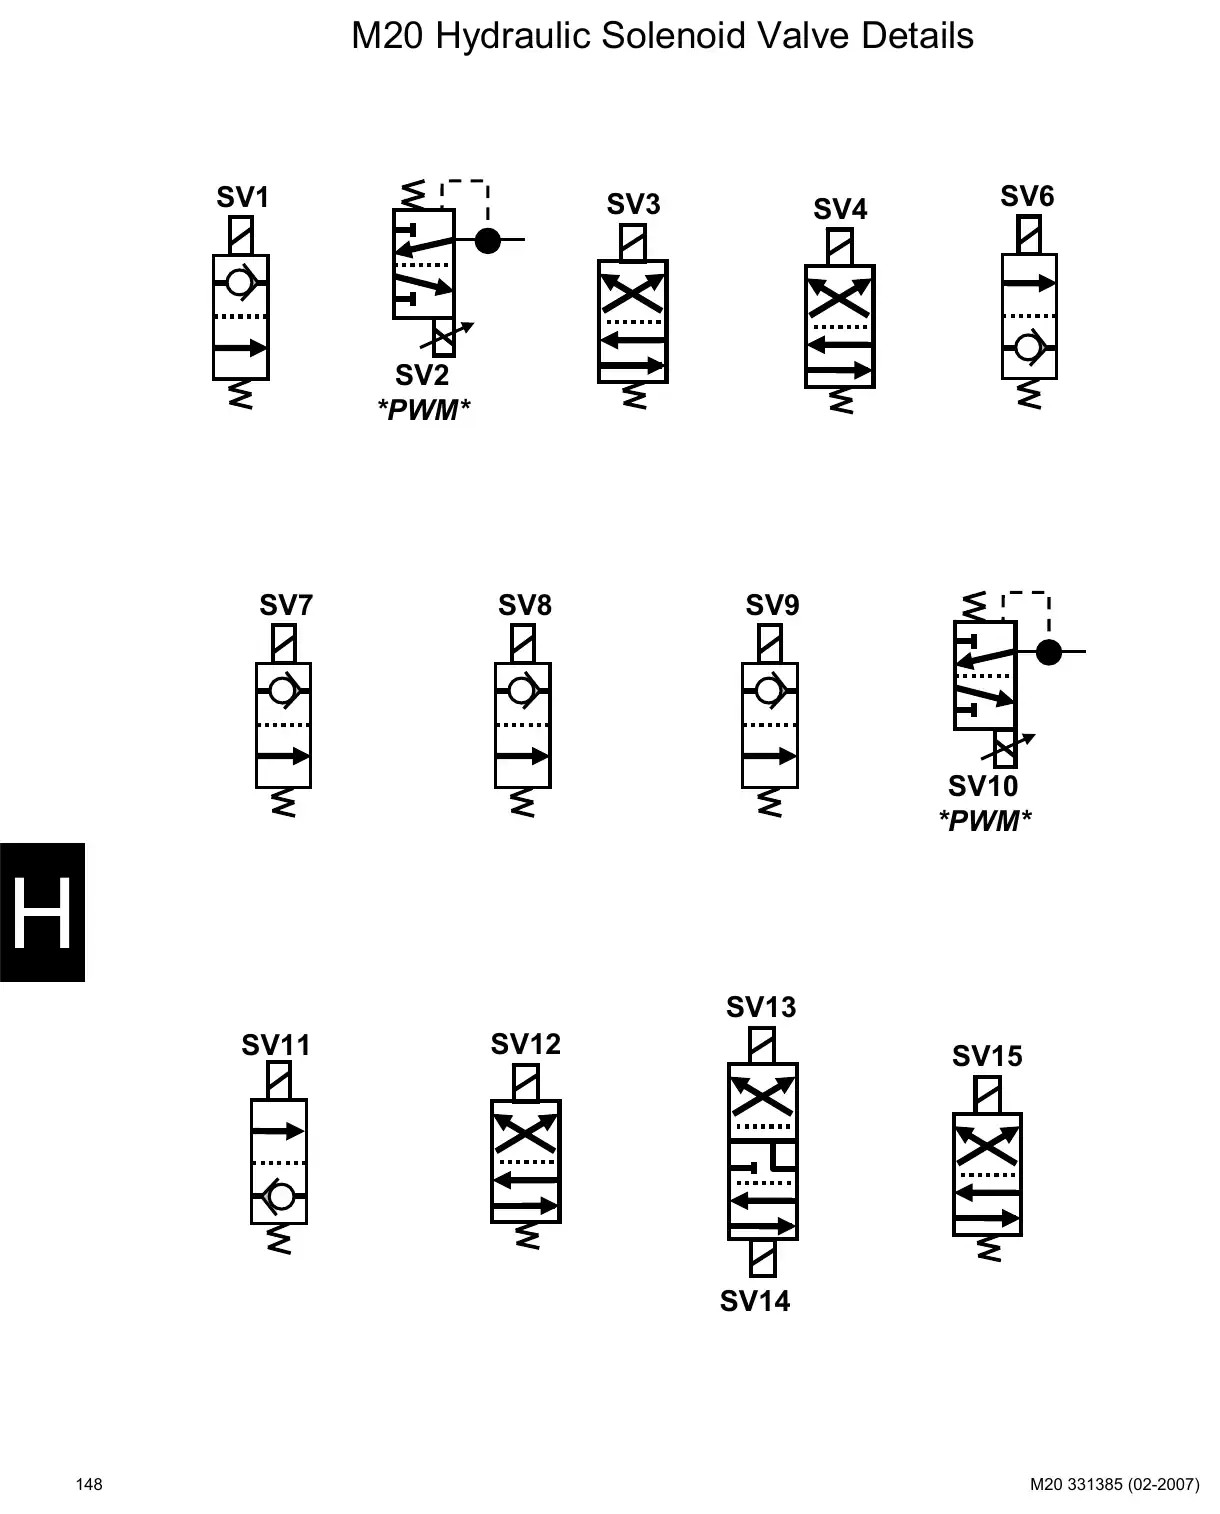
Text of manual page 148
M20 Hydraulic Solenoid Valve Details
SV1
SV3
SV4
SV6
SV2
*PWM*
SV7
SV8
SV9
SV10
*PWM*
SV13
SV11
SV12
SV15
SV14
148
Symbols, pump flow rates, abbreviations and port markingsPages 149–150 · 2 pages
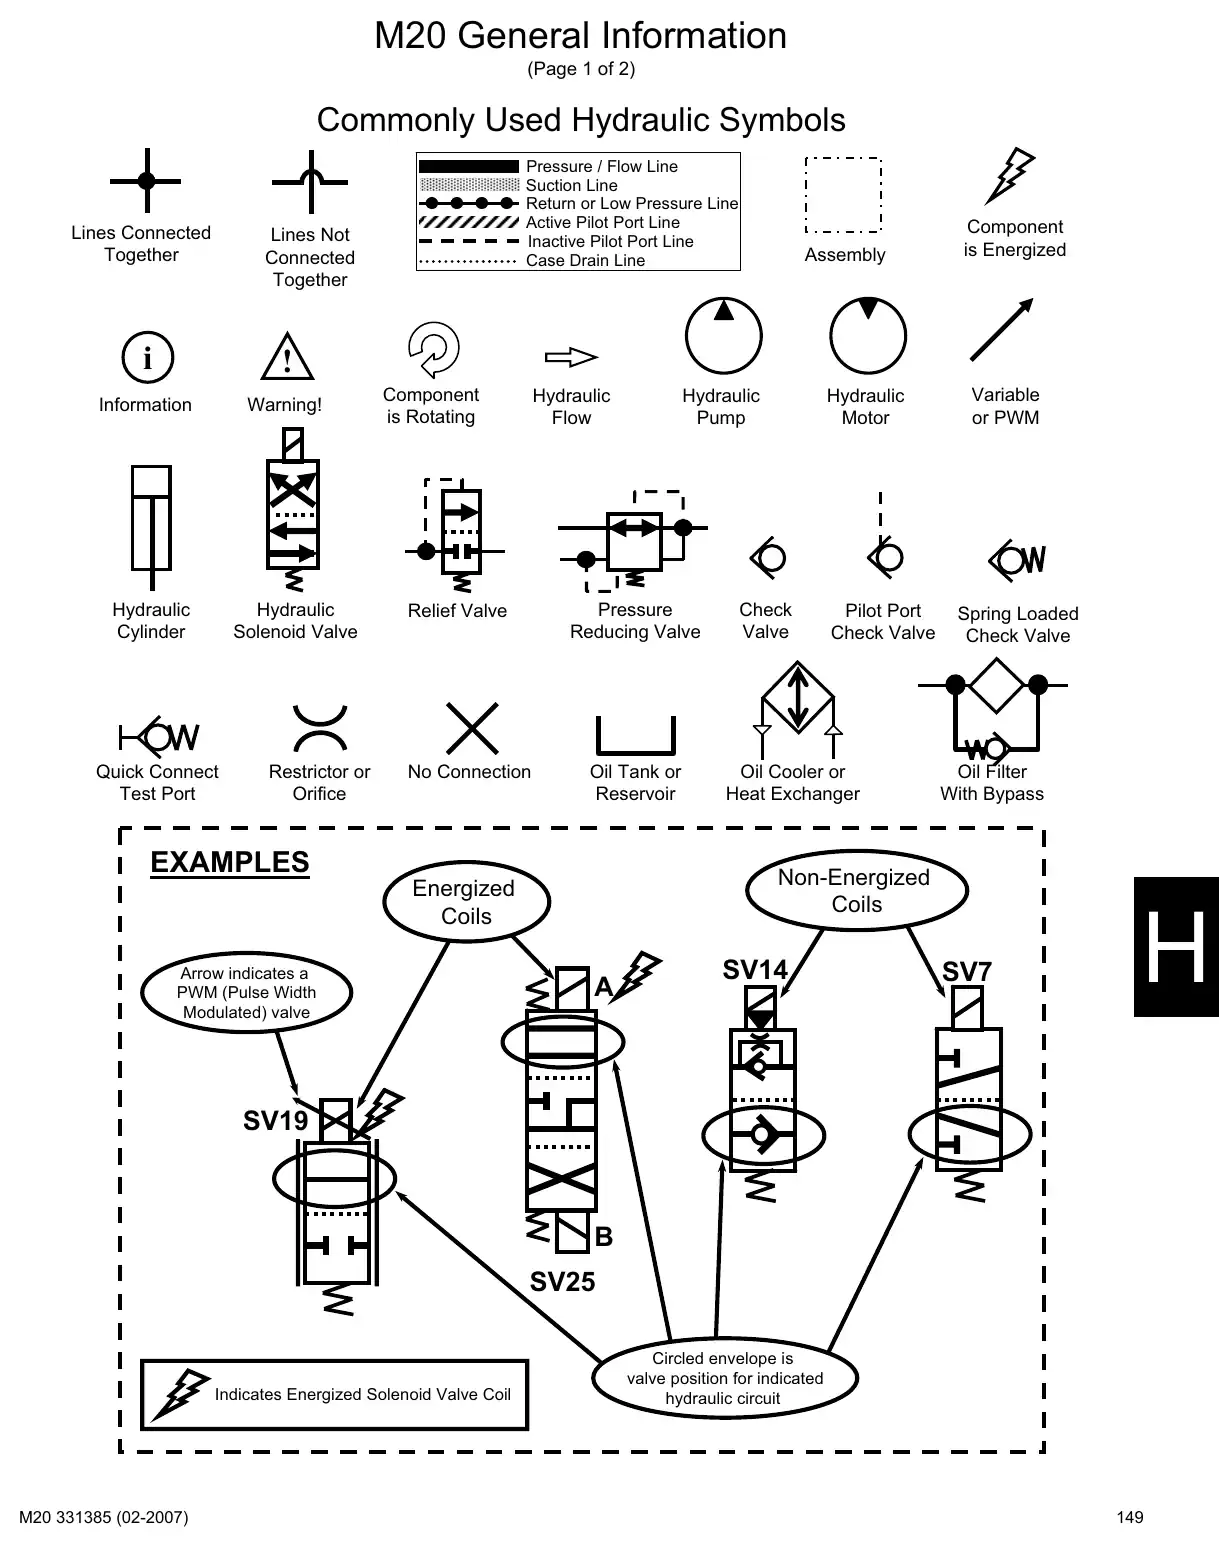
Text of manual page 149
M20 General Information
(Page 1 of 2)
Commonly Used Hydraulic Symbols
Lines Connected
Together
Pressure / Flow Line
Suction Line
Return or Low Pressure Line
Active Pilot Port Line
Inactive Pilot Port Line
Case Drain Line
Lines Not
Connected
Together
i
!
Information
Warning!
Hydraulic
Cylinder
Hydraulic
Solenoid Valve
Quick Connect
Test Port
Restrictor or
Orifice
Component
is Rotating
Hydraulic
Flow
Pressure
Reducing Valve
No Connection
Oil Tank or
Reservoir
Check
Valve
Pilot Port
Check Valve
Oil Cooler or
Heat Exchanger
Component
is Energized
Variable
or PWM
Spring Loaded
Check Valve
Oil Filter
With Bypass
Non-Energized
Coils
Energized
Coils
Arrow indicates a
PWM (Pulse Width
Modulated) valve
Hydraulic
Motor
Hydraulic
Pump
Relief Valve
EXAMPLES
Assembly
SV14
SV7
SV19
SV25
Indicates Energized Solenoid Valve Coil
Circled envelope is
valve position for indicated
hydraulic circuit
149
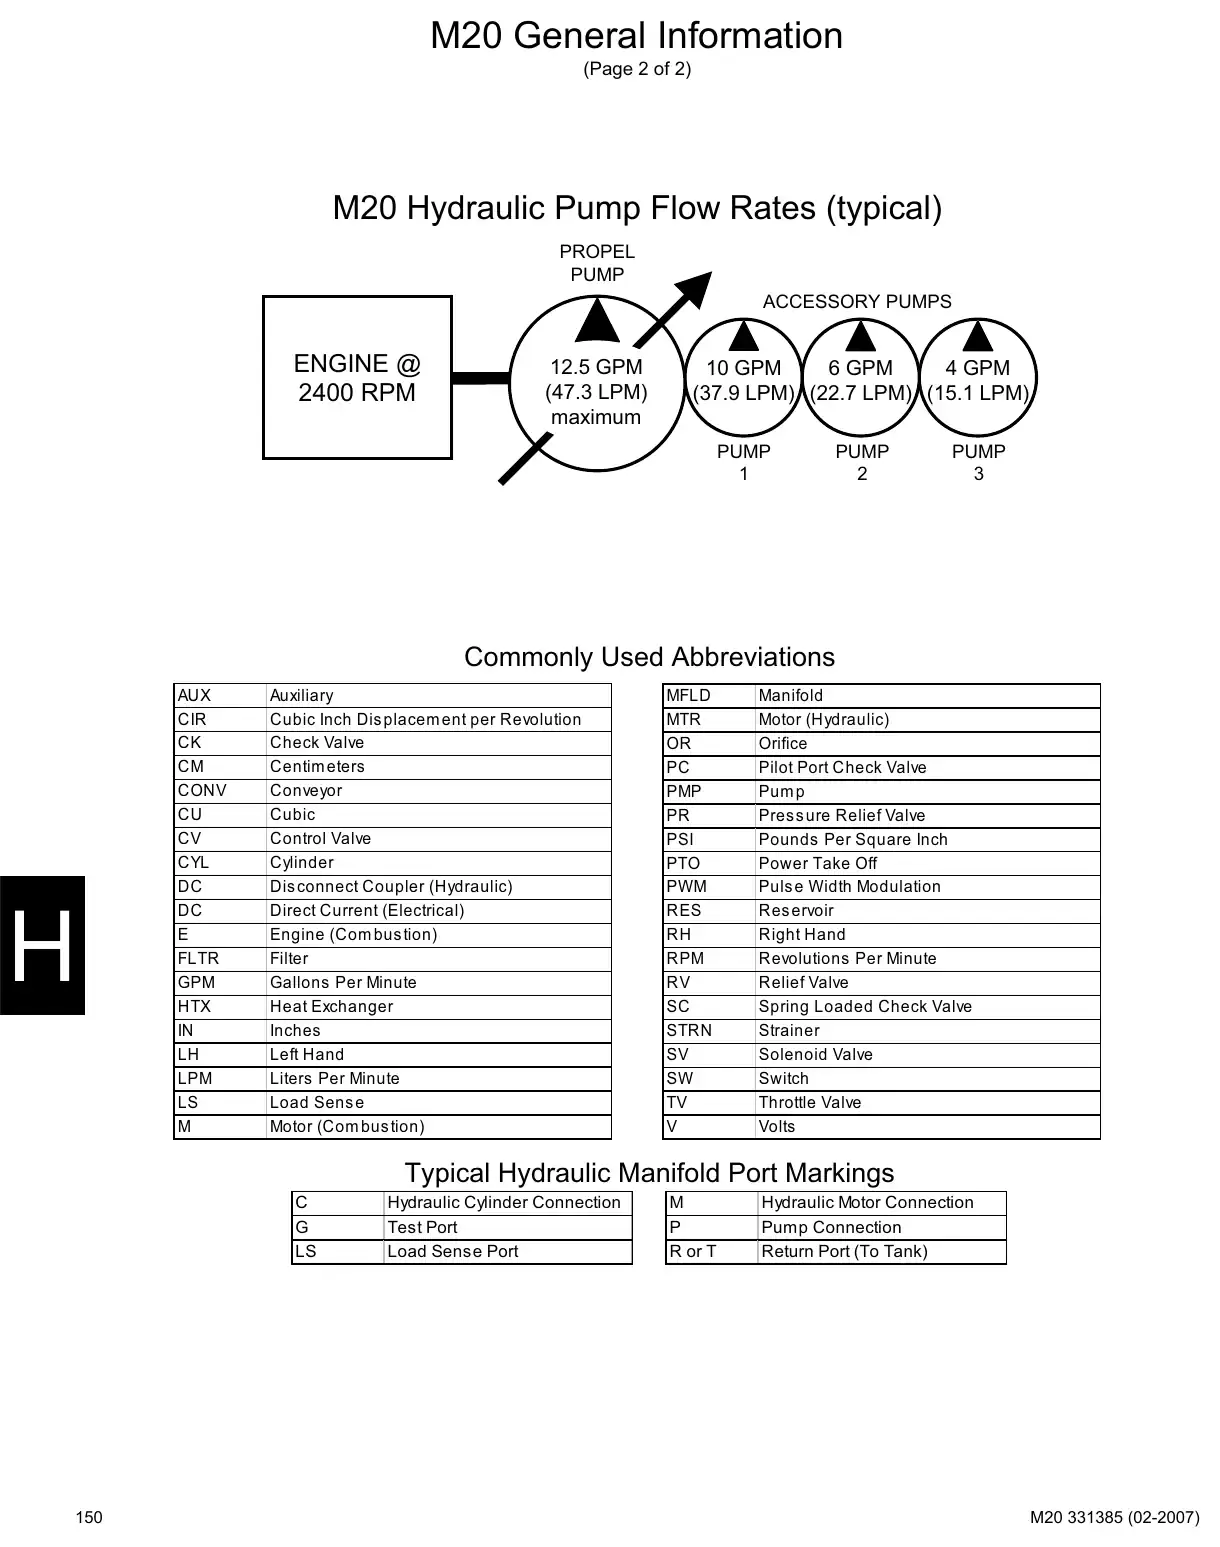
Text of manual page 150
M20 General Information
(Page 2 of 2)
M20 Hydraulic Pump Flow Rates (typical)
PROPEL
PUMP
ACCESSORY PUMPS
ENGINE @
2400 RPM
12.5 GPM
(47.3 LPM)
maximum
10 GPM
6 GPM
4 GPM
(37.9 LPM) (22.7 LPM) (15.1 LPM)
PUMP
1
PUMP
2
PUMP
3
Commonly Used Abbreviations
AUX
CIR
CK
CM
CONV
CU
CV
CYL
DC
DC
FLTR
GPM
HTX
IN
LH
LPM
LS
Auxiliary
Cubic Inch Dis placem ent per Revolution
Check Valve
Centim eters
Conveyor
Cubic
Control Valve
Cylinder
Dis connect Coupler (Hydraulic)
Direct Current (Electrical)
Engine (Com bus tion)
Filter
Gallons Per Minute
Heat Exchanger
Inches
Left Hand
Liters Per Minute
Load Sens e
Motor (Com bus tion)
MFLD
MTR
OR
PC
PMP
PR
PSI
PTO
PWM
RES
RH
RPM
RV
SC
STRN
SV
SW
TV
Manifold
Motor (Hydraulic)
Orifice
Pilot Port Check Valve
Pum p
Pres s ure Relief Valve
Pounds Per Square Inch
Power Take Off
Puls e Width Modulation
Res ervoir
Right Hand
Revolutions Per Minute
Relief Valve
Spring Loaded Check Valve
Strainer
Solenoid Valve
Switch
Throttle Valve
Volts
Typical Hydraulic Manifold Port Markings
LS
150
Hydraulic Cylinder Connection
Test Port
Load Sense Port
R or T
Hydraulic Motor Connection
Pump Connection
Return Port (To Tank)
Operating matrix and option componentsPages 151–152 · 2 pages
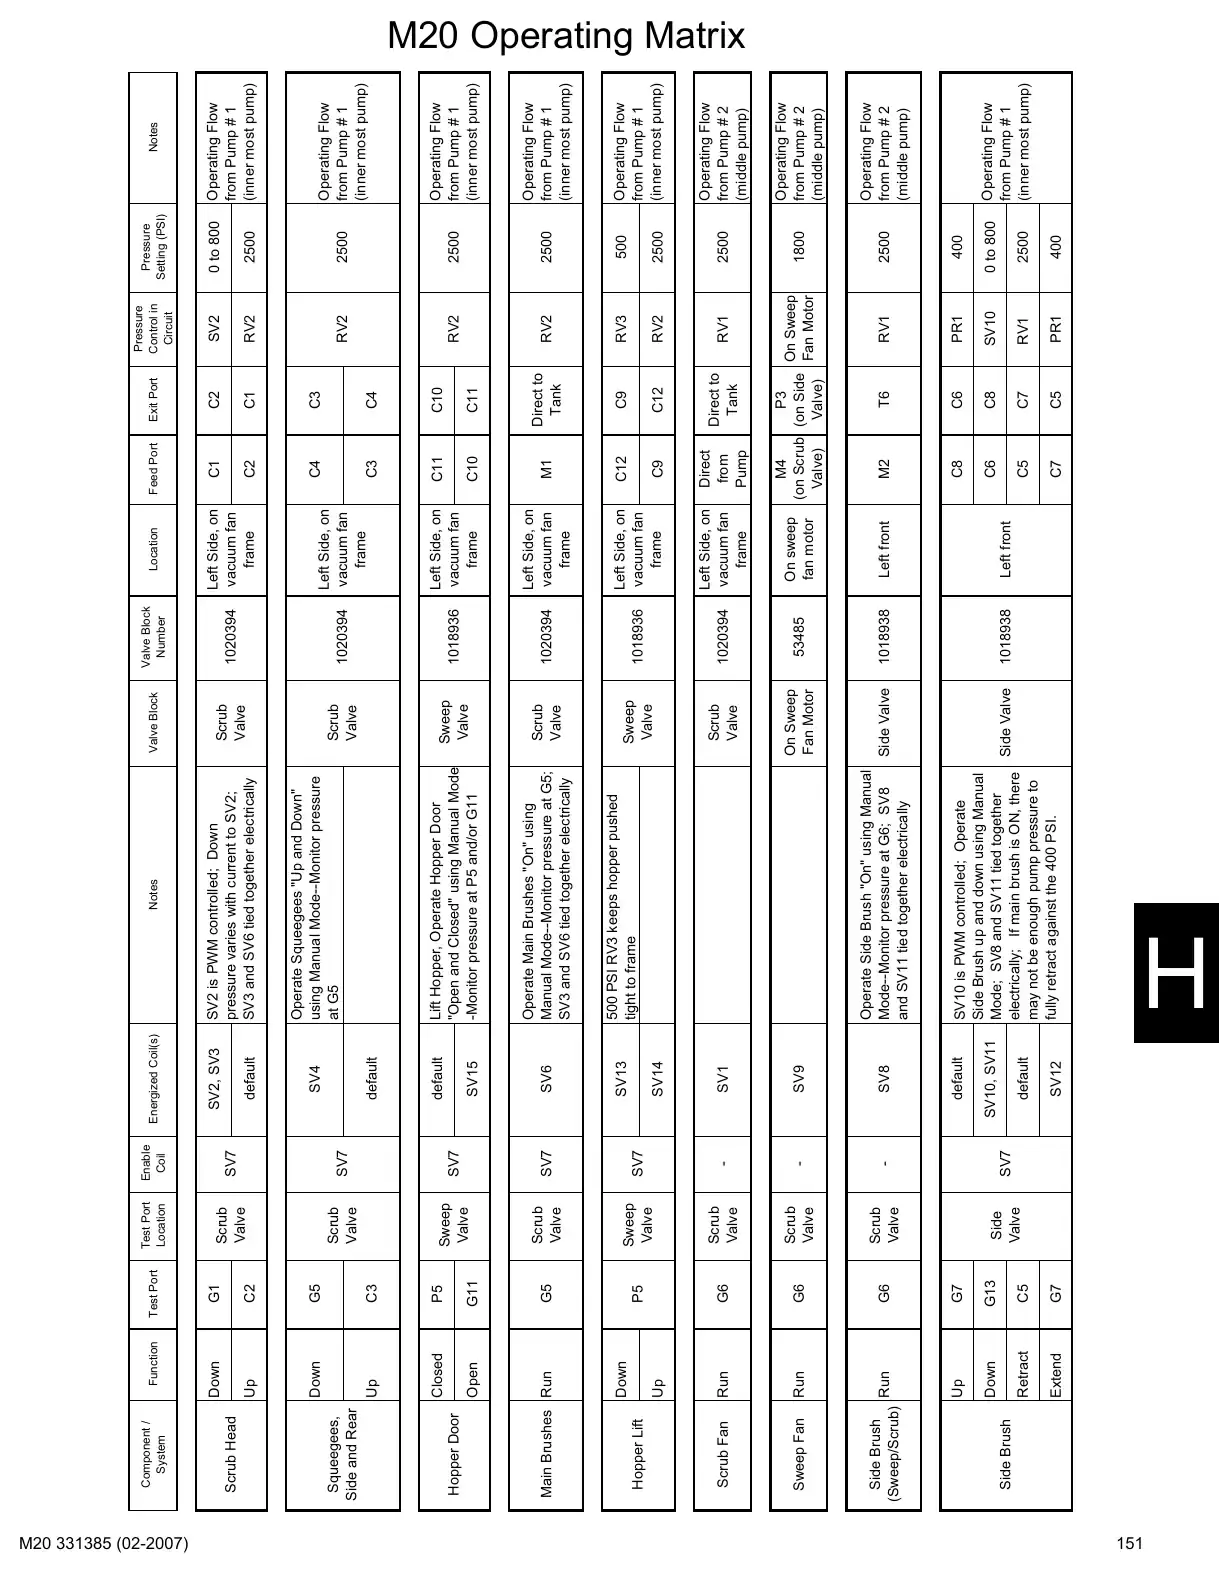
Text of manual page 151
Side Brush
C5
G7
Extend
G13
Down
Retract
G7
G6
Side Brush
Run
(Sweep/Scrub)
Up
G6
Run
Sweep Fan
G6
P5
Run
Up
Down
Scrub Fan
Hopper Lift
G5
G11
P5
Closed
Open
C3
G5
Down
Up
C2
G1
Test Port
Up
Down
Function
Main Brushes Run
Hopper Door
Squeegees,
Side and Rear
Scrub Head
Component /
System
Side
Valve
SV7
-
-
Scrub
Valve
Scrub
Valve
-
SV7
Scrub
Valve
Sweep
Valve
SV12
default
SV10, SV11
default
SV8
SV9
SV1
SV14
SV13
SV6
SV7
Scrub
Valve
default
default
SV4
default
SV2, SV3
Energized Coil(s)
SV15
SV7
SV7
SV7
Enable
Coil
Sweep
Valve
Scrub
Valve
Scrub
Valve
Test Port
Location
1018938
Side Valve
SV10 is PWM controlled; Operate
Side Brush up and down using Manual
Mode; SV8 and SV11 tied together
electrically; If main brush is ON, there
may not be enough pump pressure to
fully retract against the 400 PSI.
53485
On Sweep
Fan Motor
1018938
1020394
Scrub
Valve
Operate Side Brush "On" using Manual
Mode-Monitor pressure at G6; SV8
Side Valve
and SV11 tied together electrically
1018936
1020394
1018936
1020394
1020394
Valve Block
Number
Sweep
Valve
Scrub
Valve
Operate Main Brushes "On" using
Manual Mode-Monitor pressure at G5;
SV3 and SV6 tied together electrically
500 PSI RV3 keeps hopper pushed
tight to frame
Sweep
Valve
Lift Hopper, Operate Hopper Door
"Open and Closed" using Manual Mode-Monitor pressure at P5 and/or G11
Scrub
Valve
Scrub
Valve
SV2 is PWM controlled; Down
pressure varies with current to SV2;
SV3 and SV6 tied together electrically
Operate Squeegees "Up and Down"
using Manual Mode-Monitor pressure
at G5
Valve Block
Notes
Left front
Left front
Direct to
Tank
C12
C9
Direct to
Tank
C11
C10
C4
C3
C1
C2
Exit Port
RV1
RV2
RV3
RV2
RV2
RV2
RV2
SV2
Pressure
Control in
Circuit
C5
C7
C8
C6
C7
C6
C8
C5
T6
M2
PR1
RV1
SV10
PR1
RV1
M4
P3
On Sweep
(on Scrub (on Side
Fan Motor
Valve)
Valve)
Direct
from
Pump
Left Side, on
vacuum fan
frame
On sweep
fan motor
C9
C12
M1
C10
C11
C3
C4
Left Side, on
vacuum fan
frame
Left Side, on
vacuum fan
frame
Left Side, on
vacuum fan
frame
Left Side, on
vacuum fan
frame
C1
Left Side, on
vacuum fan
frame
C2
Feed Port
Location
400
2500
0 to 800
400
2500
1800
2500
2500
500
2500
2500
2500
2500
0 to 800
Pressure
Setting (PSI)
Operating Flow
from Pump # 1
(inner most pump)
Operating Flow
from Pump # 2
(middle pump)
Operating Flow
from Pump # 2
(middle pump)
Operating Flow
from Pump # 2
(middle pump)
Operating Flow
from Pump # 1
(inner most pump)
Operating Flow
from Pump # 1
(inner most pump)
Operating Flow
from Pump # 1
(inner most pump)
Operating Flow
from Pump # 1
(inner most pump)
Operating Flow
from Pump # 1
(inner most pump)
Notes
M20 Operating Matrix
151
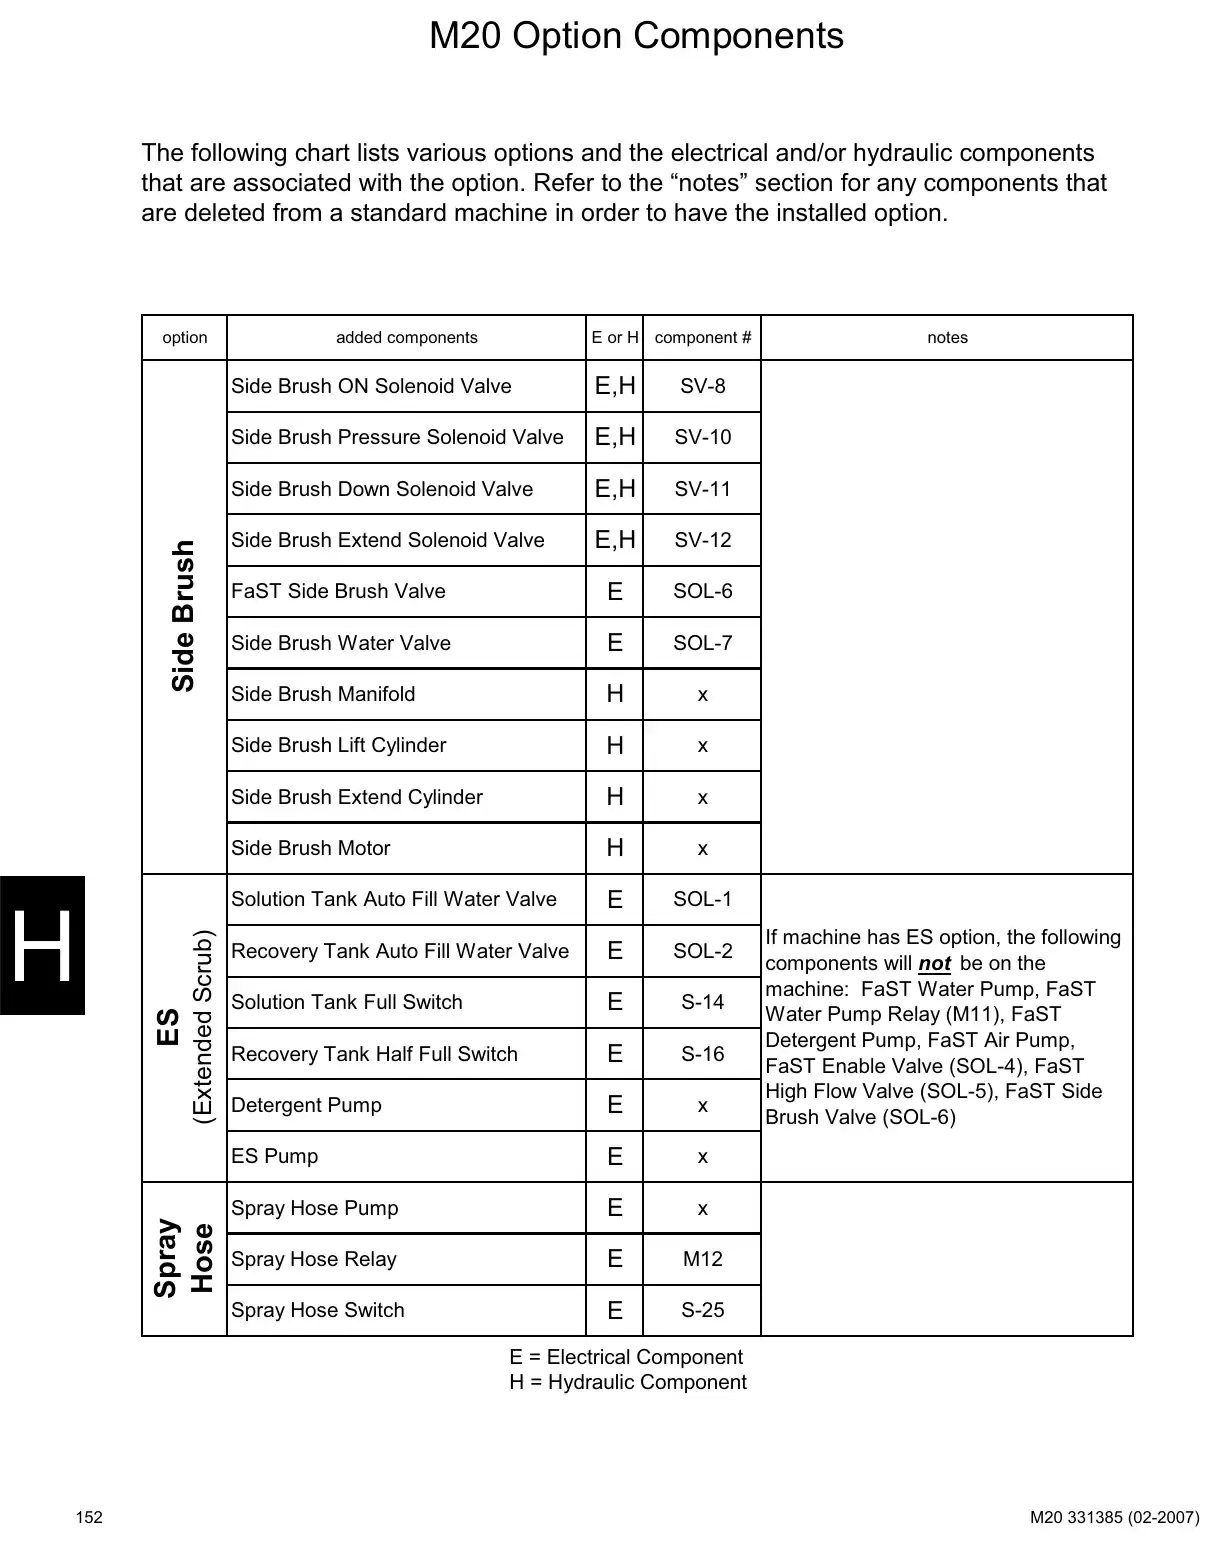
Text of manual page 152
M20 Option Components
The following chart lists various options and the electrical and/or hydraulic components
that are associated with the option. Refer to the "notes" section for any components that
are deleted from a standard machine in order to have the installed option.
Spray
Hose
ES
(Extended Scrub)
Side Brush
option
added components
E or H component #
Side Brush ON Solenoid Valve
E,H
SV-8
Side Brush Pressure Solenoid Valve
E,H
SV-10
Side Brush Down Solenoid Valve
E,H
SV-11
Side Brush Extend Solenoid Valve
E,H
SV-12
FaST Side Brush Valve
SOL-6
Side Brush Water Valve
SOL-7
Side Brush Manifold
x
Side Brush Lift Cylinder
x
Side Brush Extend Cylinder
x
Side Brush Motor
x
Solution Tank Auto Fill Water Valve
SOL-1
Recovery Tank Auto Fill Water Valve
SOL-2
Solution Tank Full Switch
S-14
Recovery Tank Half Full Switch
S-16
Detergent Pump
x
ES Pump
x
Spray Hose Pump
x
Spray Hose Relay
M12
Spray Hose Switch
S-25
notes
If machine has ES option, the following
components will not be on the
machine: FaST Water Pump, FaST
Water Pump Relay (M11), FaST
Detergent Pump, FaST Air Pump,
FaST Enable Valve (SOL-4), FaST
High Flow Valve (SOL-5), FaST Side
Brush Valve (SOL-6)
E = Electrical Component
H = Hydraulic Component
152
Hydraulic circuit operation: head, squeegee, brushes, vacuum fans, hopper and side brushPages 153–170 · 18 pages
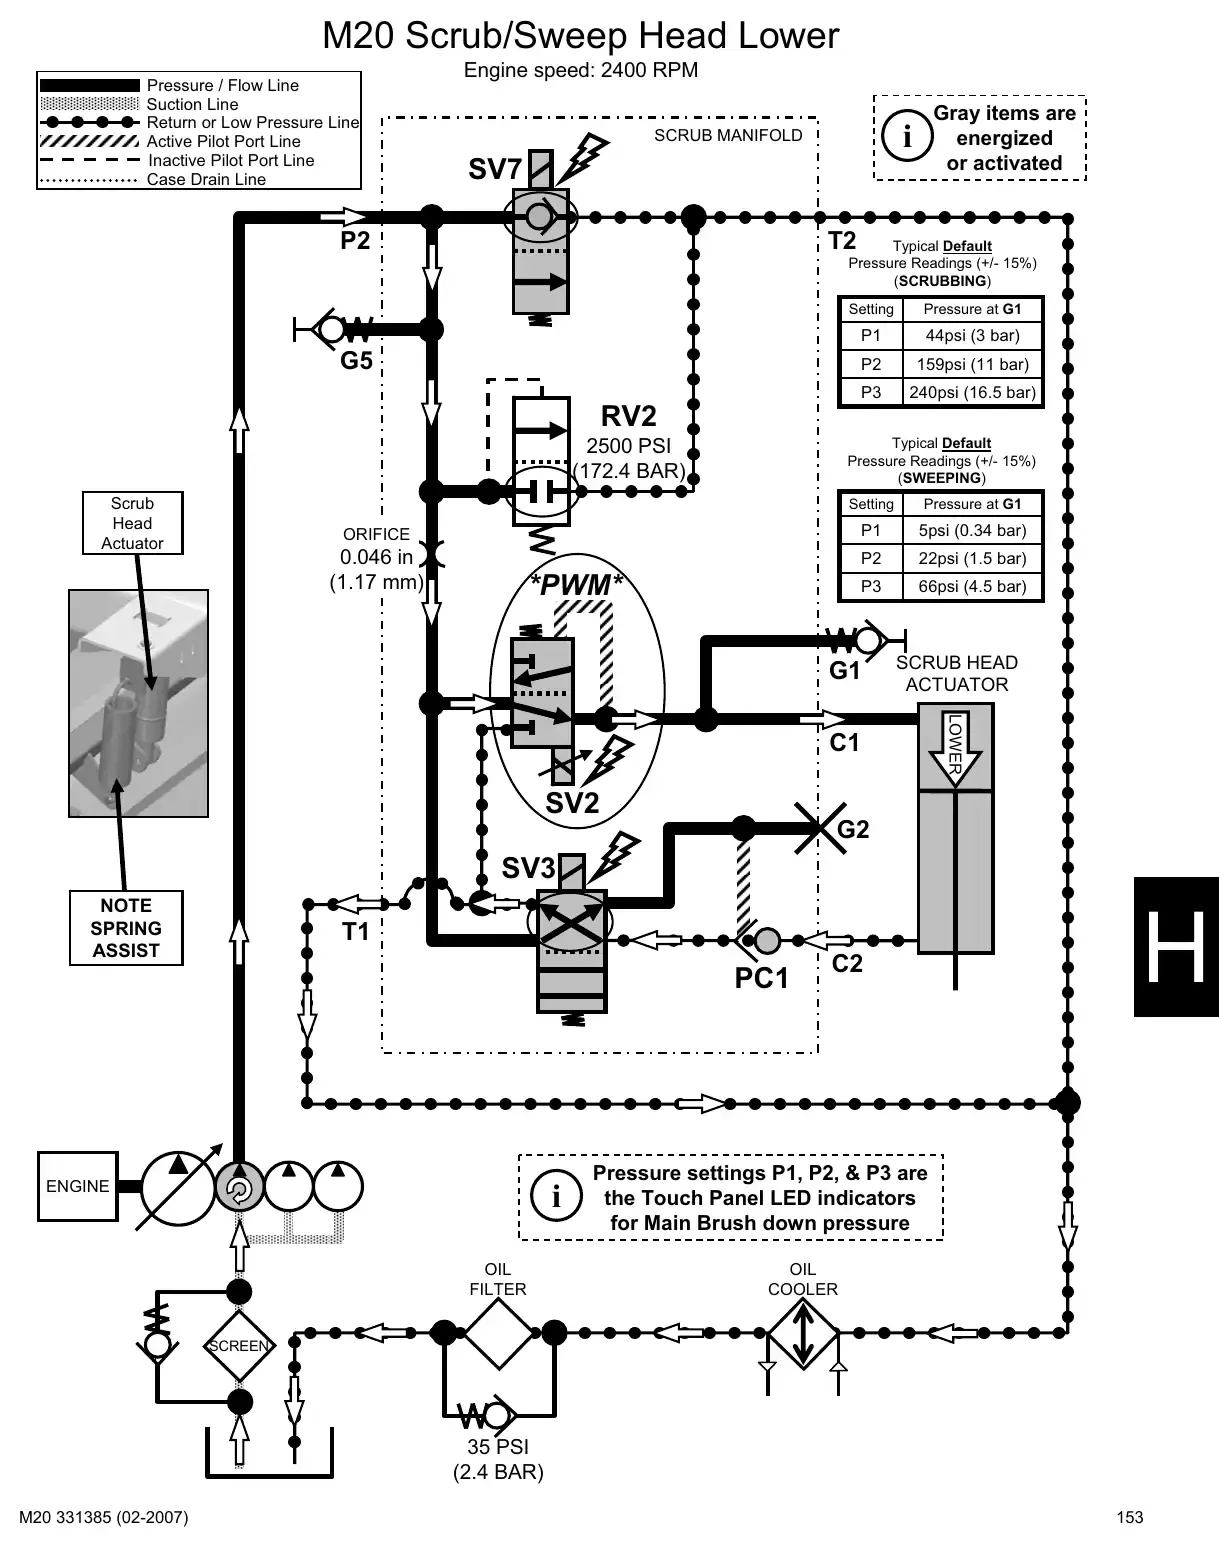
Text of manual page 153
M20 Scrub/Sweep Head Lower
Pressure / Flow Line
Suction Line
Return or Low Pressure Line
Active Pilot Port Line
Inactive Pilot Port Line
Case Drain Line
Engine speed: 2400 RPM
SV7
P2
Gray items are
energized
or activated
i
SCRUB MANIFOLD
T2
Typical Default
Pressure Readings (+/- 15%)
(SCRUBBING)
Setting
G5
Pressure at G1
P1
44psi (3 bar)
P2
159psi (11 bar)
P3
240psi (16.5 bar)
RV2
Typical Default
Pressure Readings (+/- 15%)
(SWEEPING)
2500 PSI
(172.4 BAR)
Scrub
Head
Actuator
Setting
Pressure at G1
ORIFICE
P1
5psi (0.34 bar)
0.046 in
(1.17 mm)
P2
22psi (1.5 bar)
P3
66psi (4.5 bar)
*PWM*
G1
SCRUB HEAD
ACTUATOR
C1
LOWER
SV2
G2
SV3
NOTE
SPRING
ASSIST
T1
PC1
i
ENGINE
OIL
FILTER
C2
Pressure settings P1, P2, & P3 are
the Touch Panel LED indicators
for Main Brush down pressure
OIL
COOLER
SCREEN
35 PSI
(2.4 BAR)
153
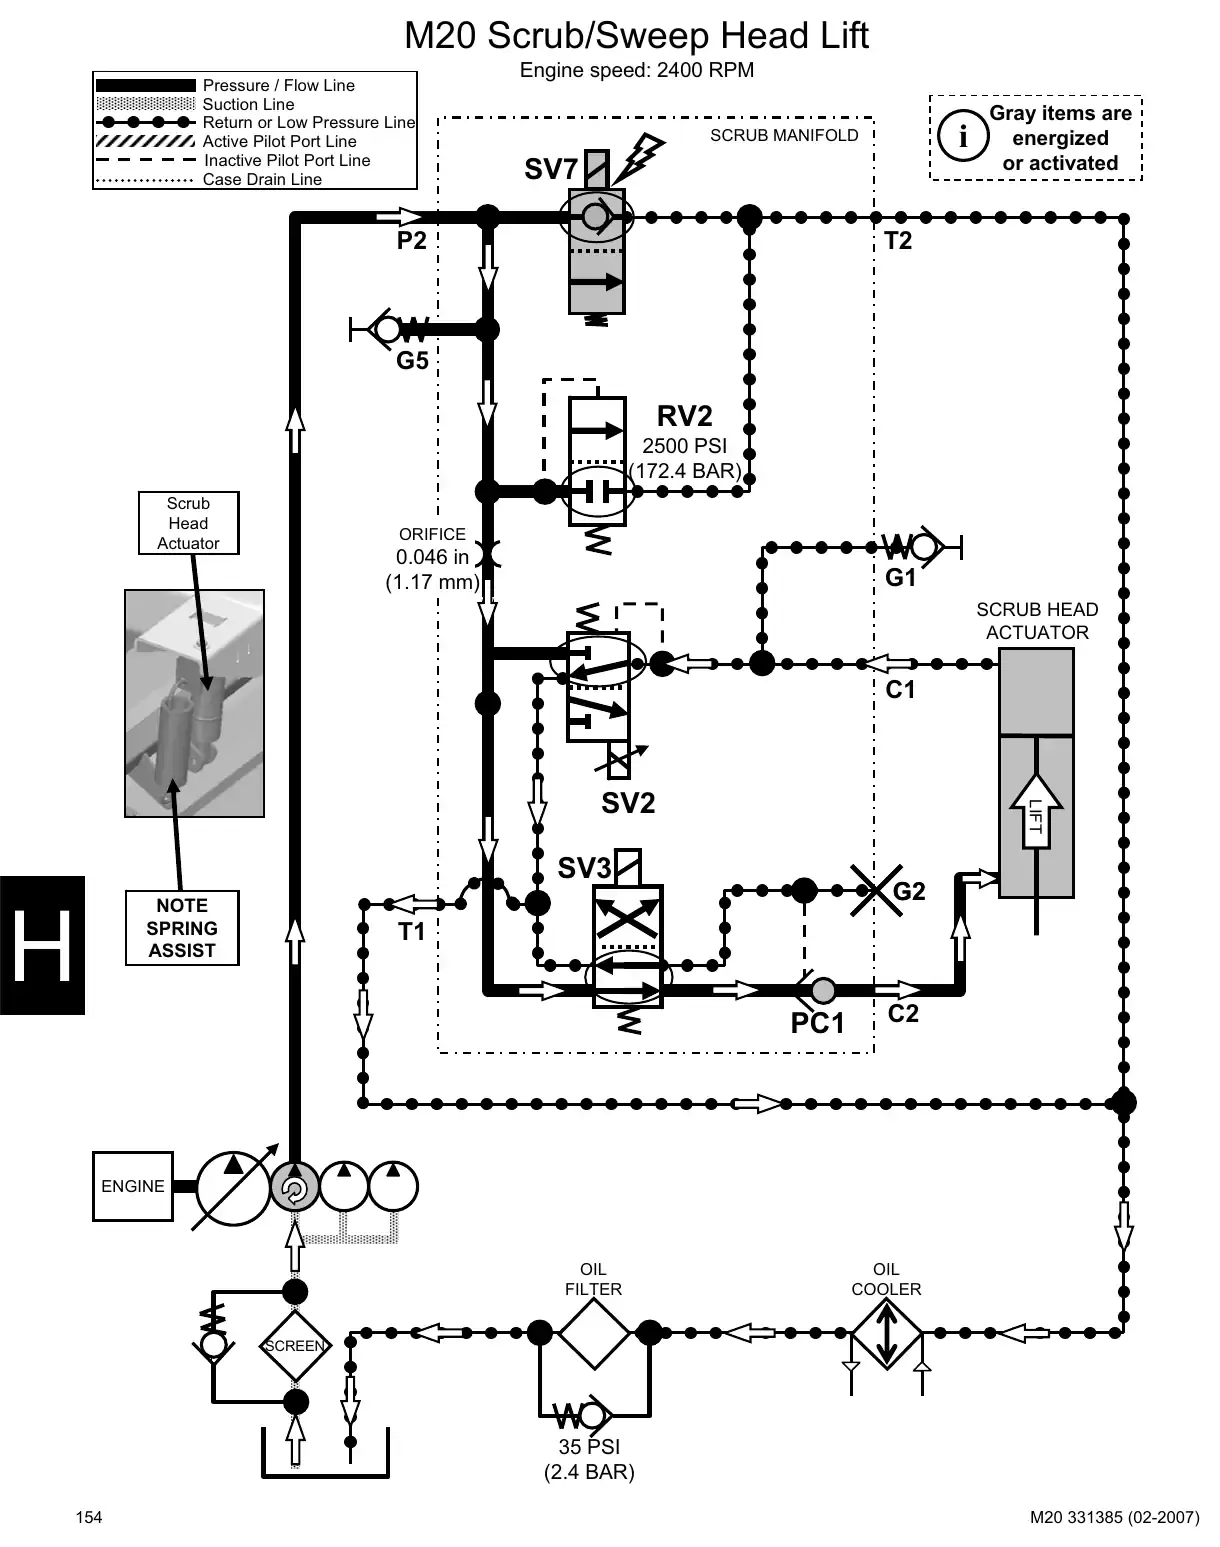
Text of manual page 154
M20 Scrub/Sweep Head Lift
Pressure / Flow Line
Suction Line
Return or Low Pressure Line
Active Pilot Port Line
Inactive Pilot Port Line
Case Drain Line
Engine speed: 2400 RPM
i
SCRUB MANIFOLD
SV7
P2
Gray items are
energized
or activated
T2
G5
RV2
2500 PSI
(172.4 BAR)
Scrub
Head
Actuator
ORIFICE
0.046 in
(1.17 mm)
G1
SCRUB HEAD
ACTUATOR
C1
LIFT
SV2
SV3
NOTE
SPRING
ASSIST
G2
T1
PC1
C2
ENGINE
OIL
FILTER
OIL
COOLER
SCREEN
35 PSI
(2.4 BAR)
154
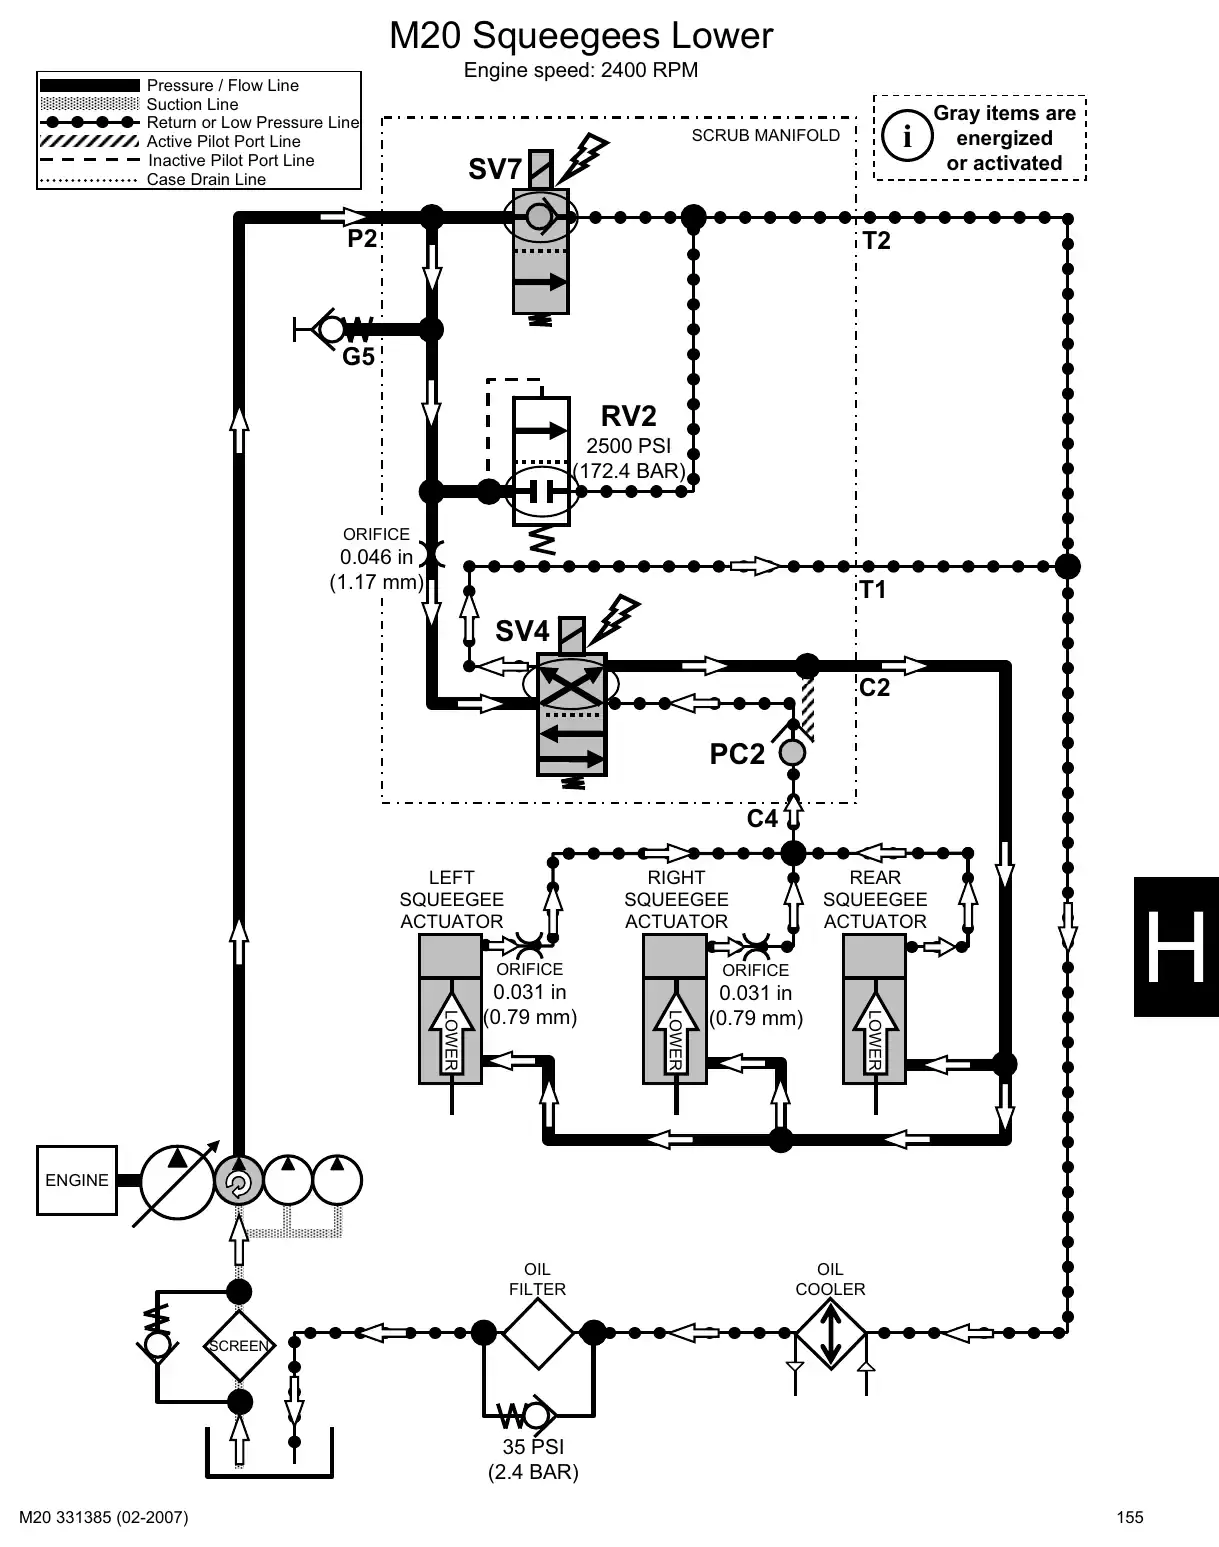
Text of manual page 155
M20 Squeegees Lower
Engine speed: 2400 RPM
Pressure / Flow Line
Suction Line
Return or Low Pressure Line
Active Pilot Port Line
Inactive Pilot Port Line
Case Drain Line
i
SCRUB MANIFOLD
SV7
P2
Gray items are
energized
or activated
T2
G5
RV2
2500 PSI
(172.4 BAR)
ORIFICE
0.046 in
(1.17 mm)
T1
SV4
C2
PC2
C4
LEFT
SQUEEGEE
ACTUATOR
RIGHT
SQUEEGEE
ACTUATOR
REAR
SQUEEGEE
ACTUATOR
LOWER
ORIFICE
0.031 in
(0.79 mm)
LOWER
LOWER
ORIFICE
0.031 in
(0.79 mm)
ENGINE
OIL
FILTER
OIL
COOLER
SCREEN
35 PSI
(2.4 BAR)
155
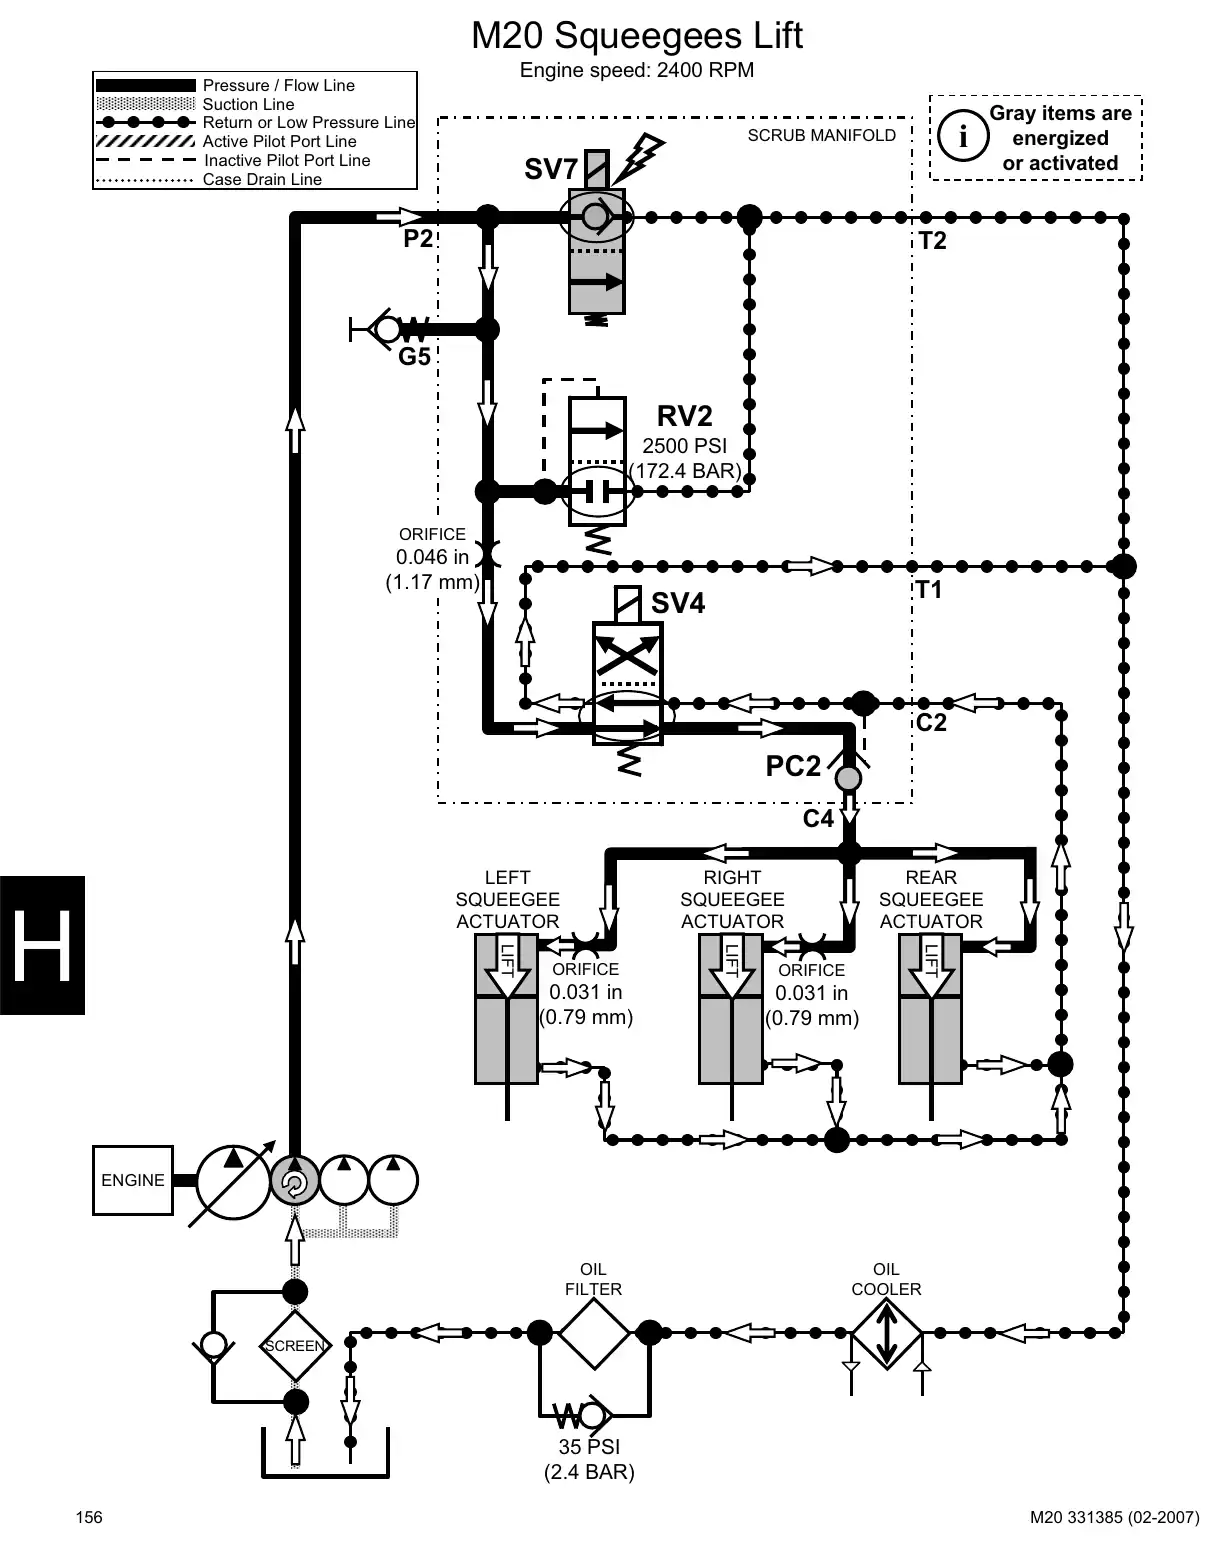
Text of manual page 156
M20 Squeegees Lift
Engine speed: 2400 RPM
Pressure / Flow Line
Suction Line
Return or Low Pressure Line
Active Pilot Port Line
Inactive Pilot Port Line
Case Drain Line
i
SCRUB MANIFOLD
SV7
P2
Gray items are
energized
or activated
T2
G5
RV2
2500 PSI
(172.4 BAR)
ORIFICE
0.046 in
(1.17 mm)
T1
SV4
C2
PC2
C4
LIFT
ORIFICE
0.031 in
(0.79 mm)
REAR
SQUEEGEE
ACTUATOR
LIFT
RIGHT
SQUEEGEE
ACTUATOR
LIFT
LEFT
SQUEEGEE
ACTUATOR
ORIFICE
0.031 in
(0.79 mm)
ENGINE
OIL
FILTER
OIL
COOLER
SCREEN
35 PSI
(2.4 BAR)
156
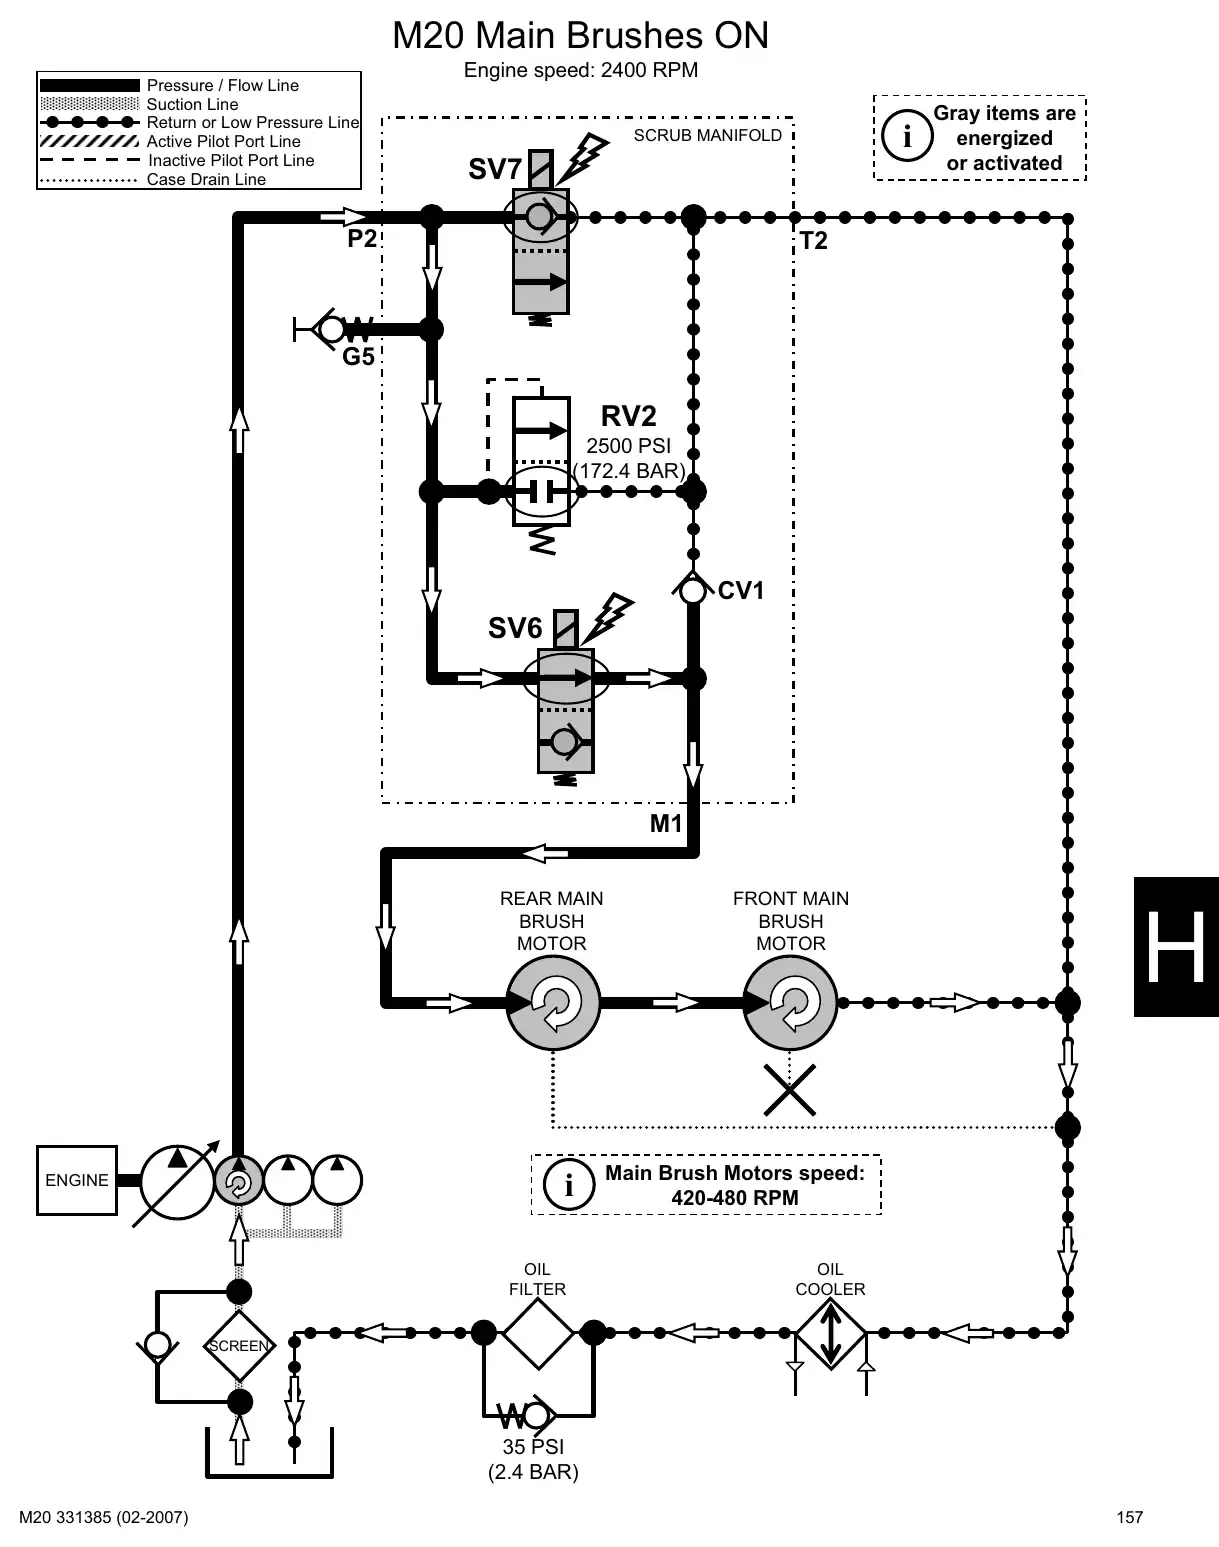
Text of manual page 157
M20 Main Brushes ON
Pressure / Flow Line
Suction Line
Return or Low Pressure Line
Active Pilot Port Line
Inactive Pilot Port Line
Case Drain Line
Engine speed: 2400 RPM
i
SCRUB MANIFOLD
SV7
P2
Gray items are
energized
or activated
T2
G5
RV2
2500 PSI
(172.4 BAR)
CV1
SV6
M1
REAR MAIN
BRUSH
MOTOR
ENGINE
FRONT MAIN
BRUSH
MOTOR
i
Main Brush Motors speed:
420-480 RPM
OIL
FILTER
OIL
COOLER
SCREEN
35 PSI
(2.4 BAR)
157
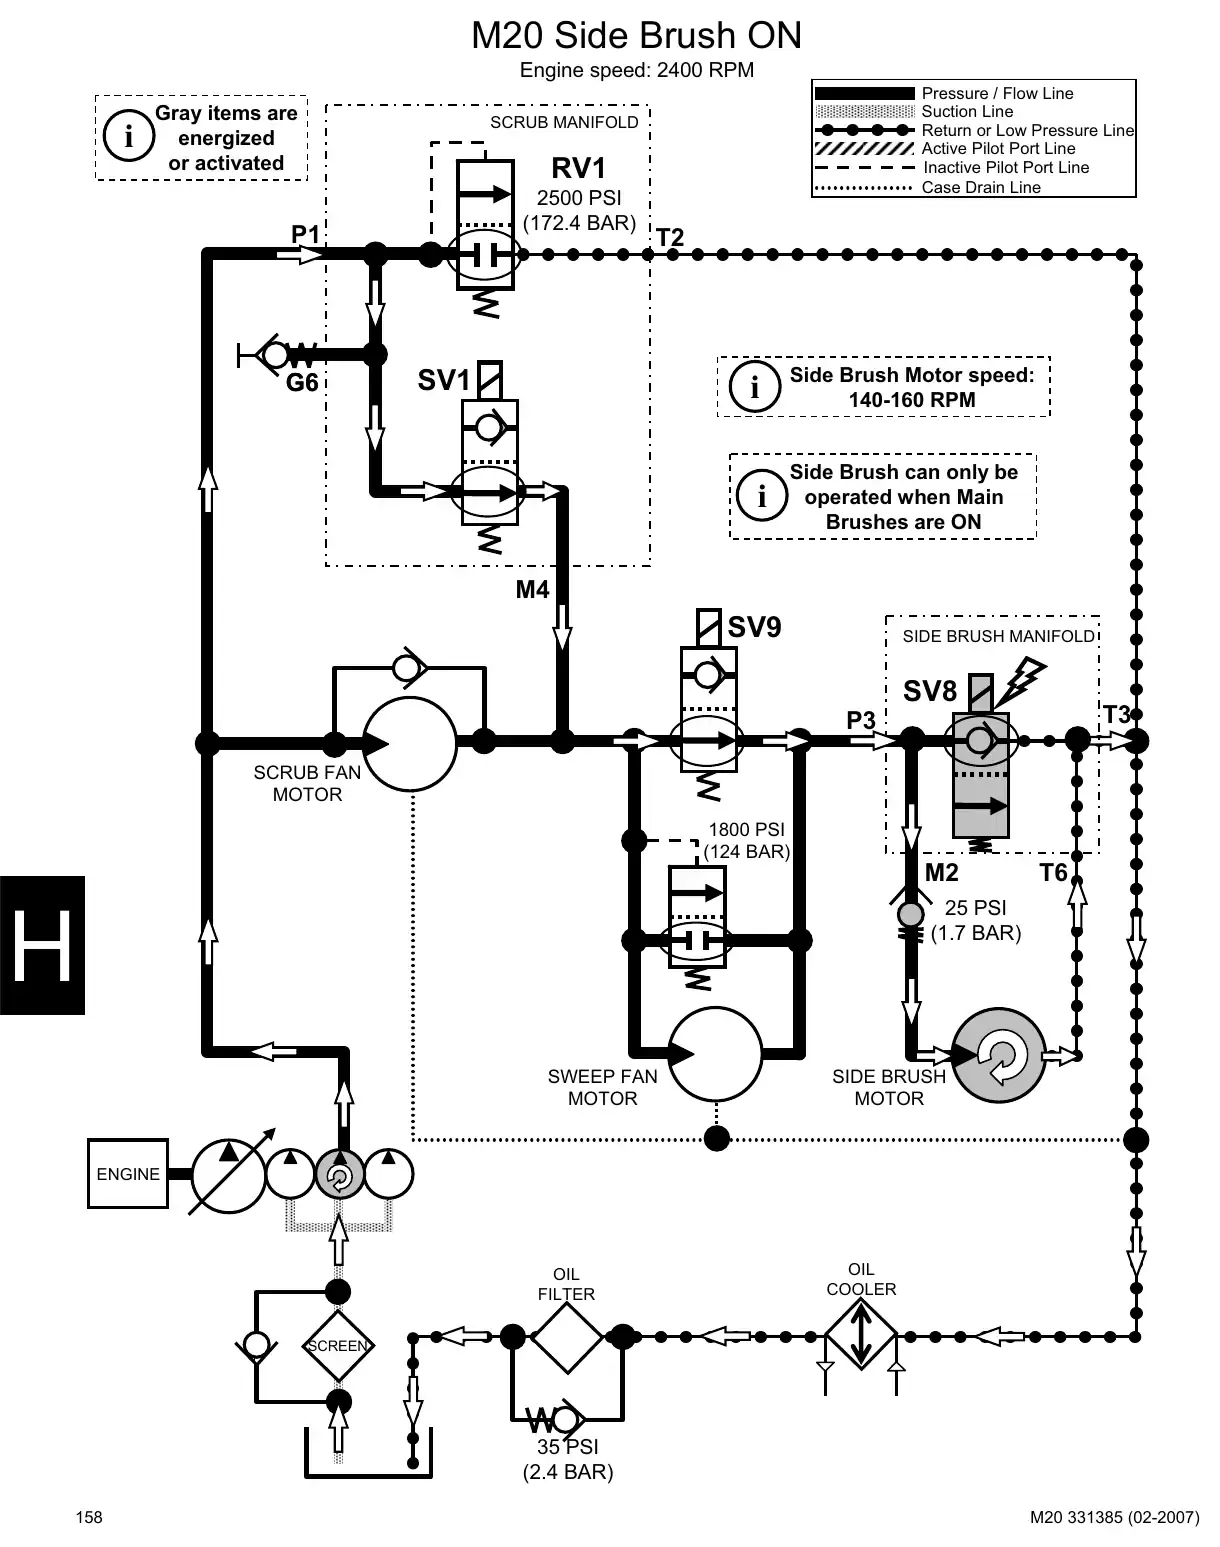
Text of manual page 158
M20 Side Brush ON
Engine speed: 2400 RPM
i
Gray items are
energized
or activated
Pressure / Flow Line
Suction Line
Return or Low Pressure Line
Active Pilot Port Line
Inactive Pilot Port Line
Case Drain Line
SCRUB MANIFOLD
RV1
2500 PSI
(172.4 BAR)
P1
G6
T2
SV1
i
Side Brush Motor speed:
140-160 RPM
i
Side Brush can only be
operated when Main
Brushes are ON
M4
SV9
SIDE BRUSH MANIFOLD
SV8
T3
P3
SCRUB FAN
MOTOR
1800 PSI
(124 BAR)
M2
T6
25 PSI
(1.7 BAR)
SWEEP FAN
MOTOR
SIDE BRUSH
MOTOR
OIL
FILTER
OIL
COOLER
ENGINE
SCREEN
35 PSI
(2.4 BAR)
158
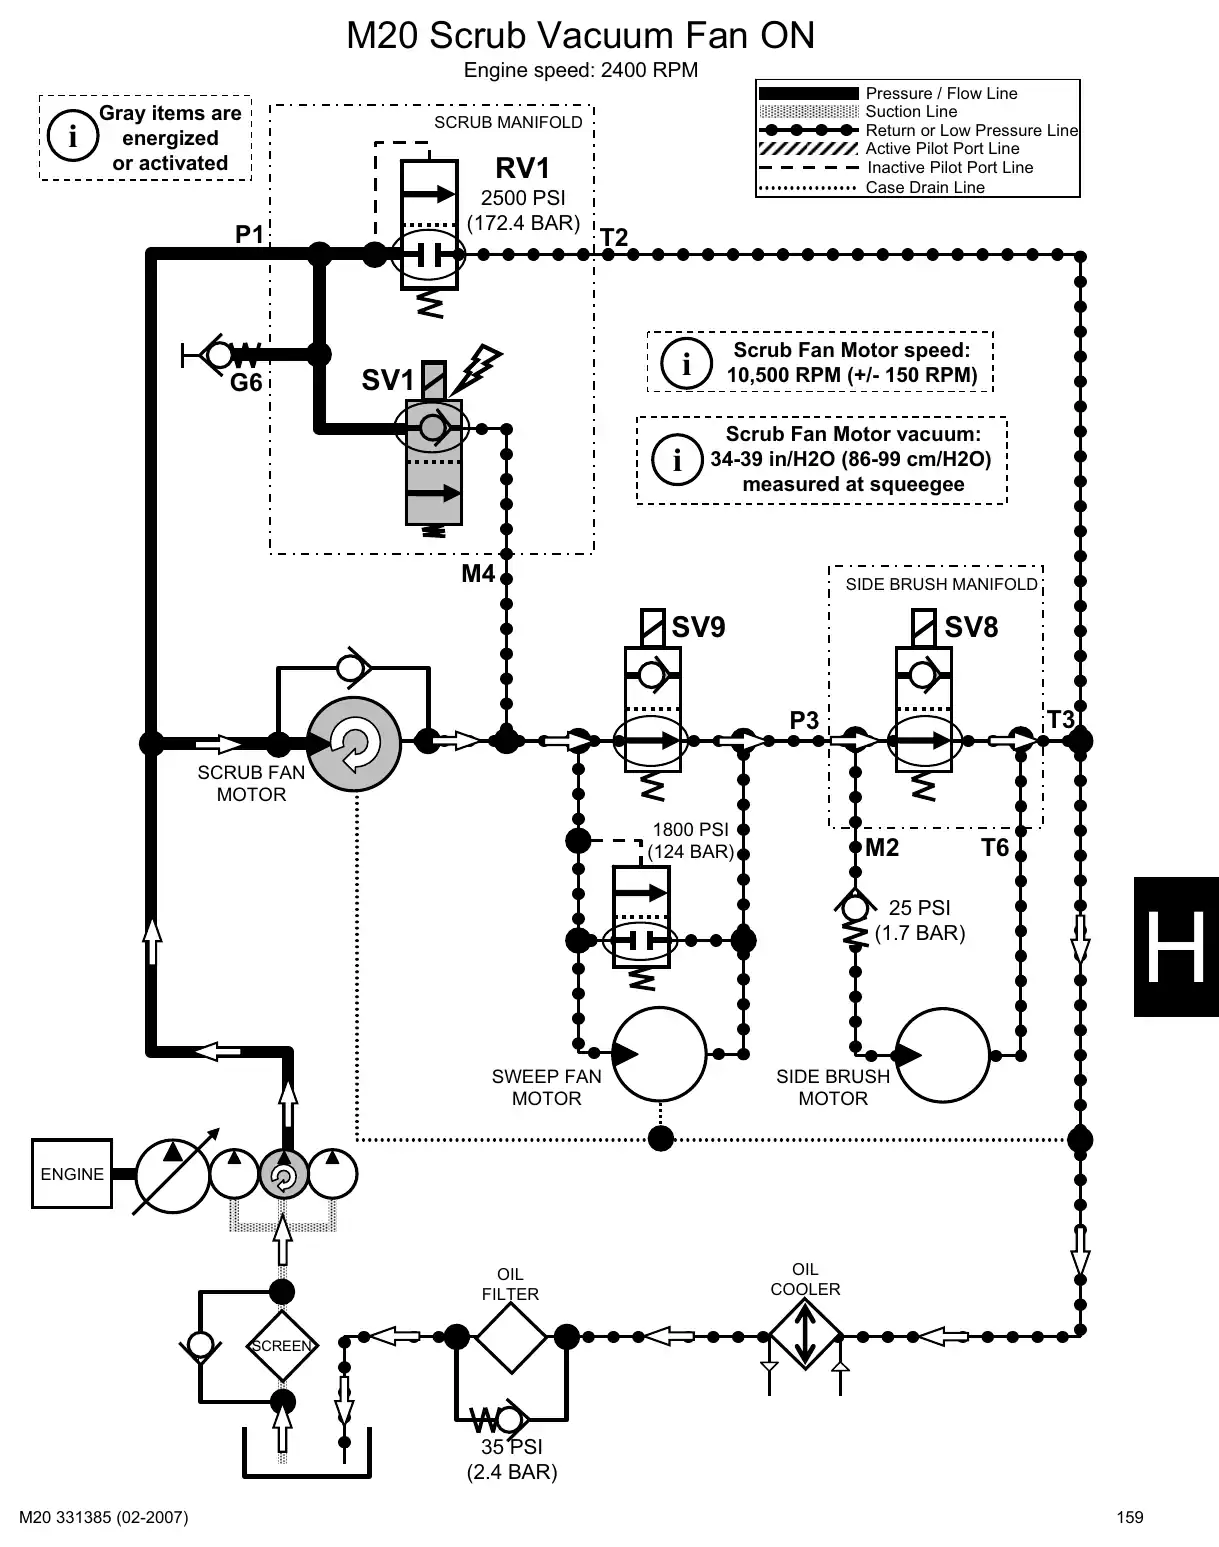
Text of manual page 159
M20 Scrub Vacuum Fan ON
Engine speed: 2400 RPM
i
Gray items are
energized
or activated
Pressure / Flow Line
Suction Line
Return or Low Pressure Line
Active Pilot Port Line
Inactive Pilot Port Line
Case Drain Line
SCRUB MANIFOLD
RV1
2500 PSI
(172.4 BAR)
P1
G6
T2
SV1
i
Scrub Fan Motor speed:
10,500 RPM (+/- 150 RPM)
i
Scrub Fan Motor vacuum:
34-39 in/H2O (86-99 cm/H2O)
measured at squeegee
M4
SIDE BRUSH MANIFOLD
SV9
SV8
T3
P3
SCRUB FAN
MOTOR
1800 PSI
(124 BAR)
M2
25 PSI
(1.7 BAR)
SWEEP FAN
MOTOR
SIDE BRUSH
MOTOR
OIL
FILTER
OIL
COOLER
T6
ENGINE
SCREEN
35 PSI
(2.4 BAR)
159
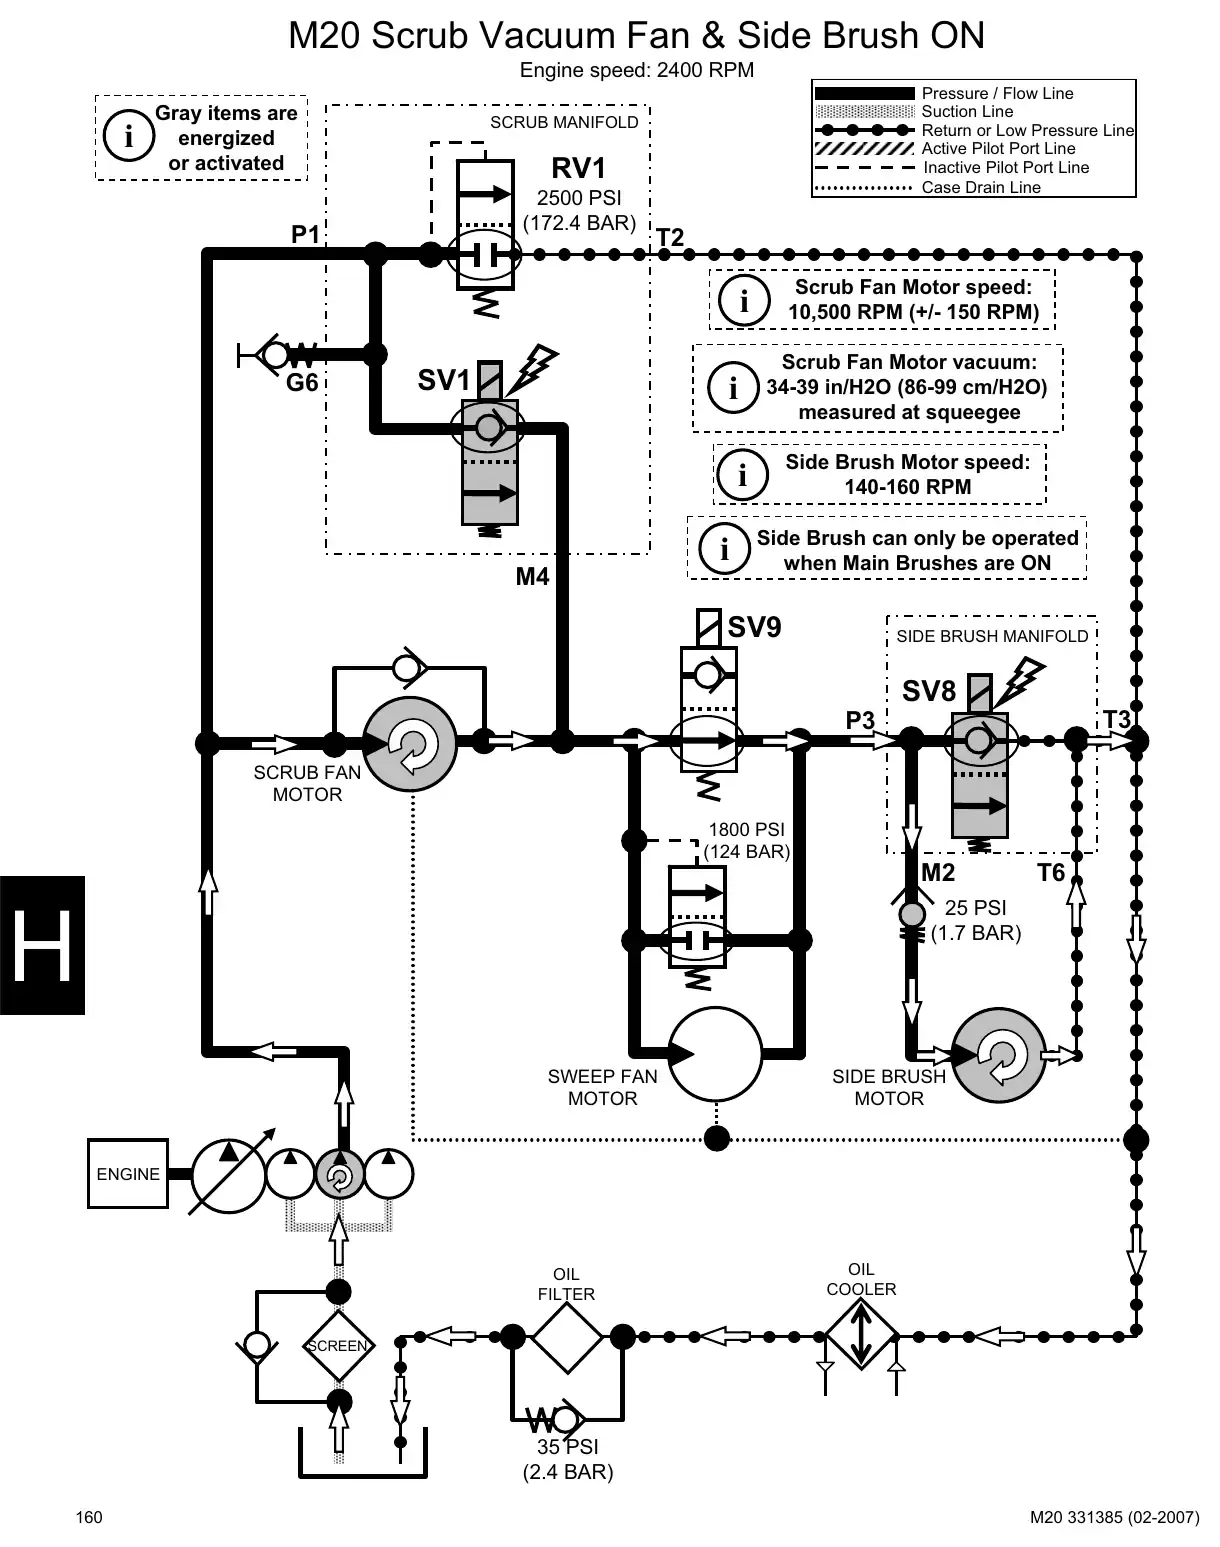
Text of manual page 160
M20 Scrub Vacuum Fan & Side Brush ON
Engine speed: 2400 RPM
i
Gray items are
energized
or activated
Pressure / Flow Line
Suction Line
Return or Low Pressure Line
Active Pilot Port Line
Inactive Pilot Port Line
Case Drain Line
SCRUB MANIFOLD
RV1
2500 PSI
(172.4 BAR)
P1
T2
Scrub Fan Motor speed:
10,500 RPM (+/- 150 RPM)
i
G6
SV1
M4
i
Scrub Fan Motor vacuum:
34-39 in/H2O (86-99 cm/H2O)
measured at squeegee
i
Side Brush Motor speed:
140-160 RPM
i
Side Brush can only be operated
when Main Brushes are ON
SV9
SIDE BRUSH MANIFOLD
SV8
T3
P3
SCRUB FAN
MOTOR
1800 PSI
(124 BAR)
M2
T6
25 PSI
(1.7 BAR)
SWEEP FAN
MOTOR
SIDE BRUSH
MOTOR
OIL
FILTER
OIL
COOLER
ENGINE
SCREEN
35 PSI
(2.4 BAR)
160
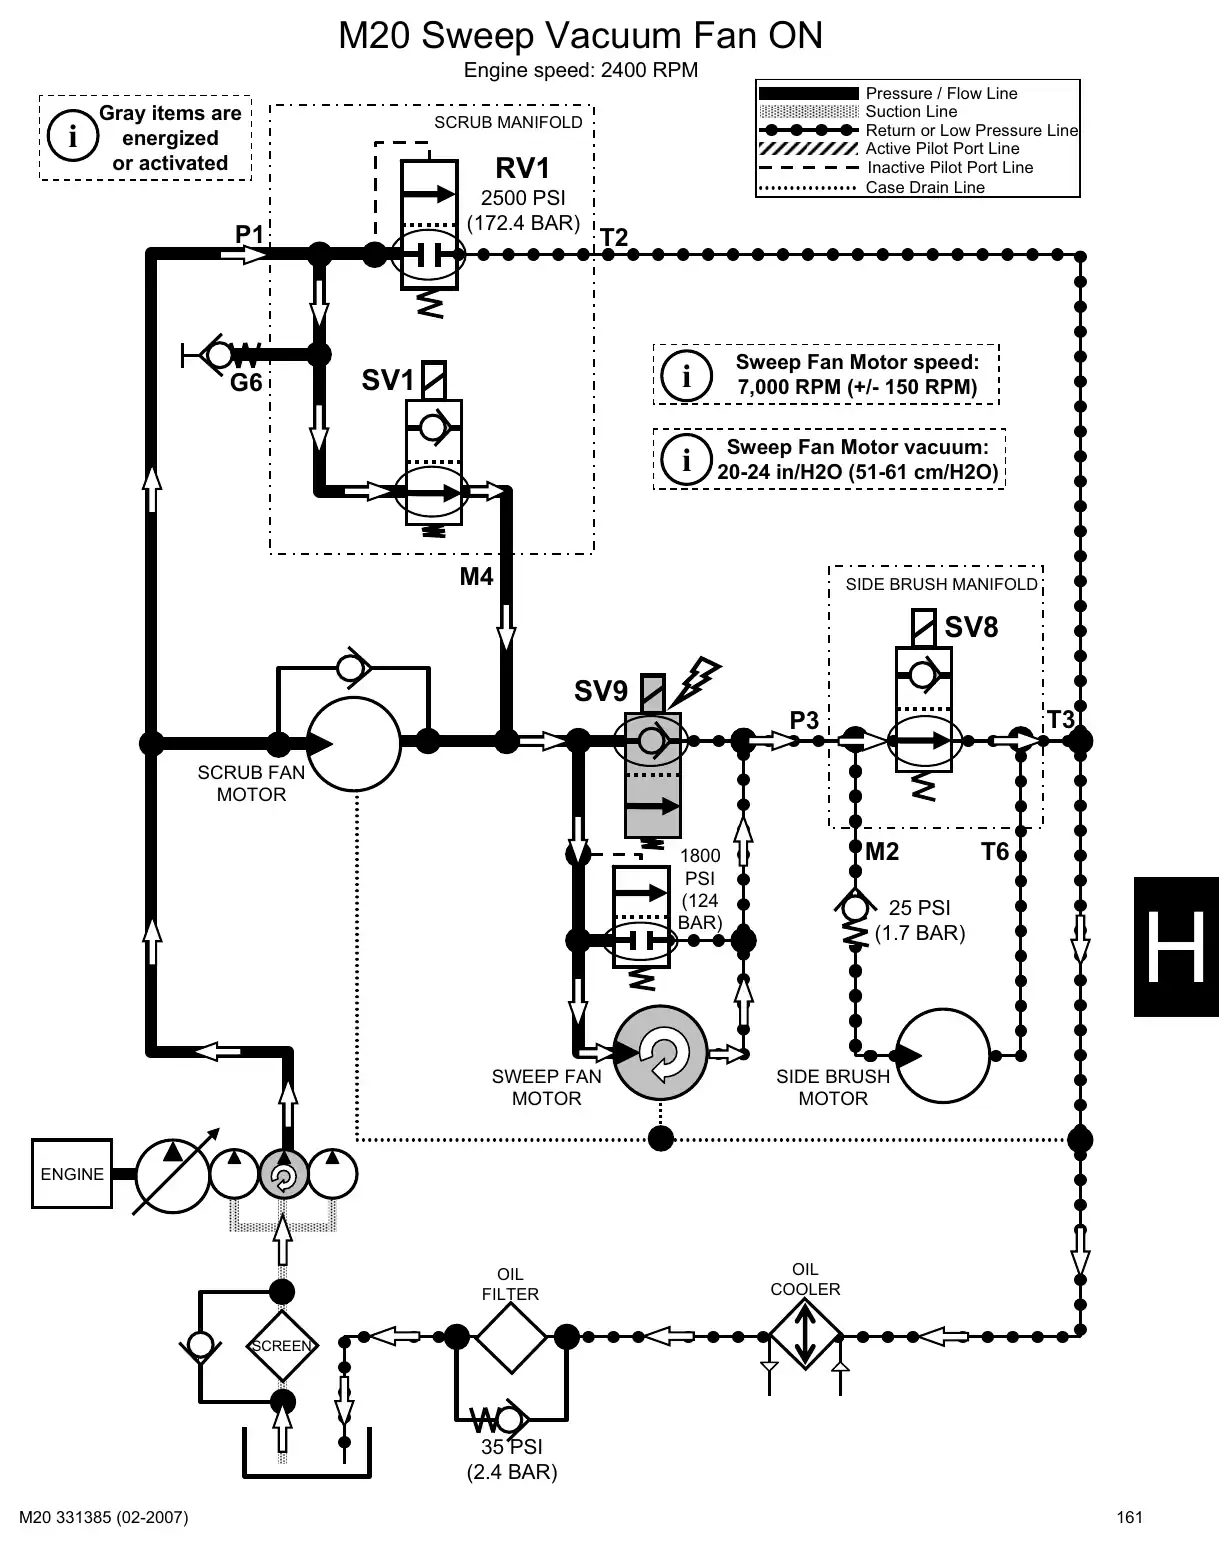
Text of manual page 161
M20 Sweep Vacuum Fan ON
Engine speed: 2400 RPM
i
Gray items are
energized
or activated
Pressure / Flow Line
Suction Line
Return or Low Pressure Line
Active Pilot Port Line
Inactive Pilot Port Line
Case Drain Line
SCRUB MANIFOLD
RV1
2500 PSI
(172.4 BAR)
P1
G6
T2
SV1
i
Sweep Fan Motor speed:
7,000 RPM (+/- 150 RPM)
i
Sweep Fan Motor vacuum:
20-24 in/H2O (51-61 cm/H2O)
M4
SIDE BRUSH MANIFOLD
SV8
SV9
T3
P3
SCRUB FAN
MOTOR
M2
1800
PSI
(124
BAR)
25 PSI
(1.7 BAR)
SWEEP FAN
MOTOR
SIDE BRUSH
MOTOR
OIL
FILTER
OIL
COOLER
T6
ENGINE
SCREEN
35 PSI
(2.4 BAR)
161
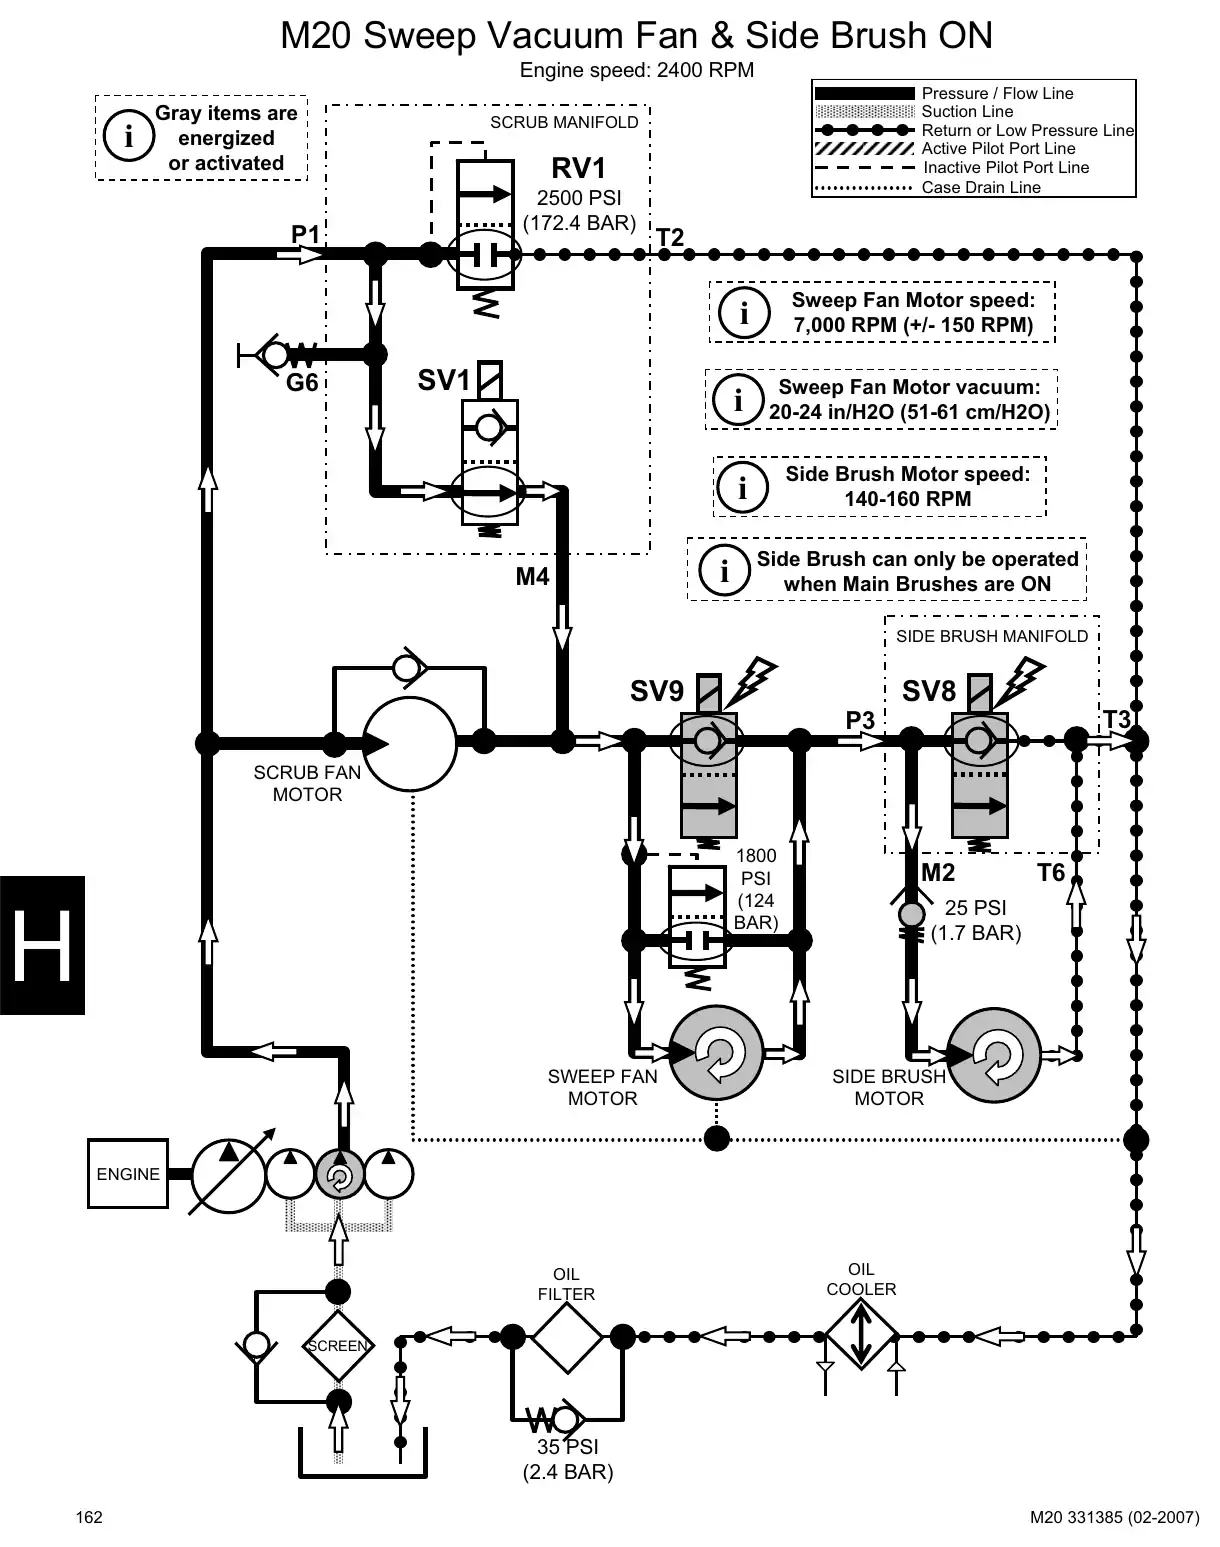
Text of manual page 162
M20 Sweep Vacuum Fan & Side Brush ON
Engine speed: 2400 RPM
i
Gray items are
energized
or activated
Pressure / Flow Line
Suction Line
Return or Low Pressure Line
Active Pilot Port Line
Inactive Pilot Port Line
Case Drain Line
SCRUB MANIFOLD
RV1
2500 PSI
(172.4 BAR)
P1
G6
T2
SV1
i
M4
i
Sweep Fan Motor speed:
7,000 RPM (+/- 150 RPM)
i
Sweep Fan Motor vacuum:
20-24 in/H2O (51-61 cm/H2O)
i
Side Brush Motor speed:
140-160 RPM
Side Brush can only be operated
when Main Brushes are ON
SIDE BRUSH MANIFOLD
SV9
SV8
T3
P3
SCRUB FAN
MOTOR
1800
PSI
(124
BAR)
M2
T6
25 PSI
(1.7 BAR)
SWEEP FAN
MOTOR
SIDE BRUSH
MOTOR
OIL
FILTER
OIL
COOLER
ENGINE
SCREEN
35 PSI
(2.4 BAR)
162
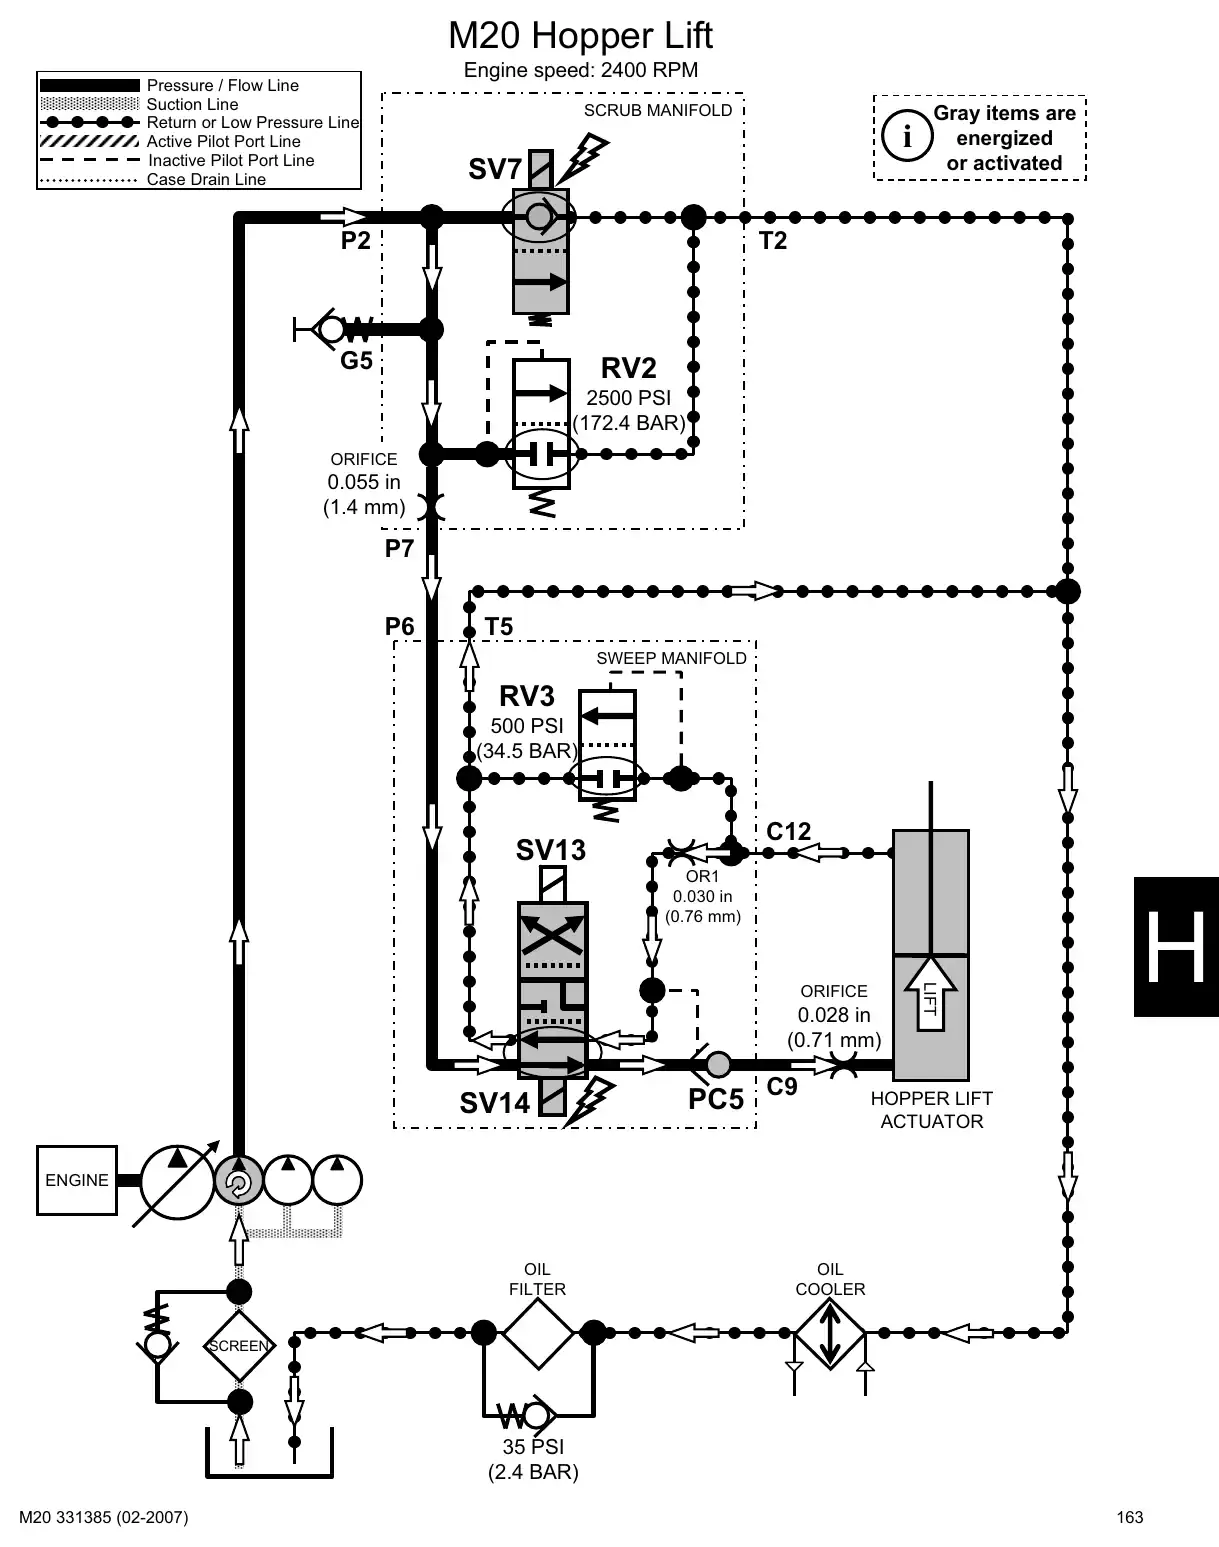
Text of manual page 163
M20 Hopper Lift
Engine speed: 2400 RPM
Pressure / Flow Line
Suction Line
Return or Low Pressure Line
Active Pilot Port Line
Inactive Pilot Port Line
Case Drain Line
SCRUB MANIFOLD
i
SV7
P2
Gray items are
energized
or activated
T2
G5
RV2
2500 PSI
(172.4 BAR)
ORIFICE
0.055 in
(1.4 mm)
P7
P6
T5
SWEEP MANIFOLD
RV3
500 PSI
(34.5 BAR)
C12
SV13
OR1
0.030 in
(0.76 mm)
0.028 in
(0.71 mm)
SV14
PC5
C9
LIFT
ORIFICE
HOPPER LIFT
ACTUATOR
ENGINE
OIL
FILTER
OIL
COOLER
SCREEN
35 PSI
(2.4 BAR)
163
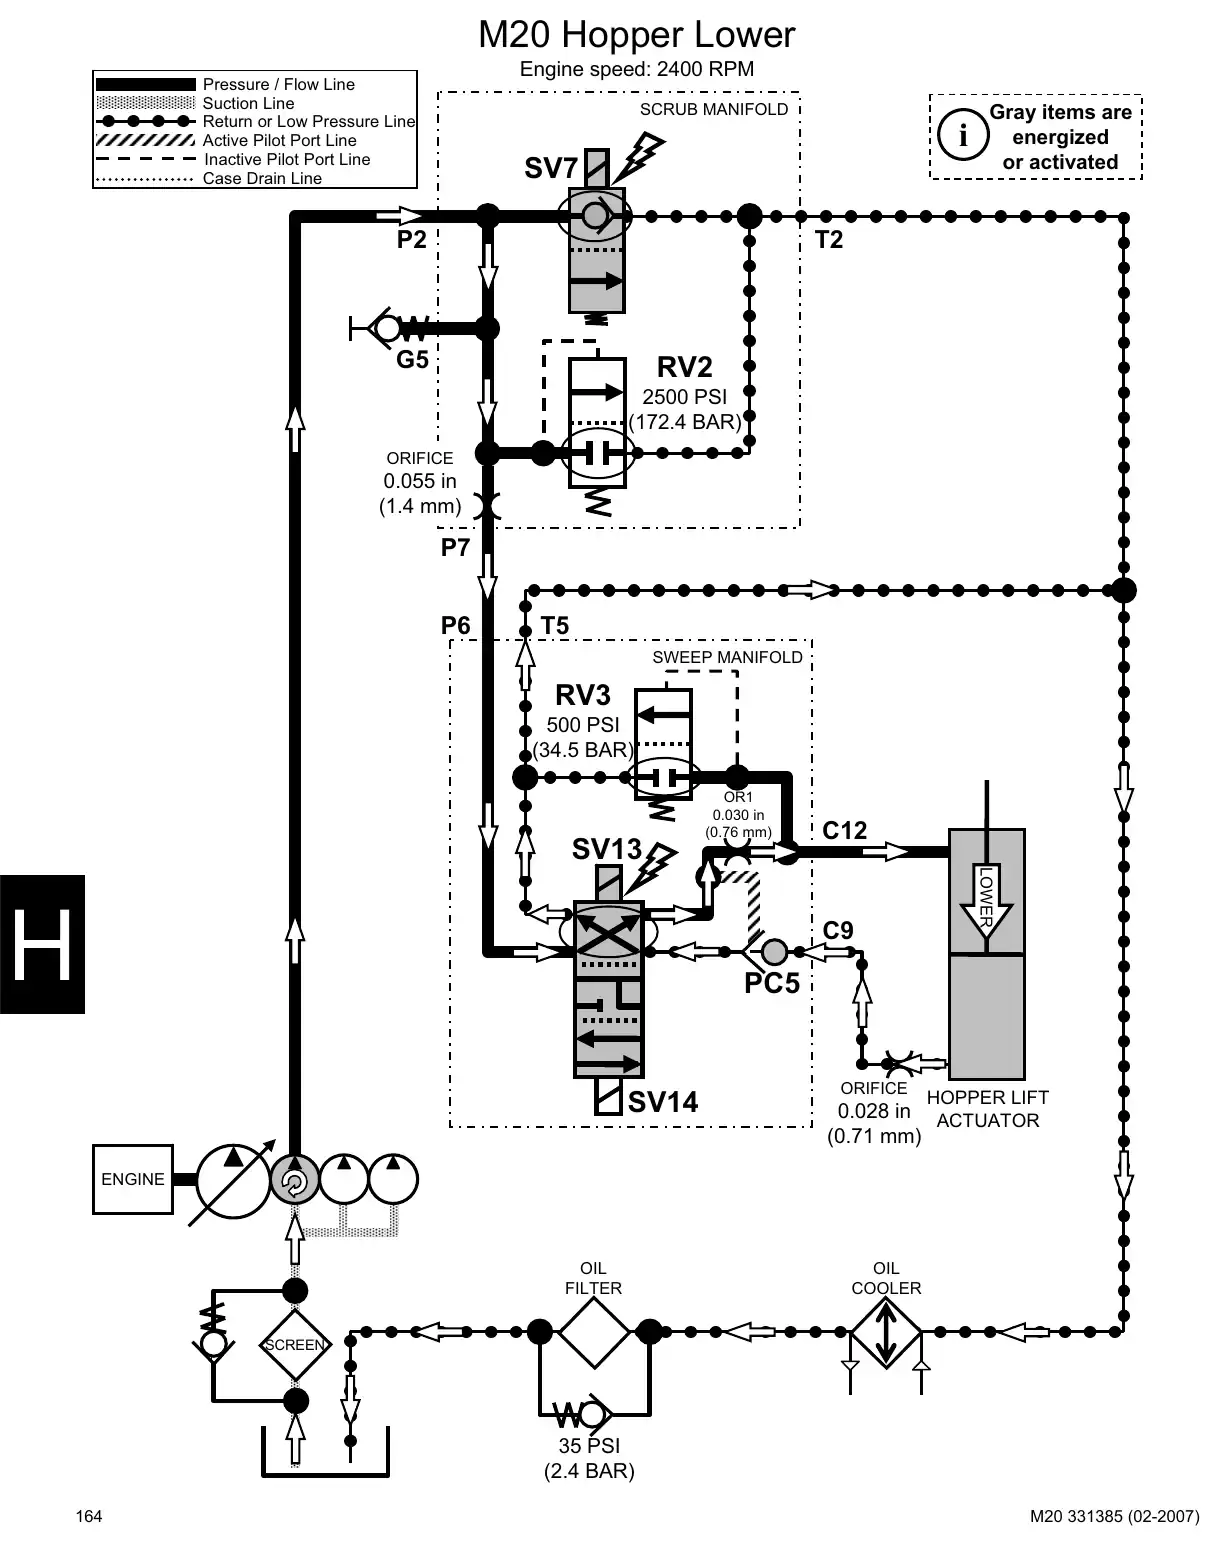
Text of manual page 164
M20 Hopper Lower
Engine speed: 2400 RPM
Pressure / Flow Line
Suction Line
Return or Low Pressure Line
Active Pilot Port Line
Inactive Pilot Port Line
Case Drain Line
SCRUB MANIFOLD
i
SV7
P2
Gray items are
energized
or activated
T2
G5
RV2
2500 PSI
(172.4 BAR)
ORIFICE
0.055 in
(1.4 mm)
P7
P6
T5
SWEEP MANIFOLD
RV3
500 PSI
(34.5 BAR)
SV13
C12
C9
LOWER
OR1
0.030 in
(0.76 mm)
PC5
SV14
ORIFICE
HOPPER LIFT
0.028 in ACTUATOR
(0.71 mm)
ENGINE
OIL
FILTER
OIL
COOLER
SCREEN
35 PSI
(2.4 BAR)
164
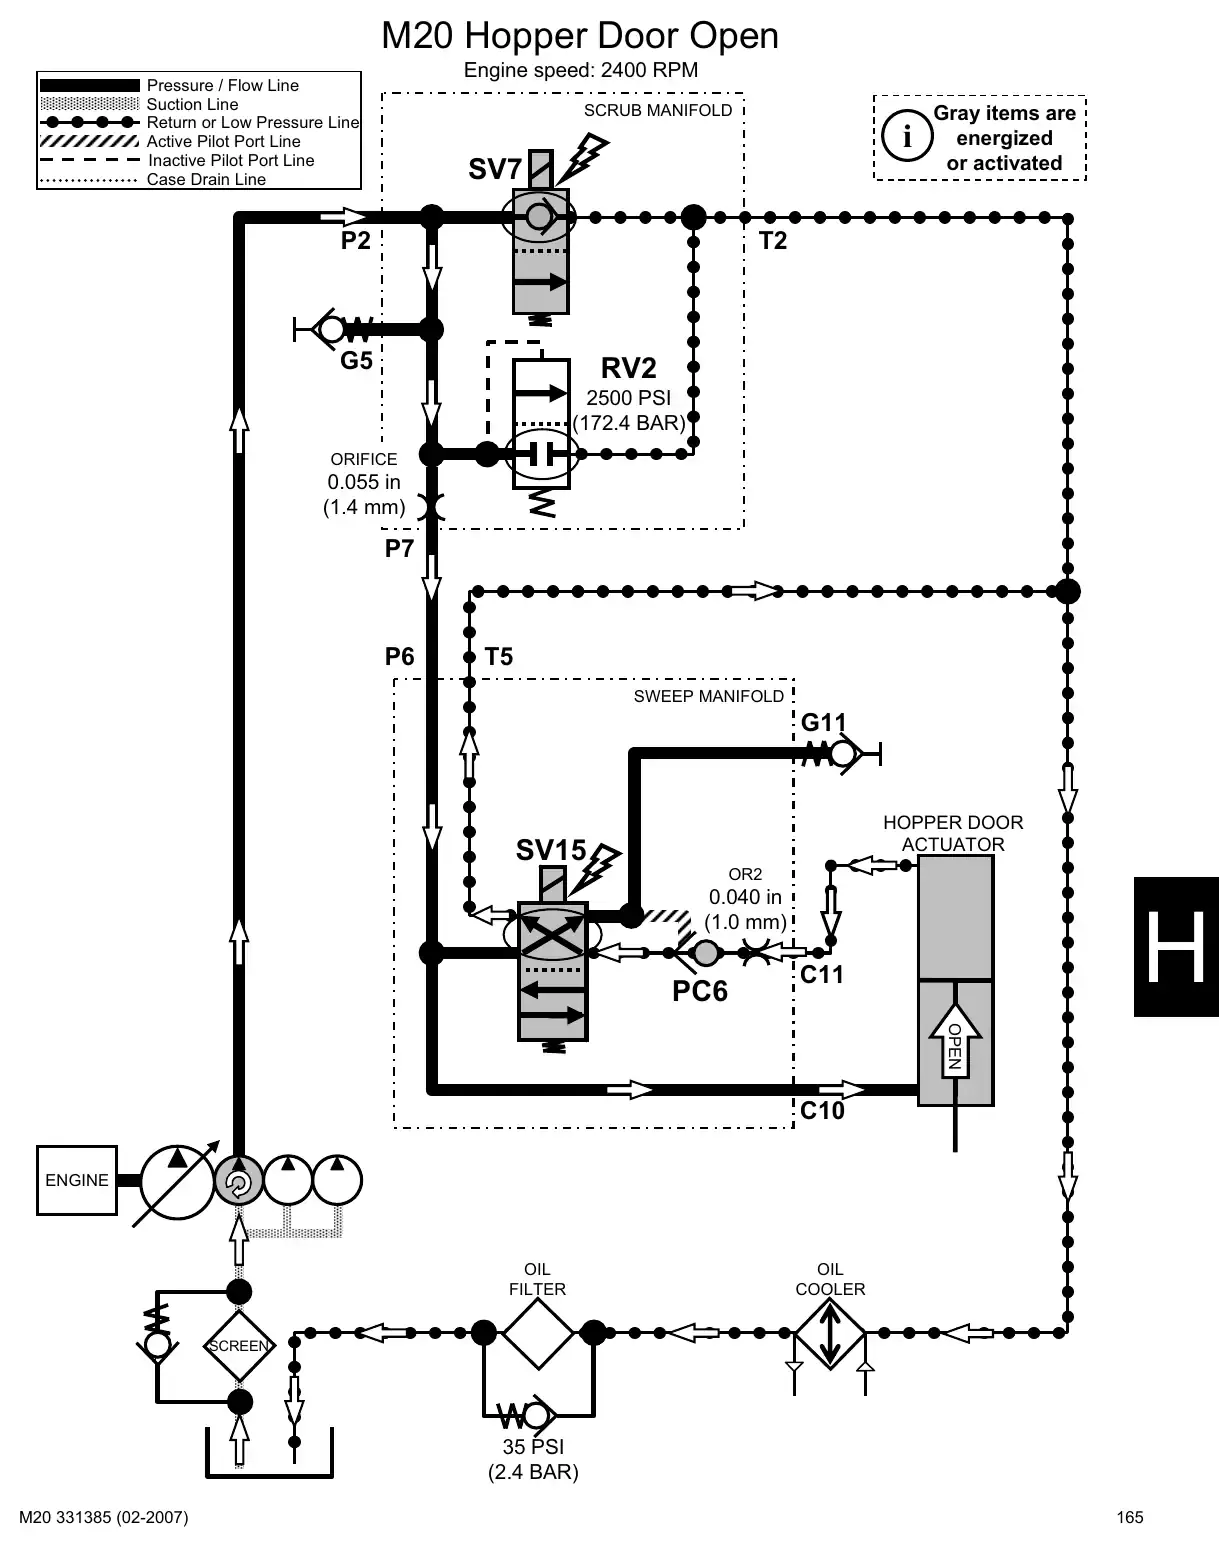
Text of manual page 165
M20 Hopper Door Open
Engine speed: 2400 RPM
Pressure / Flow Line
Suction Line
Return or Low Pressure Line
Active Pilot Port Line
Inactive Pilot Port Line
Case Drain Line
SCRUB MANIFOLD
i
SV7
P2
Gray items are
energized
or activated
T2
G5
RV2
2500 PSI
(172.4 BAR)
ORIFICE
0.055 in
(1.4 mm)
P7
P6
T5
SWEEP MANIFOLD
G11
HOPPER DOOR
ACTUATOR
SV15
OR2
0.040 in
(1.0 mm)
PC6
C11
OPEN
C10
ENGINE
OIL
FILTER
OIL
COOLER
SCREEN
35 PSI
(2.4 BAR)
165
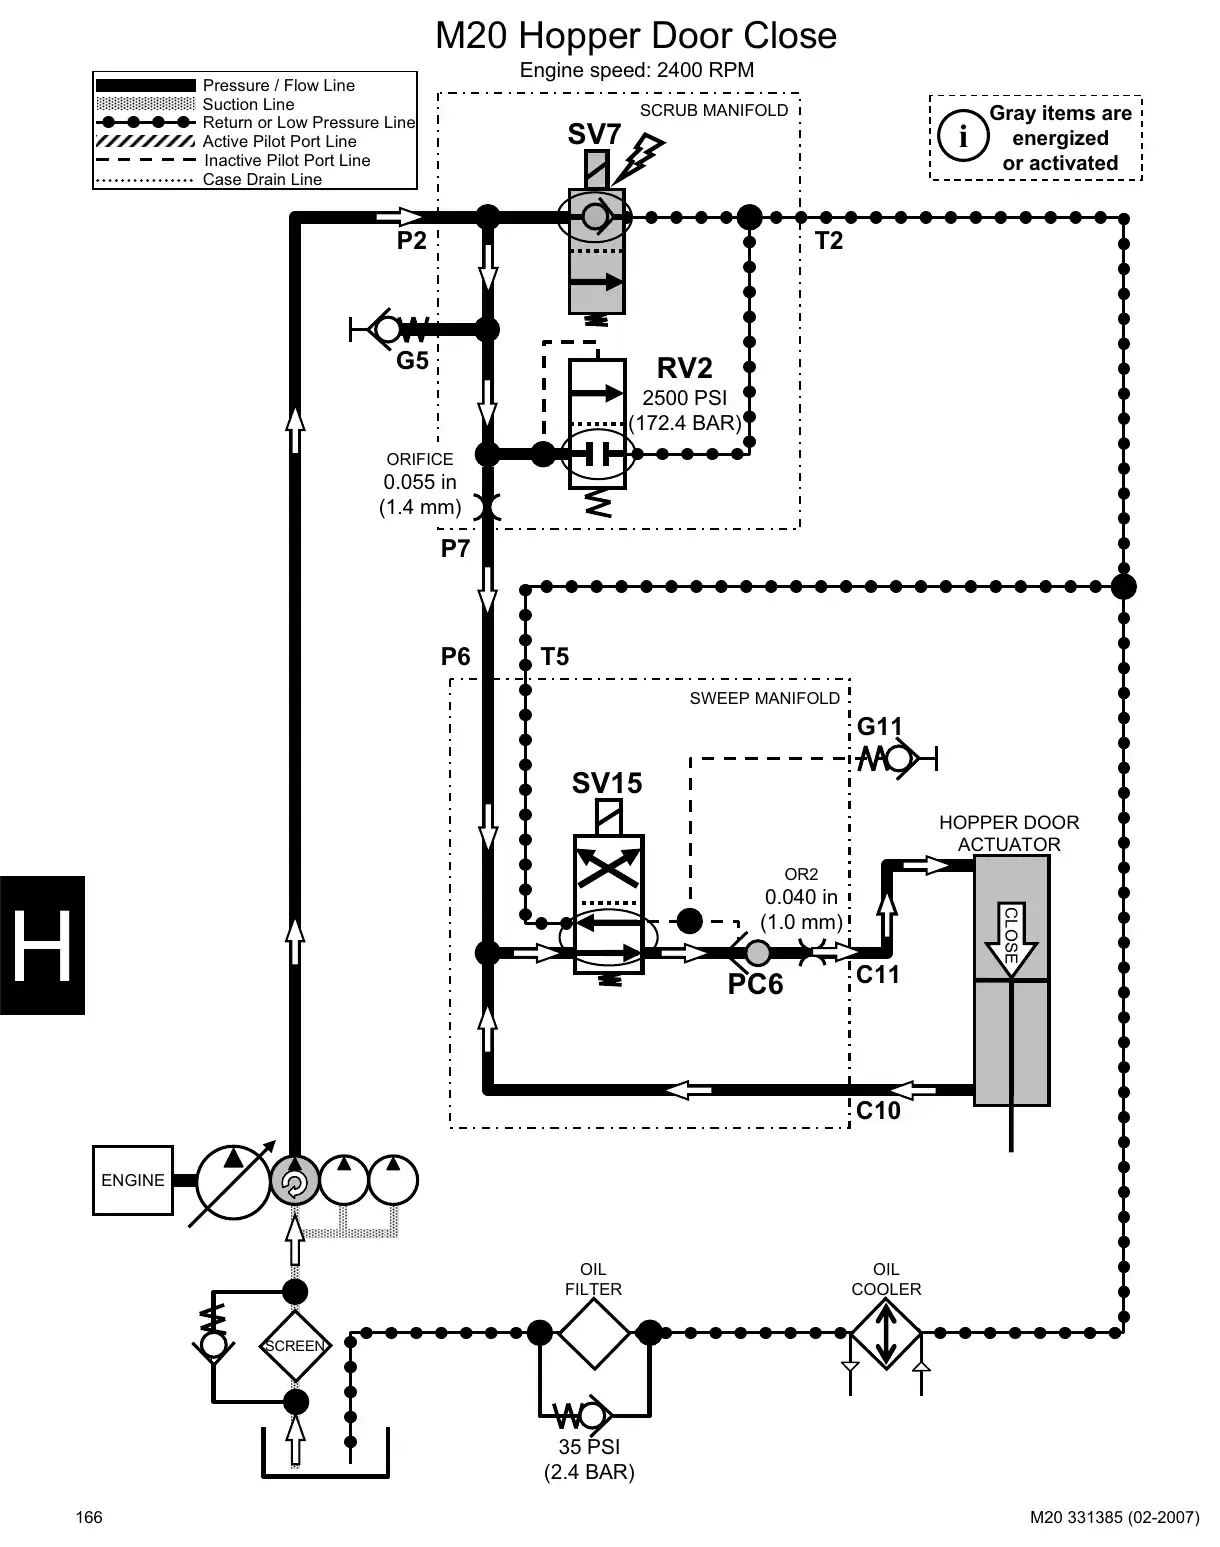
Text of manual page 166
M20 Hopper Door Close
Engine speed: 2400 RPM
Pressure / Flow Line
Suction Line
Return or Low Pressure Line
Active Pilot Port Line
Inactive Pilot Port Line
Case Drain Line
SCRUB MANIFOLD
i
SV7
P2
Gray items are
energized
or activated
T2
G5
RV2
2500 PSI
(172.4 BAR)
ORIFICE
0.055 in
(1.4 mm)
P7
P6
T5
SWEEP MANIFOLD
G11
SV15
HOPPER DOOR
ACTUATOR
OR2
PC6
CLOSE
0.040 in
(1.0 mm)
C11
C10
ENGINE
OIL
FILTER
OIL
COOLER
SCREEN
35 PSI
(2.4 BAR)
166
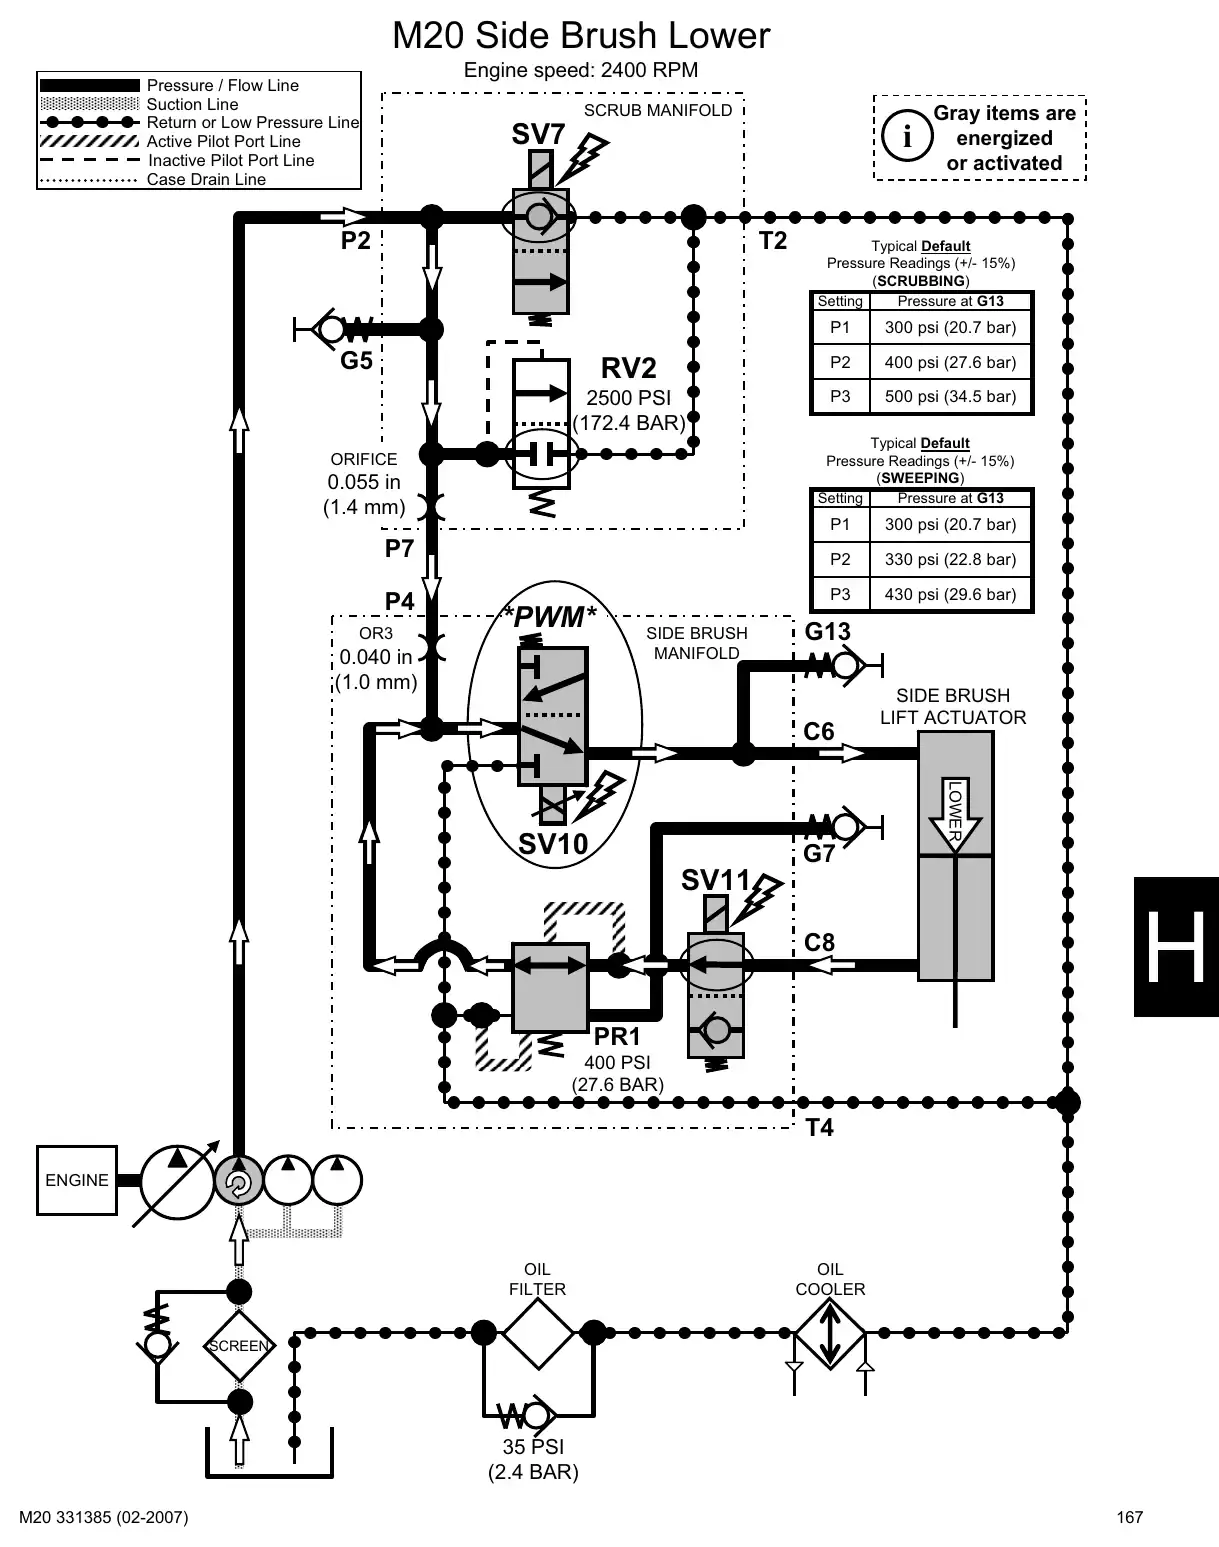
Text of manual page 167
M20 Side Brush Lower
Engine speed: 2400 RPM
Pressure / Flow Line
Suction Line
Return or Low Pressure Line
Active Pilot Port Line
Inactive Pilot Port Line
Case Drain Line
SCRUB MANIFOLD
i
SV7
P2
T2
300 psi (20.7 bar)
RV2
P2
400 psi (27.6 bar)
2500 PSI
(172.4 BAR)
P3
500 psi (34.5 bar)
Typical Default
Pressure Readings (+/- 15%)
(SWEEPING)
Setting
Pressure at G13
ORIFICE
0.055 in
(1.4 mm)
P7
OR3
Typical Default
Pressure Readings (+/- 15%)
(SCRUBBING)
Setting
Pressure at G13
P1
G5
P4
Gray items are
energized
or activated
*PWM*
0.040 in
(1.0 mm)
SIDE BRUSH
MANIFOLD
P1
300 psi (20.7 bar)
P2
330 psi (22.8 bar)
P3
430 psi (29.6 bar)
G13
C6
SIDE BRUSH
LIFT ACTUATOR
LOWER
SV10
G7
SV11
C8
PR1
400 PSI
(27.6 BAR)
T4
ENGINE
OIL
FILTER
OIL
COOLER
SCREEN
35 PSI
(2.4 BAR)
167
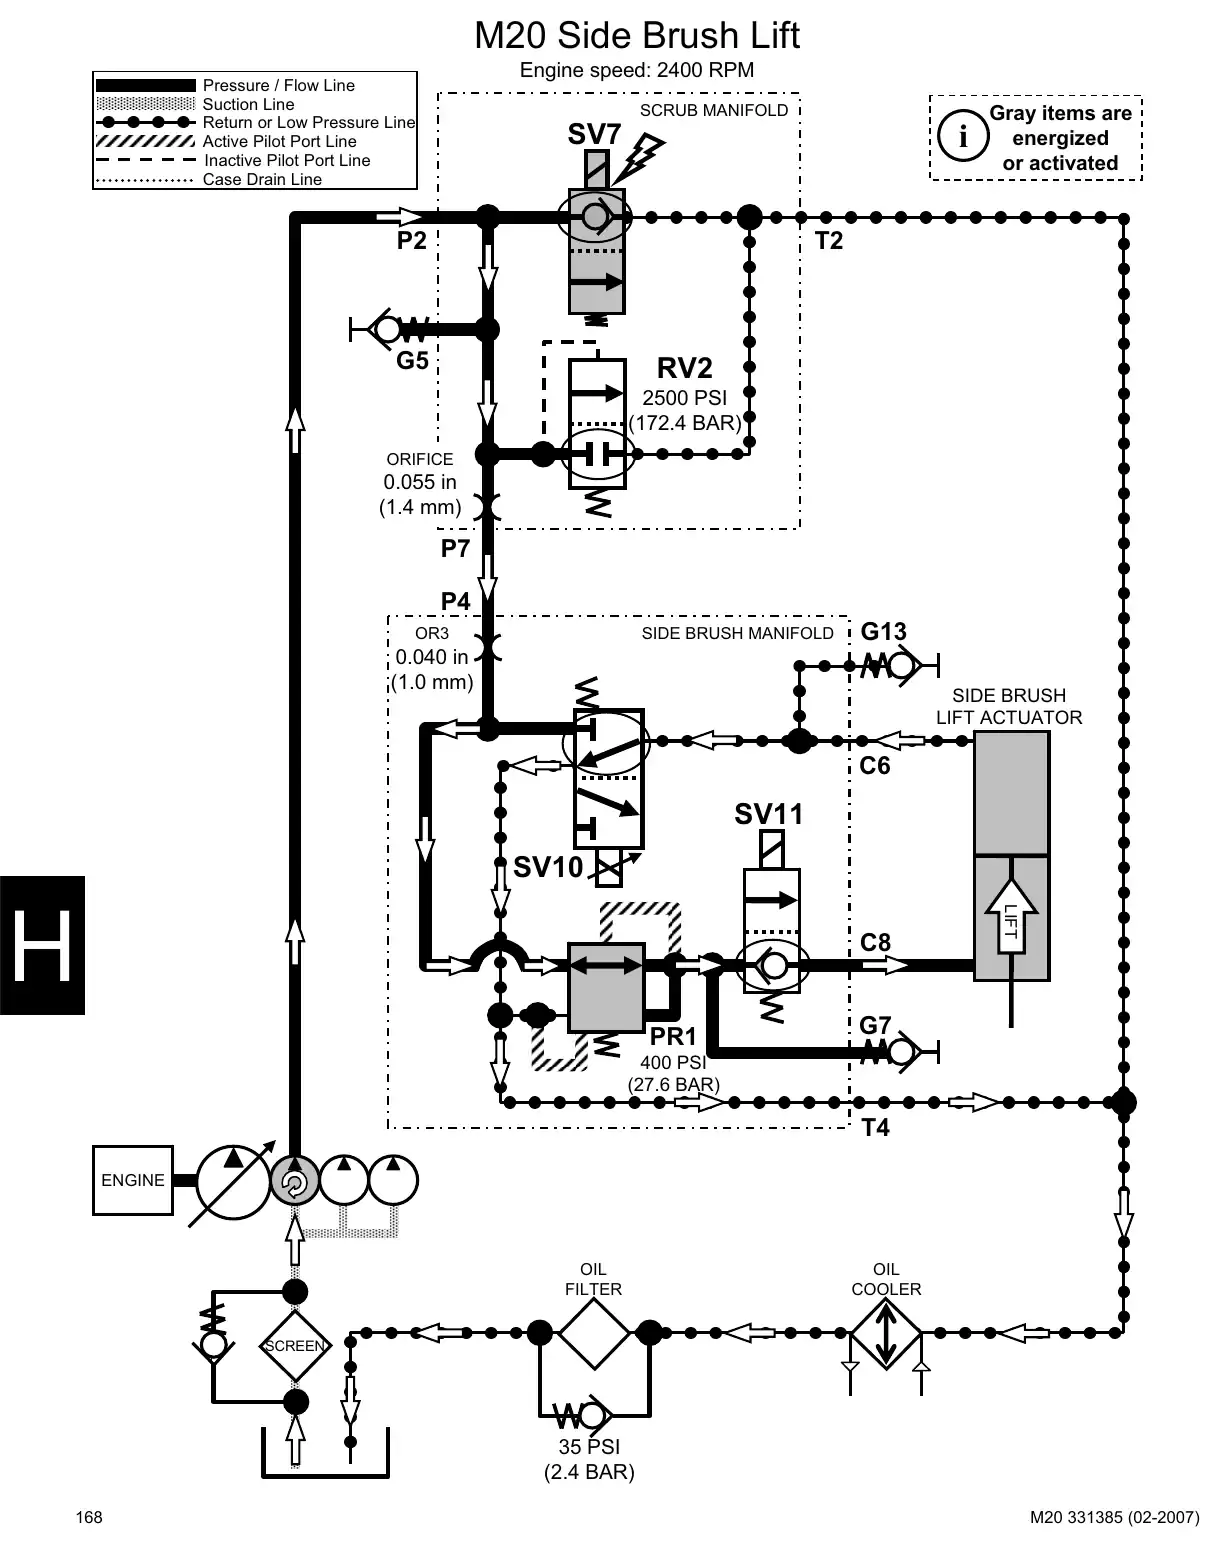
Text of manual page 168
M20 Side Brush Lift
Engine speed: 2400 RPM
Pressure / Flow Line
Suction Line
Return or Low Pressure Line
Active Pilot Port Line
Inactive Pilot Port Line
Case Drain Line
SCRUB MANIFOLD
i
SV7
P2
Gray items are
energized
or activated
T2
G5
RV2
2500 PSI
(172.4 BAR)
ORIFICE
0.055 in
(1.4 mm)
P7
P4
OR3
SIDE BRUSH MANIFOLD
G13
0.040 in
(1.0 mm)
SIDE BRUSH
LIFT ACTUATOR
C6
SV11
SV10
C8
PR1
LIFT
G7
400 PSI
(27.6 BAR)
T4
ENGINE
OIL
FILTER
OIL
COOLER
SCREEN
35 PSI
(2.4 BAR)
168
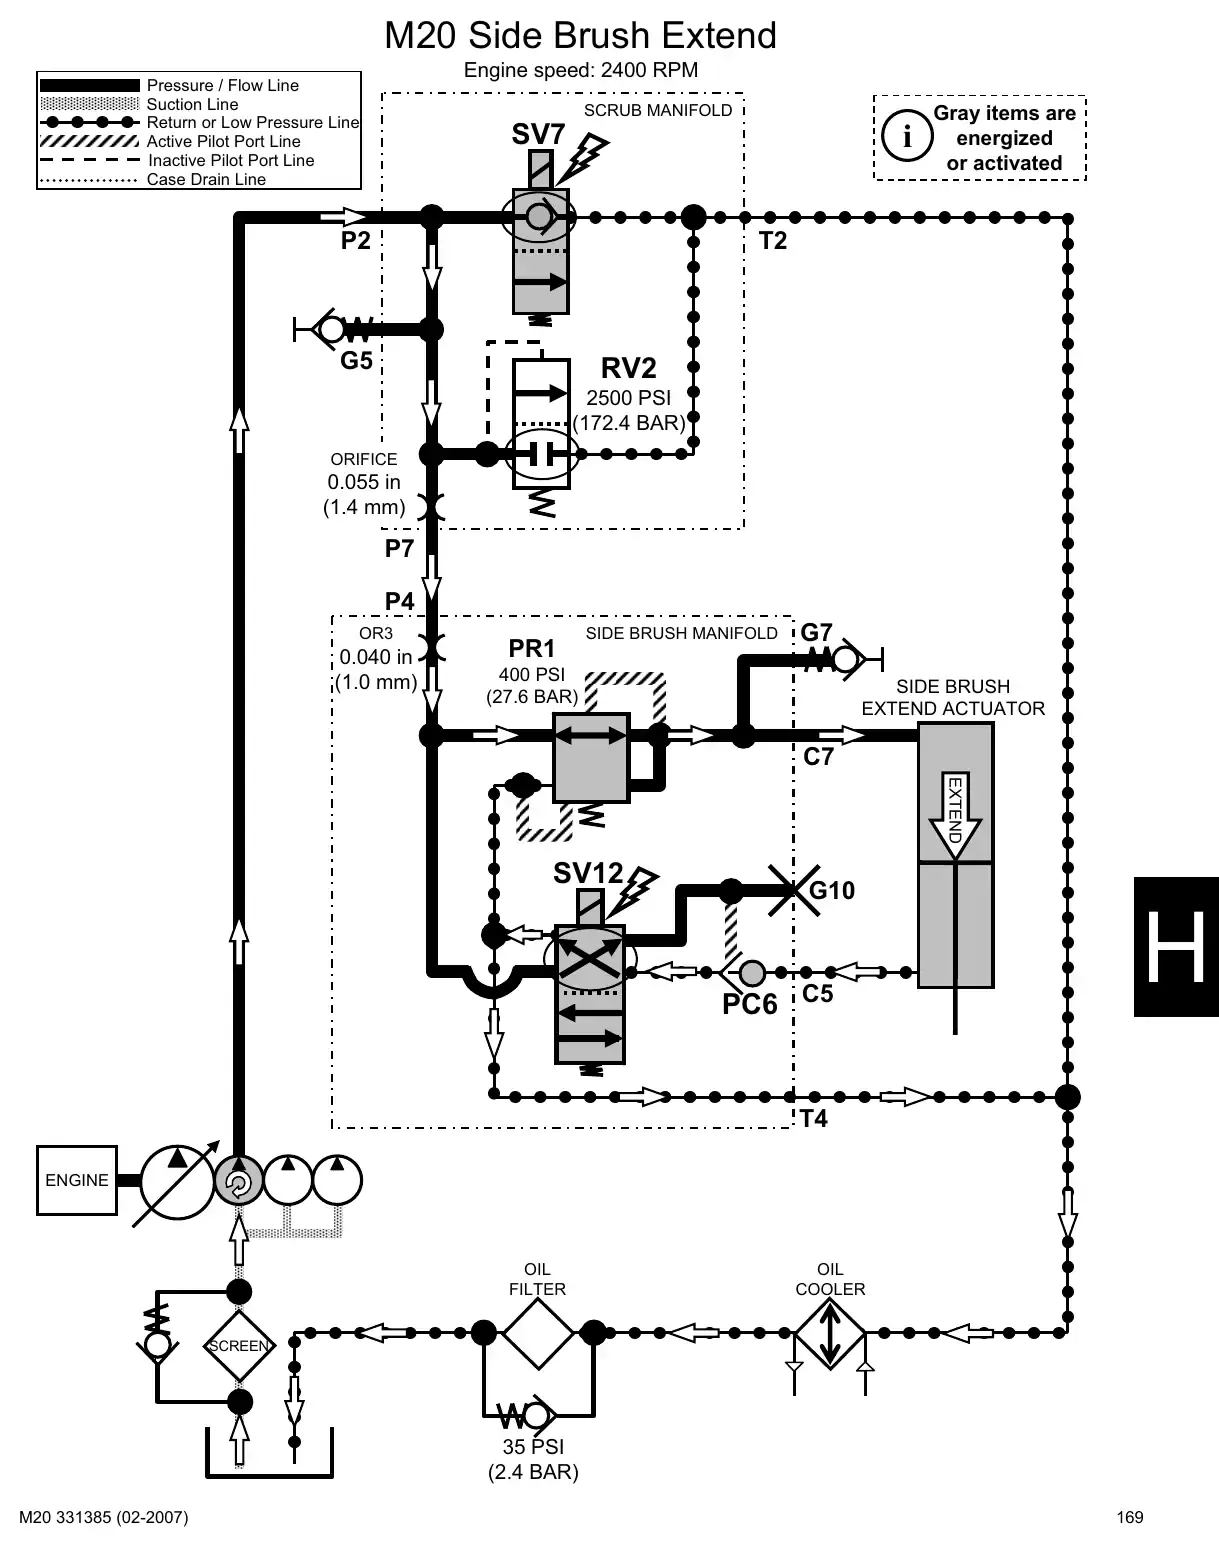
Text of manual page 169
M20 Side Brush Extend
Engine speed: 2400 RPM
Pressure / Flow Line
Suction Line
Return or Low Pressure Line
Active Pilot Port Line
Inactive Pilot Port Line
Case Drain Line
SCRUB MANIFOLD
i
SV7
P2
Gray items are
energized
or activated
T2
G5
RV2
2500 PSI
(172.4 BAR)
ORIFICE
0.055 in
(1.4 mm)
P7
P4
OR3
0.040 in
(1.0 mm)
PR1
SIDE BRUSH MANIFOLD
G7
400 PSI
(27.6 BAR)
SIDE BRUSH
EXTEND ACTUATOR
C7
EXTEND
SV12
G10
PC6 C5
T4
ENGINE
OIL
FILTER
OIL
COOLER
SCREEN
35 PSI
(2.4 BAR)
169
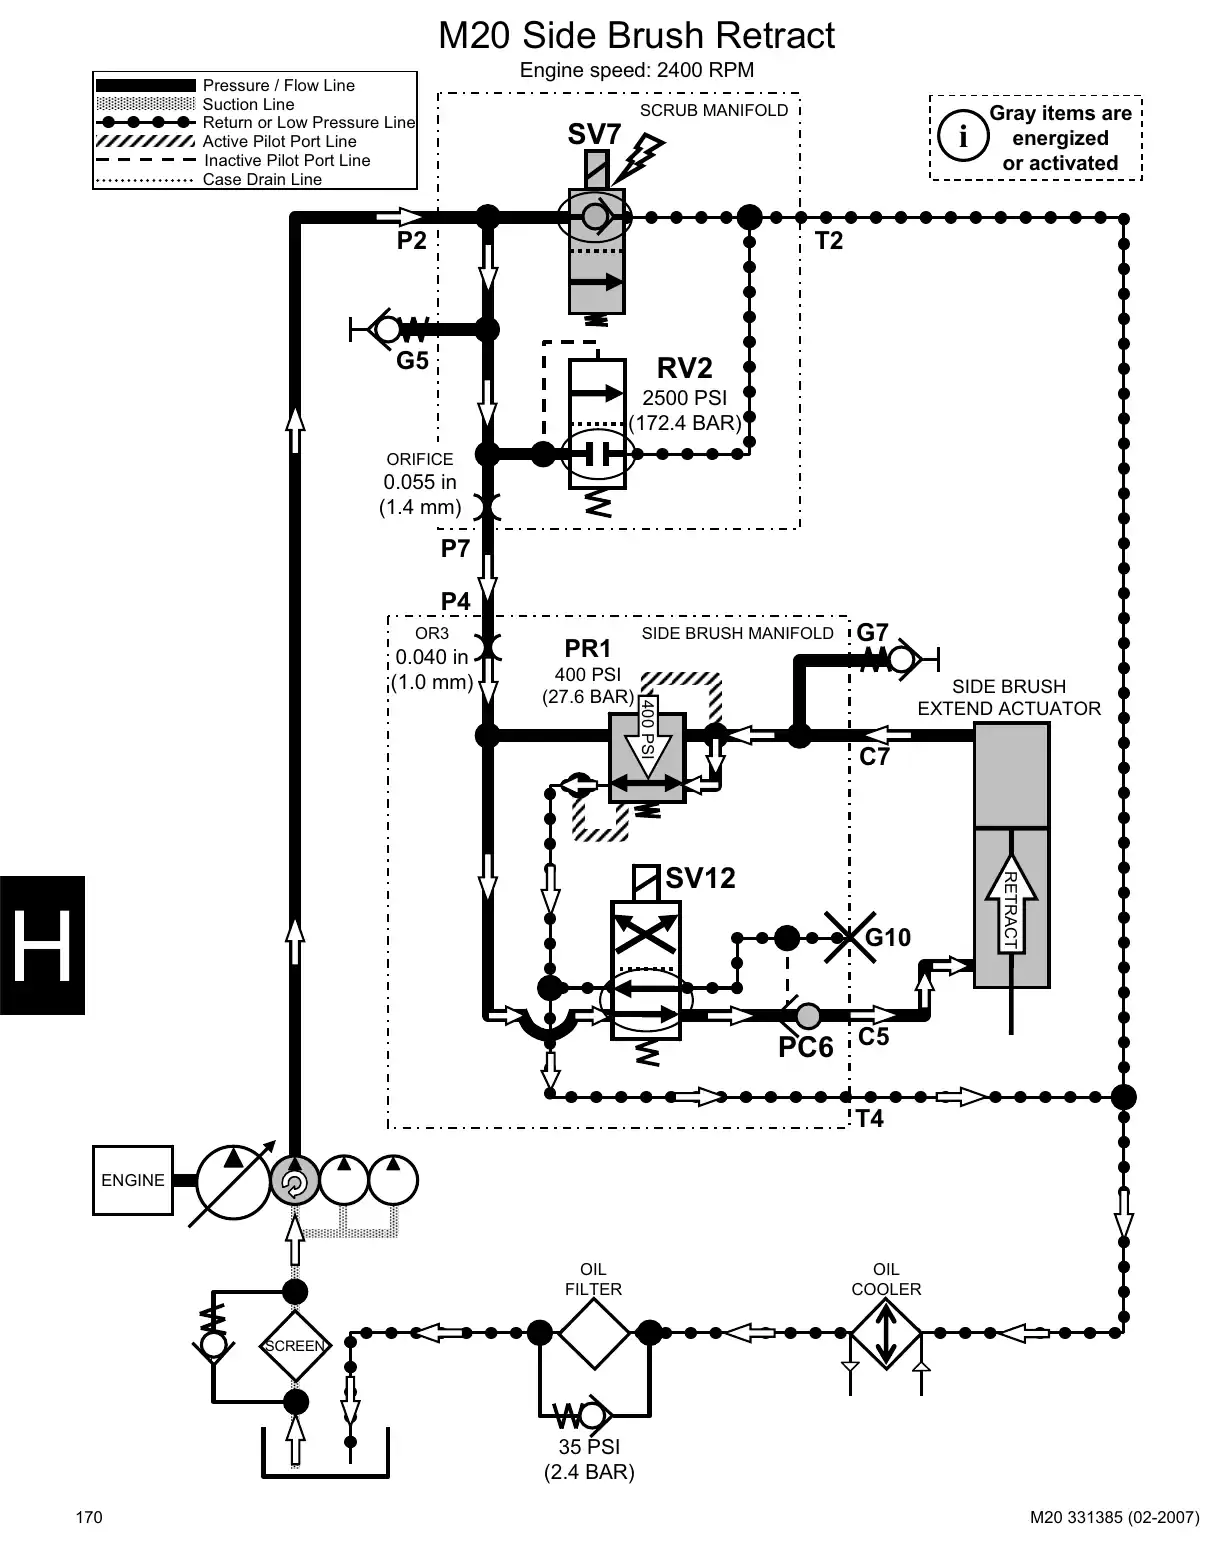
Text of manual page 170
M20 Side Brush Retract
Engine speed: 2400 RPM
Pressure / Flow Line
Suction Line
Return or Low Pressure Line
Active Pilot Port Line
Inactive Pilot Port Line
Case Drain Line
SCRUB MANIFOLD
i
SV7
P2
Gray items are
energized
or activated
T2
G5
RV2
2500 PSI
(172.4 BAR)
ORIFICE
0.055 in
(1.4 mm)
P7
P4
OR3
0.040 in
(1.0 mm)
PR1
G7
SIDE BRUSH
EXTEND ACTUATOR
400 PSI
400 PSI
(27.6 BAR)
SIDE BRUSH MANIFOLD
C7
G10
RETRACT
SV12
PC6 C5
T4
ENGINE
OIL
FILTER
OIL
COOLER
SCREEN
35 PSI
(2.4 BAR)
170
Notes on this parts list
- Service manual pages are Tennant's own pages, used with permission; values apply to the machines the manual covers.